
Whispering Skies Observatory: Developing a Computer and Networking Strategy!
Date: Jan 25, 2025

01-29-25 Revision: I forgot to add the ASTAP installation. This is now corrected
Table of Contents Show (Click on lines to navigate)
Earlier Posts in the Observatory Series
I have been thinking about building an observatory for a while now. Below are previous posts that have led up to where I am today.
Naming Your Observatory Jan 2025
Observatory Update: Powering Up the Observatory! Dec 2024
Observatory Update: Roughing In the Electric and Pouring the Slab Floor! Dec 2024
Observatory Update: Building the Structure! Nov 2024
Observatory Update: Laying the Foundation Nov 2024
Observatory Update: Custom Telescope Piers Part 3 - Painted and Complete! Sept 2024
Observatory Project: Breaking Ground! Excavation Complete! Sept 2024
Observatory Project: A Final Update Before We Break Ground! Aug 2024
Observatory Project: Opening The Roof! Aug 2024
Observatory Project: Final Roof Track System Hardware Selection July 2024
Observatory Project: Designing Custom Steel Piers - Part I June 2024
Observatory Project: Galvanic Corrosion and a Change in Track Selection! June 2024
Observatory Update: Designing the Roll-Off-Roof Track System! May 2024
The Move is Complete, Now Pivoting to the Observatory Project! April 2024
An Observatory Project Update: Success! We Just Bought A Property and Will Be Moving! Nov 2023
An Observatory Project Update - One Year In Feb 2023
Goals for my Observatory Project March 2022
Observatory Status
We seem to be having the first real winter in several years. There has been constant snow and cold temperatures, which is similar to the kind of winter I grew up with in Western New York. In the last few years, there have been sporadic snows, but the ground has been free of white stuff most of the time.
But this is the year that I am building my observatory, and of course, the weather is not cooperating!
Because of this, construction has lagged.

Whispering Skies? Maybe I should have name it Whispering Snows instead…
I am now waiting for the contractor to return to finish work on the observatory's interior. Electric heaters will keep the crew warm while the manual lockdowns and drive system are installed. The last part of installing the drive system requires us to open the roof manually, foot by foot, as the linear drive track is installed—so it won’t all be warm!
Then, I have to wait for warmer weather before installing the vinyl siding. Installing it in cold temps invites cracked vinyl.
I have no idea when we will get warmer temps! Hopefully, we will get a break in the weather that will allow for the exterior to be completed. I only need about a day and a half of 30-degree weather to finish things!
The good news is that I have not experienced weather getting into the building. This is despite the large gaps on each side where the wheels and track are - and the gaps between the roof and walls of the north and south faces. We have had rain, driving rain, snow, and blowing snow, yet nothing has come into the building or even settled on the wheels or track!

You cn see the current opening in the back corner of the building.

And along the East wall.
This means that I can install the piers and telescopes once the inside work is done!
I don’t want to do this sooner as they will get in the way, so there is no point in rushing things.
In the meantime, I have been mounting the Skyroof control system and the magnetic travel sensors in preparation for the drive install.
Given where things are, I have also started considering a computer strategy for Whispering Skies Observatory!
The Old Computer Strategy
For a long time now, I have run three telescope platforms from the driveway at my old house.
The computer strategy I used there was very simple.
HP Refurbished laptops were used for each telescope. Before COVID, these were cheap and readily available. Once COVID hit, and everyone was working or schooling from home, the demand increased dramatically, and they became harder to find at good prices.
These were set up on tables near the telescopes. The laptops controlled the platform and sequence sessions using Sequence Generator Pro.

My old driveway setup.

One of the HP laptops used to control my scopes now.
The laptops were connected to the internet via a mesh router in my garage's attic, overlooking the area where I set up my telescopes.
Subs were saved to a Dropbox drive that was stored locally and in a cloud repository. This worked great for me. The subs were available to my main computer in my Astro-Man-Cave as they were captured and thus were instantly backed up.

This is my old computer and networking setup. The new one will be very similar, though I am moving away from the laptops and I will need an additional computer to manage the Observatory itself.
I used a free version of Anydesk to connect my main computers in my warm and comfy Astro-Man-Cave to the laptops. This allowed me to control and monitor sequences as they ran.
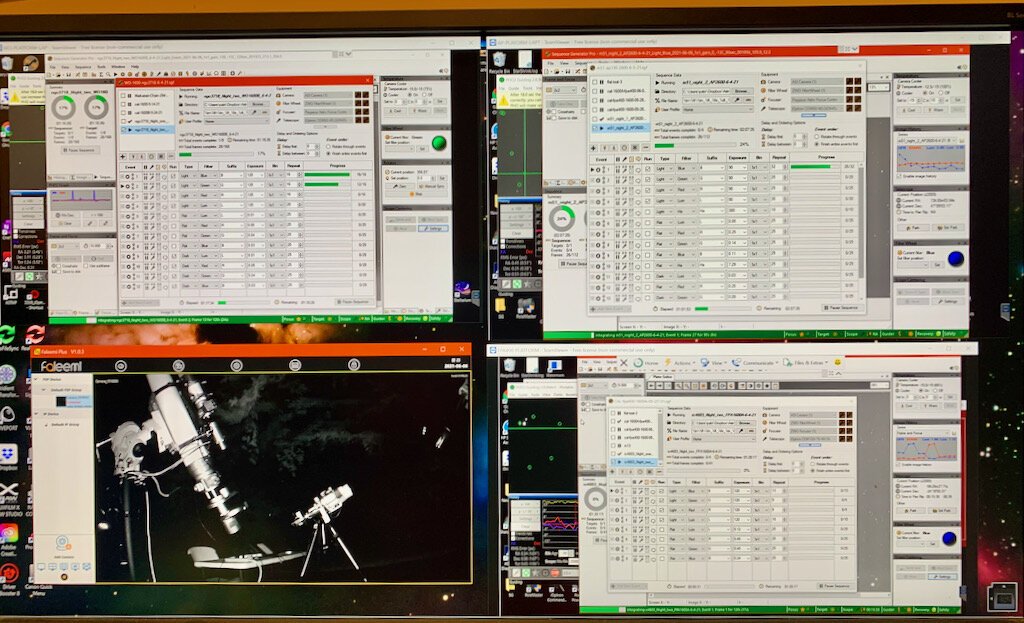
Running a remote screen for each platform - the lower right quadrant show the view from a camera.
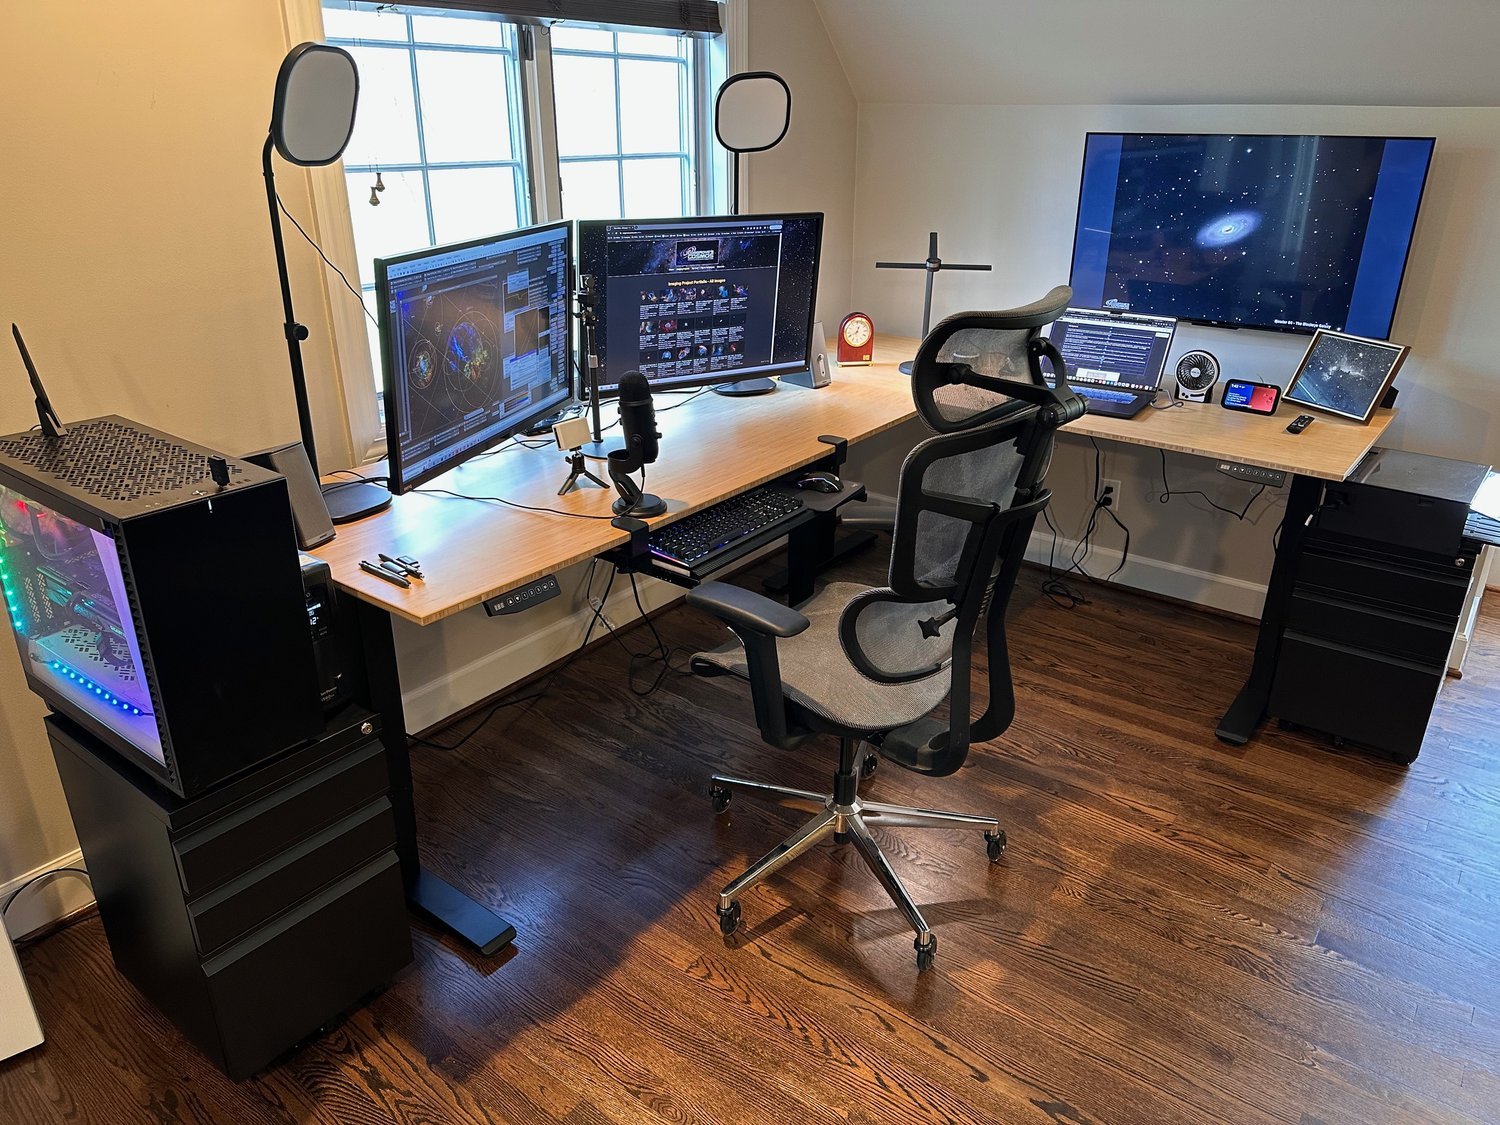
This is the computer area in my new Astro Man Cave. I will connect to the observatory mini PCs from here.
But with the observatory, my needs would be changing.
Observatory Needs
I now would have the luxury of my own observatory. No setting up each night - no tearing down in the morning! So, how would my needs change with this advancement?
As I thought about this, I wrote down the things that I thought would be key to me as we go forward:
WIFI: Even though the observatory is located 180 feet from the house, I would need great internet support. I wanted the computers and devices within it to be connected with very fast Wi-Fi.
Observatory Computer: I will need a dedicated computer to run the observatory itself. This computer must run:
The Skyroof Control software and ASCOM drivers
I support future weather systems that assess safety at night. Later this year, I will likely add the SkyAlert weather system to work with the Skyroof drive system.
Provide a file system where safety alerts can be posed for the benefit of the other computers in the observatory
Telescope Computers: I will then need a dedicated computer for each pier to support the operations of each telescope platform:
Since I now have four piers, that is one more computer than I have needed in the past.
I need to screen share each of these computers with various controlling computers:
The Observatory Computer itself
My Main computer is located in my Astro Man Cave.
WI-FI Control: I will also need WiFi-controlled power switches and lights. This will allow me to remotely reboot computers and control other devices as needed.
Cameras: I will want cameras both inside and outside the observatory. This will allow me to monitor what is going on during capture sessions as well as provide another layer of security when not in use.
Security System: I want to protect the observatory's contents. So some kind of security system should be added
Data Back Up: I have a system for processing and backing up data collected, and fortunately, I think that will continue to meet my needs as we go forward.
My Solutions
WI-FI: I had to run a 100amp power service feed 180 feet from the house. So, while this was being done, I ran another conduit holding three redundant ethernet lines. One of these would be connected to my home router. (The other two are redundant backups.)
I installed a weatherproof housing near my power panel and used it to hold an Asus Mesh router node. This uses the ethernet from the house as a hardware backlink to the main mesh node. This will bathe the entire observatory in Wi-Fi and even cover the lawn around the observatory!

This is the power panel section of my observatory. The box with the clear door houses my Mesh Node. The can see the black ethernet cable coming down and entering the conduit.
Observatory Computer: For this, I purchased a reconditioned Dell Optiplex 7050 Micro Computer from Amazon. It runs an Intel i5-6500T processor, has 16GB of RAM and 256GB of SSD storage, and comes with Win 10 Pro. I picked this unit because it has six USB 3.0 ports, allowing the observatory computer to host many devices as needed.
This small, compact unit measures 7 x 7 inches and is about 1.5 inches thick.
This unit should meet my needs and was quite affordable, coming in at only $110. You can see it HERE.
The one downside of this unit is that it does not have built-in Wi-Fi, so I rectified this by adding an inexpensive, highly rated TP-Link Wi-Fi 6.0 dongle. You can see that HERE.
I also added a 27-inch monitor I had lying around, as well as a keyboard and mouse.
I will need to install a dew cover for the keyboard.

This is my small Dell computer that I will use to power the observatory itself.

This is the ethernet dongle I had to add.
Telescope Computers: I considered using laptops again for this purpose, but I did not like the idea of putting a shelf at each pier to support a laptop. I also considered running conduit from the piers to the north wall, where I will have a counter and cabinets. I could have fished USB lines between the laptops on the counters here and the piers.
Ultimately, I opted to replace the laptops with a Fanless mini-PC.
This would keep things nice and compact at the pier. It would provide greater computing power, and since it was fanless, I did not have to worry about vibrations near the scopes. After researching things a bit, I settled on the Mele Quieter 4C with an N100 our-core processor, 16GB of RAM, 512GB of SSD, and Win 11.
I picked up four of these on Amazon. You can see this HERE.

The four Mele Quieter 4C Mini PCs ready to go.

The Specs…
Normally, I would be concerned about these units being fanless, but testing done by Patriot Astro and Cuiv, The Lazy Geek, has shown that temperatures run high but are manageable on these units.
However, I bought heat sinks and heat tape in case of an issue. You can see these HERE.
The tops of the miniPCs are where the heat is dissipated, so it is very important to remove labels from these surfaces. Earlier units had smooth metal tops, but mine have a textured surface to help shed heat. I plan to monitor temperatures during use, and if I don’t like what I see, I can mount these heatsinks and prevent problems.
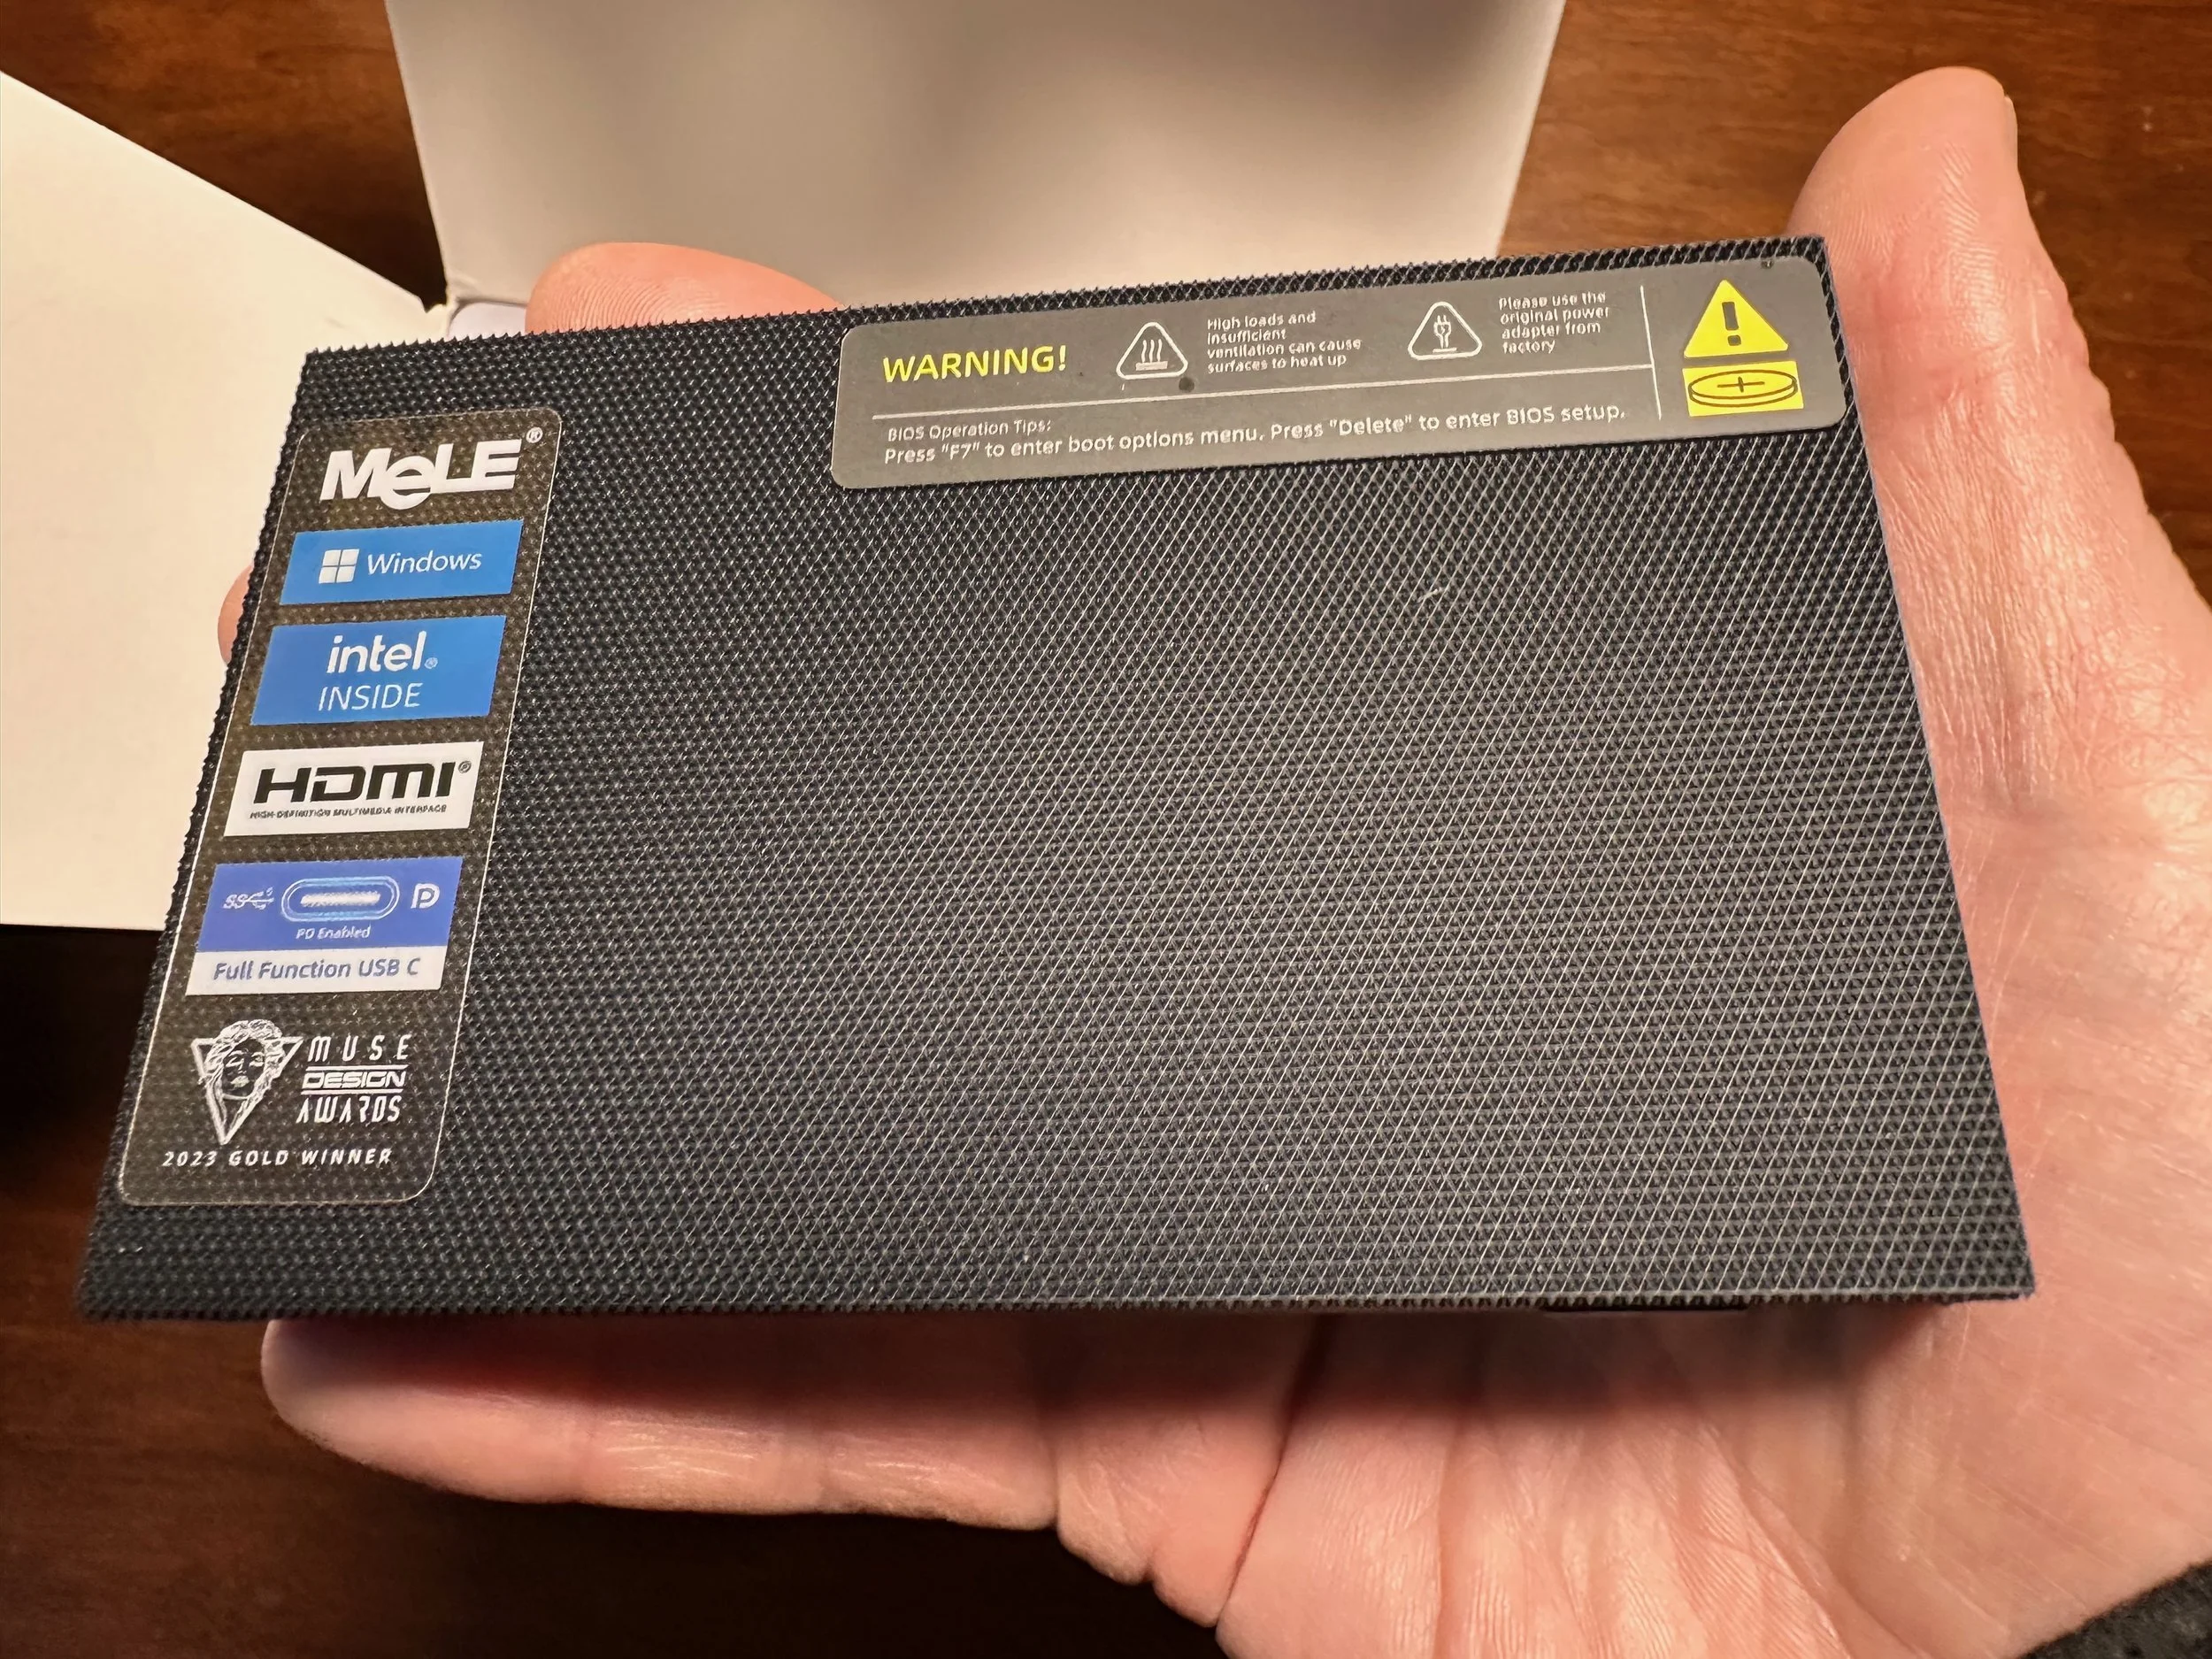
Note the texture surface of the min PC - the stickers must be removed to facilitate heat loss.

Here is the heatsink I can add if I need to…
These units will be headless, so I must screen share when using them. Later on I will discuss how I set these up in some detail.
Finally, I should mention here that I will be switching all the telescopes over to NINA for sequence control. I found that it is super easy to automate telescope control with NINA’s advanced sequencer, so I will be using that going forward.

I labels the edge of the mini PC with it Name - based on the telescope platform it will be supporting. This will be for my Astro-Physics 130mm platform.

All four mini PC’s running in headless mode after set up was complete.
The mini PCs come with a hardware bracket for mounting. I have not yet decided on how and where exactly I will mount these computers. It if common these days to mount them on the OTA itself.
I am unsure if this is the best strategy—at least for me. It is convenient if you have room for it and power available on the OTA to support the PC. However, you are adding weight to the OTA and taking up space. I don’t think I have enough power feeds up there now, so I may take an alternative route.
I may start by mounting them on the Pier itself, using Gel Tape to hold them on. I’ve used Gel tape to mount many things. It seems to work, and it has the advantage that you can remove the tape without causing any problems if you change your mind about where and how to mount something. Stay tuned on this one…
WiFi Control: I will leverage readily available WiFi Switches and lights that can be controlled via Alexa or Google Home. For my purposes, I will use Govee Smart plugs. These are very small, available in sets of four, and even report power use. I will use one for each telescope pier. You can get these HERE.
I will also use an Amazon Smart Switch for the Observatory Computer. This can be found HERE. Although it is a bit bulkier, I have a few lying around, so why not use them?

Govee Smart Plugs

Amazon smart plugs.
Cameras: For cameras, I installed some cheap pan and tilt units that I had used before in the observatory. These are 2K Litokams. They were available for $20 each on Black Friday, and they worked well. You can see these HERE.
They may not be my final camera, but they will be a start for viewing what is happening inside the observatory. I should note that these are not weatherproof, but they will be sheltered inside the building. The downside with these inexpensive units is that they are now super wide-angle, and the sound they pick up is not great. The Pan and Tilt control makes up for the narrow field of view. As I said, I may replace these later, but these will do for now.
I also have an Allesin Solar Security Wireless Outdoor 3MP Solar Camera mounted outside the observatory. These are reasonably cheap and use a solar panel for power. I can put them anywhere. They are not the most expensive units - but they are not exactly cheap either. They go for about $70, but I was able to get one on Black Friday for a better price. I won’t say they are great, but they work OK. You can see what I am using HERE.
Right now, I have one looking at the side of the observatory, and I may add another looking over the track and outrigger area.

The inexpensive 2K Litokam.
The view from the Litocam.

The Solar Powered outdoor cam I am using.

The view from the outside camera.
Security System: we currently have an ADT System for home security, and it should be straightforward to add a door sensor, a motion sensor, and a glass break sensor to the system via the ASUS Mesh network.
MiniPC Set Up
My MiniPC Setup is inspired by Patriot Astro and his excellent videos.
I have changed some things, and while I will share a high-level view of my process, I wanted to share Patiot Astro’s video here as well for your reference. (I Should also note that Patriot Astro has the BEST videos for learning and using NINA out there!)
As shown by Patriat Astro, I will use Windows Remote Desktop to connect to these PCs. To enable this, I needed to create a fixed set of IP addresses for each computer on my router. In addition, I had to create a new “hosts” file for Windows to define the names and IP addresses for these systems.
I laid all of this out before I began to set up the mini PCs.
First, I made a list of what systems I wanted to have and created names for them.
Then, I choose fixed IP addresses for them. The first three number blocks in the IP address are defined by my router. Thel ast bocks are arbitrary numbers that I chose. This looks something like this:
Observatory XXX.XXX.XXX.100 Fra400m XXX.XXX.XXX.96 WO132m XXX.XXX.XXX.95 AP130m XXX.XXX.XXX.94 4thpier XXX.XXX.XXX.93The names are obvious—one for the observatory and one for each pier. These are named after the telescopes being controlled. Since I don’t yet have a telescope or the 4th Pier, I called it just that—the 4thpier!
Once these computers are set up and connected to your network, you can define fixed IP addresses for them using your router software. Each Router has its own way of doing this.
Next, you can modify the Windows hosts file, which tells the computer about these mappings. Once you have edited the host file, you can copy it and use it when setting up the other PCs.

My updated hosts file.
With that as background, let’s get started!
My Set-Up Steps
Initial Start-Up
The PC's keyboard, screen, and mouse, as well as the power supply, are attached.
Boot and do the out-of-box Windows setup.
Check the date, time, and timezone and update it for your location. (right click on the right side of the task tray over the clock display)
System -> About-> Rename PC with the name you used in your host table
Do all window updates - this can take a while!
Begin Customizations
Download and Install .net 3.5. Several apps use this, so you may as well install this now.
Windows updates-> Advanced Options—Set active hours from 6 p.m. to 9 a.m. Since this PC works at night, you want Windows to avoid installing and updating during this time!
System->power: The power mode is set to the best performance. It never sleeps or turns off screens.
In Windows 10, you can also set up USB power to never shut down the connection for power savings. Since I could not find this option in Windows 11,o I assume “Best Performance” and “Never Sleep”dothis automatically.
File Explorer - set options to always show hidden files. You will need this as you work with host files.
Now is a good time to do some clean-up:
remove any apps you do not want on the system,
remove any desktop or tasks bar shortcuts you do not want
Personalization-> background -> set as a solid color - black - so it does not affect eyes at night. At the same time, I chose a dark theme for the same reason.
Because I tend to have multiple screen shares on my desktop at any given time, it is nice to know which machine you are dealing with, so I added an image of my telescope to the background in “center” mode so that it did not take up the whole screen.
Install Support Apps
Install critical apps that you see and depend on. For me, this was:
Chrome
Dropbox (login and determine what folders you want to be mirrored on this PC)
Anydesk (as a backup - or if I need to connect from an Apple Laptop)
Note—I will use Dropbox to access some files I want during the following steps, so it's good to do this now.
Enable Remote Desktop
Now, we can set up the system for the remote desktop.
System->Remote Desktop: toggle it on and confirm changes.
Now turn on Sharing for files and printers.
Set up each PC so the firewall allows the Remote Desktop client to come through.
At this point, your PC is named and connected to the router.
Now is the time to change the IP to a fixed address. Doing this on each router is different, so check your router documentation for the procedure. I have a phone app to control my Asus router, and this was an easy process. Note that typically the router will reset itself when after doing this after each entry. This will cause a brief Wi-Fi outage in your house, so ensure your spouse or children are not doing anything critical first.
Now, edit your hosts file to add fixed addresses. There are two ways to do this:
Run Notepad as an administrator and edit the existing hosts file
Copy a pre-edited version over the top of the existing hosts file.
I used the second method and accessed a copy of the edited file via a Dropbox folder I had set up previously.
The host file is found at c:/windows/system32/drivers/etc/hosts
Once done, run the PowerShell ->Ipconfig /flushdns. This will allow the new host file to be used.
Now test and see if this worked out OK.
On your Mini PC, go to PowerShell and run ‘ipconfig.’ Look at the printout and see what IP address the Mini PC is using. It should be the fixed address we have specified for this PC.
Then go to some other PC that you want to screen share from. Go to the power shell and type “ping” and the numerical IP address. It should find the address and return test packets.
Now, do a ping with the name associated with the address. You should still find it.

An example Ping
If all this works, your master computer can see the mini PC at its fixed and named address, and you can connect to this hostname using a remote desktop on your control computer.
When it comes up, select the options dropdown. This will allow you to enter your user name and select “save” credentials. Then save it to your desktop with a name for the computer you are connecting to. This will create a shortcut that you can use to easily connect to the mini PC in question at any time.
Now, try the shortcut. It will ask for your password - enter it to save credentials to the shortcut. You may get some warning screens as it connects. You can disregard these and indicate that they should not bother you about this in the future.

My Remote Desktop Shortcuts on my Master PC.
What if you can’t ping the numerical address?
Look to the end of this section, and I will provide a few helpful tips.
There is another consideration here - what resolution will you want to use for your Remote Desktop sessions?
Out of the box, the Mele Quieter 4C is configured to connect at a 4K resolution - assuming that your monitor supports this. Once you connect with the Remote Desktop session, this is the screen res that you will use for that session. If your Wi-Fi is slow, or - if, like me - you have many different sessions happening at the same time, you may find the connection laggy. If this is the case, you can change the resolution of the mini PC to something lower - say 2K. Note that you must do this with a physical connection to the mini PC - it cannot be done with a remote desktop connection. I am starting at 4K, and we will see how things go.
Astrophotography Software
Next, we can start setting up the drivers and apps critical to your Astrophography pursuits. I will cover what they are for me, but you may have different needs based on your tools.
The first thing I would install is ASCOM. This can take a while.
Then, whatever drivers or apps you need for your platform.
I have two IOptron CEM 60 mounts, so I run the IOPtron Software install package for this mount.
I also do a lot with ZWO products. I have cameras, EFWs, EAFs, and the AM5 mount. So, I installed the camera native drivers and the ASCOM drivers covering all these products. I also install ASIStudio software from ZWO. I don’t often use this, but it can be handy when debugging things from a camera perspective.
I also use several Pegasus Astro products: The Pocket Power Box, the Powerbox Advanced, the Falcon Camera Rotator, and the Focus Cube 2. To support these, I install the Unity Platform.
Next, install PHD2. If I already have a working setup on another computer, I can go to the Manage Profiles section and export that profile. I can then bring this to the new computer and import it using the same Manage Profiles tool.
Before Installing NINA, I would like to install the Plateslving software I use: ASTAP
Download the app from the internet and run it.
Download the star database that goes with it. I chose the D80 version with the highest star density - run to install this,
Finally, we get to NINA.
Install this software.
If you have a working profile on another computer, there is a way to migrate that to this PC. On the old computer, go to %UserProfile%\AppData\Local\NINA\ and copy the files you find there. Install those files in the same location on the new PC, and you should have a great starting point.
Recovery and Backup Options
We are almost done here. The next step is to create a recovery file for this new PC and back up the files installed here. There are plenty of resources that will walk you through this, so this is left to the student.
The last thing I do is change the BIOS to alter how the PC boots.
Final BIOS Change
If I have to reboot a computer remotely, I don’t want to run up to the observatory and hit the power button. I would rather have the machine boot as soon as power is applied. This was easy to do with my PCs and should be easy for any PC, as this option is typically offered within its BIOS.
For the Mele Quiter 4c, this involved rebooting while holding down the delete key. When the BIOS screen comes up, navigate to advanced->consumer functions ->Power and set it to auto boot.
At this point, the setup is complete. Once I connect to the telescope platform, I will need to do more to prepare PHD2 and NINA for use, but for now, I am set.
Dealing with Cases Where the Ping Fails
I have used Remote Desktop enough to have seen some problems with making it work at first. Once you get it working, it is very reliable. The most common things causing problems are:
Sharing is not enabled for files and printers
The Firewall is not set up to let Remote Desktop connections come through
So, double-check this first.
The next thing to try is to go to the PowerShell and run service.msc. A panel will come up, and you need to scroll down the list of services and make sure that the following services are running and set for Automatic Startup:
Function Discovery Provider Host
Function Discovery Resource Pub
SSDP Discovery
UPnP Device Host
In most cases, this is enough to solve the problem. However, you may also encounter a conflict with the Windows Hello login option. Right now, all of my mini PCs and my Observatory computer are running Hello login services, and I have had no problems with Remote Desktop. However, I did have one laptop on which I could not make Remote Desktop work until I disabled Hello login. Then, it worked fine.
So, as a last resort, you can try this as well.
Conclusion
At this point, you should have one or more Mini PCs configured and ready for the next step - connecting them to your telescope platforms and finalizing the PHD2 and NINA configurations.
But even now, you can connect with the Windows Remote Desktop client to manage things remotely.
For me, that means having four remote desktop sessions running at a time. I plan to have each session playing in a set of smaller windows in a grid on my main computer. When I want to work with a particular mini PC, I will double-click on it and have it take over my full screen, and I am ready to go.

The Screen of the main computer in my Astro Man Cave with four Remote Desktop sessions ready for use. Double-clicking on a screen will scale it up to full size - but this allows me to see what is happening with all systems with glance.
So there you have it - my current plan for controlling the observatory. I may find in practice that I have to adapt some aspects of this, but my intention is to report back on how well this approach works out for me. So stay tuned!