
The Coma Cluster of Galaxies (Abell 1566) - Zoom In! 1000 Galaxies, 320M Light-Years Away! (~8.2 Hours of LRGB)
Date: June 5, 2025
Cosgrove’s Cosmos Catalog ➤#0139

The first image from my Whispering Skies Observatory from my Astro-Physics 130mm Plaform! This is NOT a Star Cluster! Zoom in by Clicking on this image and pan around to see a host of tiny galaxies with some interesting spiral gems in the misx! (click on the image for a high res view via Astrobin.com)
Awarded “Explore” Status on Flickr for June 6,2025!

Table of Contents Show (Click on lines to navigate)
A Deceptive Image!
When you first look at this image, your reaction may well be - “Oh, just a shot of some star cluster - meh!”
But in this case, looks can be deceiving! That’s no star cluster!
What you are actually looking at is a cluster of over 1000 galaxies, which have an average distance of 320 million light-years away from Earth!
Zoom in and you will see over 500 galaxies captured and labeled in this image alone (see the annotated image below!)
Zoom in and check it out - most are fuzzy old-star elliptical galaxies, but there are some spiral gems in there as well!
Note: Clicking on the main image will take you to this image on Astrobin.com - which has capabilities that allow for full-res zoom and pan exploration that Squarespace (the host of this website) does not offer. So check it out! But come back and check out the rest of this post!
About the Target
The Coma Cluster (Abell 1656): A Dense Metropolis of Galaxies
The Coma Cluster, cataloged as Abell 1656, is a massive, gravitationally bound galaxy cluster located in the constellation Coma Berenices, roughly 320 million light-years (98 Mpc) from Earth. It is one of the richest and densest known galaxy clusters in the nearby universe, containing over 1,000 confirmed member galaxies, and thousands more likely members fainter than current survey limits. Most of its galaxies are ellipticals and lenticulars, though a number of spirals also reside on the outskirts.
The cluster spans more than 2 degrees across the sky, corresponding to a true diameter of about 20 million light-years. At this scale, individual galaxies are mere luminous points in a vast web of dark matter and hot gas. The Coma Cluster is part of the larger Coma Supercluster, which also includes the neighboring Leo Cluster (Abell 1367), together forming a key structural component of the cosmic web.
Historical Significance
The Coma Cluster has long fascinated astronomers. In the 1930s, Fritz Zwicky studied this cluster and discovered that the visible mass in its galaxies was far too small to account for the observed velocity dispersion of its members. From this discrepancy, he proposed the existence of “dunkle Materie”, or dark matter — a concept that remains central to modern cosmology.
Since then, the Coma Cluster has been studied extensively across the electromagnetic spectrum. Optical observations reveal its rich galaxy population. X-ray surveys from satellites like ROSAT, Chandra, and XMM-Newton show a vast halo of diffuse, hot intracluster gas at tens of millions of degrees, permeating the space between galaxies and providing crucial evidence for the mass and dynamics of the system.
Scientific Relevance
The Coma Cluster serves as a benchmark object in extragalactic astronomy and cosmology. Its high galaxy count, relatively nearby distance, and rich observational history make it an ideal laboratory for:
Measuring galaxy evolution in dense environments
Studying dark matter distribution through gravitational lensing and galaxy dynamics
Probing large-scale structure formation in the universe
Investigating the intracluster medium (ICM) and its thermal and chemical history
It is also used to calibrate scaling relations like the Tully-Fisher and Faber-Jackson relations, and to refine estimates of the Hubble constant via distance ladder techniques.
Interesting Facts
Velocity Dispersion: Member galaxies exhibit a radial velocity dispersion of over 1,000 km/s, typical for rich, gravitationally relaxed clusters.
X-Ray Halo: The cluster is enveloped in a massive X-ray-emitting gas cloud with a temperature of ~8 keV (~90 million Kelvin).
Gravitational Lensing: The mass distribution of the Coma Cluster has been used to create gravitational lensing maps, further confirming the presence of dark matter.
Faint Galaxy Population: Deep imaging has revealed a population of ultra-diffuse galaxies (UDGs) — ghostly galaxies that are large in size but extremely low in surface brightness, many of which have been discovered in Coma.
Some Galaxies of Interest within the Cluster
Among the hundreds of visible galaxies, several prominent members stand out in both appearance and astrophysical importance:
NGC 4889

NGC 4889 - from my image.
Type: Giant Elliptical (E4)
Apparent Magnitude: ~12.6
Angular Size: ~1.3’ × 1.0’
Distance: ~308 million light-years
Notable Feature: NGC 4889 harbors one of the most massive black holes ever discovered, estimated at 21 billion solar masses. The galaxy appears as a smooth, elliptical glow with a diffuse stellar halo extending far beyond its visible bounds.
NGC 4874

NGC 4874 - from my image.
Type: Elliptical (E1/E2)
Apparent Magnitude: ~12.9
Angular Size: ~1.4’ × 1.2’
Distance: ~321 million light-years
Role: Often considered the central dominant galaxy of the cluster’s core, NGC 4874 is surrounded by a cloud of over 30,000 globular clusters and a luminous halo.

NGC 4921 - from my image
NGC 4921
Type: Anemic Spiral (SA(r)ab)
Apparent Magnitude: ~13.1
Angular Size: ~2.7’ × 2.2’
Distance: ~320 million light-years
Interest: This rare spiral galaxy appears unusually smooth and gas-poor for its type — a classic example of ram-pressure stripping at work in the cluster environment. It’s a transitional object likely being transformed into a lenticular by the harsh intracluster conditions.
NGC 4911

NGC 4911 - from my image.
Type: Barred Spiral Galaxy (SA(r)bc / SBab)
Apparent Magnitude: ~13.5
Angular Size: ~1.4′ × 1.1′
Distance: ~320 million light-years
Notable Features:
One of the few actively star-forming spiral galaxies within the Coma Cluster’s core. NGC 4911 shows signs of interaction with a nearby companion and possible tidal distortions, including faint outer arms and a warped disk. High-resolution Hubble imagery reveals a bright, dusty nucleus, extended star-forming regions, and disturbed spiral arms — all suggesting it is undergoing ram-pressure stripping and environmental transformation due to the cluster’s dense intracluster medium.
NGC 4907

NGC 4907 - from m image
Type: Barred Spiral Galaxy (SBb)
Apparent Magnitude: ~13.6
Angular Size: ~1.6′ × 1.1′
Distance: ~320 million light-years
Notable Features:
NGC 4907 is a moderately bright barred spiral located toward the central region of the Coma Cluster. It retains a visible spiral structure, somewhat unusual given the cluster’s tendency to strip galaxies of their interstellar material. Its defined central bar and faint spiral arms suggest it may be in a transitional phase, possibly undergoing gas depletion due to cluster interactions. Though less studied than NGC 4911, it is a useful example of how spirals evolve in dense environments.
IC 4051

IC 4051 - from my image
Type: Elliptical
Apparent Magnitude: ~14.5
Notes: Studied in detail by the Hubble Space Telescope for its unusually high number of globular clusters (~6,000), despite being a relatively faint elliptical.
A Remarkable View into the Distant Cosmos
Though it lies over 300 million light-years away, the Coma Cluster provides an unparalleled glimpse into a scaled-up version of cosmic structure — an ancient city of galaxies held together by gravity, evolving together for billions of years. Imaging this region from Earth with modern astrophotography tools allows us to witness the grandeur of nature’s architecture on its largest visible scales.
Annotated Image
Created in Pixinsight using the ImageSolver and AnnotateImage scripts.
Note: Squarespace, which hosts this website, does not allow access to high-res images. In this particular case, the Annotated version of the image becomes difficult to read. If you want to see the fine detail, this LINK will allow you to access the high-res version. The dropbox viewer had a zoom lever that goes up to 6400% of the image size. I find setting it at 100% works fine to read the fine print.
The Location in the Sky

This annotated image created with Imagesolver and FInderChart Scripts in Pixinsight.
Zooming Through the Cluster
I thought it would be cool to “try” and put together a short video where you could zoom in and explore the Coma Cluster - not sure I succeeded!
About the Project
This is the first imaging project from my Williams Optics 132mm (WO132) Platform, taken from my new Whispering Skies Observatory! This completes the processing for the first projects coming from the four scopes in the new observatory! I want to think I will have a lot more coming in the near term, but with all of ’ve had this spring, the clouds are an issue. And even with all of this rain, forest fires in Canada are already impacting our skies! At some point, the forces will come into alignment, and new data will be coming our way!
Picking the Target
As I mentioned in my previous project, this was kind of a joke.
I was in scramble mode trying to get the four scopes set up in the new observatory, and I short-sheeted my planning process. I cheated and used ChatGPT to offer a range of possible targets for this scope.
For the first two targets, ChatGPT offered some good options that worked out fine. But the options I selected for the telescopes on my two northern piers were not so great.
They were excellent targets that were well-suited for these scopes. It’s just that the target did not actually rise when predicted. ChatGPT was off by HOURS! I knew I was in trouble when I told the scope to slew to the target, and it was trying to point to the ground. Not good!
So, around midnight of the first clear night, I was quickly trying to find some galaxy targets to shoot. I came across this massive group of galaxies that was located near NGC 4889. I roughly set up my framing and quickly got started.
This made me realize how important my planning process was in getting a good shot. I will not put myself into that position again!
With this quick change, I got started. Of the four telescopes in my observatory, this scope gave me the least trouble - everything just worked as it should.
Which, of course, made me very nervous. What was I missing? My luck is not that good - something must be going wrong, and I am just not noticing it!
The second night just as smoothly!
Data Collection
Starting late on the 22nd, I shot all night then and again on the next clear night on the 27th.
Everything looked good - tracking was good.
On April 24th, I completed a new calibration series for all the scopes after finishing data collection.
The weather changed, and we were expecting weeks of cloudy nights, so I figured it was time to start processing.
I first processed the M106 Image I shot on the SCA260, as I was eager to see how that came out. You can read all about that project HERE.
Then, I processed my image of the Markarian’s Chain, which you can see HERE. Then the last project was the NGC 5364 Group, which you can see HERE.
So this image is the last of that bunch!
I began my preprocessing by doing a blink series. And while there were some minor variations due to thin clouds, I did not end up eliminating ANY subs! This gave me a little over 8 hours of LRGB Data.
Next, I loaded up Pixinsight’s WBPP and got that rolling!
Processing Overview
I decided to apply a 2x drizzle process to the images in WBPP to maximize the resolution I was dealing with.
Then my plan was to do a LRGB Starless workflow.
The high-level flow of this approach is illustrated below.

My typical LRGB Starless Workflow.
There was nothing too crazy about the image processing. This is one busy image, and given the drizzle process, their images were quite large.
Since the details were very small, there was not much that I could do with masking. I did use a form of luminance mask to protect the background while doing operations on the galaxies, but not much else. I did create a blue mask targeting the two bright blue stars in the field that I thought looked a bit bloated.
Another issue I encountered was the color.
The image had a warm, yellowish hue, even after using SPCC to calibrate the color.
I finally realized that most of the galaxies found in the central portion of the Coma Cluster are elliptical galaxies. These featureless "fuzz-balls" are a pale golden brown in colour and contain populations of old stars with little new star formation. After reviewing images on Astrobin, I realized that this was a common characteristic of the Coma Cluster, and was the nature of the beast!
I did try to enhance the color that was there, and in some cases, the very fine details of tiny spirals showed blue and were oversaturated.
Look below for the complete step-by-step walkthrough of the processing. Note: This walkthrough is based on Pixinsight.
Final Results
As I have said before, I am not a real fan of Galaxy Clusters as they tend to be a collection of small fuzzies without detail.
But there is something kind of awesome about the sheer number of galaxies in this cluster and how far away they are. Zooming in and scrolling around with the high-res version of the image is actually kind of fun. While many of the galaxies are distant and appear as fuzzy blotches, there are some interesting spirals in the mix.
I am glad I did this one. I think I was able to pull out more detail than expected. This was a modest integration from a modest scope and an even more modest astrophotographer. But - when I look at images of this cluster taken by professional observatories - I think the detail in mine actually hold up pretty well!
Having said all of that - I am not sure I will be doing more of this kind of imaging in the future. Frankly, I like targets with more drama!
More Information
🔭 Observational Highlights
Hubble’s Sweeping View of the Coma Cluster
A detailed overview from NASA’s Hubble Space Telescope, showcasing the dense galaxy population within the cluster.
ACS Image of the Coma Galaxy Cluster (Abell 1656)
High-resolution imagery from Hubble’s Advanced Camera for Surveys, capturing a significant portion of the cluster.
Wide-field View of the Coma Galaxy Cluster
A comprehensive ground-based image from the Digitized Sky Survey, providing context for the cluster’s location and scale.
📚 Scientific Background
The Coma Cluster of Galaxies - Chandra X-ray Observatory
Insights into the cluster’s X-ray emissions and its significance in the study of galaxy clusters.
The Coma Cluster - ESA Science & Technology
An exploration of the cluster’s properties, including observations from the Planck satellite.
Coma Cluster - Wikipedia
A comprehensive article detailing the cluster’s characteristics, discovery, and significance in astronomy.
🖼️ Image & Media Resources
Hubble’s Sweeping View of the Coma Cluster of Galaxies
A collection of images and videos highlighting various aspects of the cluster.
Labeled DSS Image of the Coma Cluster
A labeled image from the Digitized Sky Survey, identifying key galaxies within the cluster.
Coma Cluster of Galaxies - JPL Image
An infrared mosaic image of the cluster, highlighting its rich galaxy population.
🔗 NASA JPL
🕰️ Historical Background
Zwicky and the Discovery of Dark Matter
In 1933, Fritz Zwicky used the Coma Cluster to infer the presence of invisible mass — what we now call dark matter.
🔗 APS
The Cluster Where Dark Matter Was Born
A popular article explaining how the Coma Cluster played a pivotal role in early dark matter theory.
Dark Matter and the Coma Cluster (Swarthmore Lecture)
An illustrated lecture describing how galaxy motions in the Coma Cluster led to the dark matter hypothesis.
Zwicky’s Original 1933 Paper (Translated)
A translated excerpt of Fritz Zwicky’s groundbreaking work on the velocity dispersion of Coma galaxies.
Historical Classification and Survey Inclusion
A research paper detailing how Coma was cataloged and included in major galaxy cluster surveys.
Capture Details
Lights Frames
Taken the nights of April 22nd and 27th, 2025
82 x 90 seconds, bin 1x1 @ -15C, Gain 0, ZWO Lum Filter - 36mm unmounted
82 x 90 seconds, bin 1x1 @ -15C, Gain 0, ZWO Red Filter - 36mm unmounted
82 x 90 seconds, bin 1x1 @ -15C, Gain 0, ZWO Green Filter - 36mm unmounted
81 x 90 seconds, bin 1x1 @ -15C, Gain 0, ZWO Blue Filter - 36mm unmounted
Total - after culling bad subs - of 8 hours and 10 minutes.
Cal Frames
25 Darks at 90 seconds, bin 1x1, -15C, gain 0
30 Dark Flats at Flat exposure times, bin 1x1, -15C, gain 0
One set of Flats done:
15 Lum Flats
15 R Flats
15 G Flats
15 B Flats
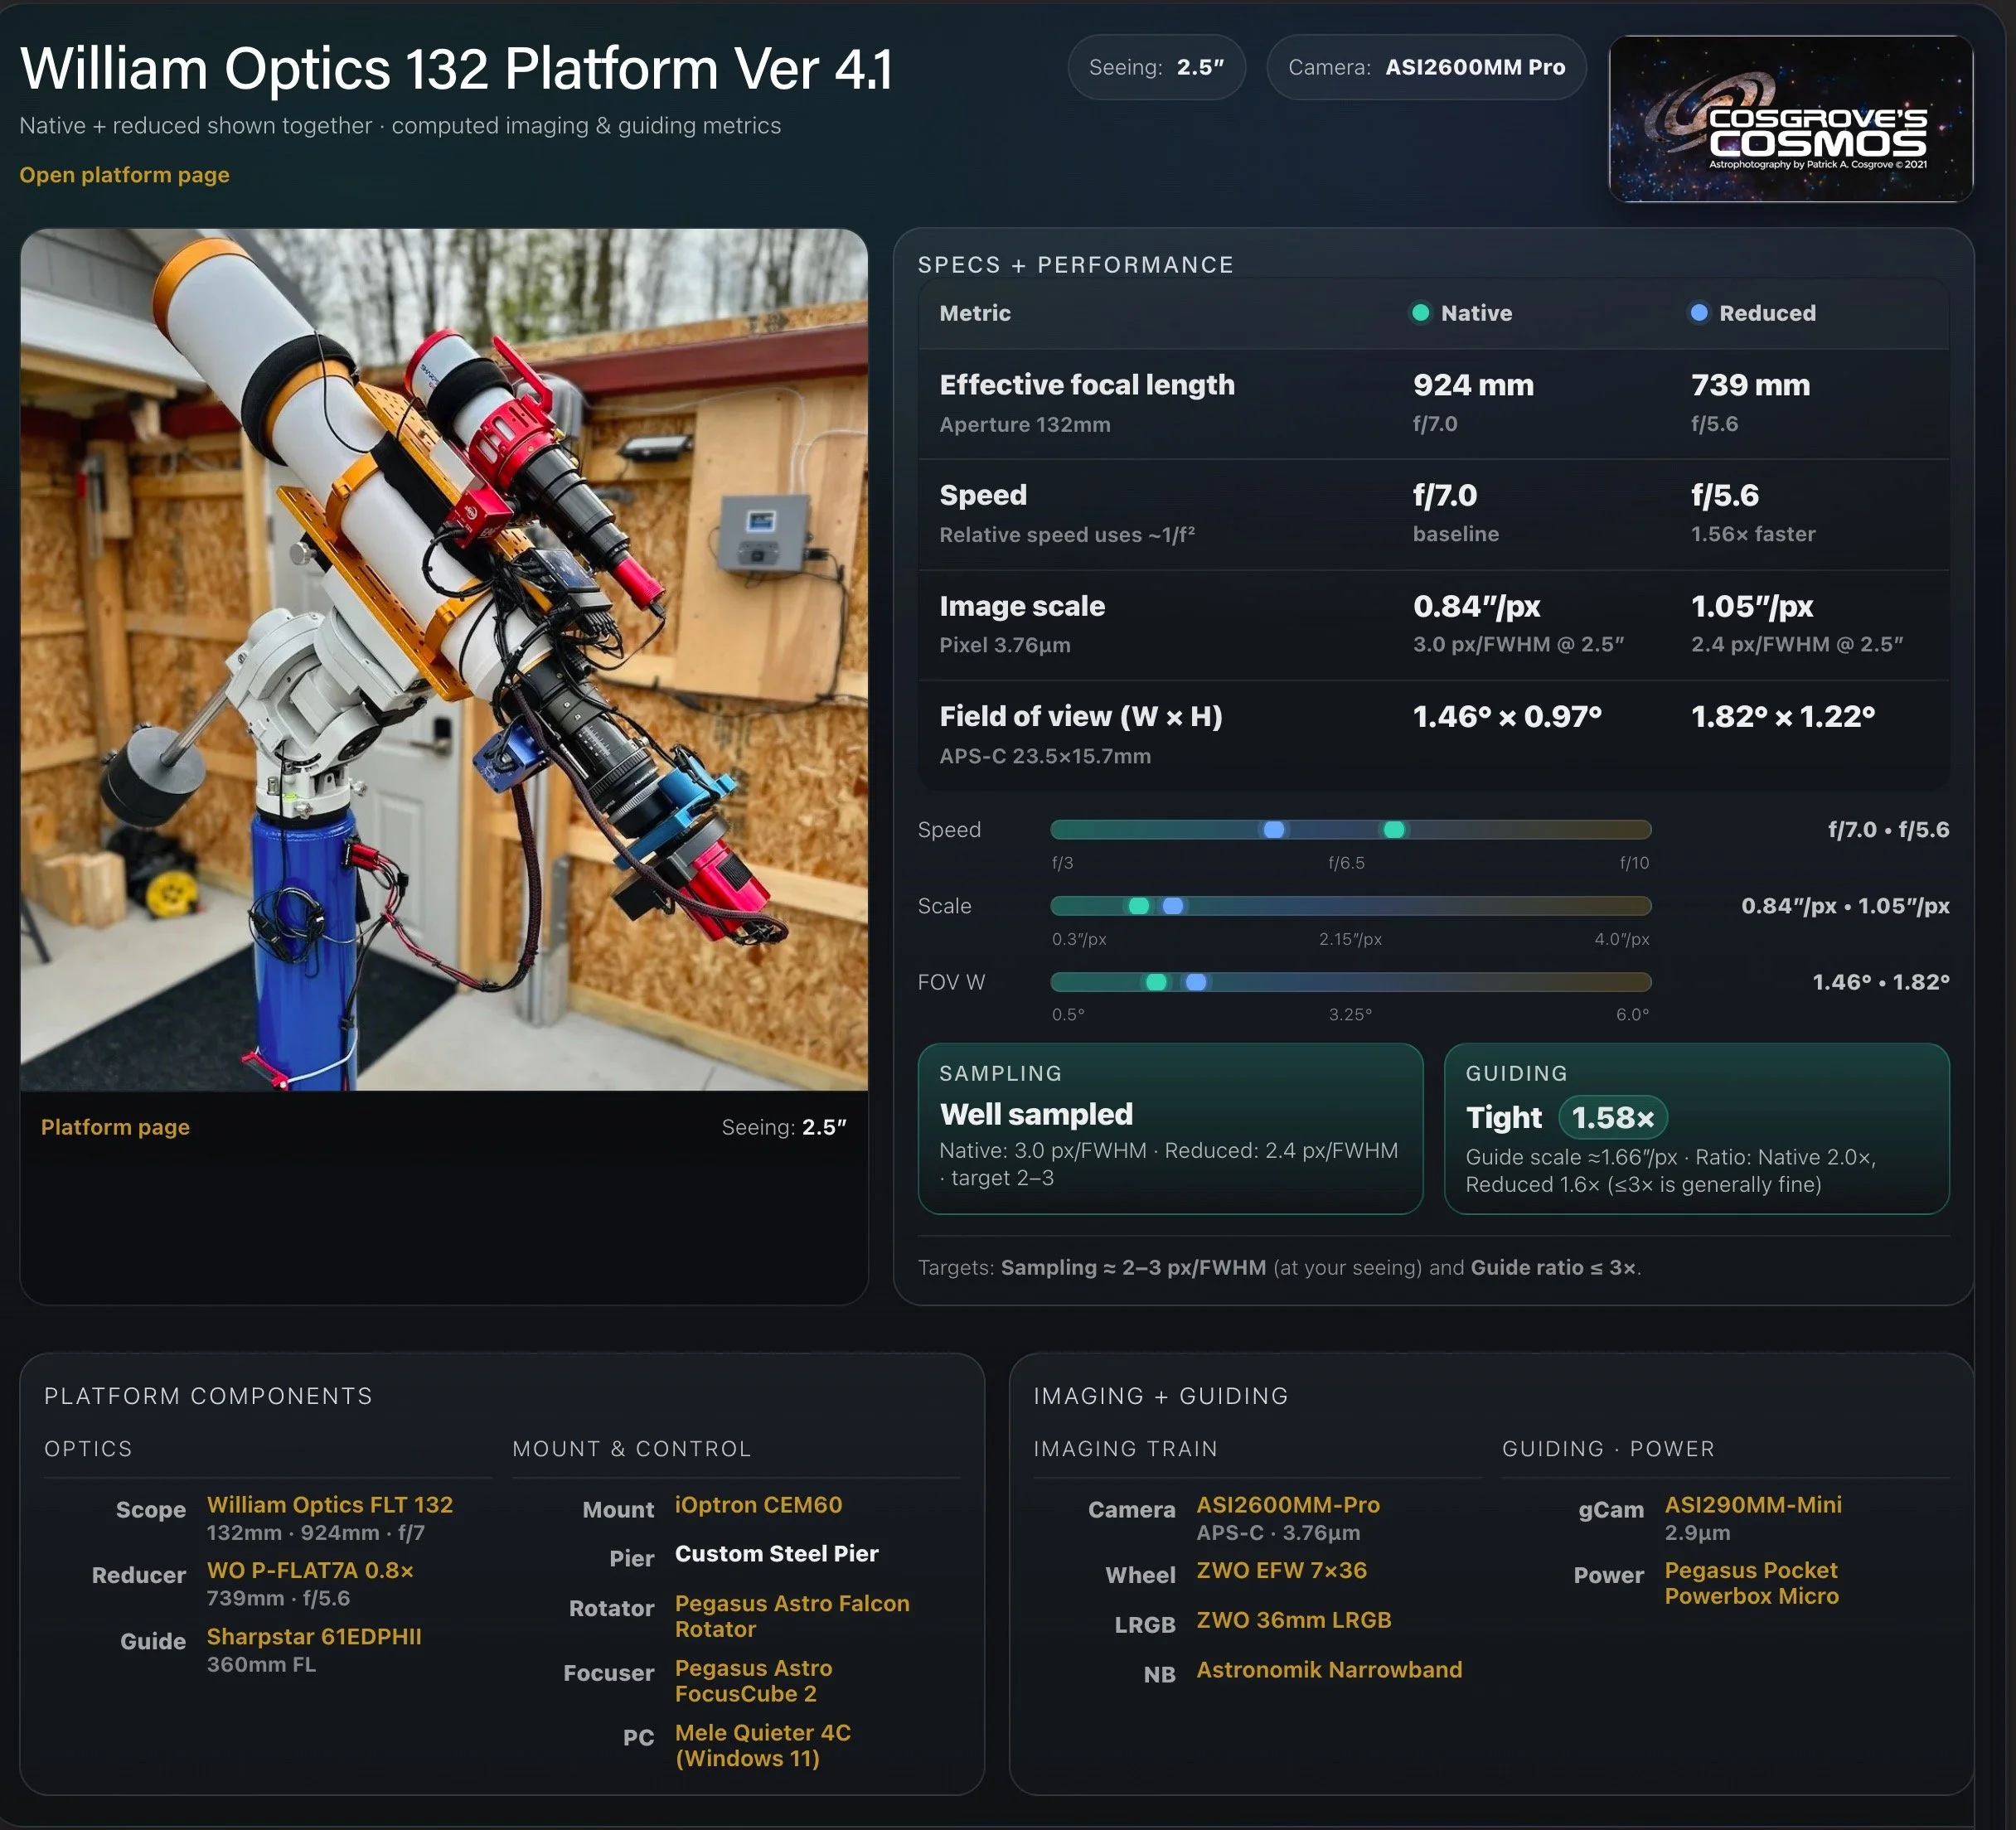
Platform used for this project
Software
Capture Software: PHD2 Guider, NINA
Image Processing: Pixinsight, Photoshop - assisted by Coffee, extensive processing indecision and second-guessing, editor regret and much swearing…..
Image Processing Walkthrough
(All Processing is done in Pixinsight, with some final touches done in Photoshop)
1. Blink
Lum
lots of satellite trails - but no removals
Red
lots of satellite trails - but no removals
Green
lots of satellite trails - but no removals
Blue
lots of satellite trails - but no removals
2. WBPP 2.8.8
Reset everything
Load all lights
Load all flats
Load all darks
Select - maximum quality
Reference Image - auto - the default
Set the output directory to a targeted wbpp folder
Pedestal value - set to auto
Darks -set exposure tolerance to 0
Lights - set exposure tolerance to 0
Lights - all set except for linear defect
Set for Autocrop
Set for 2X Drizzle
Executed in 2 hours and 6 minutes - no errors!
I more frame rejected

WBPP Calibration View

WBPP Post Calibration View

WBPP Pipeline View
3. Load Master Images
Load all master images and rename them.

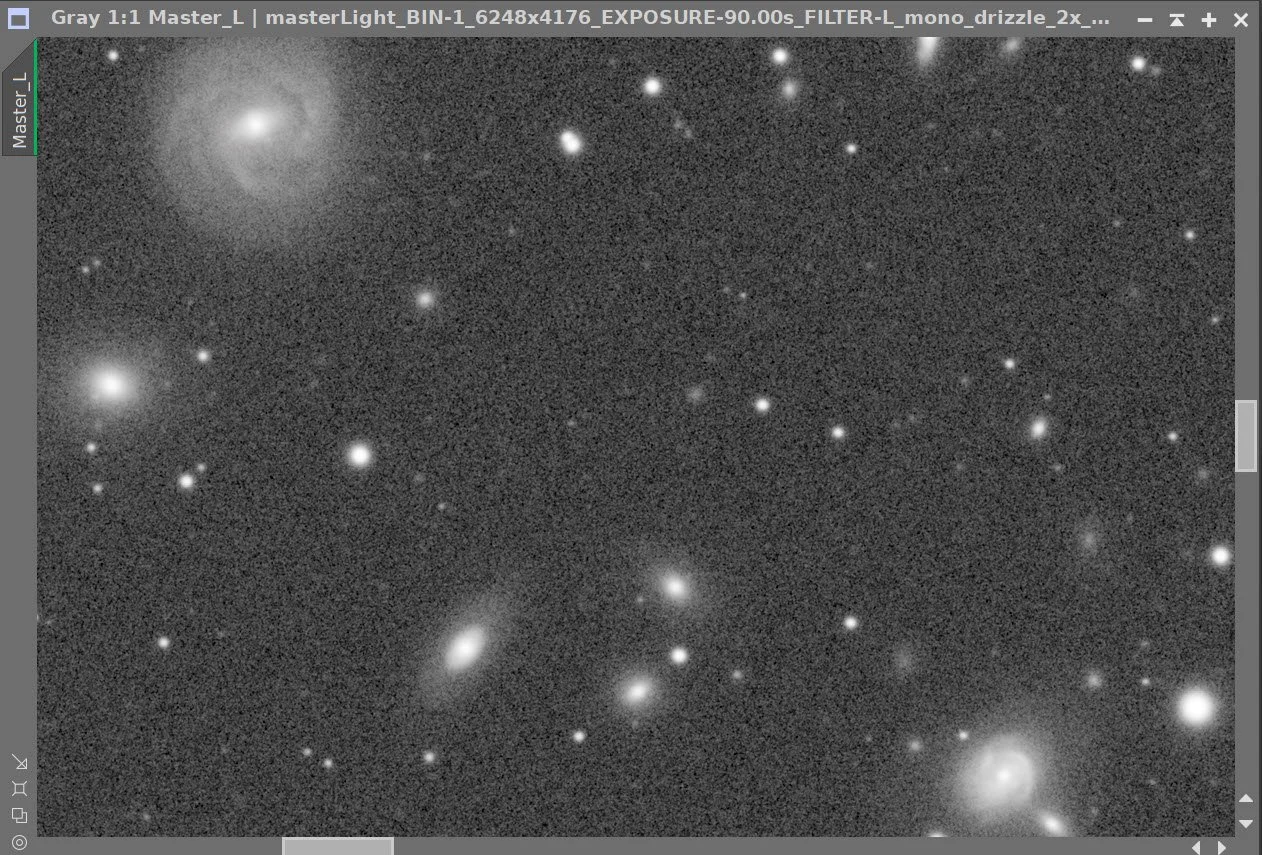
Master L, R, G, & B images
4. Process Linear RGB data
Create the RGB color image with the ChannelCombination tool
Run DBE on the linear color image:
Set up the sample pattern as shown
Fix with subtraction
To my eye, I could still see a gradient from left to right in the image, so I ran a second DBE run as shown.
Run BXT correct-only. Best to fix any star issues before SPCC
Run SPCC and calibrate the color. Use the Sony 571 QE curve and ZWO RGB filters. See the panel setup below.
Run PFSIMage to get an idea of the star sizes. X = 4.01 Y = 3.85
After experimenting with BXT settings, I used 4.8 for non-stellar restoration, which was larger than shown in the PFSImage results.
Run BXT Full correction - see settings used on the panel shot below.
Apply NXT to remove noise. Be aggressive here, as I want smooth star edges. Used model 3 and settings shown in panel snapshot below.
Use STX with Saving Stars and (Unscreen Stars not selected as this is linear) to create RGB Stars and RGB Starless images. Set to a large sample box size

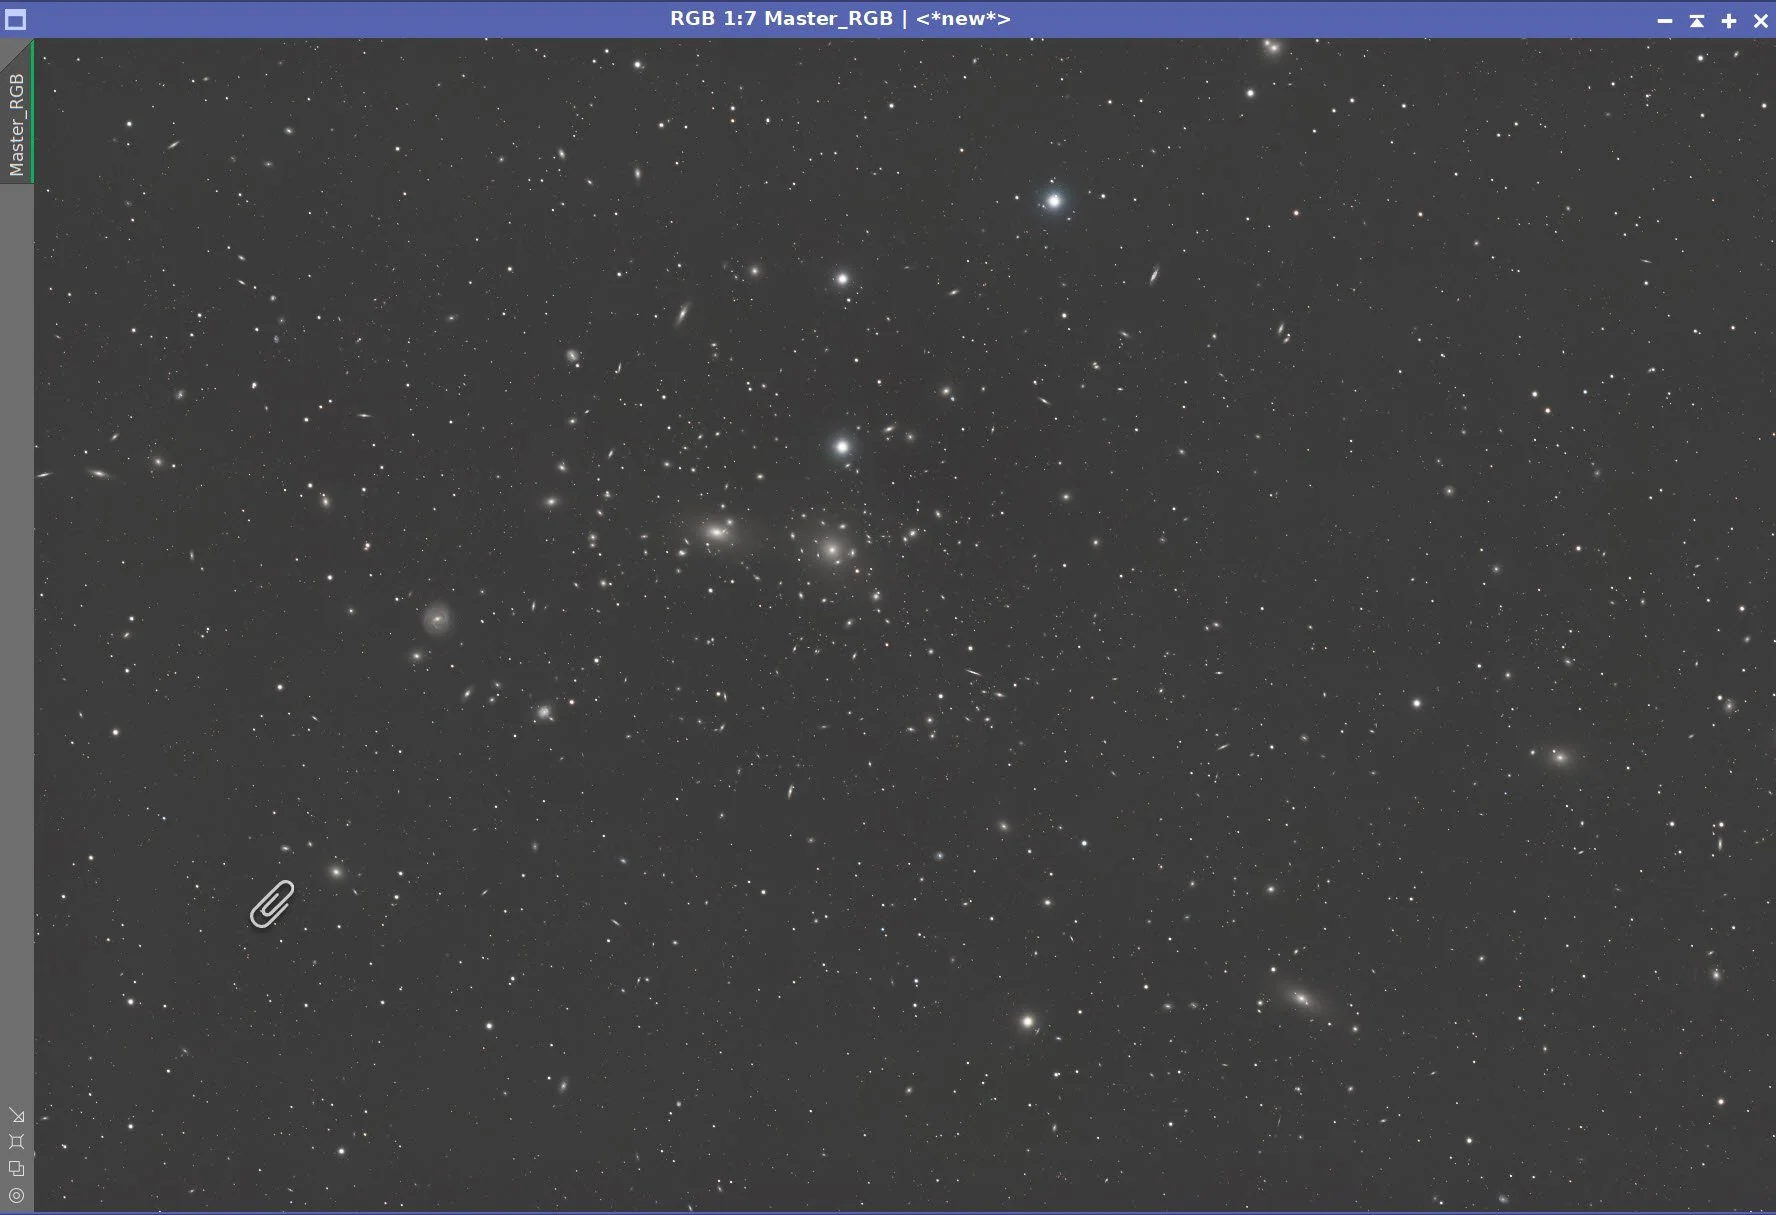
The initial RGB Linear Image.
Master RGB Sample Pattern (click to enlarge)
Master RGB Sample #2 (click to enlarge)
Master RGB Before DBE (click to enlarge)
Master RGB Before DBE #2 (click to enlarge)
Master RGB after DBE (click to enlarge)
Master RGB after DBE #2 (click to enlarge)
Master RGB Background
Master RGB Background #2

SPCC panel settings used.

The final regression result.
Master_RGB before SPCC run. (click to enlarge)

PFSImage Panel with results
Master_RGB after SPCC run (click to enlarge)

Final BXT settings used.

The NXT V3 parameters used.


The Master RGB Image before BXT, After BXT Correction only, After SPCC, After BXT Full Correction, and After NXT v3
Master_RGB before STX Star removal. NOTE: The Paperclip Image is not a true object in outer space. It is a screen copy artifact. (Sure it is… ah ha….)
RGB Stars Image resulting from STX. (click to enlarge)
Master RGB Starless Image after STX (click to enlarge)
5. Process the Linear Lum Image
Run DBE
Start with the RGB sampling plan and then enhance sampling box positions.
Use subtraction.
Run BXT Correct Only
Run PFSImage to get star sizes. X = 4.52 , Y= 4.30
Experiment with BXT settings for best results.
Run BXT Full using the star size of 6.8. Much higher than PFSImage star size. See the panel shot below.
Apply NXT - see the NXT Panel snap below.
Take each image starless with STX - use large sample box - no need to save the stars.
Final Master_L sampling plan.
Mastr Lum Before DBE (click to enlarge)
Master_L after DBE. (click to enlarge)
Master_L background removed. (click to enlarge)

PFSImage results for Master L

Final BXT Params used.

Params used with NXT V3.


Master Lum Before BXT, After BXT Correct Only, and NXT v3
Master_L before Star Removal (click to enlarge)
Master L Starless. (click to enlarge)
6. Move Images to the Nonlinear State
For RGB Stars, use the Use HistogramTransoform to manually scale the stars
For RGB Starless, use the current STF->HT method to go nonlinear.
For the Lum image, use the current STF->HT method to go nonlinear.
Initial Nonlinear RGB Stars Image (click to enlarge)
Initial Nonlinear RGB Starless image (click to enlarge)
Initial nonlinear Lum Starless Image (click to enlarge)
7. Process the Nonlinear RGB Stars Image
Then I used the CT tool to adjust brightness and Saturation until I was happy. Here is the final result.
Initial RGB Stars Image (click to enlarge)

Final Result after CT
9. Do the Processing of the Nonlinear Lum image
Use HT to set the black point based on the histogram. I wanted to darken the background a bit.
Create a Lum_mask:
By dragging the lum image and making a copy. Then use HT to increase the contrast.
Then use CT to boost the contrast on the lum_mask
I will use this mask to make changes to the galaxies while protecting the background sky.
With the Lum_mask applied, do a CT adjustment to get the galaxies looking better
With the Lum_Mask still in place, apply MLT sharpening (see panel screen snap for parameters) - this just brings out the subtle details a bit more.
Run DarkStructureEnhance Script with default parameters and no mask. This will darken the gaps in the arms of spiral galaxies.
Do an NXT with the V3 parameters shown in the panel snapshot below.
Do a final CT to darken the image in preparation for combining with the RGB image
The Initial Lum Mask (click to enlarge)
The Initial Lum image (click to enlarge)
Zoom in so you can see better. (click to enlarge)
MLT sharpen with Lum Mask in place. (click to enlarge)
After DarkStructureEnhance (click to enlarge)
Final Lum Mask after HT (click to enlarge)
Apply HT to to set the black point. (click to enlarge)
CT with Lum Mask (click to enlarge)
MLT Sharpening Params
Parameters used in the last NXT V3.

After NXT3 (click to enlarge)

Final version of the nL_starless image.
10. Complete the Processing of the RGB Starless Image
Apply HT to set the black point using the histogram. This darkens the background sky.
Apply CT to adjust contrast and saturation.
Apply the lum_mask and then apply LHE with a scale of 82, a contrast limit of 2.0, an Amount of 0.75, and an 8-bit histogram. This will help bring out small-scale details better.
Run CT with the lum_mask
Using ChannelCombination in CIE Lab mode and just enabling the L layer. Use this to field the Lum image into the RGB Image
Use NXT V3 to lower noise. See the panel shot for the parameters used.
Apply CT to tweak the tonescale
Initial RGB Starles image (click to enlarge)
After CT (click to enlarge)
After the LHE operation with the Lum Mask (click to enlarge)
After Lum image is inserted(click to enlarge)

NXT V3 params used.
After HT (click to enlarge)

Zoomed to see better(click to enlarge)
CT adjustments with lum mask (click to enlarge)

After CT (click to enlarge)
After NXT v3 (click to enlarge)
FInal LRGB image (click to enlarge)
11. Combine the RGB Starless with the RGB Stars Image
Use the ScreenStars script to add the RGB Stars back in
The two bright blue stars look bloated even more after the combination so I want to reduce them in size. To do this, I need a mask
I created a blue_ask using the Bill Bllhanshan Script, and then I used the CloneStamp tool to remove extraneous stars from the mask I did not care about, and then used HT to boos the contrast.
The mask was applied and CT was used to adjust the stars.
The RGB Stars Image (click to enlarge)
The Final Starless LRGB image (click to enlarge)

ScreenStars Panel Setup.

The image with RGB Stars inserted!
The initial blue mask after using the Bill Blanshan Script. (click to enlarge)
Then CloneStamp was used to remove stars I did not care about. (click to enlarge)
Finally, HT to boost the contrast (click to enlarge)

The final image - ready for polishing in Photoshop!
14. Export the Image to Photoshop for Polishing
Save the image as a TIFF 16-bit unsigned and move to Photoshop
Make final global adjustments with Clarify, Curves, and the Color Mixer
I selected a lot of the larger spiral galaxies with the lasso with a 10-pixel feather, and used clarity and color mix to make very small changes.
I did the final crop operation.
Added Watermarks
Export Clear, Watermarked, and Web-sized jpegs.

The Final Image!