
The NGC 5364 Group in Virgo - 6.3 Hours of LRGB
Date: June 1, 2025
Cosgrove’s Cosmos Catalog ➤#0138

The first image from my Whispering Skies Observatory from my Astro-Physics 130mm Plaform! (click on the image for a high res view via Astrobin.com)
Table of Contents Show (Click on lines to navigate)
About the Target
Galactic Ensemble in Virgo
This image captures a captivating corner of the cosmos nestled in the constellation Virgo. Showcased are five galaxies—NGC 5364, NGC 5363, NGC 5360, NGC 5356, and NGC 5348—each with its own story, yet collectively part of the expansive Virgo III Cloud, a filamentary structure extending from the Virgo Supercluster.

NGC 5364 - a beautiful spiral galaxy!
NGC 5364: The Grand Design Spiral
Type: SA(rs)bc pec (Grand Design Spiral with peculiar features)
Distance: Approximately 63.6 million light-years
Angular Size: ~3.8’ × 1.66’
Notable Features:
Exhibits a nearly symmetrical spiral structure with two prominent arms wrapping around the galaxy.
Displays an incomplete inner ring and asymmetrical spiral arms, possibly due to gravitational interactions with nearby galaxies.
Contains numerous H II regions along its arms, indicating active star formation.
Discovered by William Herschel in 1786, NGC 5364 is a textbook example of a grand design spiral galaxy. Its well-defined arms and active star-forming regions make it a favorite among astronomers and astrophotographers alike.
NGC 5363: The Dust-Laden Lenticular Galaxy

NGC 53643 - note the red dust age across its face
Type: S0 (Lenticular Galaxy)
Distance: Approximately 63.6 million light-years
Angular Size: ~4.1’ × 2.6’
Notable Features:
Characterized by prominent dust lanes along its minor axis, visible even in amateur images.
The dust structure resembles that of NGC 5128, with warps on both sides of the dust lane.
The presence of these dust lanes suggests a recent merger event, bringing in external material.
Hosts a LINER-type active galactic nucleus (AGN), indicating low-level nuclear activity.
NGC 5363’s distinctive dust lanes are a result of its complex history, likely involving the accretion of another galaxy. These features not only add visual interest but also provide insights into the galaxy’s evolutionary past.

NGC 5360
NGC 5360: The Lenticular Companion
Type: S0-Aa (Lenticular Galaxy)
Distance: Approximately 67 million light-years
Angular Size: ~1.1’ × 0.62’
Notable Features:
Appears as a small, bright oval galaxy in proximity to NGC 5364.
Its classification suggests a transitional form between elliptical and spiral galaxies, with a disk-like structure but lacking prominent spiral arms.
Though less conspicuous than its spiral neighbor, NGC 5360 adds depth to this galactic group, highlighting the diversity of galaxy morphologies within the Virgo III Cloud.

NGC 5356.
NGC 5356: The Modest Spiral
Type: SA C (Spiral Galaxy)
Distance: Approximately 76.4 million light-years
Angular Size: ~2.83’ × 0.67’
Notable Features:
Exhibits a classic spiral structure, albeit less grandiose than NGC 5364.
Its relatively small size and distance make it a subtle yet intriguing member of this group.
NGC 5356 may not steal the spotlight, but its presence offers a glimpse into the varied scales and structures of spiral galaxies.

NGC 5348
NGC 5348: The Barred Spiral
Type: Bbc (Barred Spiral Galaxy)
Distance: Data not specified
Angular Size: ~3.88’ × 0.73’
Notable Features:
Characterized by a central bar structure from which spiral arms emanate.
Its elongated shape and bar feature suggest dynamic internal processes influencing star formation and galactic evolution.
Tiny Surprise: PGC 49399 and 200309!
As I studied the image, I saw this little guy in the lower right-hand corner of the image:
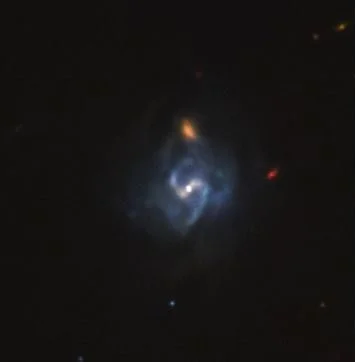
This is clearly a tiny face-on barred spiral galaxy, and I was wondering what I could learn about it. My annotation image lists the galaxy itself as PGC49399 and the small orange dot to the top as galaxy PGC 200309.
In all of my imaging projects, I have never talked about a PGC Galaxy. What is this all about? PGC stands for the “Catalog of Principal Galaxies”, which was first published was first published in 1989. This catalog is based on the Lyon-Meudon Extragalactic Database (LEDA) created in 1983 at the Lyon Observatory in Lyon, France. Originally, this database was created specifically as a database of galaxies, and each galaxy was assigned a specific identification number. This database now contains information on over 3 million astronomical objects, of which about 1/2 are galaxies.
Searching for the spiral, I found this HERE on Deep Sky Corner:

Deep SKy Corners listing of for PGC 49399.
If you click on the link you go here:
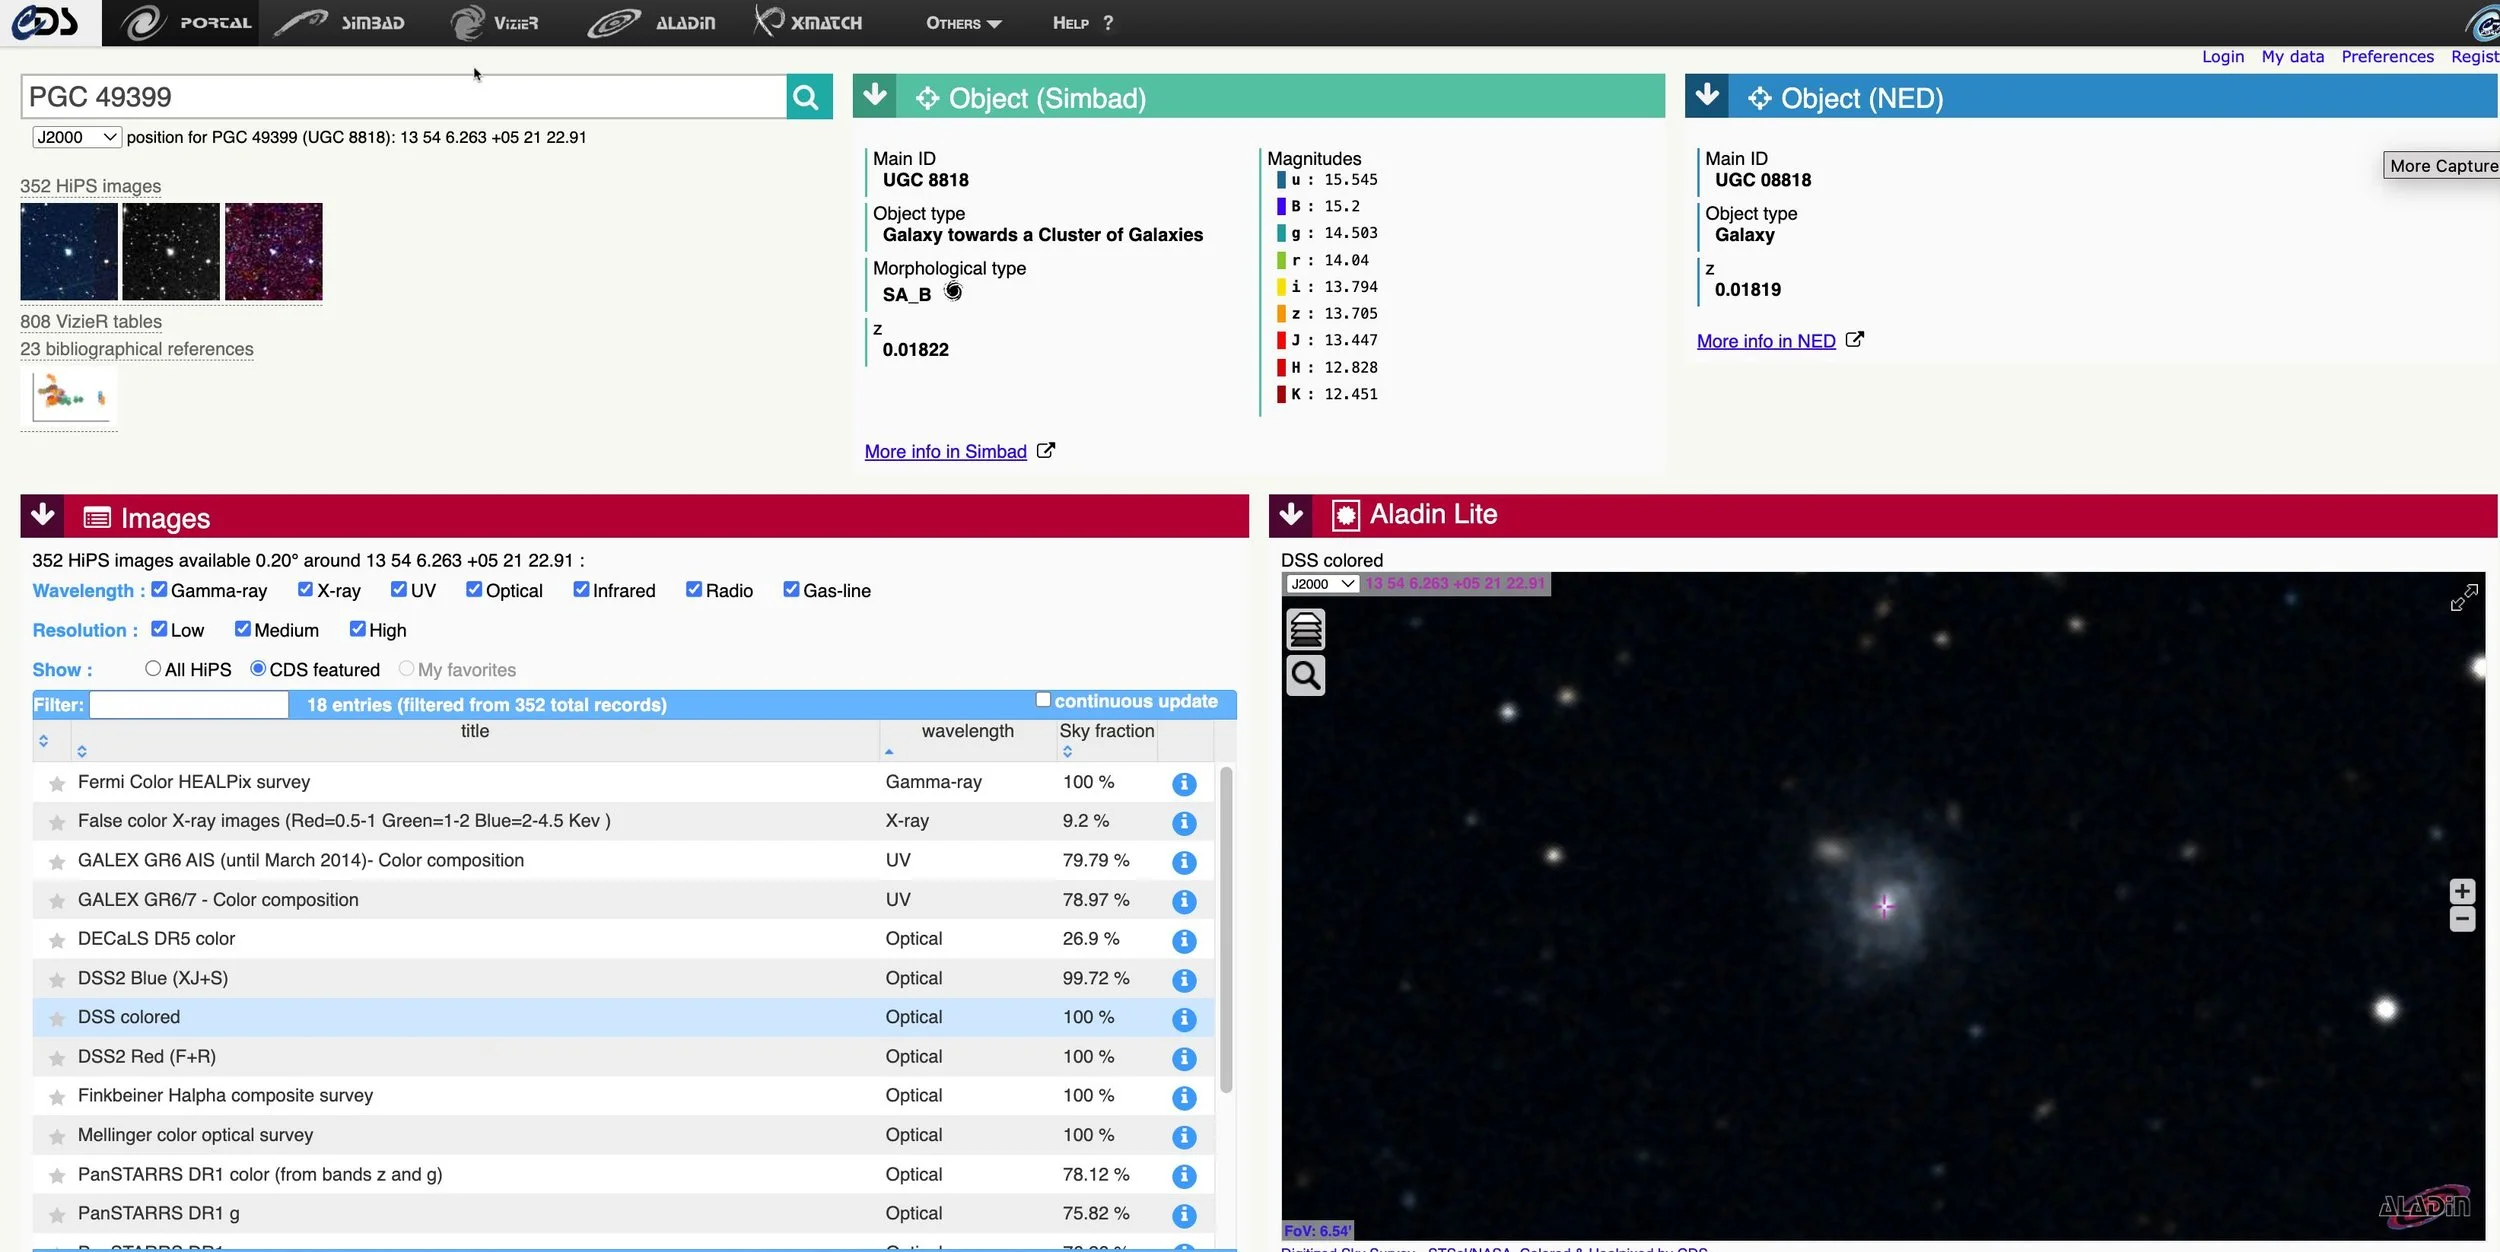
Data on this little galaxy!
So we have a SA_B barred spiral - and my little image is not all that bad!
I could not find anything about the little orange guy. If I learn anything, I will add it here. If you know anything, please let me know!
The Virgo III Cloud: A Cosmic Filament
These galaxies are part of the Virgo III Cloud, a filamentary structure extending from the Virgo Supercluster. This region comprises numerous galaxy groups and clusters, interconnected by gravitational forces and cosmic evolution.
The Annotated Image

Created in Pixinsight using the ImageSolver and AnnotateImage scripts.
The Location in the Sky
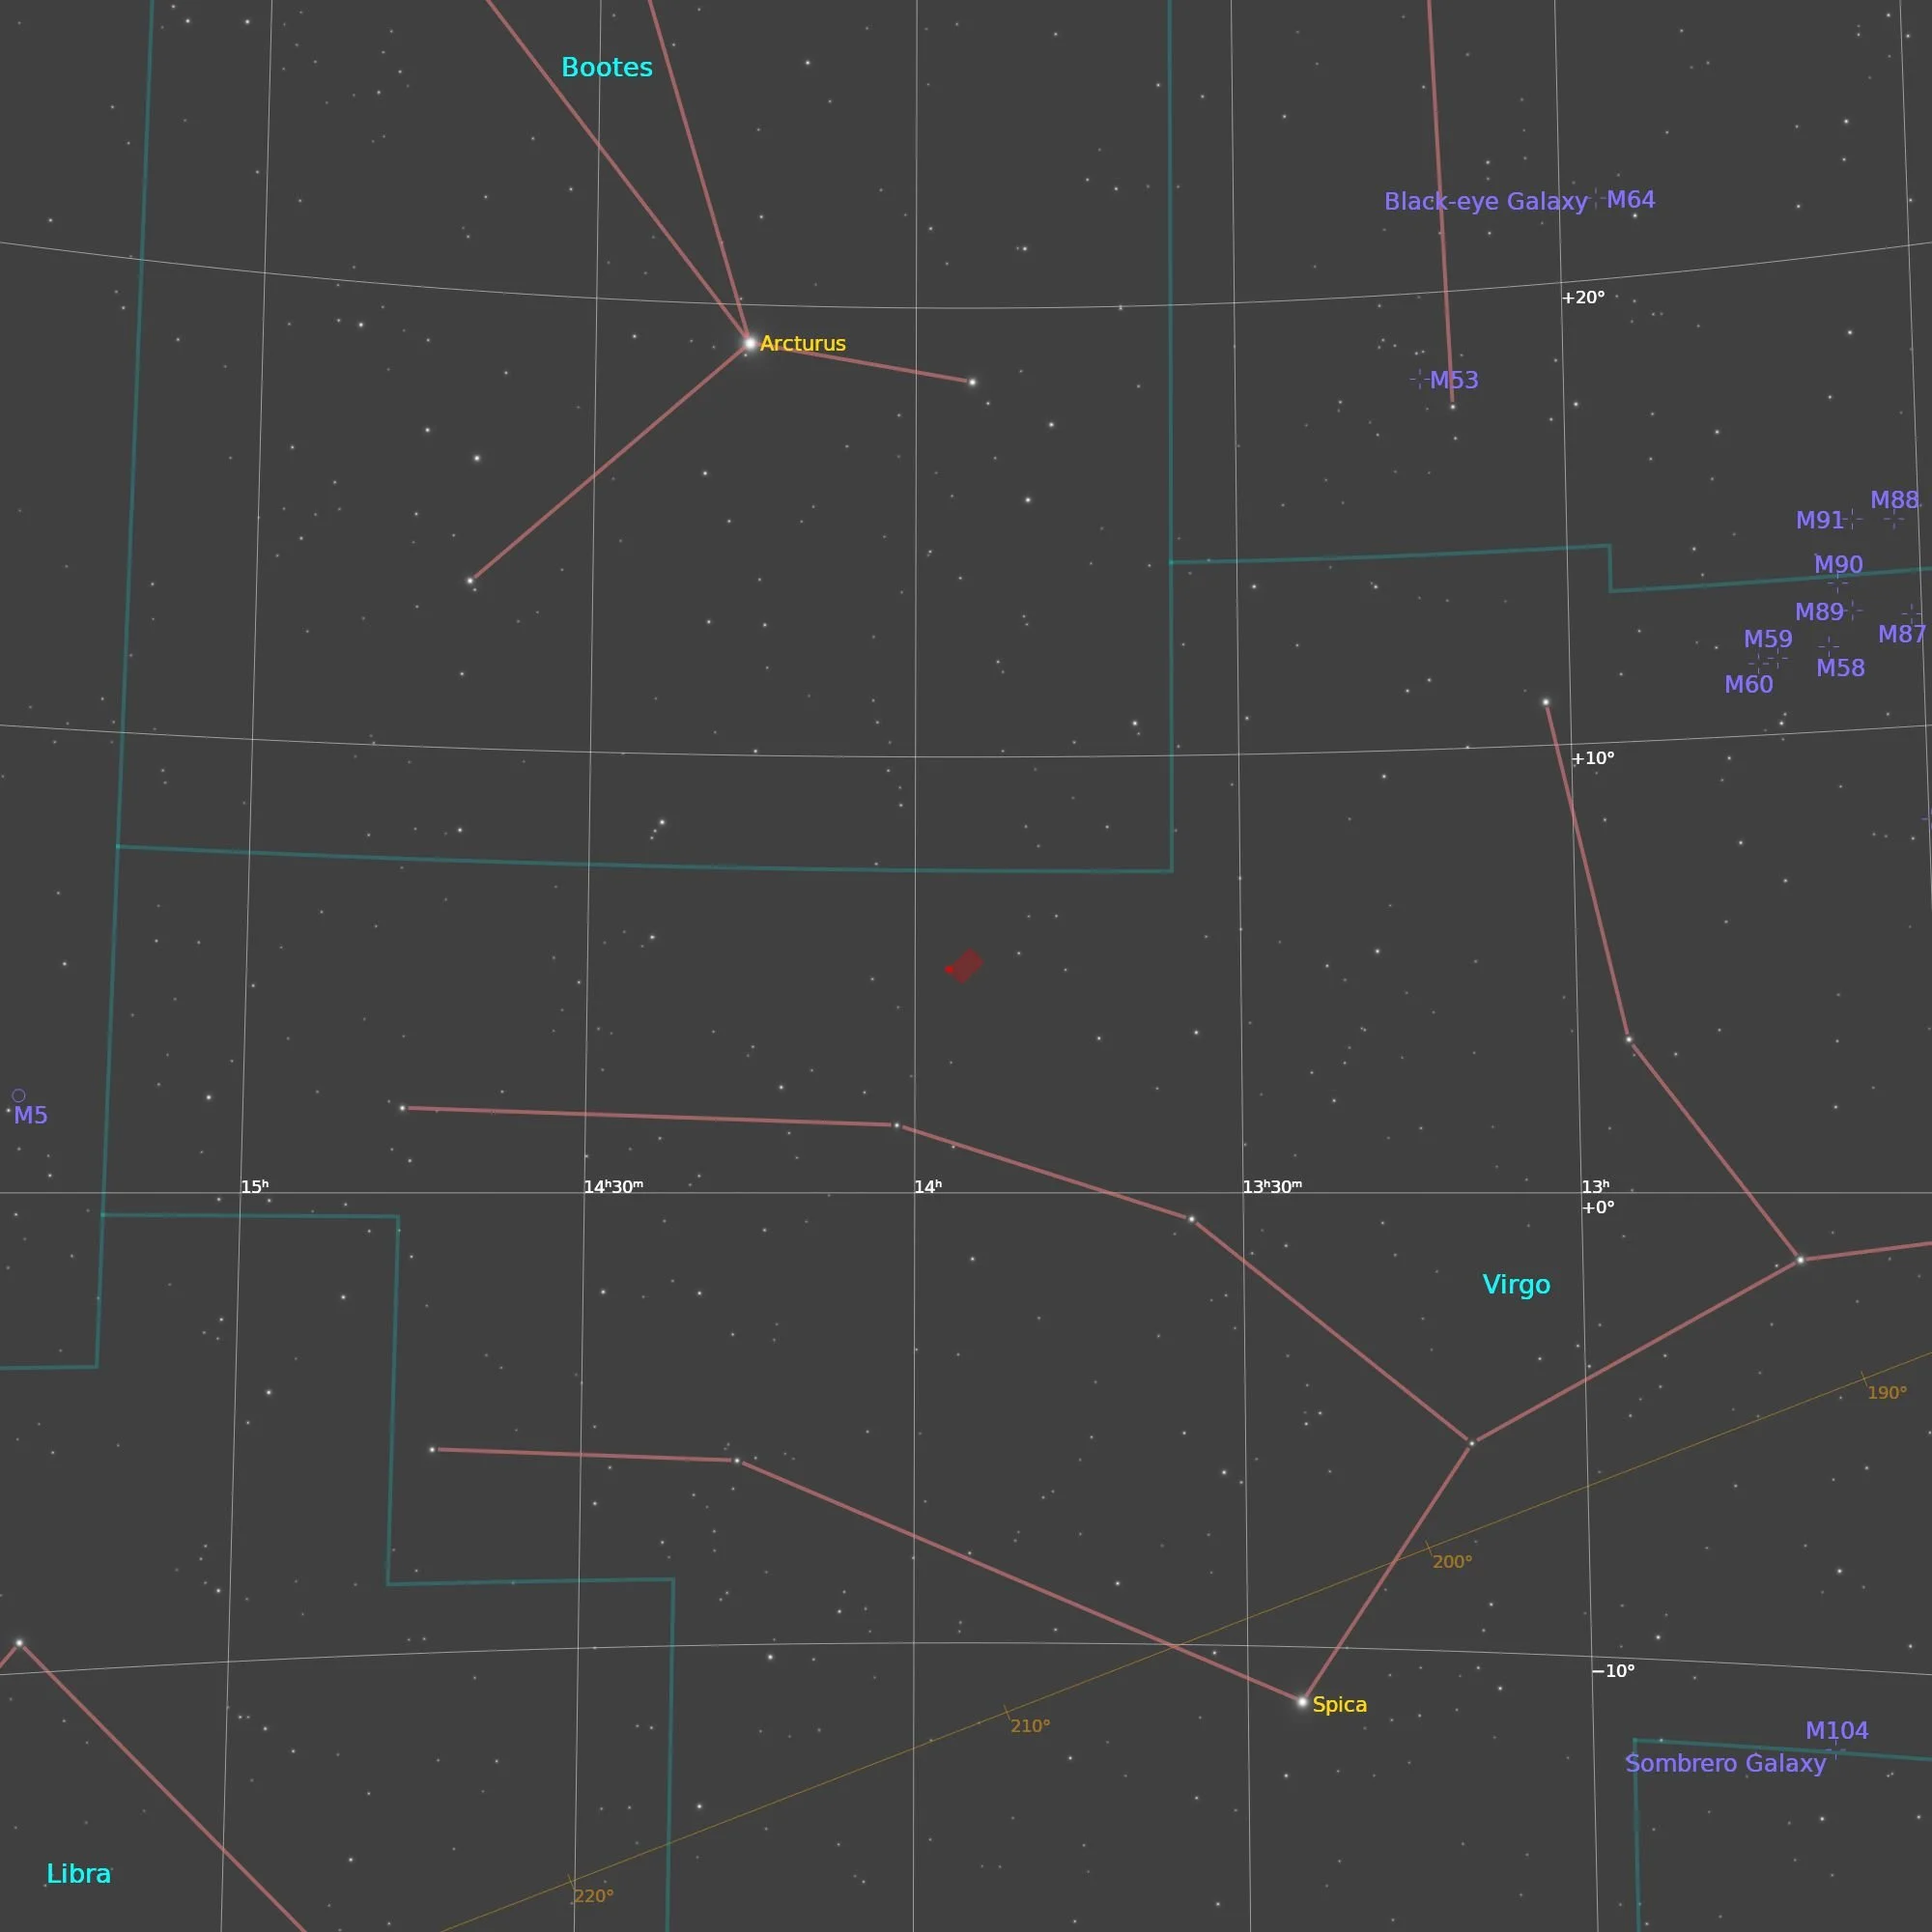
This annotated image created with Imagesolver and FInderChart Scripts in Pixinsight.
About the Project
This is the first imaging project from my Astro-Physics 130mm (AP130) Platform, taken from my new observatory!
Picking the Target
OK - this was kind of a joke.
I was in scramble mode trying to get the four scopes set up in the new observatory, and I short-sheeted my planning process. I cheated and used ChatGPT to offer a range of possible targets for this scope.
For the first two targets, ChatGPT offered some good options that worked out fine. But the options I selected for the telescopes on my two northern piers were not so great.
Oh - they were good targets that were well suited for these scopes. It’s just that the target did not actually rise when predicted. ChatGPT was off by HOURS! I knew I was in trouble when I told the scope to slew to the target, and it was trying to point to the ground. Not good!
So, around midnight of the first clear night, I was quickly trying to find some galaxy targets to shoot. I came across this little group of galaxies that was centered on NGC 5364. I roughly set up my framing and quickly got started.
This made me realize how important my planning process was to getting a good shot. I will not put myself into that position again!
So was this the best target I could have selected? No.
Was this the best framing and composition? Again No.
But at least it got me going and proved out the setup on the new scope installation.
Data Collection
Starting late on the 22nd, I shot all night then and again on the next clear night on the 27th.
Everything seemed to be going well. Tracking looked good.
On the second night, I did run into one unfortunate problem. It turns out that the new cable wrap was, shall we say, a bit too tight?
At some point in the scope's motion, it pulled the power cable right out from the mount, shutting that down! And it happened twice!
So I am going to have to fix that!
On April 24th, I completed a new calibration series for all the scopes after finishing data collection.
The weather changed, and we were expecting weeks of cloudy nights, so I figured it was time to start processing.
I first processed the M106 Image I shot on the SCA260, as I was eager to see how that came out. You can read all about that project HERE.
Then, I processed my image of the Markarian’s Chain, which you can see HERE.
Then I decided to work on this project next.
I ended up with a little over 6 hours of data.
With that, I began my preprocessing with Pixinsight’s WBPP.
Processing Overview
I decided to do a 2X drizzle process on the images in WBPP to maximize the resolution I was dealing with.
Then my plan was to do a LRGB Starless workflow.
The high-level flow of this approach can be seen below.

My typical LRGB Starless Workflow.
The processing was pretty straightforward. Because I Drizzle processed the image, the resulting image sizes were large, and this slowed down some operations. You know - start things up and then “go for coffee” slow. But I seemed to be getting some reasonable results.
I was surprised to see the dust lane in NGC 5364. I did not know it was there, and as I processed it, I realized something was buried in there. It is subtle but real - and surprises like that are always welcome!
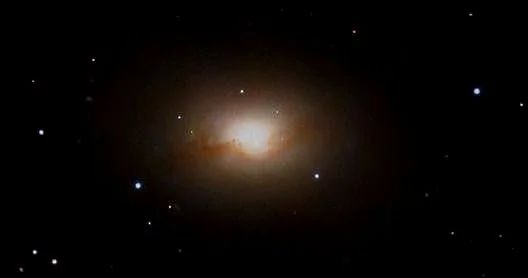
NGC 5364 - the Dust Band:
I have darken it a bit and reduced the brighnss of the core so you can better see the red dust lane going across it.
The composition was done quickly on the fly, so I thought I might need to adjust my crop to get the best composition. I tried many options, but I was not pleased with any of them.
This is the original framing as shot.
Crop Option #1 (c1ck to enalrge)
Crop Option #2 (click to enlarge)

Crop Option #3 (click to enlarge)
The original framing had kind of an empty left side. With the first crop option, I rotated the image 90 degrees counterclockwise and framed things with the 5 main galaxies. On the second, I zoomed in on the two main galaxies. In the third and final option, I tried a square format, which I typically do not use.
In my opinion, the best crop was the first one that showed the five main galaxies. I chose this, but I was not happy that the center was kind of empty. Hmmm - empty center? Not my favorite.
In the future, I need to spend more time on the planning. I know this. I usually do this. I think I just paid the price for not doing it. Lessons reinforced!
Look below for the complete step-by-step processing walkthrough! Note: This walkthrough is based on Pixinsight.
Final Results
The image is interesting in that it compares several different morphologies of galaxies in one frame.
It also proves out that everything is working on the AP130 (once I adjust the cable that was getting yanked, that is!) - so that’s good.
More Information
🧭 General Background
Virgo Cluster Overview – Wikipedia
Comprehensive information on the Virgo Cluster, its member galaxies, and its significance in the cosmic structure.
Virgo III Cloud – Wikipedia
Details about the Virgo III Cloud, a filamentary structure extending from the Virgo Supercluster, including its composition and relation to nearby galaxy groups.
Virgo Supercluster – Wikipedia
An overview of the Virgo Supercluster, encompassing the Virgo Cluster and its surrounding structures, providing context for the location of the featured galaxies.
Virgo Constellation: Location, Stars, and Mythology – Space.com
An accessible guide to the Virgo constellation, including its position in the sky, notable stars, and mythological background.
🕰️ History and Discovery
NGC 5364 – Wikipedia
Information on the discovery, structure, and characteristics of NGC 5364, including its classification as a grand design spiral galaxy.
NGC 5363 – Wikipedia
Details about NGC 5363, its discovery, and its features as a lenticular galaxy with prominent dust lanes.
Catalogue of Nebulae and Clusters of Stars – Wikipedia
Historical context on William Herschel’s cataloging of nebulae and clusters, including the initial observations of galaxies like NGC 5364 and NGC 5363.
https://en.wikipedia.org/wiki/Catalogue_of_Nebulae_and_Clusters_of_Stars
🛰️ Hubble & Webb Imagery
Hubble Captures Grand Spiral – NASA Science
A detailed view of NGC 5364 captured by the Hubble Space Telescope, highlighting its spiral structure.
https://science.nasa.gov/missions/hubble/hubble-captures-grand-spiral/
Hubble Focuses on Grand Design Spiral Galaxy NGC 5364 – Sci.News
An article discussing Hubble’s observations of NGC 5364, providing insights into its classification and features.
https://www.sci.news/astronomy/hubble-grand-design-spiral-galaxy-ngc-5364-08076.html
Wide-Field View of the Virgo Cluster of Galaxies – ESA/Hubble
A ground-based image offering a broad perspective of the Virgo Cluster, contextualizing the location of the featured galaxies.
💡 Interesting Facts
NGC 5364 = NGC 5317, Grand Design Spiral Galaxy in Virgo – Cloudy Nights
An astrophotography discussion highlighting the features of NGC 5364, including its classification and structural peculiarities.
Galaxy of the Month: NGC 5364 – Webb Deep-Sky Society
An article focusing on NGC 5364, discussing its observational history and characteristics.
Virgo Cluster Galaxies and Their Globular Star Clusters – ESA/Hubble
Insights into the globular clusters within the Virgo Cluster galaxies, providing context for the stellar populations in the region.
Capture Details
Lights Frames
Taken the nights of April 22nd and 27th, 2025
63 x 90 seconds, bin 1x1 @ -15C, Gain 0, ZWO Lum Filter - 36mm unmounted
63 x 90 seconds, bin 1x1 @ -15C, Gain 0, ZWO Red Filter - 36mm unmounted
63 x 90 seconds, bin 1x1 @ -15C, Gain 0, ZWO Green Filter - 36mm unmounted
63 x 90 seconds, bin 1x1 @ -15C, Gain 0, ZWO Blue Filter - 36mm unmounted
Total - after culling bad subs - of 6 hours and 18 minutes.
Cal Frames
25 Darks at 90 seconds, bin 1x1, -15C, gain 0
30 Dark Flats at Flat exposure times, bin 1x1, -15C, gain 0
One set of Flats done:
15 Lum Flats
15 R Flats
15 G Flats
15 B Flats
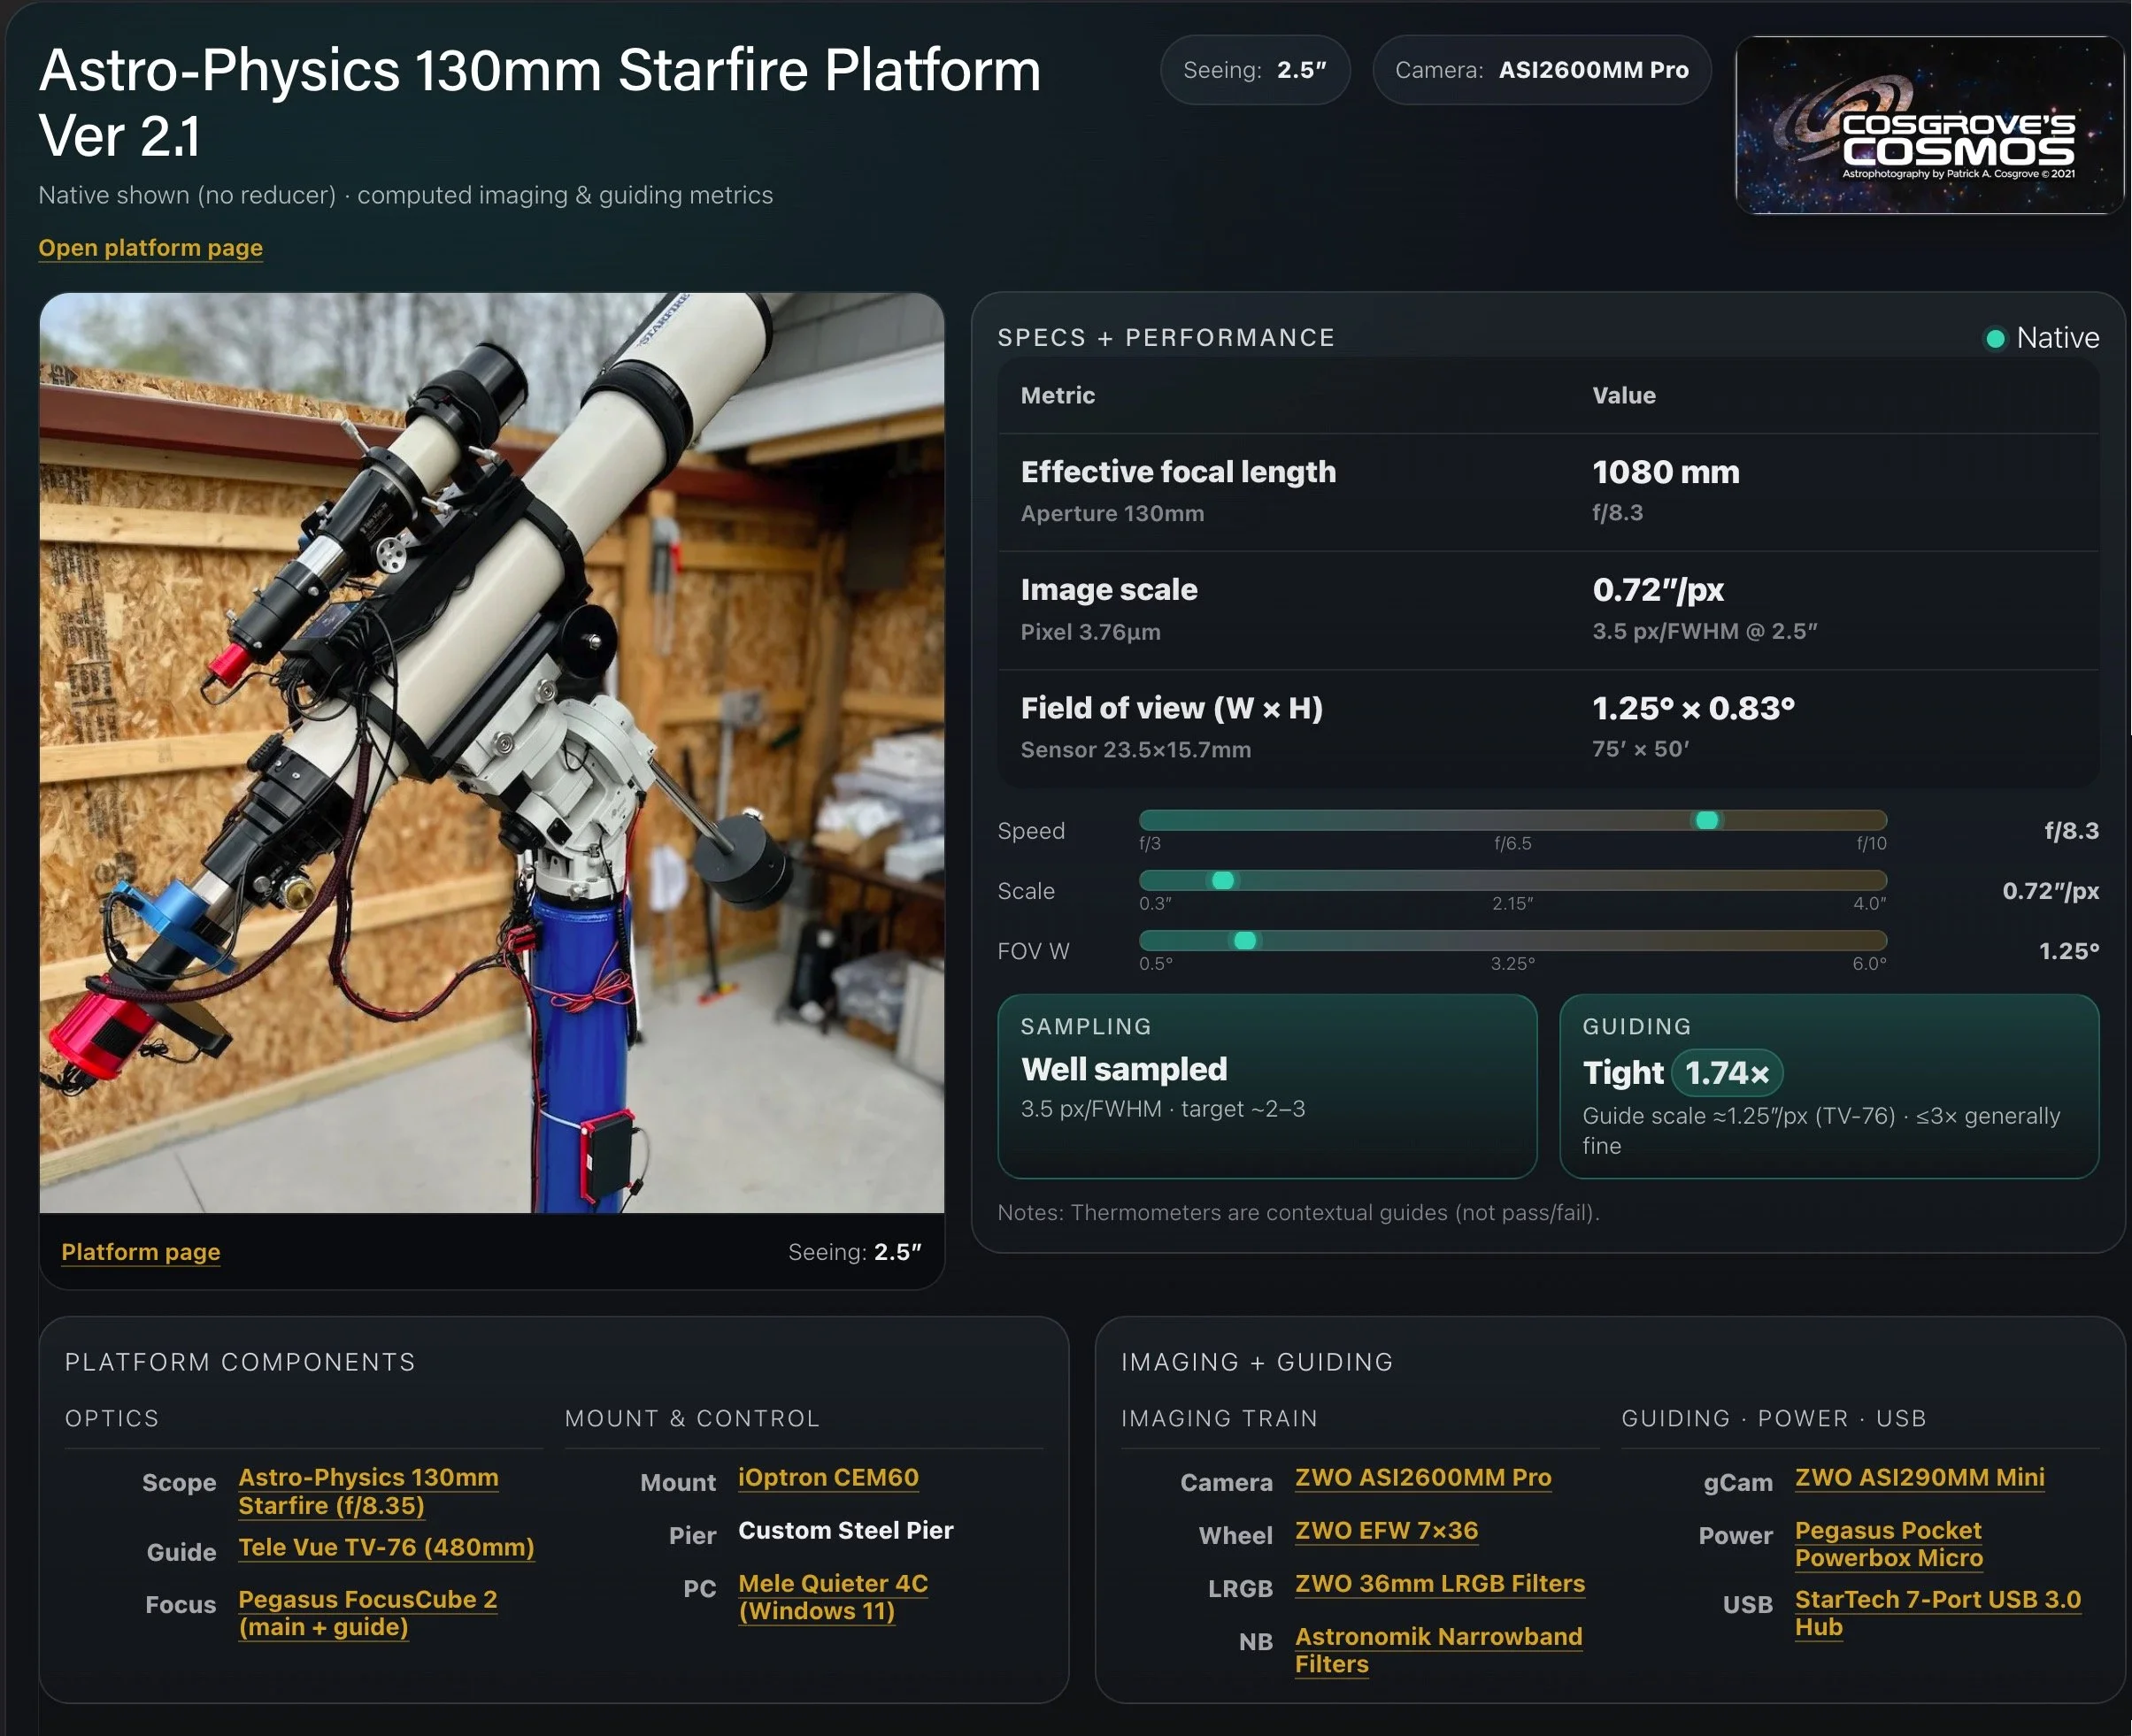
Platform used for this project
Software
Capture Software: PHD2 Guider, NINA
Image Processing: Pixinsight, Photoshop - assisted by Coffee, extensive processing indecision and second-guessing, editor regret and much swearing…..
Image Processing Walkthrough
(All Processing is done in Pixinsight, with some final touches done in Photoshop)
1. Blink
Blink was not done on this project. Why? I was super pressed for time, and I had heard from others that WBPP could remove bad frames. So, I decided to give this a go. It removed a total of 3 frames, The results look good - but having said that, I don’t believe I would do this again.
2. WBPP 2.8.8
Reset everything
Load all lights
Load all flats
Load all darks (note: darks for 200 seconds, not 120 as they should have been!)
I choose to optimize darks.
Select - maximum quality
Reference Image - auto - the default
Select the output directory to wbpp folder
Enable CC for all light frames
Pedestal value - auto
Darks -set exposure tolerance to 0
Lights - set exposure tolerance to 0
Lights - all set except for linear defect
set for Autocrop
Set for 2X Drizzle
Executed in 39 minutes - no error!

WBPP Calibration View
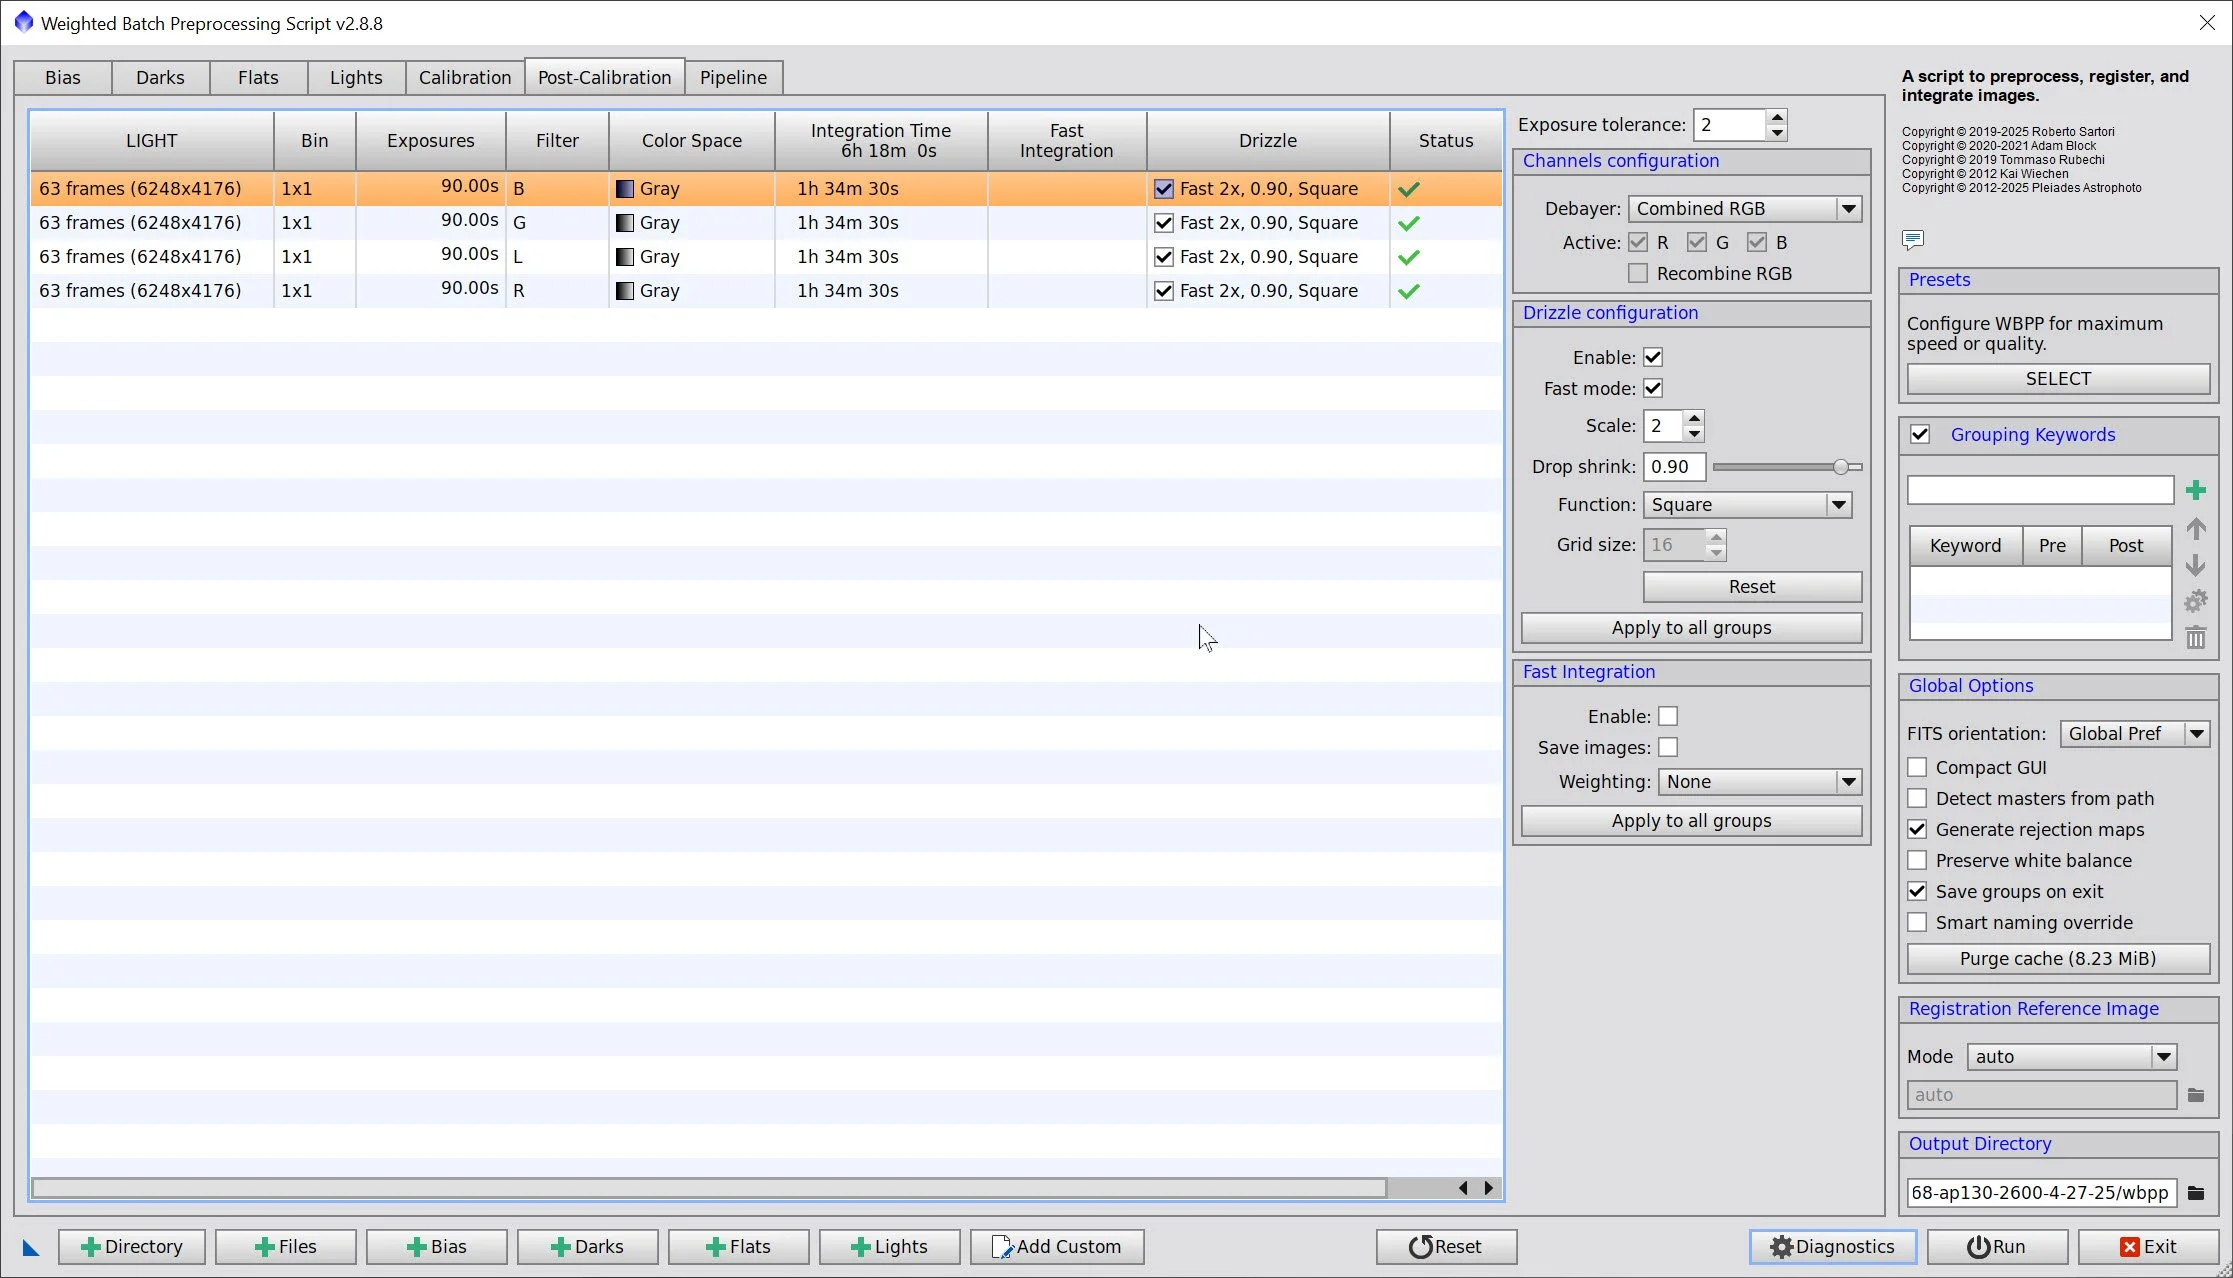
WBPP Post Calibration View

WBPP Pipeline View
3. Load Master Images
Load all master images and rename them.

Master L, R, G, & B images
4. Process Linear RGB data
Create the RGB color image with ChannelCombination
The gradients were mild, but with so little nebulosity, there was no trouble running DBE:
Set up the sample pattern as shown
Fix with subtraction
Run BXT correct-only. Best to fix any star issues before SPCC
SPCC and calibrate the color. Use the Ideal QE curve and ZWO RGB filters. See the panel setup below.
Run PFSIMage to get an idea of the star sizes. X = 5.40 Y = 5.11
After experimenting with BXT settings, I used 5.59 for non-stellar restoration, which was much larger than the PFSImage results.
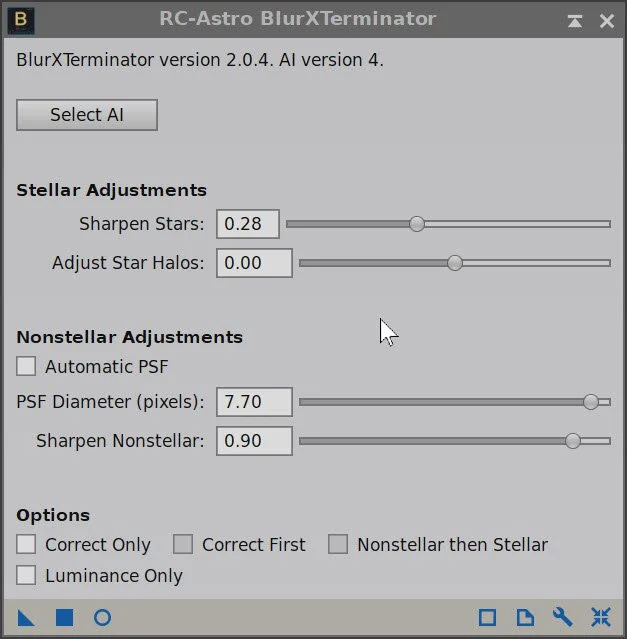
Run BXT Full correction - see settings used on the panel shot below.
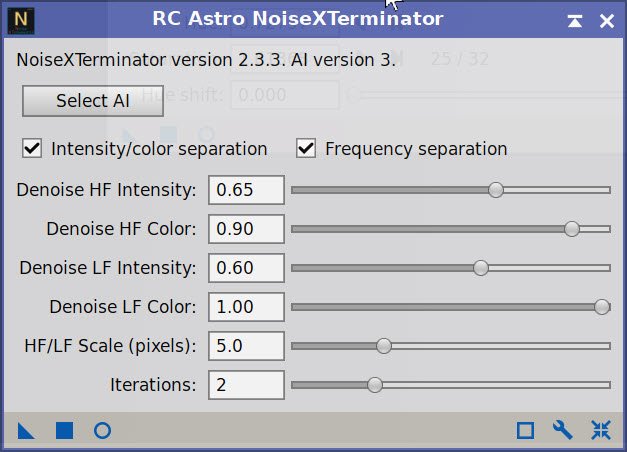
Apply NXT to remove noise. Be aggressive here, as I want smooth star edges. Used model 3 and settings shown in panel snapshot below.
Use STX with Saving Stars and Unscreen Stars selected to create RGB Stars and RGB Starless images. Set to large sample box size
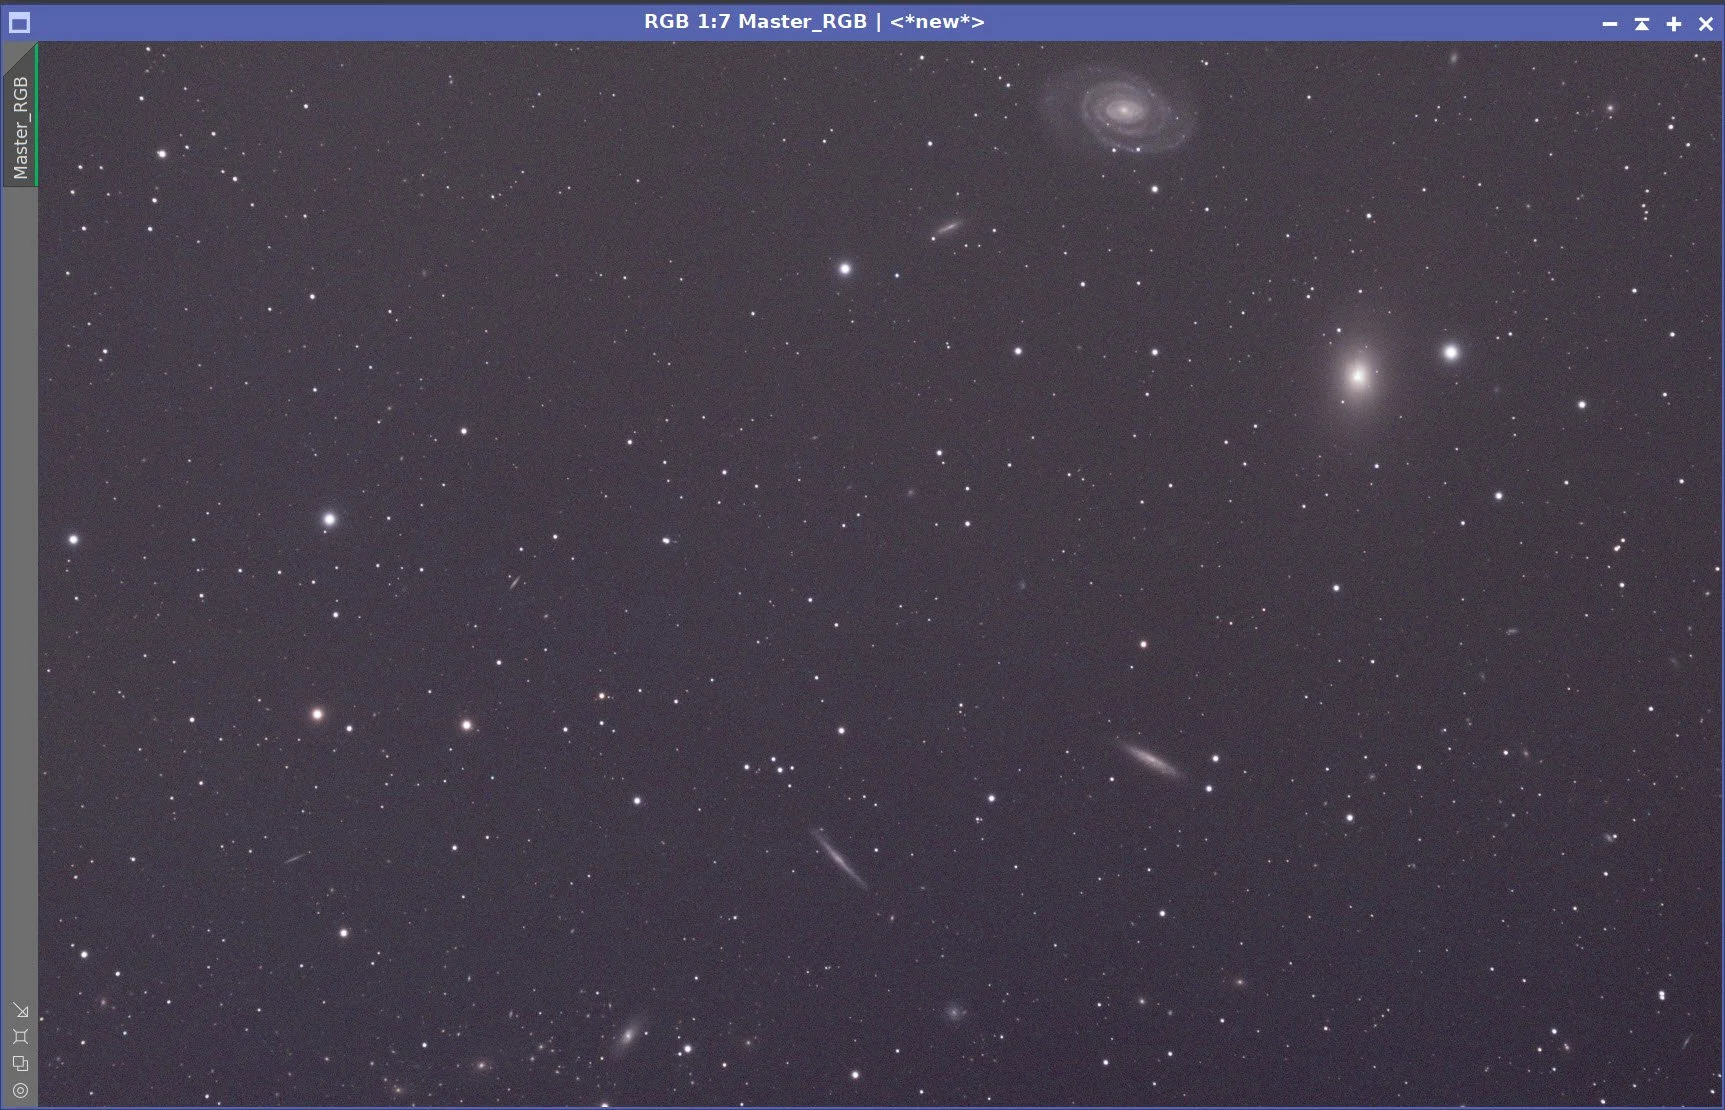
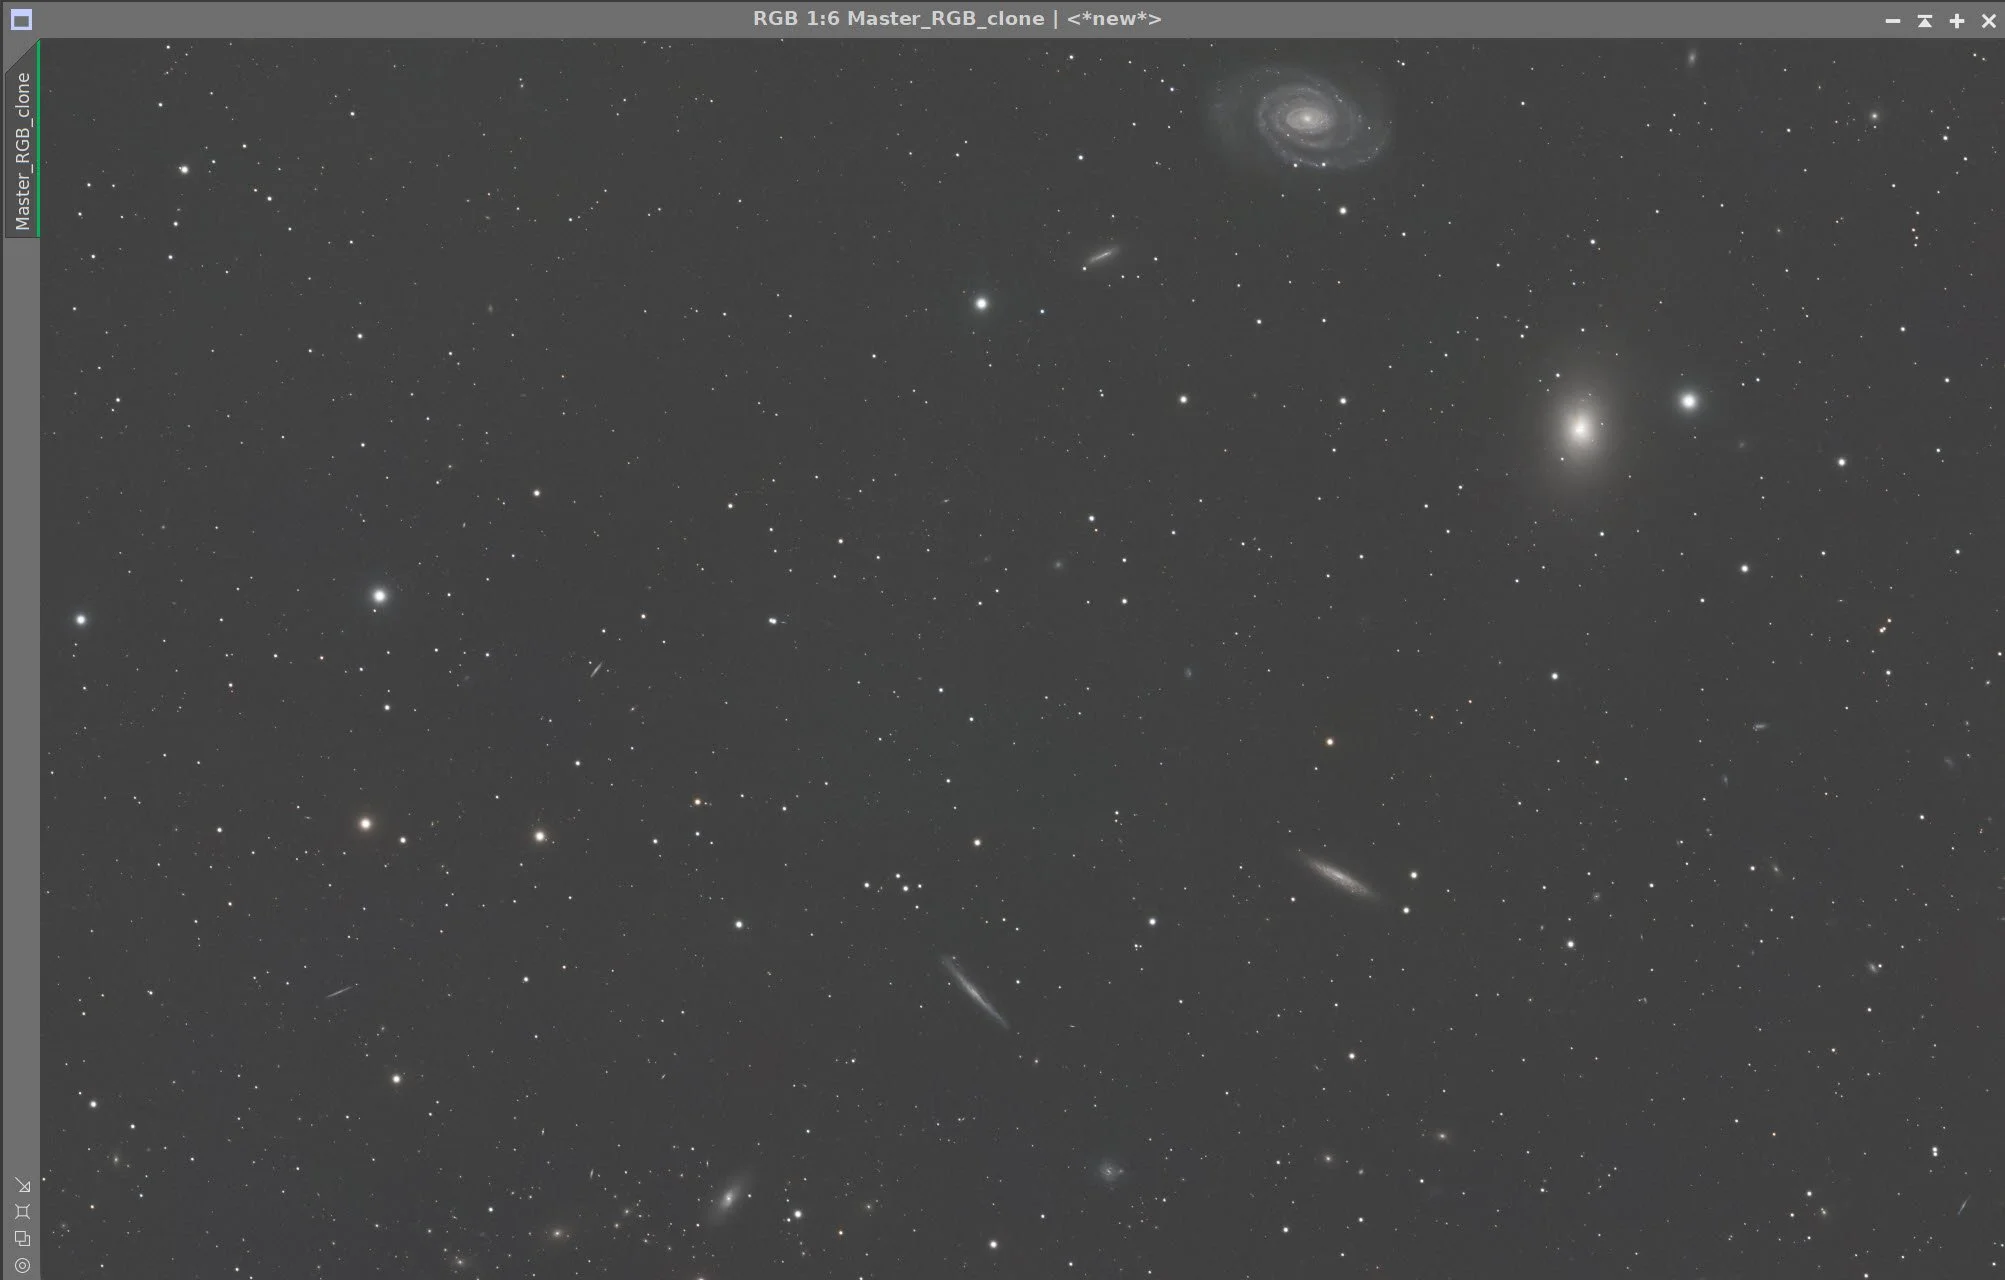
The initial RGB Linear Image.
Master RGB Sample Pattern (click to enlarge)
Master RGB Before DBE (click to enlarge)
Master RGB after DBE (click to enlarge)
Master RGB Background
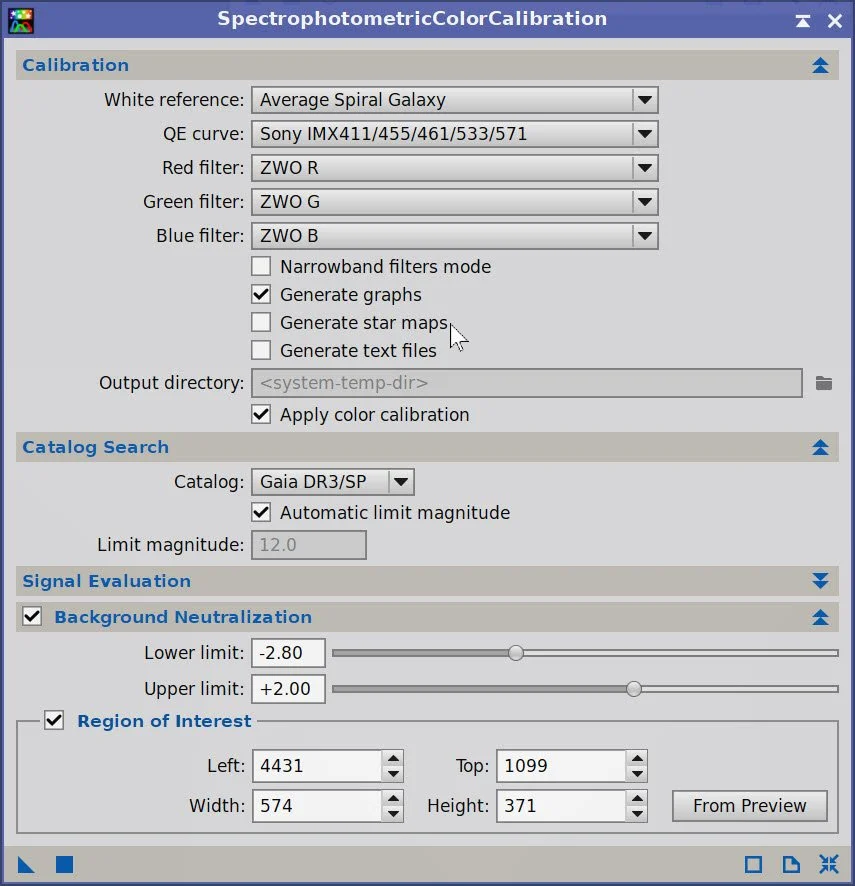
SPCC panel settings used.
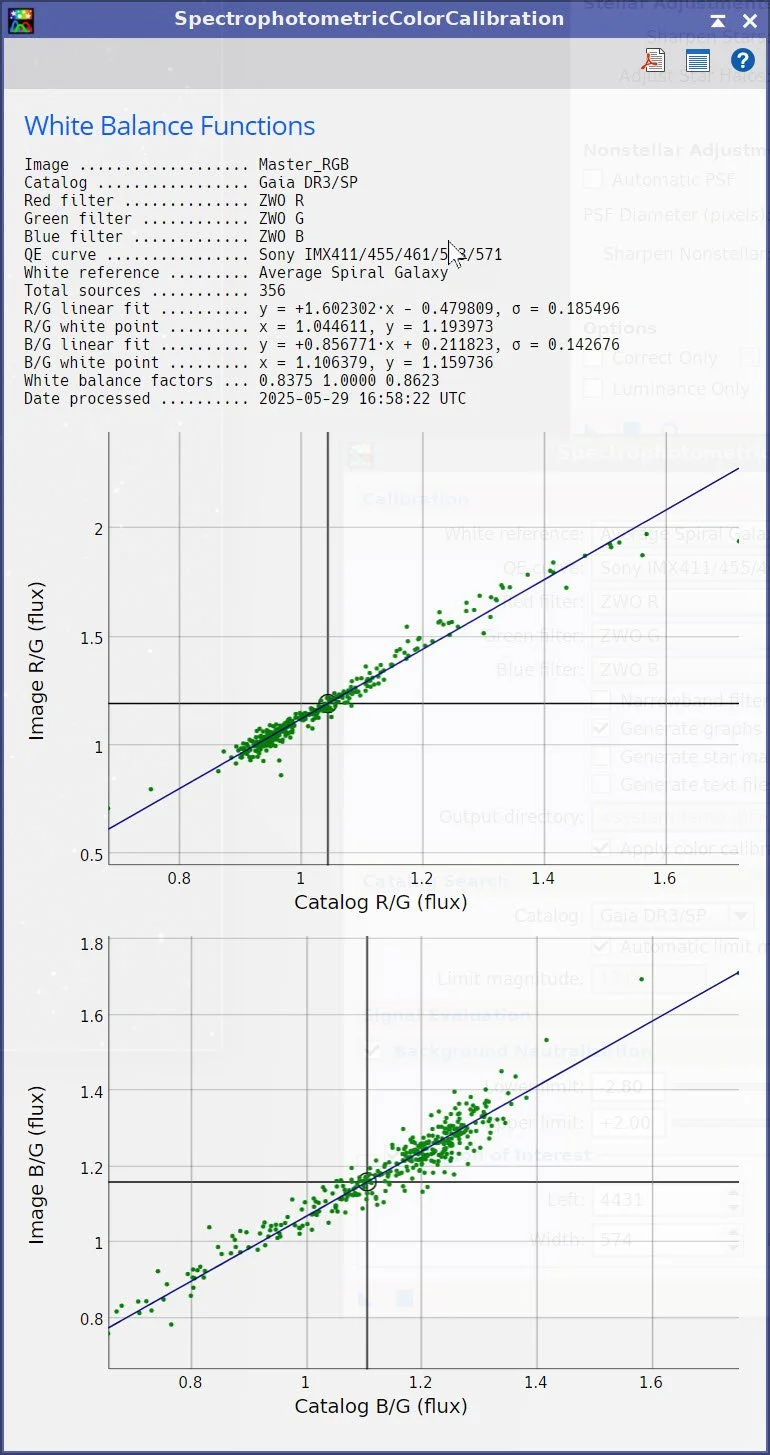
The final regression result.
Master_RGB before SPCC run. (click to enlarge)
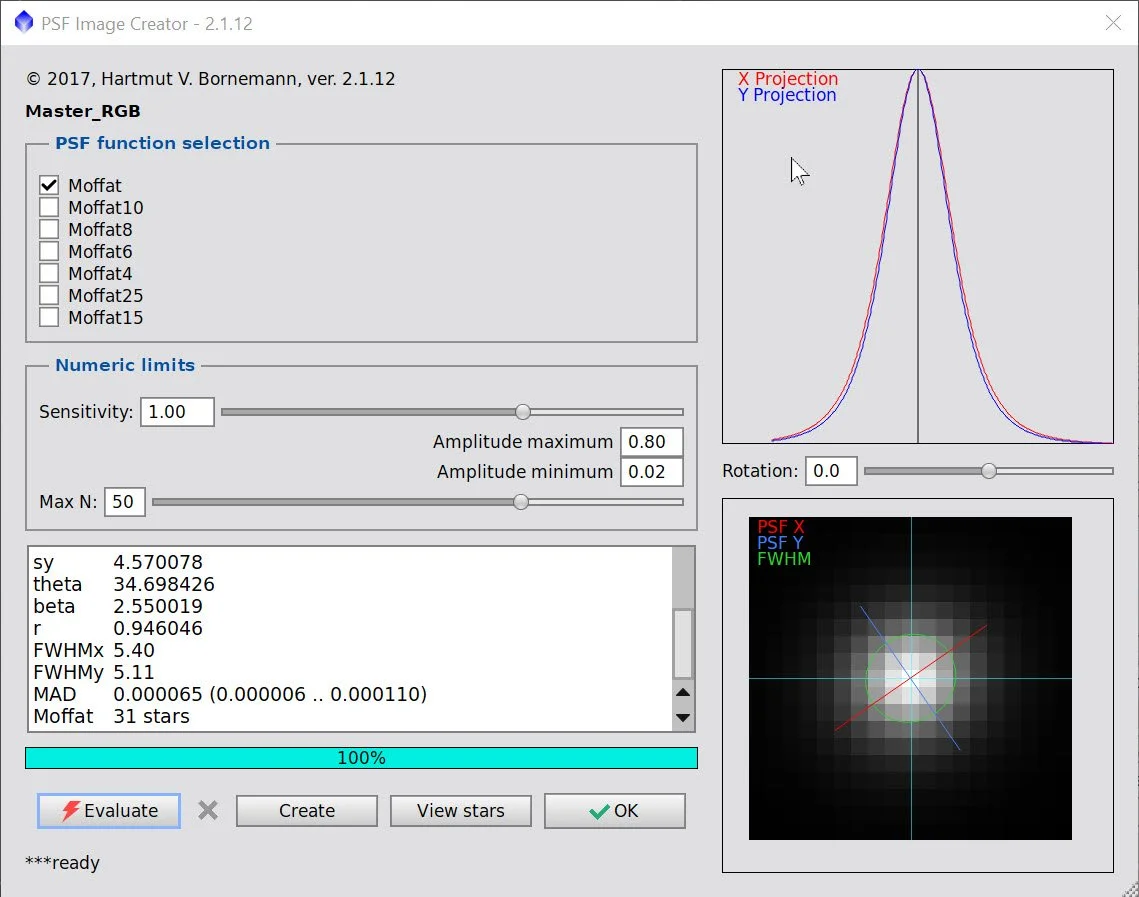
PFSImage Panel with results
Master_RGB after SPCC run (click to enlarge)

Final BXT settings used.

The NXT V3 parameters used.


The Master RGB Image before BXT, After BXT Correction only, After SPCC, After BXT Full Correction, and After NXT=0.7
Master_RGB before STX Star removal.
RGB Stars Image resulting from STX. (click to enlarge)
Master RGB Starless Image after STX (click to enlarge)
5. Process the Linear Lum Image
Run DBE
Start with the RGB sampling plan and then enhance
Use subtraction.
Run BXT Correct Only
Run PFSImage to get star sizes. X = 6.616 , Y= 5.90
Experiment with BXT settings for best results.
Run BXT Full using the star size of 6.8. Much higher than PFSImage star size. See the panel shot below.
Apply NXT - see the NXT Panel snap below.
Take each image starless with STX - use large sample box - no need to save the stars.
Final Master_L sampling plan.
Mastr Lum Before DBE (click to enlarge)
Master_L after DBE. (click to enlarge)
Master_L background removed. (click to enlarge)
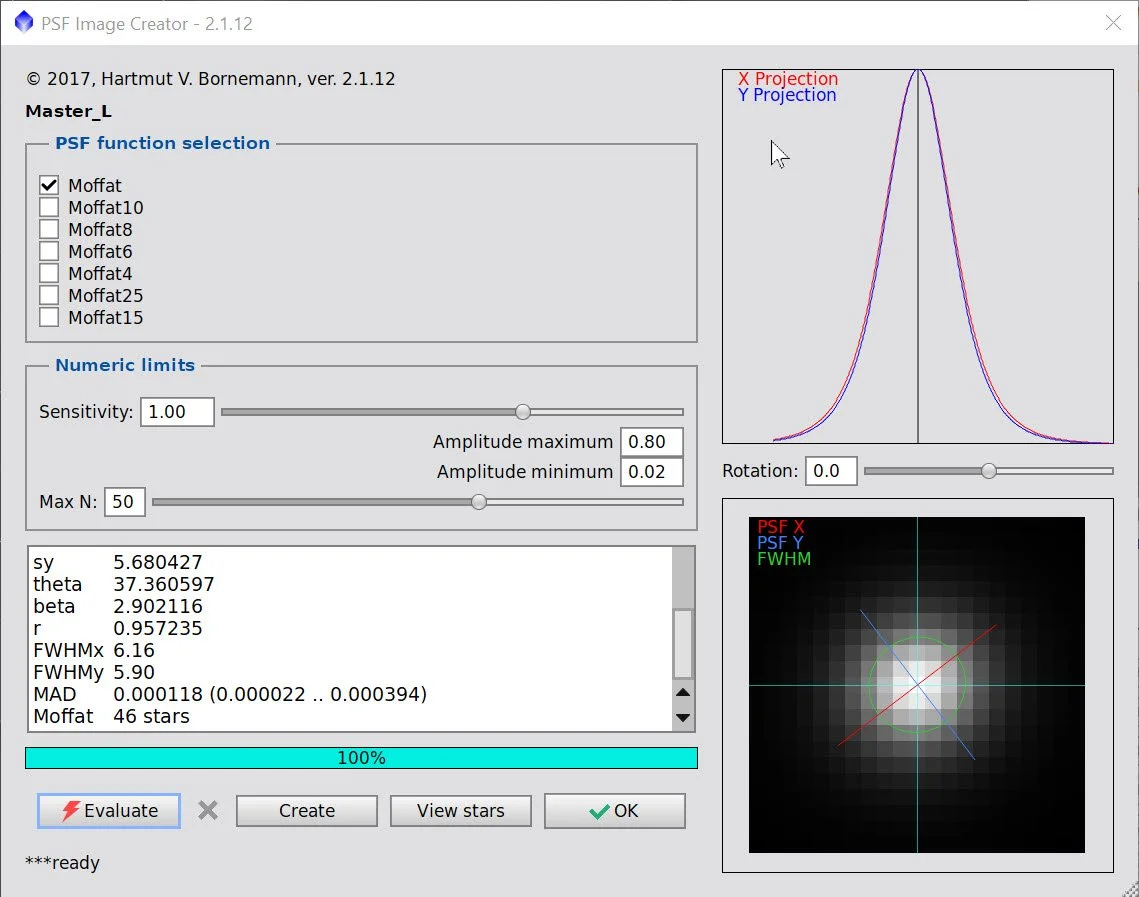
PFSImage results for Master L
Final BXT Params used.

Params used with NXT V3.


Master Lum Before BXT, After BXT Correct Only, and NXT v3
Master_L before Star Removal (click to enlarge)
Master L Starless. (click to enlarge)
6. Move Images to the Nonlinear State
For RGB Stars, use the StarStretch Script to create the initial nonlinear RGB stars image.
For RGB Starless, use the current STF->HT method to go nonlinear.
For the Lum image, use the current STF->HT method to go nonlinear.
Initial Nonlinear RGB Stars Image (click to enlarge)
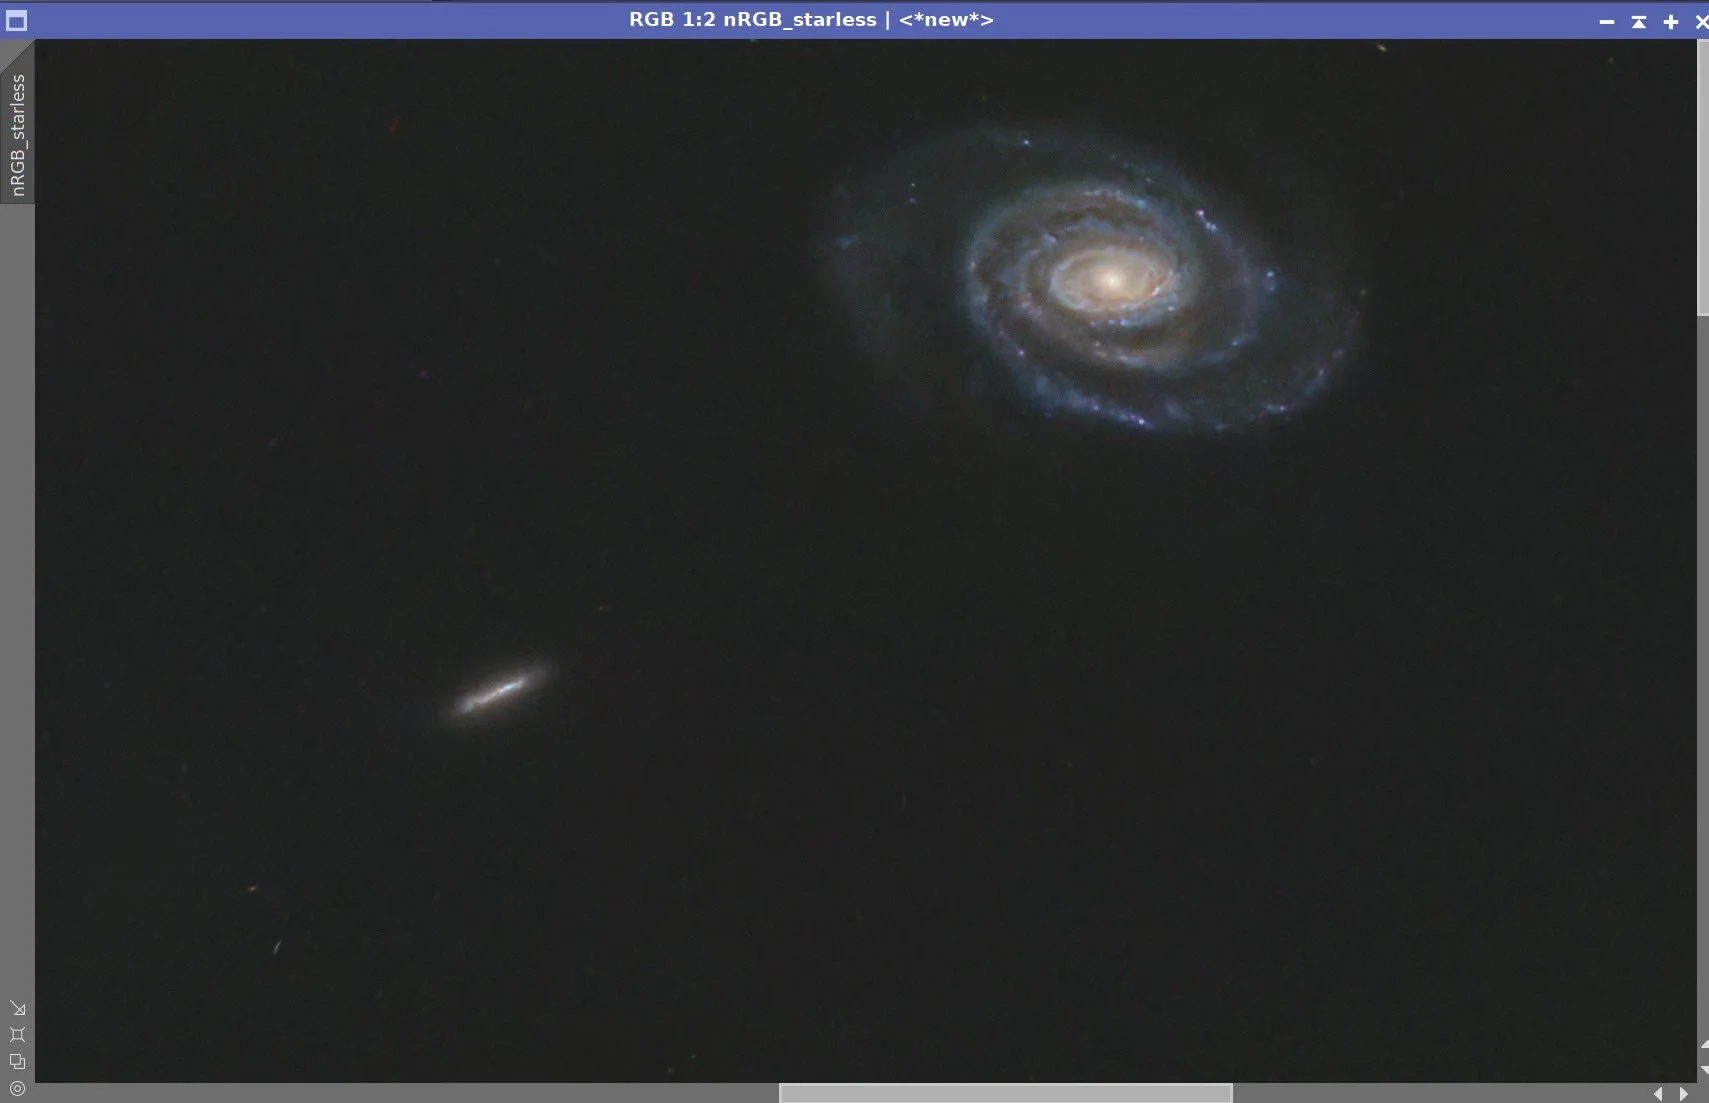
Initial Nonlinear RGB Starless image (click to enlarge)
Initial nonlinear Lum Starless Image (click to enlarge)
7. Process the Nonlinear RGB Stars Image
After going nonlinear, I applied SCNR for green to remove some slight green noise.
Then I used the CT tool to adjust brightness and Saturation until I am happy. Here is the final result.
Initial RGB Stars Image (click to enlarge)
After SCNR (click to enlarge)

Final Result.
9. Do the Processing of the Nonlinear Lum image
Apply the CT to get a nice starting contrast.
Create a Lum_mask by dragging the lum image and making a copy.
Then use CT to boost the contrast on the lum_mask
Apply the Lum_Mask and then apply LHE with scale of 90, contrast limit of 2.0, Amount of 0.15, and an 8-bit histogram
With the Lum_Mask still in place, apply LHE with scale of 300, contrast limit of 2.0, Amount of 0.10, and an 10-bit histogram
Do an MLT sharpen with the Lum mask in place (see panel screen snap for parameters)
Run DarkStructureEnhance Script with default parameters and no mask.
Do an NXT with the V3 parameters shown in the panel snapshot below.
Do a final CT to darken the image in preparation for combining with the RGB imag.e
The Initial Lum image (click to enlarge)
Lum_mask Image
Lum Mask in place. (click to enlarge)
After LHE with Lum_Mask (click to enlarge)
After MLT sharpen with Lum Mask (click to enlarge)
Aftr DarkStructureEnhance Script (click to enlarge)
Apply CT (Click to enlarge)
Lum_Mask after CT boost. (click to enlarge)
Zoomed image before first LHE operation applied. (click to elarge)
Apply second LHE with Lum Mask(click to enlarge)

Params used in the sharpening step
Parameters used in the last NXT V3.

After NXT3 (click to enlarge)
After CT to darken image (click to enlarge)
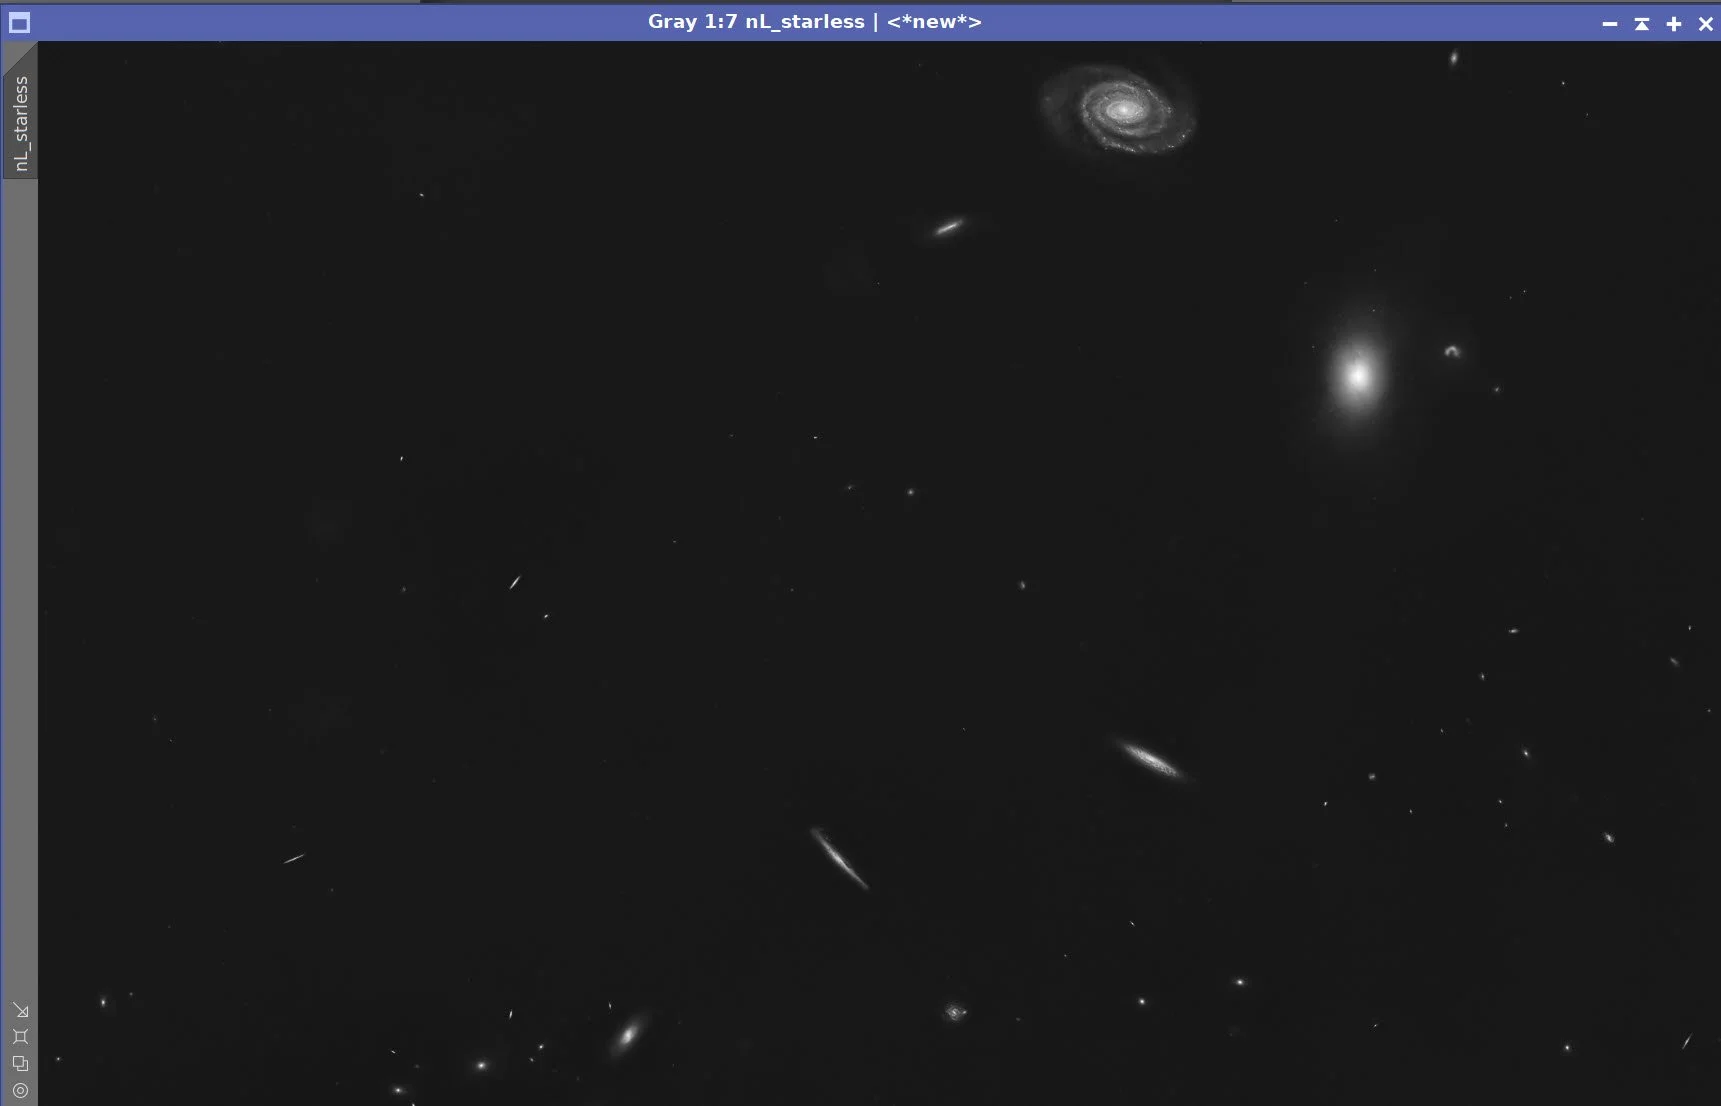
Final version of the nL_starless image.
10. Complete the Processing of the RGB Starless Image
Apply CT to adjust contrast and saturation.
Apply the lum_mask and then apply LHE with a scale of 100, a contrast limit of 2.0, an Amount of 0.18, and an 8-bit histogram.
Run ColorSaturation with the curve shown in the panel snap below.
Use NXT V3 to lower noise. See the panel shot for the parameters used.
Apply CT to tweak the tonescale
Using ChannelCombination in CIE Lab mode and just enabling the L layer. Use this to field the Lum image into the RGB Image
Initial RGB Starles image (click to enlarge)
Zoomed in to better see the next actions. (click to enlarge)
After ColorSaturation Adjustment (click to enlarge)
Apply NXT 3 (click to enlarge)
After CT (click to enlarge)
After LHE with the lum_msk applied(click to enlare)
Color Sat adjustments done (click to enlarge)
NXT V3 params used.
FInal LRGB image (click to enlarge)
11. Combine the RGB Starless with the RGB Stars Image
Use the ScreenStars script to add the RGB Stars back in
The RGB Stars Image (click to enlarge)
The Final Starless LRGB image (click to enlarge)
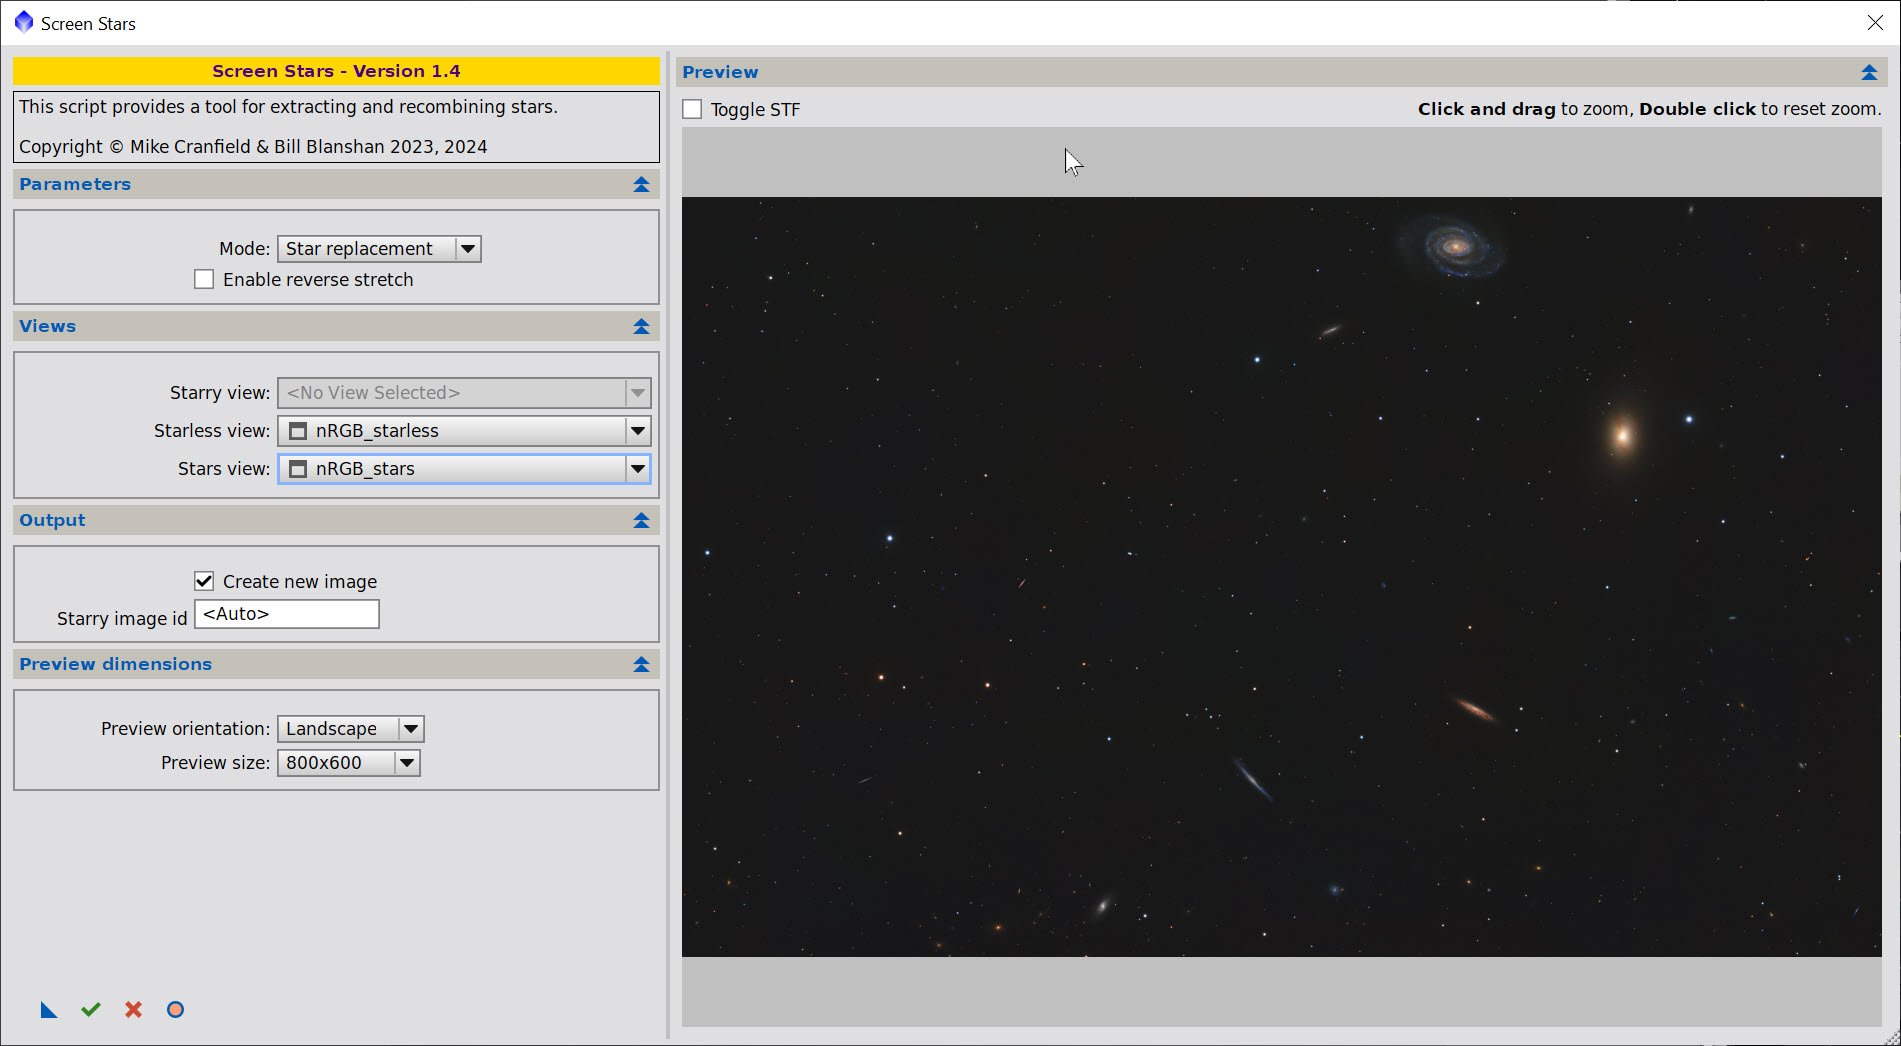
ScreenStars Panel.

The image with RGB Stars inserted!
14. Export the Image to Photoshop for Polishing
I am pretty happy with the image and ready to polish it in Photoshop.
Save the image as a TIFF 16-bit unsigned and move to Photoshop
Make final global adjustments with Clarify, Curves, and the Color Mixer
Select some feature areas with a lasso with a 100-pixel feather, and use clarity to tweak selected detail areas.
I did the final rotate and crop operation.
Added Watermarks
Export Clear, Watermarked, and Web-sized jpegs.

The Final Image!