
The Telescopes of Whispering Skies Observatory: Four Platforms, Side by Side
“Why four? One telescope is never enough. Eight is… a problem.”
Updated March 7, 2026
Viewing note
This post is table-heavy. I’ve made it work on smaller screens where possible, but it’s most readable on a full-size PC display.
The tables below are designed to make the trade-offs obvious: image scale, field of view, tolerance, and why each platform earns its spot.
Current state note (2026): This article reflects my current four-pier lineup. The AP130 platform was a major part of my imaging history, but it has now been replaced by the AP155.
Platform Overview

Table of Contents Show (Click on lines to navigate)
Summary
This page is the “why” behind my four-platform imaging setup. The goal is not variety for its own sake — it’s deliberate coverage across target size, field, and tolerance, while keeping the workflow consistent.
At a high level, the platforms currently form a clean ladder:
FRA400 (400 mm) — wide-field context: big nebula complexes, star fields, and composition-first imaging.
WO132 (739 mm) — general-purpose mid-scale: a dependable nebula and galaxy platform when target size is uncertain.
AP155 (810 mm) — a second mid-scale refractor with more aperture: when I want tighter framing than the WO132 without jumping all the way to the SCA260, and I still want that clean refractor look.
SCA260 (1300 mm) — small targets and tight framing: galaxies, groups, and anything where reach matters and mechanical discipline is non-negotiable.
Two design choices drive everything you’ll see below:
Stable foundations first. The piers are not cosmetic — they are the difference between repeatable performance and chasing variables night after night.
Standardize where it matters. Three platforms are built around the same APS-C mono camera class, so the math, framing, calibration, and processing behavior stay consistent even as focal length changes.This page is the “why” behind my four-platform imaging setup. The goal is not variety for its own sake — it’s deliberate coverage across target size, field, and tolerance, while keeping the workflow consistent.
Introduction
In May 2025, my Whispering Skies Observatory became operational. The exterior wasn’t fully complete, but enough was in place to make sense to install the rigs and start capturing data again.
At first, I brought over the three telescopes I had been using from the driveway. The observatory was built with a fourth pier, and before long, I made a deliberate choice for what belonged there — and the system became what it is today.
Each platform has its own detailed post, but this article is the missing piece: how the four work together, where each one wins, and why the differences are intentional. If you’re here for the quick version, jump straight to the platform links below—then come back for the deeper comparisons.
History
My first telescope was the William Optics 132mm FLT APO. It was my first scope, and it is still one of my favorites. I used it for a couple of years in its f/7 configuration, then added a flattener/reducer to bring it to its current f/5.6 configuration.
Shortly after that, I had an opportunity to acquire my second telescope: the Astro-Physics 130mm EDT Starfire. That acquisition has its own story (linked here):
The story behind how I got this scope
This was premium optics at a very reasonable price. I didn’t choose the focal length or aperture as part of a top-down plan — the opportunity presented itself, and I jumped on it.
Platform lineage (quick context): For years the AP130 was my “tight refractor” platform and it produced a lot of the work you’ll see across my galleries. The AP155 is now taking over that role on the pier. So: the AP130 still shows up in older projects and examples, while the AP155 is the current platform going forward.
The Askar FRA400 was originally purchased as a portable scope. I didn’t end up using it that way, but it turned out to be a perfect wide-field platform — the one that lets me capture targets that are simply too large to do cleanly with the longer systems.
The Sharpstar SCA 260 V2 was a very conscious choice. I wanted a longer focal length for chasing galaxies, but I also wanted a fast scope. In that sense, the SCA260 V2 is unique. A fast, long focal length astrograph.
The current configuration for each platform is linked next. If you only want the hardware details, start there—then come back for the “why” behind the comparisons.
Corrected reflector for tight framing and small galaxies—built for stiffness and repeatability.
The “reach” refractor now running at 810mm—more aperture and tighter framing than the WO132, with classic refractor rendering.
My dependable mid-scale platform when target size is uncertain—predictable night to night.
Big targets and rich star fields—wins on field size and composition, not raw aperture.
Prior “reach” refractor platform. Kept here as the historical reference configuration and for archived project context.
Current State
I have four piers in the observatory, which I refer to as the NW, NE, SW, and SE piers.
The southern piers are more limited in how low they can go before a scope runs into trees or the observatory wall. The northern piers have the best access to low targets toward the south.
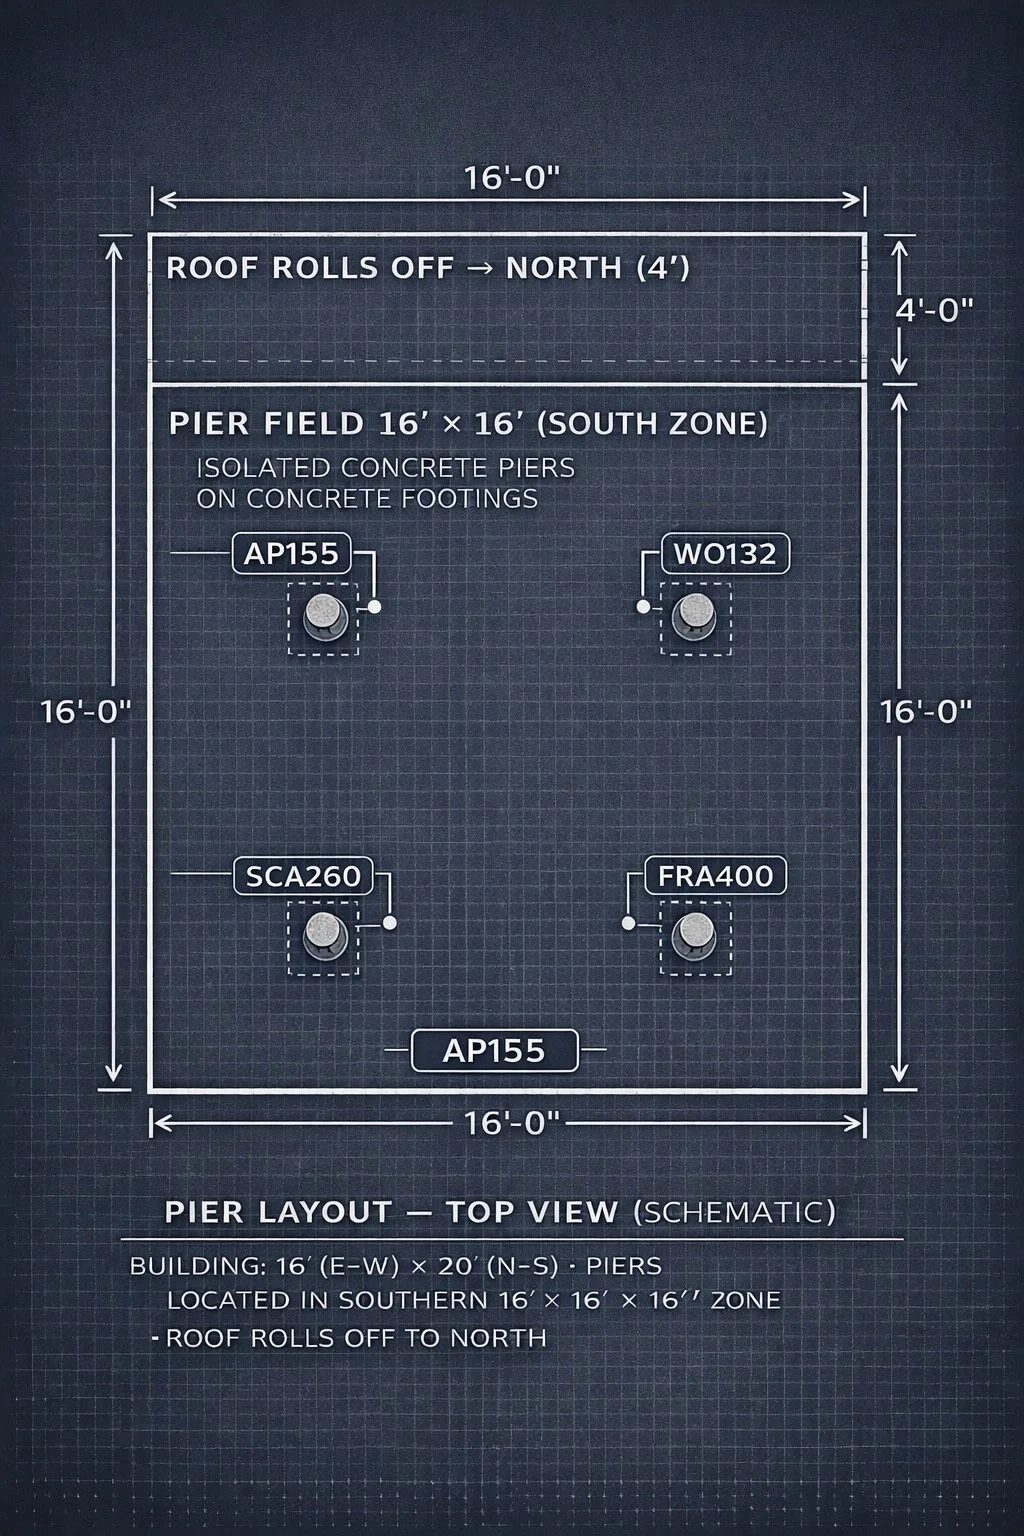
Pier layout (top view) — Building footprint (16′ × 20′) with the southern 16′ × 16′ pier field and platform assignments; roof rolls off to the north.
SW: SCA260 — I expect higher-elevation work here, so I’m looking through the least atmosphere.
SE: FRA400 — wide-field platform; planned pier extension reduces low-altitude constraints.
NW: AP155/ NE: WO132 — generalist refractors with the best access to low southern targets.
Why I’m not worried about low-north access:
Targets rotate around Polaris — if something is low, I can usually wait until it climbs.
Low northern sky also tends to sit in the Rochester light dome, so it’s rarely where my best work happens anyway.
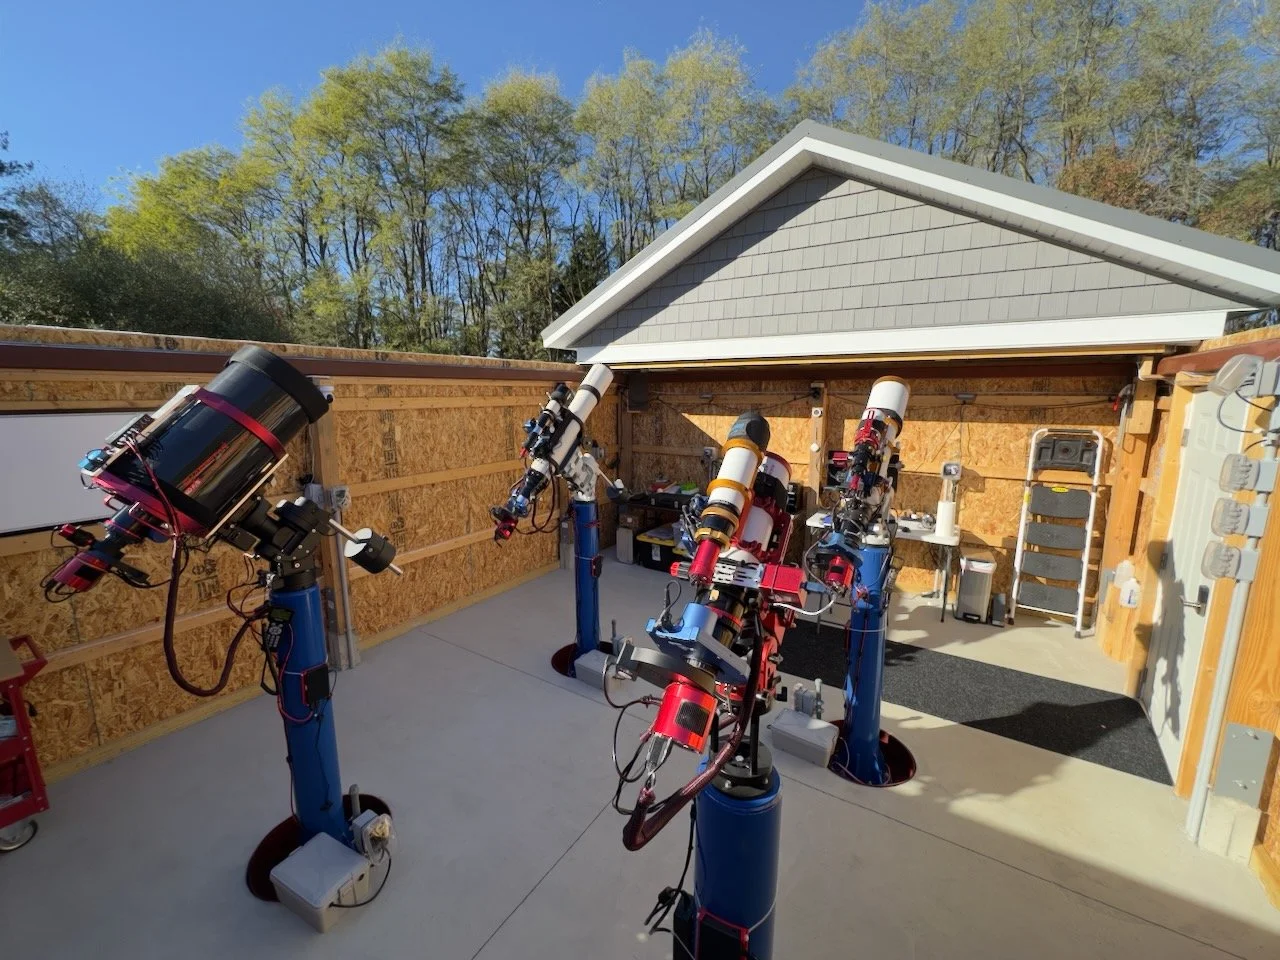
Looking north inside my Whispering Skies Observatory. All four scopes sitting on their piers!
Mounts (Mechanical Backbone)
Mounts are the mechanical backbone of each platform — they set the ceiling for star shape, repeatability, and how hard you have to work to get a clean integration.
But the mount is only half the story. Every system sits on a heavy-duty custom steel pier, which removes a whole class of problems: tripod flex, settling, seasonal re-leveling, and the “mystery drift” you get when the ground or a tripod leg becomes part of the system.
With the piers in place, the mount is working on a stable foundation, which is exactly what you want when you’re chasing consistent performance night after night.
With the foundation and mount strategy established, the rest of the portfolio analysis is straightforward: I’m going to walk through the key dimensions that actually drive outcomes — optical design, image scale, sensor choice, rotation strategy, and guiding architecture.
With the pier problem essentially solved up front, the differences you see in this table are mostly about matching mount capacity and tracking tolerance to each platform’s focal length and sampling regime.
A Comparison and Analysis of the Four Platforms
Looking at the Capability Now in Place
From here on, I’m treating the four platforms as a single system. Each section looks at one critical dimension — and why that dimension matters more (or less) depending on focal length, sampling, and tolerance.
A) Optical Style and Design Philosophy
First, let’s look at the fundamental optical design of these instruments. These four instruments are not redundant. They are intentionally different optical solutions to different problems.
Optical architecture drives field correction, tolerance to tilt/collimation, and how much “fuss factor” it takes to keep a system delivering.
Askar FRA400
- Flat field by default — widefield is the native behavior
- Composition and “big structure” targets in one frame
- More forgiving than long-FL reflectors when conditions aren’t perfect
William Optics FLT 132
- Classic refractor look: clean stars and predictable behavior
- A strong “daily driver” platform for mixed target selection
- Accessory-driven flexibility (reducers/flatteners as needed)
Astro-Physics AP155 (EDFS)
- More refractor headroom: aperture + contrast working together
- “Reach with manners” — tighter framing without the reflector workflow
- Flexible personality with reducers/flatteners when you want to change the pace
Sharpstar SCA260 V2
- Reach and speed for small galaxies, groups, and tight framing
- Corrected performance when the mechanical/optical chain is dialed in
- Exposure economics refractors can’t match at the same framing
This portfolio is intentionally diverse because optical design is not just an academic detail — it dictates field correction, tolerance to tilt/collimation, and how much “fuss factor” it takes to keep a system delivering.
The FRA400 is the wide-field specialist because the correction is baked into the design. That matters. It means the flat field is the default behavior, not something you bolt on later with a flattener and a stack of adapters. In practice, that translates into fast wide-field composition and big-structure targets — with a workflow that is generally forgiving compared to long-focal-length reflectors. The trade is straightforward: 72mm is not about raw reach. It wins with field size and convenience, not small-target capability.
The WO132 and AP155 are both triplet refractors with similar specs. The WO132 is classic “mid-aperture refractor territory” with accessory-driven flexibility — reducers and flatteners let you tune it to the target class, and when spacing and tilt are handled correctly, it delivers the clean stars and predictable behavior people expect from a good APO. The AP155is my high-confidence refractor: tighter framing with refractor behavior, excellent contrast, and stable performance session to session. Astro-Physics confirmed by serial number that my objective is oil-spaced, and that shows up in the consistent rendering. The cost is speed. It is not “fast,” and in deep sky that matters — you pay for that rendering in exposure economics.
Then there’s the SCA260, which lives in a different world. It’s a corrected reflector built to deliver reach and speed for small galaxies, groups, and tight framing — and it earns its keep exactly there. The flip side is that “good enough” setup practices stop being good enough. Collimation, tilt control, and mechanical rigidity matter most on this platform because the optical design will reveal every weakness upstream. When it’s dialed in, the performance is unmatched in the portfolio at that framing. When it isn’t, the system tells you immediately.
That’s the point of this coverage strategy. These are not four versions of the same idea — they are four fundamentally different approaches that let me choose the right tool based on target size, composition goals, and how much tolerance the night (and my patience) can afford.
B) Aperture (Diameter) and What It Actually Changes
Aperture is not just a bragging metric. It drives two practical things: resolution potential (seeing-limited most nights, but still) and signal collection (especially on small, dim targets when you’re already working at long focal length).
My AP130 and WO132 platforms have obviously similar diameters, while the FRA400 is much smaller, and the SCA260 is much larger.
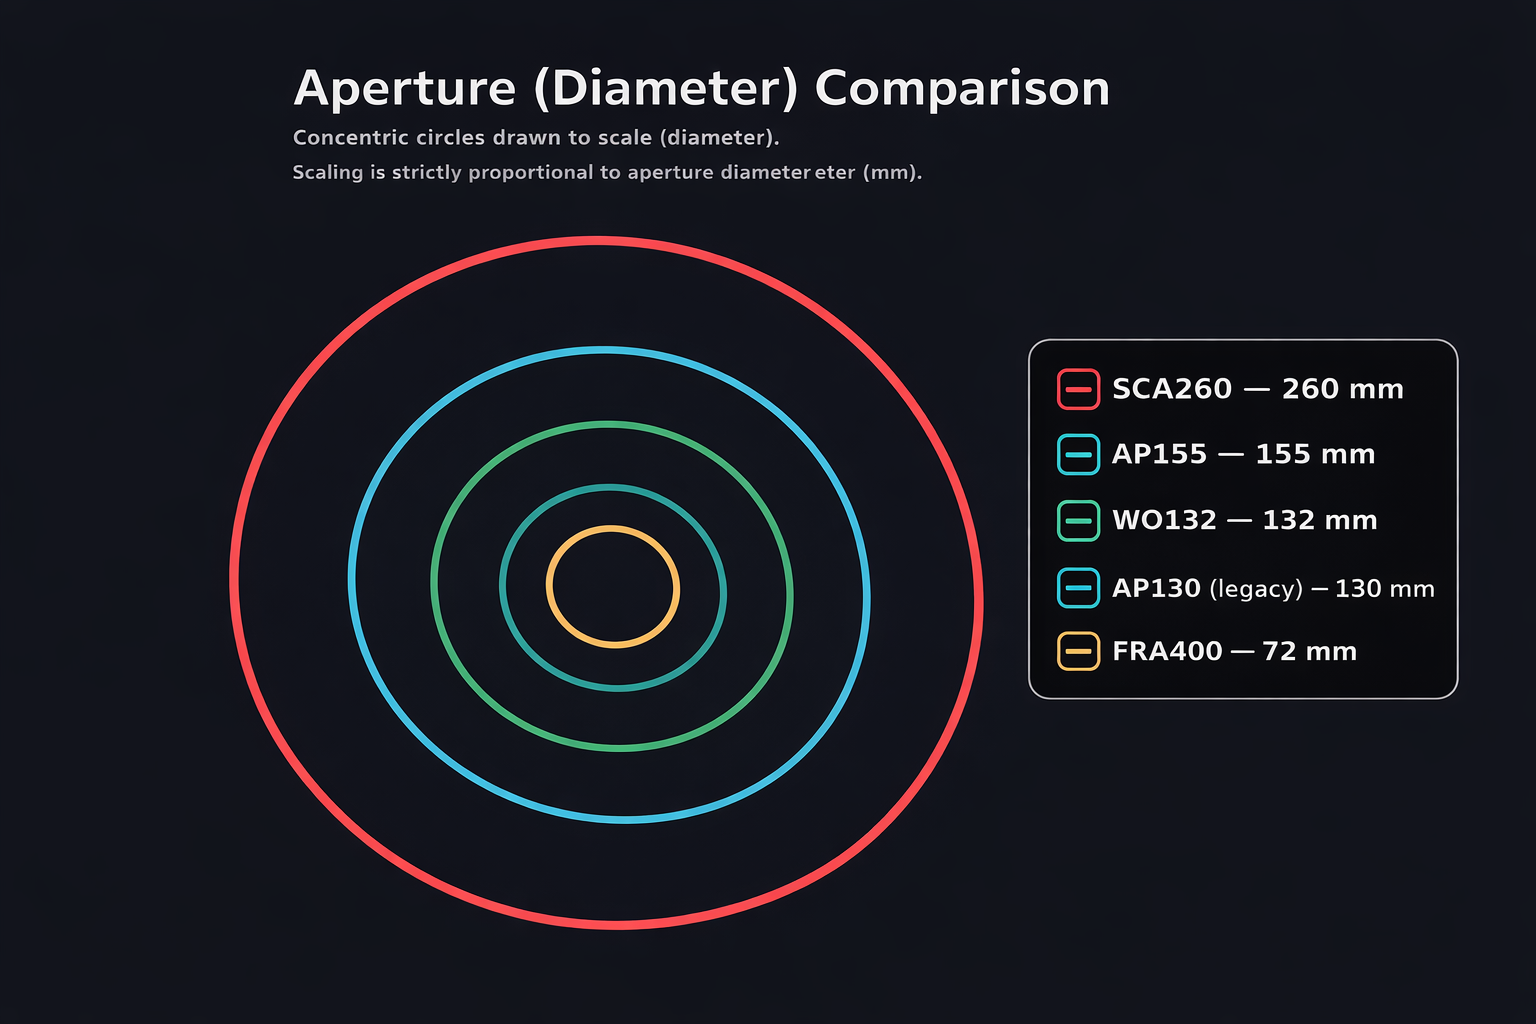
A scaled comparison of the diameters of my scopes. Note that the AP130 and the WO132 are so close in size that they blend together in this representation.
The SCA260 lives in a different league on raw light-gathering: about 13× the capture area of the FRA400. That’s exactly why it dominates the small-target / “reach” work. When the target is small, faint, and detail is the point, aperture buys you margin.
The AP155 is the big refractor step. It sits clearly above the WO132 (and far above the FRA400) in capture area and theoretical Dawes limit — which is why it earns the “refractor reach” role: more photons, tighter diffraction math, and still the clean refractor look.
The WO132 remains the mid-scale generalist. It’s not trying to win an aperture contest — it wins by being predictable, flexible, and efficient for the targets that don’t justify the complexity of the SCA260 or the heavier reach of the AP155.
And the FRA400 is honest about what it is: small aperture by design, trading raw reach for wide-field composition and convenience. The Dawes column is included as a sanity check, but for deep-sky it’s mostly academic — seeing, sampling, and guiding decide how much of that theoretical resolution you actually get to keep.
Legacy note: the AP130 lives at the same general diameter class as the WO132, so the real differentiation there was never aperture — it was focal length, speed, and system behavior in practice. It stays on the page as a reference for past results, not as a current rung in the ladder.
Bottom line: if the target is small and faint and you want detail, the 260mm system is the one that can justify the effort. If you want “reach” but in a refractor package, that’s where the AP155 earns its keep. And if the target is about context and framing, the FRA400 wins — because it’s built for that job.C) Focal Length (Framing and Target Selection)
This is a clean, deliberate ladder from wide to tight. There’s no awkward gap, and there’s no pointless overlap.
D) f/ratio (speed vs tolerance)
Here’s how I interpret this in practice:
The f/5–f/5.6 systems are my efficiency engines. When I’m trying to build signal quickly—especially in narrowband—those faster optics get me to a satisfying SNR in fewer nights, and they’re simply easier to justify when transparency or seeing is only “decent.”
The AP155 changes the story in a good way. It gives me that premium refractor look—clean stars, high contrast, and predictable correction—without the same speed penalty I lived with on the old long f/ratio workflow. In other words, it keeps the refractor rendering I care about, while moving that “reach refractor” slot closer to the pace of the rest of the portfolio.
The AP130 (Legacy) is still worth acknowledging, because it taught me the lesson the numbers make obvious: at roughly f/8.35, it simply can’t compete on speed. On extended targets, you can be looking at 2–3× more integration than an f/5 system to reach comparable depth per pixel. And in my weather, that matters—if I only get one clear night, the AP130 capture is often well behind what the other platforms can produce in the same time.
So the practical takeaway is simple: the fast systems do the heavy lifting most nights, the AP155 covers the “refractor reach” slot without making me pay an absurd time tax, and the AP130 remains a respected legacy platform—just not one I can justify running as a primary engine under typical upstate skies.
E) Field of view and image scale (what the camera actually “sees”)
If you understand one thing about this portfolio, it should be this: image scale is where the tolerance regime changes. The farther you move toward tight sampling, the more every mechanical and optical detail gets amplified.
Using the defined sensors and pixel sizes:
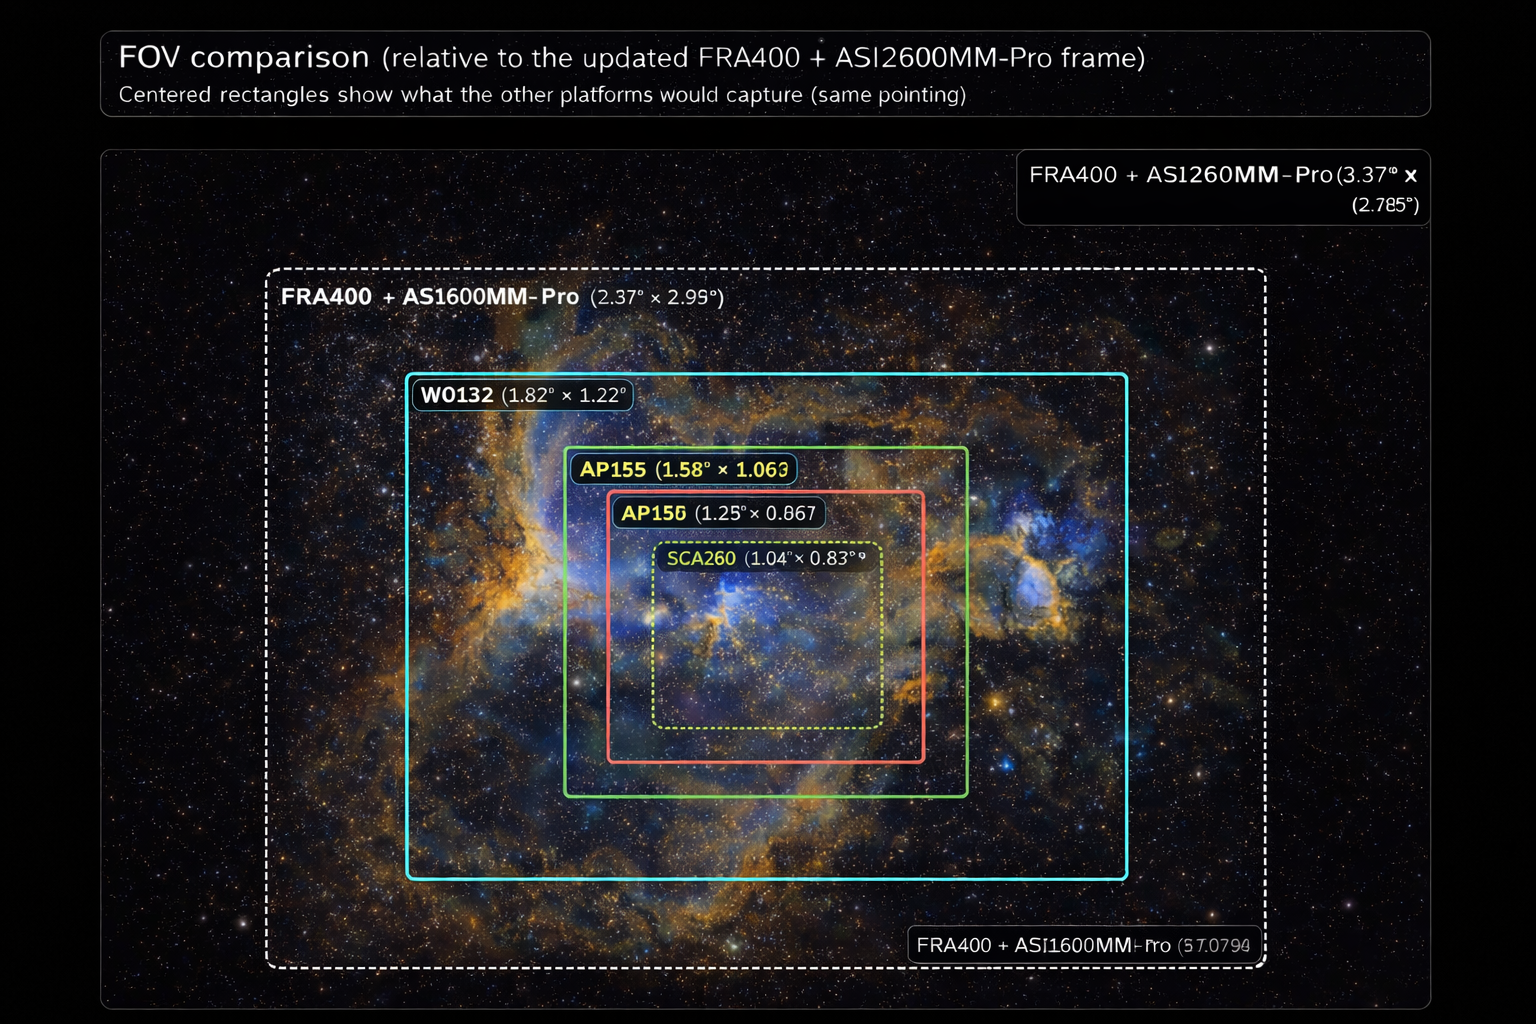
This image was taken with the FRA400 platform using the ASI1600MM-pro camera. However, this platform has just been upgraded to the ASI2600MM-Pro Camera. The larger sensor captures a large FOV which is now represented by the larger black square.
Here’s how I interpret these charts in the real world—where framing drives both target selection and composition:
This is where the portfolio stops being “four scopes” and starts behaving like a deliberate coverage ladder.
SCA260 isn’t “a little tighter” than the refractors—it’s in a different framing class. When the target is small and the composition needs to feel intentional (galaxies, groups, tight nebula cores), this is the reach tool.
AP155 is the new rung beneath that: still on the tighter side, but with premium refractor behavior—clean stars, strong contrast, and the kind of consistency that lets you focus on the target instead of the hardware. It’s my refractor choice when I want detail without reflector fuss.
WO132 is the true generalist. It lives in the sweet spot where a lot of nebulae and mid-sized galaxies fit naturally—detailed enough to feel “close,” but not so tight that framing becomes a constant constraint.
FRA400 is the big-sky platform: wide structures, full-region context, and fast, forgiving composition work.
And AP130 (Legacy) still matters here. It earned its place in the portfolio history—and it’s useful as a reference point in these charts because it shows where my older “tight refractor” slot lived before the AP155 took over.
F) Camera capability (sensor class and what it implies)
Next is the deliberate standardization choice: I’ve kept three platforms in the same APS-C mono camera class, the ASI2600MM-Pro, so I’m not relearning calibration behavior and processing cadence every time I swap focal length.
The last platform to be upgraded was the FRA400. Until very recently, this platform was using the ASI1600MM-Pro.
Now that all platforms are using the same camera, we can explore the specs of this camera and show how they have improved from the previous ASI1600MM-Pro model.
This chart captures why I treat these two cameras as different generations, not minor variants.
The ASI2600MM-Pro is the baseline I’ve standardized on because it gives me more of everything that matters in deep-sky work: more pixels across the frame (real resolution headroom), much more full-well capacity (better tolerance for bright cores and star control), and a more modern readout / dynamic range feel that holds up when I start pushing processing. Add in the higher QE and the “zero amp-glow” behavior, and it’s simply a cleaner, more efficient imaging engine per hour—especially on nights that are decent but not perfect.
The ASI1600MM-Pro can still deliver strong results and has earned its place, but it’s clearly built on older architecture: less full-well headroom, lower resolution, and greater reliance on calibration discipline to keep everything tidy. That’s why three platforms live on the 2600 class now, and why the 1600 is a transition platform in this lineup rather than the long-term standard. Another problem I have seen with the ASI1600MM-Pro is micro-lensing artifacts around bright stars. This can really mess up an image, and the artifacts are hard to correct for in processing.
While I have gotten good images with the 1600 series camera, I am very happy to have upgraded to a 2600 series camera.
Once the sensor and pixel scale are set, the next practical question is: can I control framing and repeat it—without adding mechanical risk?
G) Camera Rotators
Rotation is a workflow decision, not a badge of sophistication. On some platforms, it buys efficiency and repeatability; on the SCA260, I intentionally trade that convenience for stiffness and fewer failure modes.
Rotators are part of the imaging train, not the mount, and I treat them like a framing and repeatability tool—not a luxury accessory.
When you’re building a portfolio that spans wide nebula complexes through tight galaxy work, the ability to set orientation deliberately (and return to it later) is a real productivity gain. But rotators also add a mechanical interface to the camera stack, so they’re not “free.”
On the platforms where framing flexibility matters most, I use them. On the platform where mechanical simplicity matters most, I don’t.
On the FRA400, WO132, and AP155 a rotator pays for itself: it makes composition intentional, it makes multi-night projects repeatable without guesswork, and enables flat frames to be collected when needed.
The SCA260 is the exception by design.
That platform runs an OAG and lives in the tightest tolerance regime of the four systems. Every extra joint in the train is another opportunity for tilt, sag, cable torque, or a spacing surprise—exactly the kind of friction that shows up as star shape problems at 1300mm.
And for galaxy work, rotation usually isn’t the constraint; galaxies tend to sit near the center of the field, and orientation is rarely the reason a project succeeds or fails. So I kept the SCA260 camera side intentionally simple: fewer interfaces, fewer variables, more stability.
H) Sampling characteristics under a common seeing assumption
This is where the numbers keep you honest. Using 2.5″ seeing:
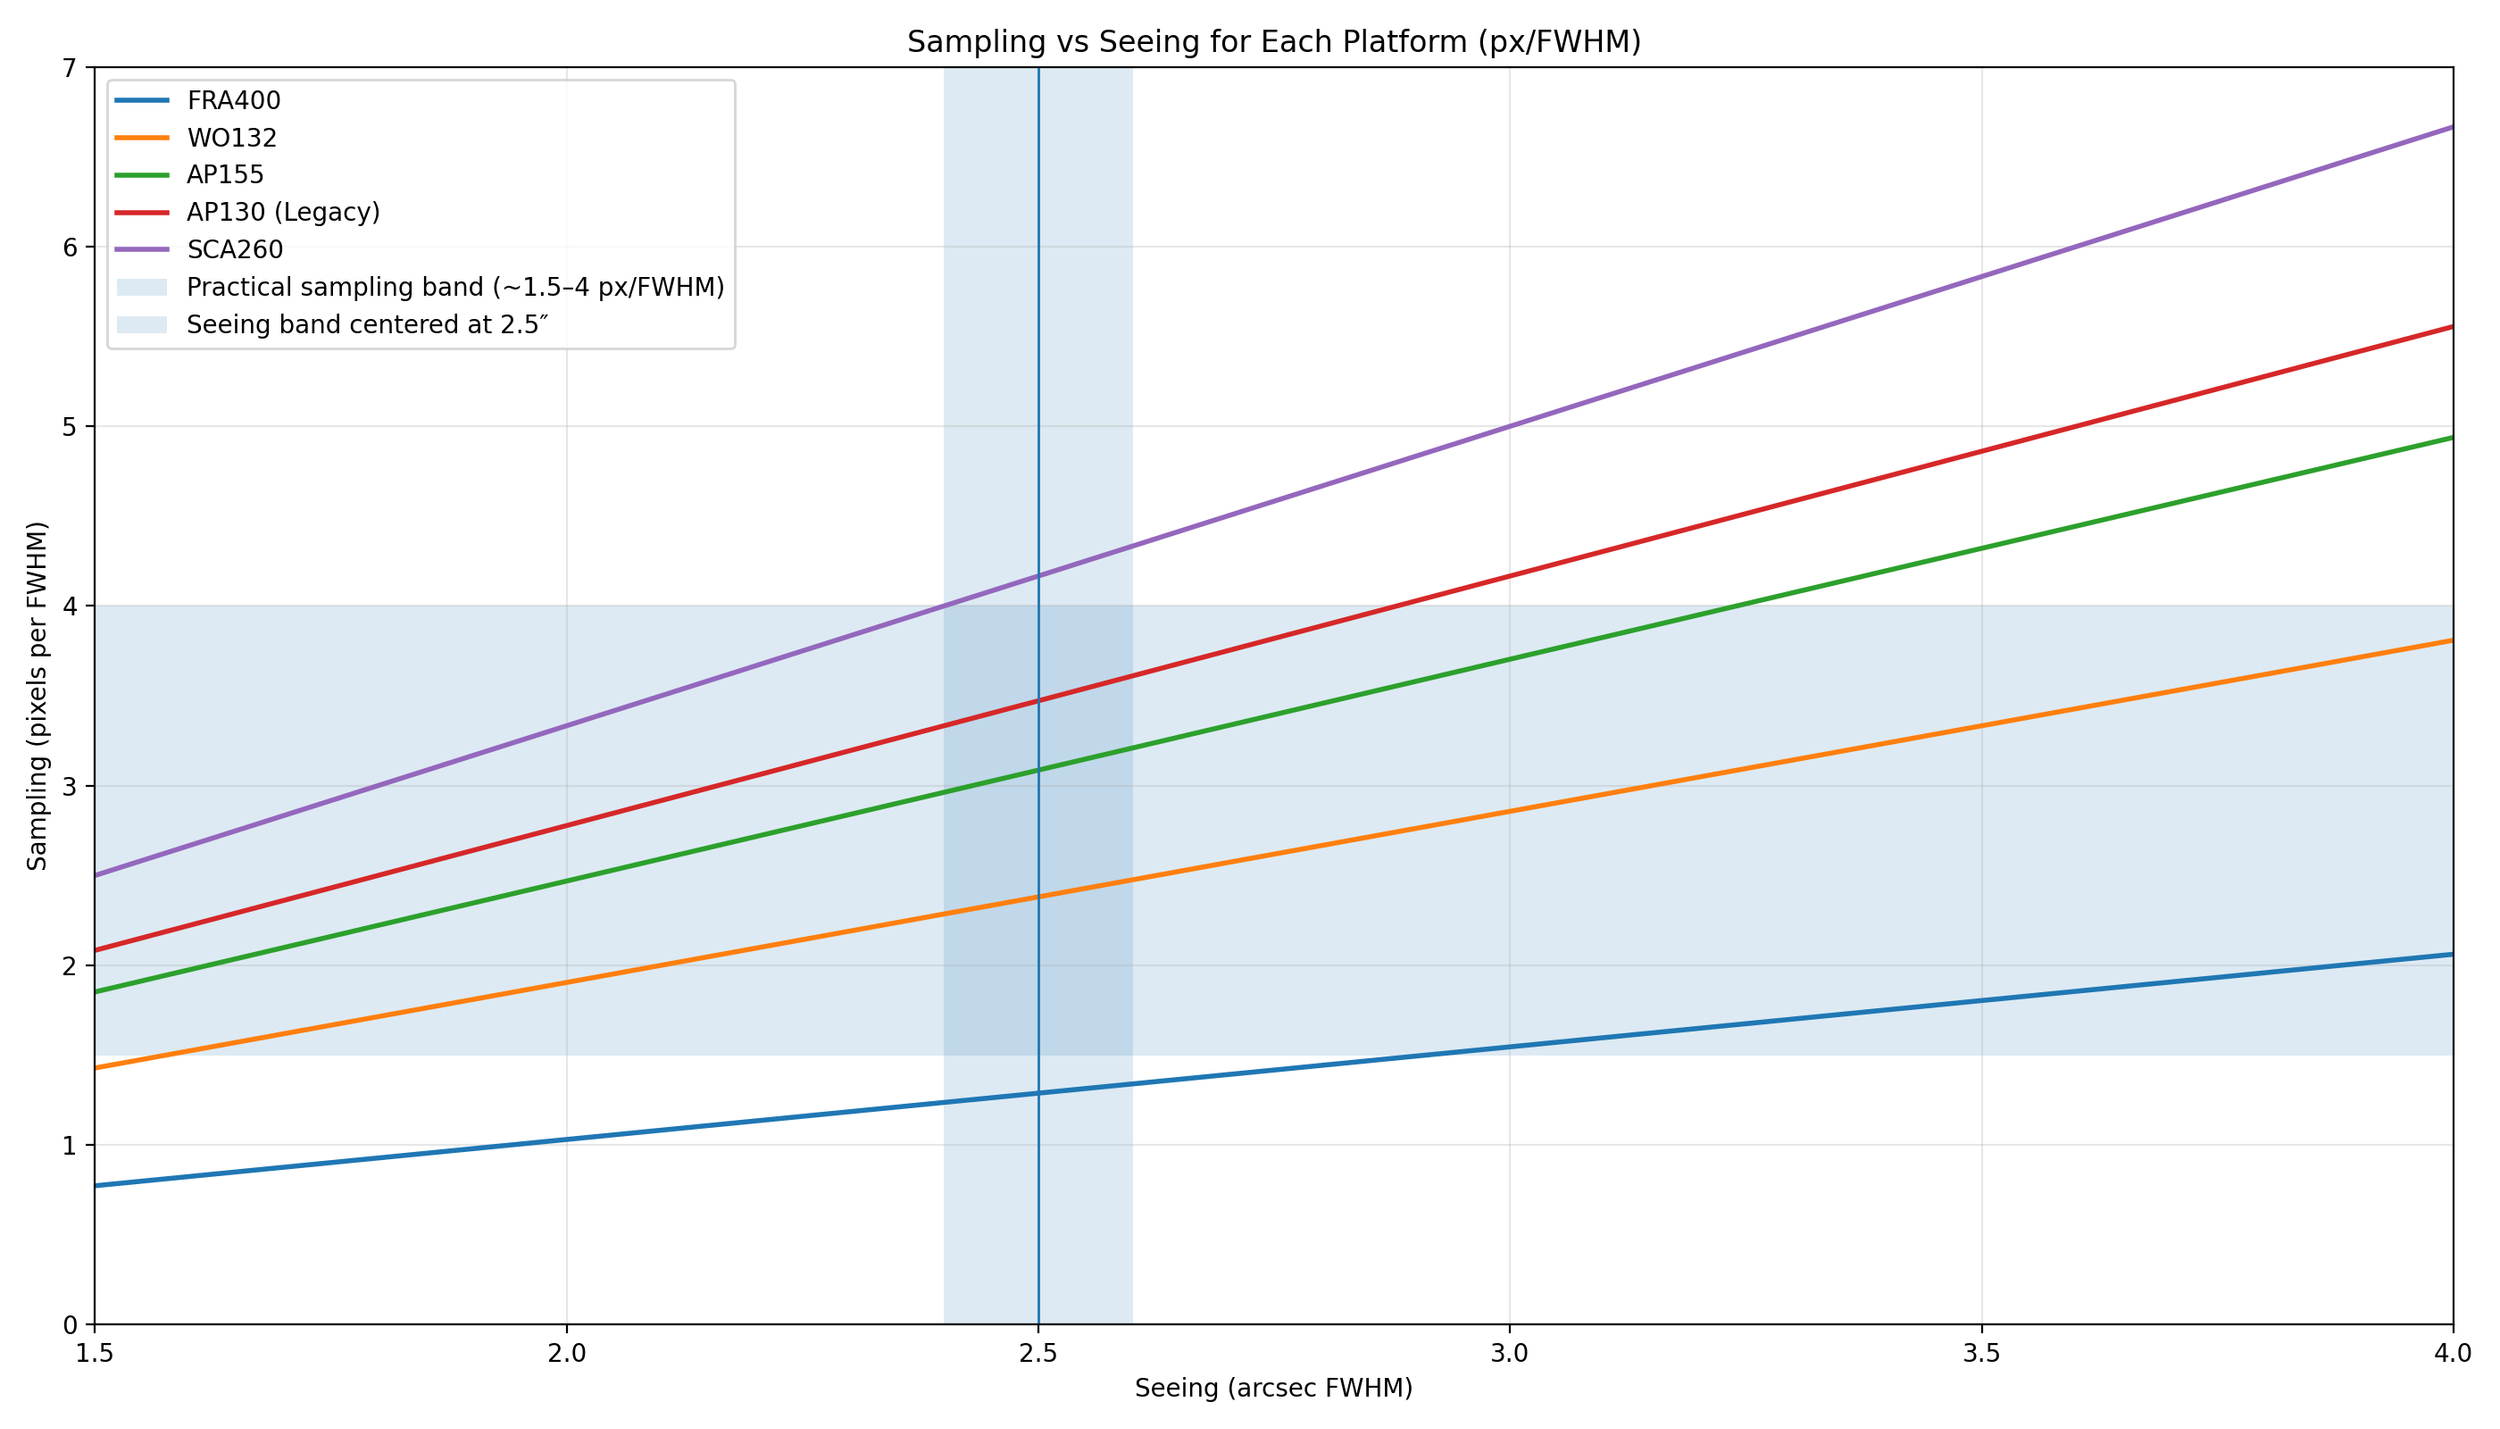
Blunt Conclusion:
This chart is the reality check I actually use.
The FRA400 lives on the wide-field side of the trade—at typical seeing, it’s simply not sampling fine structure, so it won’t magically turn mediocre nights into tight star profiles. What it will do is deliver clean, attractive wide-field compositions with a lot of context, and that’s exactly why it’s in the lineup—but it is not a “resolution platform.”
At the other end, the SCA260 is absolutely resolution-ready on paper, but my atmosphere often won’t let me cash the full check; most nights I’m still seeing-limited, not optics-limited. It still wins when I’m framing small galaxies and tight groups, but the right mindset is: the scope can do it, the sky has to cooperate.
It also acts as another reason to upgrade my FRA400 platform with a 2600 camera!
I) Guiding setups and what they say about intent
Guiding is the unglamorous part of deep-sky imaging that decides whether your optics ever get a chance to shine.
The mount can be “good,” the scope can be “excellent,” and the sky can be “decent”—and you can still throw away resolution if the guide solution is mismatched to the platform.
The core issue is simple: as focal length goes up and image scale tightens, everything gets amplified—tracking error, wind, cable tug, and especially differential flexure.
That’s why guiding isn’t a one-size-fits-all choice in this portfolio.
Guide scopes are fast, convenient, and often perfectly adequate on wide and mid focal lengths, but at the long end, you’re living in a world where small mechanical errors become visible in the stars. That’s where an OAG (Off-Axis Guiding) stops being “extra complexity” and becomes the most reliable way to keep the imaging train honest.
Guide cameras are part of the guiding system, not an accessory.
Once you decide how you’re guiding (guide scope vs. OAG), the next question is what kind of guide camera makes that method easier to live with.
A guide scope usually gives you a generous field and plenty of bright stars, so the camera can prioritize low noise and fast, clean centroiding.
An OAG is the opposite: the pick-off prism sees a much smaller slice of sky, star availability can be hit-or-miss, and you often have to guide on dimmer stars by necessity. That’s why I don’t treat guide cameras as interchangeable — the guiding modality drives the requirements, and those requirements can justify different cameras even within the same overall imaging portfolio.
Guiding is where the architecture matters. The wide-field rigs can use guide scopes without drama; the long-focal-length platform benefits from OAG behavior because it keeps the guide signal inside the same flexure regime as the imaging train.
I run two guide cameras because the job is fundamentally different depending on whether I’m guiding with a guide scope or an OAG.
With a guide scope, I’m star-rich and field-rich, so the ASI290MM Mini’s low read noise and fine pixels are a great match — it locks easily, stays stable, and doesn’t need hero exposures to find a star.
An OAG is the opposite: fewer and dimmer stars. That’s where the ASI174MM Mini earns its keep. The much larger sensor area and 5.86 µm pixels make it dramatically more forgiving about guide-star availability, especially when you’re chasing dim stars off a prism.
In practice: I use the 290 for easy, consistent guiding on the refractors; 174 for the SCA260 where star-finding and rigidity are non-negotiable.
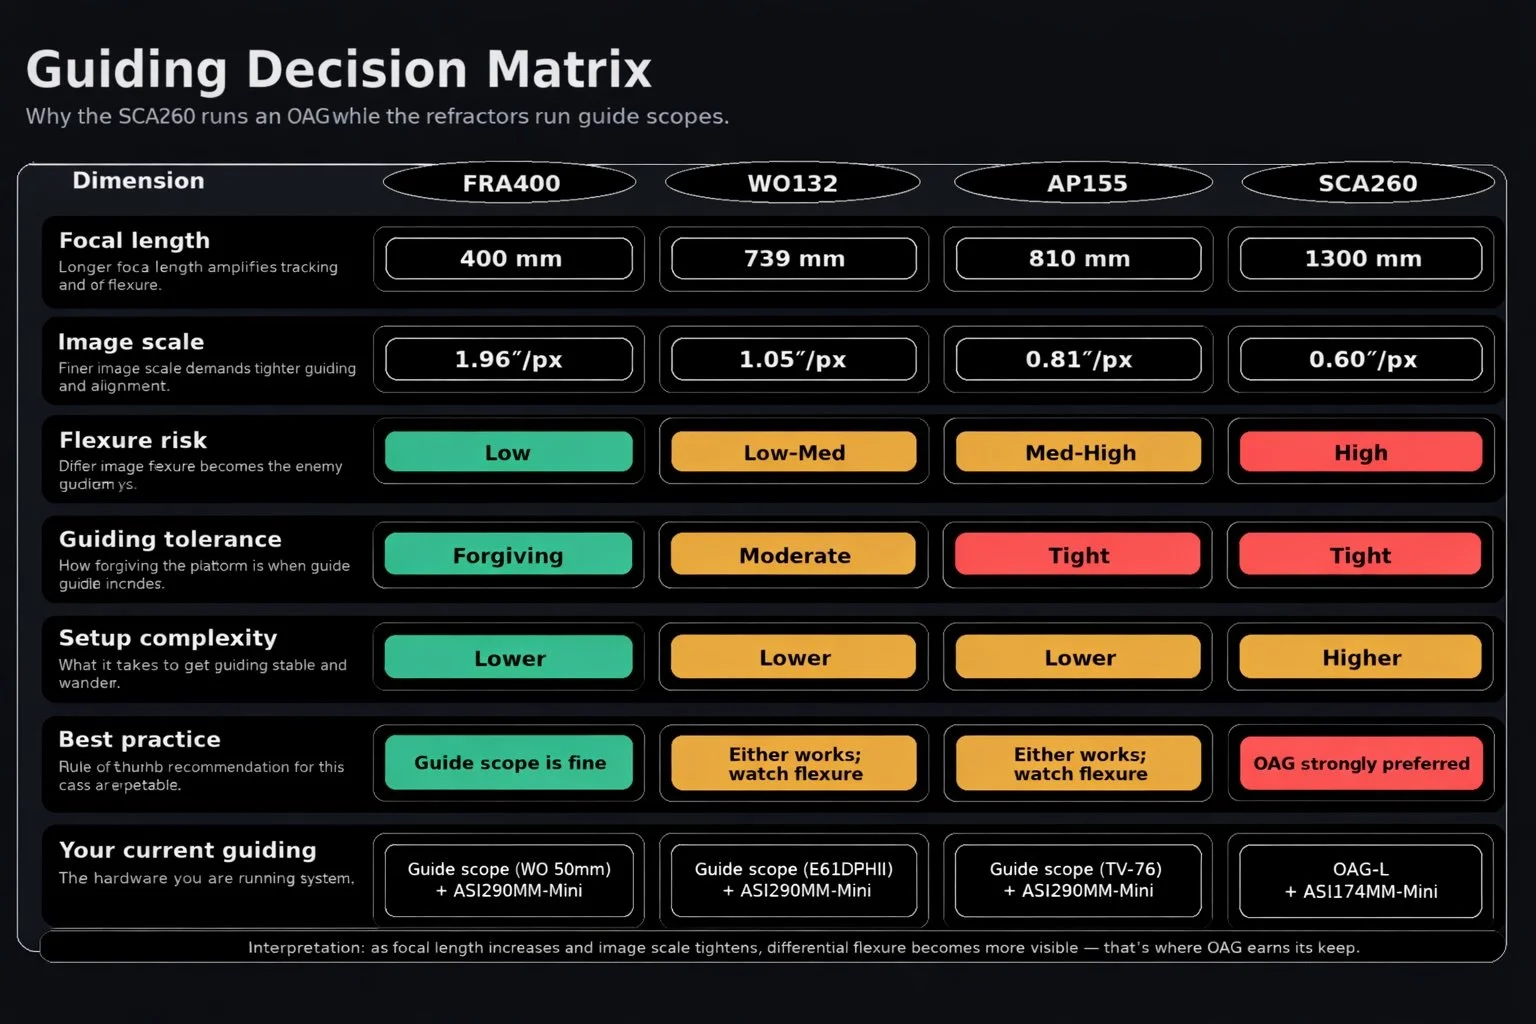
This matrix is basically my justification for why the SCA260 runs an OAG while the refractors mostly don’t.
The FRA400 is forgiving: short focal length, wide image scale, low flexure sensitivity—so a guide scope is straightforward and the whole system stays low-drama.
The WO132 sits in the middle: still very manageable with a guide scope, but it’s the first place where I start paying attention to flexure and mechanical cleanliness because it can show up if I’m sloppy.
The AP155 is tighter again—still “refractor predictable,” but now I’m operating in a regime where guiding tolerance is less forgiving, and the penalty for flexure is real, even if the optics themselves are easy to live with.
Then there’s the SCA260: longest focal length, tightest image scale, and the highest sensitivity to alignment and rigidity. That combination is exactly why the best-practice answer becomes blunt: OAG strongly preferred. It’s not because guide scopes can’t work at all—it’s because at this scale, the system will reveal every weakness upstream, and the OAG is the most direct way to remove differential flexure from the equation.
What this reveals about the design choices:
Off-axis guiding on the SCA260 is the serious choice for long focal length: it removes differential flexure as a major variable and keeps stars tighter when the system is behaving.
Guide scopes on the three refractor platforms are a pragmatic trade: simpler setup, easier troubleshooting, and generally sufficient at their image scales—especially the widefield FRA400, where the tolerance is inherently higher.
The Key Takeaways
This portfolio is not four versions of the same idea. It’s a deliberate coverage strategy:
Optical design diversity (refractor + Petzval-like astrograph + super-Cassegrain)
Focal length ladder (400 → 739 → 810 → 1300mm)
Camera standardization where possible (three systems on the same APS-C mono camera class )
Guiding choices that match the tolerance regime (OAG where you need it; guide scopes where you don’t)
Refractor + Petzval-style astrograph + super-Cassegrain — different tools for different problems, not redundant hardware.
A clean ladder: wide → mid → reach → tight framing. (AP155 is the current reach rung; AP130 remains as legacy.)
APS-C mono across the core rigs—consistent framing math, calibration behavior, and processing outcomes.
OAG where you need it; guide scopes where you don’t — pick the architecture that fits the flexure risk and image scale.
The next table summarized how I utilize this set of scopes.
Each clear night, I put all four scopes to work on a set of targets. On those wonderful long nights of Fall, there may even be two sets of targets. A primary set and a secondary set that I go after once the primary target has set.
So when clear, moonless nights are anticipated, you will see me go through a flurry of target-selection activities.
As I pick the targets I want to pursue, I have to decide which telescope platform is best suited for each target.
I tend to use the criteria above because they are logical and make sense. But not always. Sometimes I have more than one wide target - one will go to the FRA400, and then I decide where to place the second. It also means I will spend more time on composition and framing, as I may have to use a scope that is not ideal for image scale or field of view.
So mapping targets to scope isn't always straightforward, but I try to be smart about it.
Having these scopes in my observatory gives me many options when I hunt for targets, and that is a very good thing!
Closing
Each clear night, I try to put all four scopes to work on a set of targets. On those wonderful long nights of Fall, there may even be two sets — a primary plan, and then a secondary plan once the first target(s) have set.
So when a clear, moonless night is coming, you’ll usually see me in a flurry of target selection and re-selection. I’m not just choosing what I want to image—I’m also choosing which platform gets which target.
Most of the time, the mapping is logical: target size and structure drive focal length; faintness and detail drive “reach.” But it isn’t always clean. Some nights I have more than one wide-field target, and the FRA400 can only do one of them. Some nights, the best target in the sky doesn’t land neatly on the “perfect” scope, so I compromise and spend more effort on framing and composition to make the most of what I have available.
That’s the real point of this observatory portfolio:
I’m not trying to own four telescopes. I’m trying to own four capabilities.
Wide context. Mid-scale flexibility. Refractor detail. Small-target reach.
And when the sky finally cooperates — which is never as often as we’d like — having those options ready to go means I can spend the night collecting photons instead of wishing I had brought a different tool.
Clear nights are rare. When I get one, I want zero regrets.
Future Upgrades (Planned)
With this set of platforms, I have achieved the platform set I wanted, spanning a range of useful focal lengths.
That said, there are some changes I would like to make during 2025
FRA400 camera standardization
This one has already happened! I have updated this document to reflect that.
The “Slow” AP130
Now upgraded to the AP155!
Auto covers
I am very interested in obtaining a powered telescope flap with a flat-field light source for each instrument.
This would allow me to better automate the start and stop of telescope sessions remotely from the house and to automate the gathering of Flat calibration files.
Note: now done for the AP155, and the FRA400 platforms. WO132 is next!
If/when those changes happen, I’ll document them as a new hardware revision (so the page remains a faithful snapshot of what I was actually running at the time).