
The SkyAlert Weather Monitoring System by Interactive Astronomy
Date: July 26, 2025
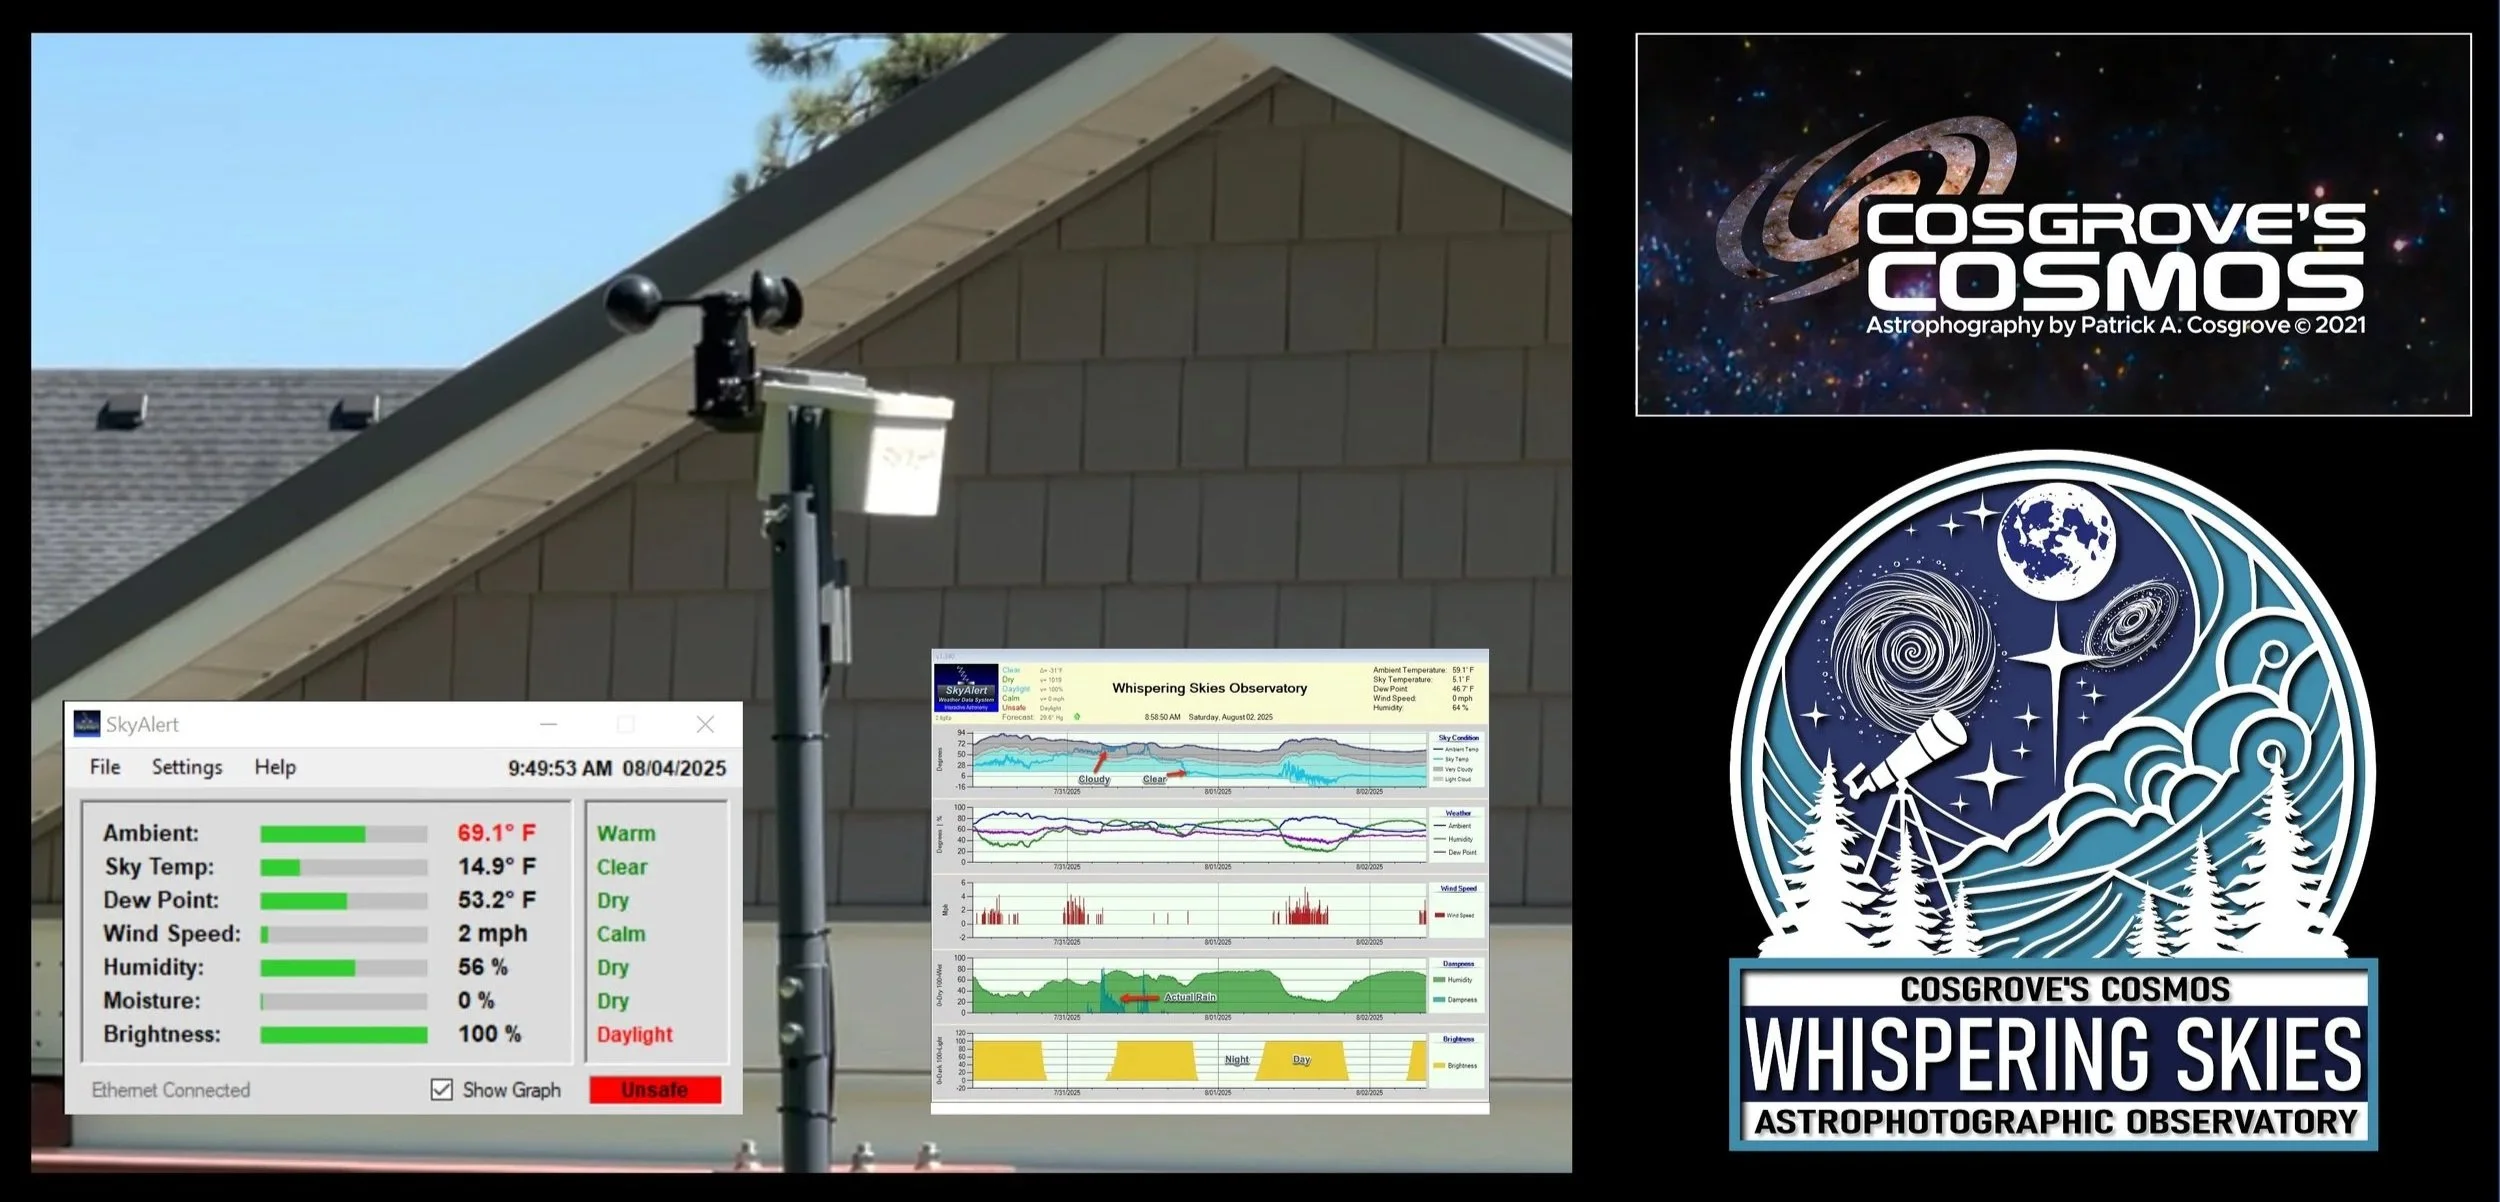
This SkyAlert will watch over my night time data collection!
Table of Contents Show (Click on lines to navigate)
Weather Systems and Roll-Off-Roof Observatory Automation
Now that the Whispering Skies Observatory is built and operational, I am beginning to work on automation.
Part of this is a Roof Control System that will automatically close when the conditions are unsafe. I chose the SkyRoof System for roof control, this feature.
Another part of this is a system of passive interlocks, which lock the roof to the walls when fully open and closed. I have a design for this and the parts, and hope to install that soon.
Another critical part is a real-time weather system that will detect unsafe conditions and flag when it is unsafe to continue operations. I was not sure what I was going to use here, and so I started to do some research.
SkyAlert System
My search ended being a short one.
I had already purchased the SkyRoof motor and control system by Ineractive Astronomy, so I was aware of their product line. One of their other offerings is the SkyAlert system, which offers real-time weather monitoring and a tie-in to the SkyRoof system, and features an ASCOM software interface.

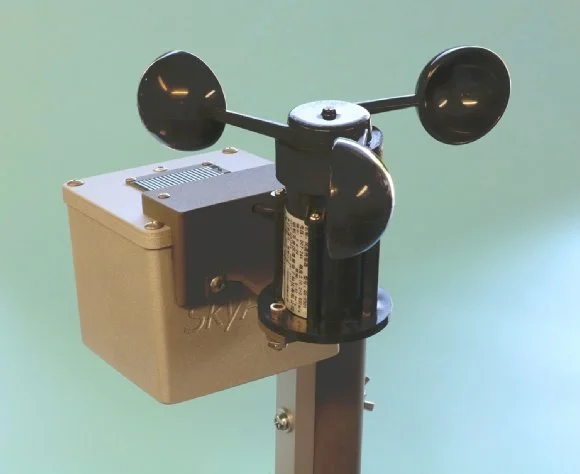
The basic SkyALert System w/Solid State Anemometer.
I read over the specs, and it looked interesting.
I decided to look for reviews and see what feedback there was out there about this unit. I saw many positive comments on Cloudy Nights, and I came across this more in-depth review:
It sounded pretty positive.
I have had good luck with my SkyRoof system, and I have found Jim Collins at Interactive Astronomy to be super to work with. I typically get a call back the same day when I have a question, and Jim has been very proactive in resolving any issues or questions that come up. I liked the idea of going with a US company with a proven support record.
I also liked that the SkyRoof and the SkyAlert system were designed to work together:
The SkyAlert System creates a single-line summary weather file
The SkyRoof System reads this file and, based on its content, it can
Close the roof
Open the roof
Report key events via email or sms.
I also liked that sensors could be replaced over time, either in the field by myself or by sending the small unit to Interactive Astronomy for work.
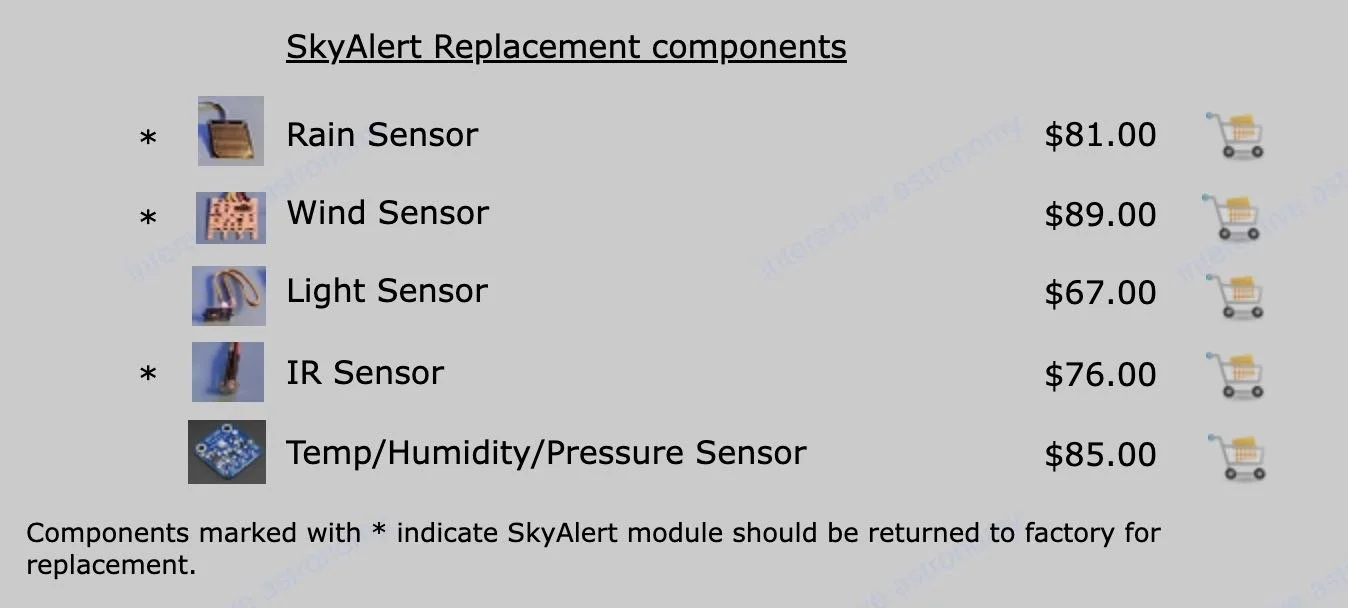
Replacement Sensor Availability
So while there are other systems out there, I decided to go with the SkyAlert System.
Choices and Options
The SkyAlert system is offered in different configurations. When you buy it, you have some choices to make.
The system comes with a solid-state anemometer to measure wind speed. But you can order it with a mechanical 3-cup anemometer.

Solid State Anemometer version - with bird spikes to keep feathered friends from being to comfortable there.
Here is the mechanical Anemometer System.
Next, you can choose between a USB cable and an Ethernet cable.
Finally, you have a choice in cable length.
I ordered the system with the mechanical anemometer, in Ethernet version, and a cable length of 35 feet.
Why these specific choices?
With a Roll-Off-Rof design, I am especially concerned with wind. The roof is basically a wing profile, and I don’t want it to take flight. Mesaufing wind speed is critical here, and I wanted something that would do the best job for that. I felt the mechanical Anemometer was the way to go.
I was planning on mounting the unit towards the back of he observatory so any cable lengths would be longer. The USB version requires a separate DC power line, while the internet version carries power through that single cable. This seemed like the way to go for me. If I was mounting it closer to the observatory computer, I would have considered the USB version.
My mounting plans dictated the length of the cable.
What I Received
Less than a week after ordering, I had the SkyAlert in hand.
In the box, you have the SkyAlert unit itself, a long Ethernet cable with an associated power supply, a USB drive with software, and a manual.
I also ordered a pole mast system to mount it. This unit was designed for a Skylink system, but I thought it would work fine for my uses. By loosening and taking out one bolt, the whole unit will pivot down so you can access the SkyAlert for cleaning or maintenance. Below is the mast I bought.
HERE is the link on Amazon for those interested.
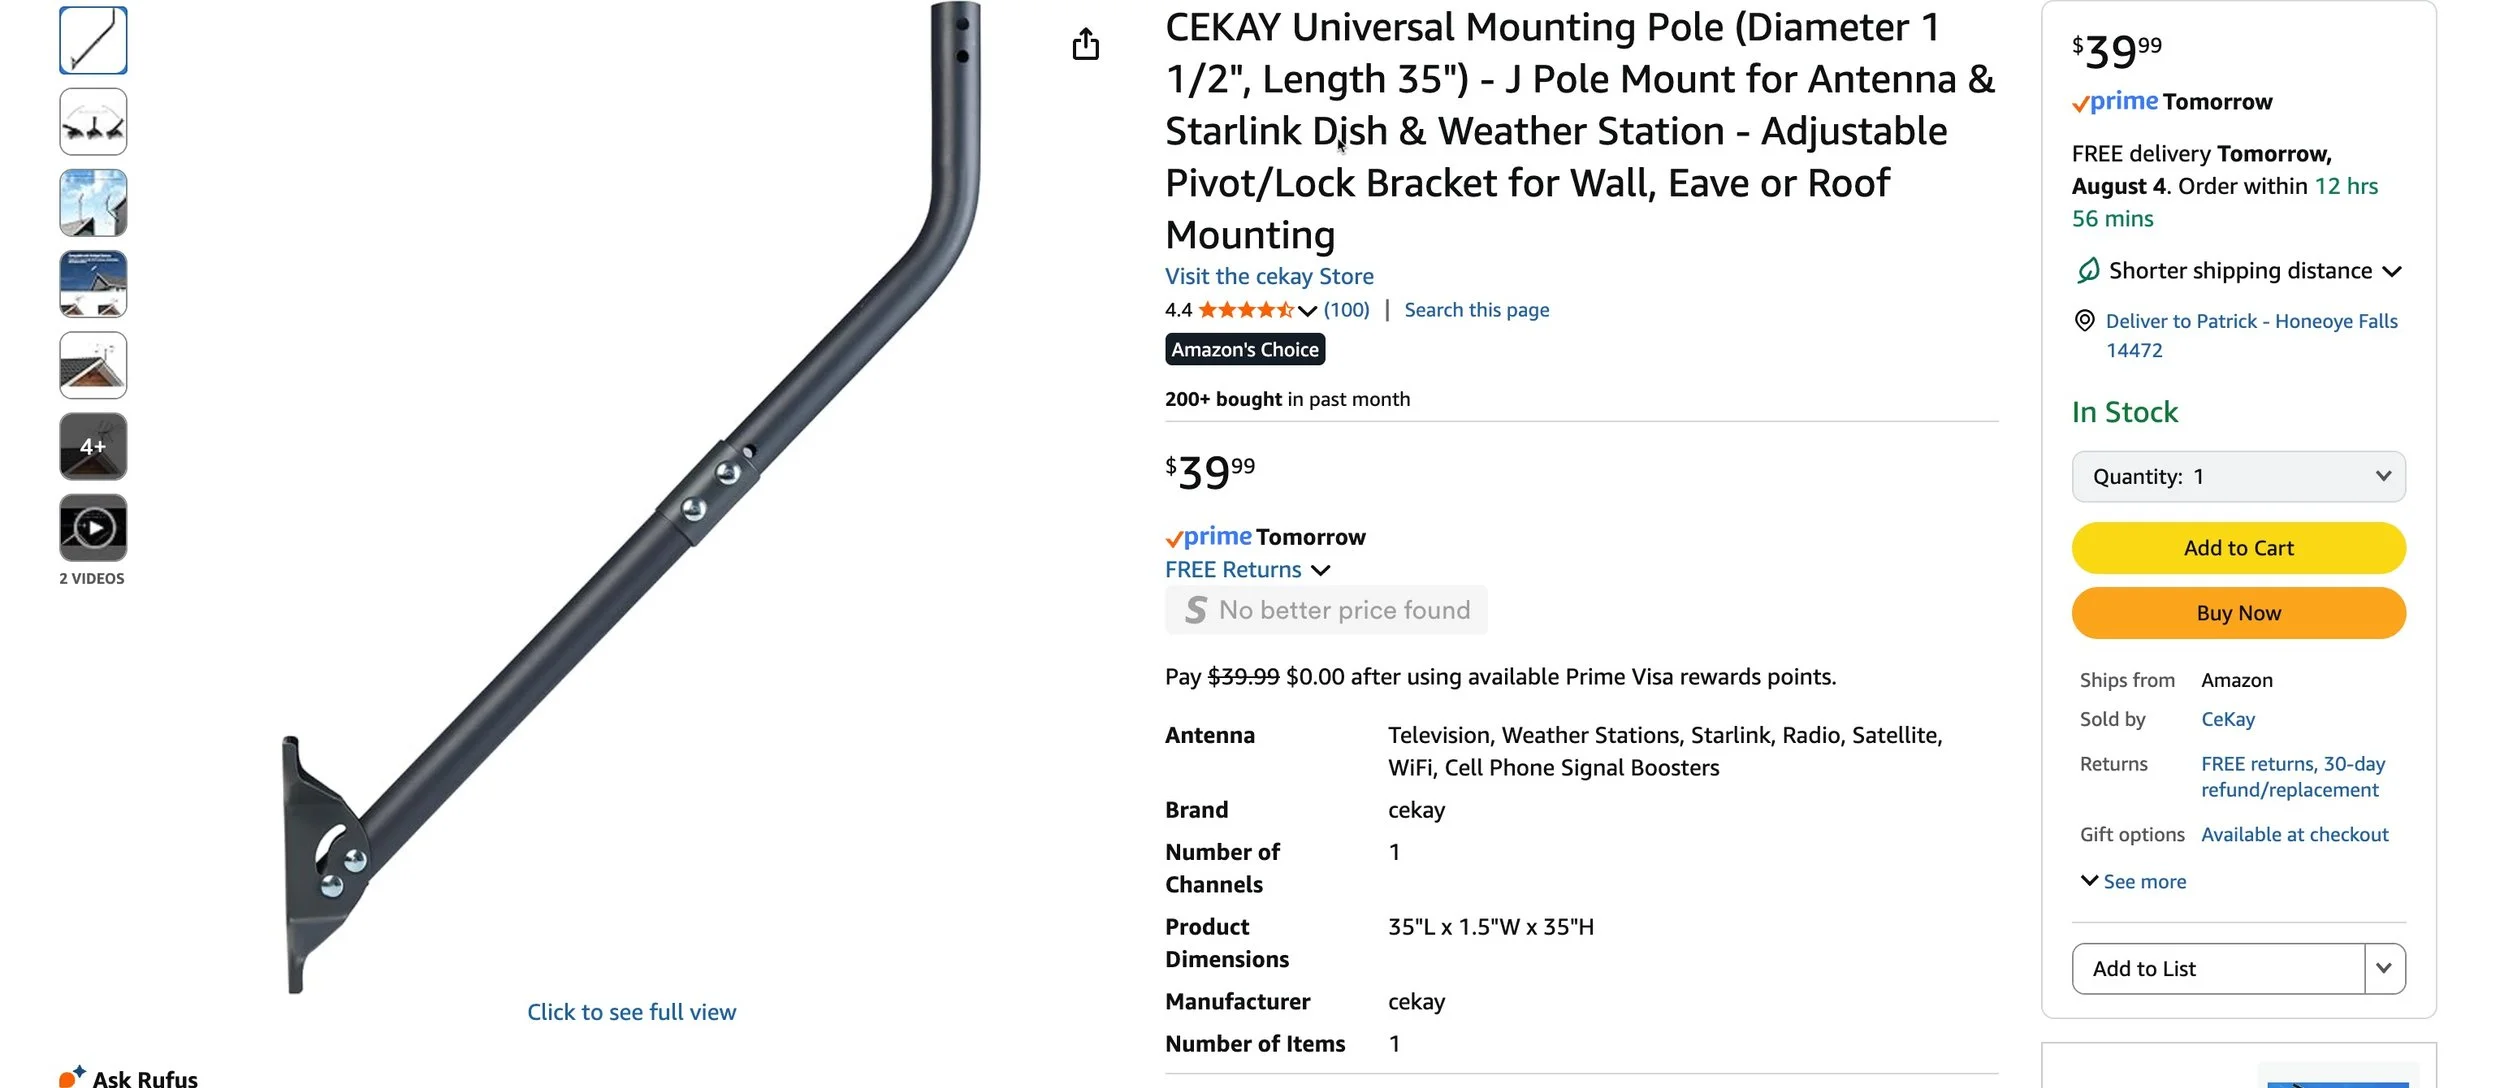
Mounting Pole I went with.
Initial Setup
The first step is something that can and should be done inside.
The SkyAlert unit must be plugged in and powered so that it can get an IP address on the local network. A NetChecker application is provided and used to identify the IP address for the SkyAkert. With this address, you can proceed to set up the main software.
I planned on mounting the unit on the NW portion of the steel outriggers that support the roof when opened.
The cable length I ordered would run from the unit to the back of the observatory and would then feed inside to the back of the north wall. My computer is located here. I planned to run an Ethernet cable from my router to this same location, ending in an Ethernet switch box that I already had on hand.
I mounted the switch in that location, and the cable from the SkyAlert could plug right into it.
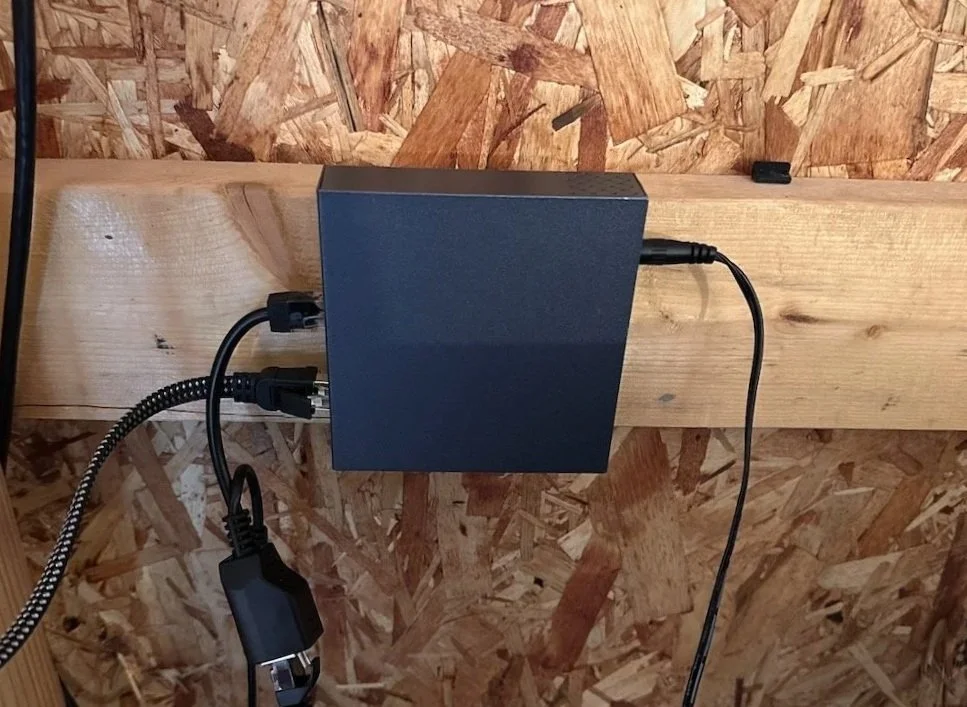
The internet switch. The bottom cable is from the router. The top cable is from the Skyalert. The right-most cable is the power cable for the Ethernet switch,.
I then plugged in the Ethernet cable into the Ethernet switch and the power supply into the power, and ran the Netcheck. I soon saw the Skyalert and grabbed its IP address.

The NetChecker App showing the SkyAlert Unit.
With this, I got the main software working. I decided to leave it running inside the observatory to see how it worked over a few days until I was ready to install it on the outside framework.
The main readout panel for the ASkyAlert Software.
Good thing I did that. I noticed that the ambient temperature was running a constant 32 degrees F!
Hmm - given that it was like 80 degrees out, this seemed very odd indeed…
Everything else seemed to work fine. I tested the anemometer by blowing on it - things seemed to be alright except for the temperature output.
A quick call to Jim Collins identified the sensor as bad, and Jim got a replacement out to me right away.
Replacing the Temp Sensor
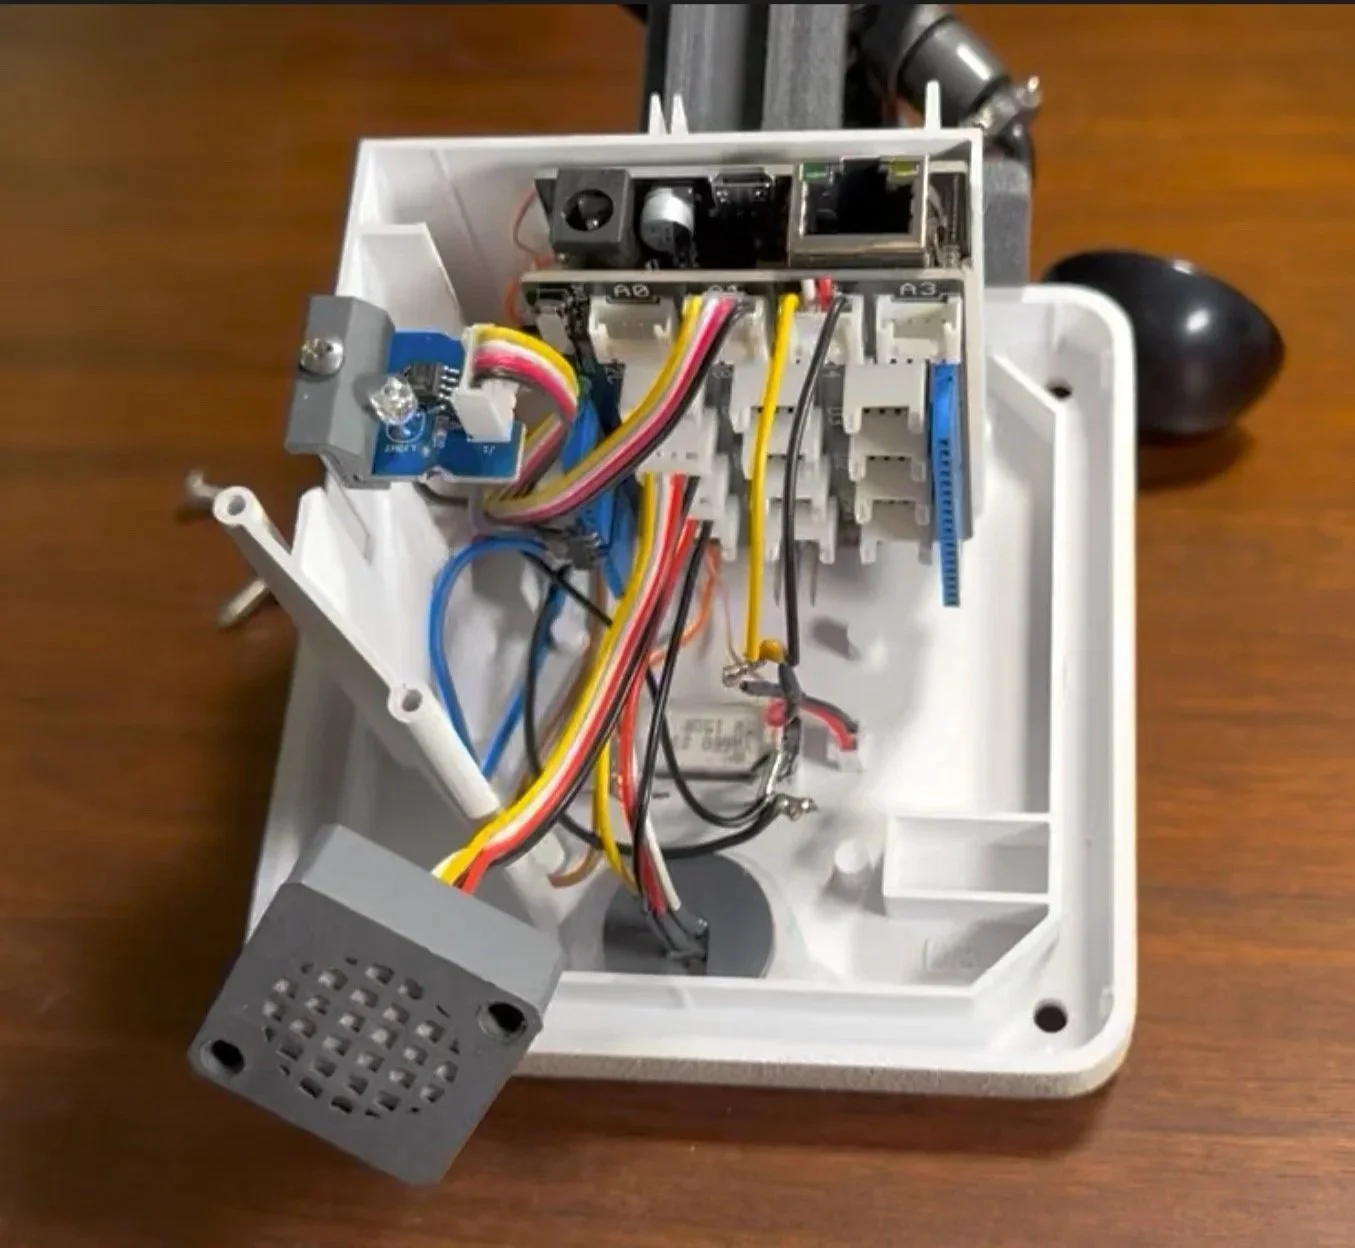
Replacing the sensor was easy. A few screws pop the cover off. The old sensor was held by two screws. I unplugged the cable, noting where it was plugged into the motherboard, and the replacement was quickly done.
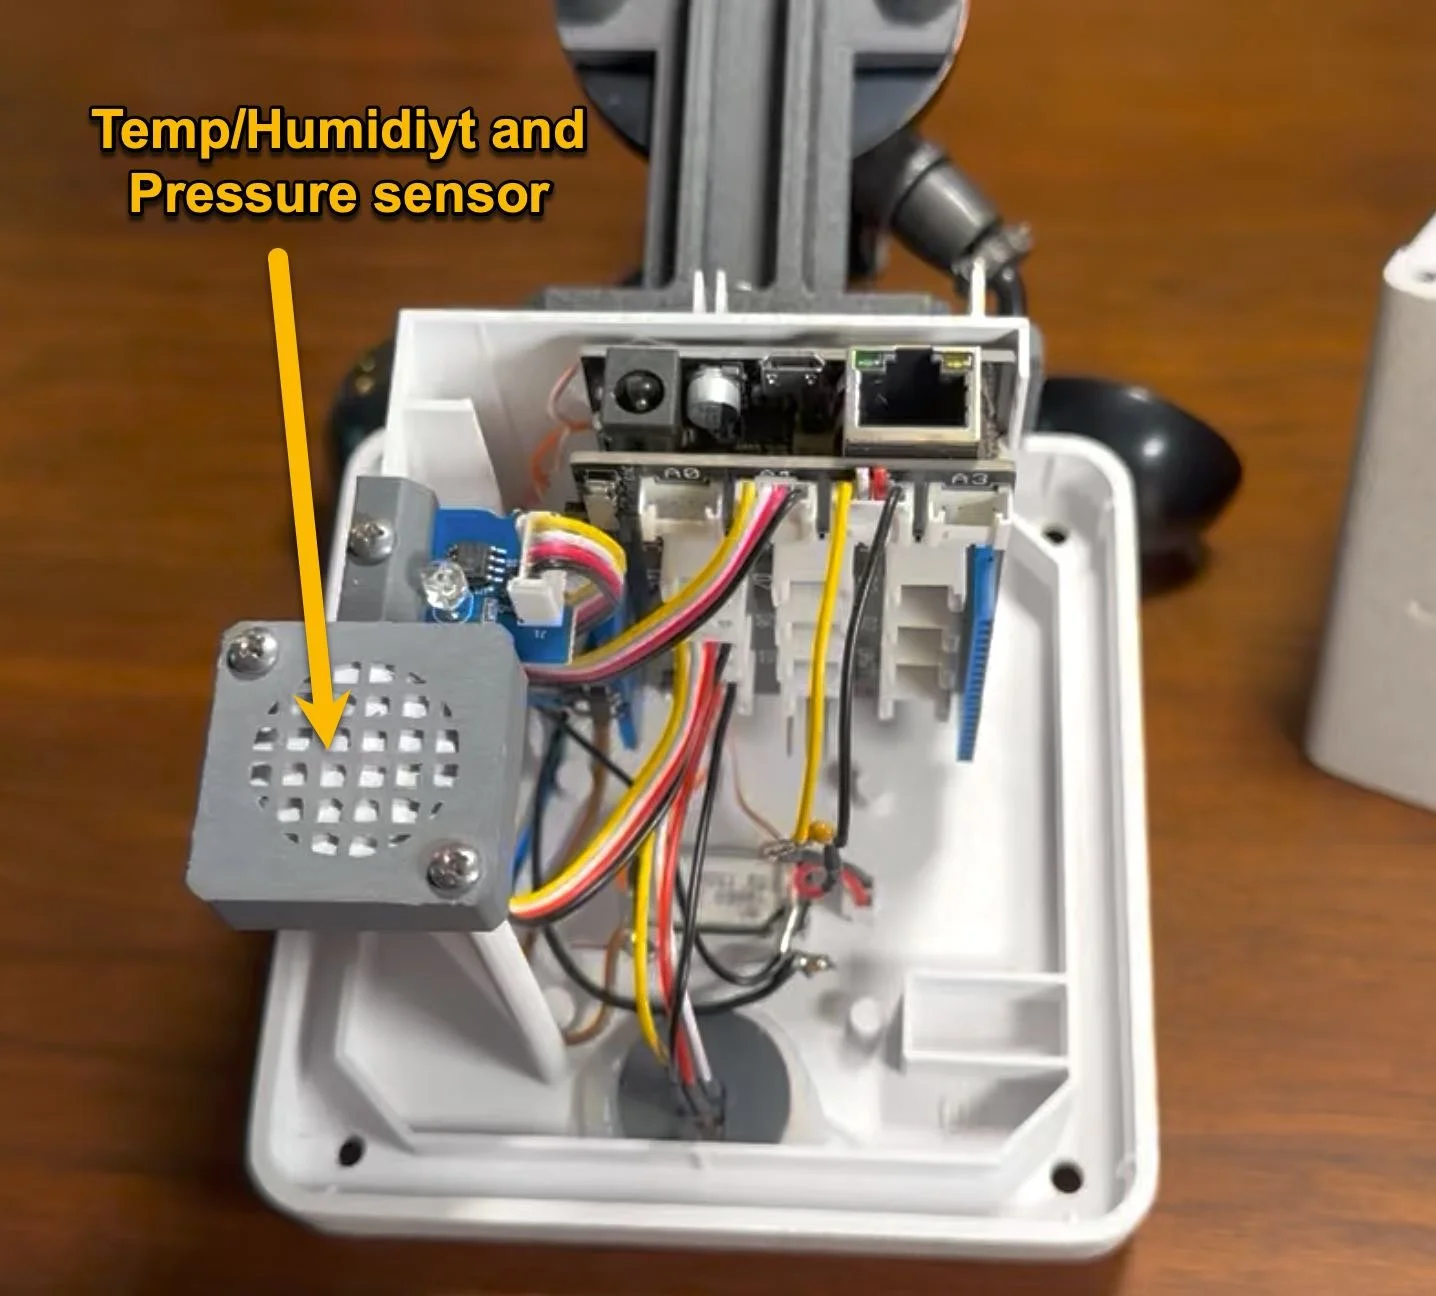
Under the cover of the unit.
The Temp/Humidity/Pressure sensor unscrewed.
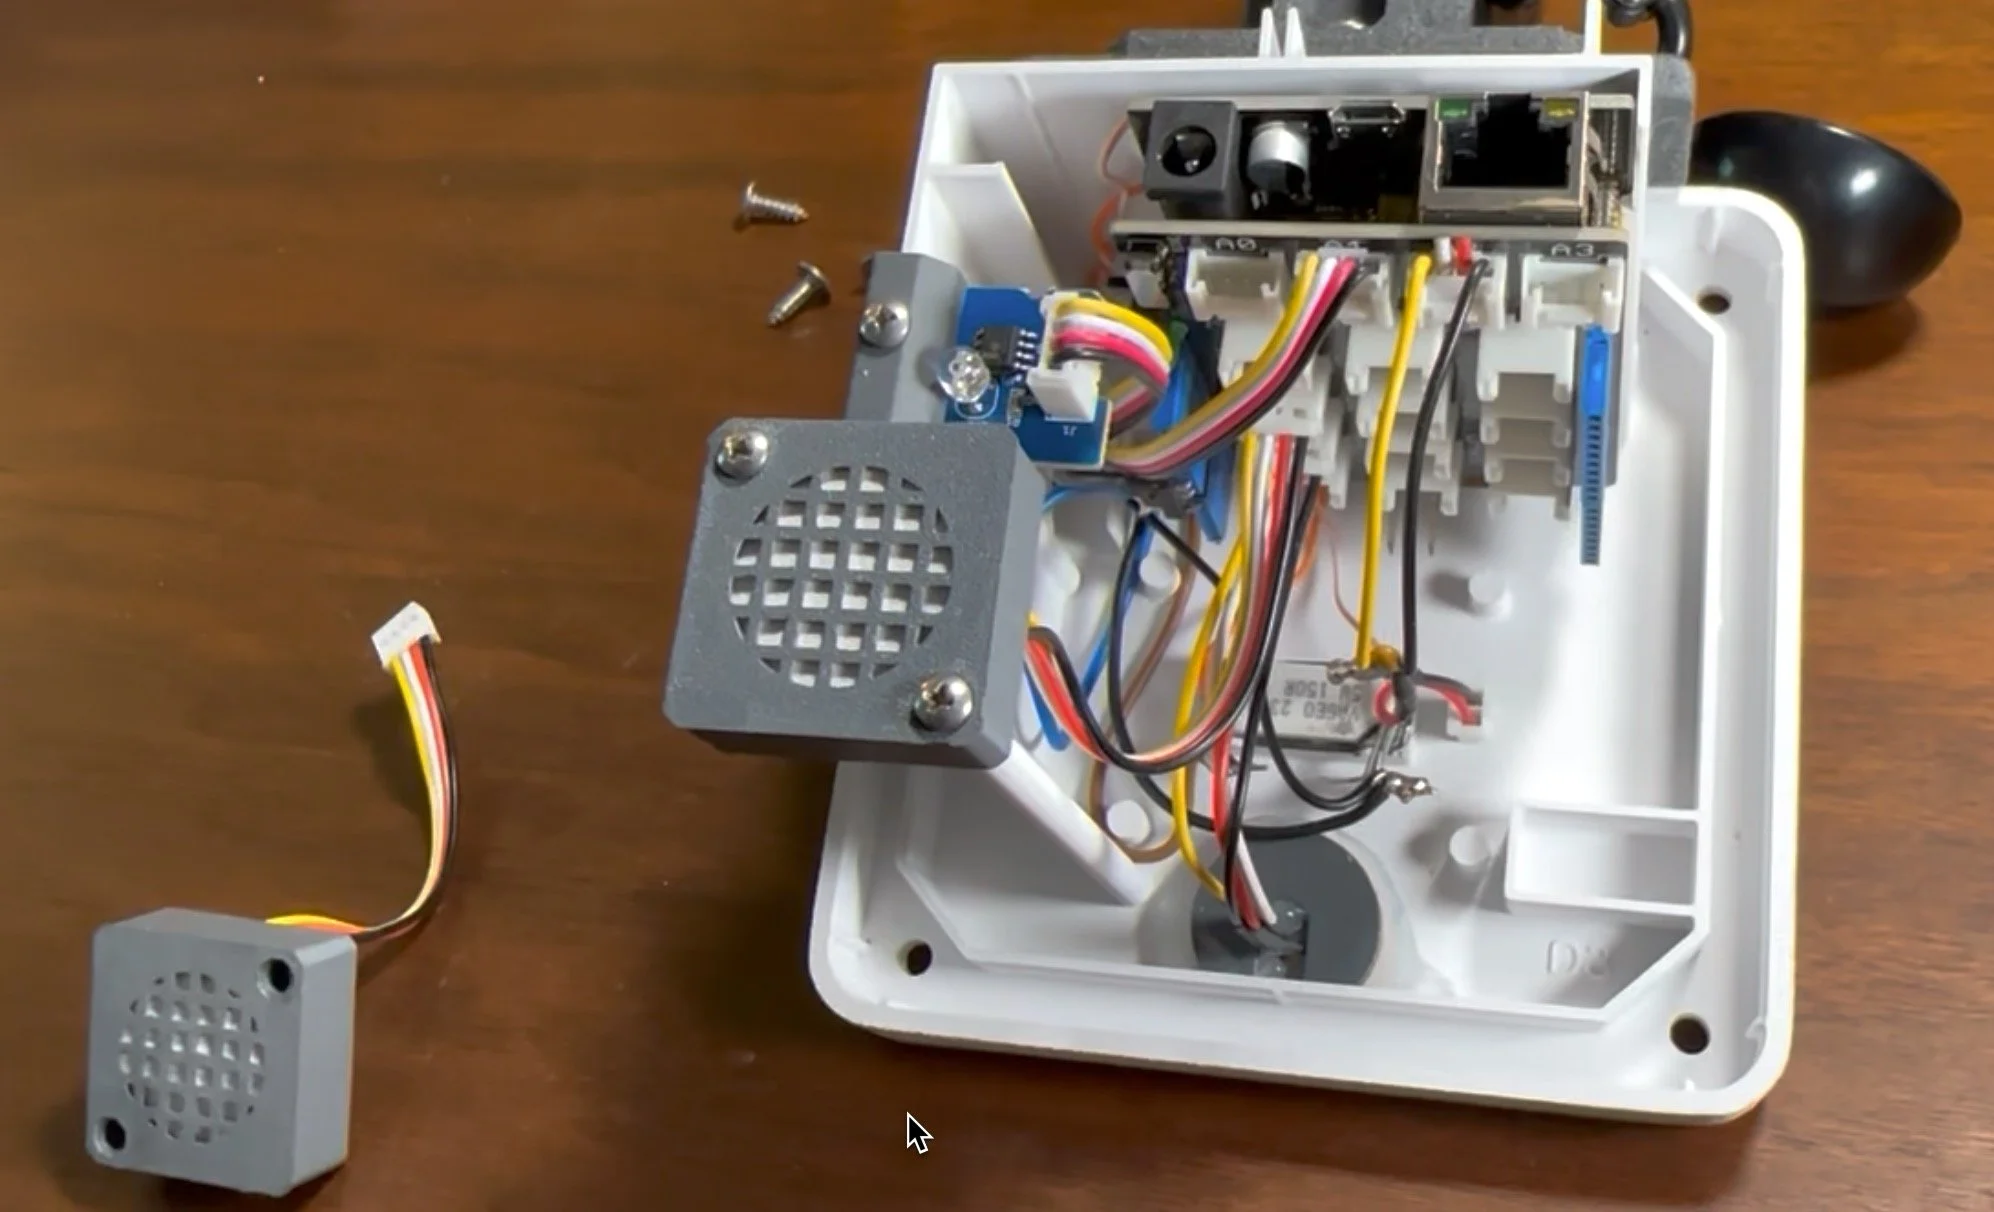
The new sensor in with the old one seen off to the side.
Once replaced, the Ambient Temperature readout started working fine.
Tilt Angle
The SkyAlert unit is designed to be mounted such that it tips towards the north. The top of the unit has an IR Sensor for measuring sky temperature - this is critical in detecting cloud presence.
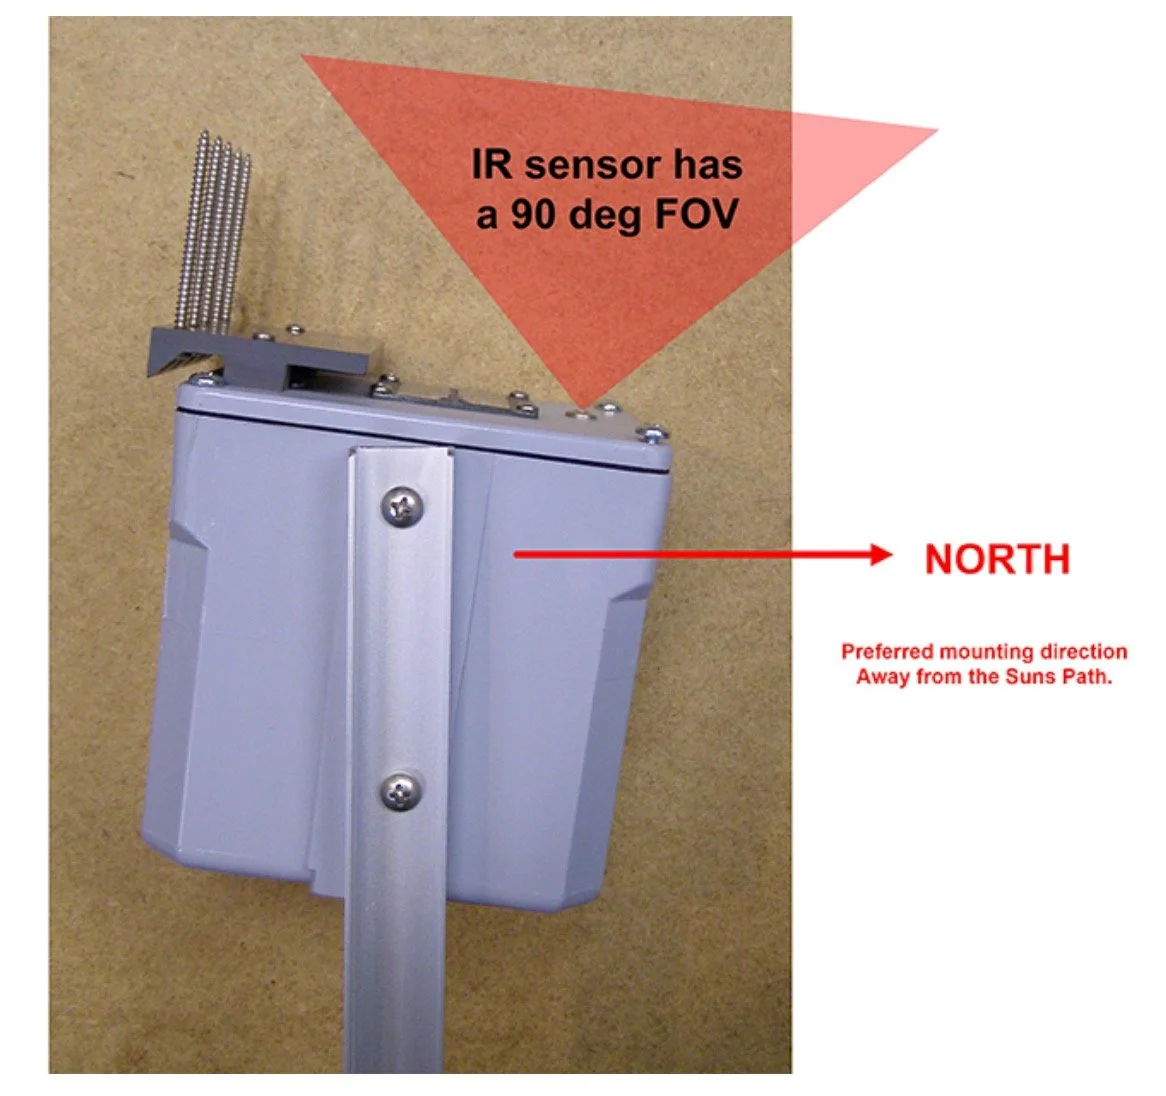
Interactive Astronomy’s documentation on Sky IR Sensor positioning.
But for me, given where I was mounting it, the tree line would easily fall within this cone of view.
I talked to Jim Collins about this, and the slant of the unit is designed to ensure that the Sun is not in this 60-degree cone of view.
Since I will be depending on this for readings at night, that would not be an issue for me. So instead, I mounted it such that it tipped towards the West to avoid the tree line.
This ended up working well, as my cloud detection seems to work fine.
Installation
Now that everything was working, it was time to mount the Skylert unit onto the mast.
Since the roof moves, I did not want to mount it there.
The roof has a pretty good overhang; most pole masts would not accommodate mounting on the sides of the building under the roof.
So I opted to mount it on the Northwest corner of the steel outrigger. This is a solid place to mount it, and the roof will not be an issue regardless of its position.
I used self-drilling bolts to mount the pole bracket onto my steel framework. I predrilled smaller holes, which made the task easier. Once the plate was on, I bolted in the pole, and while it was rotated in its lower position, I mounted the SkyAlert unit.

Mast mounting bracket installed on the steel.
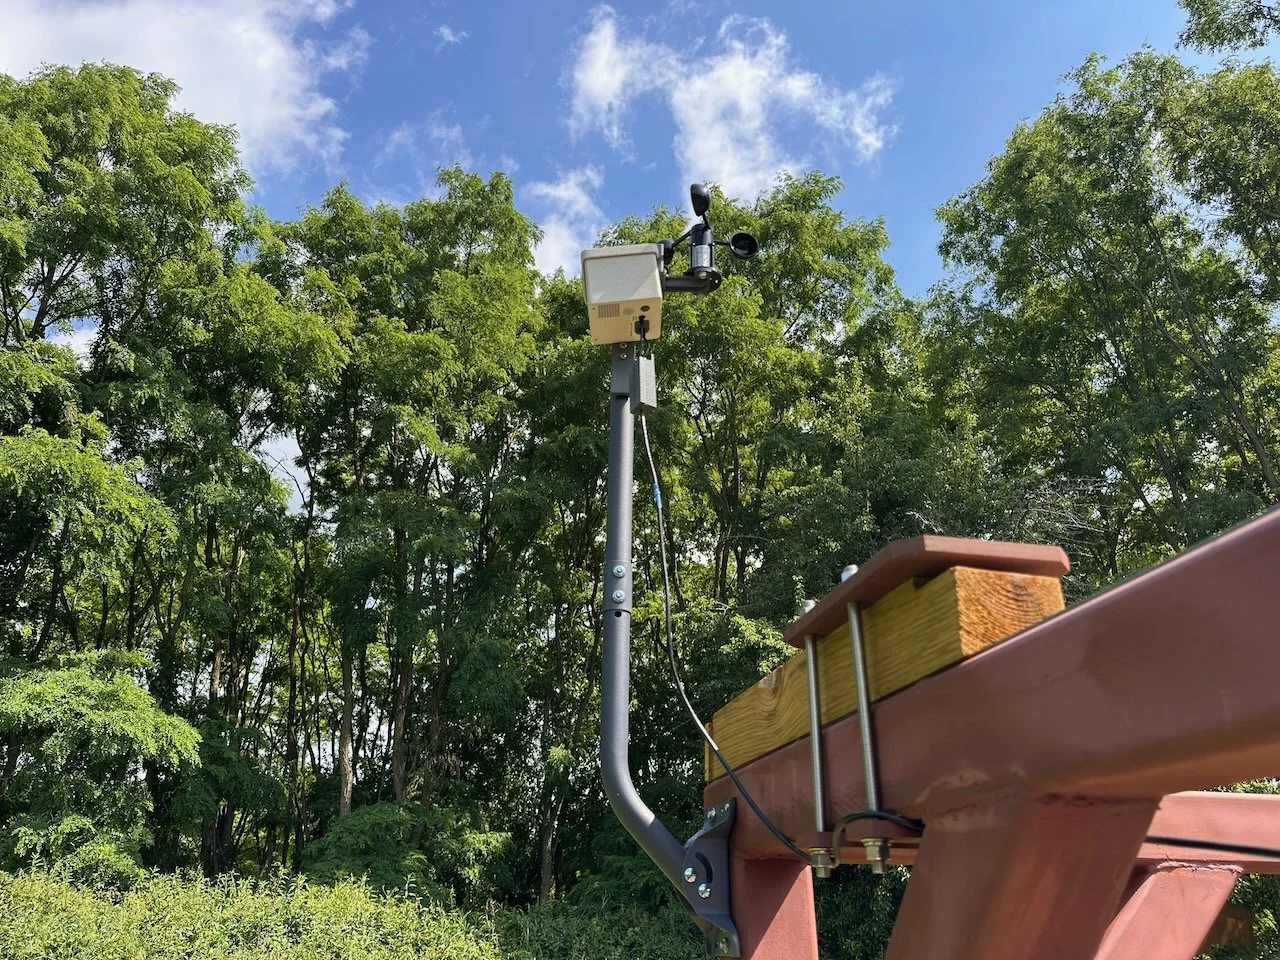
Mast and SkyAlert physically installed. I still need to screw the junction box down and cable wrap the cable.
Once in the final position, we tightened the bolts, routed the cable, and we were good to go!
Final stet up.

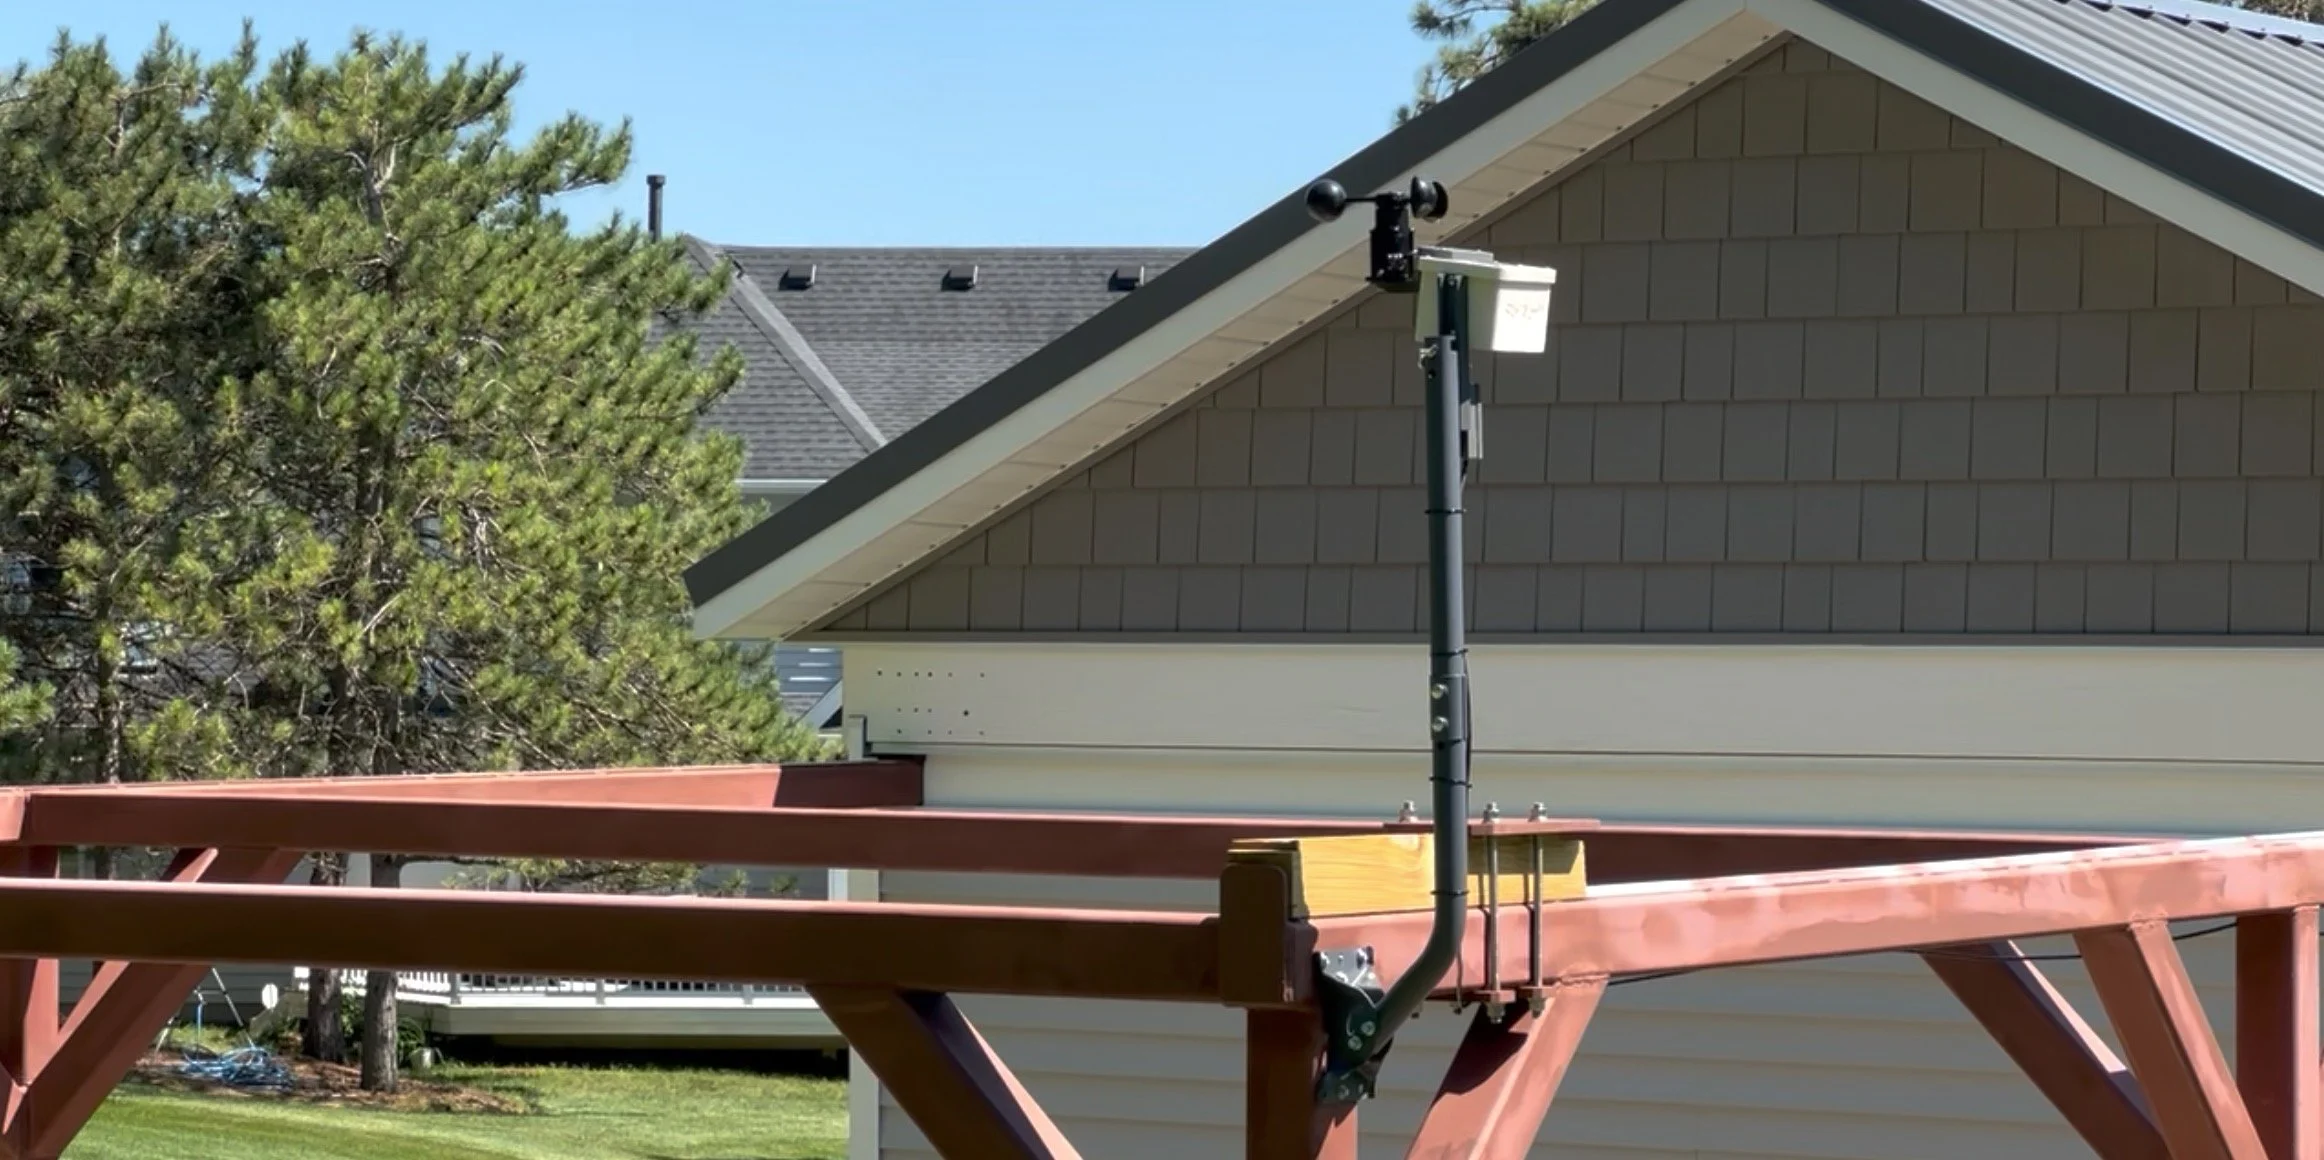
With the roof all the way open.
With the roof completely open, the SkyAlert is taller than the outer section of the roof, as can be seen in the image above.
The SkyAlert in action!
Initial Results
There are provisions in the software to calibrate the sensors, should this be needed.
I never felt that I had to do that. The readings seemed appropriate compared to other sensors I had available. The cloud detection, which is based on a delta between the ambient temperature and the IR Skytemp reading, seemed to correlate with the cloud conditions that were occurring. So we were all good.
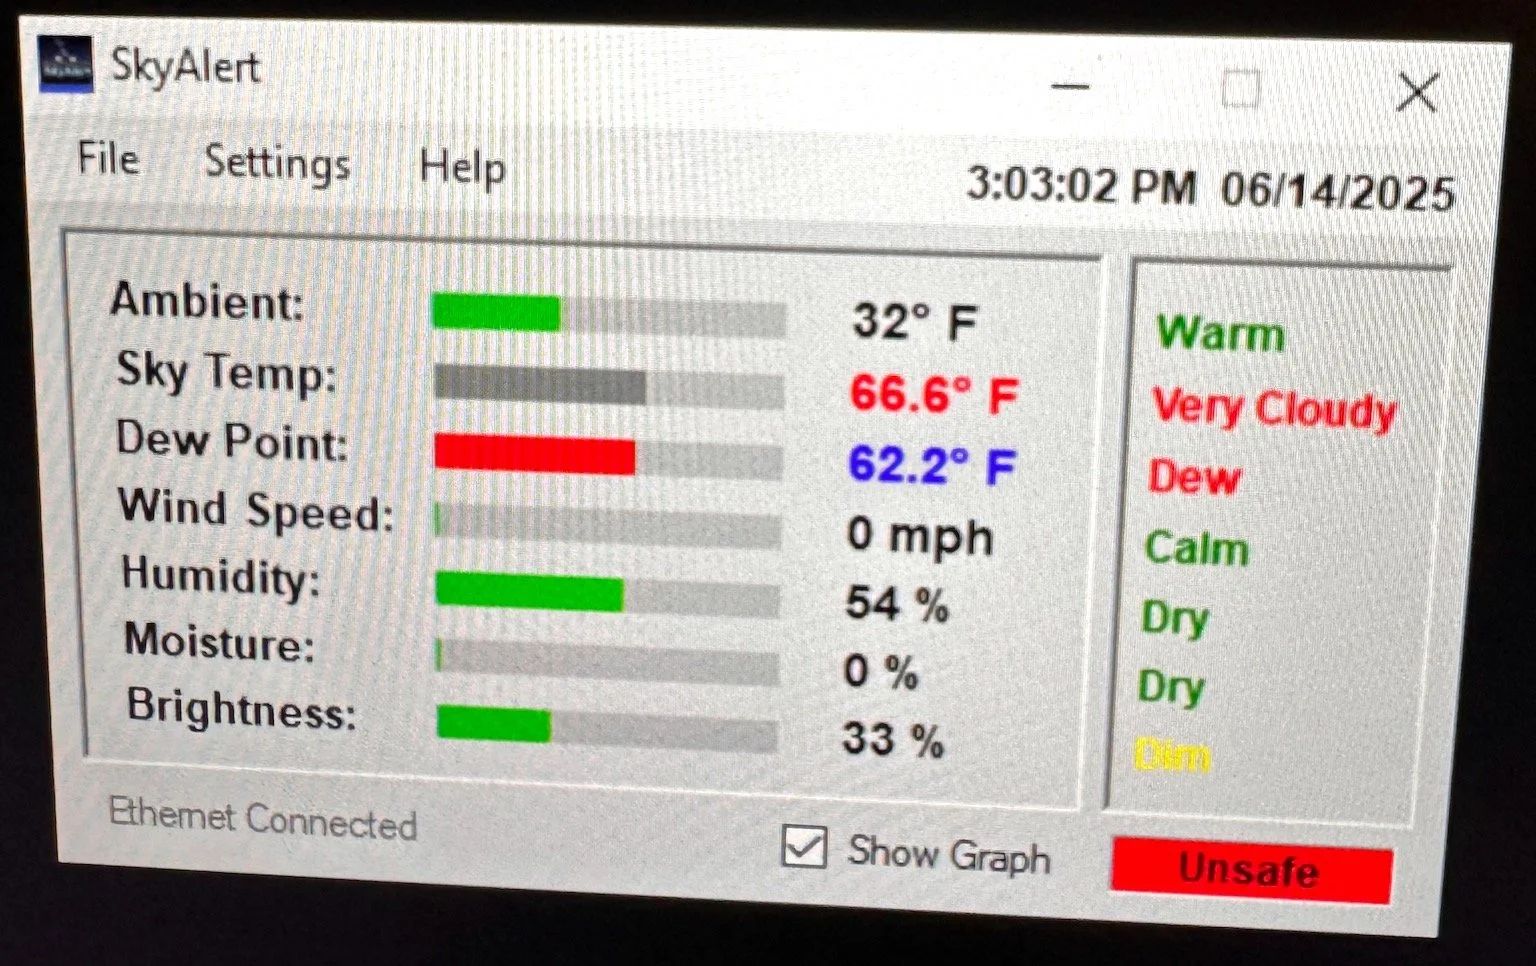
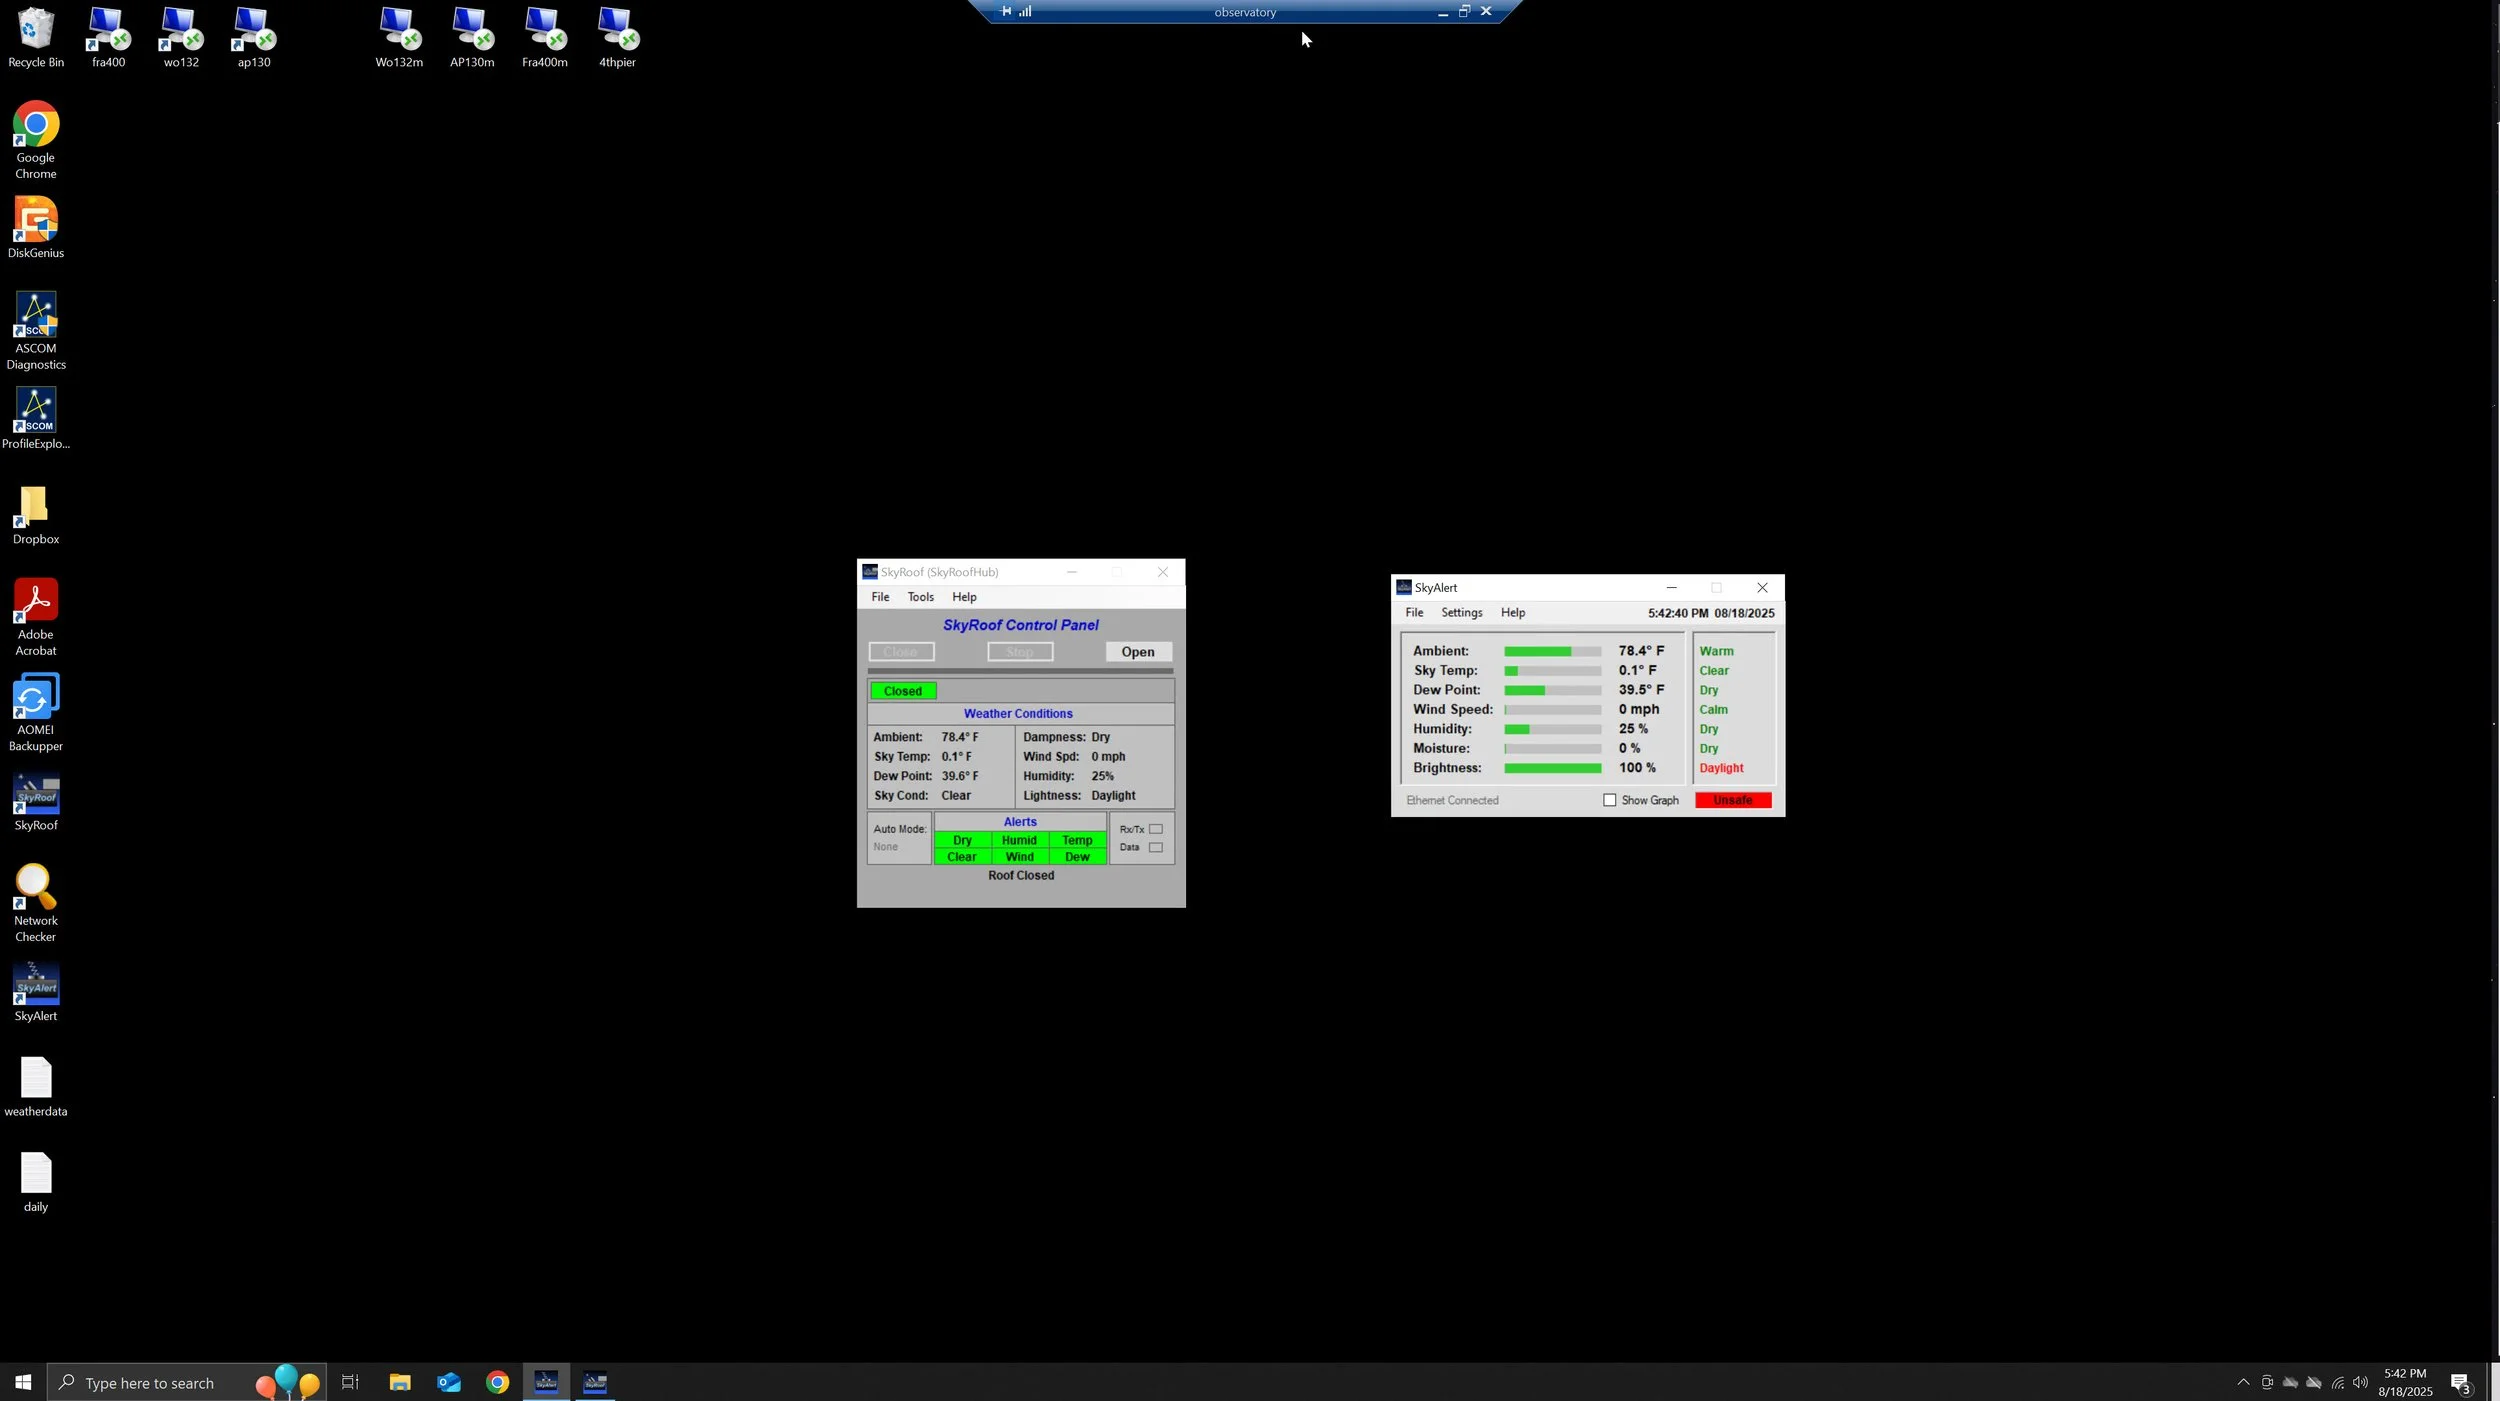
When you run the app, you get this main screen:
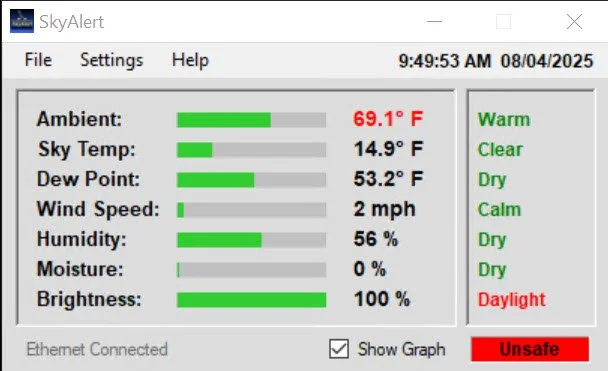
SkyAlert Main Panel.
This shows the basic data available from all of the sensors. It also shows a descriptive classification of each value, which is green unless it exceeds a predetermined threshold.
On the bottom right, you can see a red “Unsafe” message. In this case, it is because it is daylight.
If you check the “Show graph” box, you get a plot of weather conditions over time, shown graphically, as well as the sensor readings shown at the top. This was set up to show a 3-day rolling timeframe.
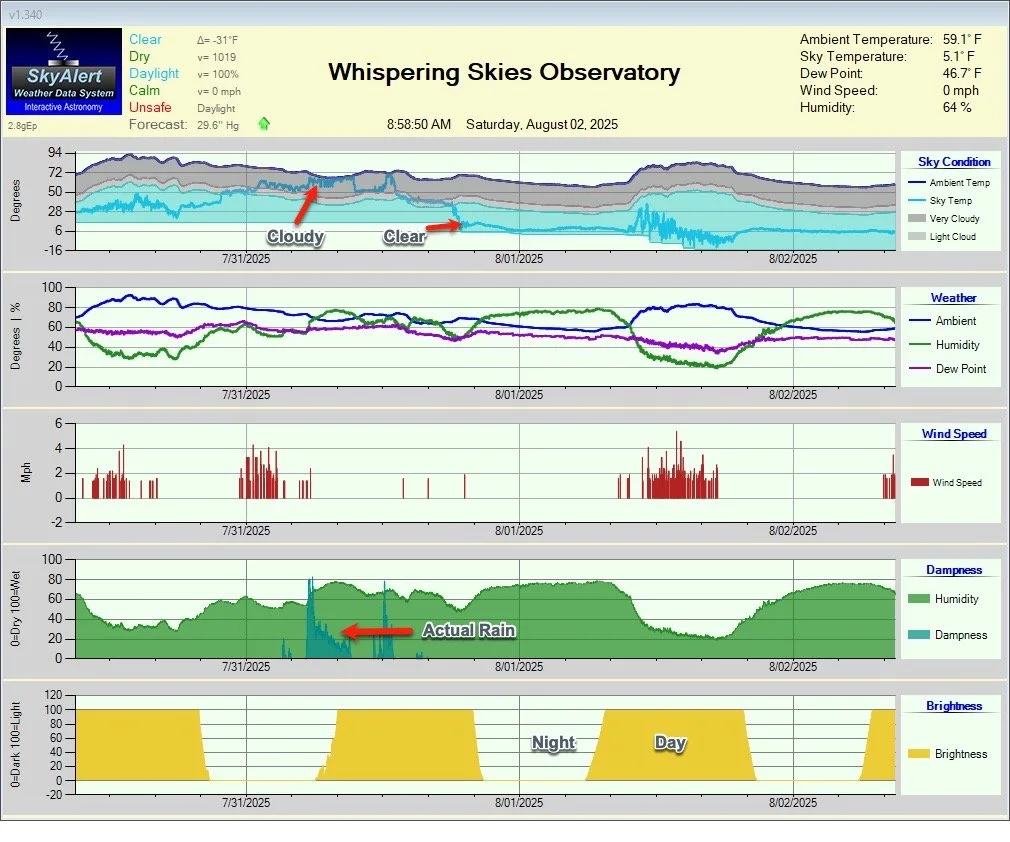
The Tracking Graph VIew. Note my Annotations.
The first graph shows the sky condition. This is basically a comparison of sky temperature versus ambient temperature. When the sky temperature enters the gray band, clouds are predicted.
The second graph shows the ambient temperature, humidity levels, and the dew point.
The third shows wind speed.
The fourth shows the humidity level and actual rain being sensed.
The final one shows brightness so you can see day vs night and the transitions,
At the top, you see a sensor value display along with the safety levels.
Much of this can be customized, as you will see in the settings section.
It also creates a series of useful data files.
The first is the one-line weather summary file - this standardized file is sometimes called "Clarity", “Boltwood II” or "WeatherData."
SkyAlert uses “WeatherData.” This is read by various other apps and in our case, the SkyRoof App.

The one line weather data summary file.
The one line format can be interpreted as follows:

The key to interpreting what is in the WeatherData file.
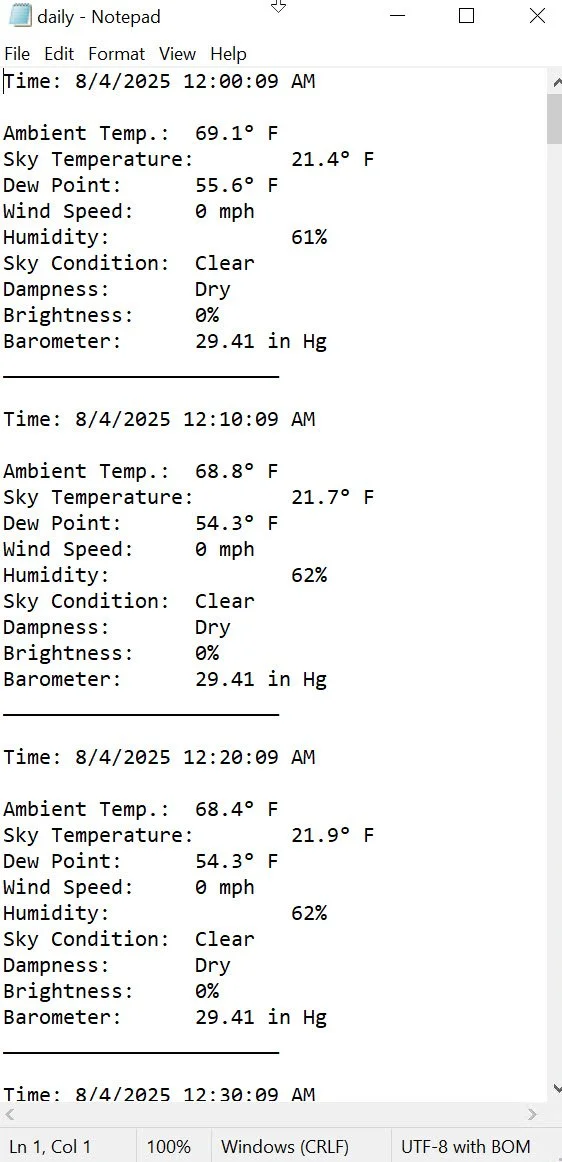
In addition this this, a daily record of these one line summaries is stored in another file and archived before the next day is started.

The Daily Archive.
Finally a weather summary, captured every 10 minutes, is written to another file that labeled for ease of reading.
The Weather Summary File.
I set all of these files to be stored in a directory that is mirrored on Dropbox. This way it is accessible to other computers in my network
Settings Available
Below is the main setup screen.

The main settings screen.
In the left column are the parameters that define operations.
This allows you to specify how connections are made and some options around operations.
You can enable the one-line weather file and specify where it will be saved.
The Cloud offset allows you to fine-tune the temperature offset for cloud determination for your area.
The next section allows for some definition of what constitutes a safe/unsafe situation.
And finally, some global options around the graphical presentation in the tracking screen.
The rest of the screen focuses on options for each plot shown in the tracking screen.
Working with SkyRoof Software
In many ways, SkyRoof software is similar to SkyAlert Software.
It has a main screen that shows the main status of the system and some software controls for the roof.
When opened without SkyAlert Data, it has a weather section that is not populated. But once you set up SkyRoof to grab the one-line weather file, this section comes to life.

SkyRoof running with no SkyAlert Connection.
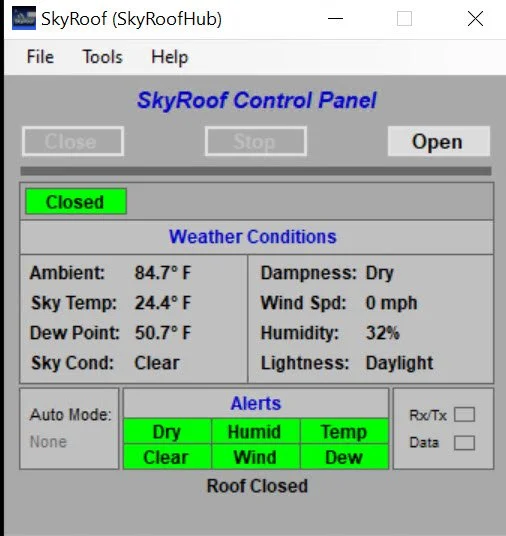
With the SkyAlert Connection. Note that the weather area is now populated.
To enable this, one goes to the Settings page, enables “Read Weather File,” and then points the software to where to find the file.
The section below that looks very much like the Safe/Unsafe section in SkyAlet. But in this case, we are talking about actions and alerts rather than classifying the current weather situation.
This section defines when you should close the roof and under what circumstances the roof can be reopened.
Finally, one of the most useful sections is the alerts. Skyroof allows email and SMS alerts. These can report roof actions - and this can also be used to provide weather alerts - something that SkyAlert software itself does not do.

The SkyRoof Setting Page.
To enable this, you must press the “Sms Settings” button and go to this page:

The expanded version of the email/sms setting page.
You can choose to send alerts via sms, email, or both.
But I did find a few “gotchas” here to be aware of:
If all you want to do is send an SMS message, you still MUST set up a working email address. This seems odd, but I have confirmed that this is the way the software works.
I have been told that the interface that allows the software to send SMS messages to phones with AT&T service plans is not currently functioning due to changes made by AT&T. So, unfortunately, I will not be able to use SMS alerts. This was disappointing, as this was the main service I wanted to use.
I was unable to set up my Outlook or Apple emails successfully. I put in the appropriate server parameters and used app-specific passwords, but no joy. The software does not give any helpful information to help resolve this. Sending a test message gives you a “Message send failed” message. Not very useful.
I was finally able to get a GMAIL account working, so I am now all set - but this turned out to be more troublesome than I expected. Alerts are a key feature here, and I ought to be able to use sms or any email for this purpose, but I could not.
ASCOM
Interactive Astronomy also provides an ASCOM SkyAlert Safety Monitor driver that you can install. Once installed, you can run most sequence control software applications, and under the safety monitor section, you can now see the SkyAlertASCOM driver.
I use NINA, so when I connect the Safety Monitor to the SkyAlert Ascom Driver, I can choose the settings button, and from there I can point to the WeatherData file location. Once this is chosen, Safe/Unsafe conditions are seen within that environment.
FailSafe
Should there be a hardware failure or a loss of data, SkyAlert will generate a message indicating the failure, and the user has two minutes to resolve the issue before an UNSAFE condition is set in the WeatherData file. This would cause SkyRoof to close the roof. This ensures that the roof is closed if things are going wrong.
The Good and… Opportunities for Improvement
The Good
My SkyRoof System has been a good performer in general, and the support I have gotten from Jim Collin is exceptional. The hardware seems well designed, and the combination of software and hardware seems very reliable.
My experience with SkyAlert is very similar.
I tend to walk slowly towards automation, doing small steps and proving to myself that everything is working as it should before moving forward. So, I am just now beginning to integrate SkyRoof and SkyAlert.
However, I fully expect the system to operate as advertised.
Good Hardware
Reliable Software
Excellent Support
Appropriate Expectations
If you have ever had a weather system before, the chances are that you are most familiar with weather tracking or prediction systems. This is a device consisting of a group of weather sensors designed to predict the oncoming weather or record current and past weather conditions.
Buying a SkyAlert system, you might think you are getting a traditional weather system. However, that is not the case.
SkyAlert is a system of weather sensors that monitors environmental conditions to determine safe or unsafe conditions. If you are expecting a general weather prediction or tracking system, you might be disappointed.
For example:
It will tell you the Barometric Pressure:
It won’t track it over time
It will tell you it’s raining:
It won’t tell you how much rain you had over a period of time
It won’t tell you when it will rain.
It will tell you the wind speed. It will not tell you:
wind direction
average wind speed over a period of time
the speed of wind gusts encountered.
So if you understand that, then you are less likely to be disappointed.
Opportunities for Improvement…
While the software is reasonably well-designed and reliable, it seems a bit dated.
The main screens are very small, especially when shown on modern high-res 4K screens. There is no provision for making the displays larger, and they don’t follow standard window resizing behaviors that would allow you to do that. That can make the display very small and hard to read. This is especially true in an observatory setting where you might want to look across the building to see the info on these screens.
The graphics are simplistic and limited.
If your system has been running for 3 days, or for the duration you have set for your graphical tracking display, it will be fully populated. But if the app quits or your computer crashes, the graph will take a few days to refill this window and repopulate the display. The app itself is saving file data on all of this history, so I don’t understand why you could not repopulate that missing data with archived readings.
There is no provision for controlling the app from a phone. In this modern age, everybody wants a phone app to control things.
A key feature is the ability to communicate alerts. However, SMS is not working with my provider (AT&T), and I was unable to use my first two choices for an email service provider. Now this may very well be related to changes made by those email and phone cell providers, but this needs to be dealt with. It might also be good to have some alternative notification services, such as those used by the NINA Plugin Ground Station, such as Pushover.
I am not trying to be nitpicky here. I like the system and I wish these aspects would be addressed in future releases. I am hoping that they will, as I think this will make for a better and more robust solution.
As referenced in the first bulet above, the main screens for the SkyAlert and the SkyRoof App can get lost on a larger higher resolution 4K monitor.
The Bottom Line
I am happy with my purchase and fully expect the system to do what I wanted to do. There is some room for improvement, and I hope that Interactive Astronomy continues to improve this system over time.
I will update this review as I get more experience with the unit, so stay tuned!