
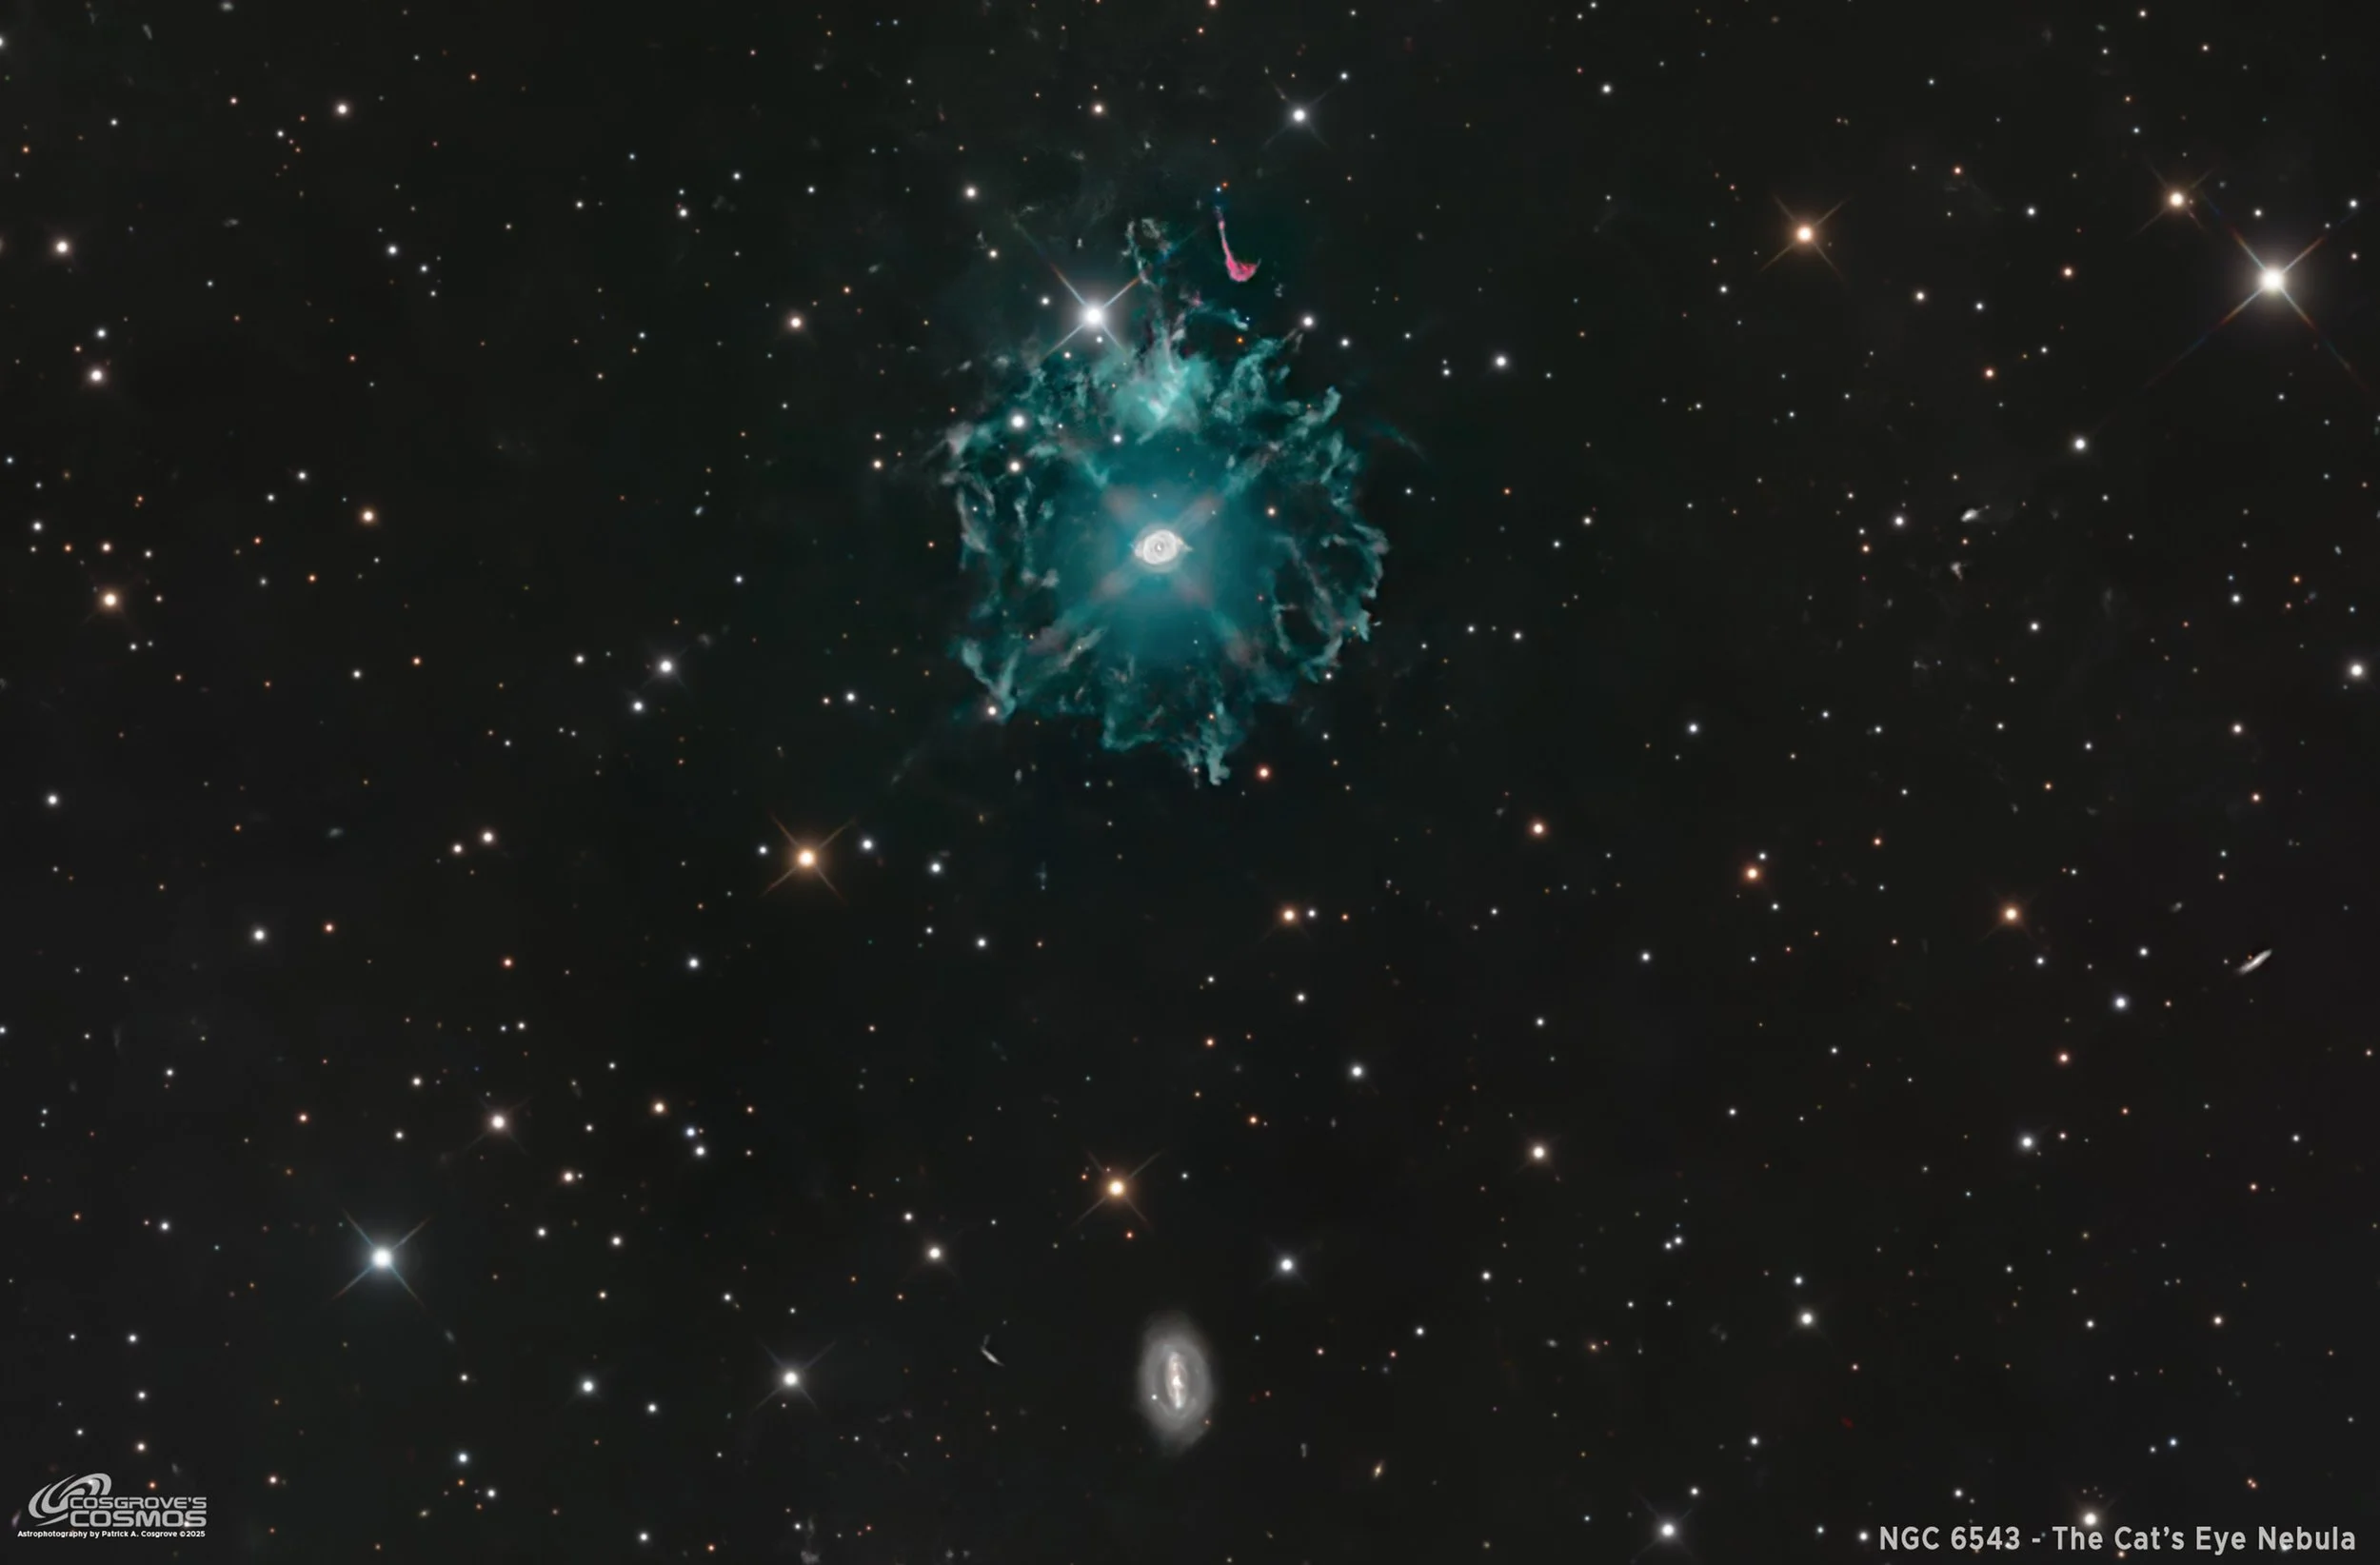
NGC 6543 - The Cat’s Eye Nebula w/ NGC 6522 (14.6 hours in LRGB)
Date: Aug 10, 2025
Cosgrove’s Cosmos Catalog ➤#0144
The processing of this faint nebula drove me barking mad.! (click for access to full res image via Astrobin.com)
Table of Contents Show (Click on lines to navigate)
About the Target
Overview
NGC 6543, more commonly known as The Cat’s Eye Nebula, is a famous planetary nebula in the northern constellation Draco. It is also known as Caldwell 6, and historically, it has also been referred to by less common names such as the “Snail Nebula” and “Sunflower Nebula,” though these are rarely used today.
Of course, a planetary nebula is not related to planets at all – it is an expanding cloud of ionized gas ejected by a dying Sun-like star near the end of its life.
NGC 6543 is one of the more famous and most complex examples of this, located roughly 3,000 light-years from Earth in the direction of Draco. Its glowing gaseous envelope spans only a few light-years across. Telescopically, the bright core of this nebula can be seen with a distinctive shape, earning its common name.
Discovery and Scientific Significance
This nebula was discovered on February 15, 1786 by astronomer William Herschel, one of the first planetary nebulae ever identified.
Early observers like Herschel noted its round, disk-like shape in small telescopes, which is why he coined the term “planetary nebula,” thinking such nebulae resembled the disks of Uranus or Neptune.
Nearly a century later, on August 29, 1864, English astronomer William Huggins made the Cat’s Eye Nebula a milestone in science by observing its light with a spectroscope. Huggins discovered the nebula’s spectrum was dominated by bright emission lines instead of a continuous spectrum, proving that planetary nebulae consist of hot glowing gas rather than stars or clusters.

William Herschel (1738-1822) From: Wikipedia
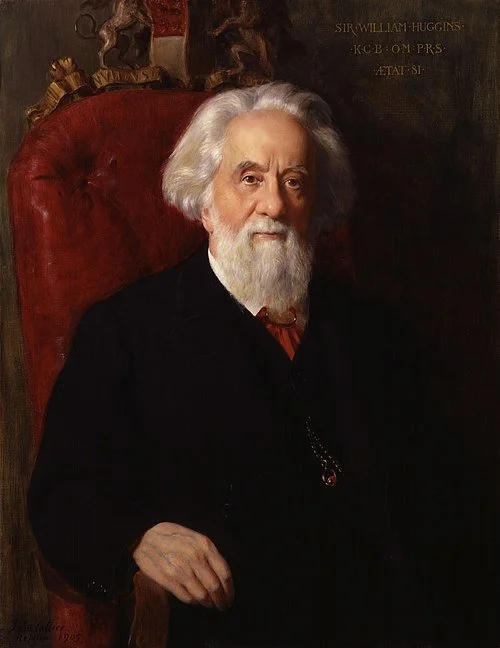
Sir William Huggins (1824 – 1910) From Wikipedia
NGC 6543 was in fact the first planetary nebula to have its spectrum studied, a breakthrough that revealed its gaseous nature. Since then, the Cat’s Eye has been studied extensively across the electromagnetic spectrum, from radio waves to X-rays, making it one of the most examined nebulae in the sky. Hubble Space Telescope images in the 1990s and 2000s greatly advanced our understanding of NGC 6543, unveiling its beautiful yet baffling internal structure in unprecedented detail.
Structure and Characteristics
The Cat’s Eye Nebula is often cited as one of the most complex planetary nebulae known. High-resolution images reveal a wealth of structures: a bright elliptical core with concentric rings, intricate filaments, knotty clumps of gas, and even bipolar jets. At the heart of this nebula is a dying star (the planetary nebula’s central star) which is extremely hot – classified as a Wolf–Rayet type star – that illuminates the surrounding gas and drives powerful stellar winds. Over thousands of years, this star has shed its outer layers in a series of pulses, creating multiple spherical shells of material.
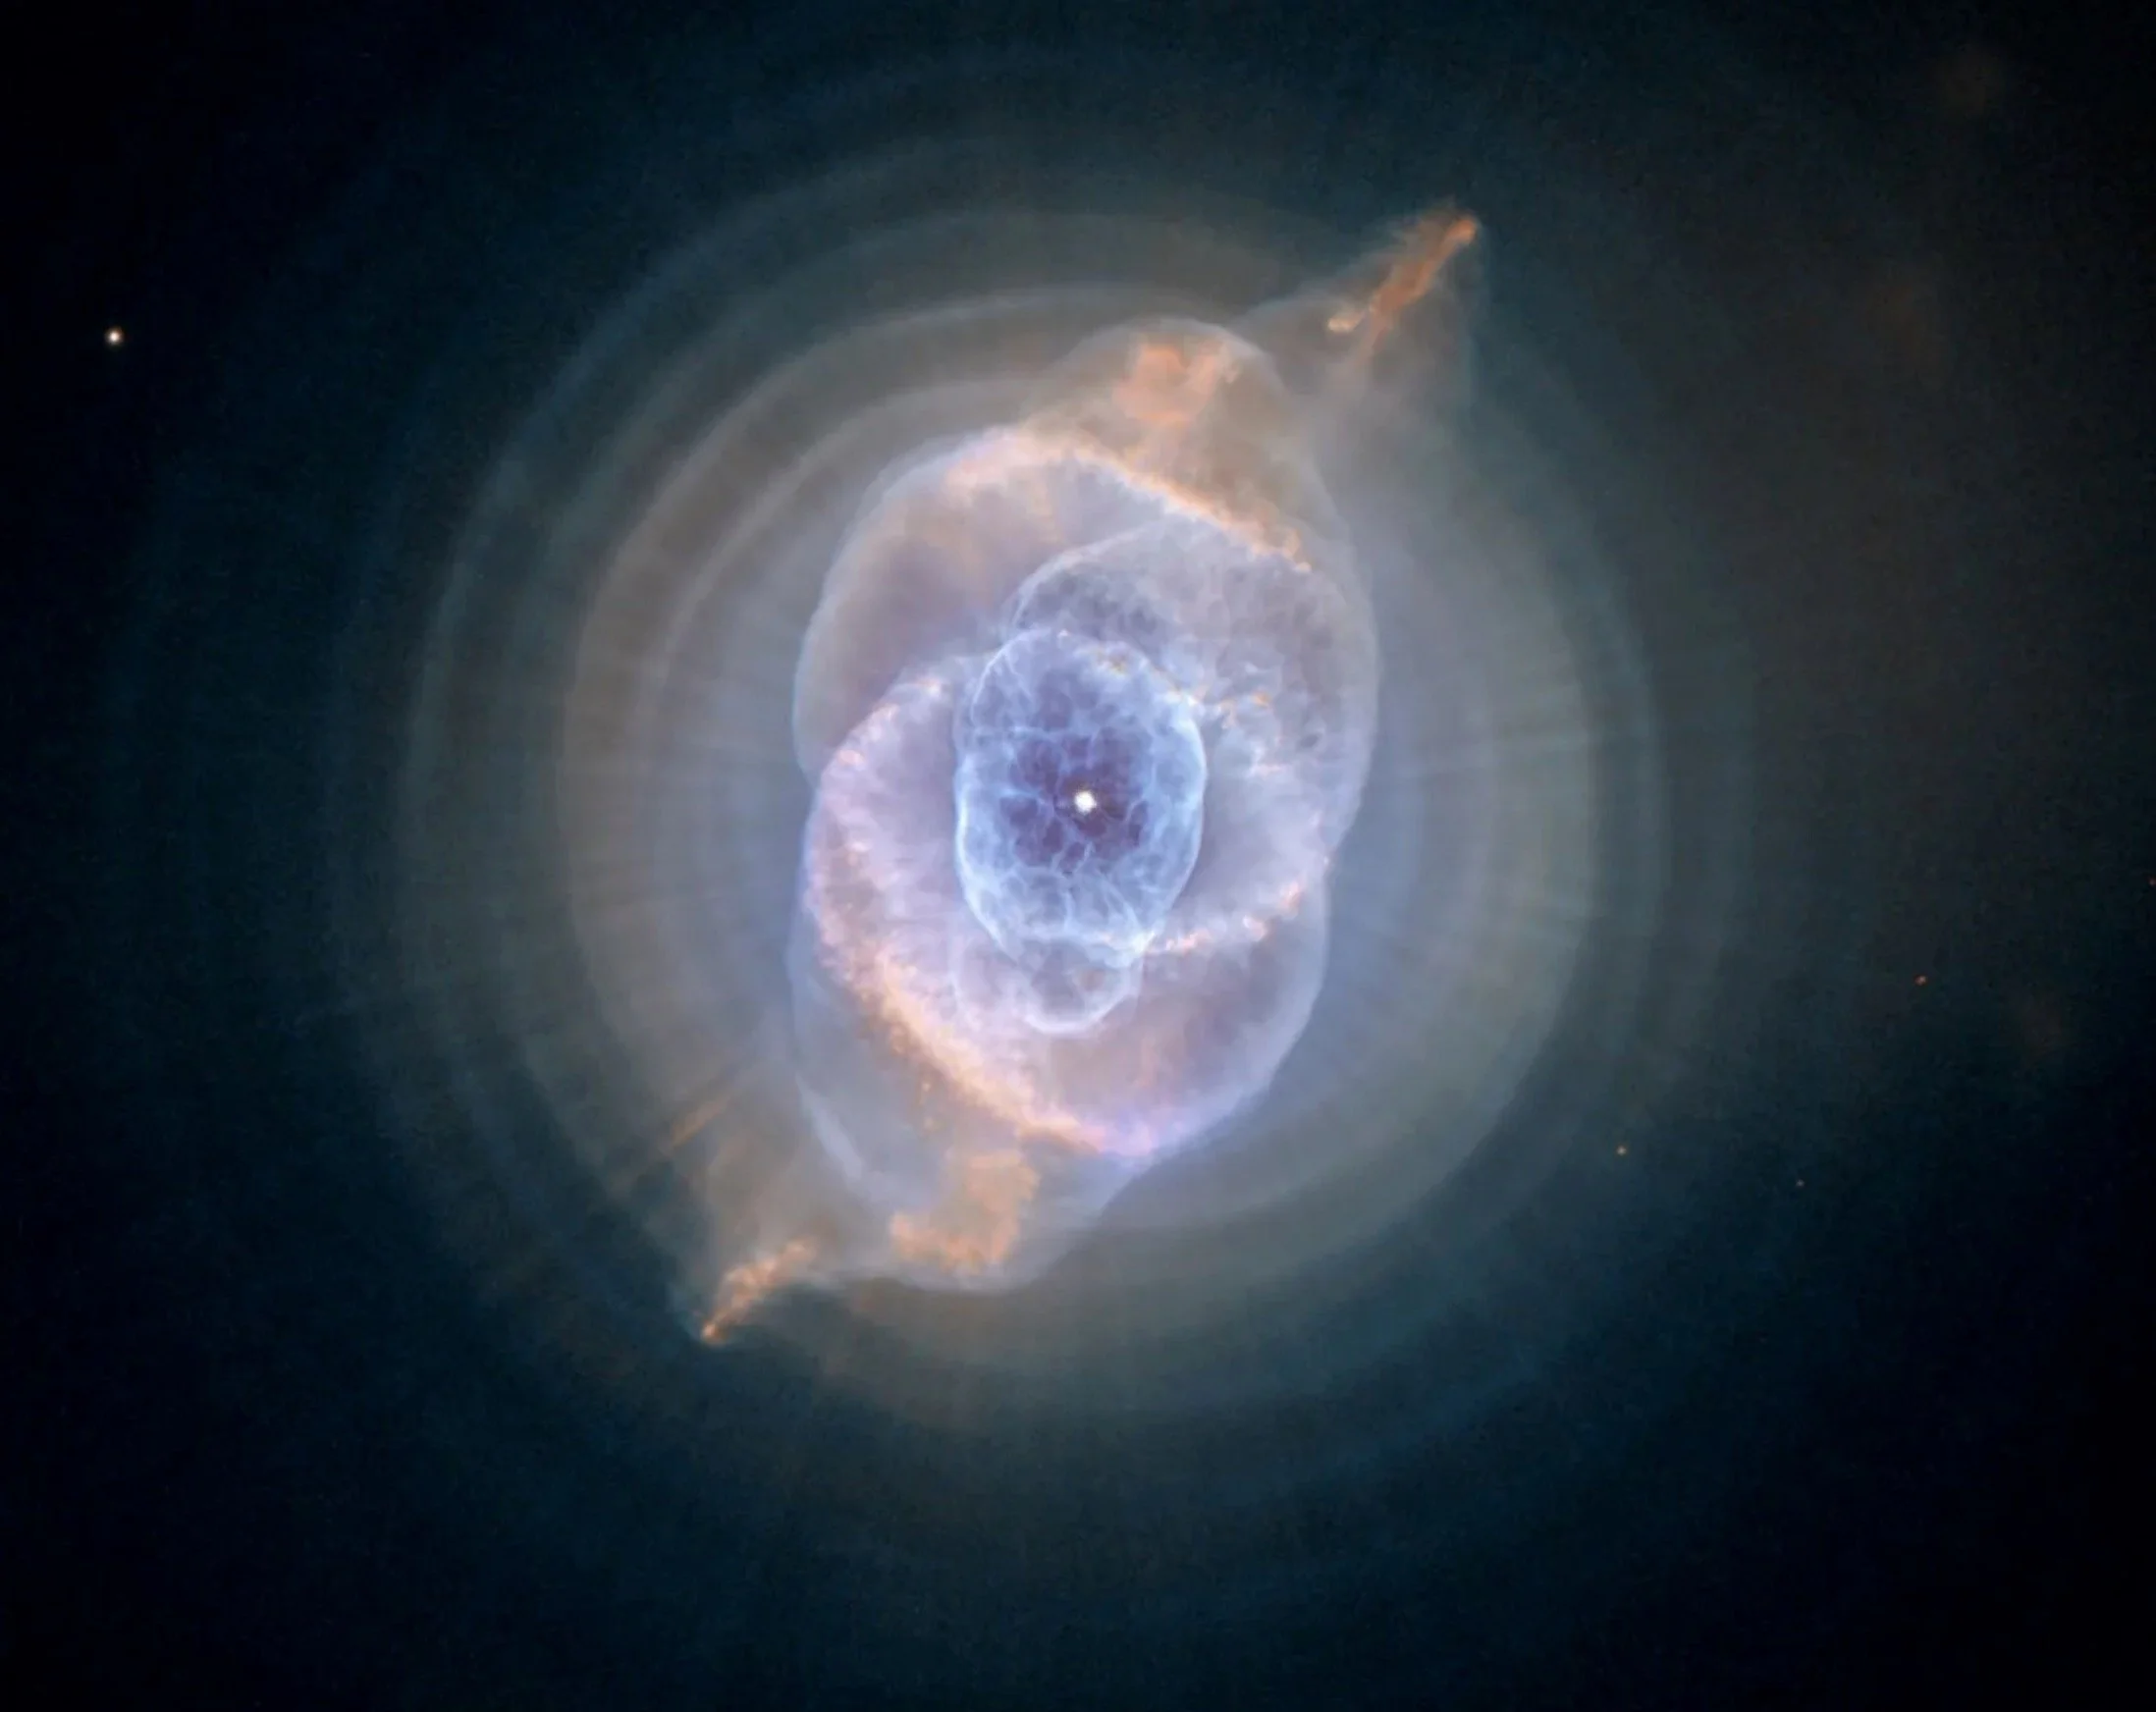
The Cat’s Eye as seen by the Hubble Space Telescope - Credit: NASA, ESA, HEIC, and The Hubble Heritage Team (STScI/AURA)
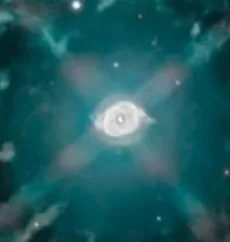
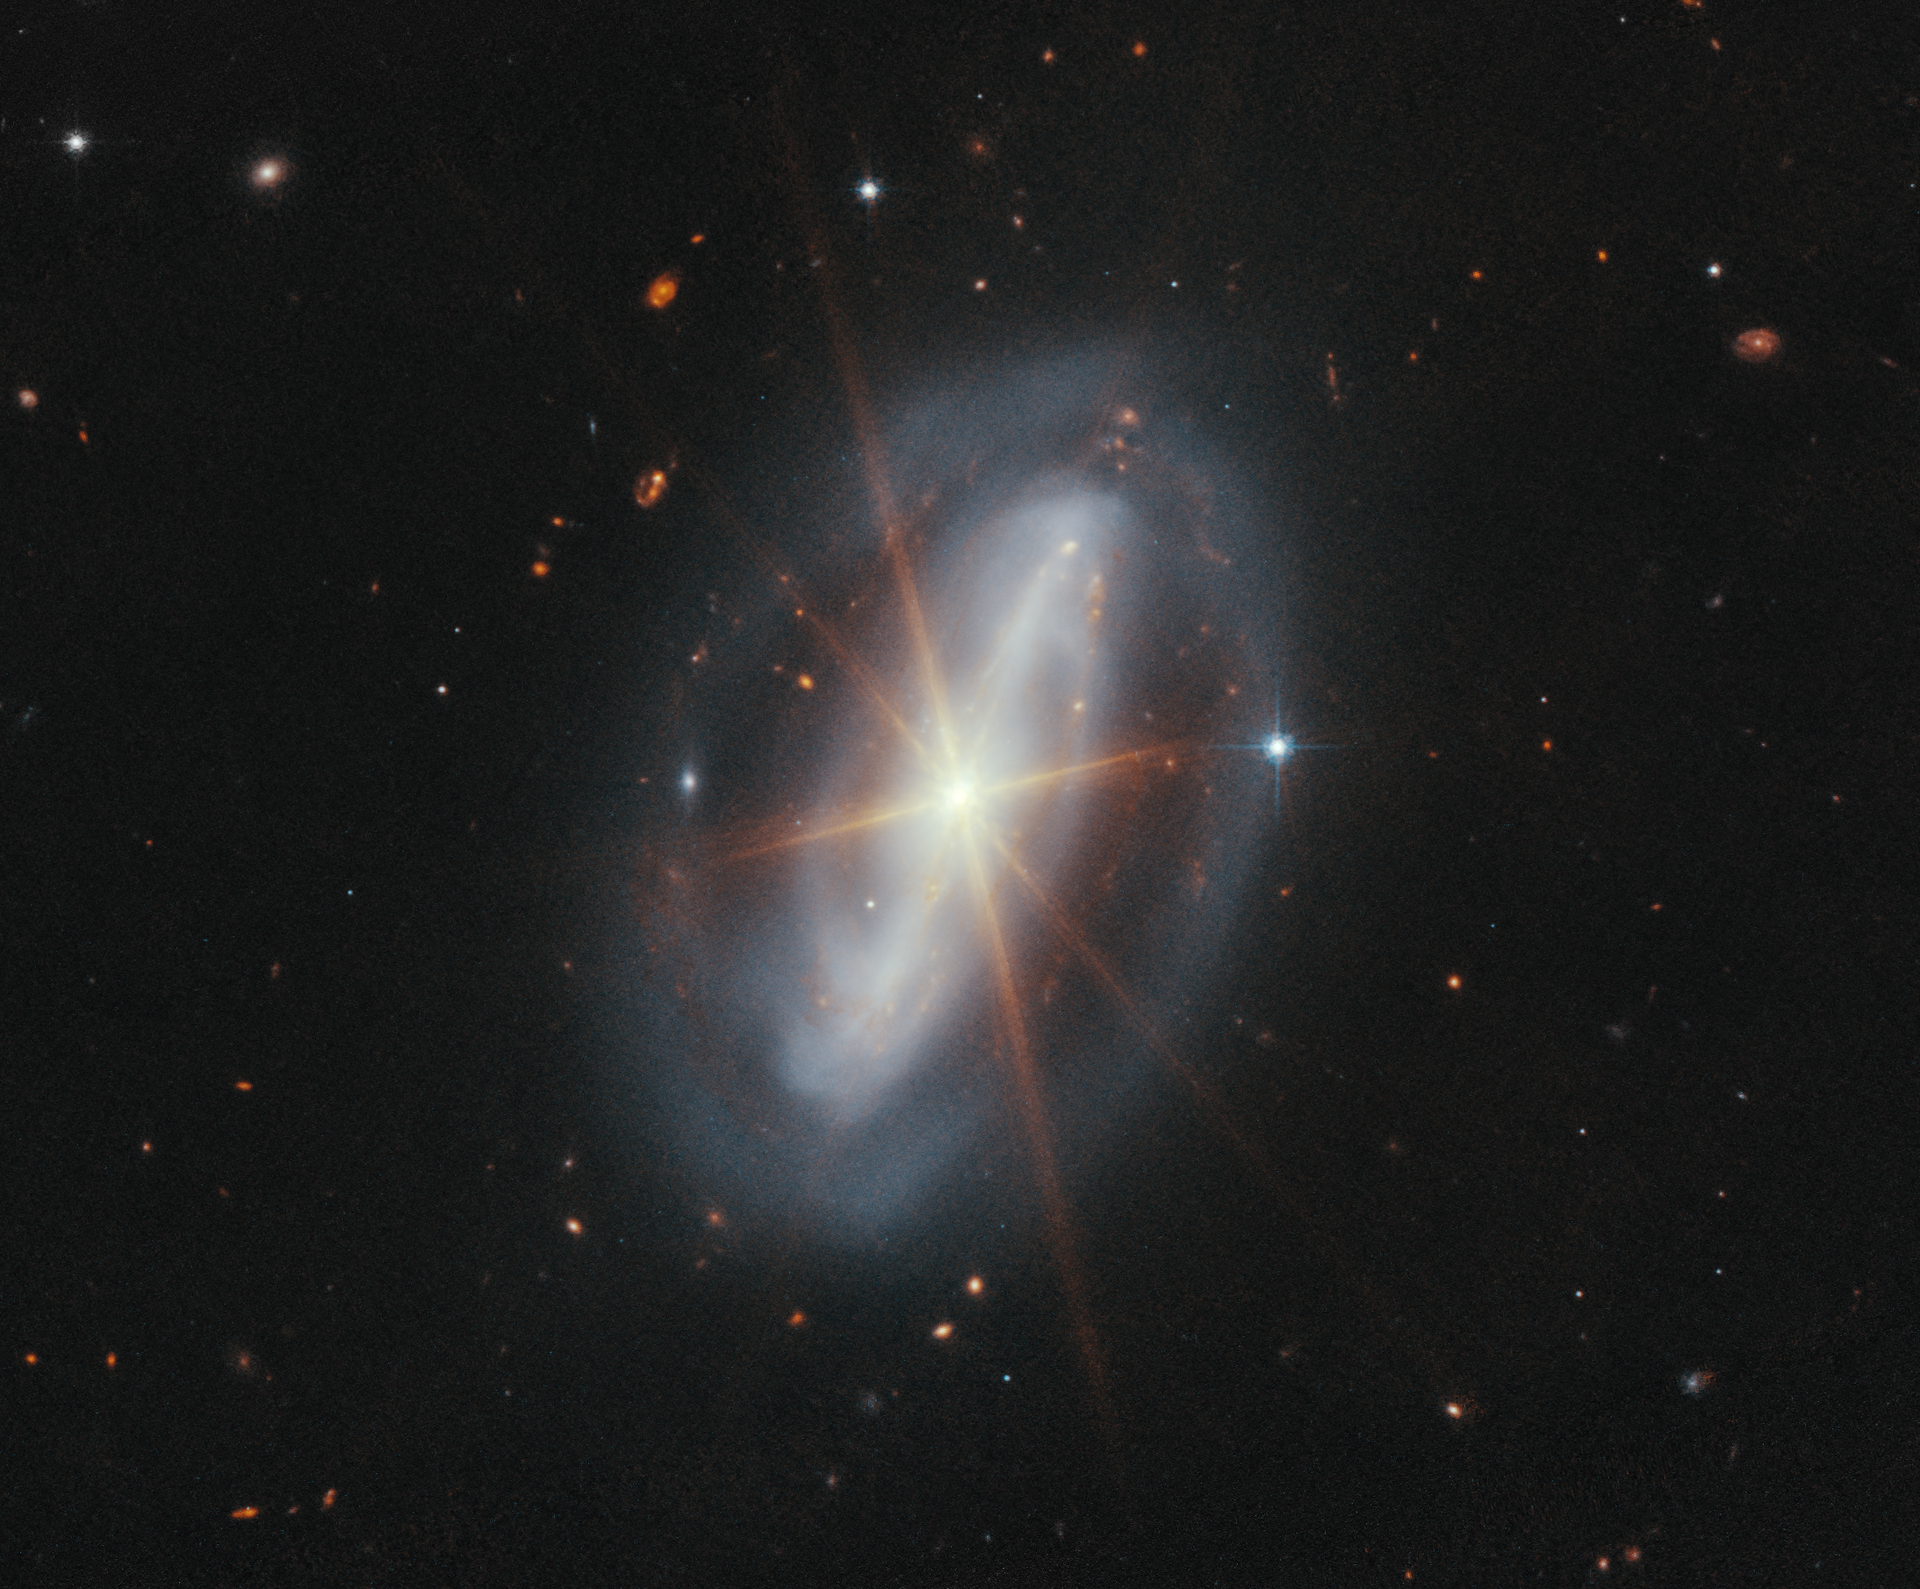
From my image - almost identical to what Hubble got - right? OK, maybe not!
Deep photographs show a faint outer halo about 5 arc minutes across, ejected earlier when the star was in its red giant phase. The bright inner nebula, by contrast, is only about 20–25 arc seconds in diameter – a tiny “eye” at the center of a much larger, dimmer halo of gas. Temperature measurements indicate the nebula’s main body is about 7,000–9,000 K, while the thin outer halo is even hotter (~15,000 K) but far more diffuse. The central star itself is incredibly luminous (thousands of times brighter than the Sun) with a surface temperature of ~80,000 K, and is blowing off material at a prodigious rate (on the order of 10^-7 solar masses per year) via fast winds ~1,900 km/s. All of these factors make the Cat’s Eye Nebula a rich laboratory for astronomers studying stellar evolution.
One of the most intriguing aspects of NGC 6543’s structure is the regular spacing of its concentric shells. Astronomers estimate there are about 11 or more distinct rings visible, like ripples in a pond. This pattern suggests the central star experienced a series of periodic convulsions or pulses every ~1,500 years that expelled massive shells of gas and dust. Remarkably, each shell contains roughly the mass of all the planets in our Solar System combined (though still only about 1% of the Sun’s mass). The cause of these evenly-timed pulses is not yet fully understood – they came as a surprise to astronomers, who didn’t expect a dying star to shed mass in such a cyclic fashion. Some hypotheses propose that cyclical magnetic activity (somewhat like an extreme stellar analog of the Sun’s sunspot cycle) could drive the pulses, or perhaps an undetected companion star periodically influences the ejections. Another idea is that the stellar wind blows off material fairly continuously, but the gas later forms wave-like instabilities that appear as separate rings. This ongoing research means the Cat’s Eye Nebula remains an enigmatic object – as one NASA description puts it, “as well known as it is enigmatic” – offering astronomers a visually stunning “fossil record” of a dying star’s final stages.
Observing and Interesting Facts
The Cat’s Eye Nebula holds a special place both in professional astronomy and among sky enthusiasts. It has one of the highest surface brightnesses of any nebula, meaning it appears quite bright through a telescope despite its small size. With an apparent magnitude around 8–9, NGC 6543 is bright enough to be seen in amateur telescopes as a tiny, bluish-green disk of light. Visually, it may appear stellar at low magnification, but higher magnification will reveal a small oval nebula with a hint of internal structure.
Located in the constellation Draco, the Cat’s Eye is circumpolar (always above the horizon) for many northern observers and is best seen on summer nights in the Northern Hemisphere. Draco lies near Ursa Minor (the Little Dipper), not far from Polaris, so NGC 6543 rides high in northern skies. Observers at mid-northern latitudes can spot it by star-hopping in Draco, while those in the far southern hemisphere, unfortunately, cannot see it due to its far-northern declination. (It just barely peeks above the horizon for observers near the equator in winter months.) For amateur astronomers, NGC 6543 is a rewarding target.
In addition to its Caldwell 6 listing, it was one of the first planetary nebulae ever discovered and thus has historical significance in telescope observing lists. Through a moderate telescope, the Cat’s Eye Nebula appears small but distinctive, often described as a greenish or aqua-colored disk. Using averted vision (looking slightly off to the side of the object rather than directly at it) can help bring out more of its faint halo and “billowing” outer gas clouds in the eyepiece. Astrophotographers prize this nebula for its intricate detail; long-exposure images reveal the breathtaking concentric shells and delicate inner filaments. The Hubble Space Telescope’s famous pictures of the Cat’s Eye Nebula have further popularized it, showcasing its beauty to the public and making it an iconic example of a planetary nebula. In fact, the nebula’s delicate, symmetric structure is frequently compared to a cosmic eye, and it stands as a testament to the fascinating and complex outcomes of stellar death.
NGC 6552
Towards the bottom of the frame, about 9–10 arcminutes away, you’ll find NGC 6552 (also cataloged as UGC 11096/PGC 61252), a faint barred spiral galaxy measuring only ~1′ across, with a visual magnitude of V ~14.6. One interesting fact is that it sits almost exactly on the North Ecliptic Pole!
While the Cat’s Eye Nebula is located relatively close by in our own galaxy, NGC 6552 is located at a distance of roughly 390 million light-years away!
It hosts a heavily obscured Seyfert-2 nucleus—one of the classic Compton-thick Active Galactic Nuclei. This means that the black hole at its center is heavily obscured by gases. It was first flagged in X-rays in the 1990s and now probed in the mid-IR by JWST/MIRI, which resolves an ionized nuclear outflow. Though tiny in the field, it’s a neat background counterpoint to the nearby planetary nebula!
A color composite of JWST commissioning data and some earlier, coincidentally imaged HST data. The nucleus of the galaxy is blatantly active when viewed in infrared with JWST. Red-orange: JWST/MIRI F560W Blue-cyan: HST/ACS/WFC F814W North is 123.96° clockwise from up. Credit: “NGC 6552” by Judy Schmidt, CC BY 2.0

And here is my zoomed-in version of NGC 6552 - More detail that I would have expected!
Annotated Image

Image created with Pixinsight’s ImageSolver and AnnotateImage scripts.
Location in the Sky
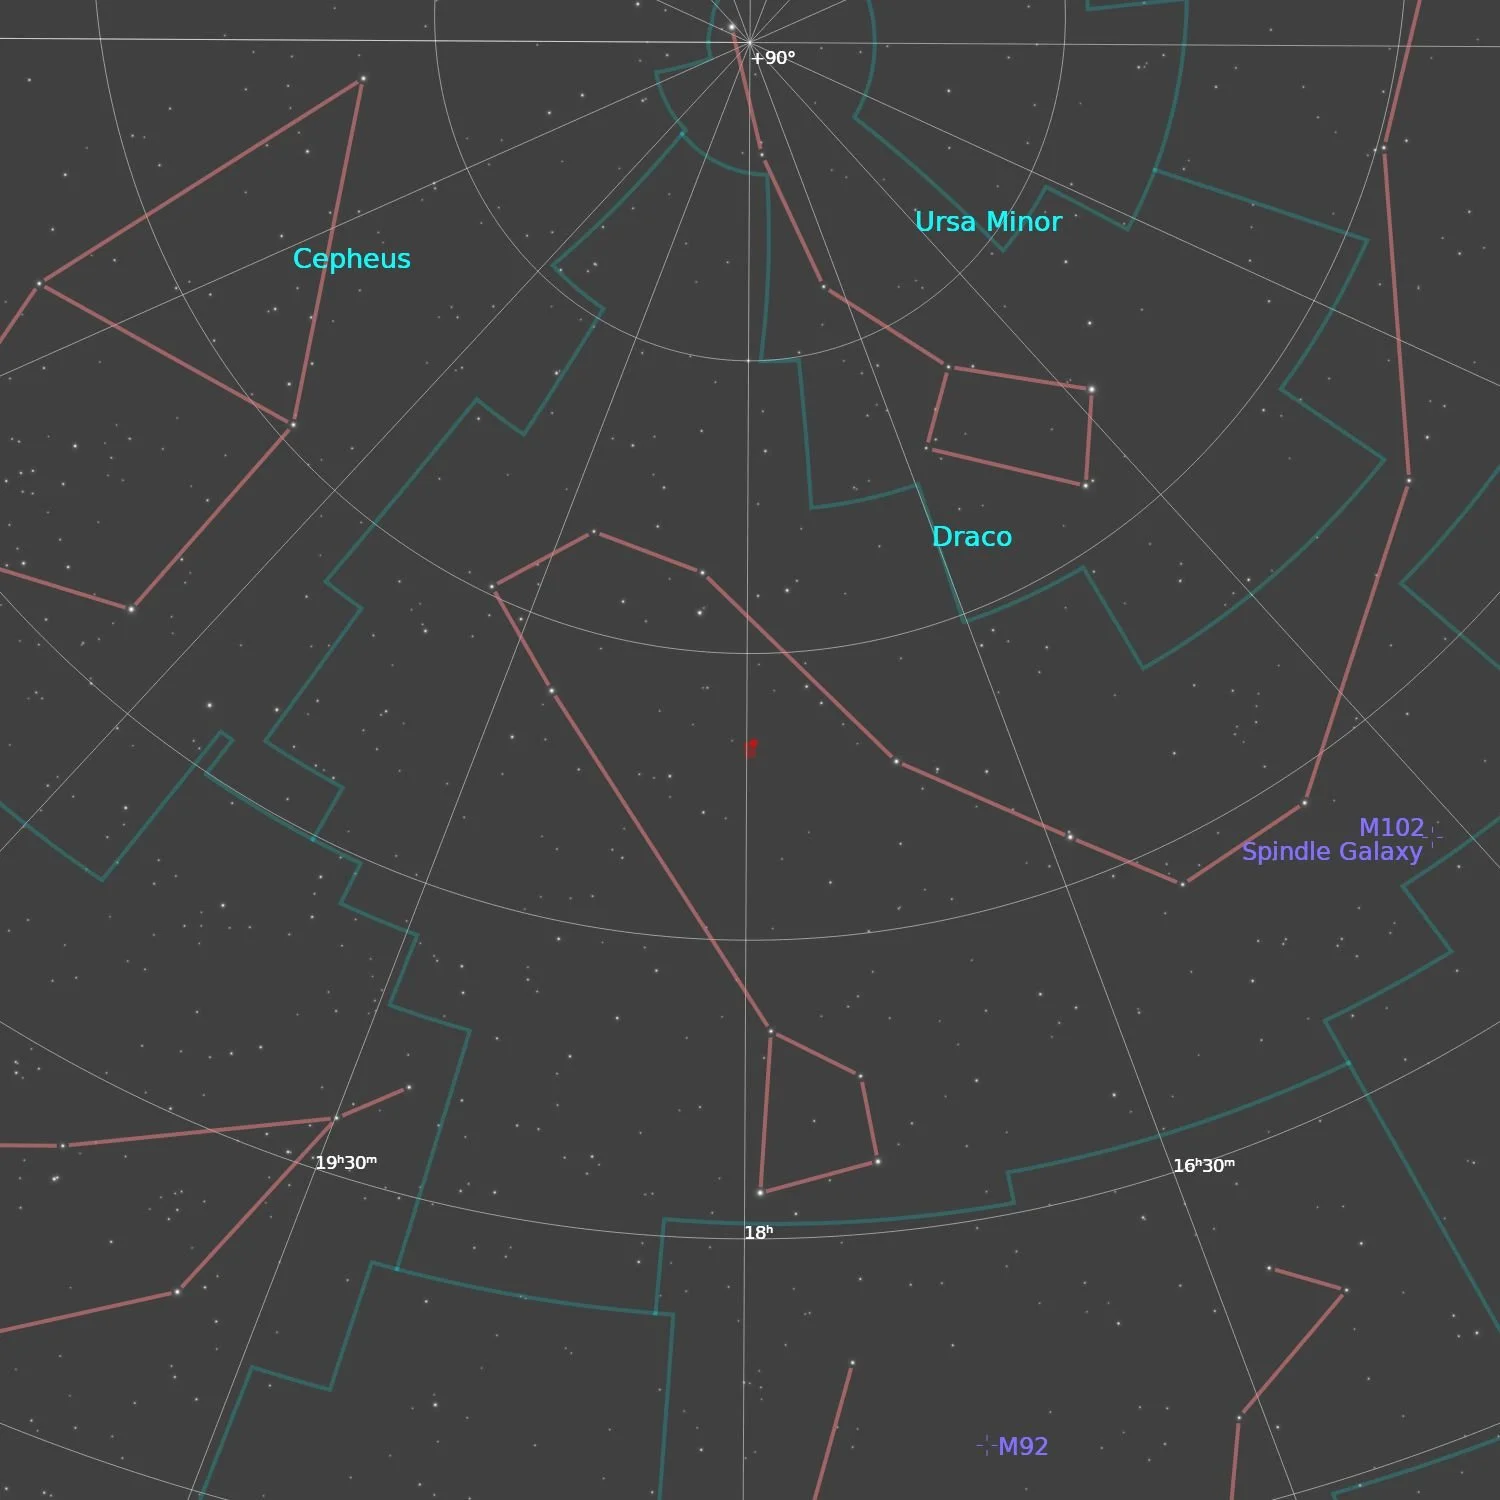
Findershart created with Pixinsight’s ImageSolver and FinderChart scripts.
About the Project
This was my third project with the Sharpstar SCA 260 V2 Platform. I was looking for something small that would test the system, and I came across the Cat’s Eye Nebula.
I was familiar with this target and knew it could be challenging. The core of the nebula is rather bright and can be observed with a moderate telescope. However, the extended nebula is very faint and difficult to image, and I discovered, difficult to process.
At least it drove me barking mad as I attempted to get the best image from it!
Data Capture
Towards the end of July, we did not have many great nights, but every clear night, I set up and started capturing subs. Clouds moved in many nights and cut off my sessions. But having an observatory now lets me pursue those iffy opportunities.
I was able to capture on the nights of July 15, 19, 20, 21, and 23.
In the end, I had captured almost 16 hours of data!
As I indicated, I used the SCA260 V2 platform and elected to go after LRGB broadband data, nd because we were still having an unseasonably hot weather, I chose the target cooling aim of -10C.
Since I do not have a rotator on the scope, I decided to use the darks and the flats from my previous project.
Image Processing
The image processing for this image was more difficult than I expected.
My intention was to follow my normal narrowband workflow, which looks like this:

But as I progressed, I realized that I had a problem.
When I used StarXterminator to remove the stars, I found that the “eye” of the nebula was pulled out as a star. I figured - no big deal! I will process the stars and then pay special attention to the “eye”.
I tried that and expected things to look good, but I found that when the stars were added back in, the nebula around the eye had artifacts that I did not like. So I processed it using a more traditional workflow where I kept the stars in the image throughout.
Another problem I had was a weird non-uniformity in the background sky.
I suspected that this was due to a slight light leak in the gear when I shot my darks. I tried to use DBE to handle this, and I thought it might work out. However, the nebula is so faint that you need to do some aggressive stretching to bring it out. Unfortunately, this also brought up the nonuniformity in the background sky. The only way I could deal with this was to bury the problem in the black.
I also really hit the nebula with a lot of sharpening, and in the end, I thought it had an unnatural look to it.
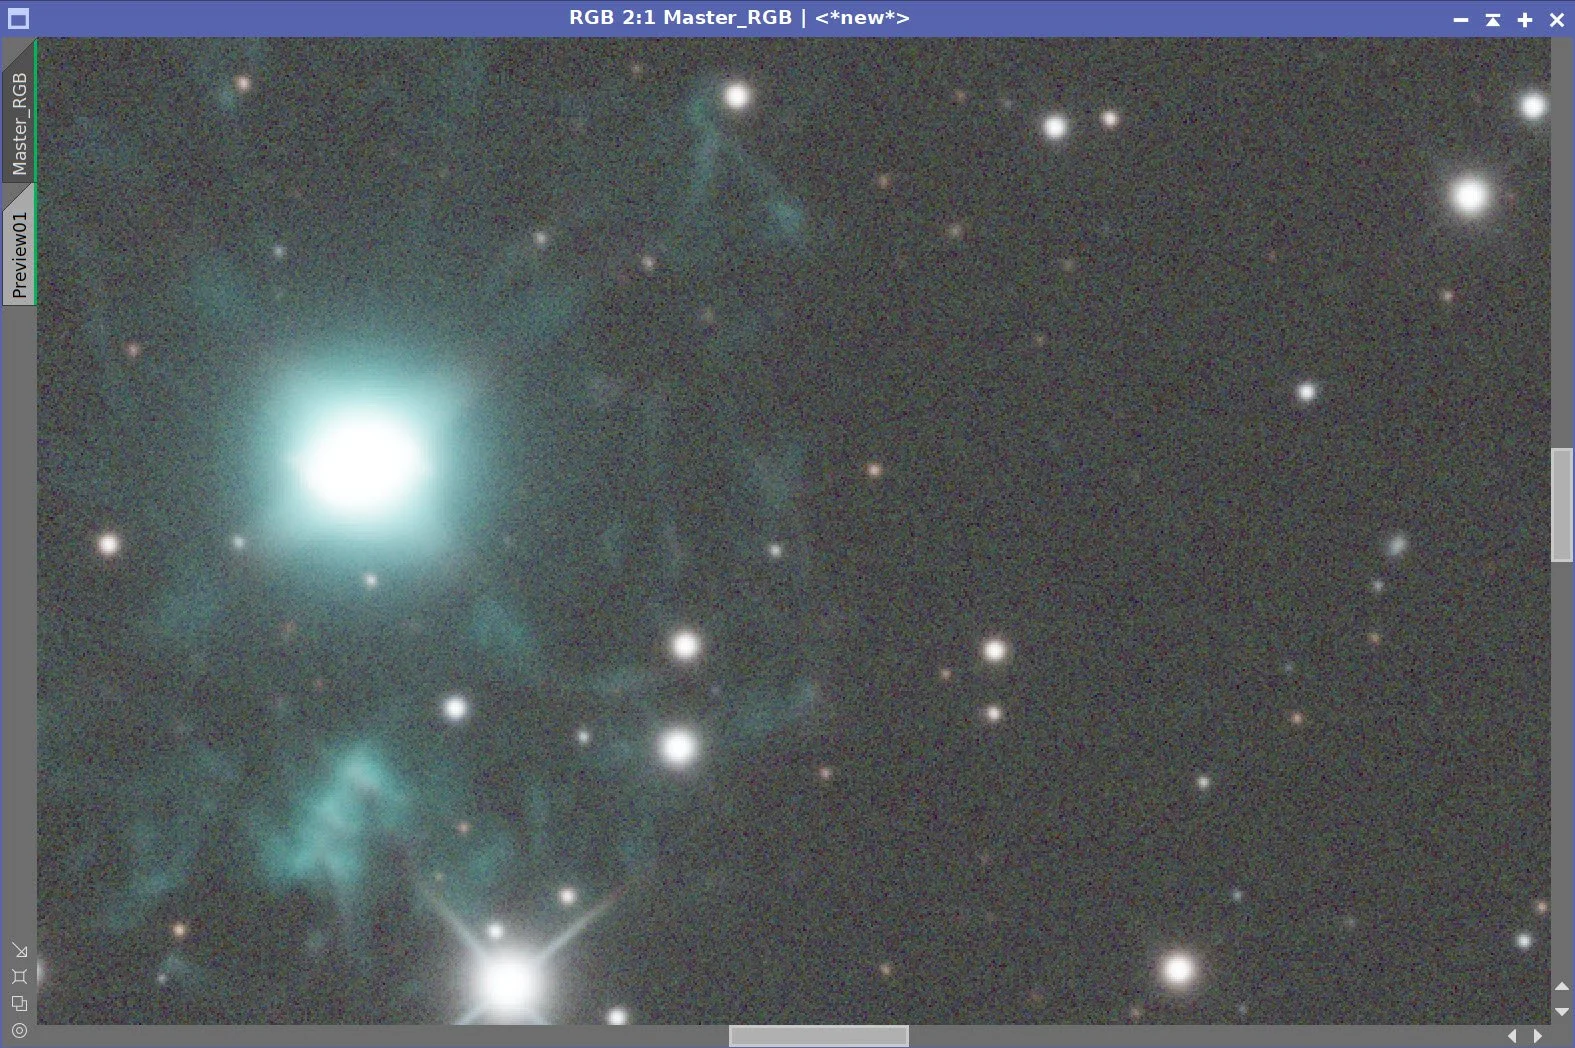
The resulting image looked like this:

An early version of the image with clipped blacks and overly processed nebula.
I tried re-processing this image - starting back at the master image - two or three times. But the result did not look good to my eyes.
I started to obsess over this image!
I finally did a major reset:
I reshot all of my cal frames at night so there could be no light leaks
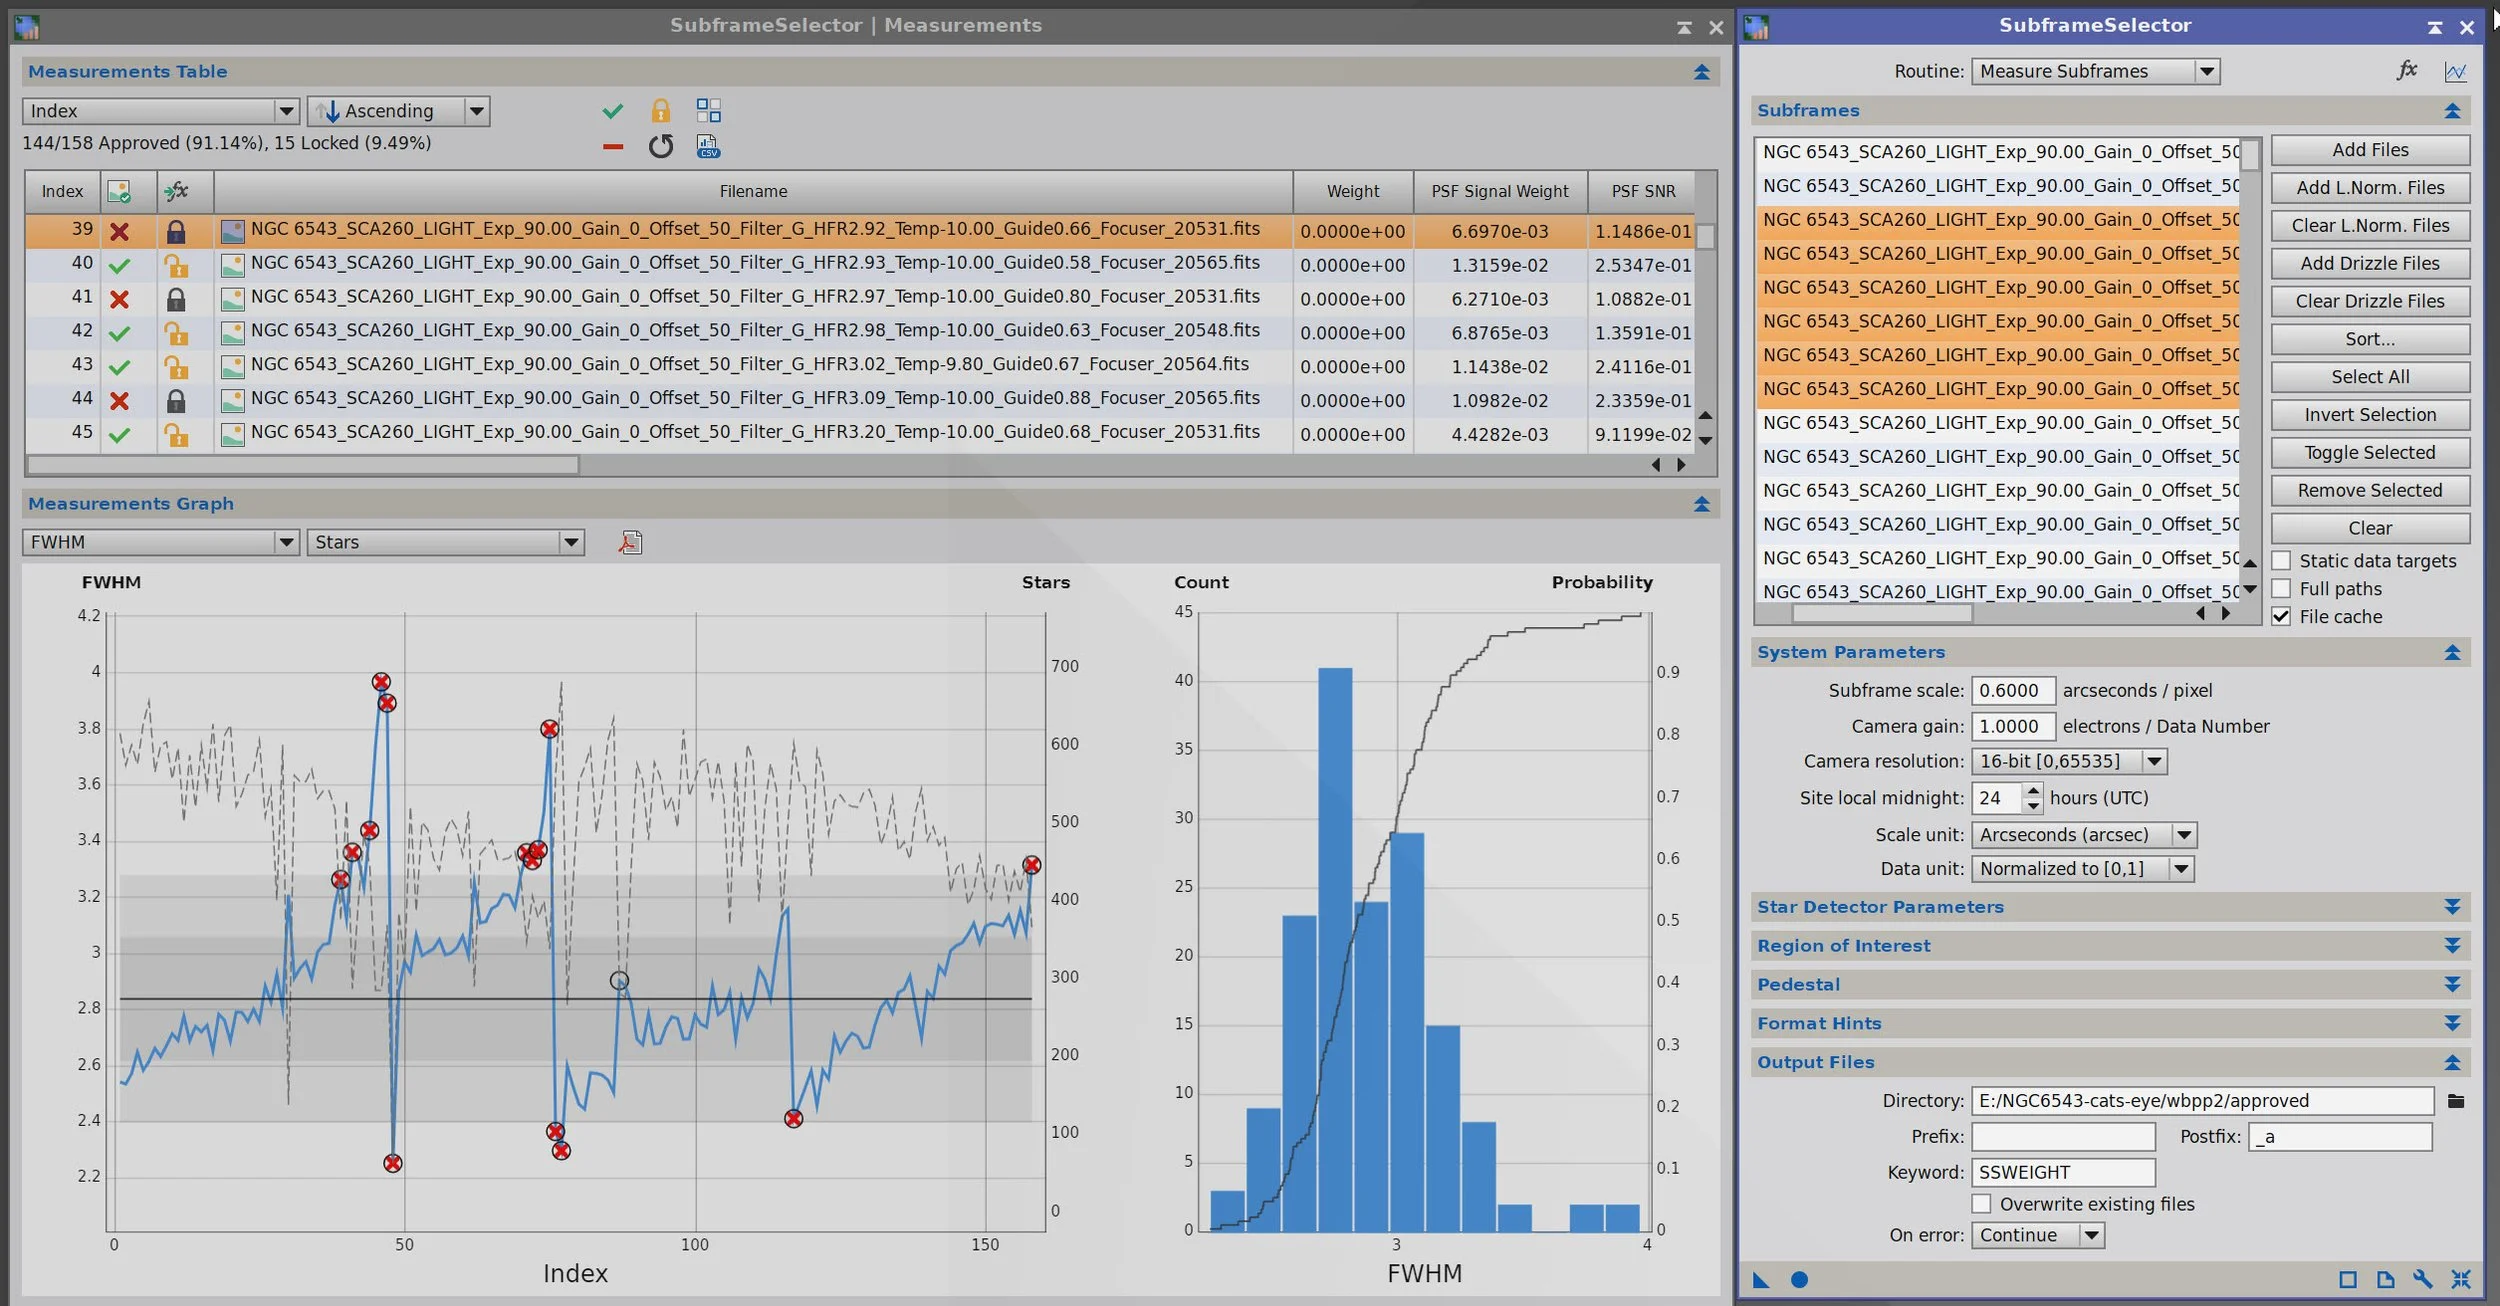
I ran SubframeSelector on all of the images, looking at star size and the number of stars. I ended up removing 46 frames of data because they were not sharp enough.
I reran WBPP and started once again.
This time, the “eye” stayed with the nebula when removing stars. I saw this as a good sign and went down my standard workflow. But once again, I was not happy with the results.
So I did a hybrid approach. First time I ever tried this.
I processed the RGB image while keeping the stars, and performed most of my processing in this way.
I did the same thing for my Lum image
When I combined the images, the Lum stars just blew out the RGB stars.
So I actually went starless at this point!
I ran SXT on the RGB image with the “unscreen” stars option since the image was nonlinear.
I did the same for the Lum image and discarded the stars.
I then folded the starless Lum image into the starless RGB image
Finally, I ran the ScreenStars script to add the RGB stars back into the new NLRGB Starless image.
Results
Processing this image really seemed to kick my butt like no other image I have worked on.
I think I am pretty happy with where it came out. Or at least I have become so sick of working on it that I am ready to move on!
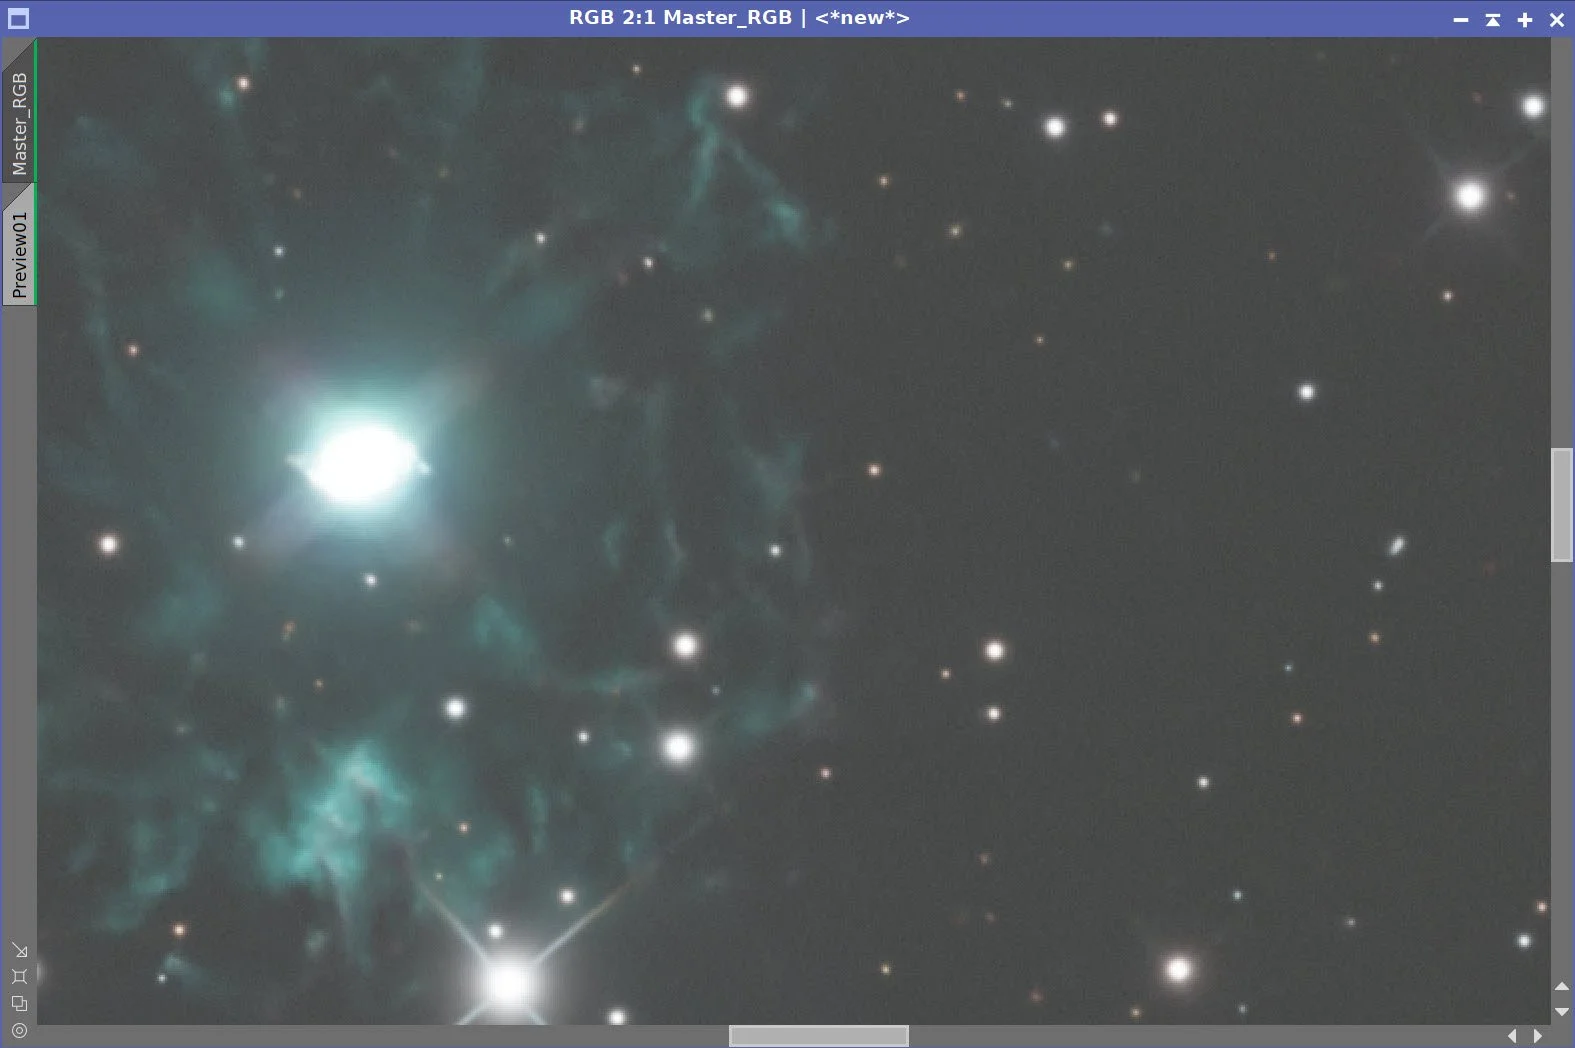
The final version of the image has a much nicer background, and I was able to show some very subtle nebulosity on the top of the image. I think the nebula looks more natural now - not as overly processed.
Finally, the “eye” came out looking pretty reasonable.
The downside is that with the secondary obstruction on the telescope, you are definitely seeing some difraction spike artifacts from the bright “eye” itself, and I can’t really get rid of those.
Bottom Line
I feel that I failed to release the best image in this data set. I am convinced there is a better image in there that I have thus far failed to release. I know that I will probably revisit this image during the winter doldrums. Perhaps I will find a way to get where I think this data could take me!!
More Info
🔭 General Background
https://en.wikipedia.org/wiki/Cat%27s_Eye_Nebula- A detailed overview covering discovery by William Herschel, basic physical characteristics, and the nebula’s significance as the first planetary nebula studied spectroscopically.
https://esahubble.org/images/opo9501c - ESA/Hubble’s official page showcasing high-resolution imagery of the Cat’s Eye Nebula and a concise explanation of its complex layered structure.
🌀 Morphology & Structure
https://www.nasa.gov/image-article/cats-eye-nebula-2 - NASA’s breakdown of the nebula’s strikingly symmetrical and nested shells, including insights into its turbulent formation from multiple stellar outflows.
https://arxiv.org/abs/2209.01313 - A 3D morpho-kinematic study providing evidence of point-symmetric ring structures likely shaped by precessing jets — a rare phenomenon in planetary nebulae.
🌈 Multi-Wavelength Observations
https://arxiv.org/abs/astro-ph/0101444 - Chandra X-ray observations reveal hot gas filling the interior of the nebula and a central point source, suggesting a complex wind-driven shaping mechanism.
https://en.wikipedia.org/wiki/Cat%27s_Eye_Nebula#Infrared_and_radio - Discussion of infrared and radio observations identifying cold dust, molecular hydrogen, and argon in the outer halo, revealing un-ionized and shocked gas components.
🌬️ Central Star & Wind Dynamics
https://arxiv.org/abs/1210.0533 - Spectroscopic analysis of the central star’s UV wind lines reveals rotating wind structures (CIRs), suggesting a rotation rate atypical for central stars of planetary nebulae.
https://arxiv.org/abs/1603.06689 - Hubble/STIS observations detect a mixing interface layer between the hot inner bubble and the cooler outer shell, in pressure equilibrium — a rare phenomenon in PNe.
🎓 Educational & Outreach Resources
https://www.skyatnightmagazine.com/astrophotography/nebulae/cats-eye-nebula - An accessible observing guide with finder charts, visibility information, and basic tips for amateur astrophotographers looking to capture the Cat’s Eye.
https://chandra.si.edu/sound/ngc6543.html - Part of the Chandra Sonification Project, this site converts X-ray and optical data from NGC 6543 into audio, providing a multisensory perspective for outreach and education.
Capture Details
Lights
Taken on the nights of July 15, 19, 20, 21, and 23, 2025.
Number of frames is after bad or questionable frames were culled.
148 x 90 seconds, bin 1x1 @ -10C, gain 0, ZWO 36mm diameter Lum Filter
150 x 90 seconds, bin 1x1 @ -10C, gain 0, ZWO 36mm diameter Red Filter
144 x 90 seconds, bin 1x1 @ -10C, gain 0, ZWO 36mm diameter Green Filter
141 x 90 seconds, bin 1x1 @ -10C, gain 0, ZWO 36mm diameter Blue Filter
Total of 14 hours 34 minutes 30 Seconds.
Cal Frames
30 Darks at 90 seconds, bin 1x1, -10C, gain 0
30 Dark Flats at each Flat exposure times, bin 1x1, -10C, gain 100
15 Lum Flats
15 Red Flats
15 Green Flats
15 Blue Flats
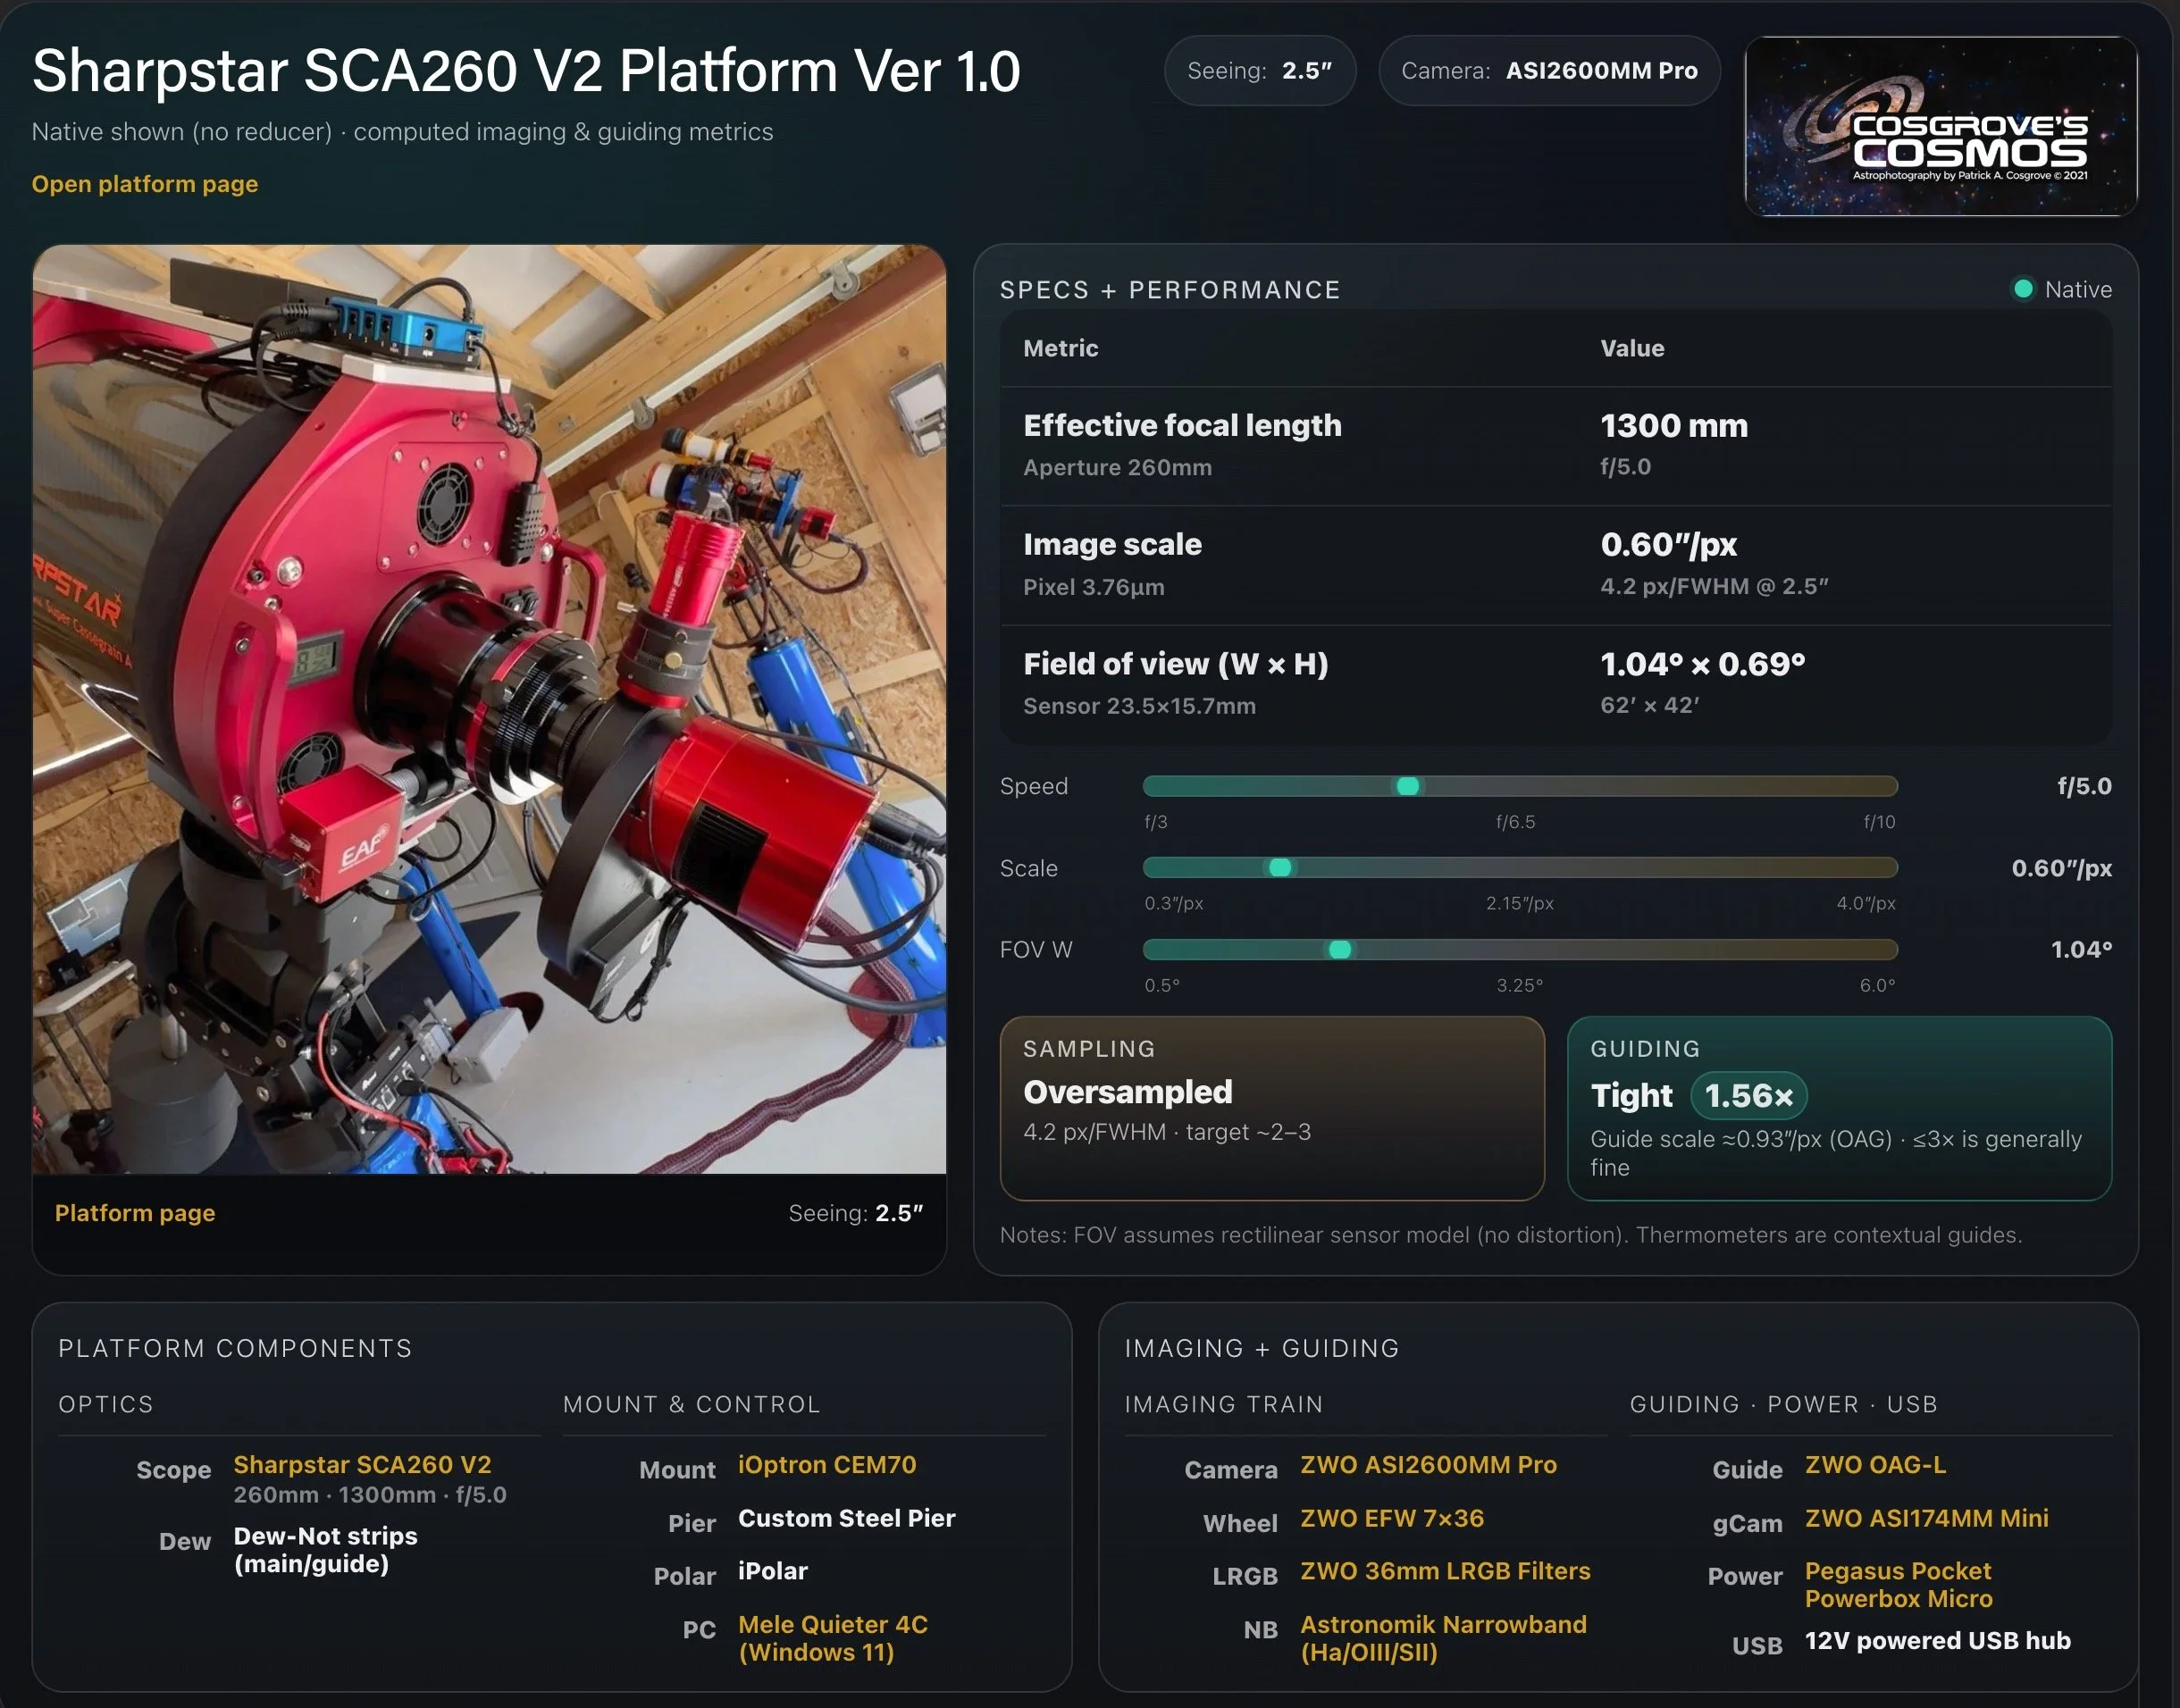
Platform used for this project
Software:
Capture Software: PHD2 Guider, NINA
Image Processing: Pixinsight, Photoshop - assisted by Coffee, extensive processing indecision and second-guessing, editor regret and much swearing…..
Image Processing Detail (Note: This is all mostly based on Pixinsight with image polishing done in Photoshop)
1. Assess all captures SubframeSelector
Lum Filter:
11 frames removed due to large star size or low star counts

SubframeSelector for Lum
Red Filter:
8 image removed
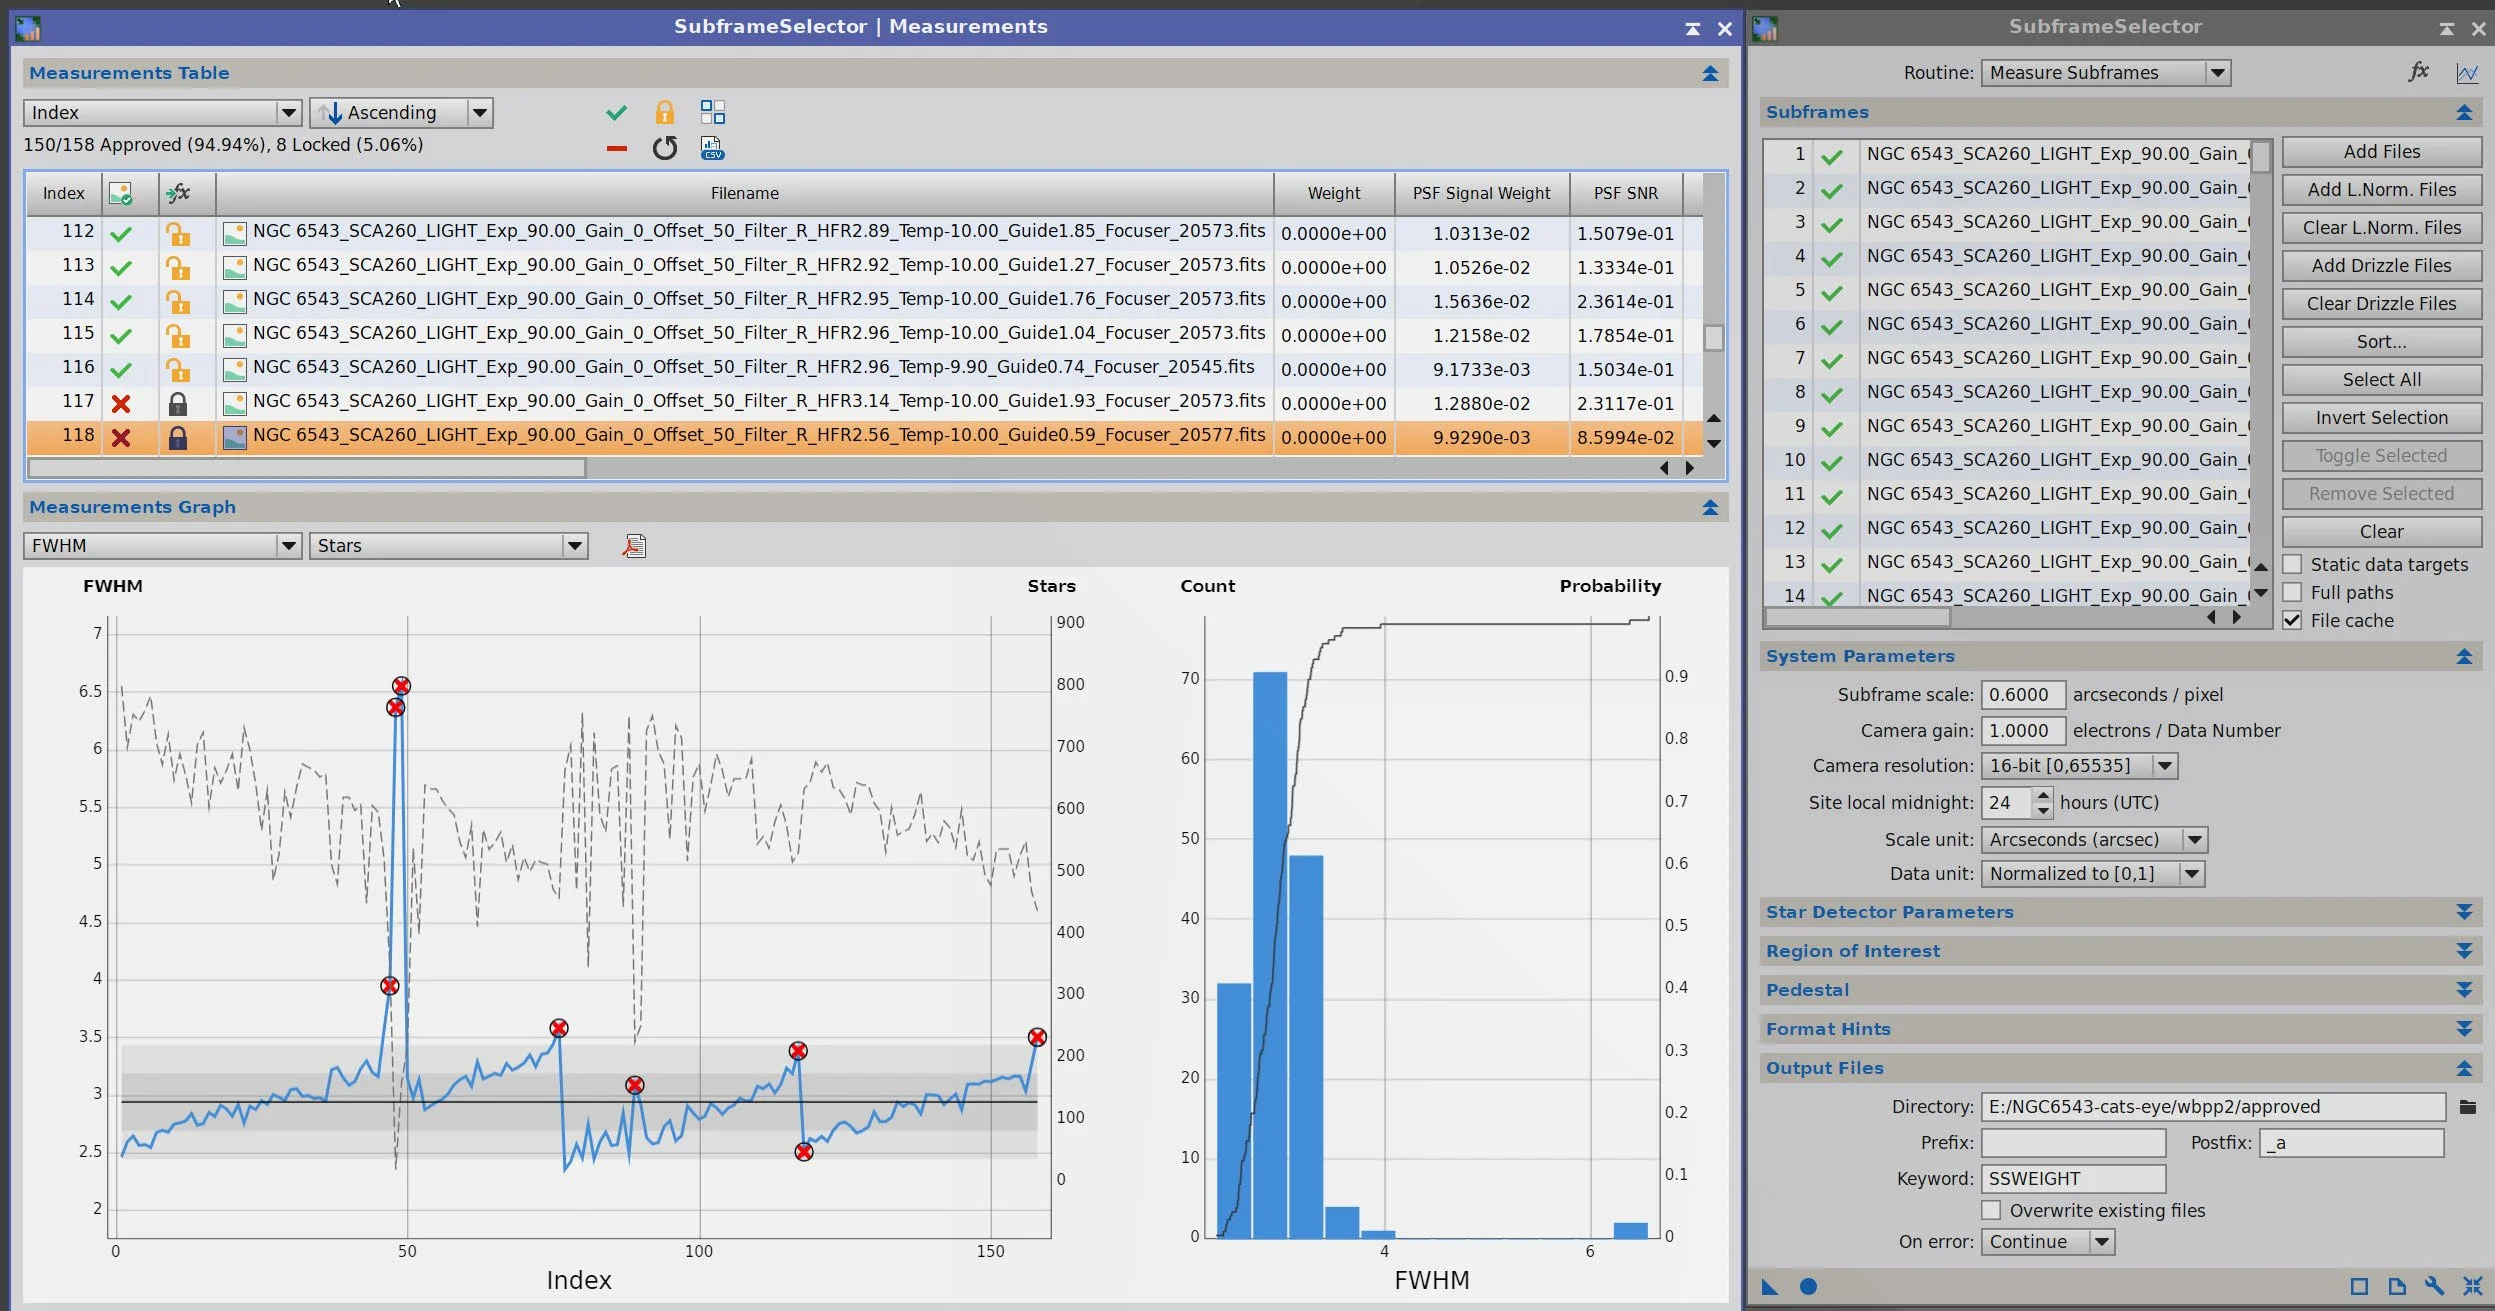
SubframeSelector for Red
Green Filter:
14 frame removed
SubframeSelector for Green
Blue Filter:
13 frames removed
Note - one frame was so far off base that is messed up the scaling on the plot for all the other points!

SubframeSelector for Blue.
Summary:
A total of 46 subs were removed as not being top quality
The total time before removal was 15.75 hours
The total time of the removed frames was a little over an hour.
2. WBPP Script V 2.8.9
Load all files
Dark exp tolerance set to zero
Light exp tolerance set to zero
Pedestal auto for all frames
CC auto for all groups
Select max quality
Ref image set to auto
Selected the target folder
Executed in 2:11 with no errors

WBPP setup.

Post Processing View of WBPP
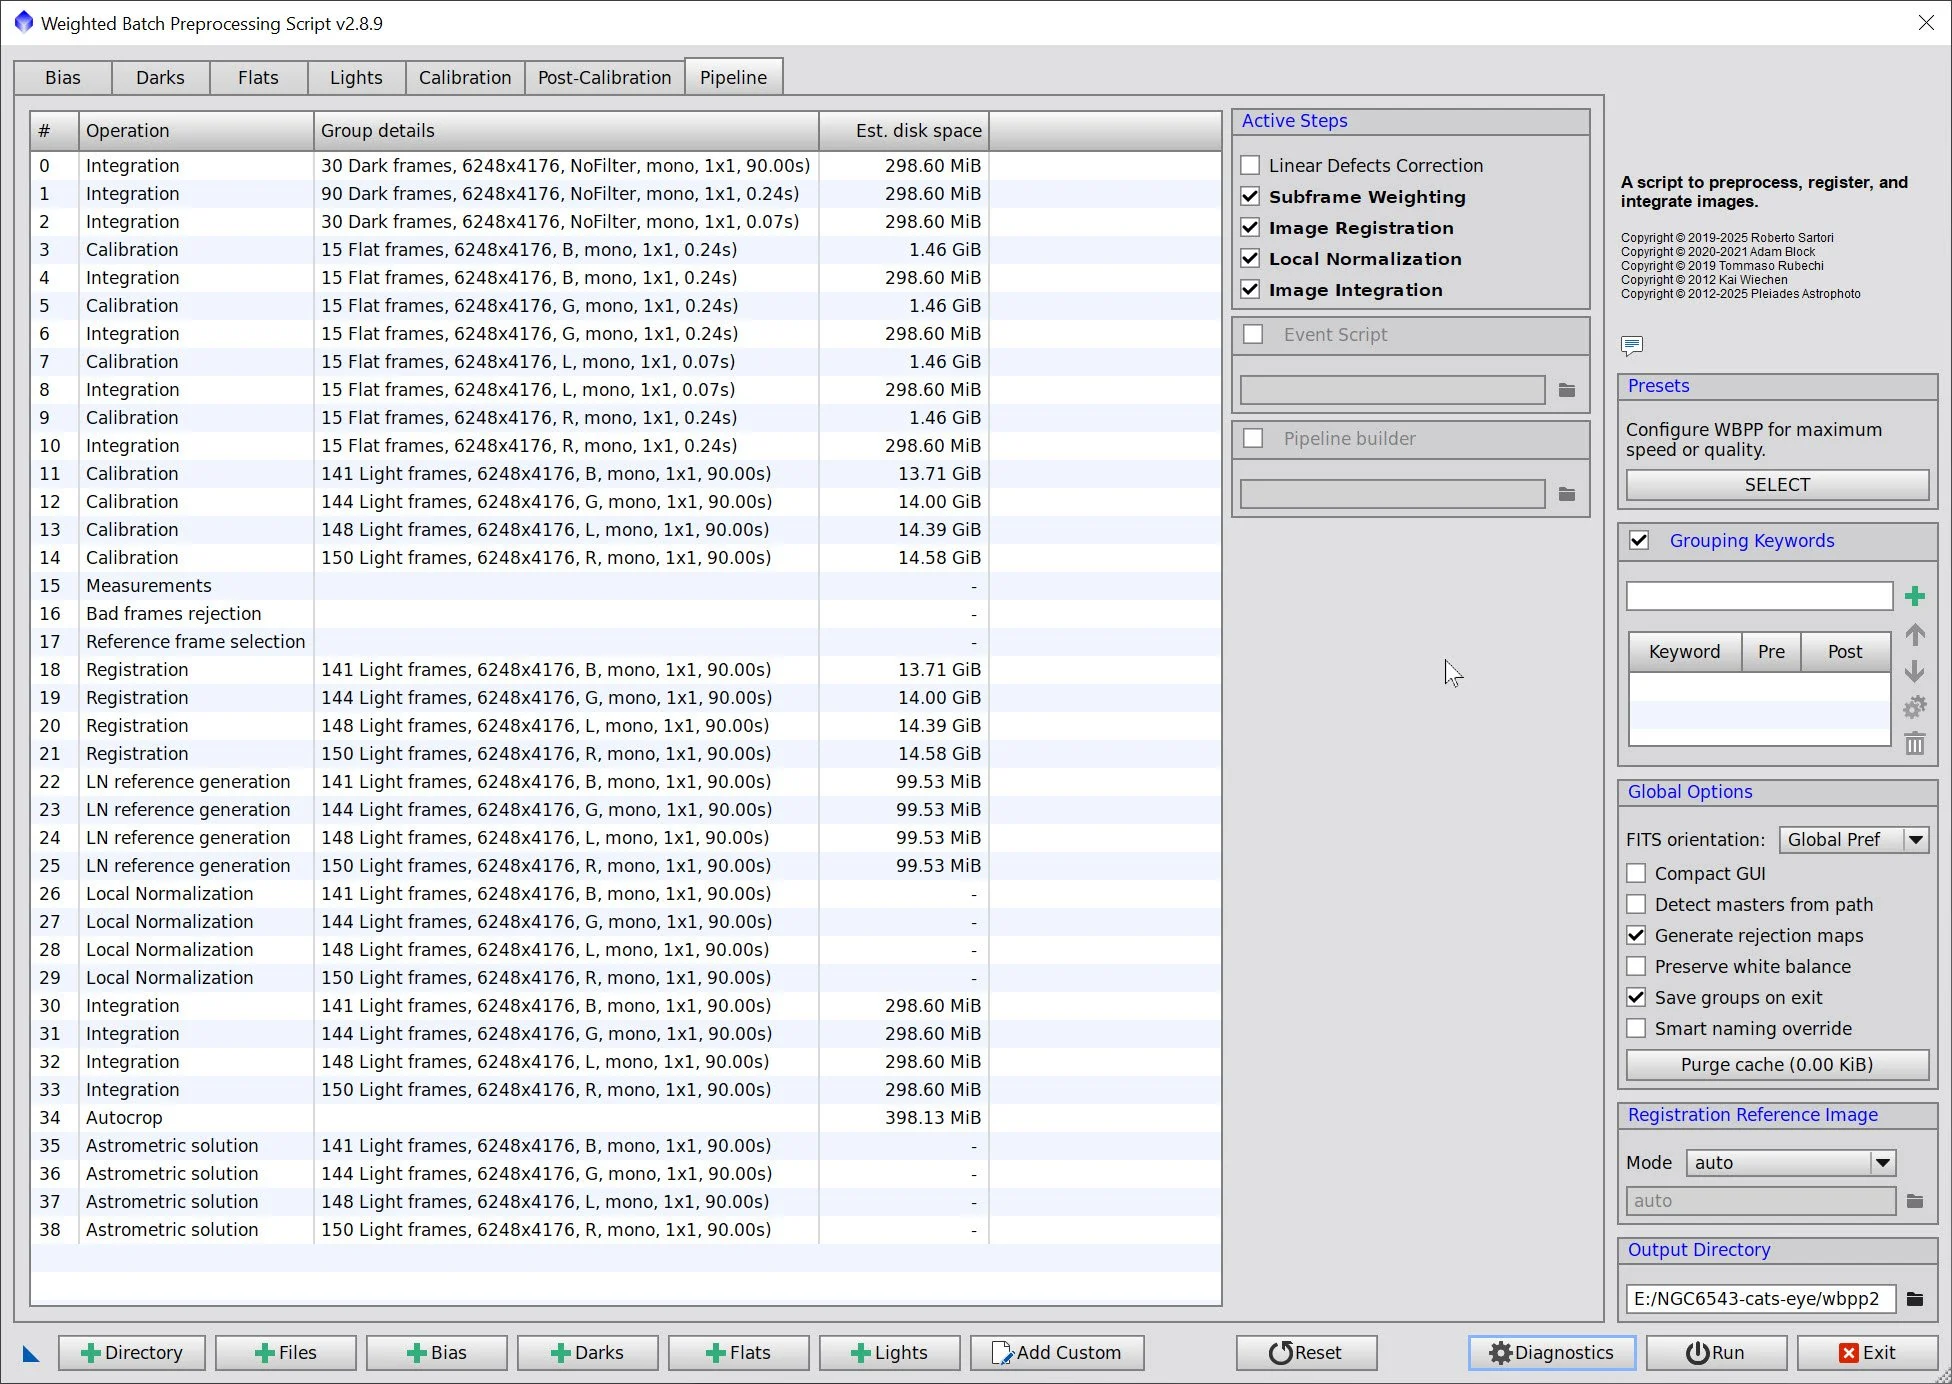
WBPP Pipeline view
3. Import Master images and Rename
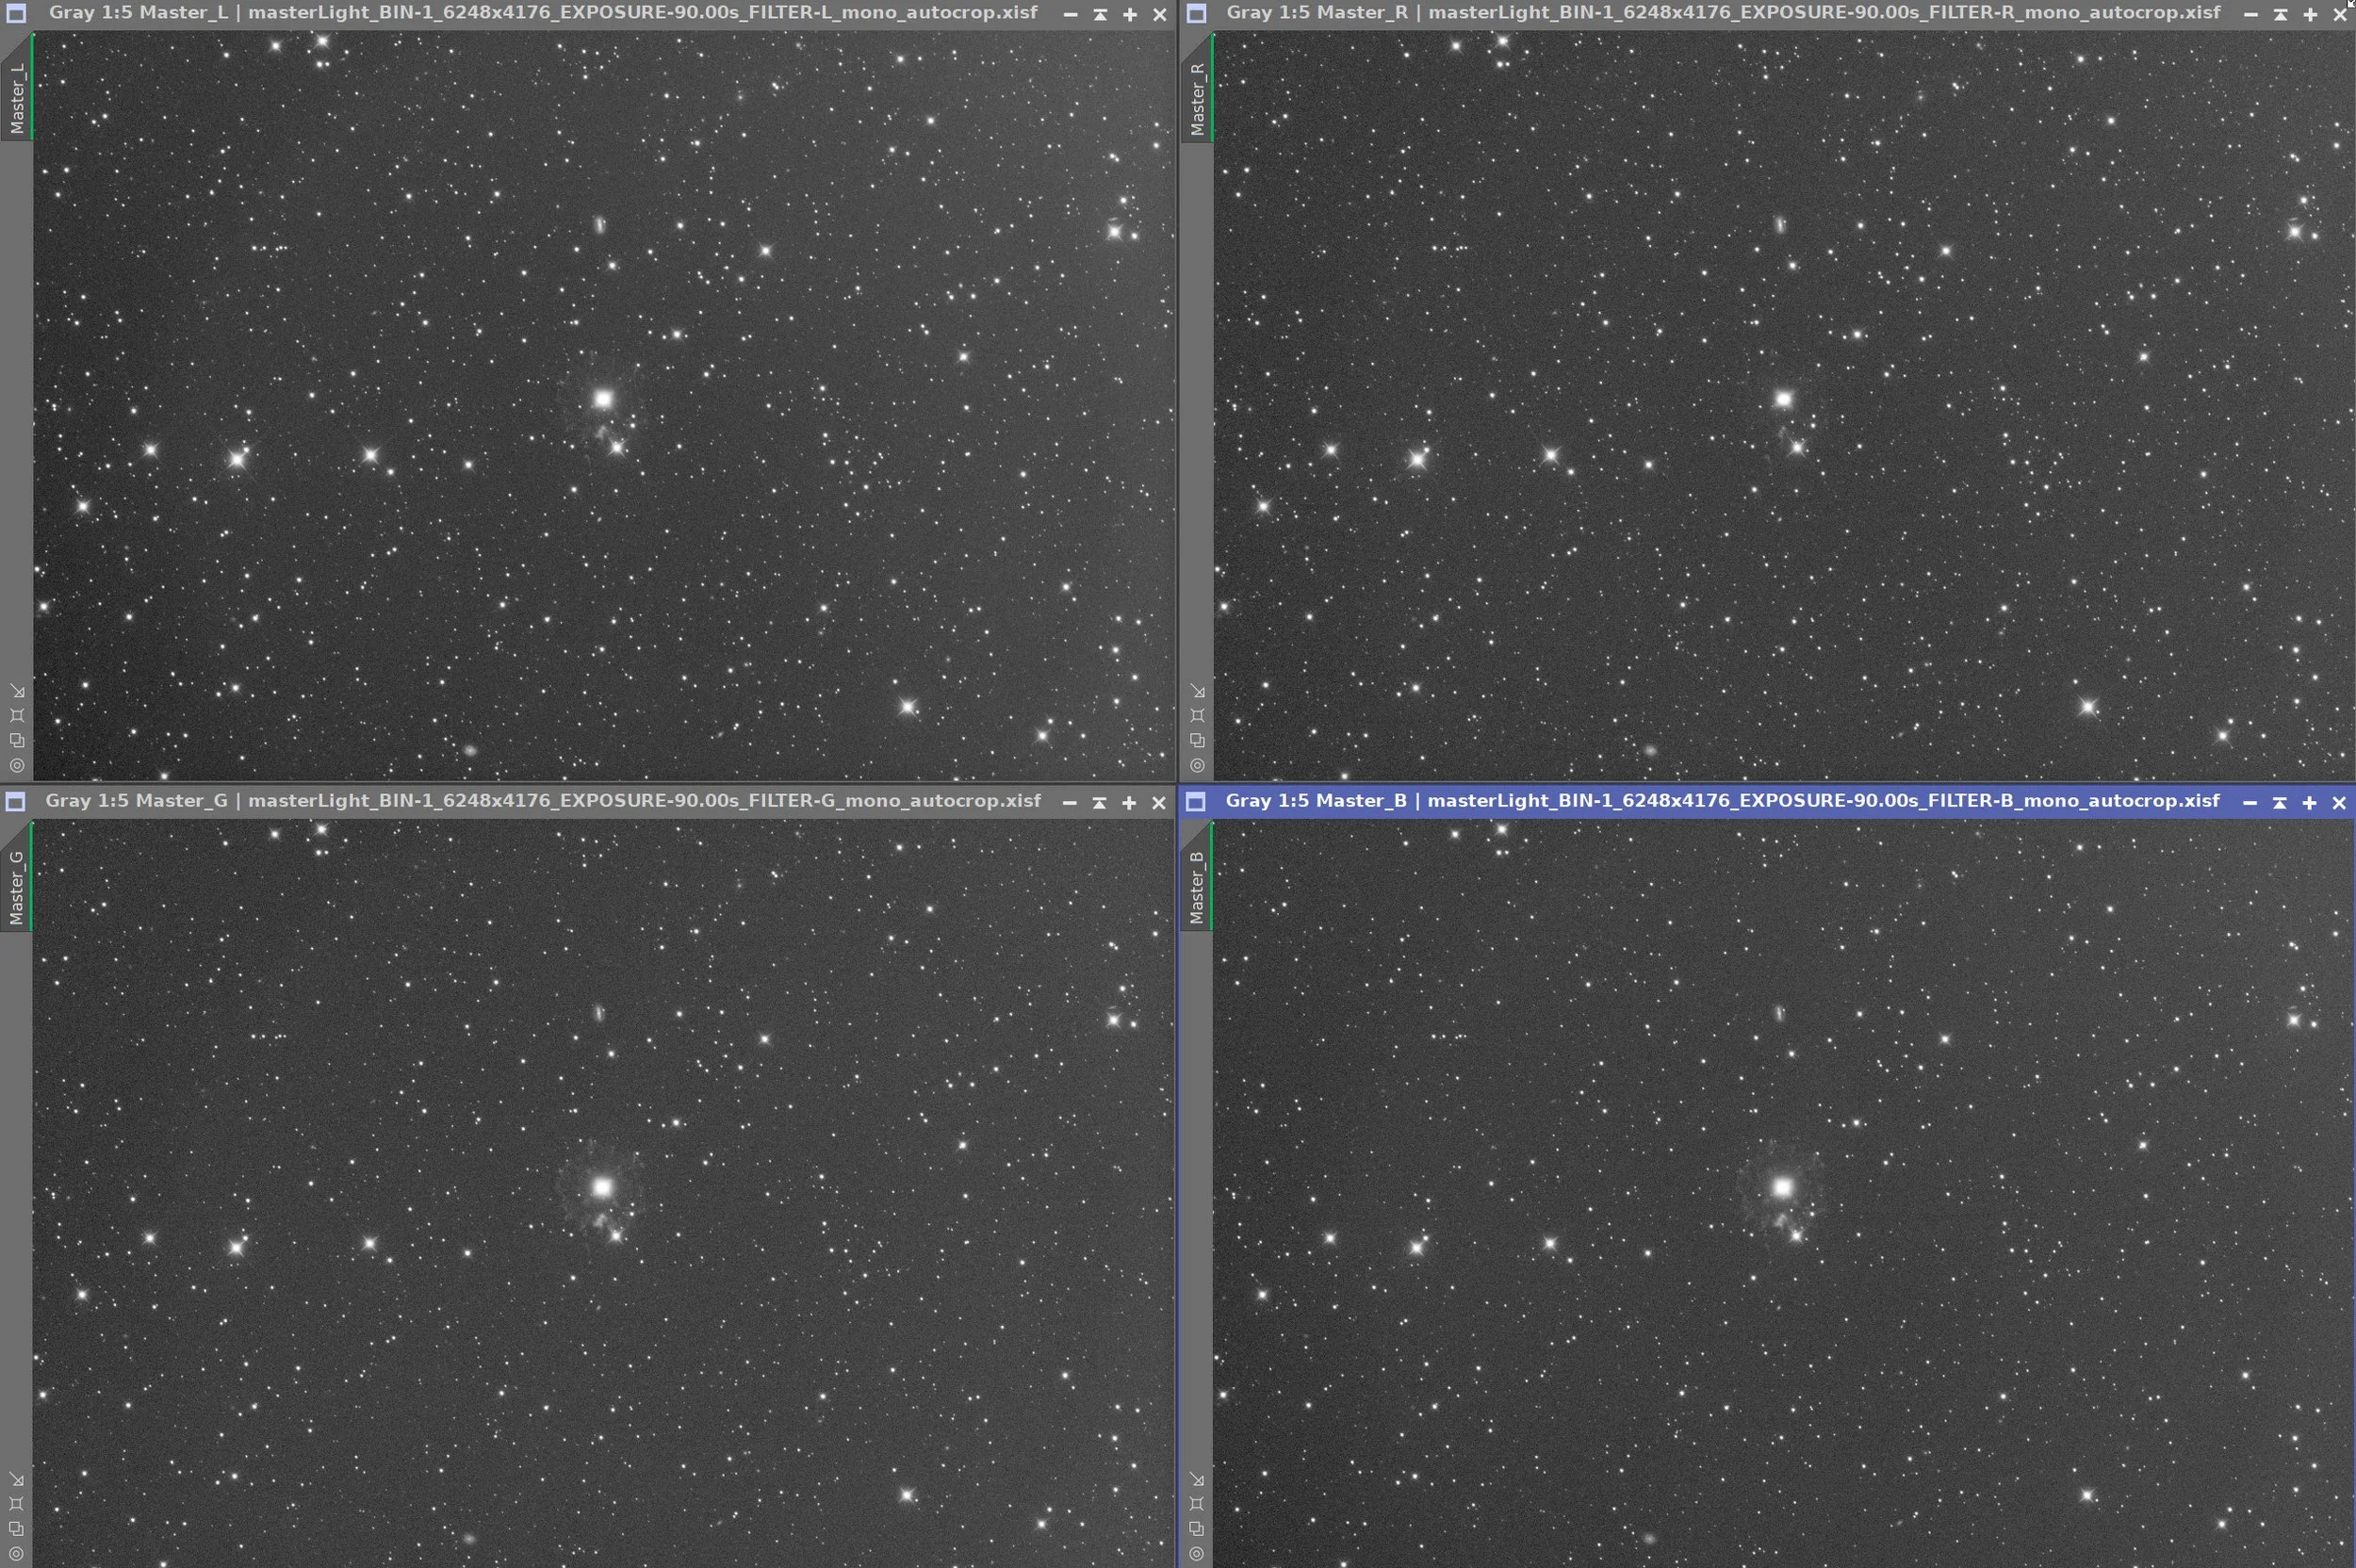
Master images. L, R, G, B
4. Remove Gradients
The gradients look a little different for each filter, so I decided to do them separately
DBE was used with subtraction
DBE of Lum Image - Before (click to enlarge)
DBE of Lum - Sample Pattern (click to enlarge)
DBE of Lum - Afer Image (click to enlarge)
DBE of Lum - Background (click to enlarge)
DBE of Red - Before
DBE of Red - Sample Pattern (click to enlarge)
DBE of Red - After (click to enlarge)
DBE of Red - Background (click to enlarge)
DBE of Green - Before (click to enlarge)
DBE of Blue - Before (click to enlarge)
DBE of Green - Sample Pattern (click to enlarge)
DBE of Blue - Sample Pattern (click to enlarge)
DBE of Green - After (click to enlarge)
DBE of Blue - After (click to enlarge)
DBE of Green - Background (click to enlarge)
DBE of Blue - Background (click to enlarge)
5. Create and Process the Linear RGB Color Image
Create the Master RGB image using the ChannelCombination Tool
Set up the SPCC panel and run it on the image. In this case, we will use the 571 device curve, choose the ZWO R, G, & B filters, and choose an area of the image to represent the reference background.
Apply BXT on the color image with “Correct Only”
Run PFSImage: X = 3.20 Y = 3.07. Not sure I believe this as the diffraction spikes might influence things.
Apply BXT with full correction. See panel-snap below for values used. These were selected after interactive testing.
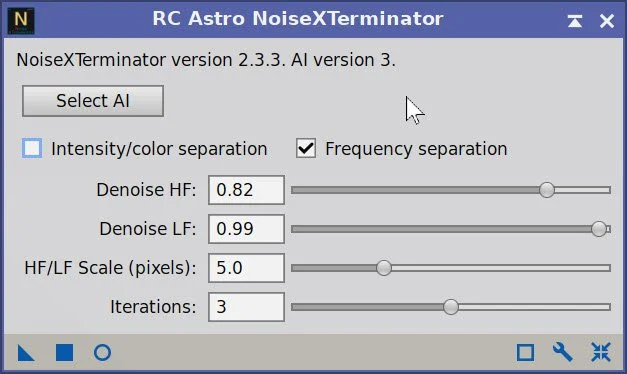
Run NXT V3 - see panel snap below for final parameters used.
Normally, at this point, I would go starless. But I have had issues doing this with the linear image as the core of the cat’s eye gets split between the starless and the starred image, and when recombined, artifacts form. So for this project, I will continue to process, leaving the stars in until later in the process.
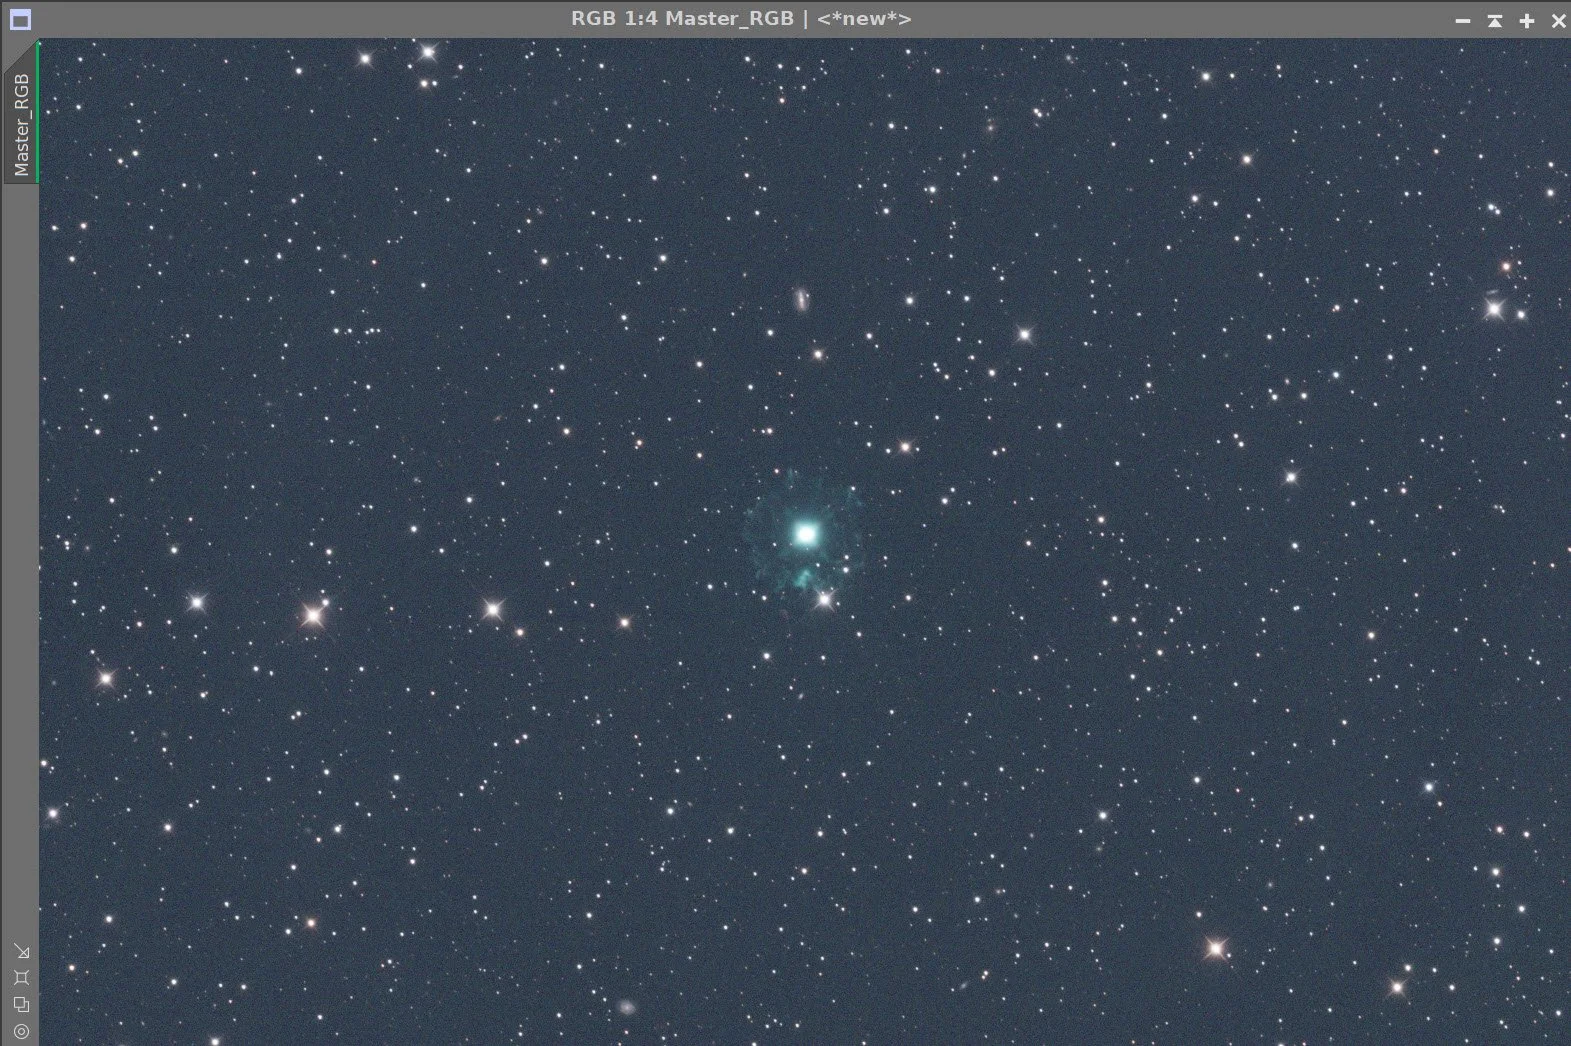
The initial RGB Image
Spcc Panel (click to enlarge)

SPCC Regression Results
SCNR 95% Green run (click to enlarge)
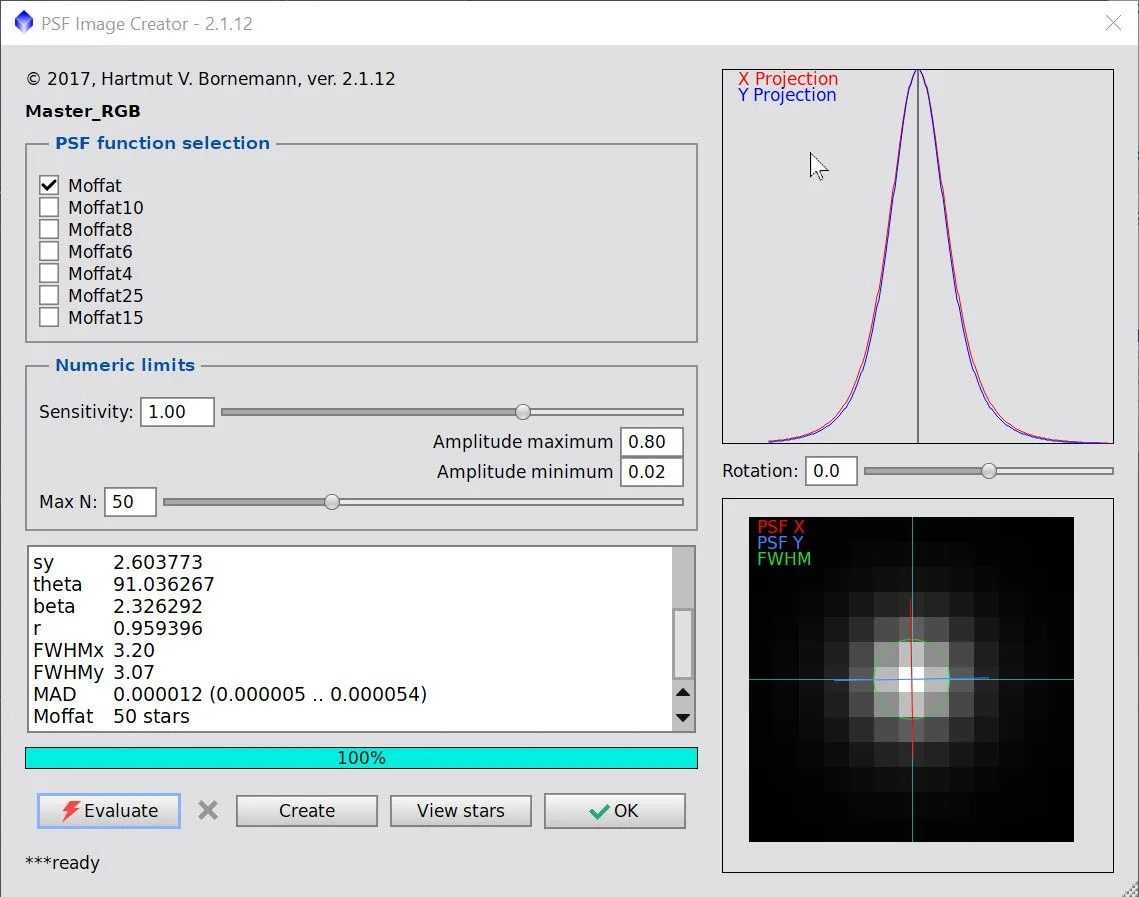
PFSImage for the Linear RGB Image

BXT Params used for the RGB image
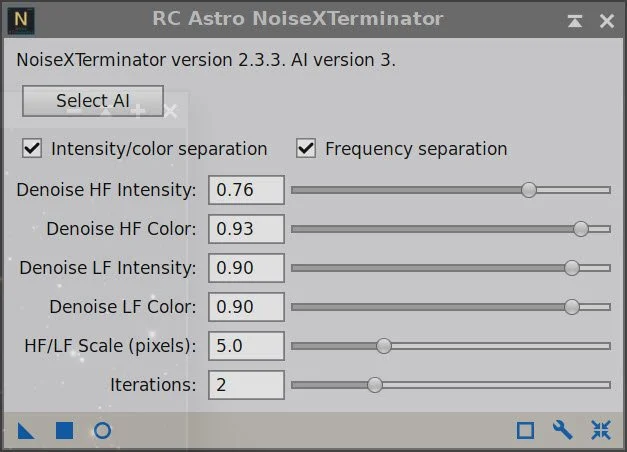
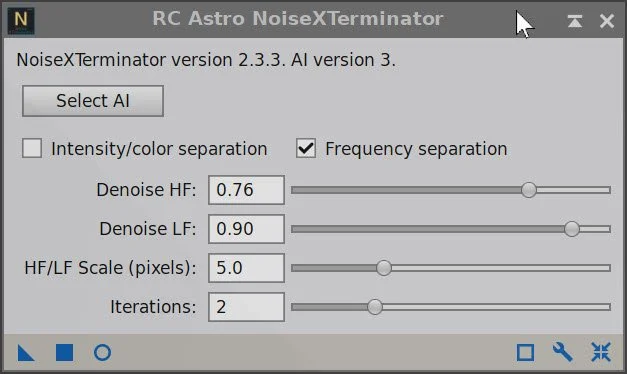
NXT Params used for the RGB image.


RGB Image Before BXT, After BXT Correct Only, After BXT Full Correction, After NXT V3
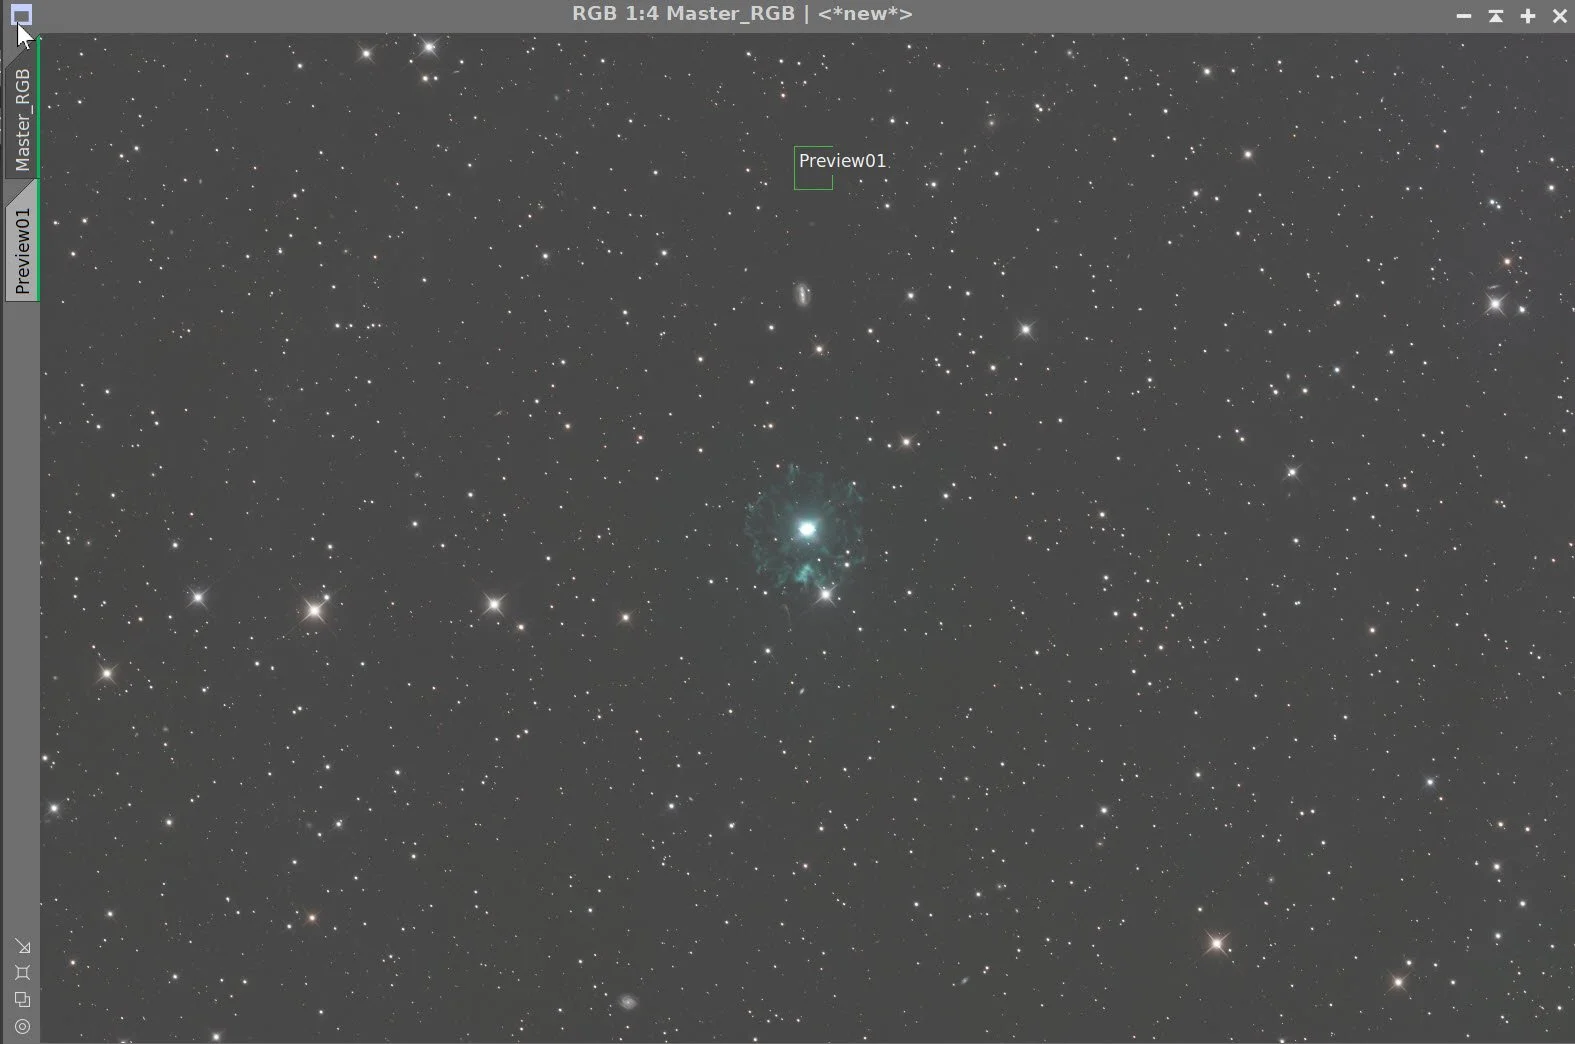
The Final Linear RGB image
6. Process the Linear Lum Image
Apply BXT on the Lum image with “Correct Only”
Run PFSImage: X = 3.20 Y = 3.07. Not sure I believe this as the diffraction spikes might influence things.
Apply BXT with full correction. See panel-snap for values used. These were selected after interactive testing.
Run NXT V3 - see panel snap below for final parameters used.
Normally, at this point, I would go starless. But I have had issues doing this with the linear image as the core of the cat’s eye gets split between the starless and the starred image, and when recombined, artifacts form. So for this project, I will continue to process, leaving the stars in until later in the process.
Initial SHO Starless Image (click to enlarge)
After CT adjust (click to enlarge)
The NXT V3 par used for this image.


Before BXT, After BXT Fix Only, After Full BXT, After NXT V3
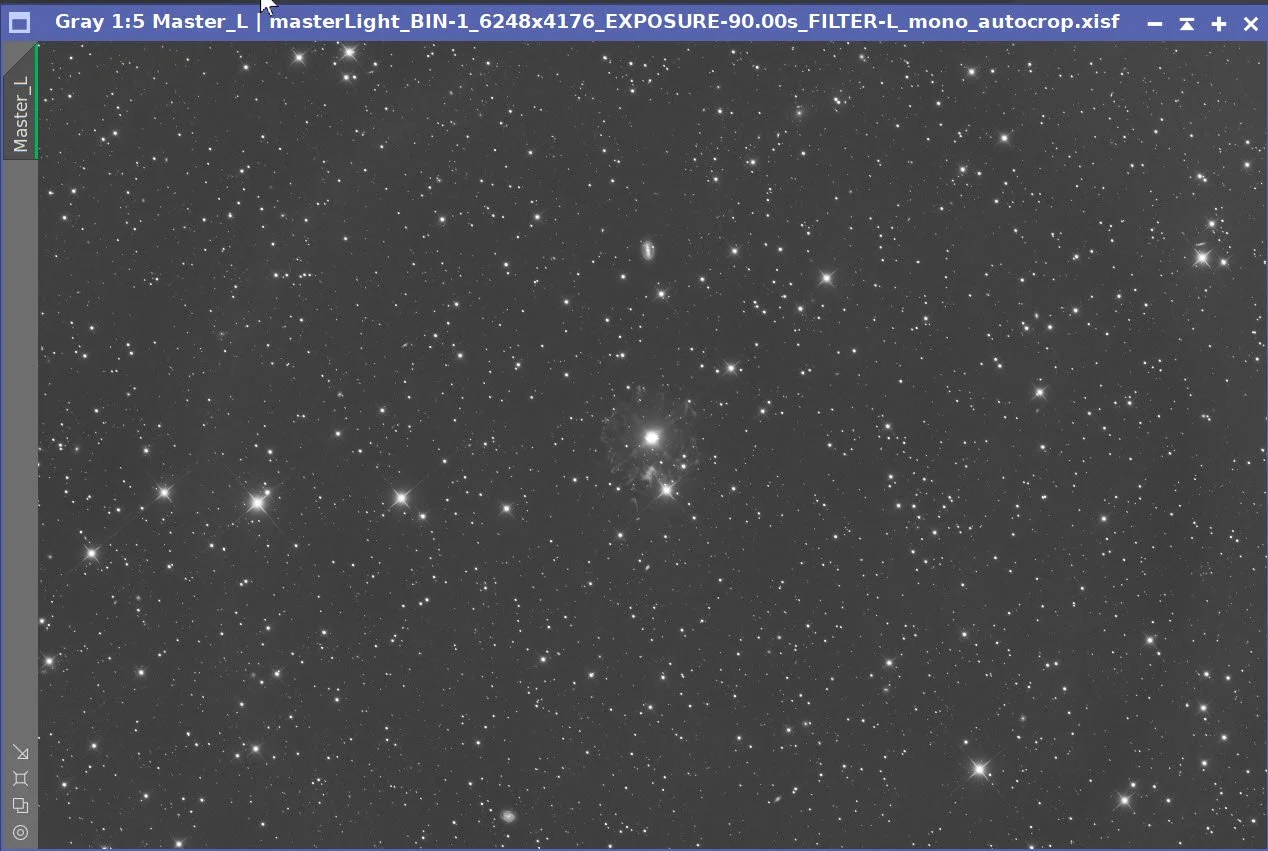
Final linear Image.
7. Take Images Nonlinear
For the Lum image, use the STF->HT method.
For the RGB image, use the STF-HT method.
Initial RGB Nonlinear Image (click to enlarge)
Initial Lum nonlinear Image (click to enlarge)
8. Process the Nonlinear Lum image
Create a mask using GAME to cover just the core of the Cat’s Eye - we will call it the CoreMask.
Apply the CoreMask and run HDRMT with levels = 4 as shown in the screen snap below.
What follows now is a somewhat random series of CT adjusts with the mask or the inverse of the mask - I am zeroing in on where I want the Lum tone scale to be for the whole image vs the core.
Invert the CoreMask and use CT to darken the field other than the core
Now invert the mast so the focus is the core and use CT to darken that a bit.
Invert the mask again to use CT on the rest of the image.
Do a Global CT
D0 a CT with the inverse CoreMask ti finish things off.
Starting Image . (click to enlarge)
The CoreMask image. (click to enlarge)
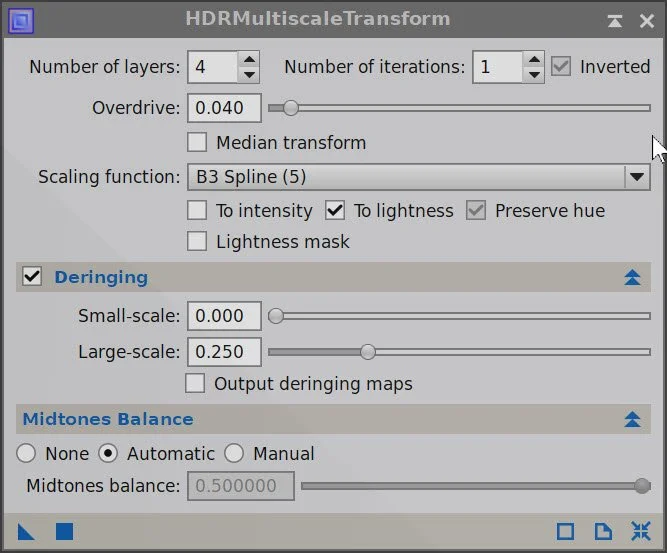
The HDRMT params used.
After CT using the Inverse of the CoreMask (click to enlarge)
Anotehr CT adjust with the inverse CoreMask (click to enlarge)
afer NXT. (click to enlarge)
After HDRMT with the Core Mask - zoomed to show core better (click to enlarge)
After CT with the CoreMask to Darken the core (click to enlarge)
NXT V3 params we are about to use.
Global CT Adjust (click to enlarge)
9. Process the Nonlinear RGB Image
Apply a global CT adjust to darken the background.
Note: Ultimately, I will be cropping the image, so I will zoom in on portions of the image showing what I will focus on in the final crop.
Apply the CoreMask (same one as used in the Lum image process previously) and run HDRMT using the params shown in the screen snap below.
Invert the CoreMask and use CT to adjust the rest of the image.
Create a CyanMask using ClorMask_Mod with cyan colors.
Apply the CyanMak and do a CT Adjust
With the CyanMask in place, run LHE with a radius of 20, a contrast of 2.0, and an amount of .5 nd a 10-bit histogram.
NXT V3 with the params shown
Initial Nonlinear RGB Image (click to enlarge)
Zoomed in version of the previous image. (click to enlarge)
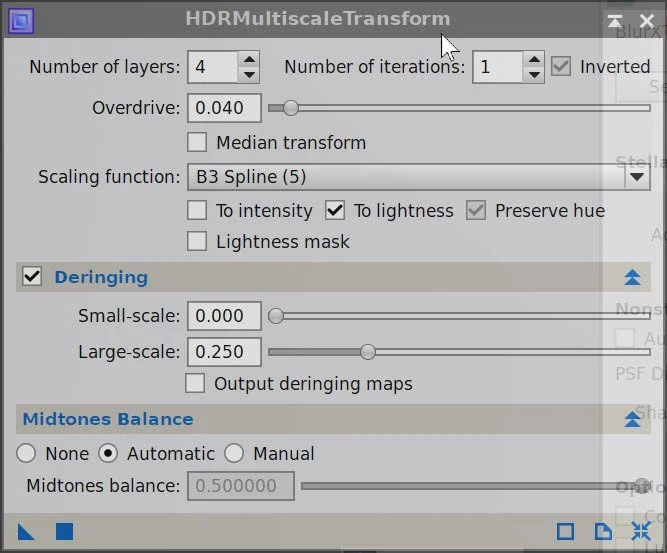
HDRMT Params used.
After CT with CoreMask (click to enlarge)
CyanMask (clic to enlarge)
After LHE used with the CyanMask (click to enlarge)
After LHE with the CyanMask (click to enlarge)
After global CT adjust (click to enlarge)
CoreMask - same as what I used in the Lum image processing (click toenlarge)
After HDRMT using the CoreMask (click to enlarge)
After CT using Inverted CoreMask (click to enlarge)
After CT with CyanMask (click to enlarge)
CT adjust with the CyanMask
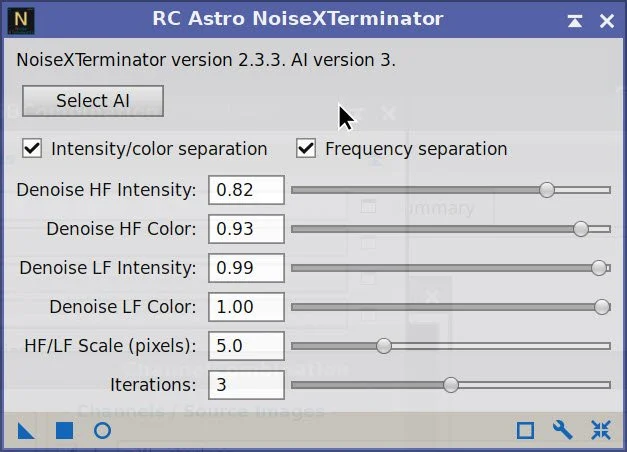
NXT Params used

After NXT
10. Fold the Lum Image to the RGB Image
Now I need to fold the Lum image in. BUT if I do that with the Starred image, the stars will get blown out. I could just add in the Lum image with the CyanMask in place, but I decided to try going starless now, adding in the Lum Starless image to the RGB Starless image and then adding the stars back in!
Run SXT on the RGB, retaining RGB stars.
Run MLT Sharpening with the CyanMask in place - see screen snap for params
Run SXT on the LUM Image - discard the Lum stars.
Darken the Lum image with a CT and the Inverse CoreMask
Fold the Lum image into the RGB image using ChannelCombination in Color Mode.
RGB Starless image after running SXT (click to enlarge)
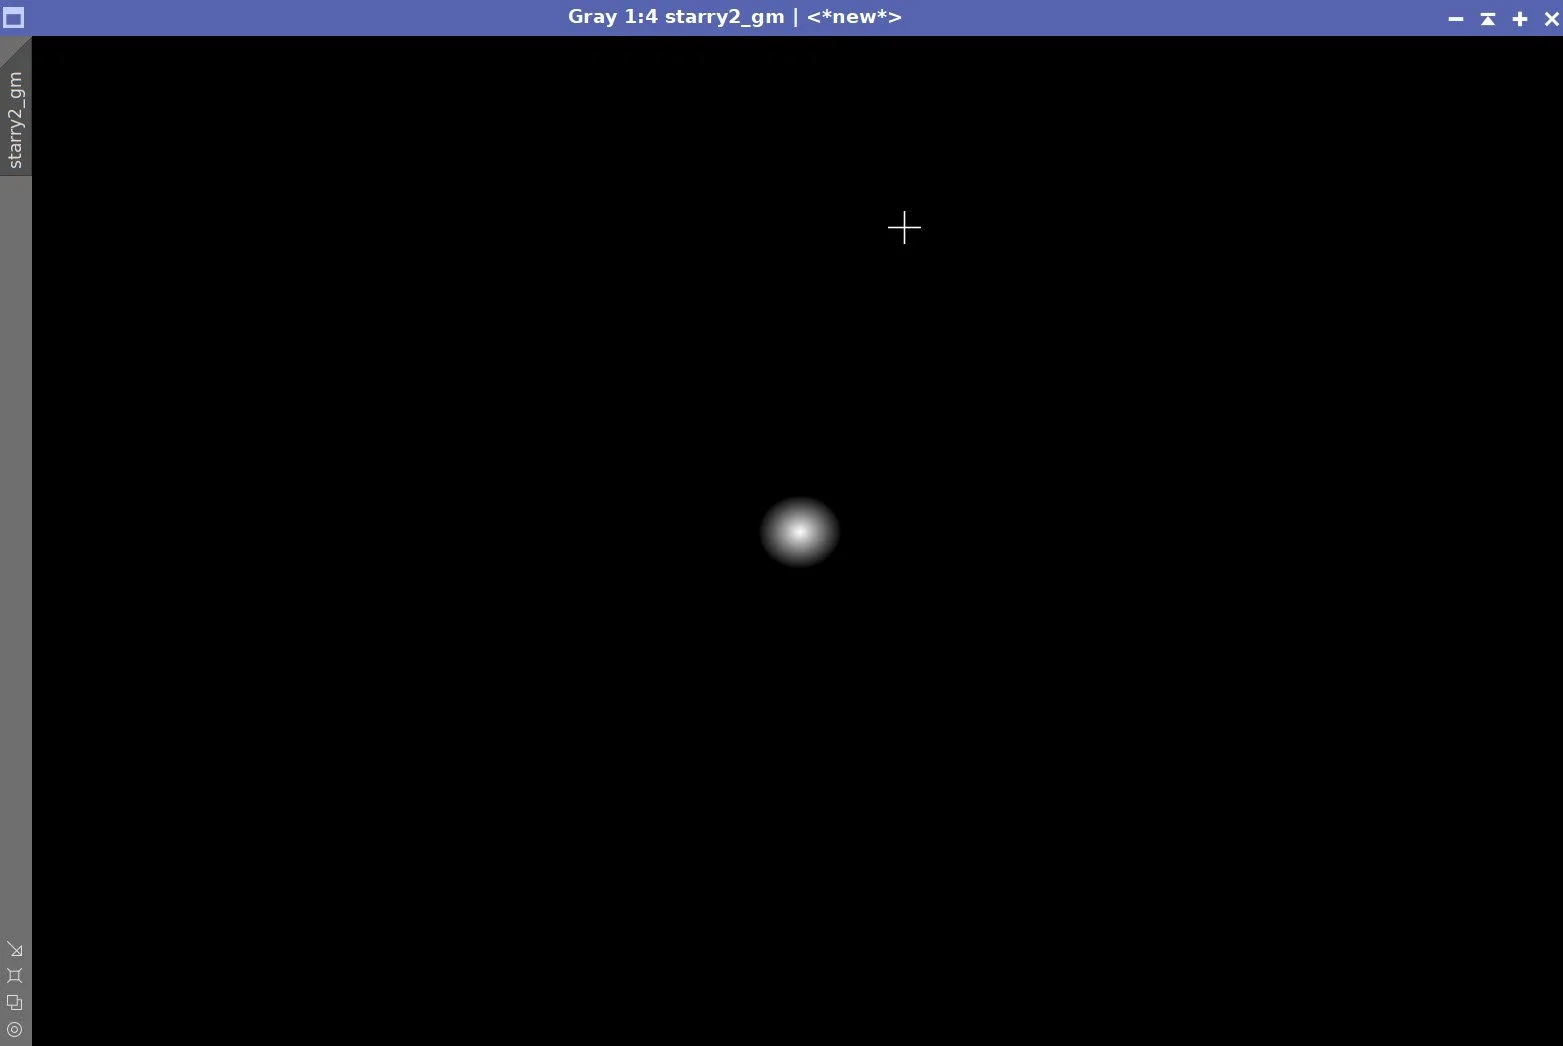
The RGB Stars only image (click to enlarge)
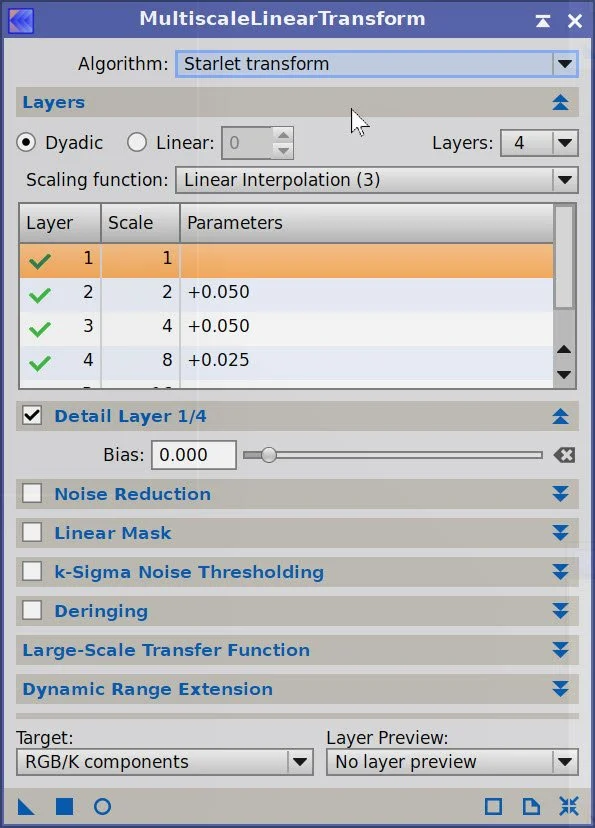
MLT Sharpening Params used.
After Running MLT Sharpening - Seen Panel for params (click to enlarge)
CT with Inverse CoreMask (click to enlarge)
Lum Starless image after SXT (click to enlarge)
Use ChannelCombination to fold the Lum Starless image in (click to enlarge)
11. Process the RGB Stars and Add Them Back In
The RGB star image has the Core showing, so we need to process the stars, and then we also need to process the core.
Apply the CoreMask and run HDRMT using the params from the panel snap below.
With the CoreMask still in place, adjust the core brightness with CT
Invert the CoreMask and use CT to adjust star brightness and color saturation.
Invert the CoreMask again and do a final tweak on the core.
Use ScreenStars to add stars back in
Zoomed RGB Strs showing the core (click to enlarge)
After HDRMT run with the CoreMask in place (click to enlarge)
CT with the inverse CoreMask - adjusting tone and sar (click to enlarge)

Params used in the next step
CT with the CoreMask in place (click to enlarge)
FInal CT adjust with the CoreMask (click to enlarge)
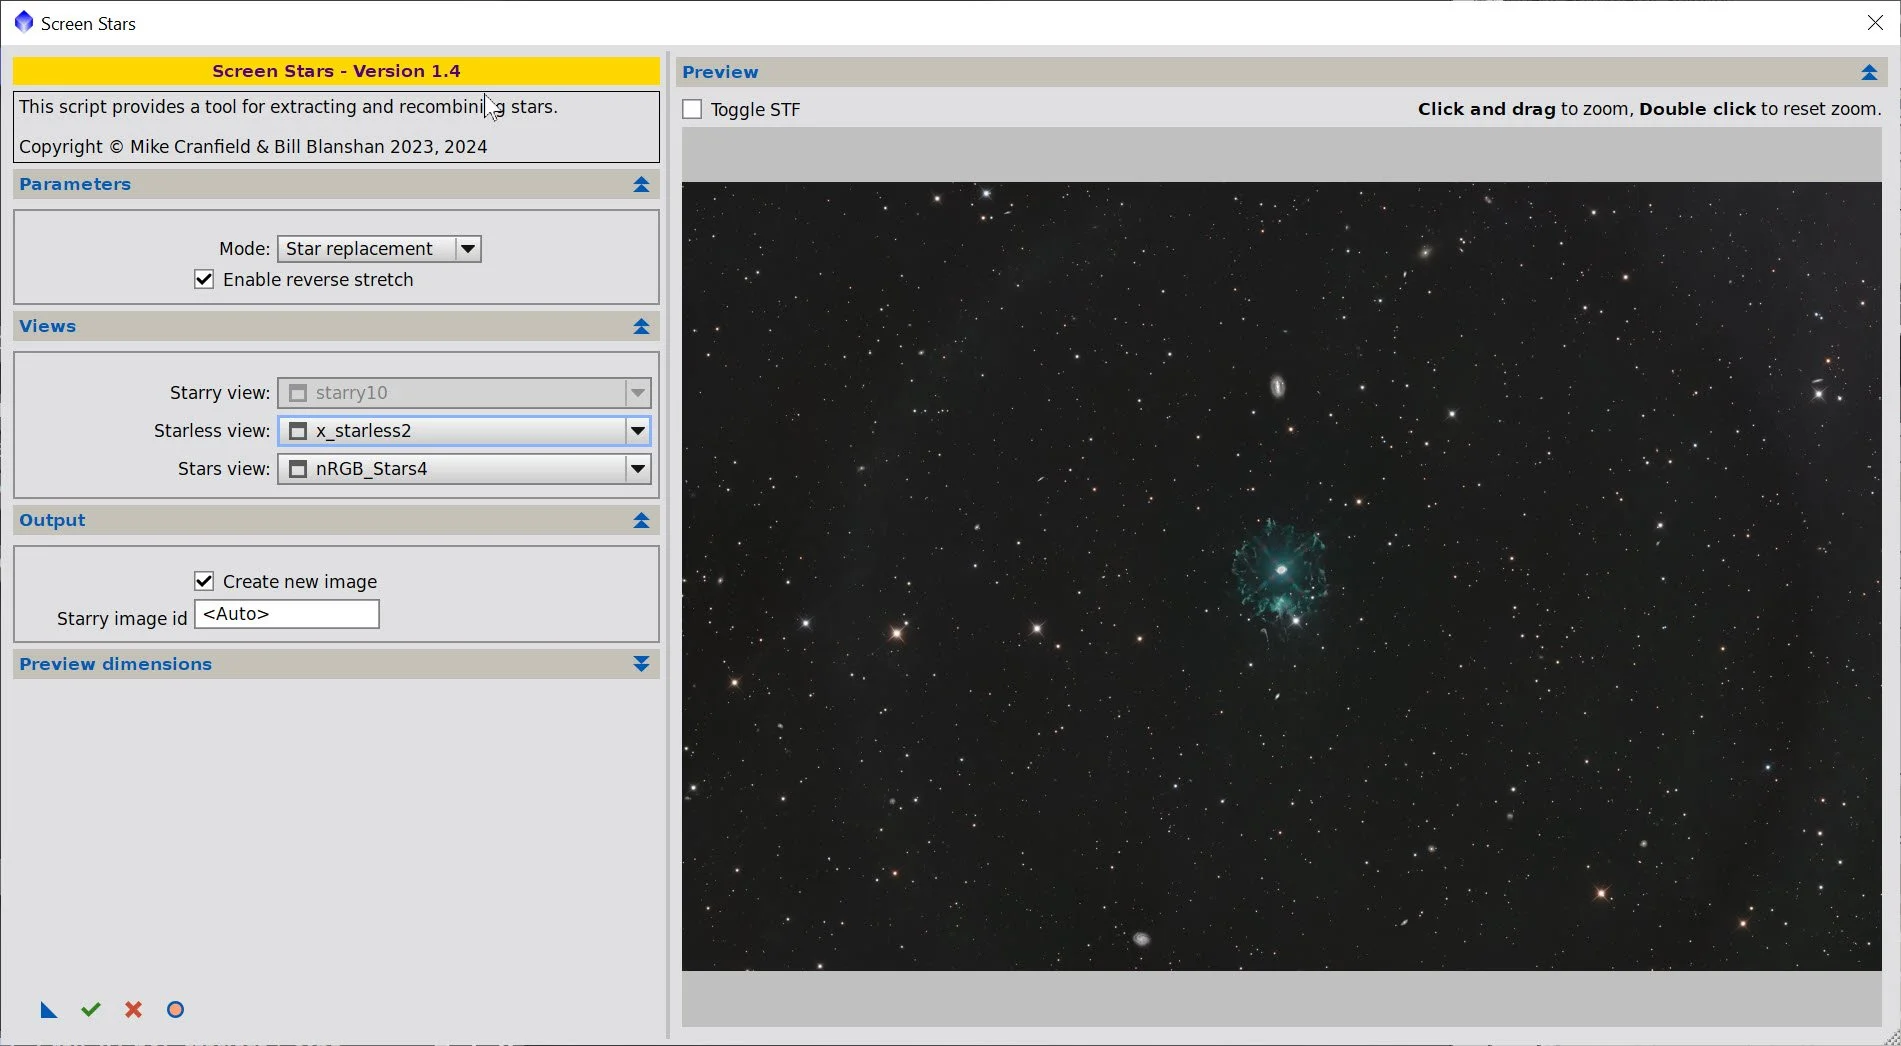
Screenstars Script panel
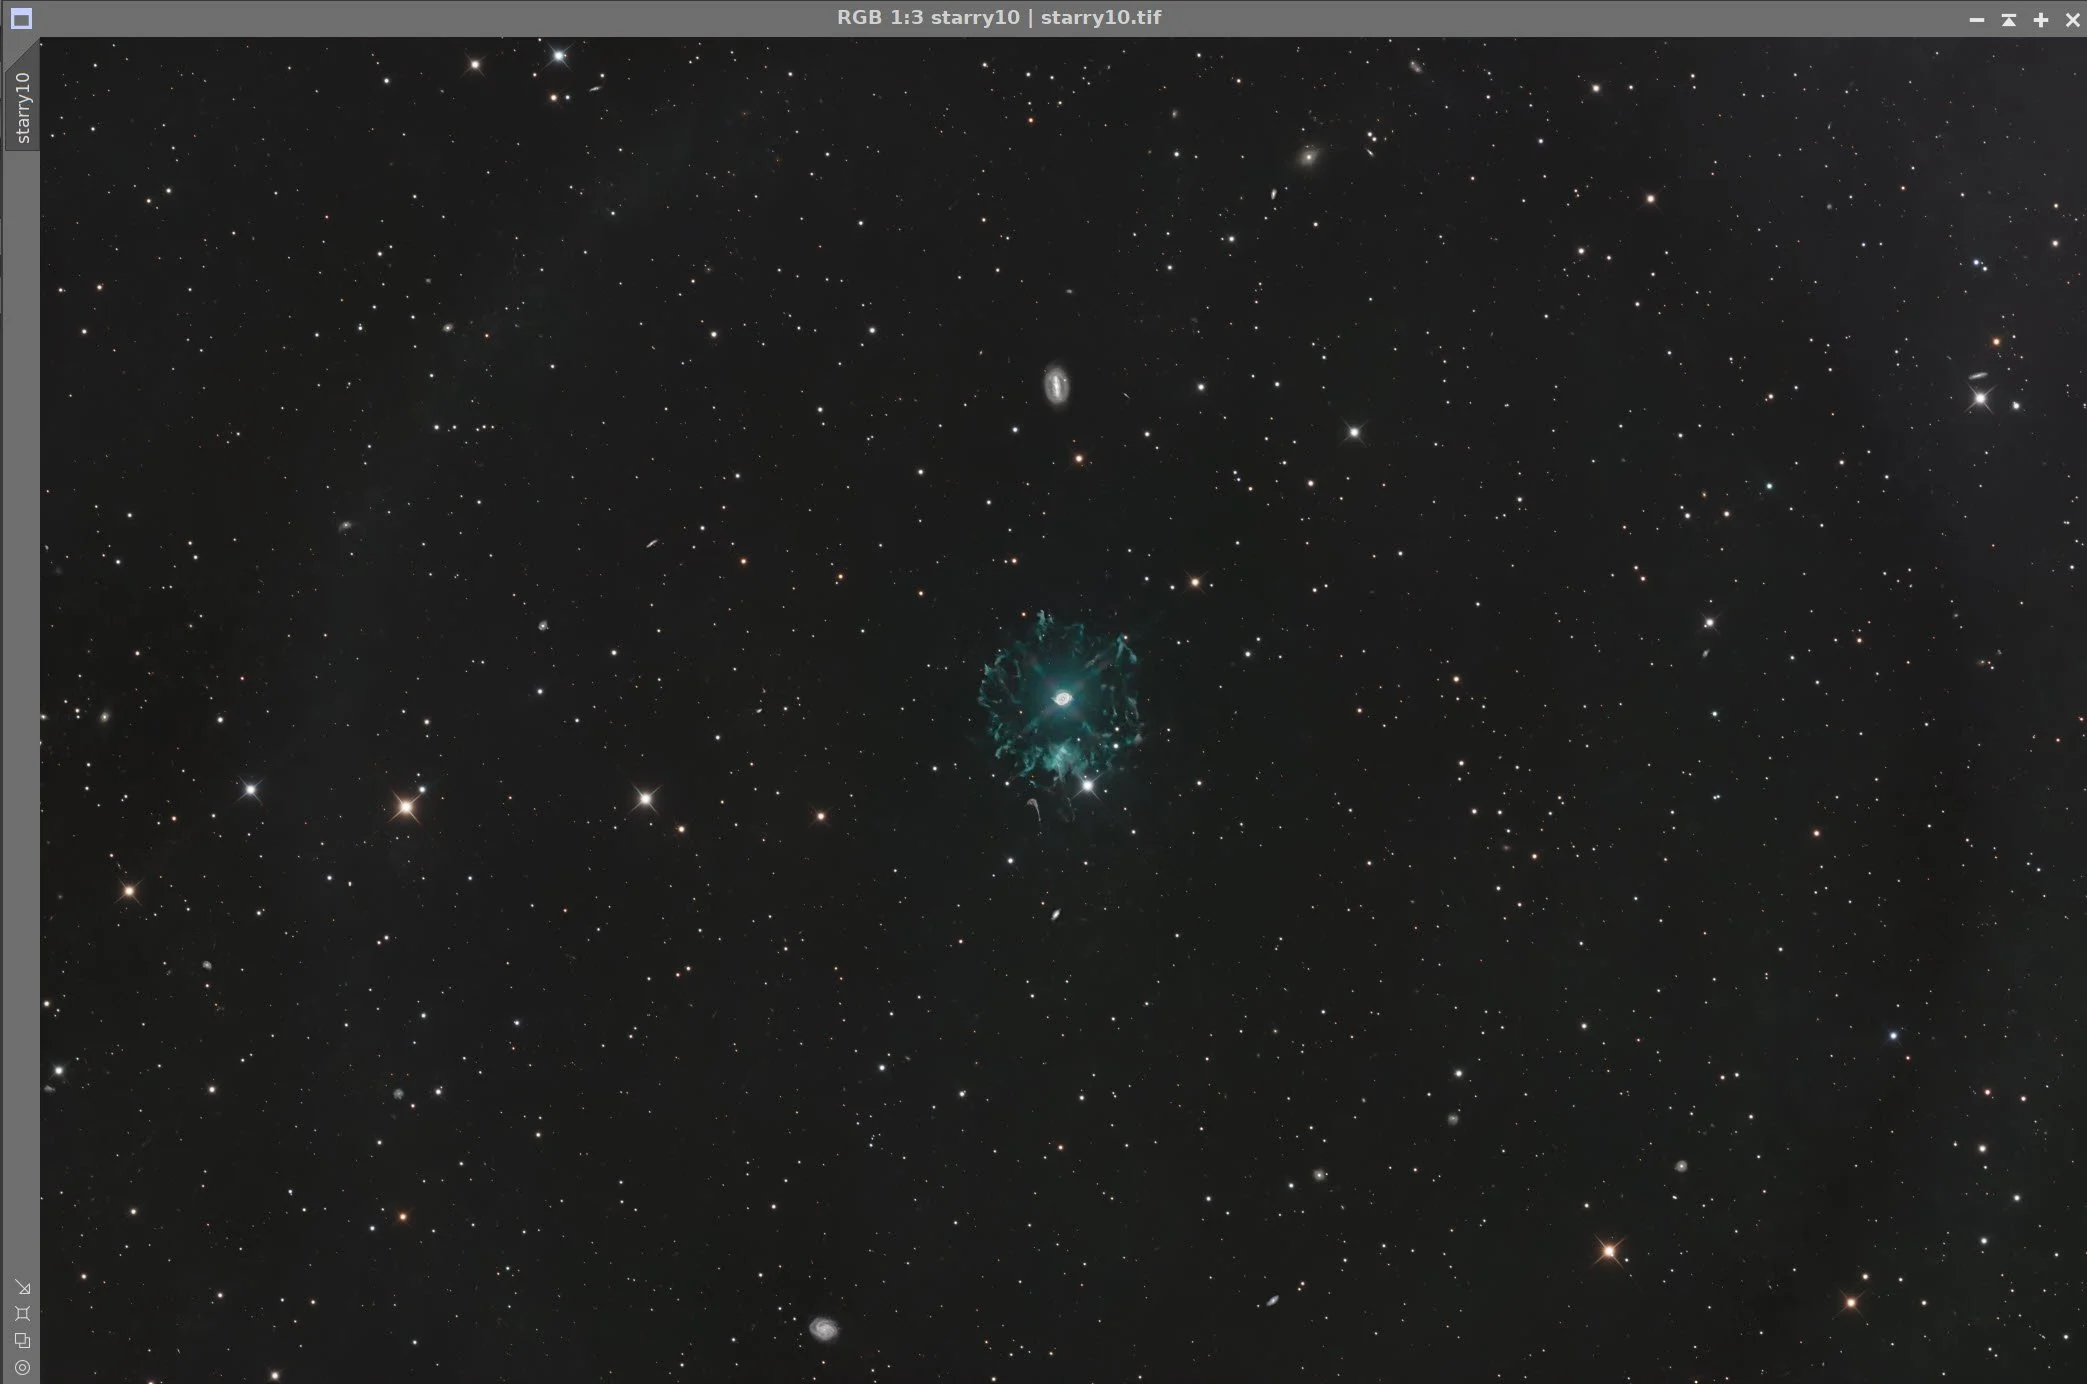
Stars added Back in
12. Move to Photoshop and do the final Polish
Export as 16-bit TIFF
Open in Photoshop
Rotate and Crop to create the final composition.
Use the Camera Raw filter to tweak color, tone, and Clarity globally. As part of this, I lightened the background a bit to show nebulosity seen at the top of the image.,
Select the Nike ‘check mark”. This has a slight red color; amplify it using colorMix in the Camera Raw filter.
Add watermarks
Export various versions of the image
The final image after Cropping and polishing in Photoshop.