
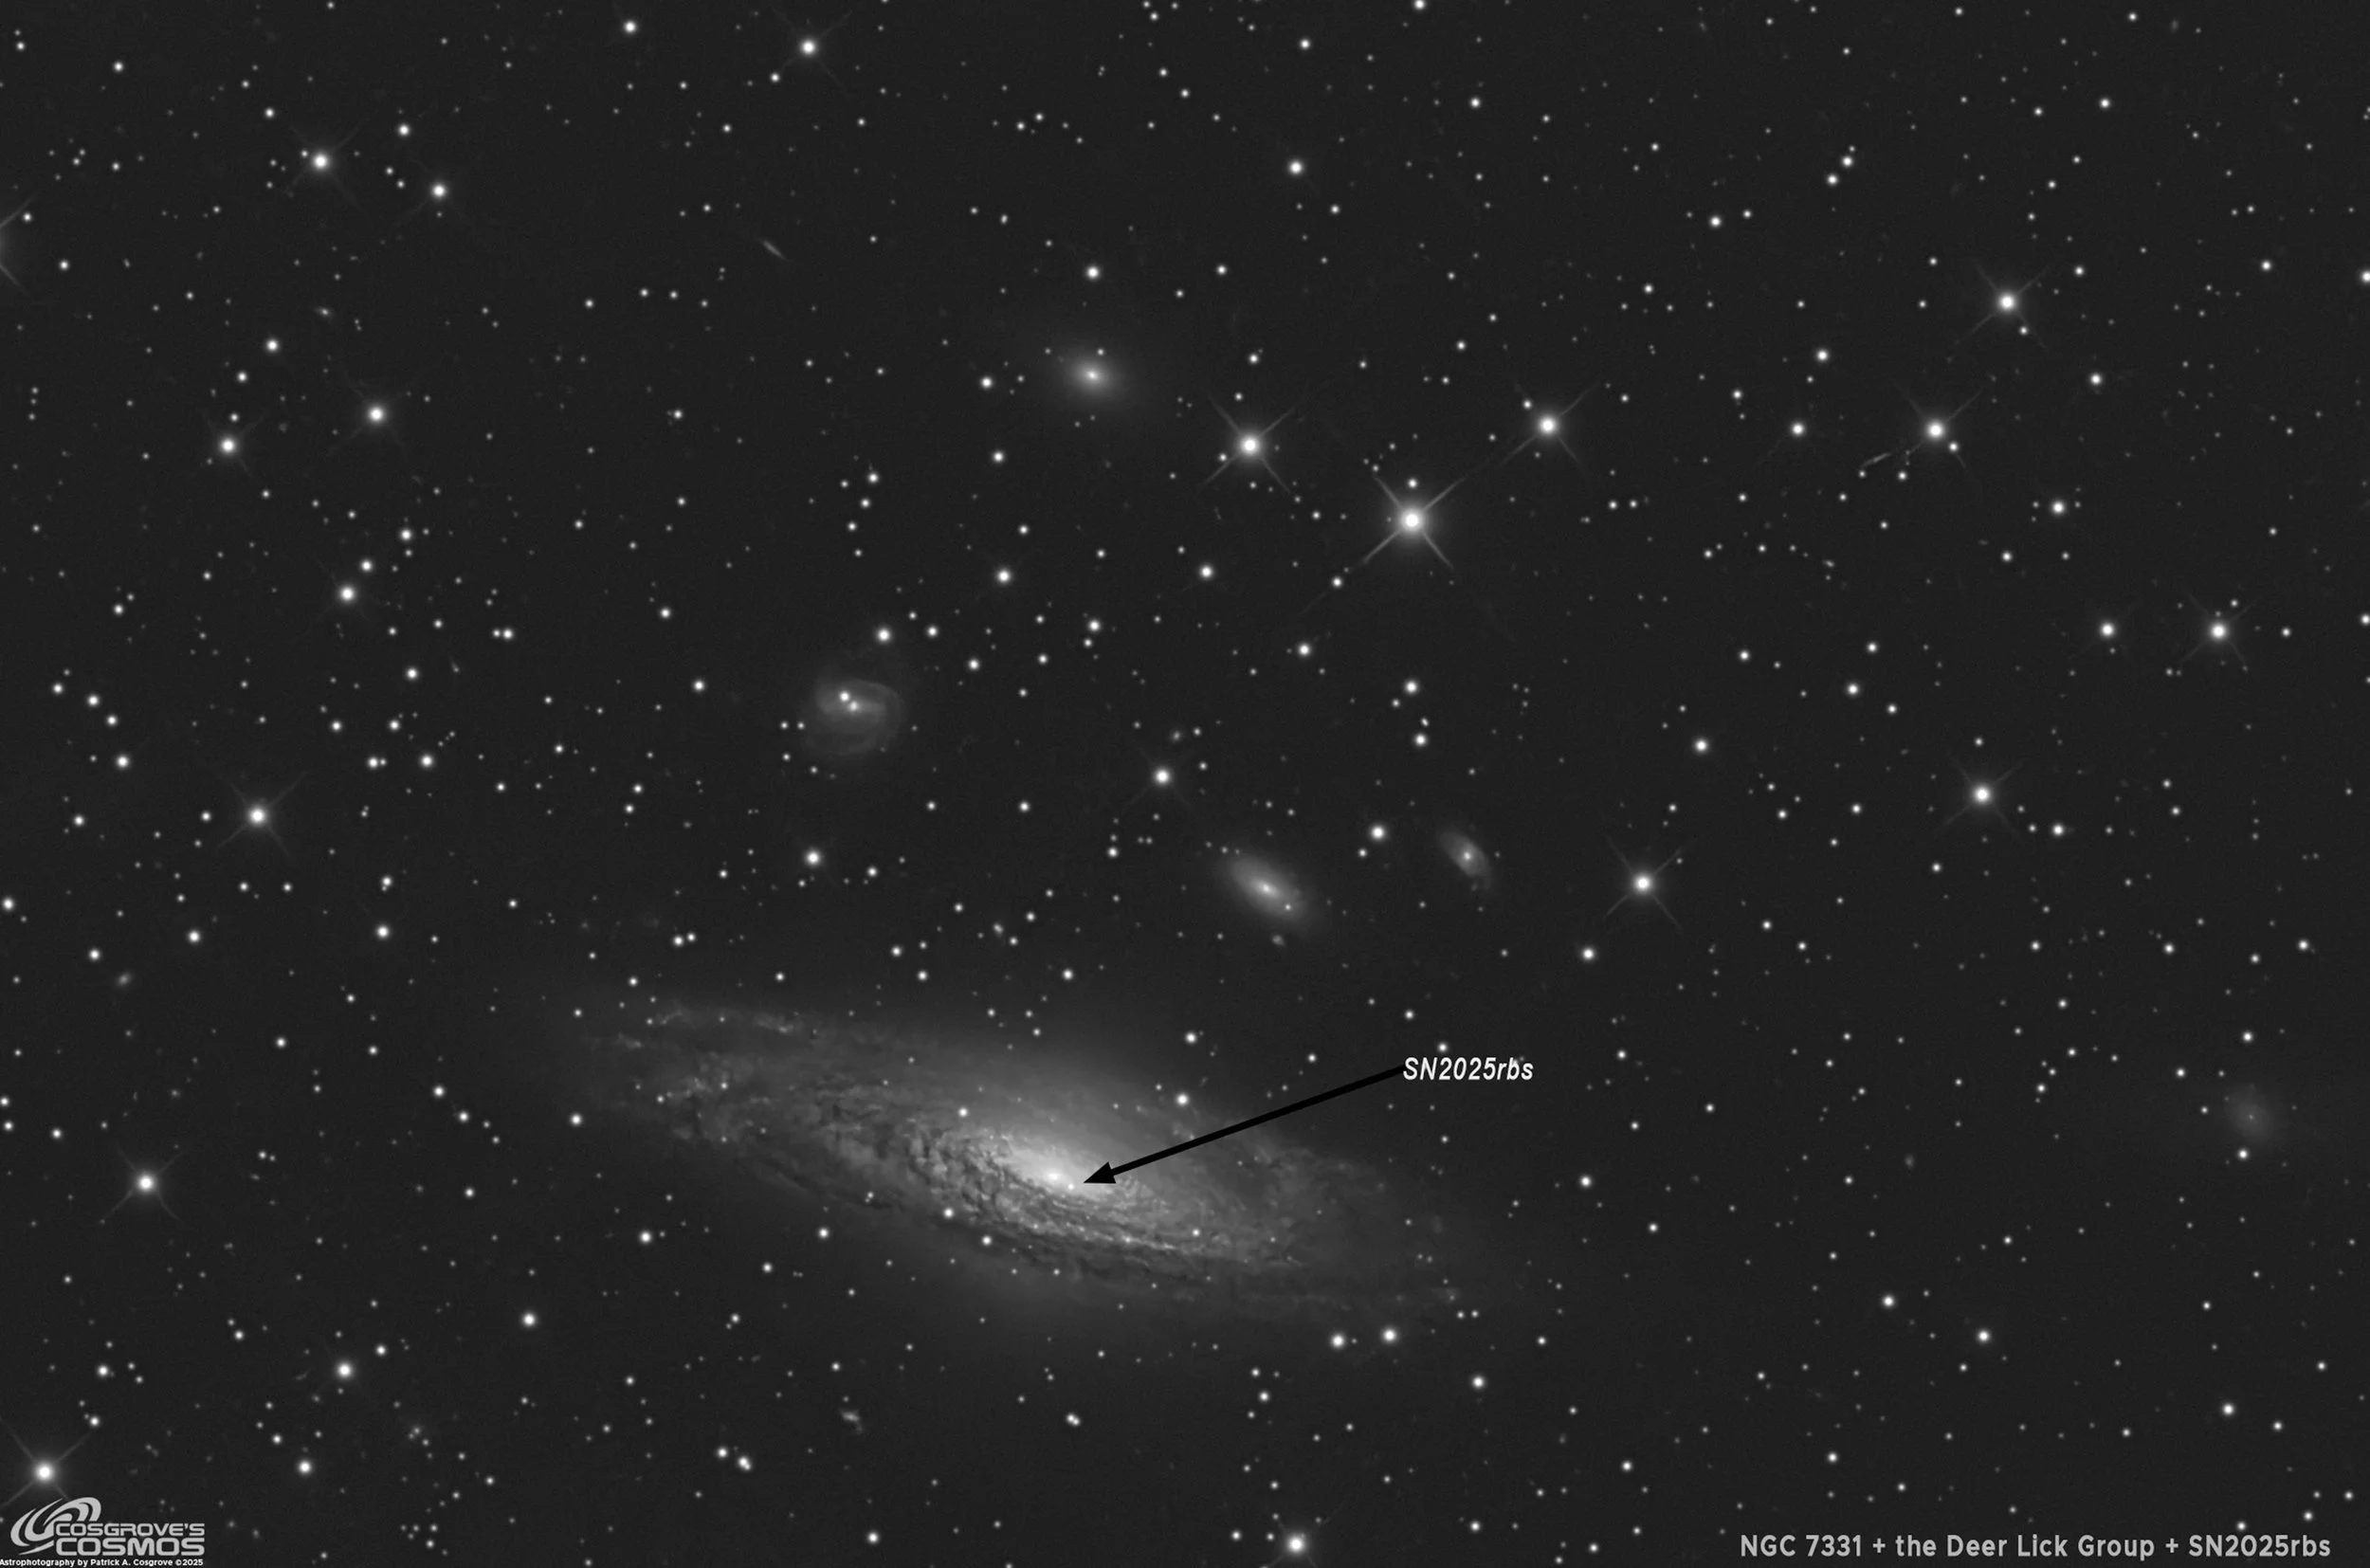
NGC 7331 and the Deer Lick Group with Supernova SN2025rbs (4.7 hours in LRGB)
Date: Sept 3, 2025
Cosgrove’s Cosmos Catalog ➤#0147
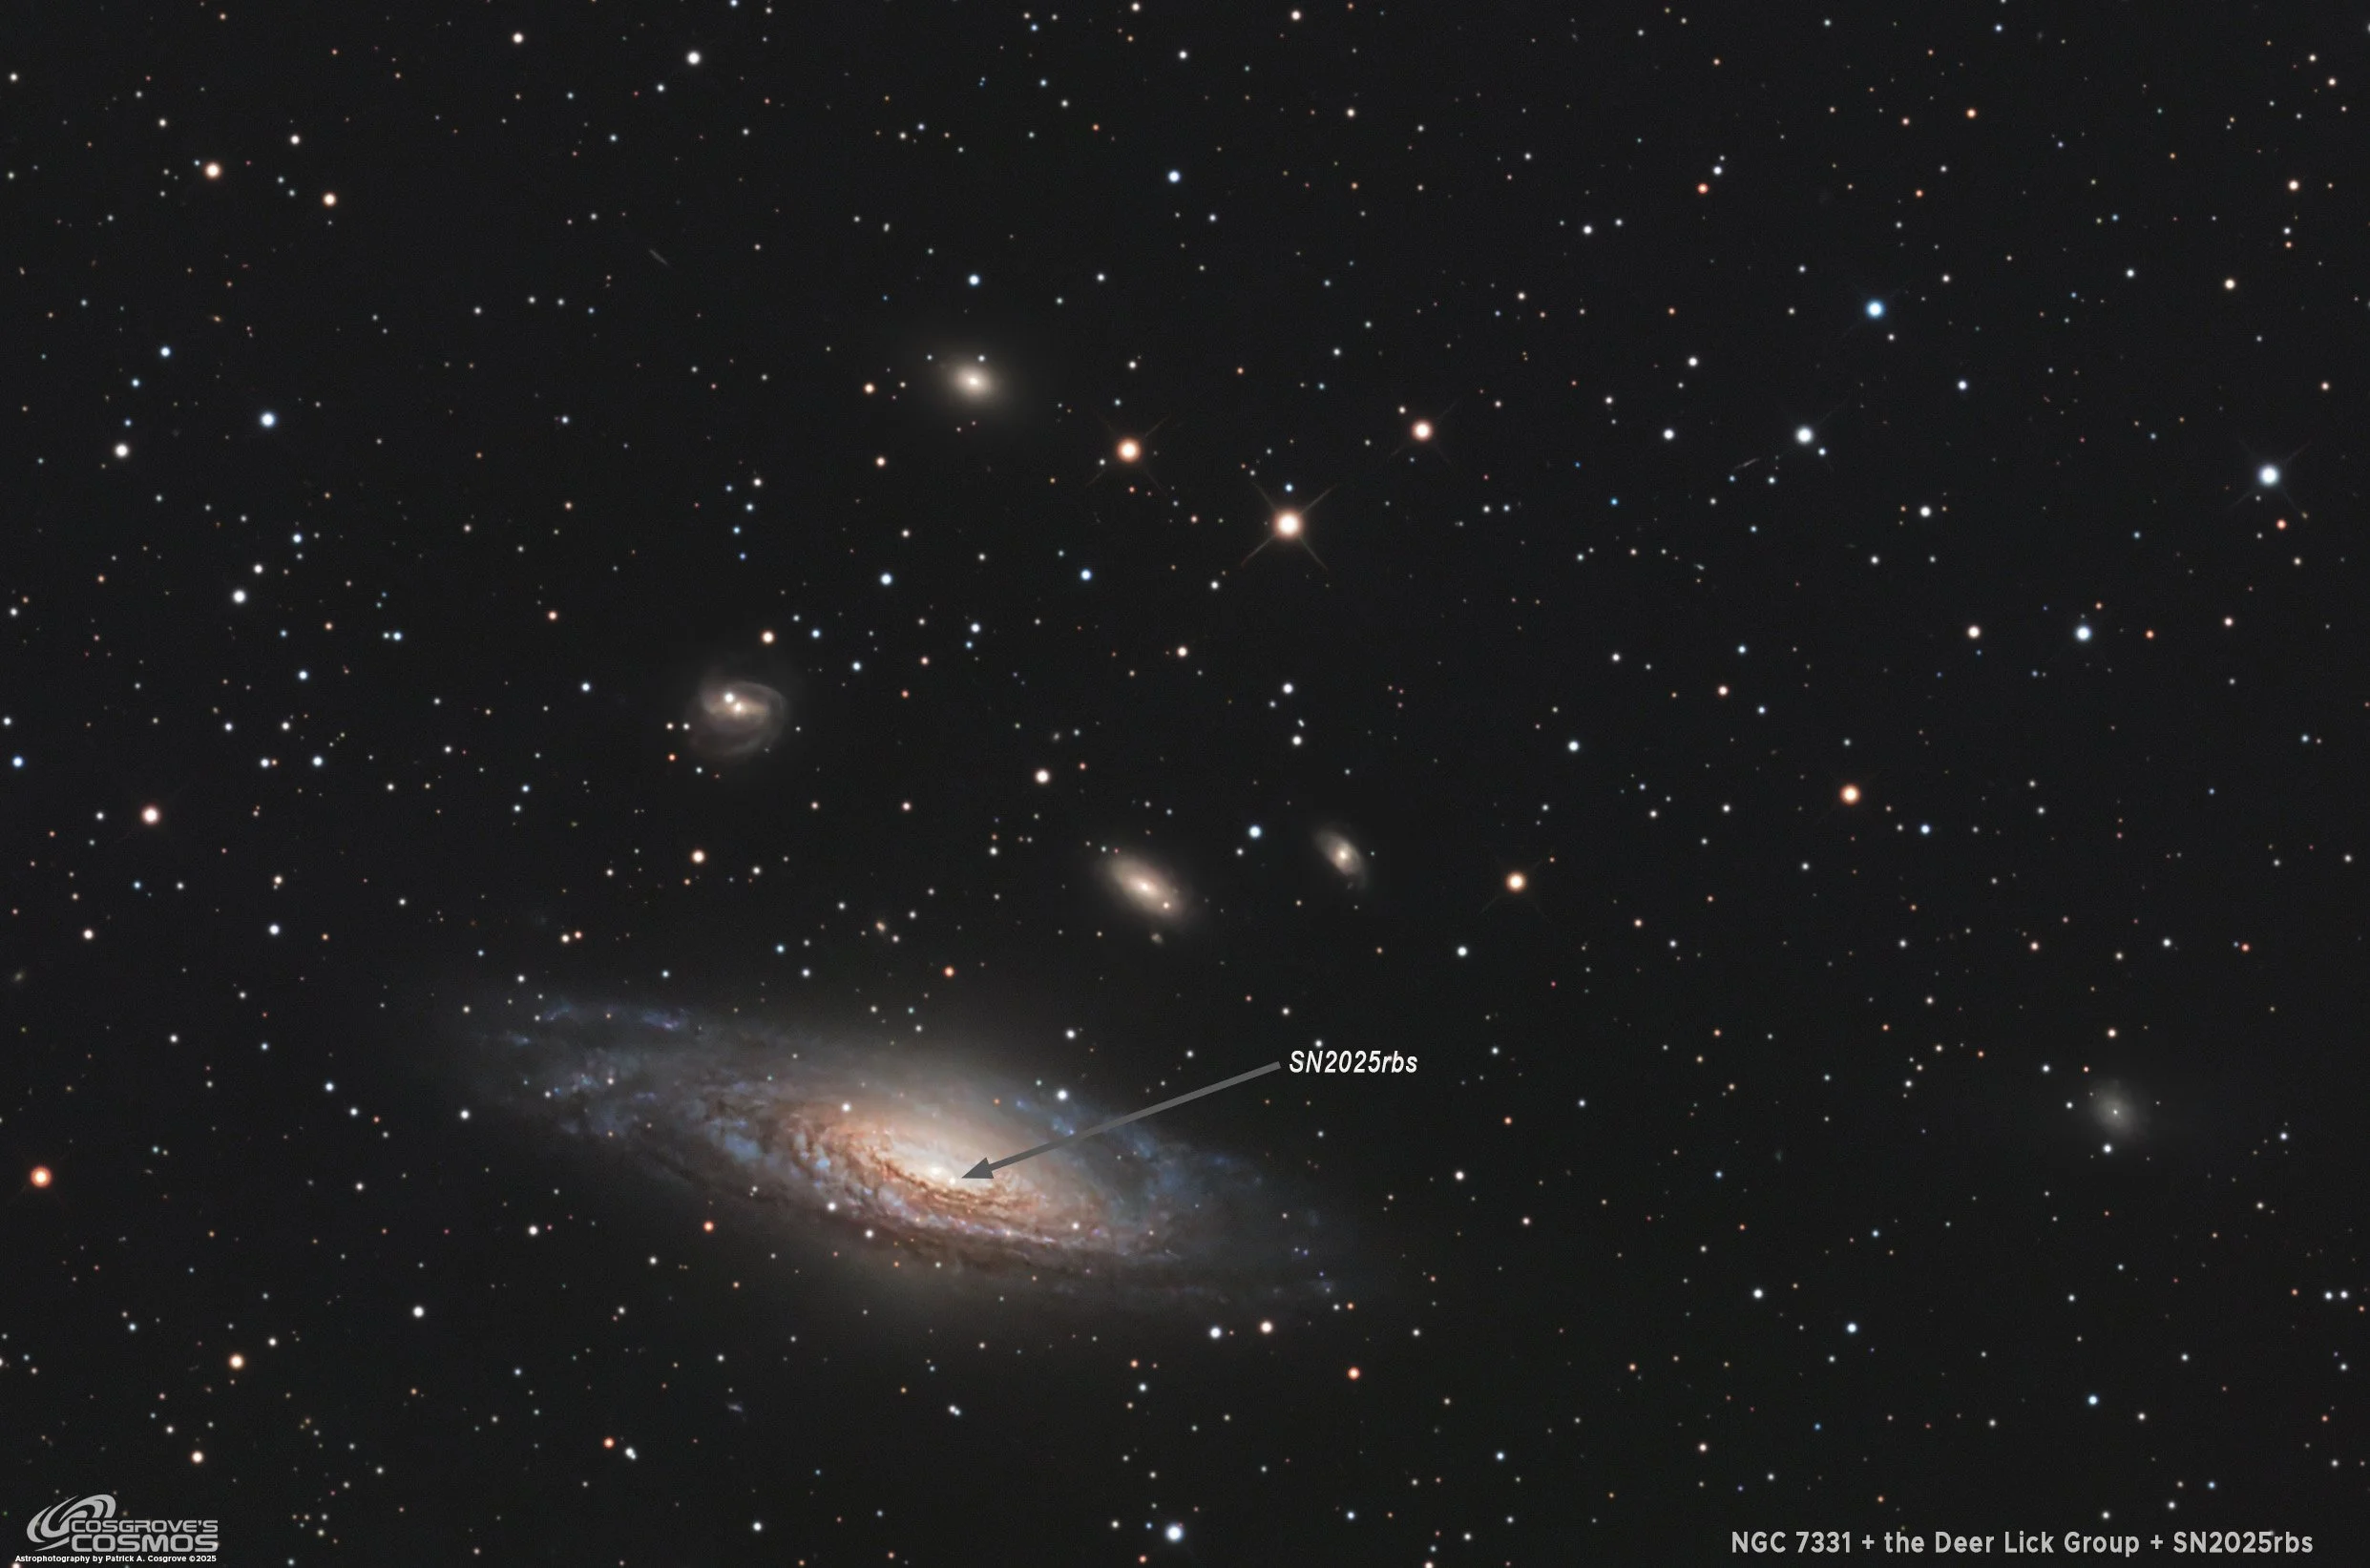
By the time this image was taken, the Supernova had diminished quite a bit and it was a challenge to pull it out of the glare of the bright core. (click for full res image via Astrobin.com)
Table of Contents Show (Click on lines to navigate)
About the Target
Overview
NGC 7331 is a prominent spiral galaxy located roughly 40 million light-years away in the constellation Pegasus.

Friedrich Wilhelm Herschel 1738-1822 (from Wikipedia)
It was discovered by astronomer William Herschel in 1784 and is sometimes called a “twin” of the Milky Way due to its similar size and structure.
.NGC 7331 is an unbarred spiral and is tilted about 75° to our line of sight, which exposes its spiral arms and dark dust lanes. The galaxy’s central bulge is pronounced and contains a supermassive black hole, and with an apparent magnitude of around 10.4, it ranks as one of the brightest galaxies visible to amateur telescopes.
Just a few arcminutes away in the sky, a collection of four smaller, faint galaxies surrounds NGC 7331. Collectively, these neighbors are nicknamed the “Deer Lick Group.” While some sources describe this moniker as an analogy, NGC 7331 is like a “salt lick” attracting a handful of “deer” (the companion galaxies). In some astronomy circles, those dim companion galaxies have even been jokingly called “the Fleas” next to the big galaxy. However, it would seem that this name originated from amateur astronomer Tom Lorenzin in the 1980s, who observed the galaxy cluster from the Deer Lick Gap Overlook in the North Carolina mountains. This was actually a tribute to the famous observing location, not a description of the galaxies' appearance.
The Deer Lick grouping includes galaxies NGC 7335, 7336, 7337, and 7340, which appear close to NGC 7331 in visual maps.
However, this is only a chance alignment – NGC 7331 lies approximately 40 million light-years from us, whereas the four “deer” are about 290–350 million light-years distant.
So, NGC 7331 is in the foreground, and those smaller galaxies are far in the background, so they are not physically related or bound together by gravity. This line-of-sight coincidence nevertheless provides a striking view: the big, nearer galaxy in the foreground, contrasted against the tiny background galaxies, illustrates the immense depth of field in our universe.
Historically, NGC 7331 was overlooked by Charles Messier’s famous catalog. Still, it later gained recognition in amateur observing guides (it’s listed as Caldwell 30), and it continues to intrigue observers, especially when framed with its “Deer Lick” companions.
Supernova SN2025rbs in NGC 7331
In July 2025, galaxy NGC 7331 became host to a new supernova designated SN 2025rbs.
This stellar explosion was first detected on 14 July 2025 by the Gravitational-wave Optical Transient Observer (GOTO), an automated network of wide-field robotic telescopes that scans the sky for transient events. Astronomers quickly obtained follow-up observations and determined that SN2025rbs is a Type Ia supernova, identified by its characteristic spectral features.
A Type Ia supernova is the catastrophic thermonuclear explosion of a white dwarf star in a close binary system. In such systems, the white dwarf gradually steals matter from its companion star; if the white dwarf’s mass approaches the Chandrasekhar limit (about 1.4 times the Sun’s mass), it becomes unstable and detonates in a runaway fusion reaction. This results in a brilliant burst with no hydrogen in its spectrum – a key signature that distinguishes Type Ia supernovae from other types. The classification of SN2025rbs as Type Ia was confirmed by comparing its spectrum to known supernova templates, which showed it closely matched a normal Type Ia event just a couple of weeks before peak brightness. In essence, what erupted in NGC 7331 was a white dwarf that had reached the tipping point and obliterated itself, briefly outshining its entire host galaxy.

Type Ia Supernova (Credit NASA)
SN2025rbs appeared very near the luminous core of NGC 7331, practically in the galaxy’s inner region, which makes it a bit of a challenge to spot against the bright central glow. Despite its location against the galaxy’s nucleus, the supernova brightened significantly in the weeks after discovery.
It was initially around magnitude 17 at discovery, but it surged to about magnitude 14 at its peak – meaning it became roughly 25 times brighter than when first spotted. (For context, lower magnitudes denote brighter objects, so this peak made SN2025rbs visible in moderate amateur telescopes.)
In fact, it was among the most luminous supernovae observed in 2025!
Even by the end of August 2025, several weeks after maximum light, SN2025rbs was still holding around magnitude 14.4, slowly fading but remaining visible. This relatively slow fade gave astronomers and enthusiasts ample time to monitor and photograph the supernova over the summer, which is why I was able to image it this late after its discovery.
Interestingly, SN2025rbs is the fourth supernova on record in NGC 7331.
Previous supernovae in this galaxy were observed in 1959, 2013, and 2014, highlighting that large spiral galaxies like NGC 7331 occasionally produce these stellar explosions. Notably, the 2014 event (SN 2014C) in NGC 7331 drew scientific attention for its unusual evolution – it started as one type of supernova (Type Ib) but over the course of a year transformed into a hydrogen-rich Type IIn as it interacted with surrounding material. While SN2025rbs is a more “standard” Type Ia, its occurrence provides both a stunning visual in an already picturesque galaxy and valuable data for researchers.
Overall, the sight of NGC 7331 flanked by the Deer Lick Group and highlighted by the brilliant flare of SN2025rbs offers a remarkable scene. For newcomers to astronomy, it showcases a grand spiral galaxy not unlike our own Milky Way, and for seasoned observers, it’s an opportunity to witness a fresh supernova amplifying the view of a well-known deep-sky object.
Annotated Image

Image created with Pixinsight’s ImageSolver and AnnotateImage scripts.
Location in the Sky

Findershart created with Pixinsight’s ImageSolver and FinderChart scripts.
About the Project
During the last week of August, we had some “iffy” nights. These are nights when the weather apps suggested that there might be periods of clear skies, but also indicated a real possibility of cloud formations moving in.
However, with the observatory now operational, I felt there was little downside to capturing images on these nights. Set up and shut down are not he major tasks they used to be, so it was not such a big deal to start capturing on one of these nights and see where things went.
In fact, the good news is that I am typically not in the observatory very much!
First, I set up the scopes remotely from my Astro Man-Cave.
I program the NINA sequence
I turn the power on to the scopes themselves via a remote relay
Then I connect each of the scope devices within NINA.
Then I go out to the observatory for a few minutes:
I unlatch the roof and open it.
I take the caps off all of the scopes.
Then it’s back to the Man Cave
I watch things over a security camera
I fire off the NINA sequences
NINA takes it from there.
I slept for most of these nights (yes - slept! I love it when a plan comes together!)
In the past week, I have been shooting a narrowband series of the Cave Nebula with my Sharpstar SCA260. I already had some good data for the project, but I planned to collect more.
But an old astro friend of mine, Glenn, had shown me some images of the Supernova in NGC 7331 that a member of our local astronomy club shared. He prodded and suggested I give it a try.
So I thought - why not!
I could quickly program a NINA sequence to do this, and I could possibly take an hour or so to capture the data, then return to my original target.
Easy-peasy.
Well - except for that sleep part. I set an alarm to swap out targets (yes, I know I could have automated this within NINA as well, but this is a quick and dirty thing on the fly). The alarm went off and — I was lazy and decided to let it run all night whilst I went back to sleep!
S0 - it went all night…
I ended up with almost 5 hours of integration. Even with this short an integration time, I was happy with the detail I was able to capture on the target. While the Supernova was a little hard to see, being embedded in the bright haze of the core, the detail in NGC 7331 was pretty satisfying!
The “Fleas”, the four “companion galaxies,” show up quite well. I find it fascinating that NGC 7331 is a foreground object at a paltry 40 Million Light-years away, while the “companions” are about 350 million light-years away!
I expected to see no detail in these galaxies due to their size and distance, but there is some detail on a couple of them.
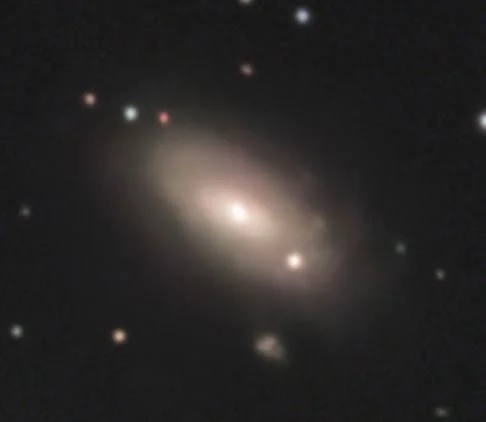
NGC 7337 is a barred spiral with a classification SB(rs)b, which is estimated to be 300 million light-years away. It has the most structure and detail of the bunch.

NGC 7337
NGC 7335 is a Spiral galaxy with a bright core that is classified as S0-Aa, and is estimated to be 303 million light-years away. Again - you can just start to make out details of its spiral form.
NGC 7335
NGC 7336 is an Intermediate Spiral galaxy with a classification SBc, and is located approximately 294 million light-years away. You can see a hint of its spiral form and maybe a distortion towards the bottom.

NGC 7336
NGC 7340 is an elliptical galaxy with a bright core, with a classification of E3. It is estimated to be 290 5to 332 million light-years away.
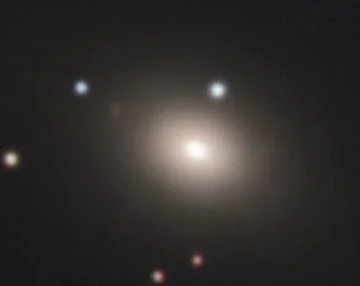
NGC 7340
Previous Capture Efforts
The first time I tried the NGC 7331 Group was in October of 2019. I had just begun my astrophotographic journey at the time, and the image clearly shows that. You can see the project HERE.
The second time was back in August of 2020. At that time, I did a 3.5-hour integration with an OSC camera. This shot was framed so that it caught both the NGC7331 group as well as Stephen's Quintet. You can see the project HERE.
Both of those images can be seen below for convenience and comparison.
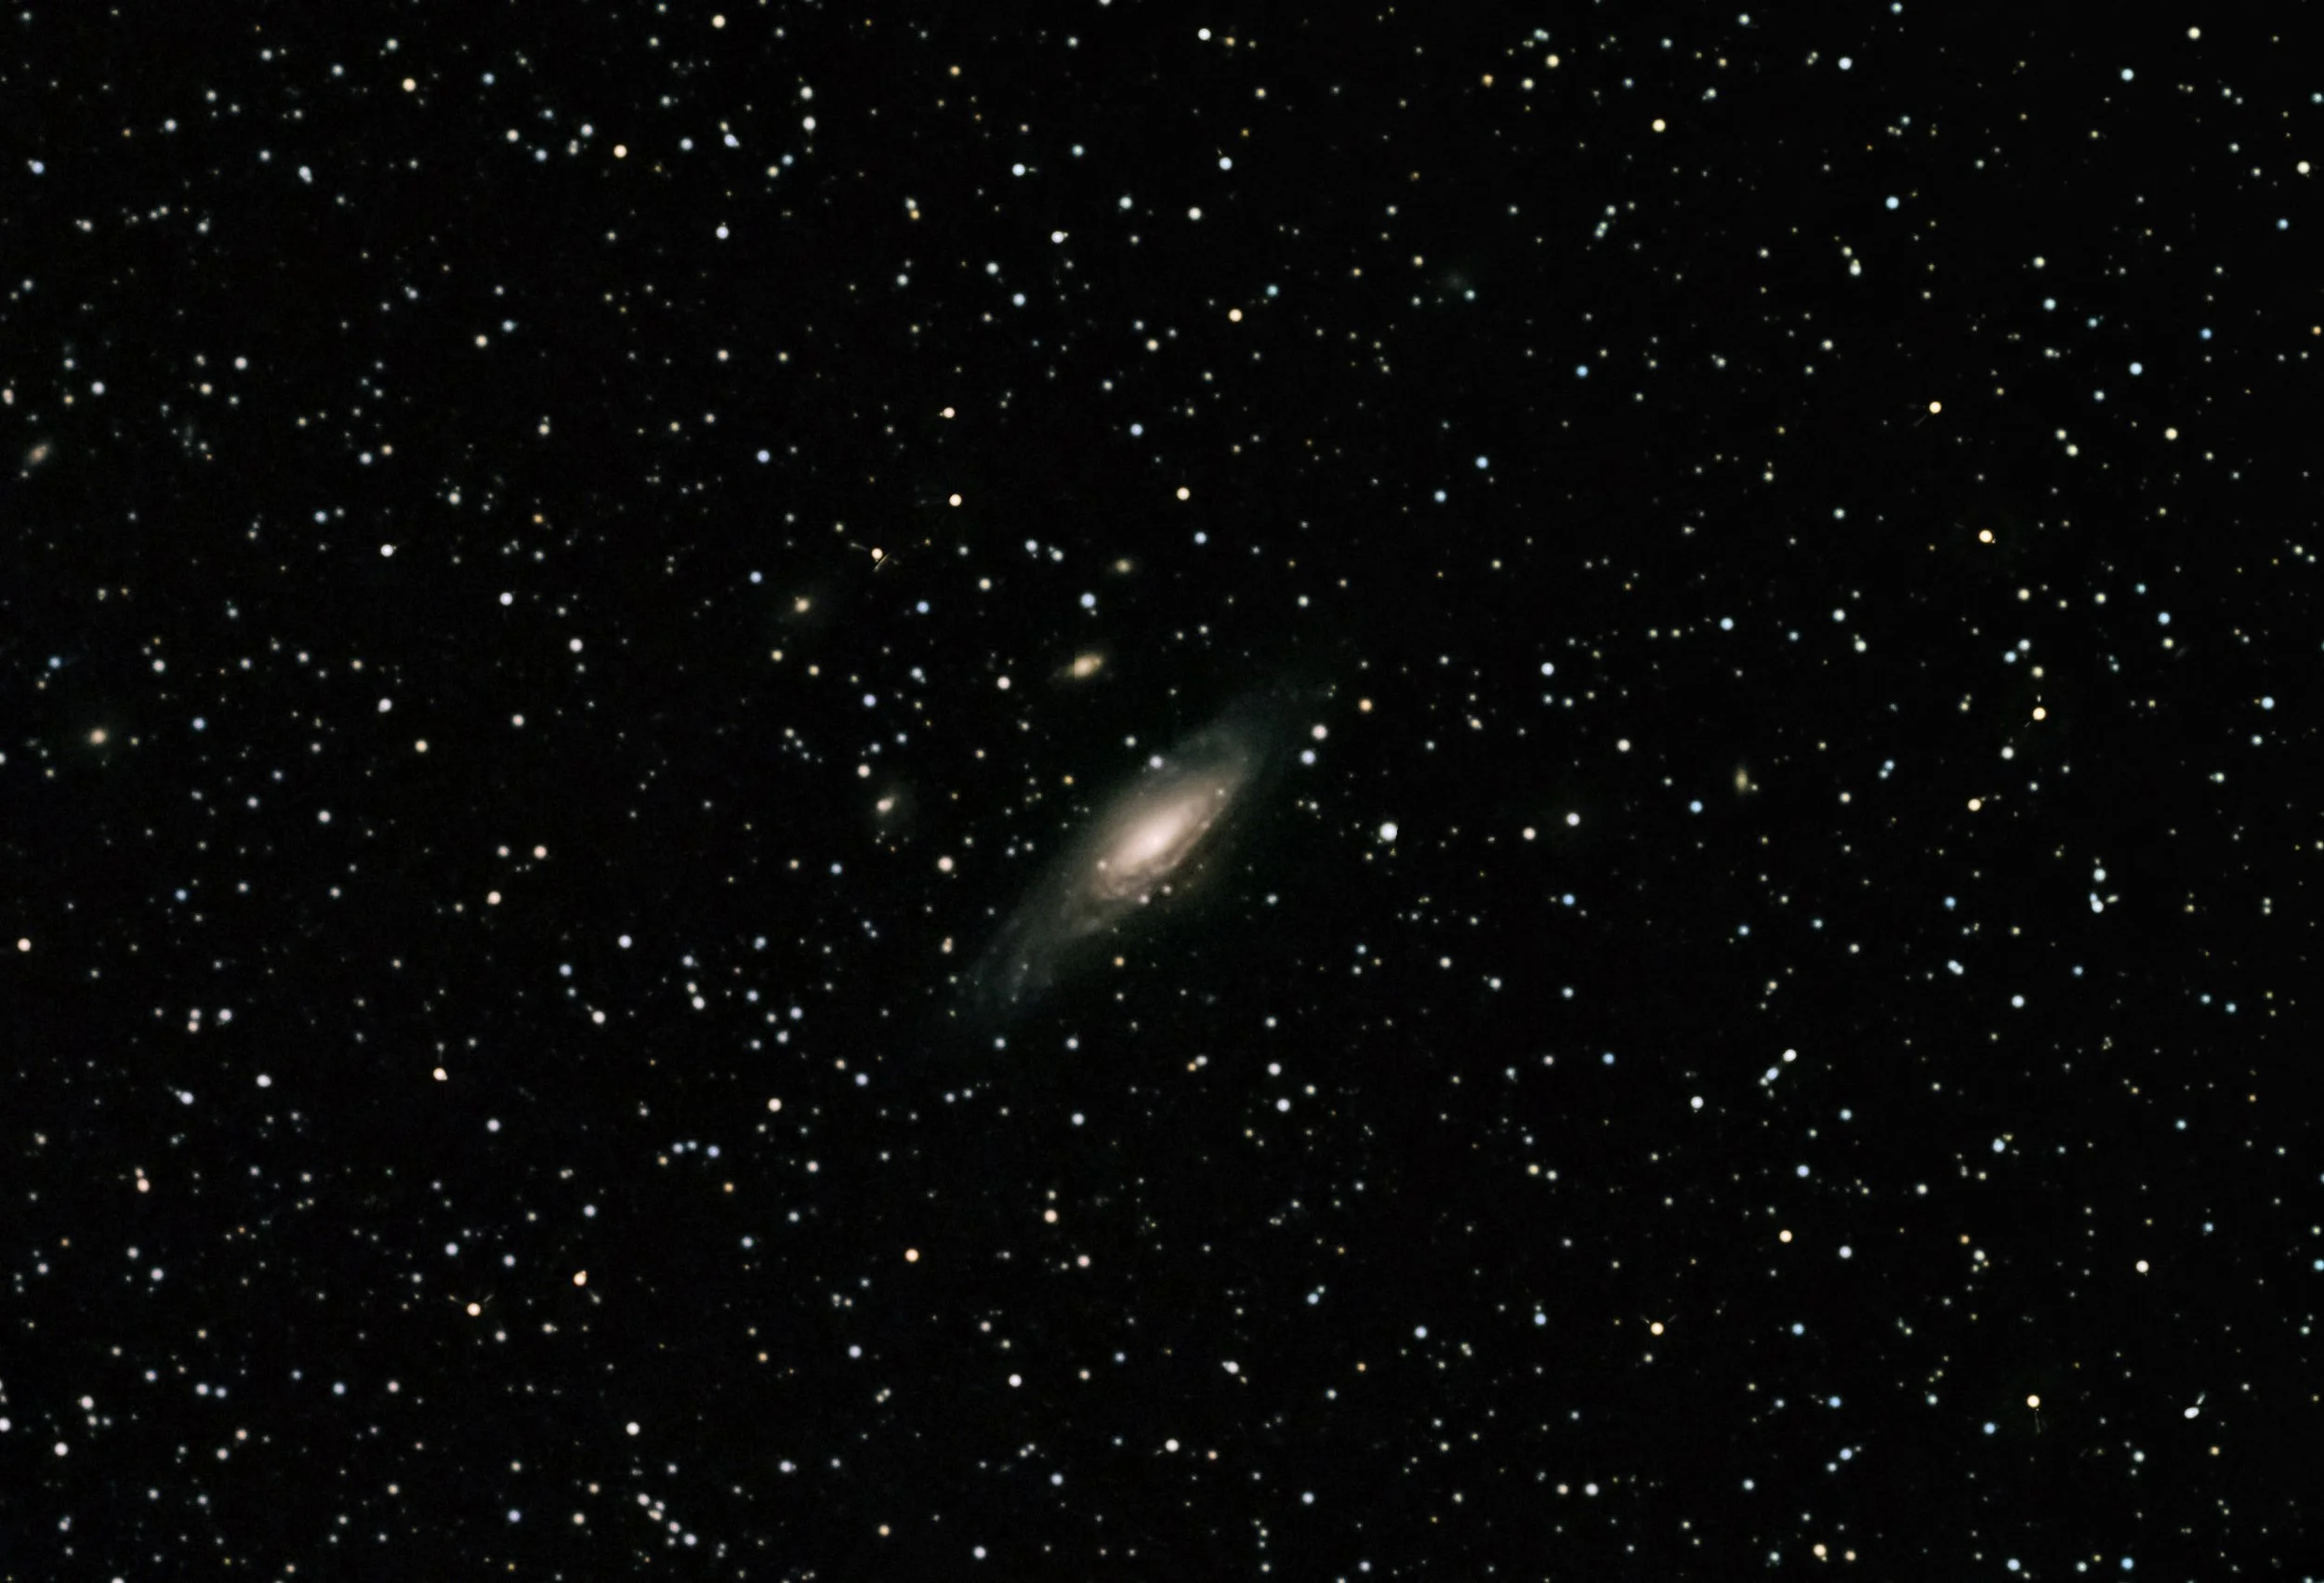
My very first attempt back in October of 2019! (click to enlarge)
Secnd attempt in 2020 - NGC3771 Group and Spephan Quintet. (click to enlarge)
Data Capture
Data was captured on the night of August 30.
I decided on doing an LRGB sequence of 90-second exposures with the camera cooler aim set to -10 degrees C. Since I don’t have a rotator on the SCA260, I centered NGC 7331 and the Deer Lick group in the middle of the field.
I normally set the sequence to use focus offsets and then rotate through the filters to get separate L, R, G, & B subs for each cycle. However, this time I set it up to capture two Lum subs and then one each for R, G & B.
I thought there was an offhand chance that I might do a B&W image here, so I decided to stack the deck with lum subs.
Data collection happened without any errors, and I slept through most of it! (Yay!)
Image Processing
Normally, I would use a starless processing workflow to deal with this image. However, I was a little concerned that it might cause an issue with the SN, and I wanted to simplify the process, so I opted for an old-fashioned 'leave-the-stars-in’ methodology.
As you might expect, I processed the L image to enhance detail and sharpness, and the RGB image to increase color and reduce noise, and then combined them at the end.
I quickly realized that the Master Images did not seem to show the supernova at all! It was lost in the bright glow of the nucleus of this galaxy.
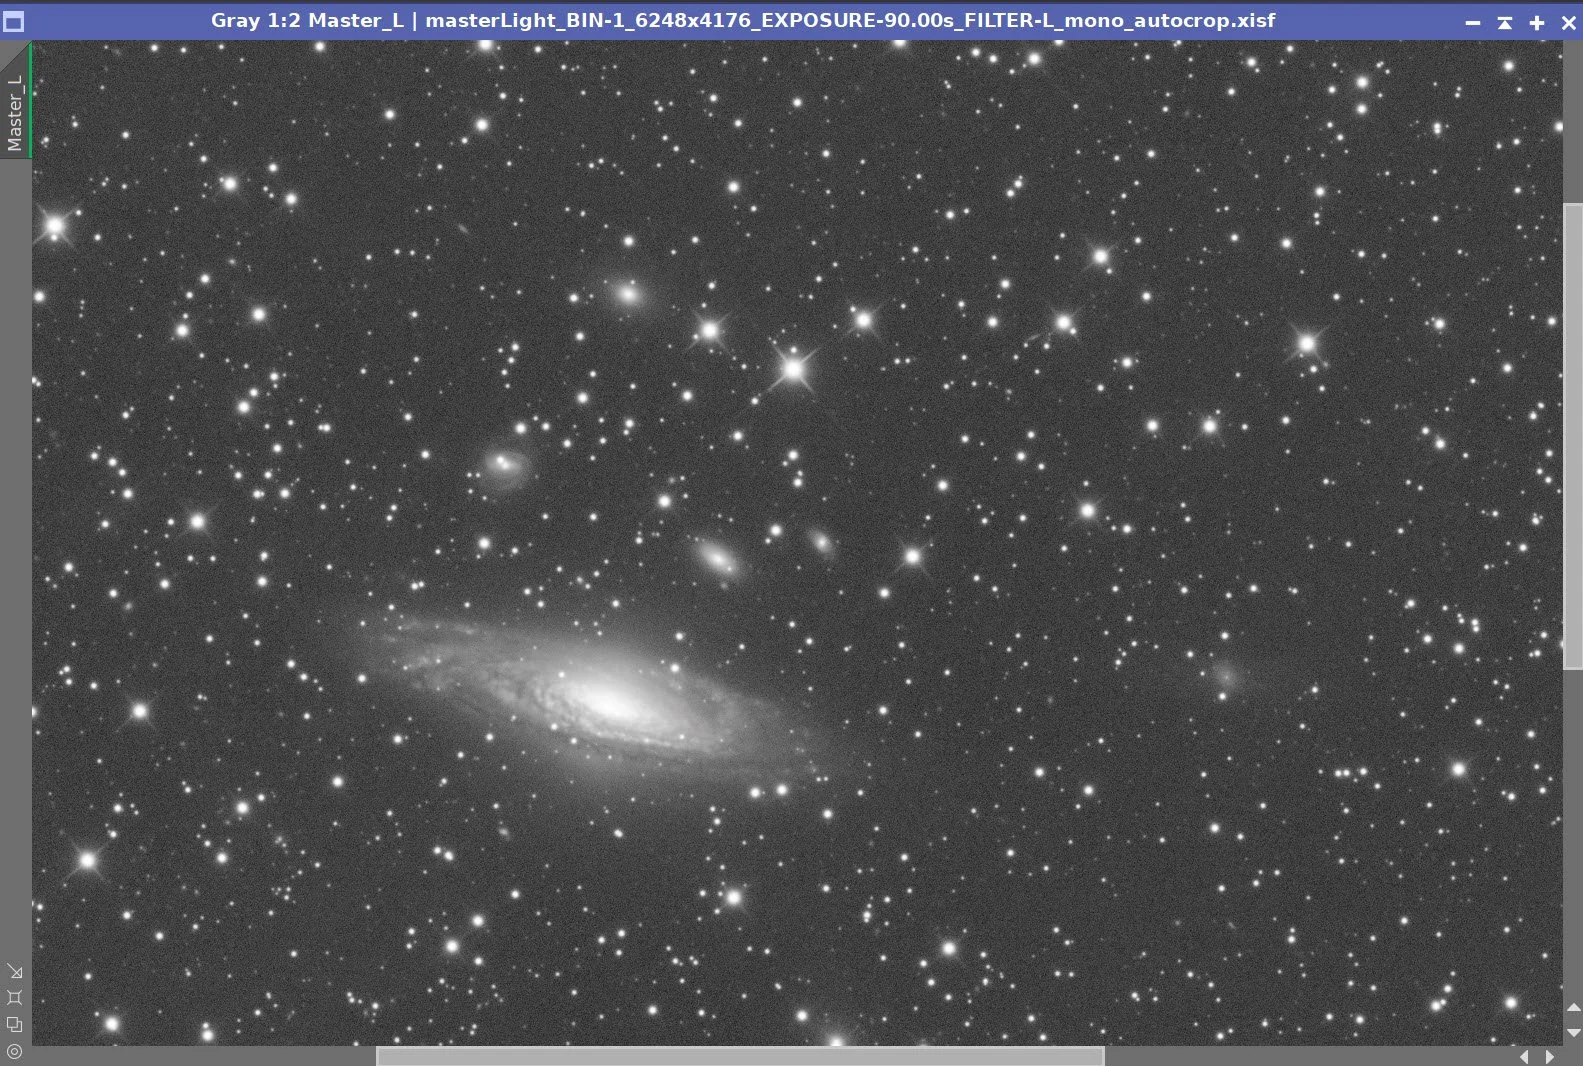
If I looked at a single blue filter 90-second sub, I could clearly see the core of the galaxy as well as the SN:
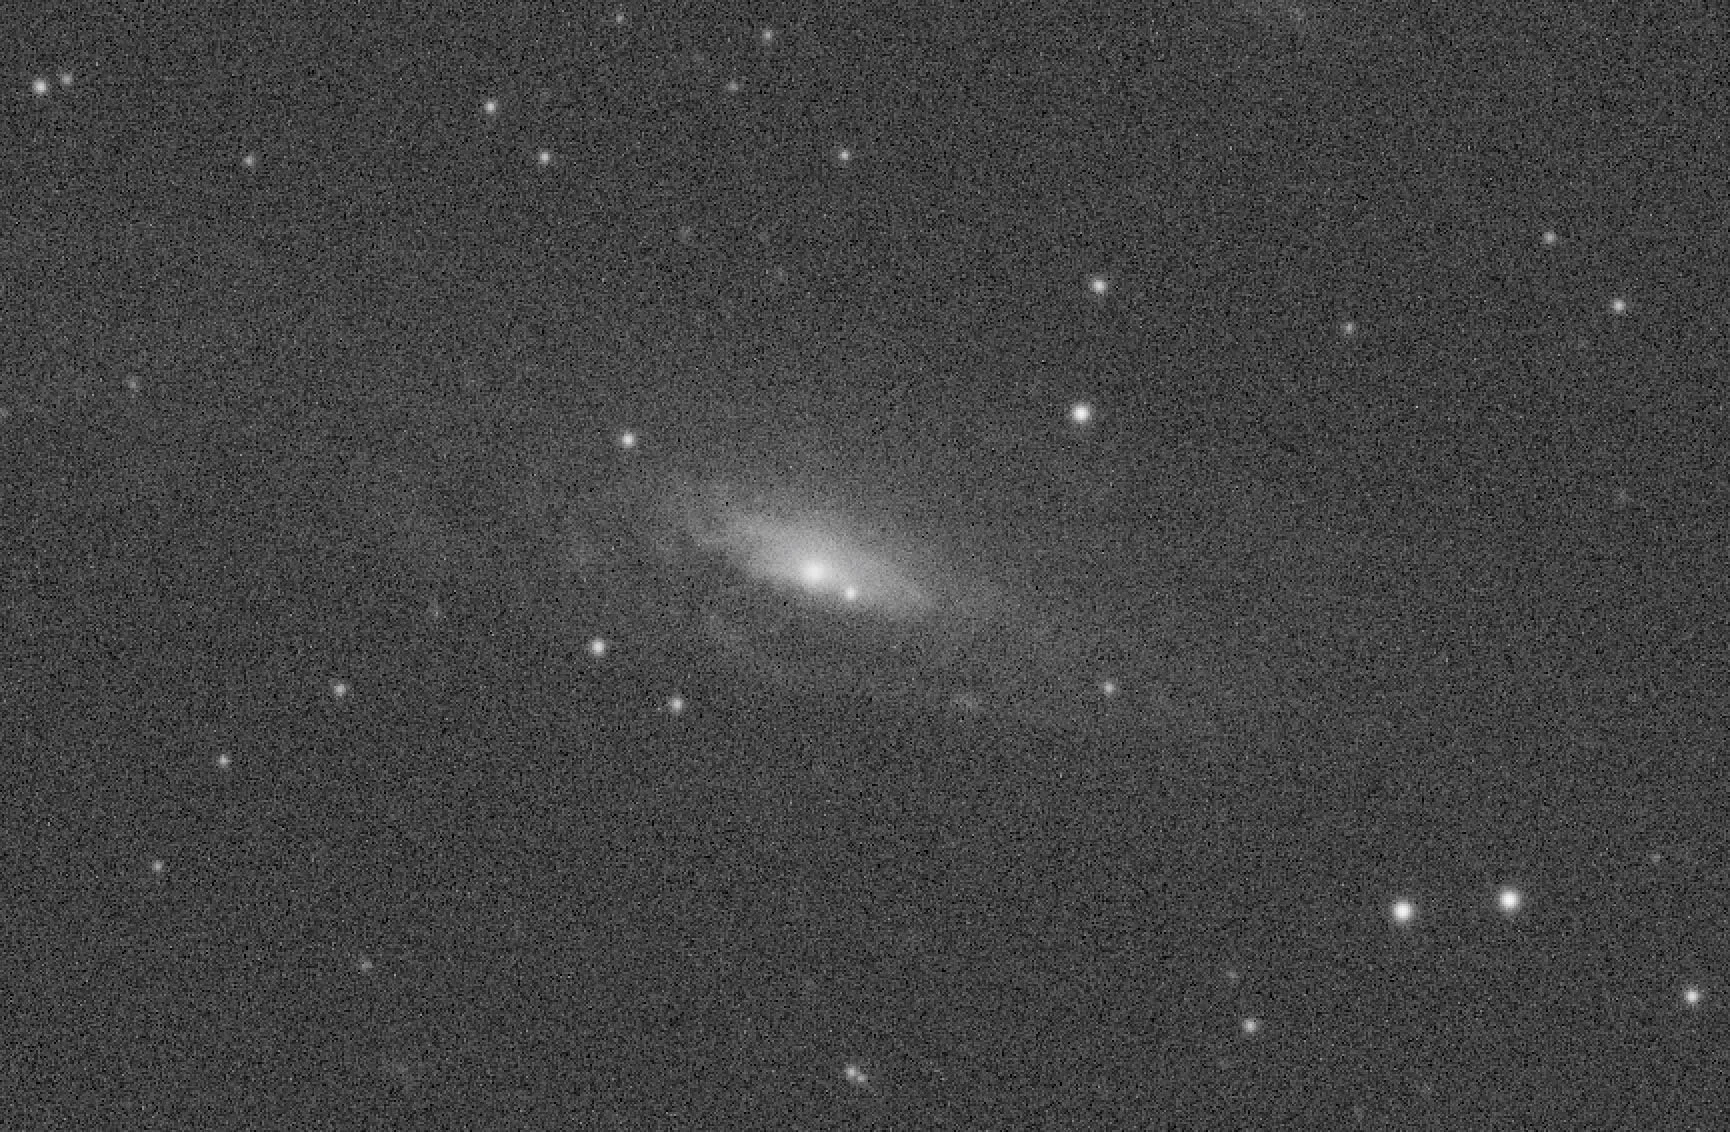
A zoomed in portion of a single blue filter subframe shows the nucleus as well as the Supernova.
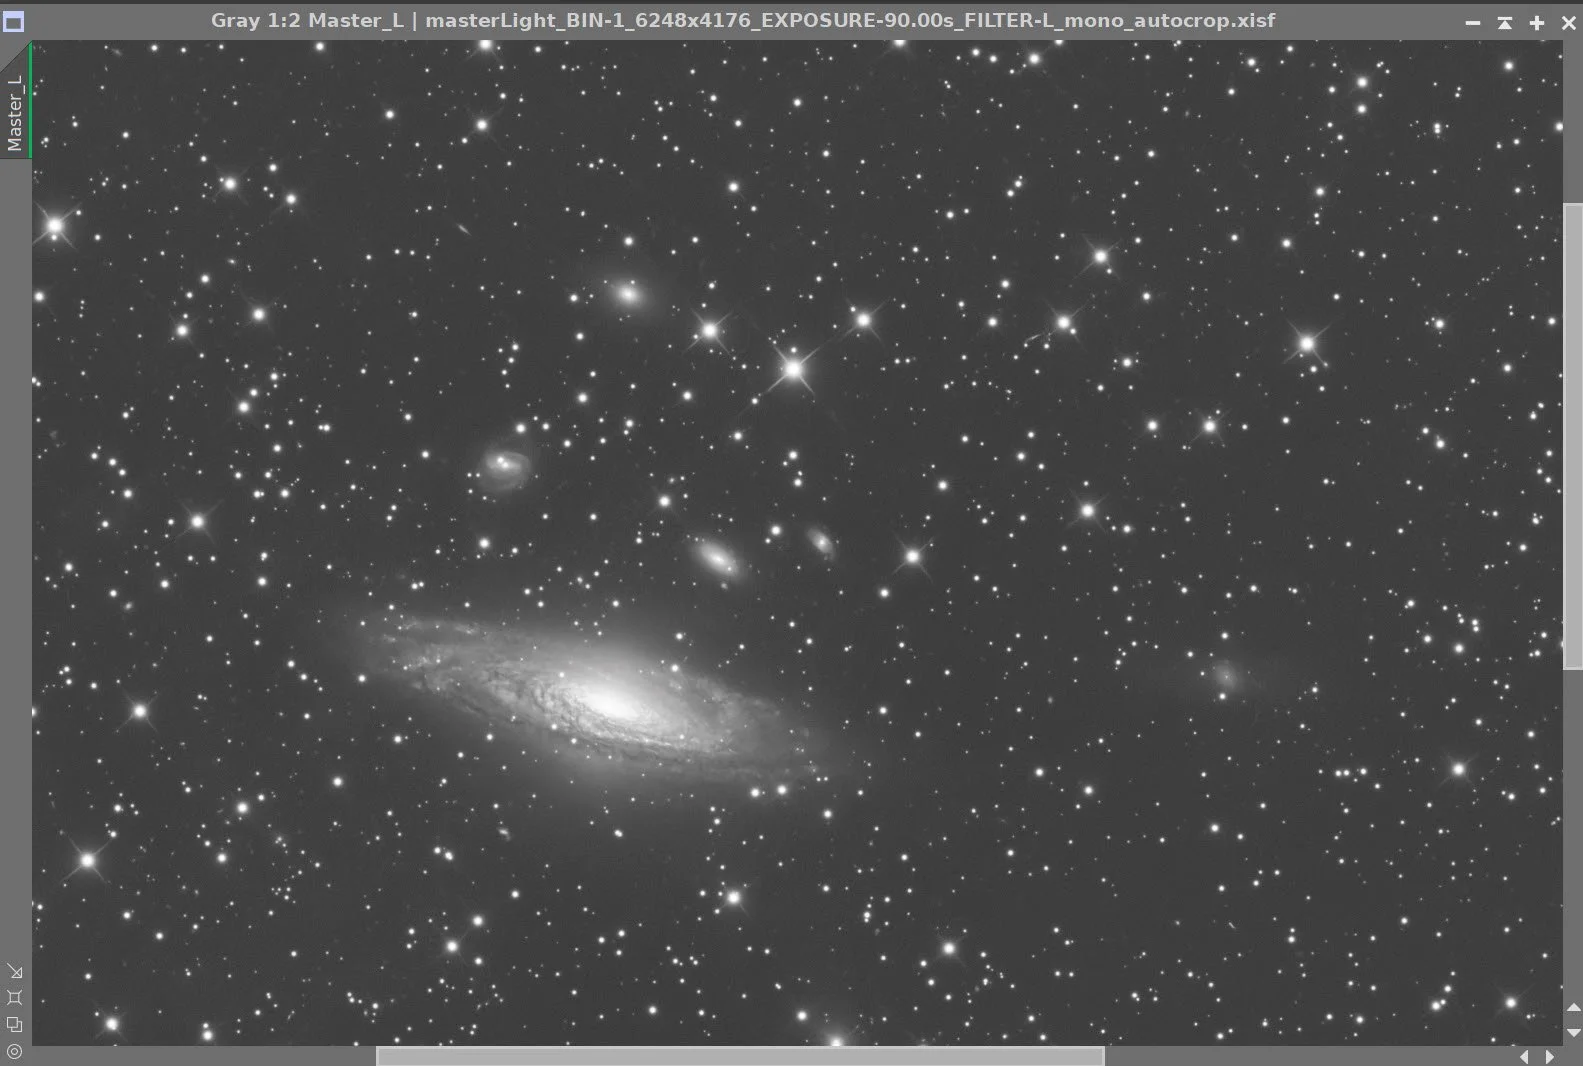
If I look at a Lum subframes, it gets harder to see:

In an Luminance Subframe, the SN is starting to get lost in the glow of the core.
Why is this? Well, the cut of the blue filter is nominally 100 nanometers wide, while the L filter has a cut of about 300 nanometers. It has a larger spectral window, which means it just captures more photons.
So if I processed my image the way I normally would, there would be no SN to see. If I processed the image so the SN was visible, the rest of the galaxy would be suppressed.
I ended up creating a gradient mask using the GAME script. This covered the core of the galaxy and allowed me to segment the processing into “core” and “not-core” processing by using this mask and its inverse.
I tried to strike a happy medium between a great view of the galaxy while still being able to discern the SN.
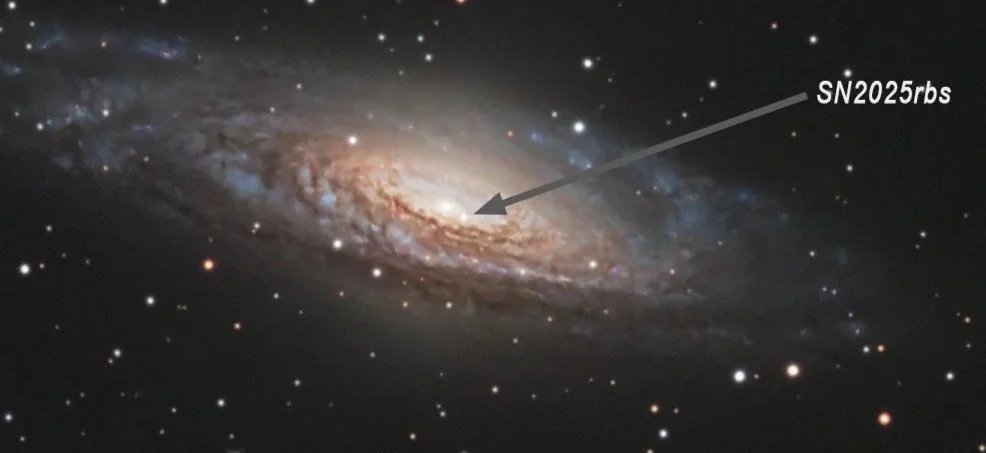
In my FInal image, you can still see the SN while the core does brighten as it should
But I did go back and processed a B&W version of the image where I darkened things so that the SN was more evident. I biased the processing a bit towards the SN rather than the whole scene.
Biasing for the Supernova.
Here is a zoomed in version:
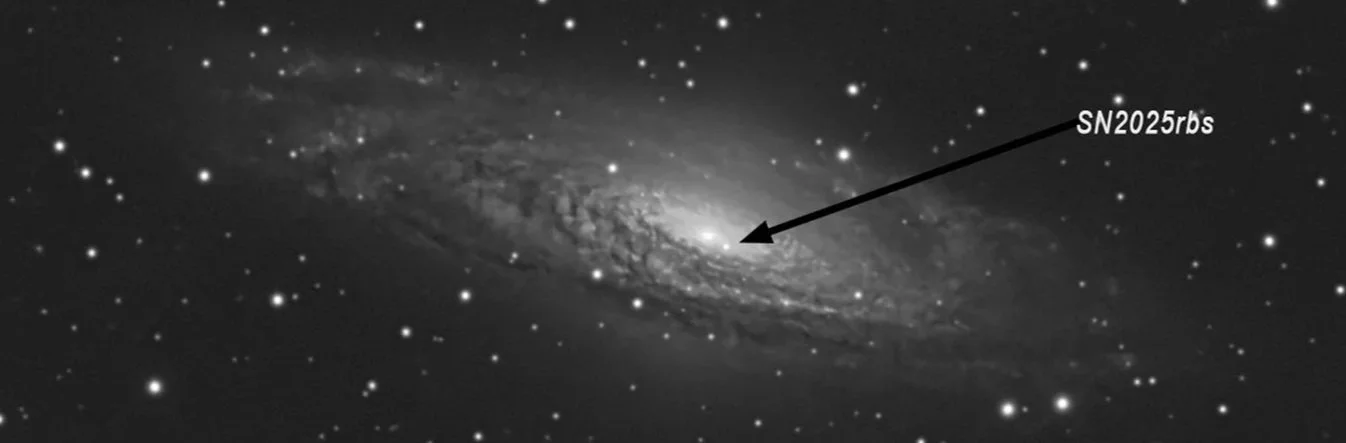
Zoomed in view of the B&W image.
Note: A detailed Image Processing walkthrough can be found at the end of this post!
Results
I'm reasonably happy with the final result!
I only had less than 5 hours of integration, but the image of the galaxy came out nicely, and I was still able to see the Supernova. Not a bad balance.
What would I do differently next time? I think I would do better with shorter sub exposures - maybe 30 seconds.
But more importantly, I think I would have done much better if I had captured the SN earlier in its life cycle, when it was at its brightest. Then there would be no problem showing it!
More Info - NGC 7331 Group
🔭 Target Details
https://en.wikipedia.org/wiki/NGC_7331 — Concise overview: type, distance, discovery, and why it’s often compared to the Milky Way.
https://science.nasa.gov/mission/hubble/science/explore-the-night-sky/hubble-caldwell-catalog/caldwell-30/ — Hubble “Caldwell 30” page with object data, context, and observing notes.
https://www.spitzer.caltech.edu/news/ssc2004-12-seeing-double-spitzer-captures-our-galaxys-twin — Spitzer release explaining the galaxy’s IR structure (bulge, star-forming ring, arms) as a Milky Way analog.
📜 History & Nomenclature
https://freestarcharts.com/ngc-7331 — Discovery date, basic facts, and finder charts for visual observers.
https://www.fortlewis.edu/observatory/image_detail.asp?ID=267 — Short historical note (missed by Messier) and “Deer Lick Group” context.
🧠 Science & Research
https://esahubble.org/images/potw1805a/ — ESA/Hubble image + caption discussing structure and similarities/differences with the Milky Way.
https://noirlab.edu/public/images/iotw2451a/ — NOIRLab “Image of the Week” highlighting structural details (inclination, bulge/disk behavior).
https://arxiv.org/abs/astro-ph/9602142 — Research paper reporting a counter-rotating bulge component in NGC 7331 (historically notable result).
🖼️ Images & Visualizations
https://apod.nasa.gov/apod/ap230914.html — APOD: deep portrait “NGC 7331 and Beyond,” showing the foreground galaxy and background “Deer Lick” companions.
https://www.spitzer.caltech.edu/image/ssc2004-12a-morphology-of-our-galaxys-twin — Spitzer multi-band visualization separating bulge, ring, and arms.
https://science.nasa.gov/gallery/hubbles-caldwell-catalog/ — Hubble Caldwell gallery entry with imagery and the location of SN 2014C marked.
🧭 Observing & Finder
https://www.constellation-guide.com/ngc-7331/ — Object profile with location, dimensions, and notes on the “fleas” (background companions).
https://www.jwinman.com/starcharts/NGC%207331%20chart.htm — Printable finder/star chart centered on NGC 7331.
https://skyandtelescope.org/online-gallery/deer-lick-galaxy-group-ngc-7331/ — Imaging gallery entry with field context explaining why the “Deer Lick Group” is a line-of-sight grouping.
More Info - SN 2025rbs
📡 Discovery & Classification
https://goto-observatory.org/bright-supernova-2025rbs-discovered-by-goto/ — GOTO’s official discovery write-up and early details submitted to TNS.
https://ui.adsabs.harvard.edu/abs/2025TNSAN.213….1O/abstract — TNS AstroNote abstract covering discovery/coordinates and host context.
https://www.narit.or.th/en/AstronomyNews-20250731-SN2025rbs — NARIT release with follow-up images and an accessible Type Ia summary.
🧠 Scientific Context
https://nustar.caltech.edu/news/nustar250801 — NuSTAR’s rapid X-ray follow-up; why nearby Type Ia events like SN 2025rbs are valuable.
https://ui.adsabs.harvard.edu/abs/2025ATel17303….1G/abstract — Astronomer’s Telegram abstract on early NuSTAR observations and timing.
https://science.nasa.gov/mission/roman-space-telescope/type-ia-supernovae/ — Background explainer on Type Ia supernova physics and use as standard candles.
🖼️ Images
https://www.virtualtelescope.eu/2025/07/17/supernova-sn-2025rbs-in-the-ngc-7331-spiral-galaxy-an-image-16-july-2025/ — Early image (16 Jul 2025) showing the supernova near the bright core.
https://www.virtualtelescope.eu/2025/08/01/supernova-sn-2025rbs-in-the-ngc-7331-spiral-galaxy-an-image-1-aug-2025/ — Follow-up image near maximum light with magnitude estimate.
https://apod.nasa.gov/apod/ap250731.html — APOD (31 Jul 2025) featuring SN 2025rbs in context within NGC 7331.
🔭 Observing & Light Curves
https://www.rochesterastronomy.org/sn2025/sn2025rbs.html — Rochester Astronomy page aggregating images/links and brightness notes for SN 2025rbs.
https://www.rochesterastronomy.org/supernova.html — “Latest Supernovae” hub tracking current magnitudes and discoveries (2025 listings include SN 2025rbs).
https://app.astrobin.com/i/xs15vv — Example high-quality amateur image page with acquisition details and framing (good for visual comparison).
Capture Details
Lights
Taken on the night of Aug 30, 2025.
Number of frames is after bad or questionable frames were culled.
80 x 90 seconds, bin 1x1 @ -10C, gain 0, ZWO 36mm diameter Lum Filter
38 x 90 seconds, bin 1x1 @ -10C, gain 0, ZWO 36mm diameter Red Filter
35 x 90 seconds, bin 1x1 @ -10C, gain 0, ZWO 36mm diameter Green Filter
35 x 90 seconds, bin 1x1 @ -10C, gain 0, ZWO 36mm diameter Blue Filter
Total of 4 hours 42 minutes.
Cal Frames
30 Darks at 90 seconds, bin 1x1, -10C, gain 0
30 Dark Flats at each Flat exposure times, bin 1x1, -10C, gain 100
15 Lum Flats
15 Red Flats
15 Green Flats
15 Blue Flats
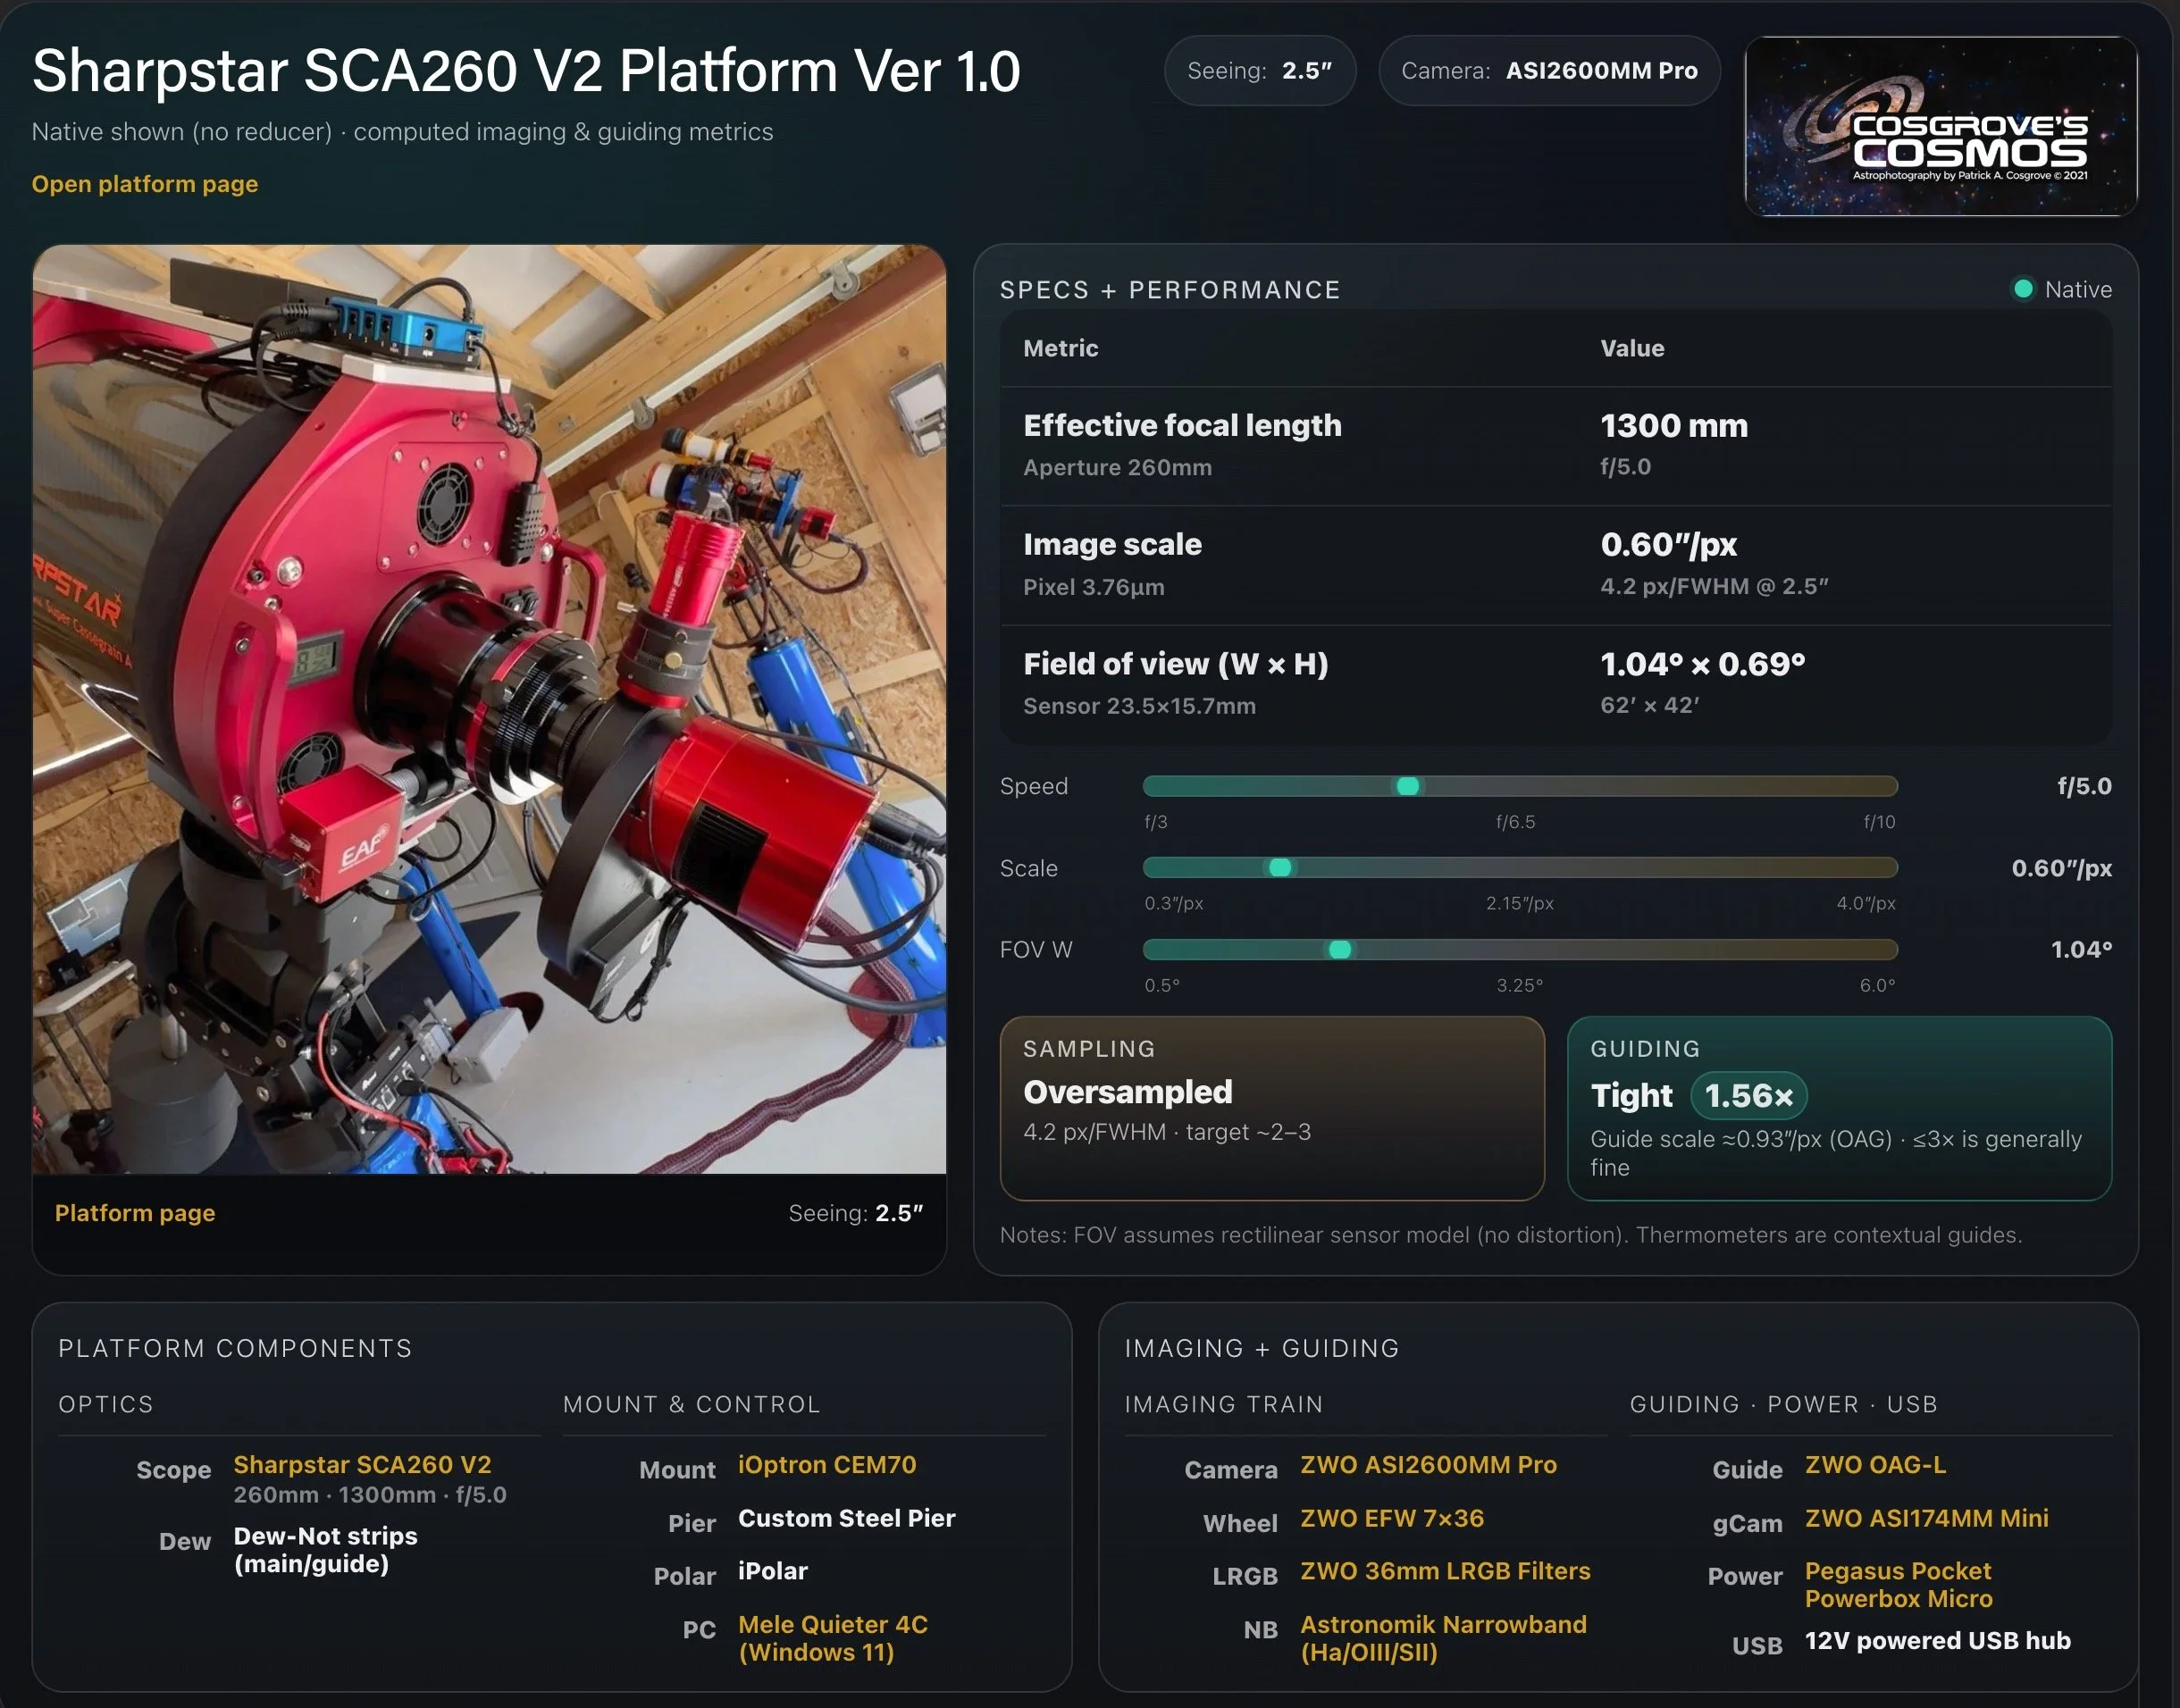
Platform used for this project
Software:
Capture Software: PHD2 Guider, NINA
Image Processing: Pixinsight, Photoshop - assisted by Coffee, extensive processing indecision and second-guessing, editor regret and much swearing…..
Image Processing Detail (Note: This is all mostly based on Pixinsight with image polishing done in Photoshop)
1. Blink Analysis
Lum Subs:
15 removed for clouds
Red Subs:
5 frames removed for clouds
Green Subs:
9 removed for clouds
Blue Subs:
11 fames removed for clouds
All Flats and Darks:
All looked good!
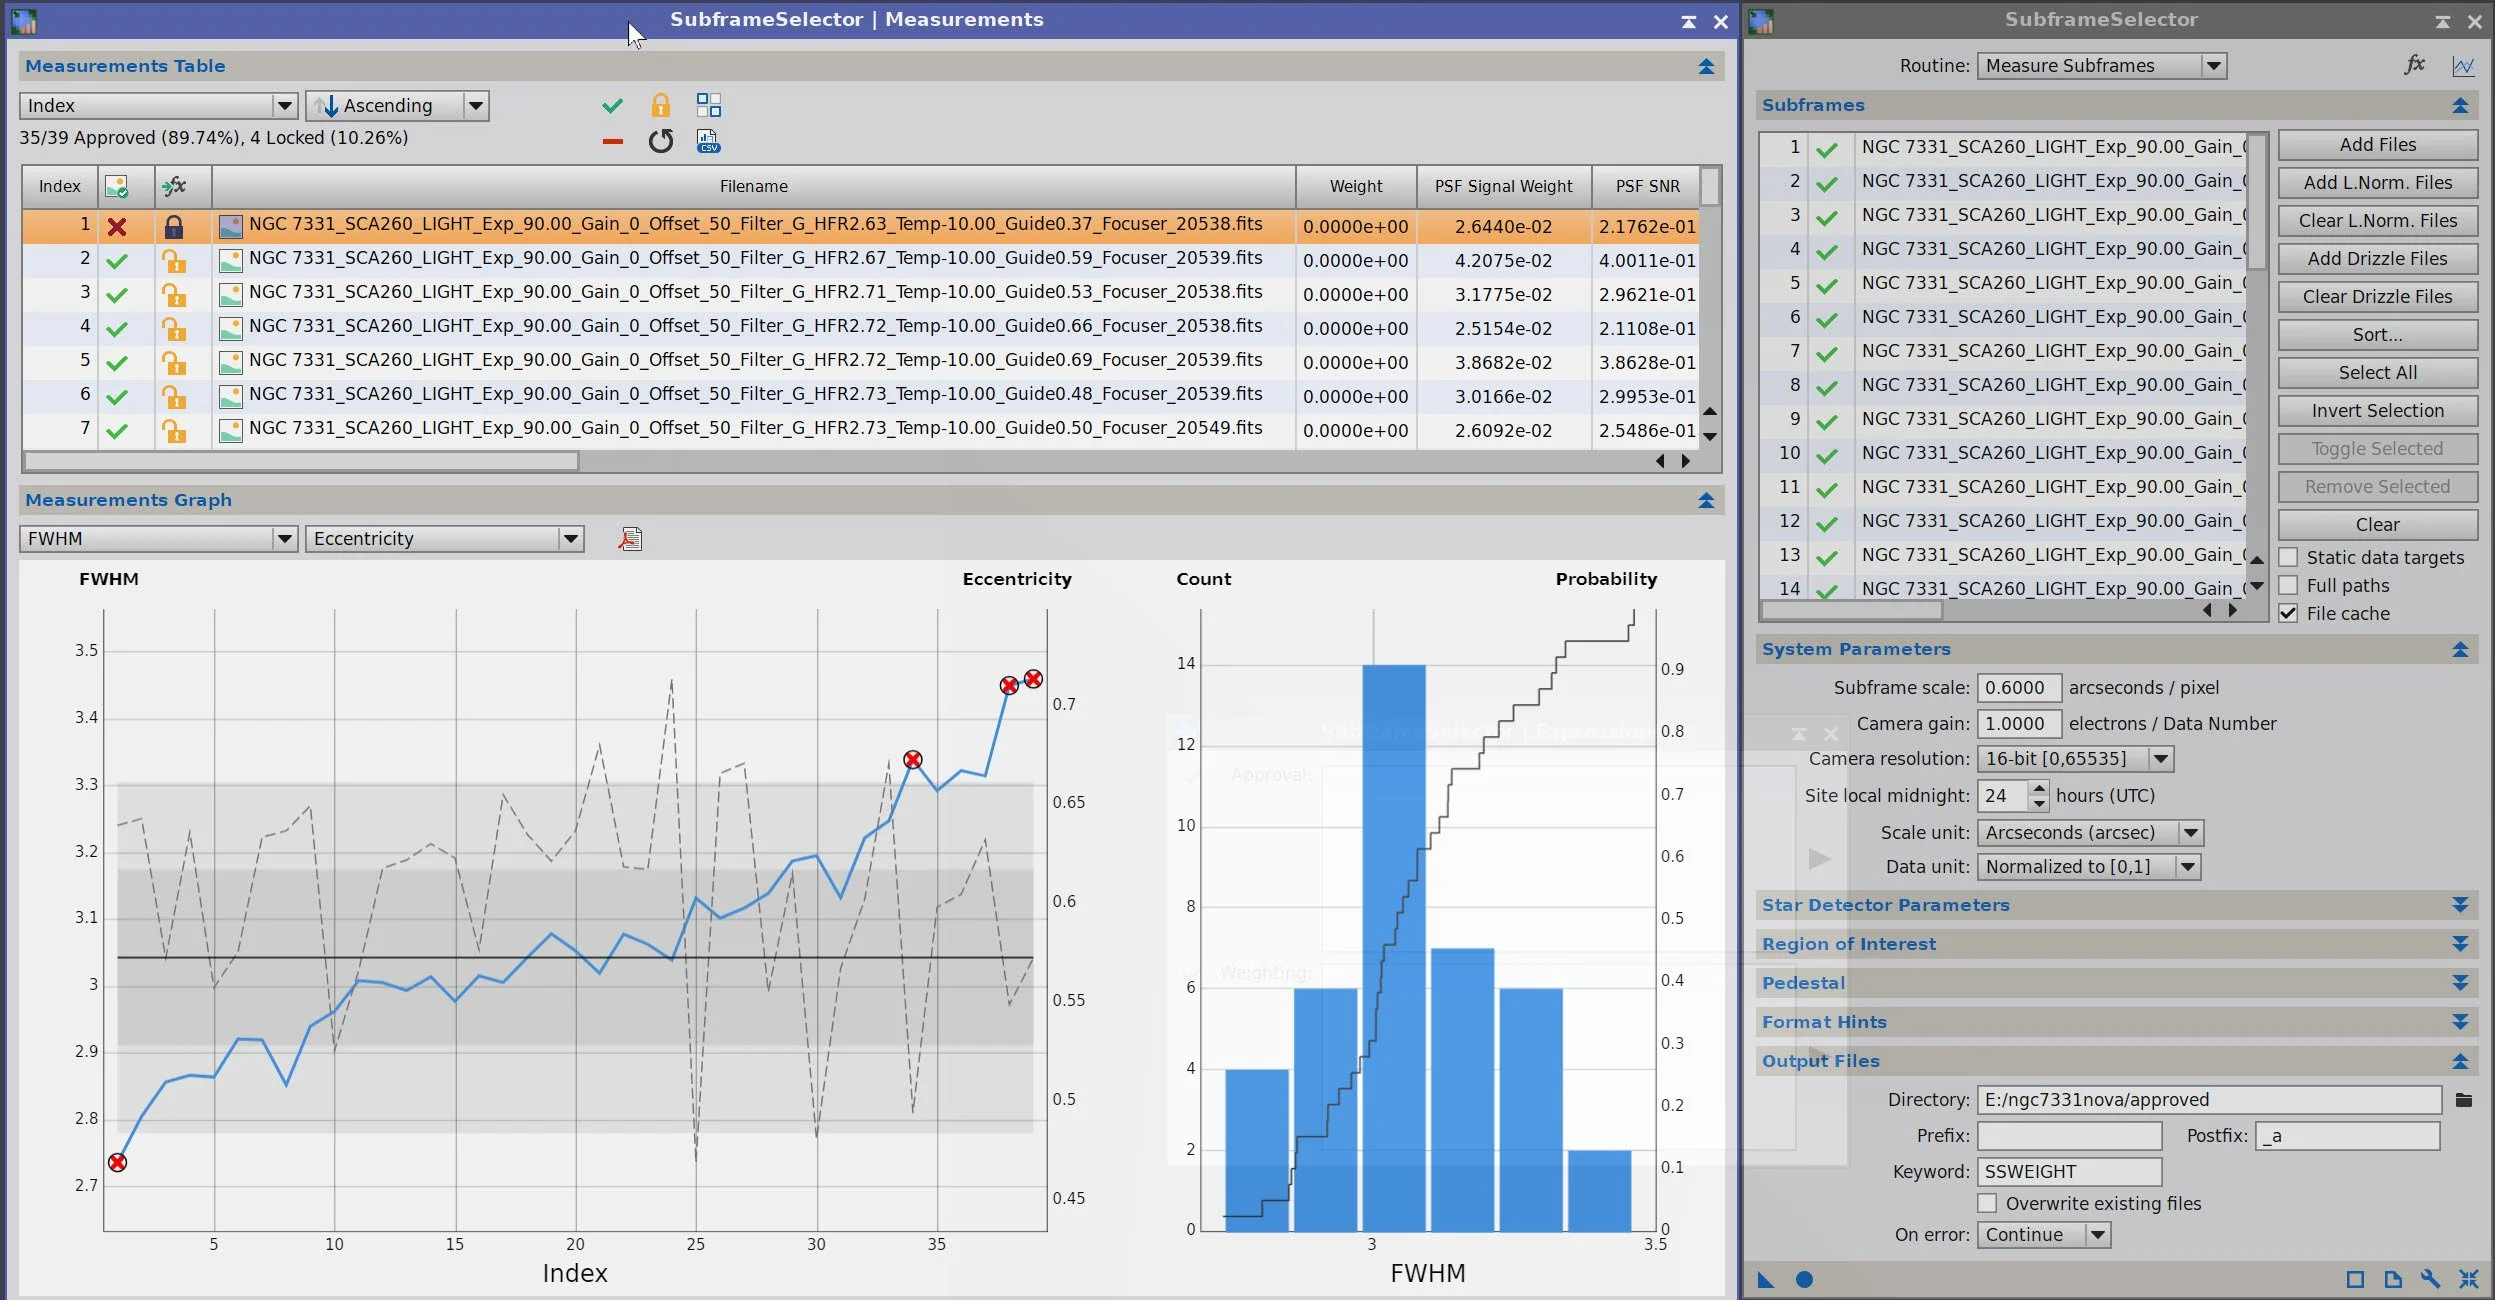
2. Assess all captures SubframeSelector
Lum Filter:
14 frames removed

SubframeSelector for Lum
Red Filter:
5 images removed

SubframeSelector for Red
Green Filter:
4 frames removed
SubframeSelector for Green
Blue Filter:
3 frames removed

SubframeSelector for Blue.
Summary:
A total of 62 subs were removed as not being top quality
The total time of the removed frames was 1.55 hours lost!
3. WBPP Script V 2.8.9
Load all files
Dark exp tolerance set to zero
Light exp tolerance set to zero
Pedestal auto for all frames
CC auto for all groups
Select max quality
Ref image set to auto
Selected the target folder
Executed in 2:11 with no errors

WBPP setup.
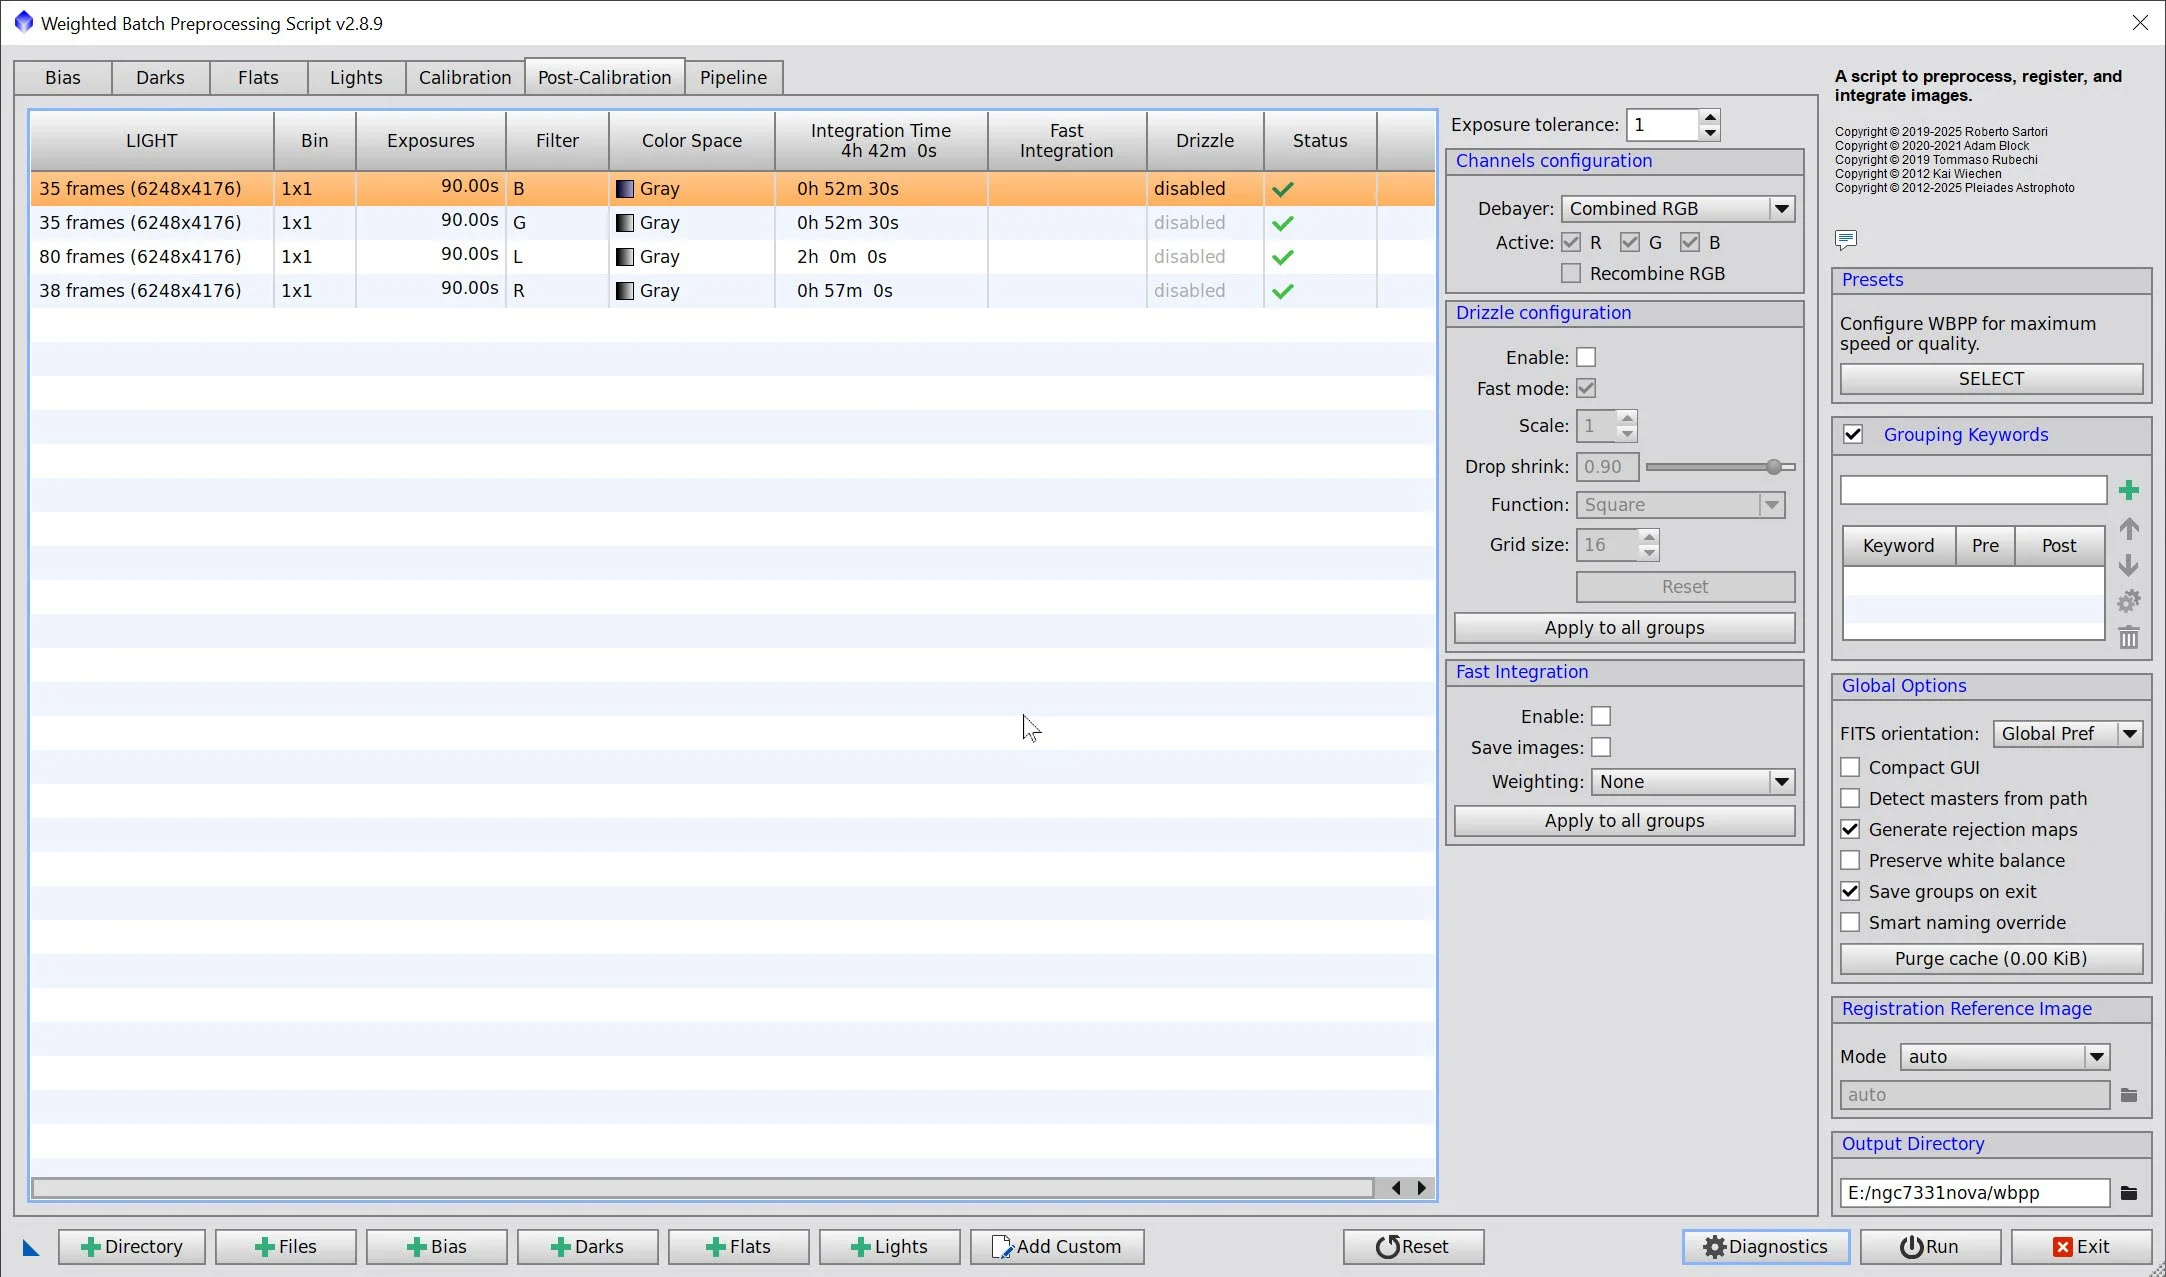
Post Processing View of WBPP
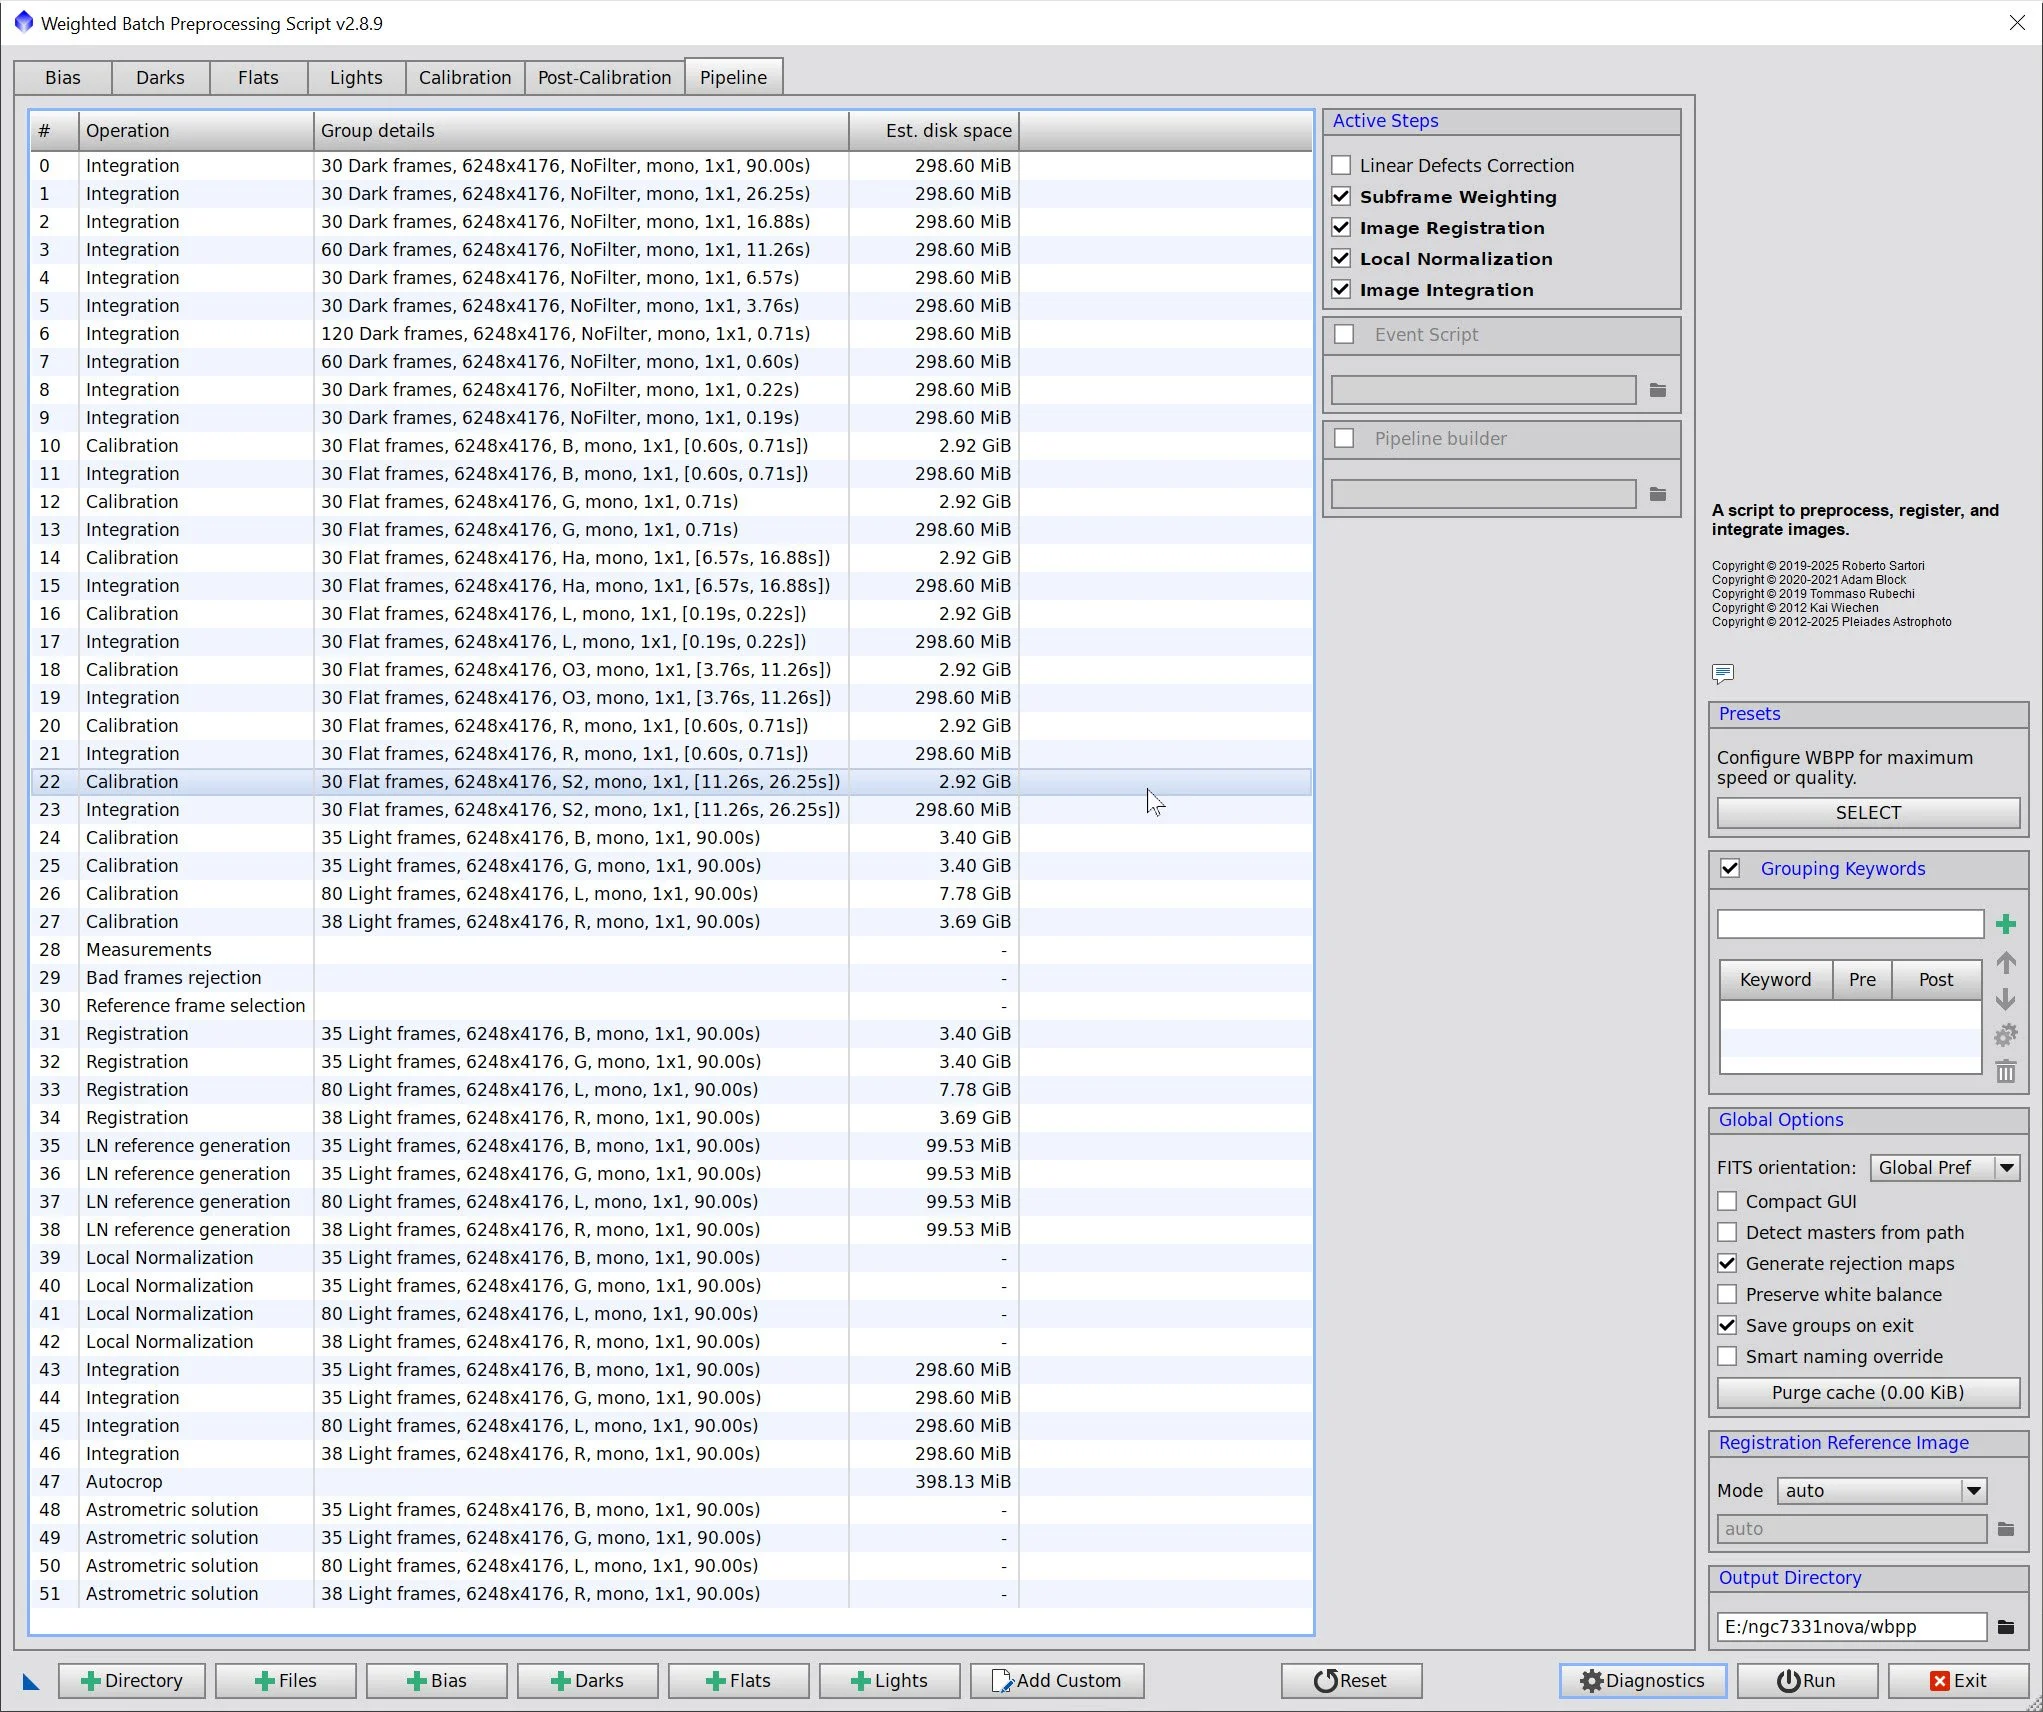
WBPP Pipeline view
4. Import Master image, Rename, Create Color RGB Image
Import master images and rename
Use ChannelCombination to create the initial RGB image.

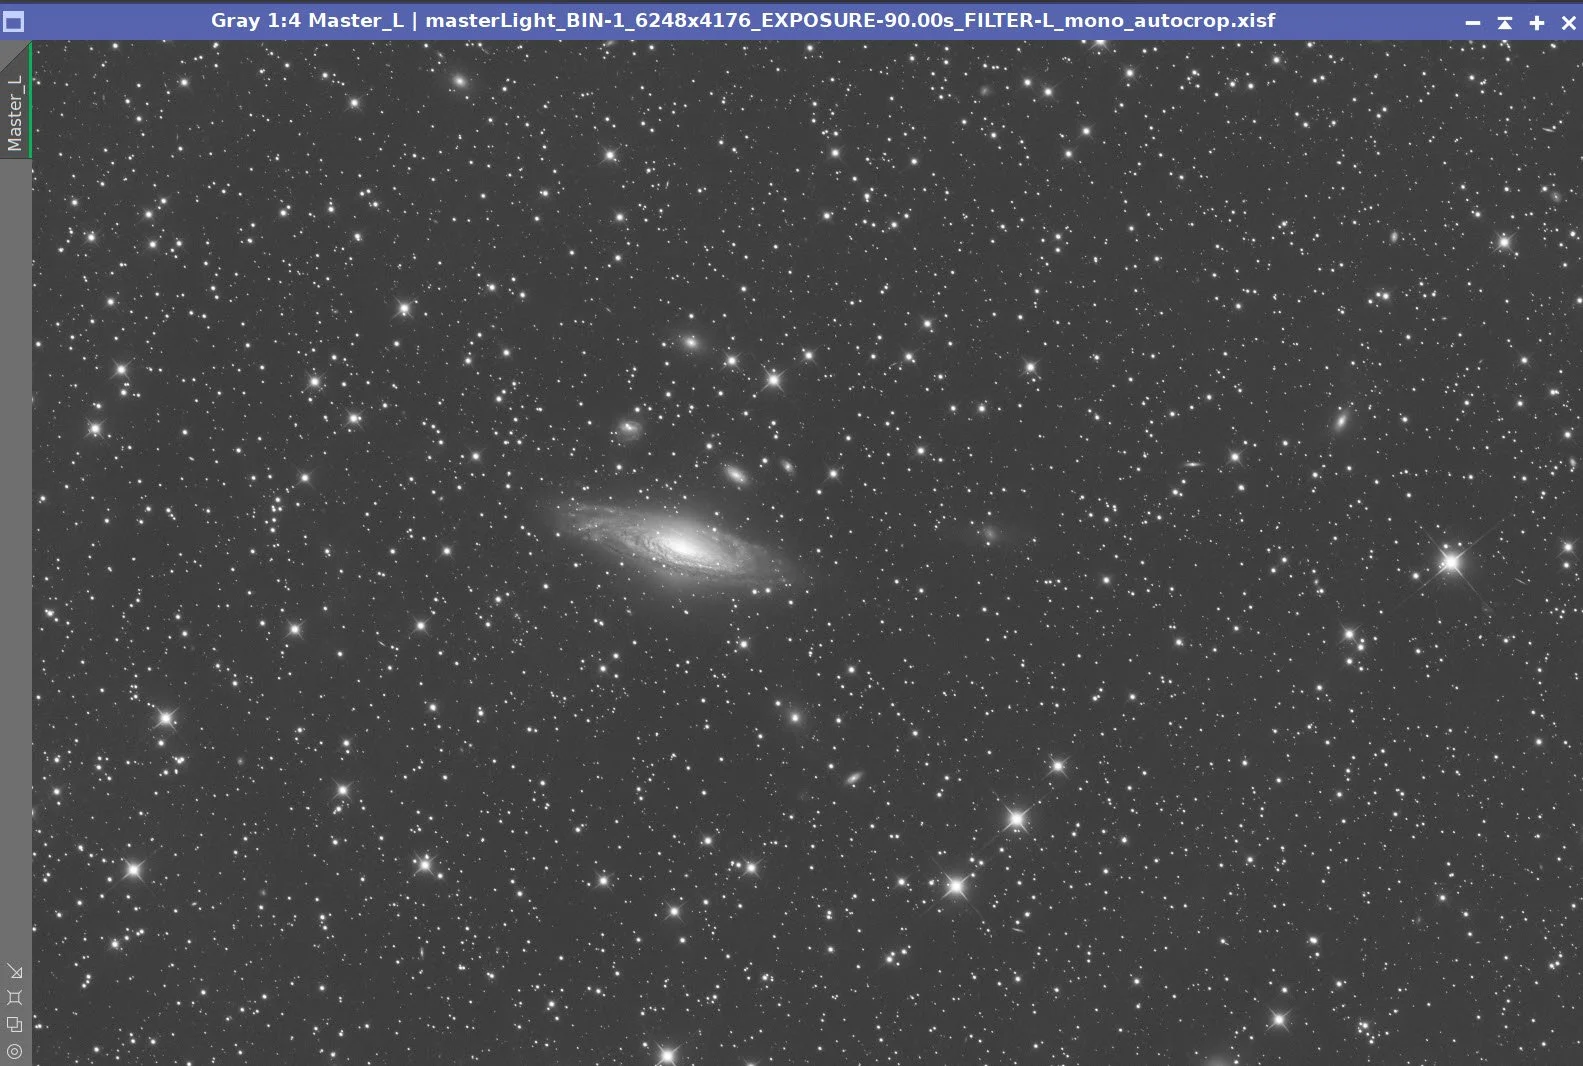
Master images. L, R, G, B
Master RGB Image
5. Remove Gradients
Sampling pattern chosen to avoid galaxies
DBE was used with subtraction
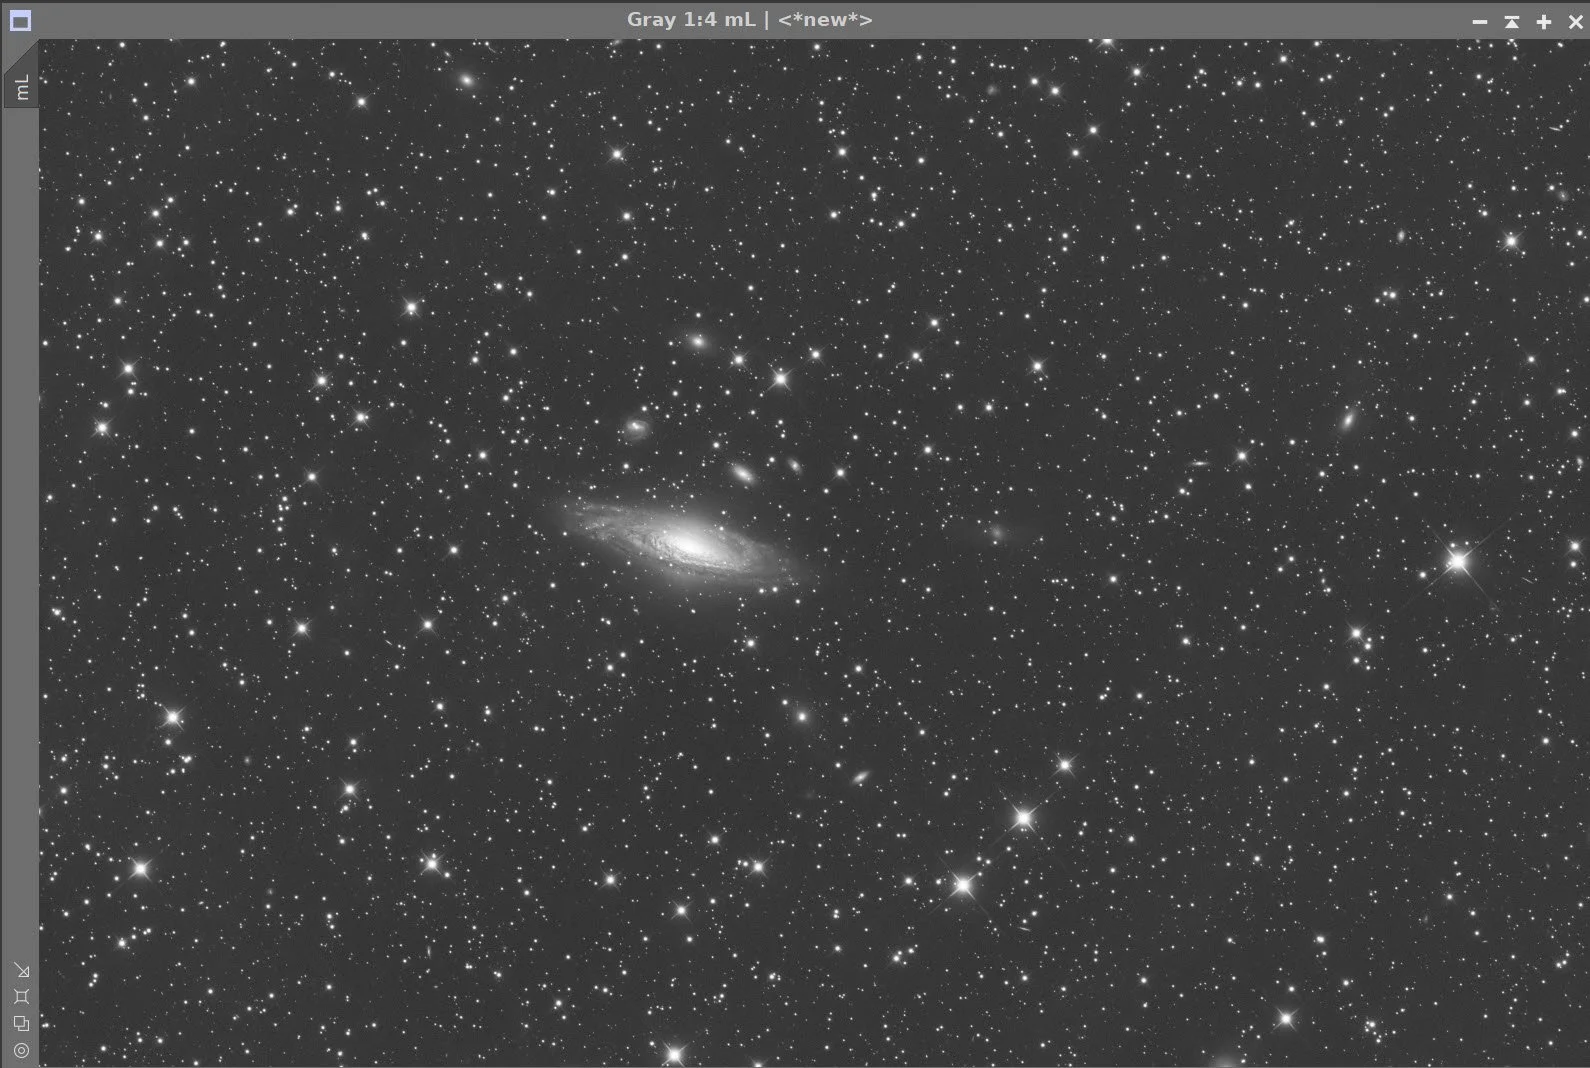
DBE of Lum Image - Before (click to enlarge)
DBE of Lum - Sample Pattern (click to enlarge)
DBE of Lum - Afer Image (click to enlarge)
DBE of Lum - Background (click to enlarge)
DBE of RGB image - Before
DBE of RGB - Sample Pattern (click to enlarge)
DBE of RGB - After (click to enlarge)
DBE of RGB - Background (click to enlarge)
6. Create and Process the Linear RGB Color Image
Apply BXT on the color image with “Correct Only”
Set up the SPCC panel and run it on the image. In this case, we will use the 571 device curve, choose the ZWO R, G, & B filters, and choose an area of the image to represent the reference background.
Run PFSImage: X = 3.49 Y = 3.36. Not sure, I believe these are the diffraction spikes that might influence things.
Apply BXT with full correction. See panel-snap below for values used. These were selected after interactive testing.
Run NXT V3 - see panel snap below for final parameters used.
Note: Some images below will be shown full screen, while others will be shown zoomed into a likey crop positon so you can see small changes beter.
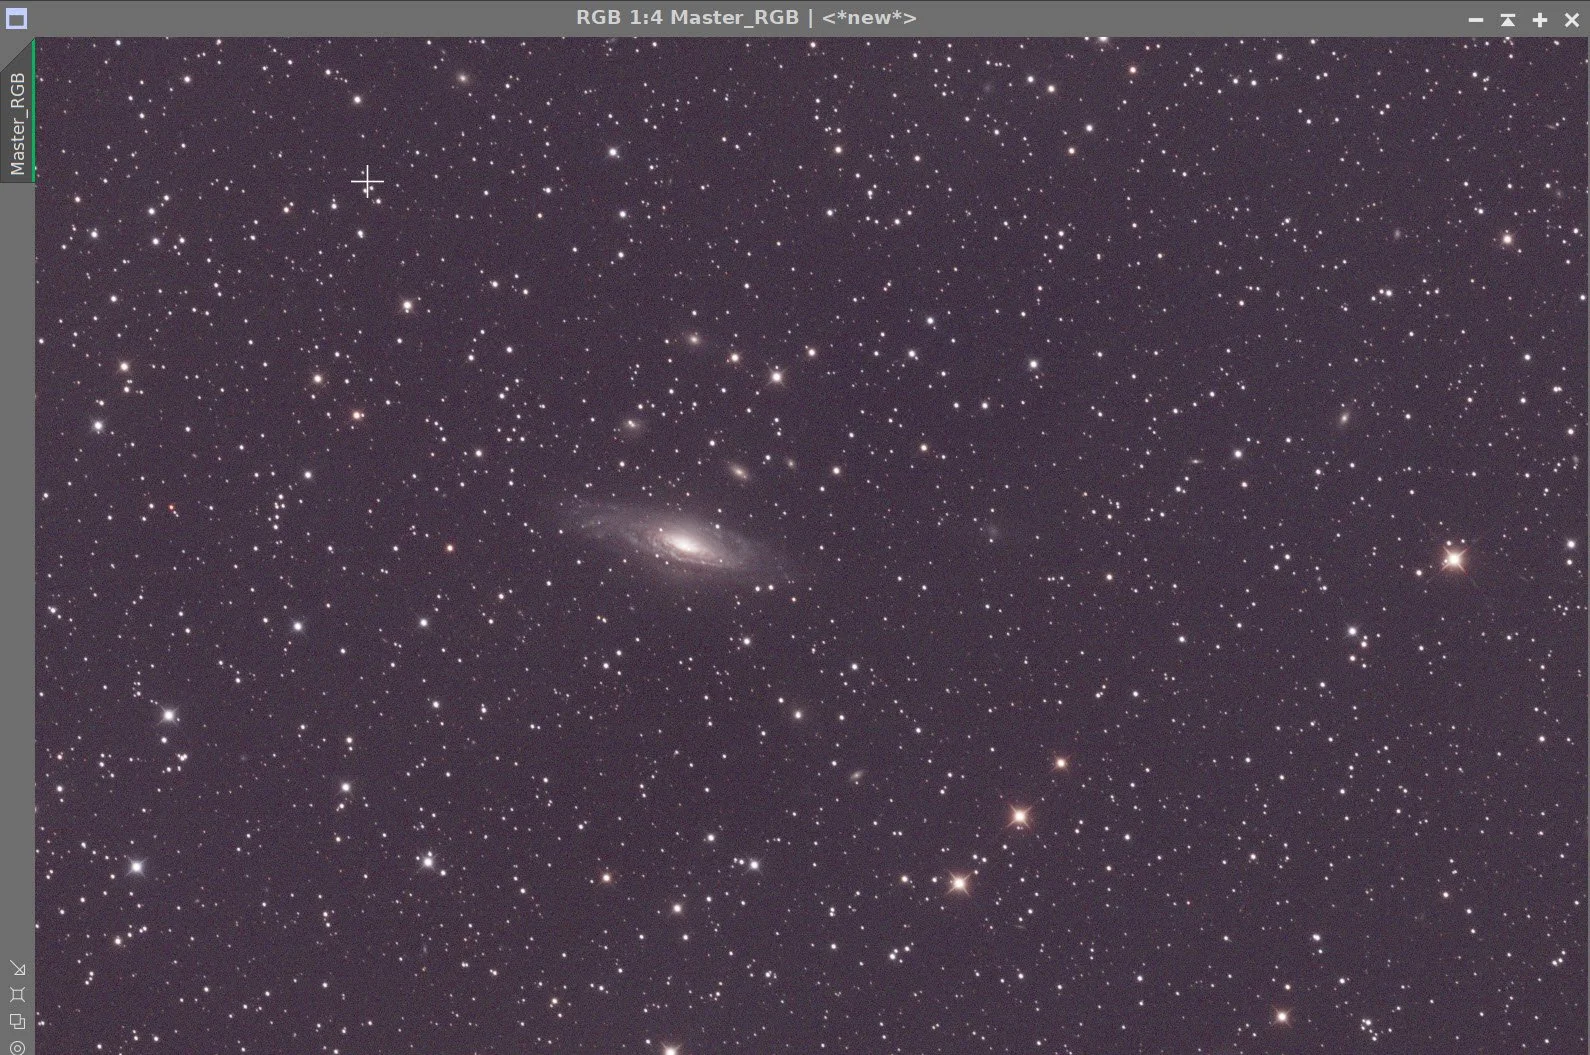
The initial RGB Image (after DBE)
Spcc Panel (click to enlarge)
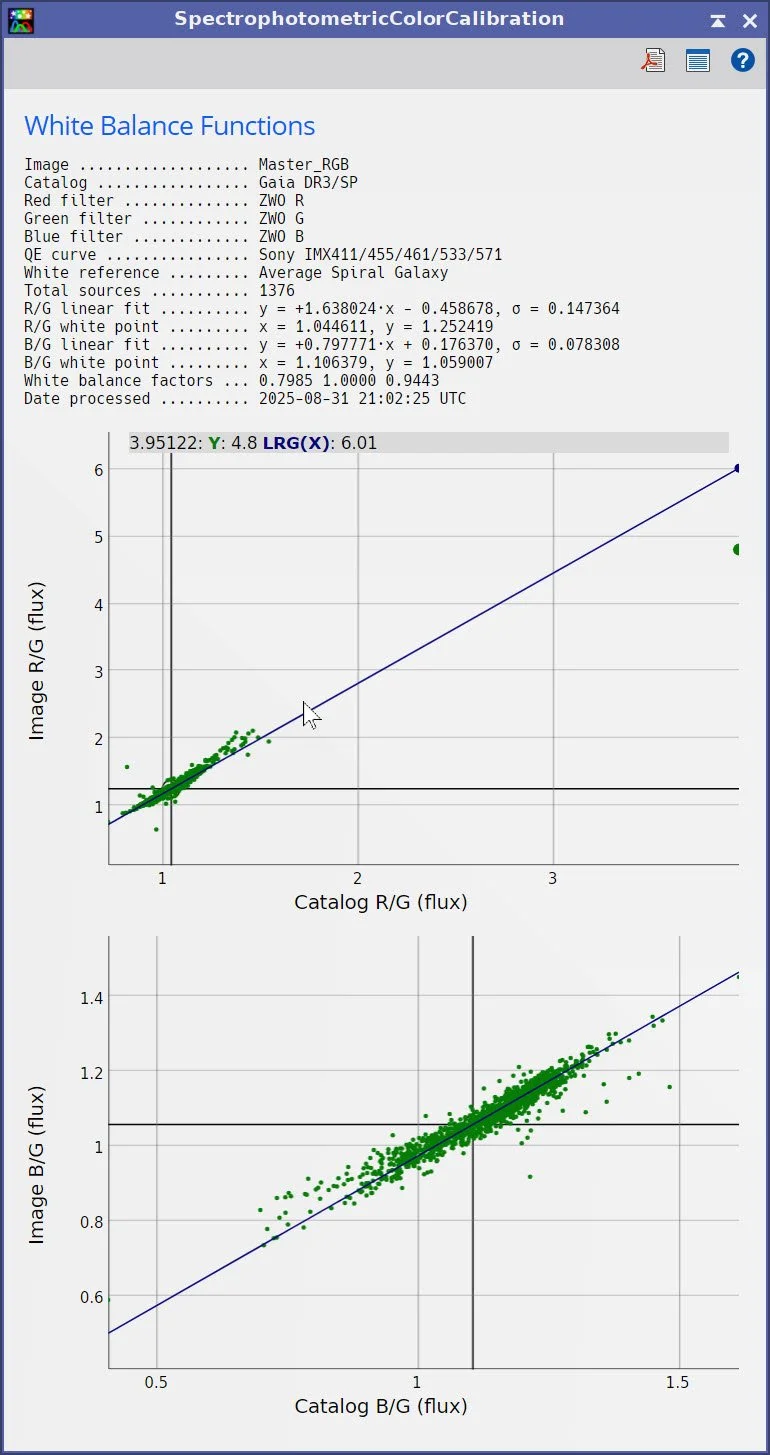
SPCC Regression Results
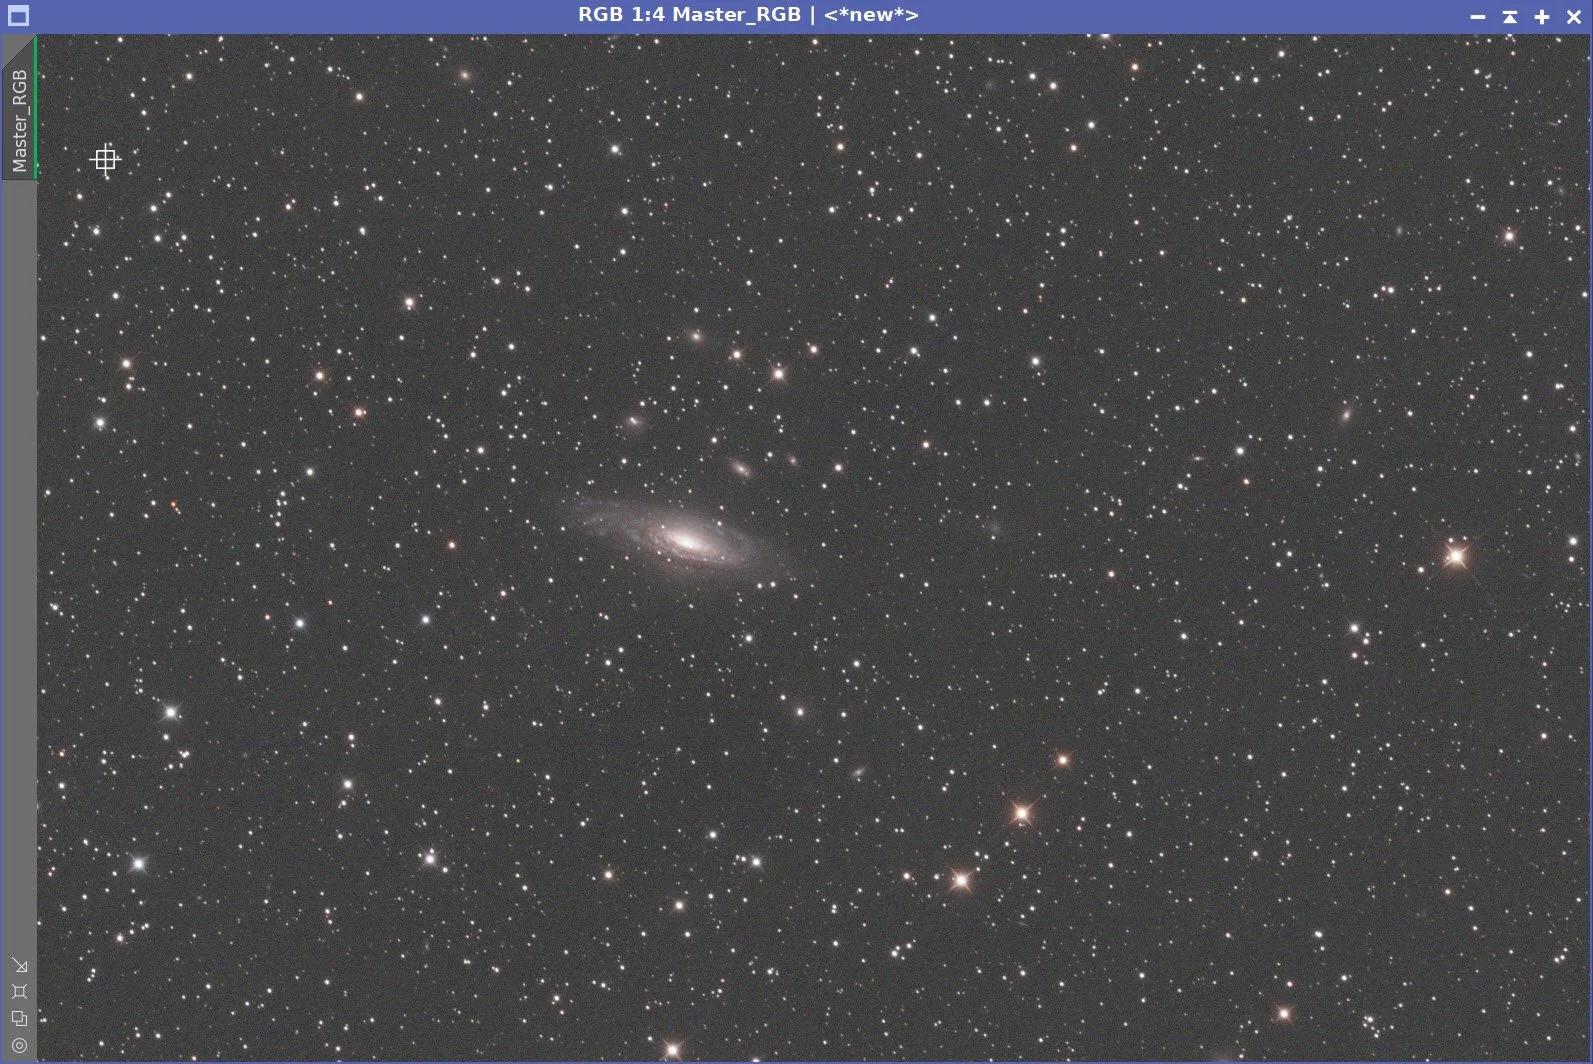
After SPCC - Zoomed into likely crop region, (click to enlarge)
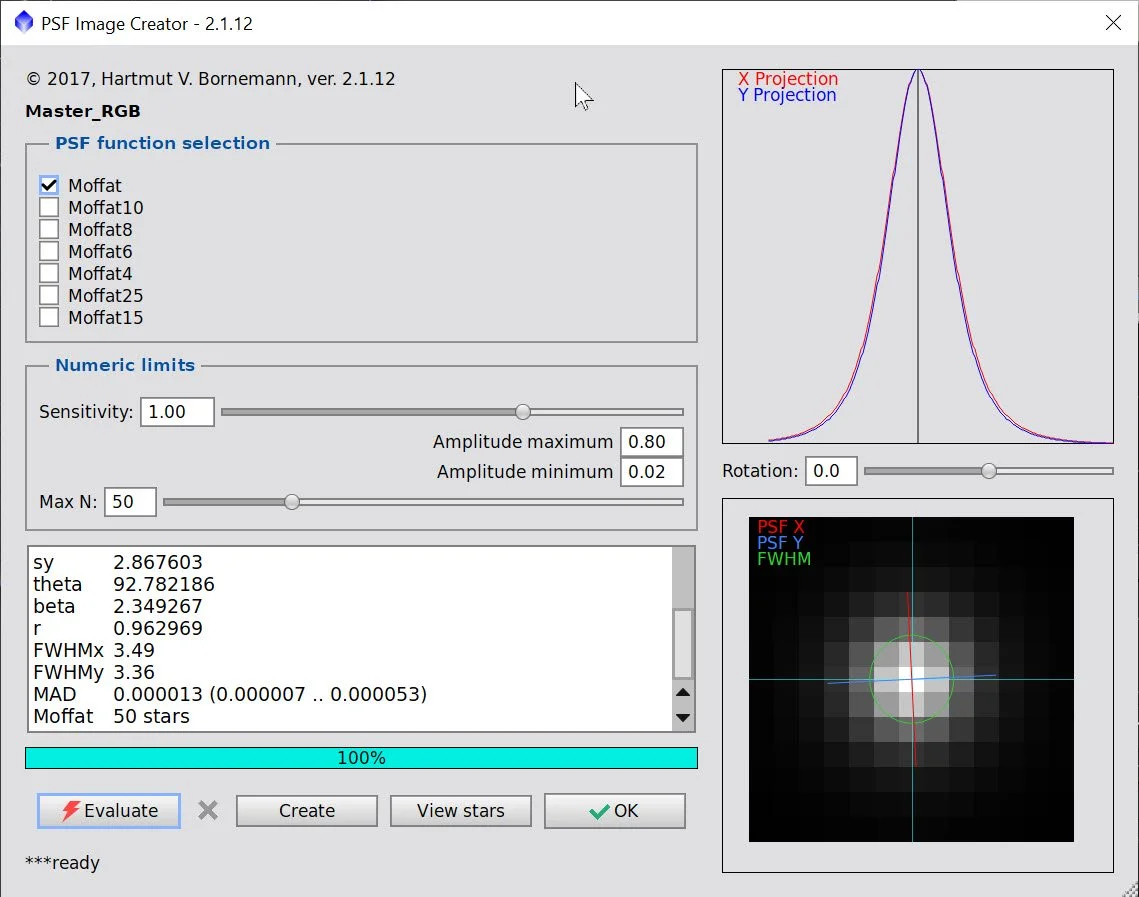
PFSImage for the Linear RGB Image
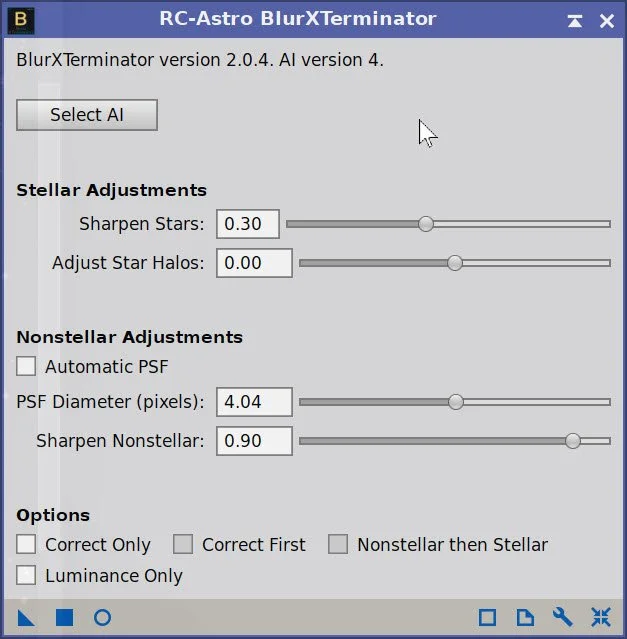
BXT Params used for the RGB image
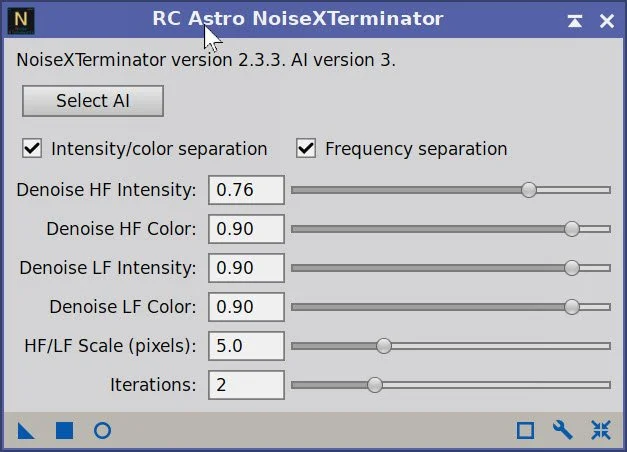
NXT Params used for the RGB image.
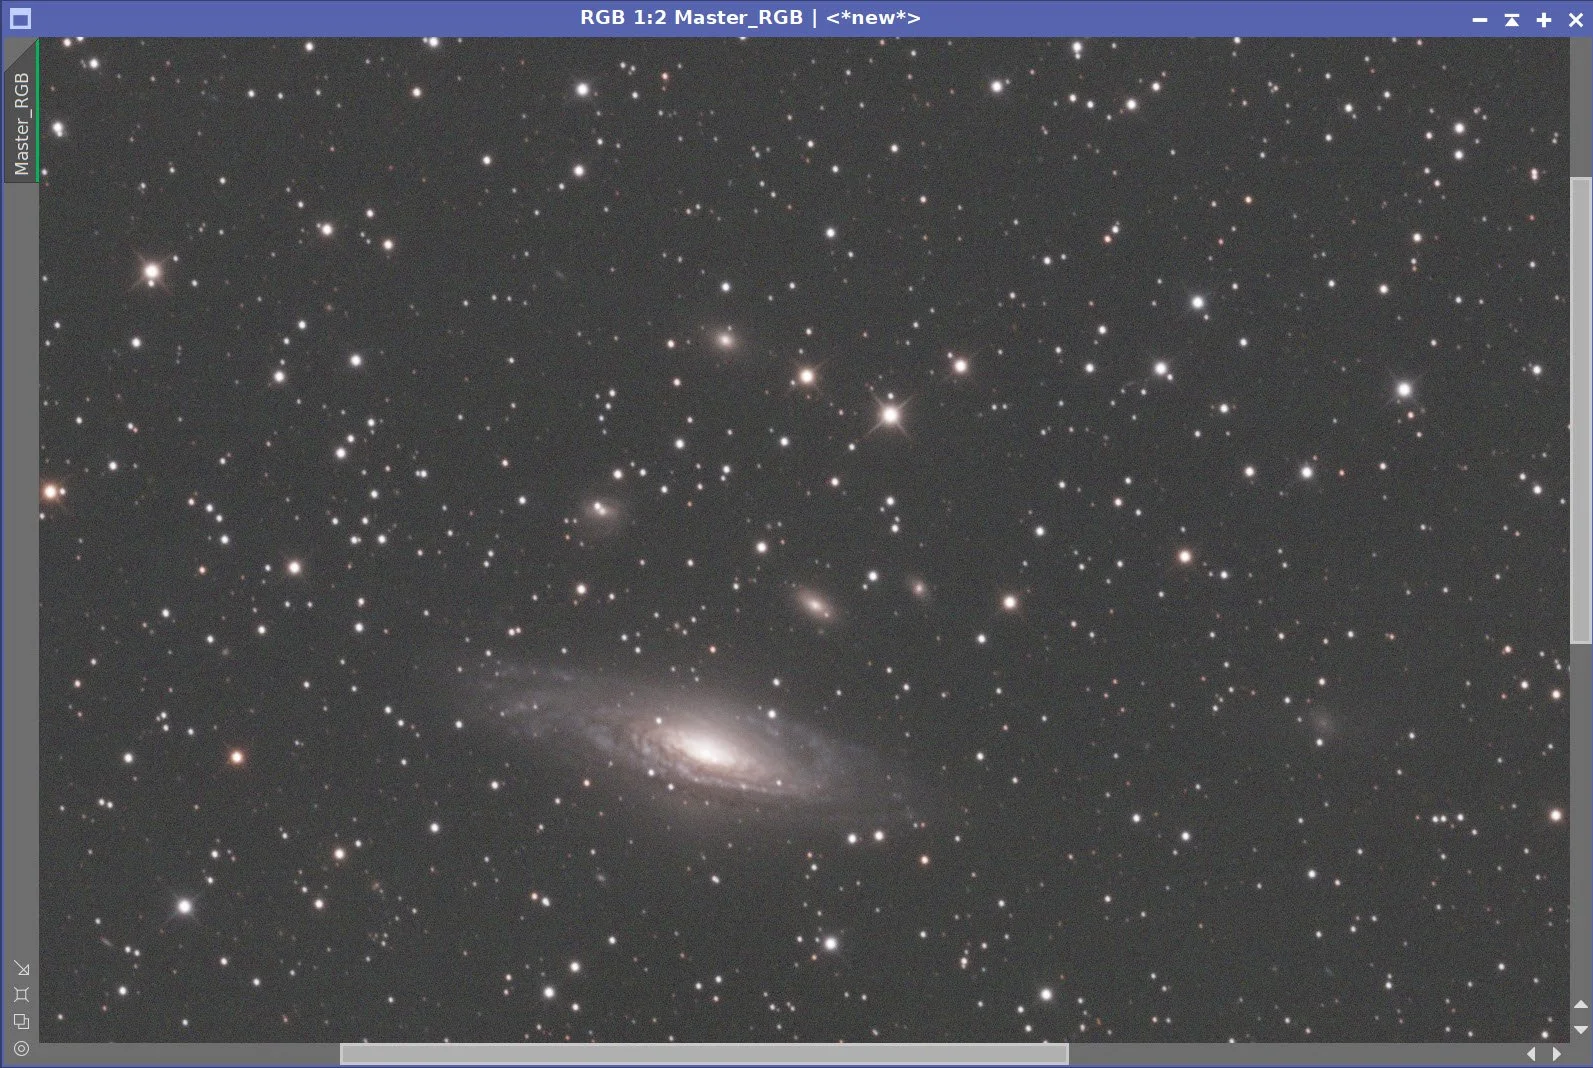
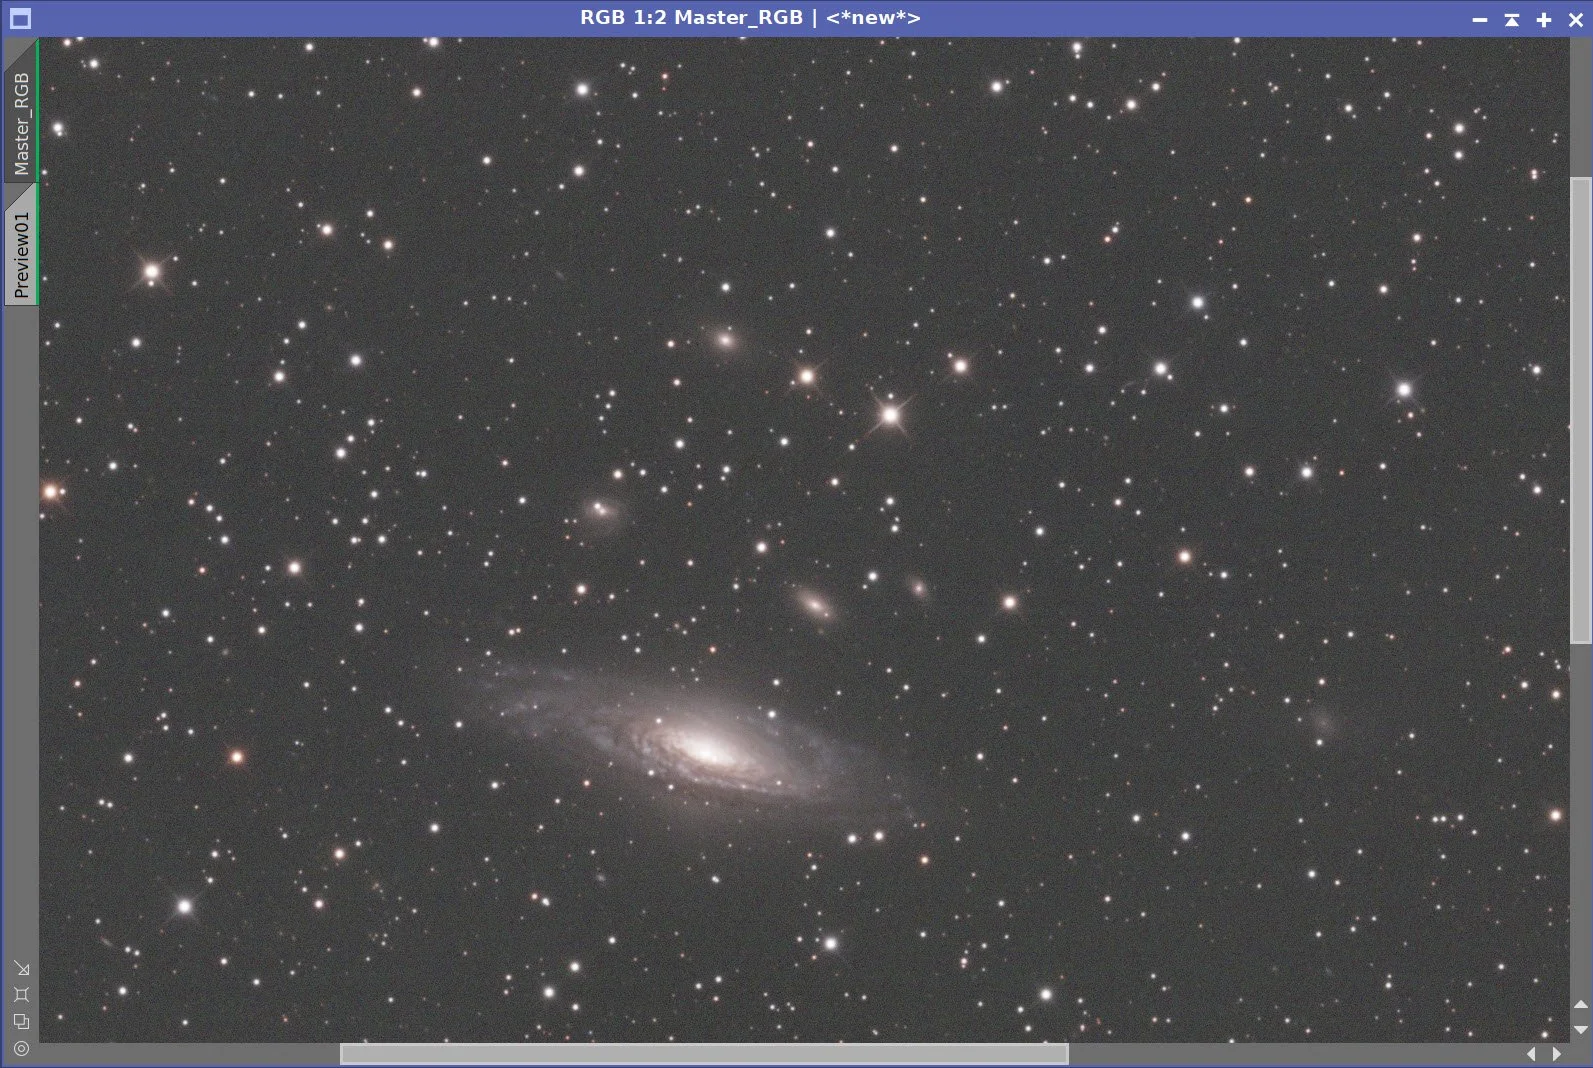

RGB Image Before BXT, After BXT Correct Only, After SPCC, After BXT Full Correction, After NXT V3
The Final Linear RGB image
7. Process the Linear Lum Image
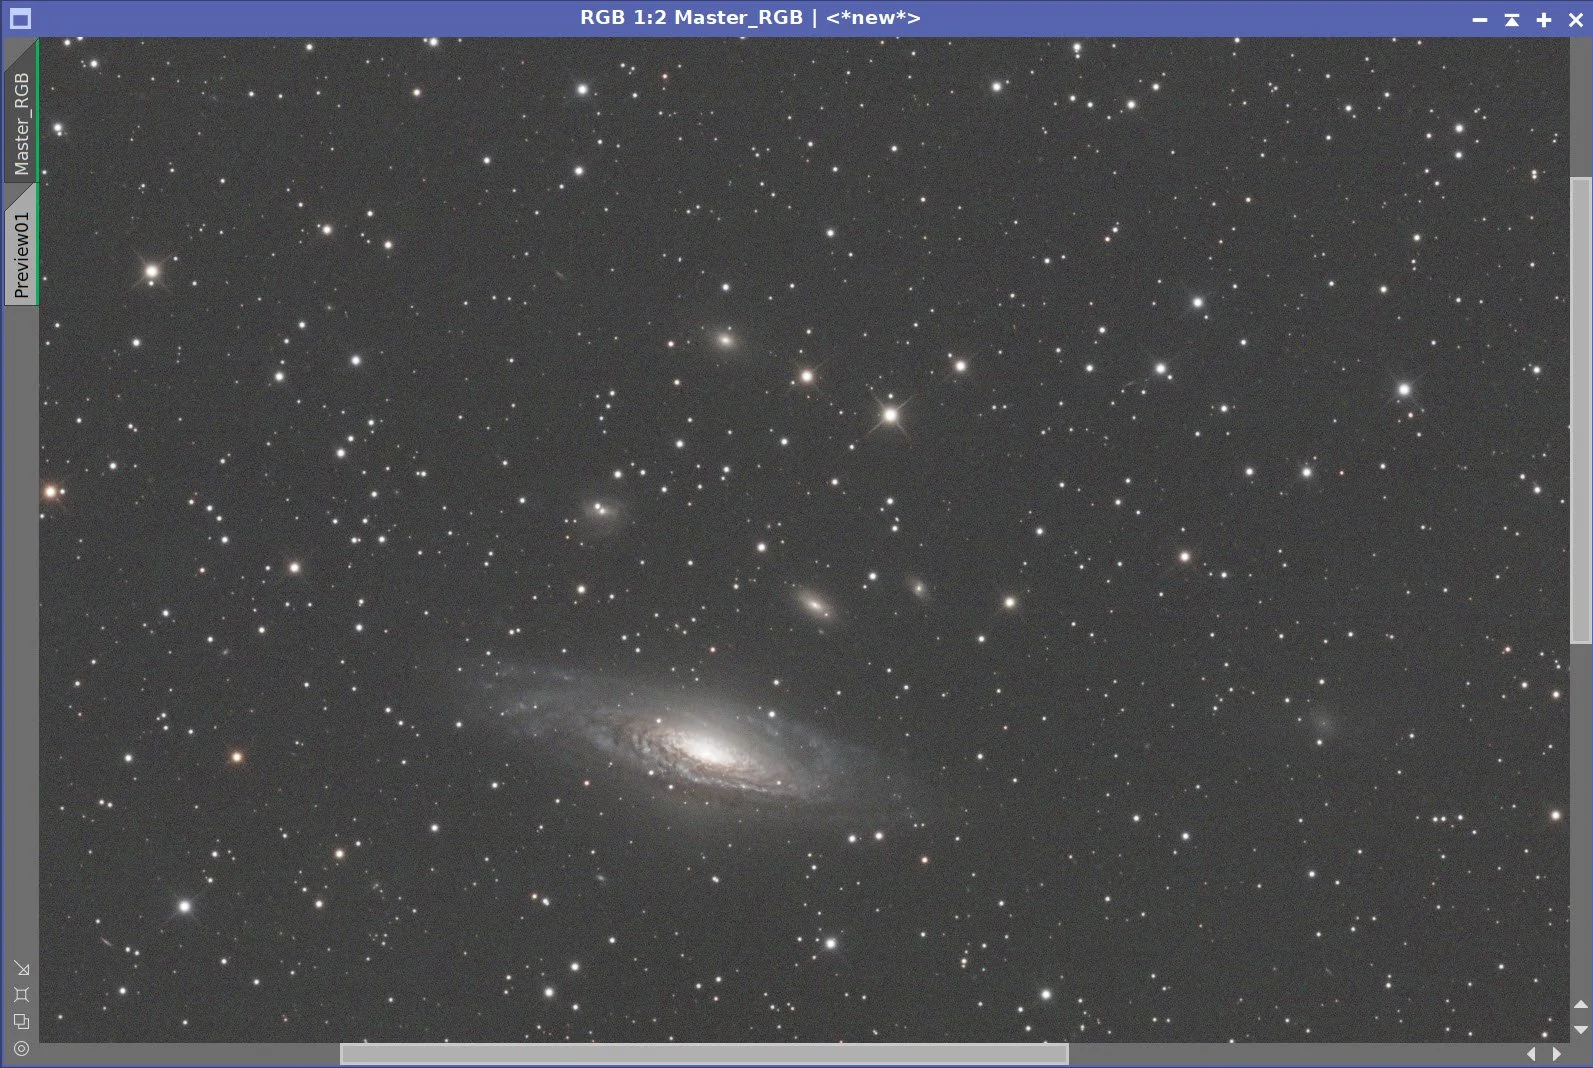
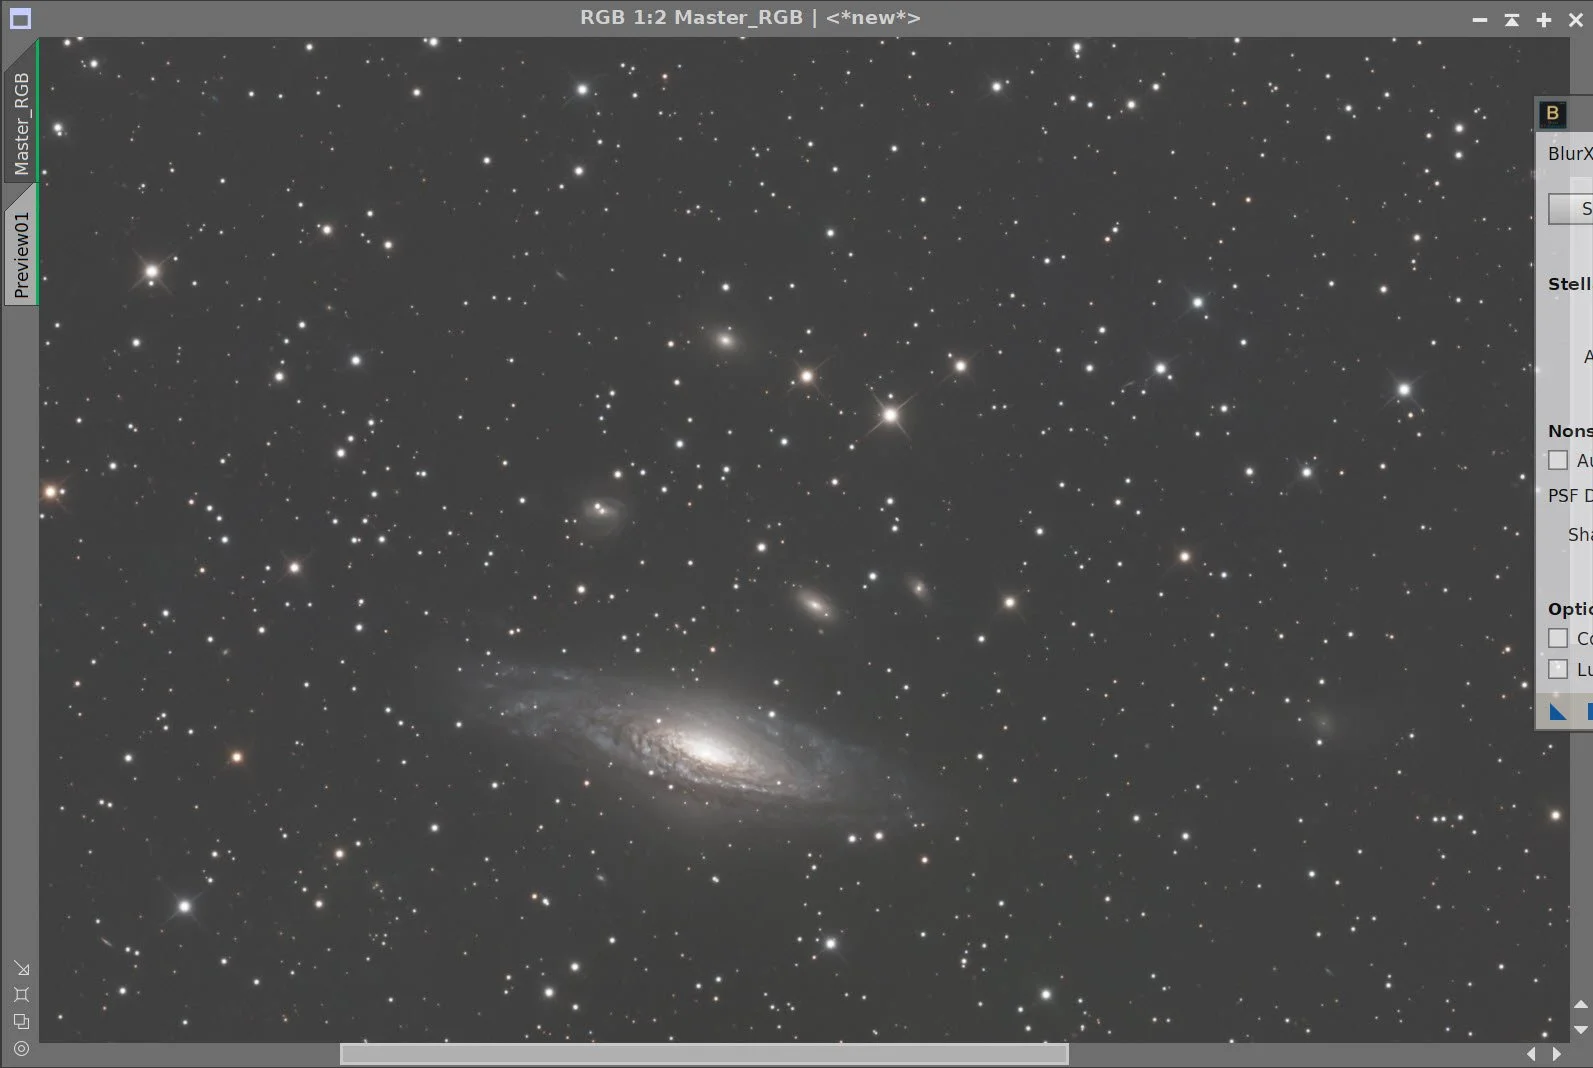
Apply BXT on the Lum image with “Correct Only”
Run PFSImage: X = 3.76 Y = 3.64. Not sure I believe this as the diffraction spikes might influence things.
Apply BXT with full correction. See panel-snap for values used. These were selected after interactive testing.
Run NXT V3 - see panel snap below for final parameters used.
Normally, at this point, I would go starless. But I am a little concerned with impacting the images of the supernova itself, so I have decided to go pretty much old school on this - I will not be using a starless workflow.
OFSImage panel showing star sizes. (click to enlarge)
BXT Params used. (click to enlarge)
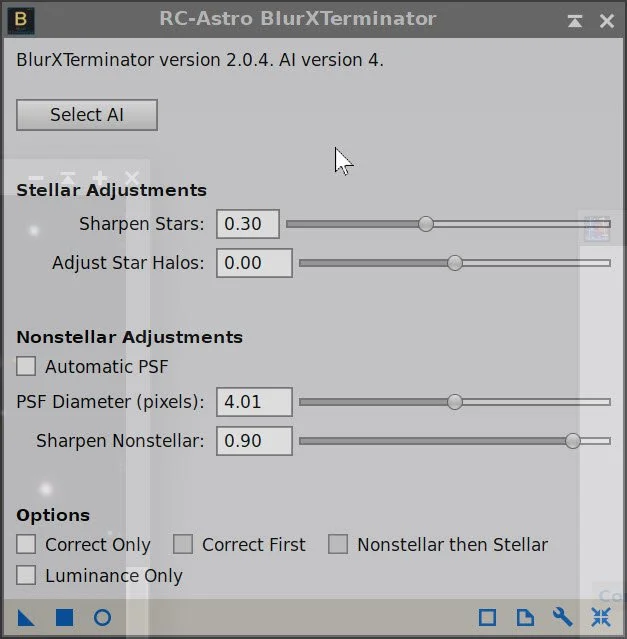
The NXT V3 params used for this image.


Before BXT, After BXT Fix Only, After Full BXT, After NXT V3
Final linear Lum Image.
8. Take Images Nonlinear
For the Lum image, use the STF->HT method.
For the RGB image, use the STF-HT method.
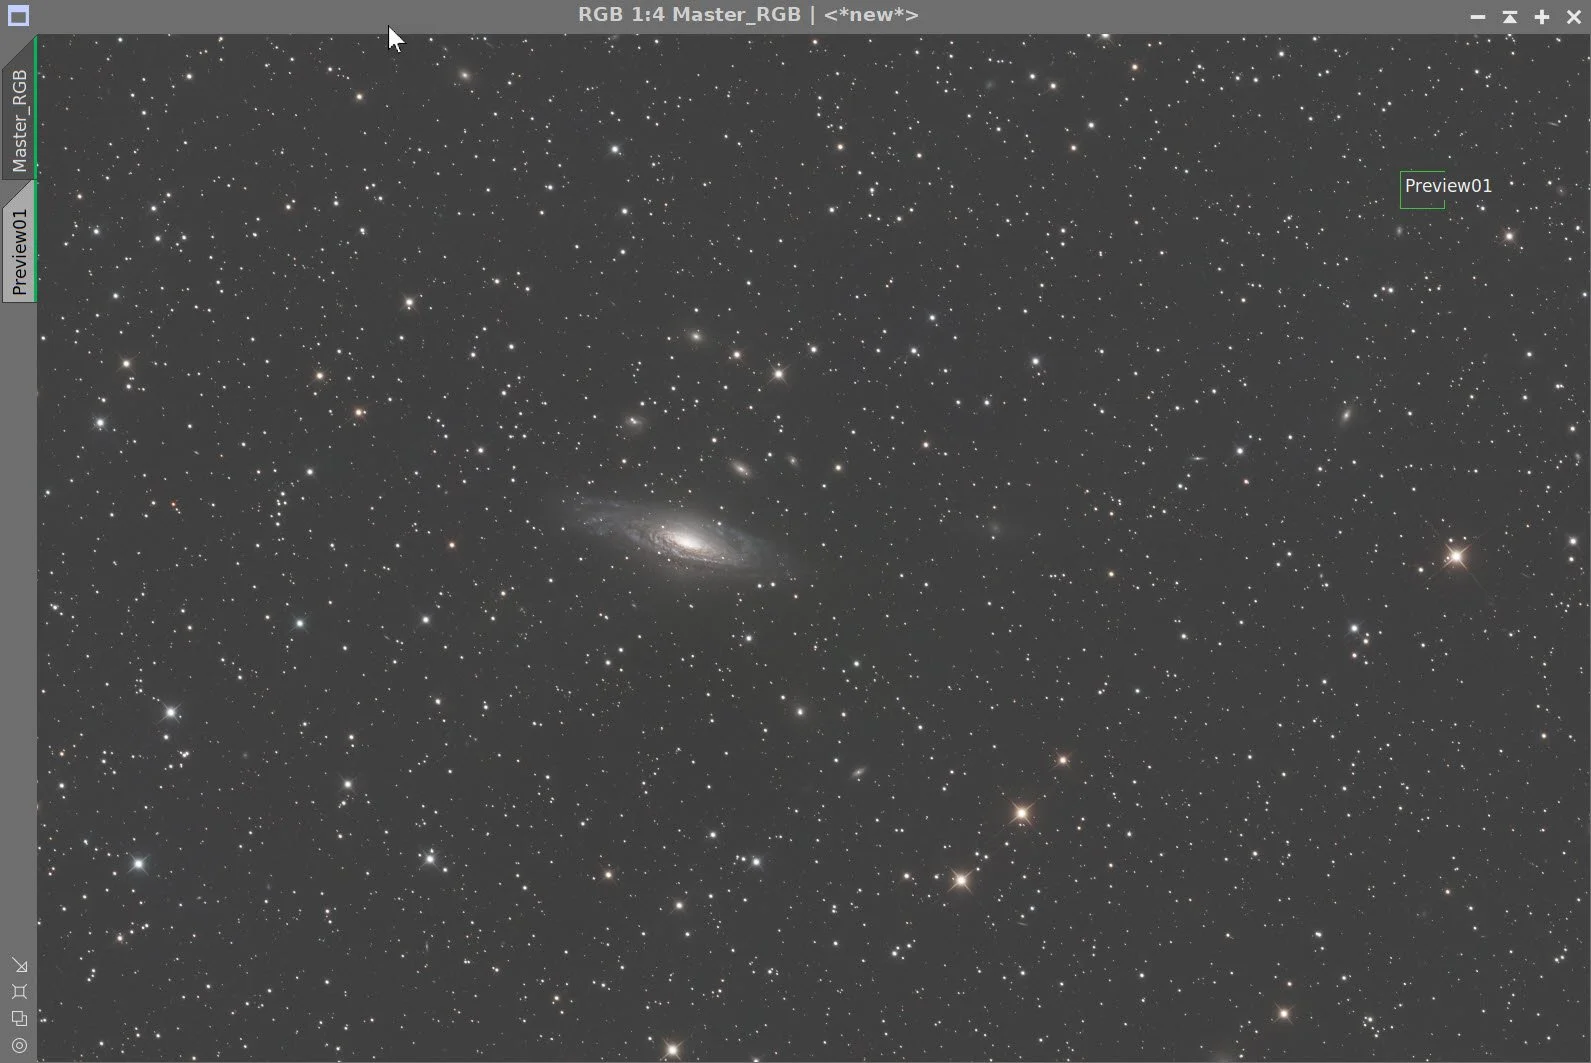
Initial Lum Nonlinear Image (click to enlarge)
Initial RGB nonlinear Image (click to enlarge)
9. Process the Nonlinear Lum image
Use CT to darken the background sky and slightly darken the galaxy
Create a mask using GAME to cover just the core of the NGC 7331 - we will call it the CoreMask.
Apply the CoreMask and run HDRMT with levels = 5 as shown in the screen snap below.
With the CoreMask still in place, use CT to adjust the core further.
Invert the CoreMask and use CT to adjust the rest of the scene.
Do an MLT sharpening (see MLT Panel screensnap to see params used) with the CoreMask in place - trying to enhane the core and the SN.
Do a final CT with no Mask
Starting Image . (click to enlarge)
After CT (click to enlarge)
The Core Mask, create with the GAME script (click to enlarge)
Befoe HDRMT aplied to the core using the CoreMask (click to enlarge)
After CT adjust with the CoreMask (click to enlarge)
After CT with the Inverse CoreMask (click to enlarge)
HDRMT params to use in the next step (click to enlarge)
After HDRMT with the CoreMask (click to enlarge)
Broader view - before CT with the Inverse CoreMask (click to enlarge)
Sharpening set up usedon Core. (click to enlarge)
MLT Sharpening done with CoreMask (click to enlarge)
Final CT with no mask (click to enlarge)

Final Lum image.
10. Process the Nonlinear RGB Image
Apply a global CT adjust dial in the intensity signal and a color saturation boost.
Apply the CoreMask, and do another CT.
Invert the CoreMask and do another CT, adjusting the rest of the image.
With the Inverted CoreMask, apply LHE with a radius of 134, max contrast of 2.0, an amount of 0.2, and an 8-bit histogram. This will enhance the contrast of larger-scale features.
I now want to enhance the blue of the outer galaxy and the warmth of the inner galaxy, so I set up a color saturation curve in the ColorSaturaton tool and applied it with an inverse CoreMask.
Use ChannelCombination in CIE Mode, with only the Luminance channel selected to add the Lum Image into the RGB image.
I am anticipating that I will do a tight crop around the main galaxy and Deer Lick group - with this “magnification,” I am concerned that the star image sizes will look bad. Although I did not use a starless workflow, I will still use the ReduceStars Script to adjust things. That will need a starless image, so create one with SXT.
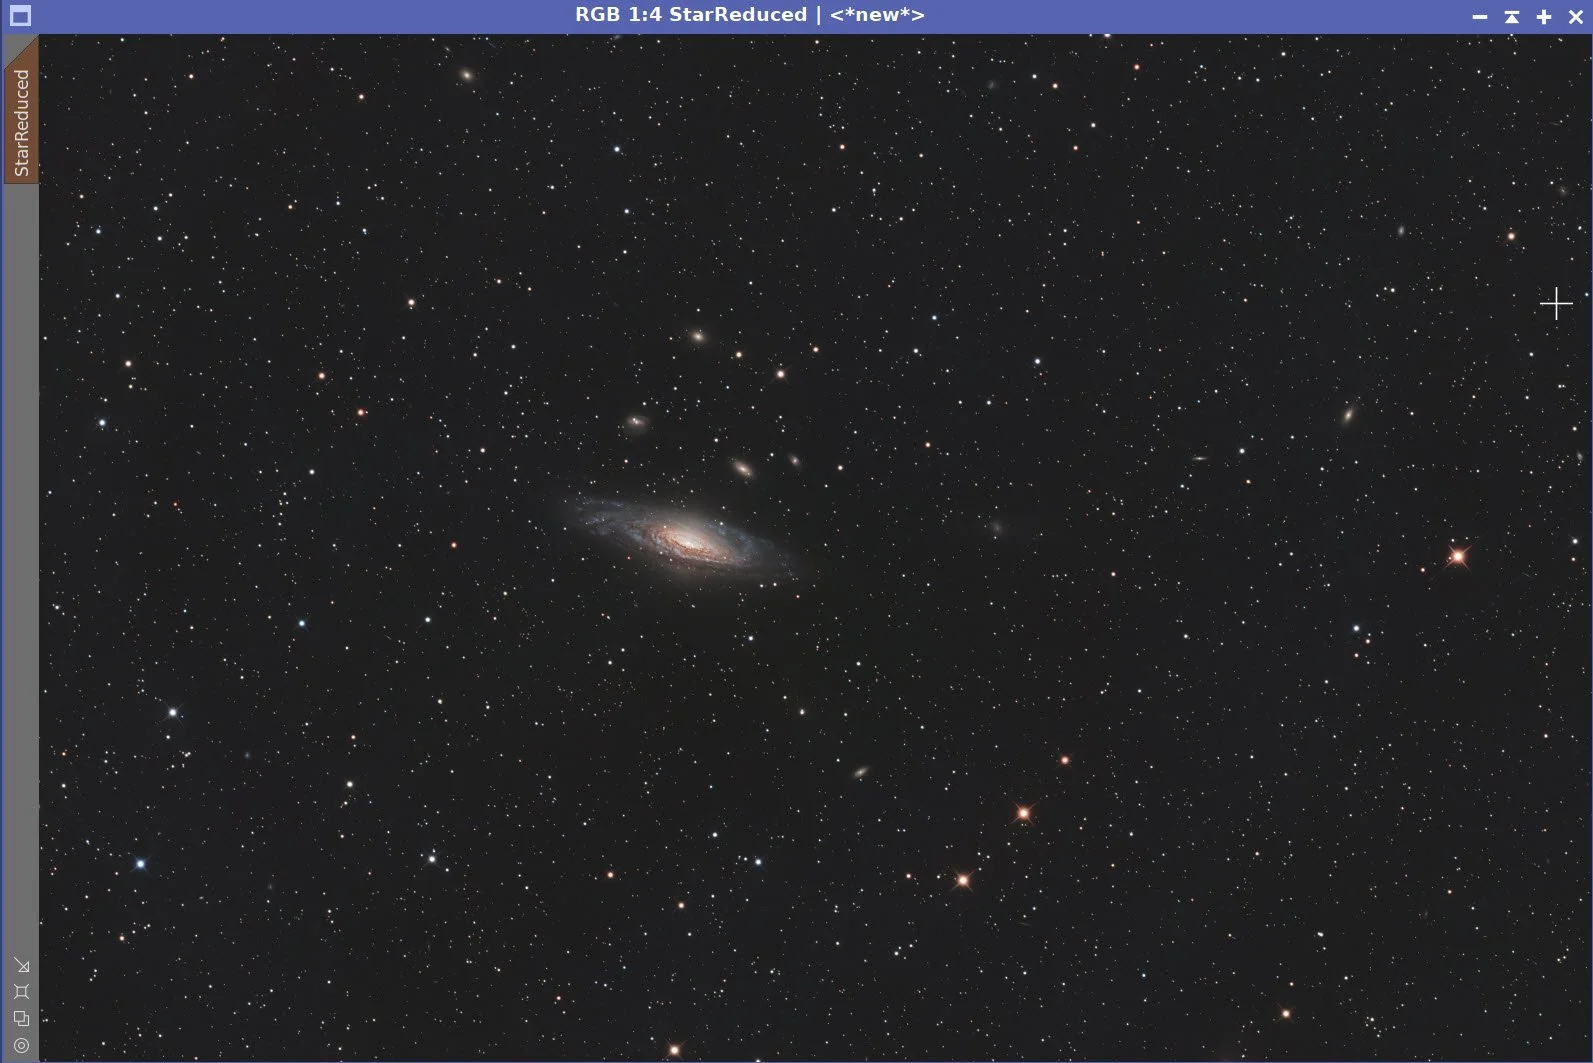
Now run the StarReduction Script. I enabled the Small Star Protection, and after some experimentation, I also used the Moderate setting for best results.
One thing I did not like about what Star Reduction did was that I found some bright color rings around red stars. To tone this back a bit, I created a color saturation curve for the ColorSaturation tool that reduced the saturation on bright red.
I did not want the red-ring fix to work on the body of the galaxy, so I created a GalaxyMask with GAME that covered the body of the Galaxy.
With the Inverse GalaxyMask applied, I ran the ColorSaturation Process.
I’m pretty happy with the image now, and I can see the SN just fine. But the problem is that the core looks unnatural because it is not as bright as it should be. So, I applied the CoreMask once again, brightening it as much as I could while still allowing the SN to be seen.
Initial Nonlinear RGB Image (click to enlarge)
After CT with the CoreMask in place . (click to enlarge)
After an LHE operation using the Inverse CoreMask (click to enlarge)
After ColorSaturation Adjust (click to enlarge)
Using SXT, create a Starless RGB image. (click to enlarge)
Before Star Reduction (click to enlarge)
After global CT adjust (click to enlarge)
CT with the inverse CoreMask (click toenlarge)
The ColorStatuation curve used to enhance image color (click to enlarge)
After ChannelCombination to add in Lum image (click to enlarge)
Star Reduction Script with parameters used. (click to enlarge)
After Star Reduction (click to enlarge)
A Color Sat curve to reduce saturated red rings on some stars. (click to enlarge)
The GalaxyMask, created with GAME (click to enlarge)
The Red Rin problem. (click to enlarge)
After ColorSaturation with the an Inverse GalaxyMask (click to enlarge)
Before Final CT with the CoreMask Applied. (click to enlarge)
After Final CT with the CoreMask Applied. (click to enlarge)
11. Move to Photoshop and do the final Polish
Export as 16-bit TIFF
Open in Photoshop
Crop to create the final composition.
Use the Camera Raw filter to tweak color, tone, and Clarity globally.
Add watermarks
Add arrow and text annotation to highlight the location of the Supernova
Export various versions of the image
The final image after Cropping and polishing in Photoshop.