
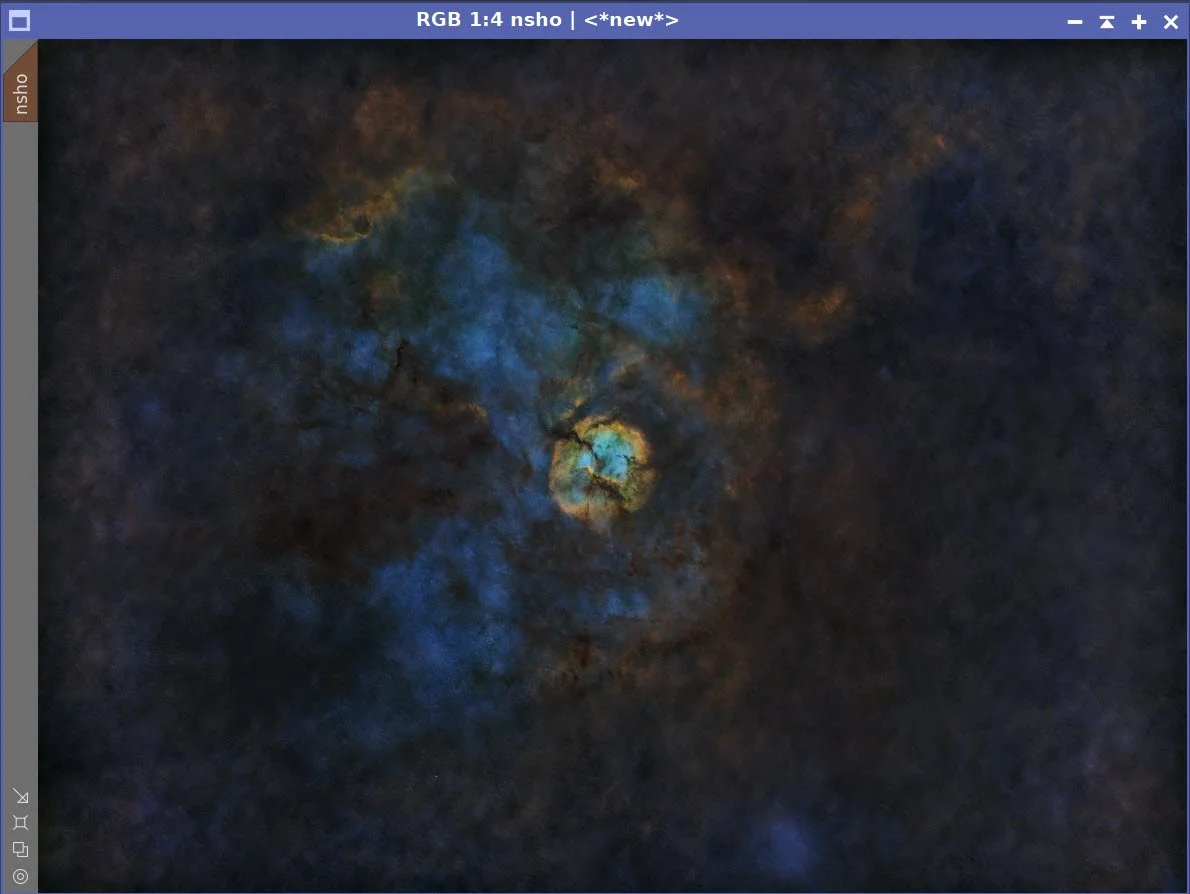
SH2-124 - The Hidden Nebula (~14.2 hours in SHOrgb)
Date: August 22, 2025
Cosgrove’s Cosmos Catalog ➤#0146
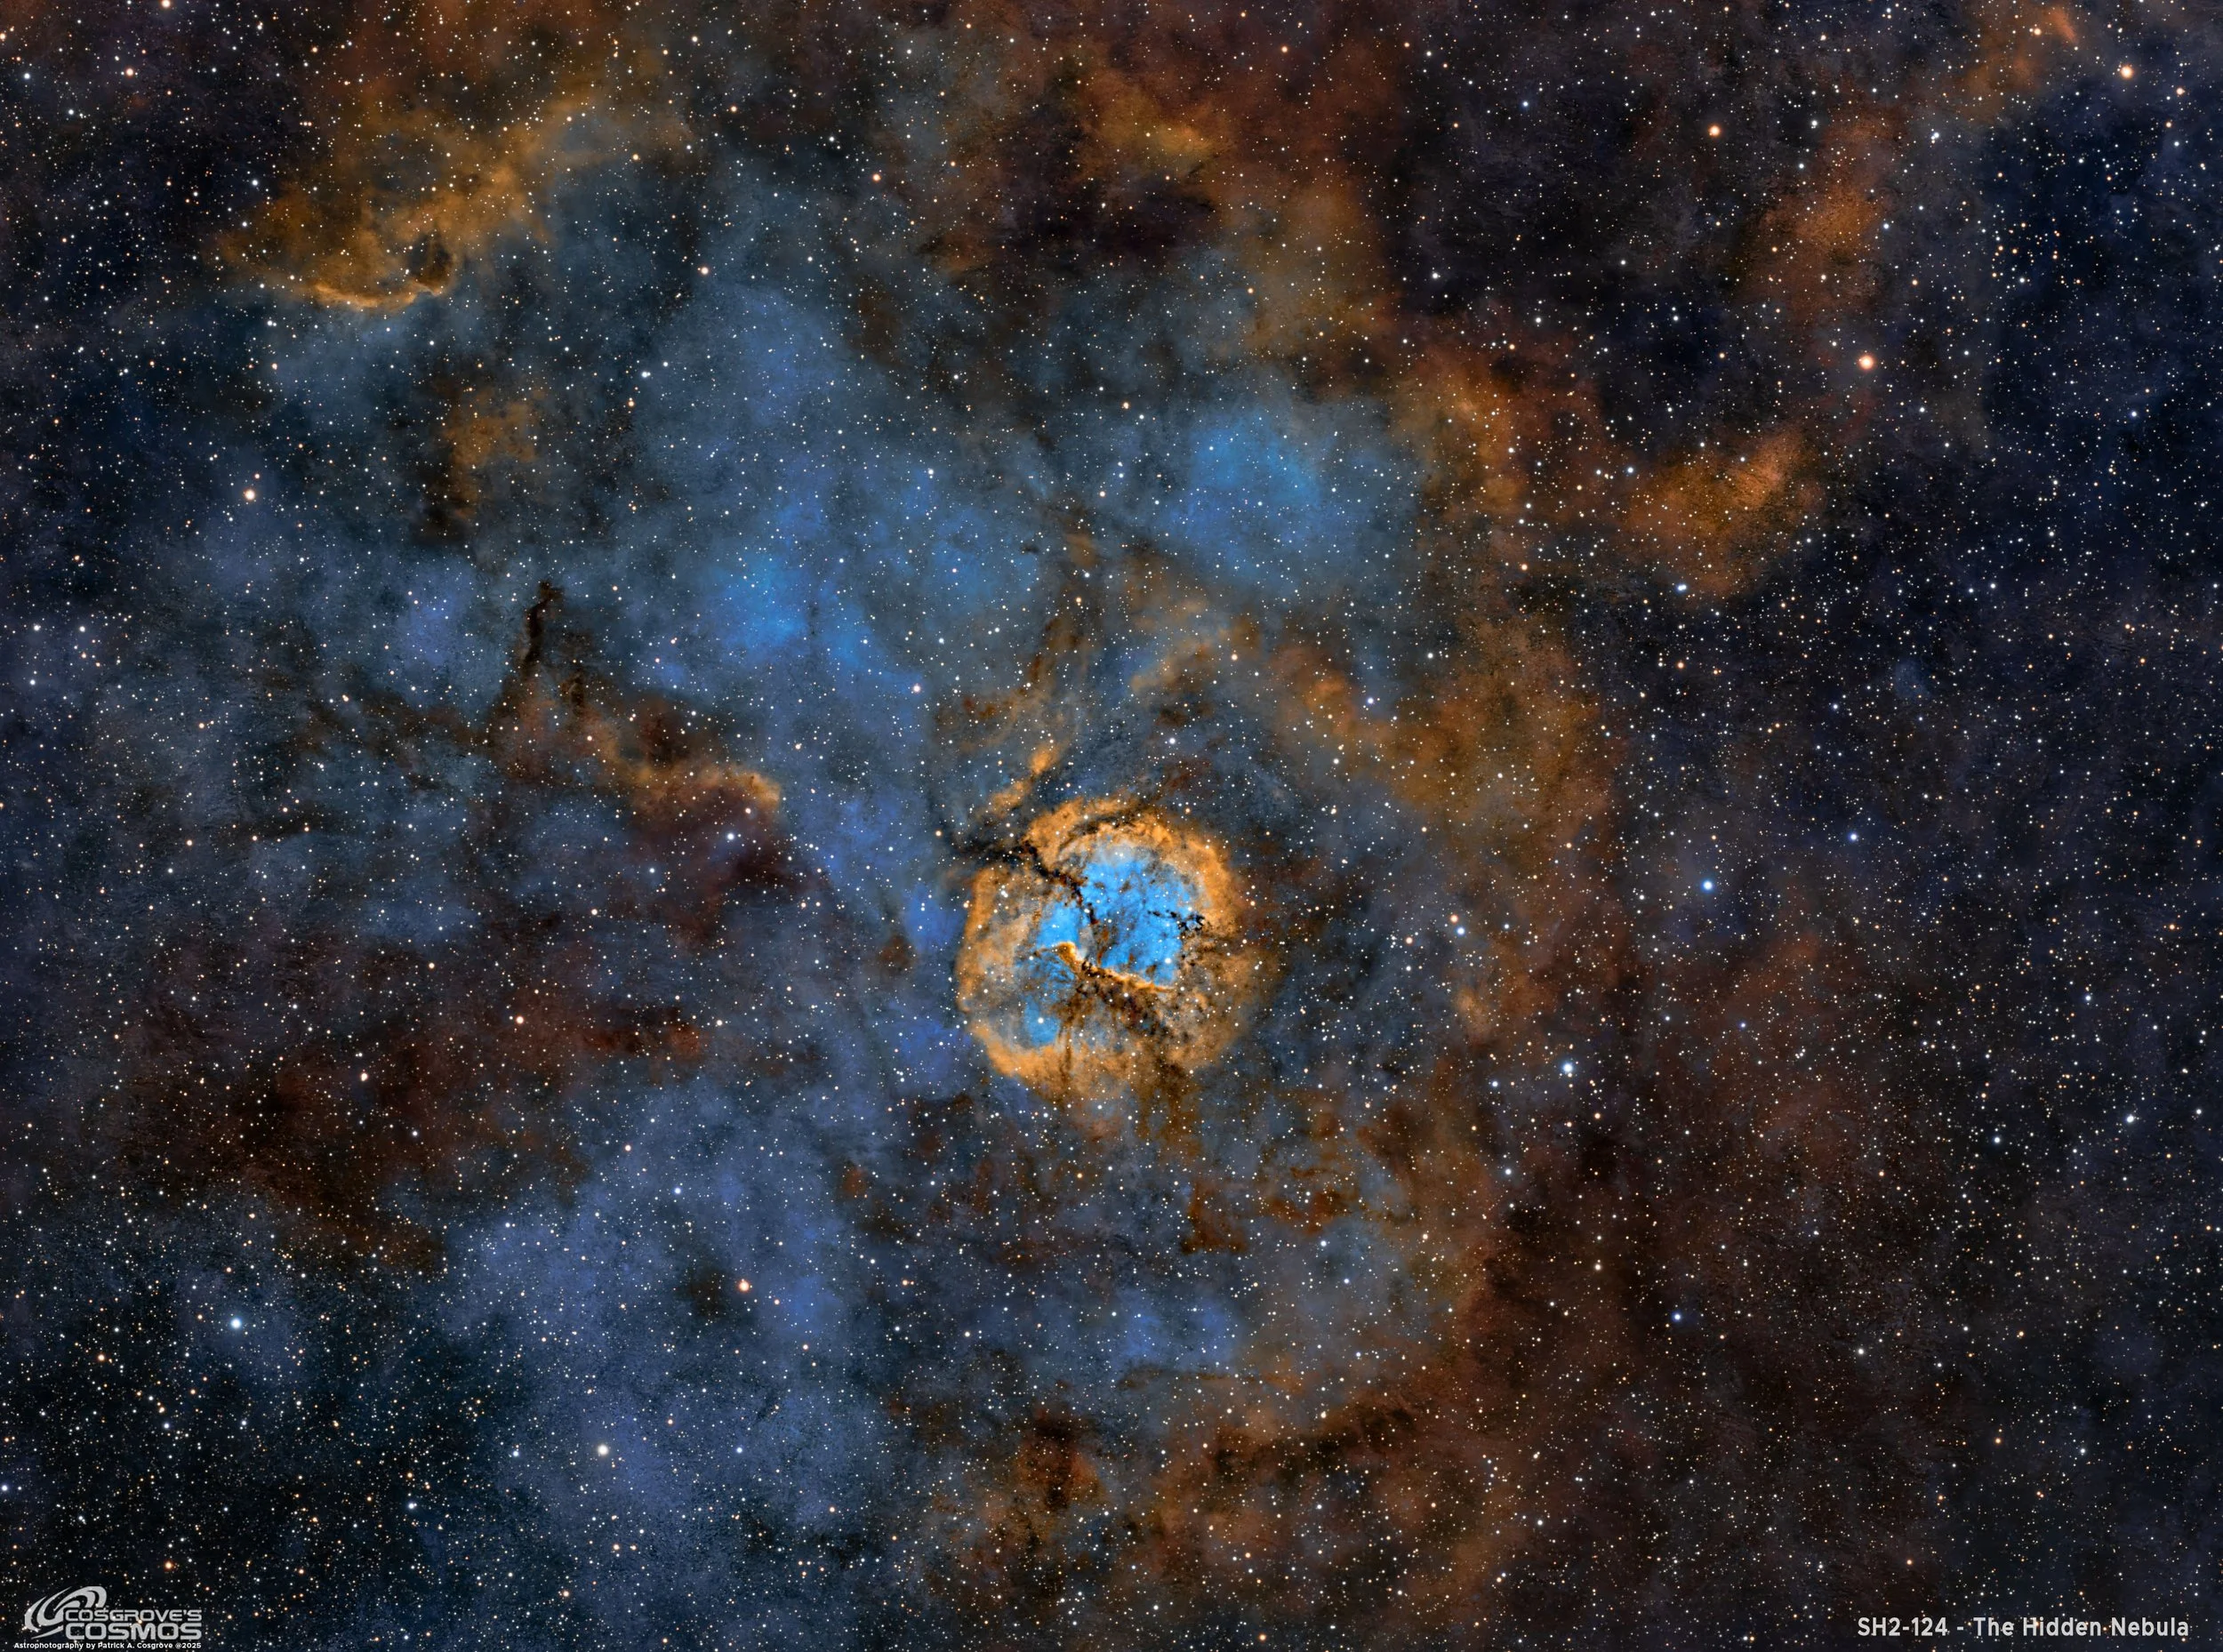
SH2-124 - another example of a nebula that is often overlooked beause of its locatiion close to a brighter and more well known neighbor! (ckick image for hi-res version via Astrobin.com)
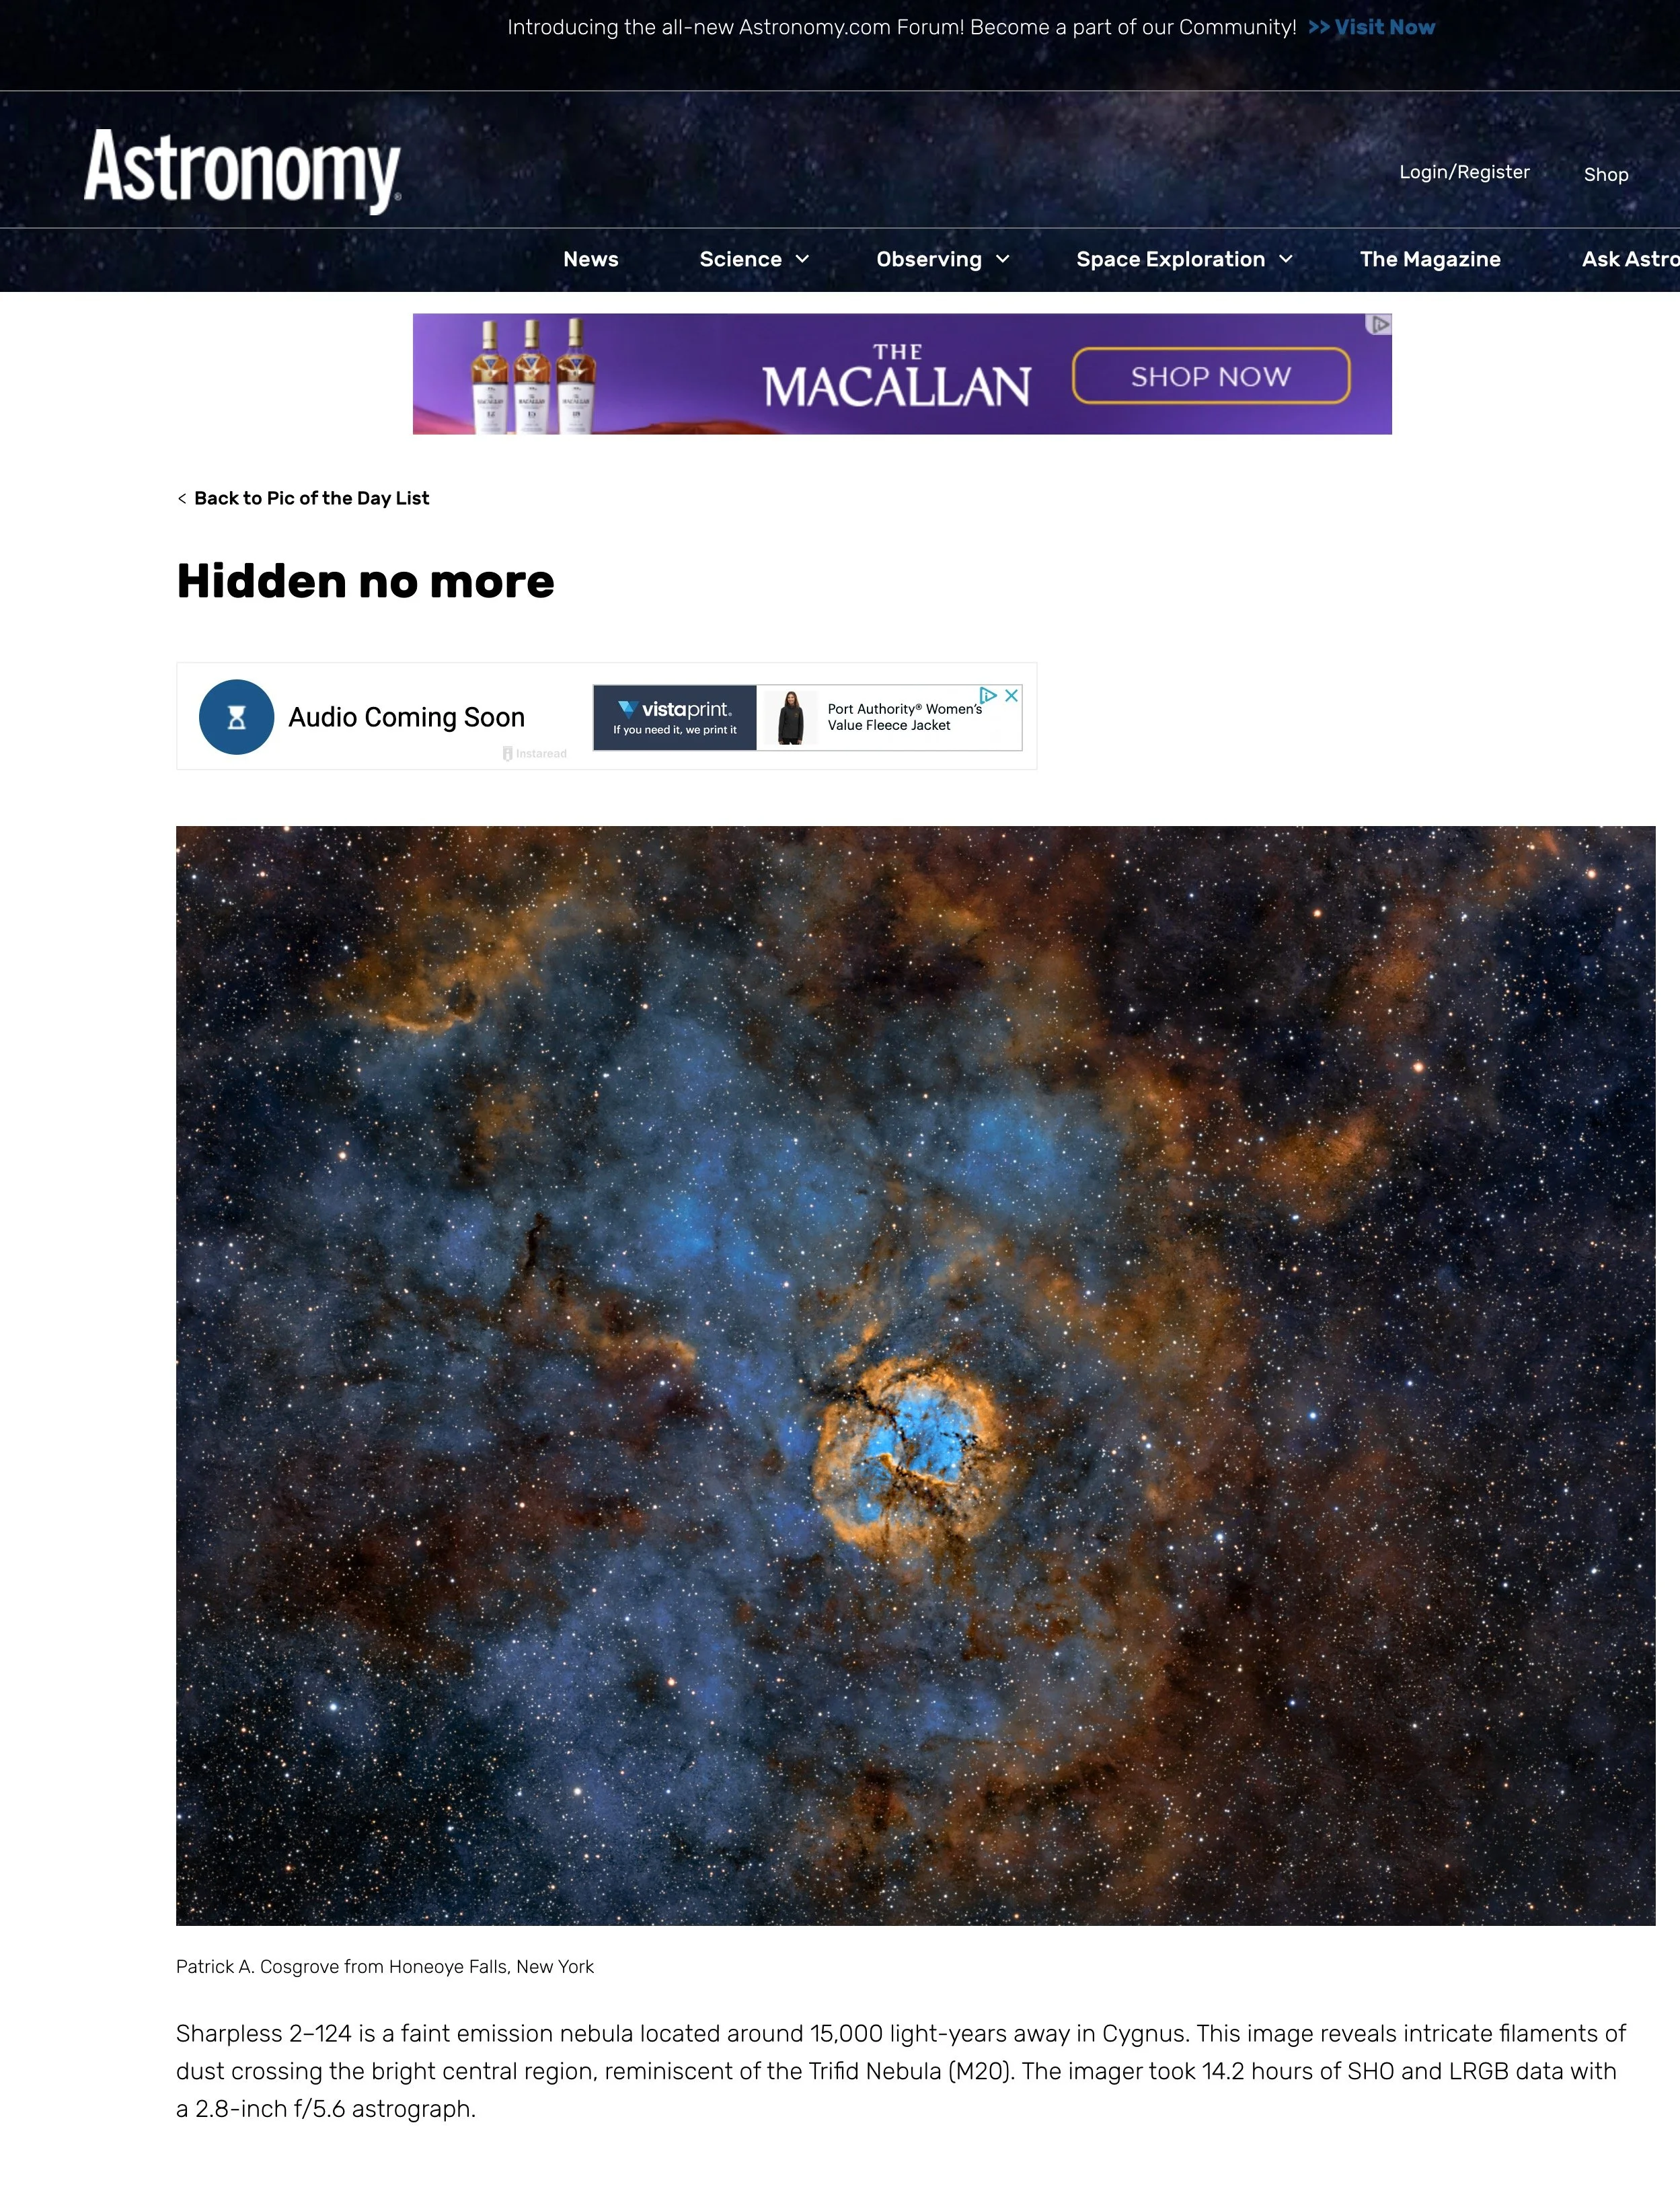
Chosen as Astronomy Magazine’s Picture-Of-The-Day for August 28, 2025:
Featured in Astronomy Magazine’s February 2026 Issue:
Feb 2026 issue f Astronomy Magazine! (click to enlarge)
Table of Contents Show (Click on lines to navigate)
About the Target
Sharpless 2-124 (Sh2-124) is a large emission nebula in the constellation Cygnus. It lies along the northwestern edge of Cygnus near the plane of the Milky Way, roughly 8,500 light-years from Earth.
Sh2-124 is an H II region – a cloud of ionized hydrogen gas glowing red from the ultraviolet radiation of hot young stars. It appears about 70′ (arcminutes) across on the sky (a bit over a degree or about two full Moons wide), which corresponds to a physical size of around 170 light-years in diameter at its estimated distance.
Despite its great extent, this nebula is relatively faint and lacks a well-known popular name, so it is often overlooked next to its more famous neighbor, the Cocoon Nebula (Sh2-125 - also known as IC 5146).

My Image of SH2-125 - THe Cocoon Nebua - also known as IC 5146.
Astronomers catalog it under various designations – for example, it’s listed as LBN 426 in Lynds’ Catalogue of Bright Nebulae and as the infrared source RAFGL 2789 – but it is most commonly referred to by its Sharpless catalog number, Sh2-124.
Sh2-124 was first documented in the 1950s by American astronomer Stewart Sharpless, who included it in his 1959 catalog of galactic emission nebulae. Prior to that survey, large Hα nebulae like Sh2-124 had largely escaped notice because they are very diffuse and mostly visible only in long-exposure photographs. Sharpless’s work identified Sh2-124 as a distinct H II region in Cygnus, and he gave it the number 124 in his catalogue (which ultimately listed 313 such nebulae).
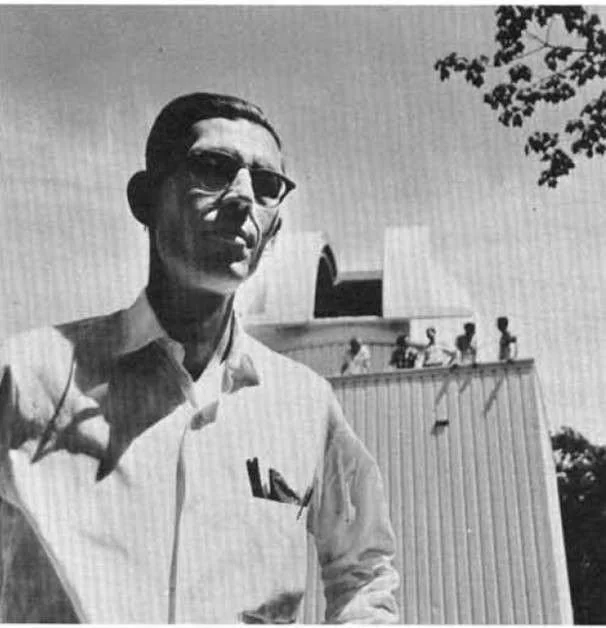
Stewart L. Sharpless (1926–2013). The C. E. K. Mees Observatory in the background. (Image taken from https://baas.aas.org/pub/2020i0326/release/1
Even many decades after its discovery, this object remains under-studied – “almost nothing has been written about this nebula in the scientific literature,” as one source notes. This mystique has led some to dub Sh2-124 a “hidden” or “mysterious” nebula, since it received far less attention than brighter nebulae in the region. For modern observers, it’s a challenging target that requires sensitive detectors (such as Hα filters or long exposures) to reveal its structure.
Scientifically, Sharpless 2-124 is interesting as a site of ongoing star formation. Deep observations have found that the nebula harbors young stellar objects; for example, it’s associated with a bright infrared source called RAFGL 2789, which corresponds to a star, V645 Cygni, embedded within the nebula. V645 Cygni appears to be a very young massive star – possibly an O-type star or a Herbig Be star (a pre-main-sequence star) – still in its early developmental stage. Intense ultraviolet light from this star and several others ionizes the surrounding hydrogen gas, causing Sh2-124’s glow.
In fact, astronomers have identified a handful of hot stars likely responsible for lighting up the nebula’s gas – notably a blue O7 V star and a B2 V star, among others, are thought to be the chief ionizing sources that make the cloud shine. The nebula’s gas is thus excited to emit the reddish H-alpha light that we capture in images. Moreover, researchers have detected telltale signs of active star formation within Sh2-124: they found several infrared-emitting protostars inside it, and even discovered natural microwave laser emissions (masers) from molecules in the cloud.
In particular, water maser signals have been observed coming from the vicinity of V645 Cygni, and a strong methanol maser pervades the region  – these are clear indicators of dense, energetic environments where new stars are being born. All of these findings highlight Sharpless 2-124 as an enormous cosmic stellar nursery, even though it remains a relatively enigmatic and under-explored object in the sky. Its study helps astronomers piece together how massive stars form and influence their surroundings, and ongoing surveys continue to unveil the nebula’s intricate structure and composition.
The Annotated Image
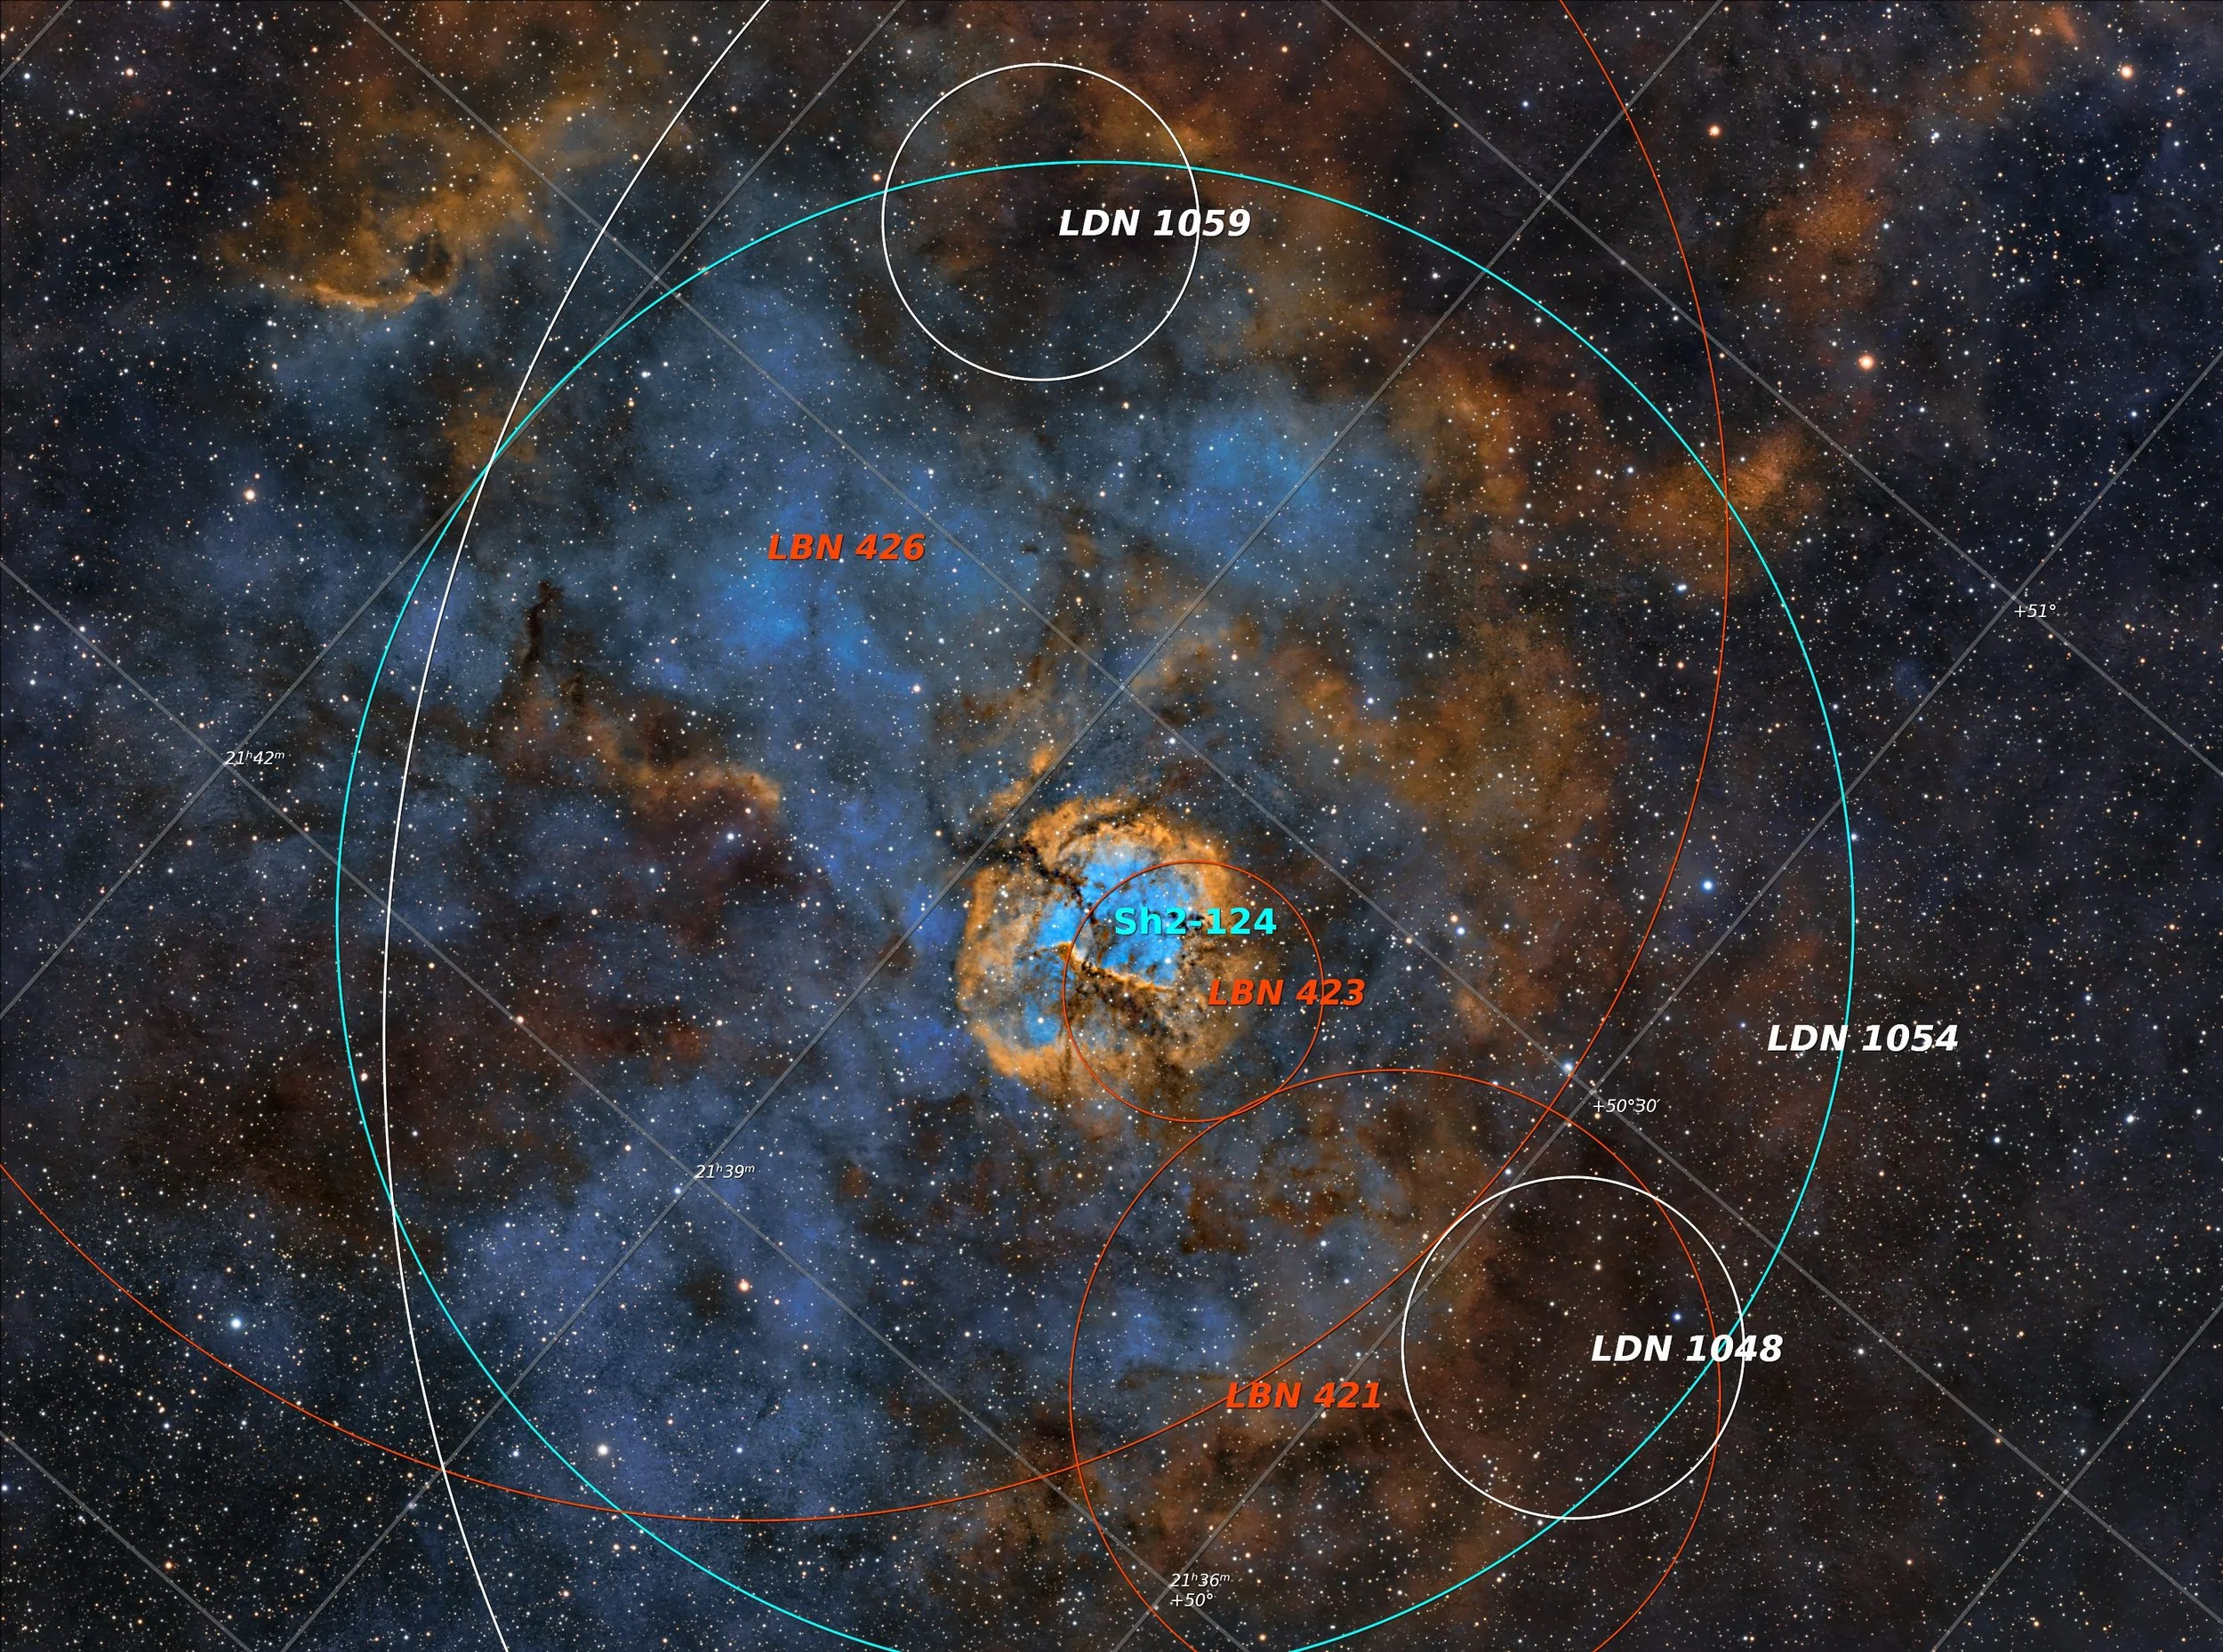
This annotated image was created with the imageSolve and ImageAnnotation scripts in Pixinsight.
The Location in the Sky
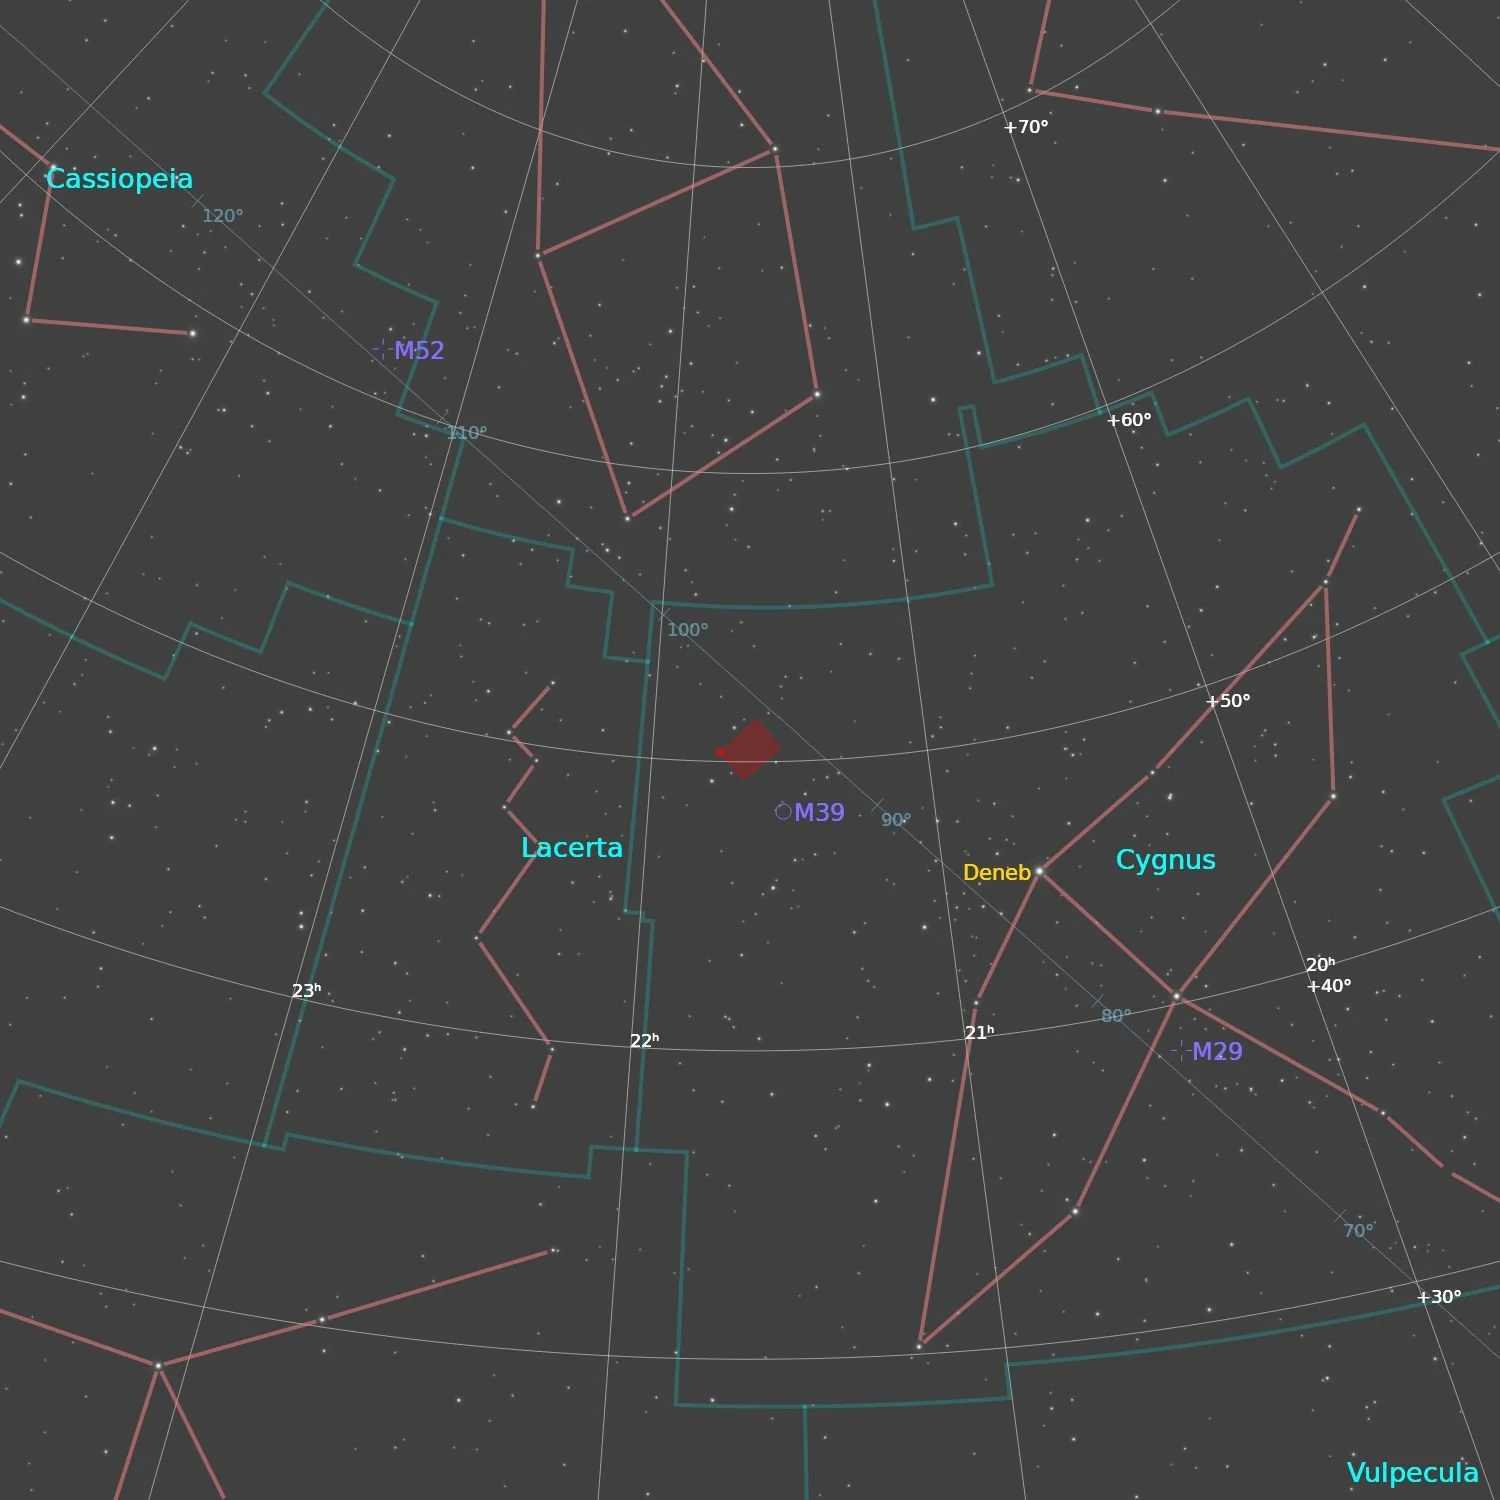
This annotated image created with Imagesolver and Annotate Image Scripts in Pixinsight.
About the Project
Picking the Target
When choosing targets, I often identify the constellations that are at my eastern treeline when darkness falls. Then I look at interesting objects in those constellations that appear in various catalogs. One of the catalogs that I tend to use is the Sharpless Catalog.
Cygnus was starting to be well-positioned, so I started looking for targets there.
As I was looking through one listing of the Sharpless objects in Cygnus, I came across one that I knew - the Famous Cocoon Nebula, known as SH2-125. I had shot this twice before, and I was wondering if it was worth another go. Then I noted a similar-looking nebula just before it in the list - SH2-124.

Sharpless entries SH2-124 and 125.! (Taken from http://astro.neutral.org/sharpless/sharpless-catalogue-list.html)
I knew all about SH2-125 - but SH2-124? Never heard of it!
So I did a little digging. Despite the image shown above, this object was very faint and had received less study and imaging than others.
Another target I captured during this session was the “Forsaken” Nebula. I chose that one because it was often overlooked in favor of brighter and more well-known targets nearby.
SH2-124 seemed to have a similar story.
The idea of choosing yet another target that has often been overlooked appealed to me.
The nebula itself was small, but it seemed to be surrounded by a larger HII region, so I decided to use my Askar FRA400 platform to go after it!
A Quick Aside - A Local Connection to Stewart Sharpless!
I mentioned that I often use the Sharpless Catalog to hunt for prospective targets. This is true, as I often find great nebulae within our galaxy on this list. While many popular and well-known targets are on it, there are many more that are not as well-known.
In the case of the SH2-124, the Sharpless catalog did not just list a known object - it discovered and documented an unknown object!
As I document my imaging projects, I often like to describe the history behind a target and add an image of its discoverer.
In this case, it was Stewart Sharpless himself.
So I went looking for an image of him. Typically, I can find such an image on Wikipedia, but the entry on Sharpless had no image. So I searched further. I finally found an image with a Google Search.
In the background of this image, I could see Mees Observatory. Huh?
I was struck because this observatory is relatively local to where I live. As I read the article that had the image, I learned that in his later years, Sharless was associated with the University of Rochester and had helped establish the Meese Observatory!
I had no idea that there was a local connection until I read this. I found it facinating. Here is a link to that article in question. If you live in the greater Rochester, NY region, or if you are just interested in the history here, please give it a read!
Data Collection
Data for this project were collected on the nights of July 18, 19, 20, 21, and 23 of 2025.
Some of these nights were “iffy”, but now that the observatory is functioning and I don’t have to set up and take down gear each night, I am finding that I can go after those types of evenings with little risk.
Most did not pan out for the entire night, but a few did. But I did get some good capture time from each evening.
Most nights had unseasonably warm weather, but the ASI1600MM-Pro camera seems to have a more capable cooling system, so I was able to drive the camera down to -15 degrees C despite the heat.
At this point, I had most of my automation in NINA working very well, so most of my time was spent sleeping rather than babysitting. Since this has been a real goal of mine, I am happy to have this come about!
Since data collection had been going well, on the last night, I added in some frames with the RGB filters so that I could have natural color stars in the final image.
After the last night of capture, cal frames were shot, and I was ready to go.
Processing Overview
This was a SHOrgb image, so I intended to use a workflow like shown in the chart below.
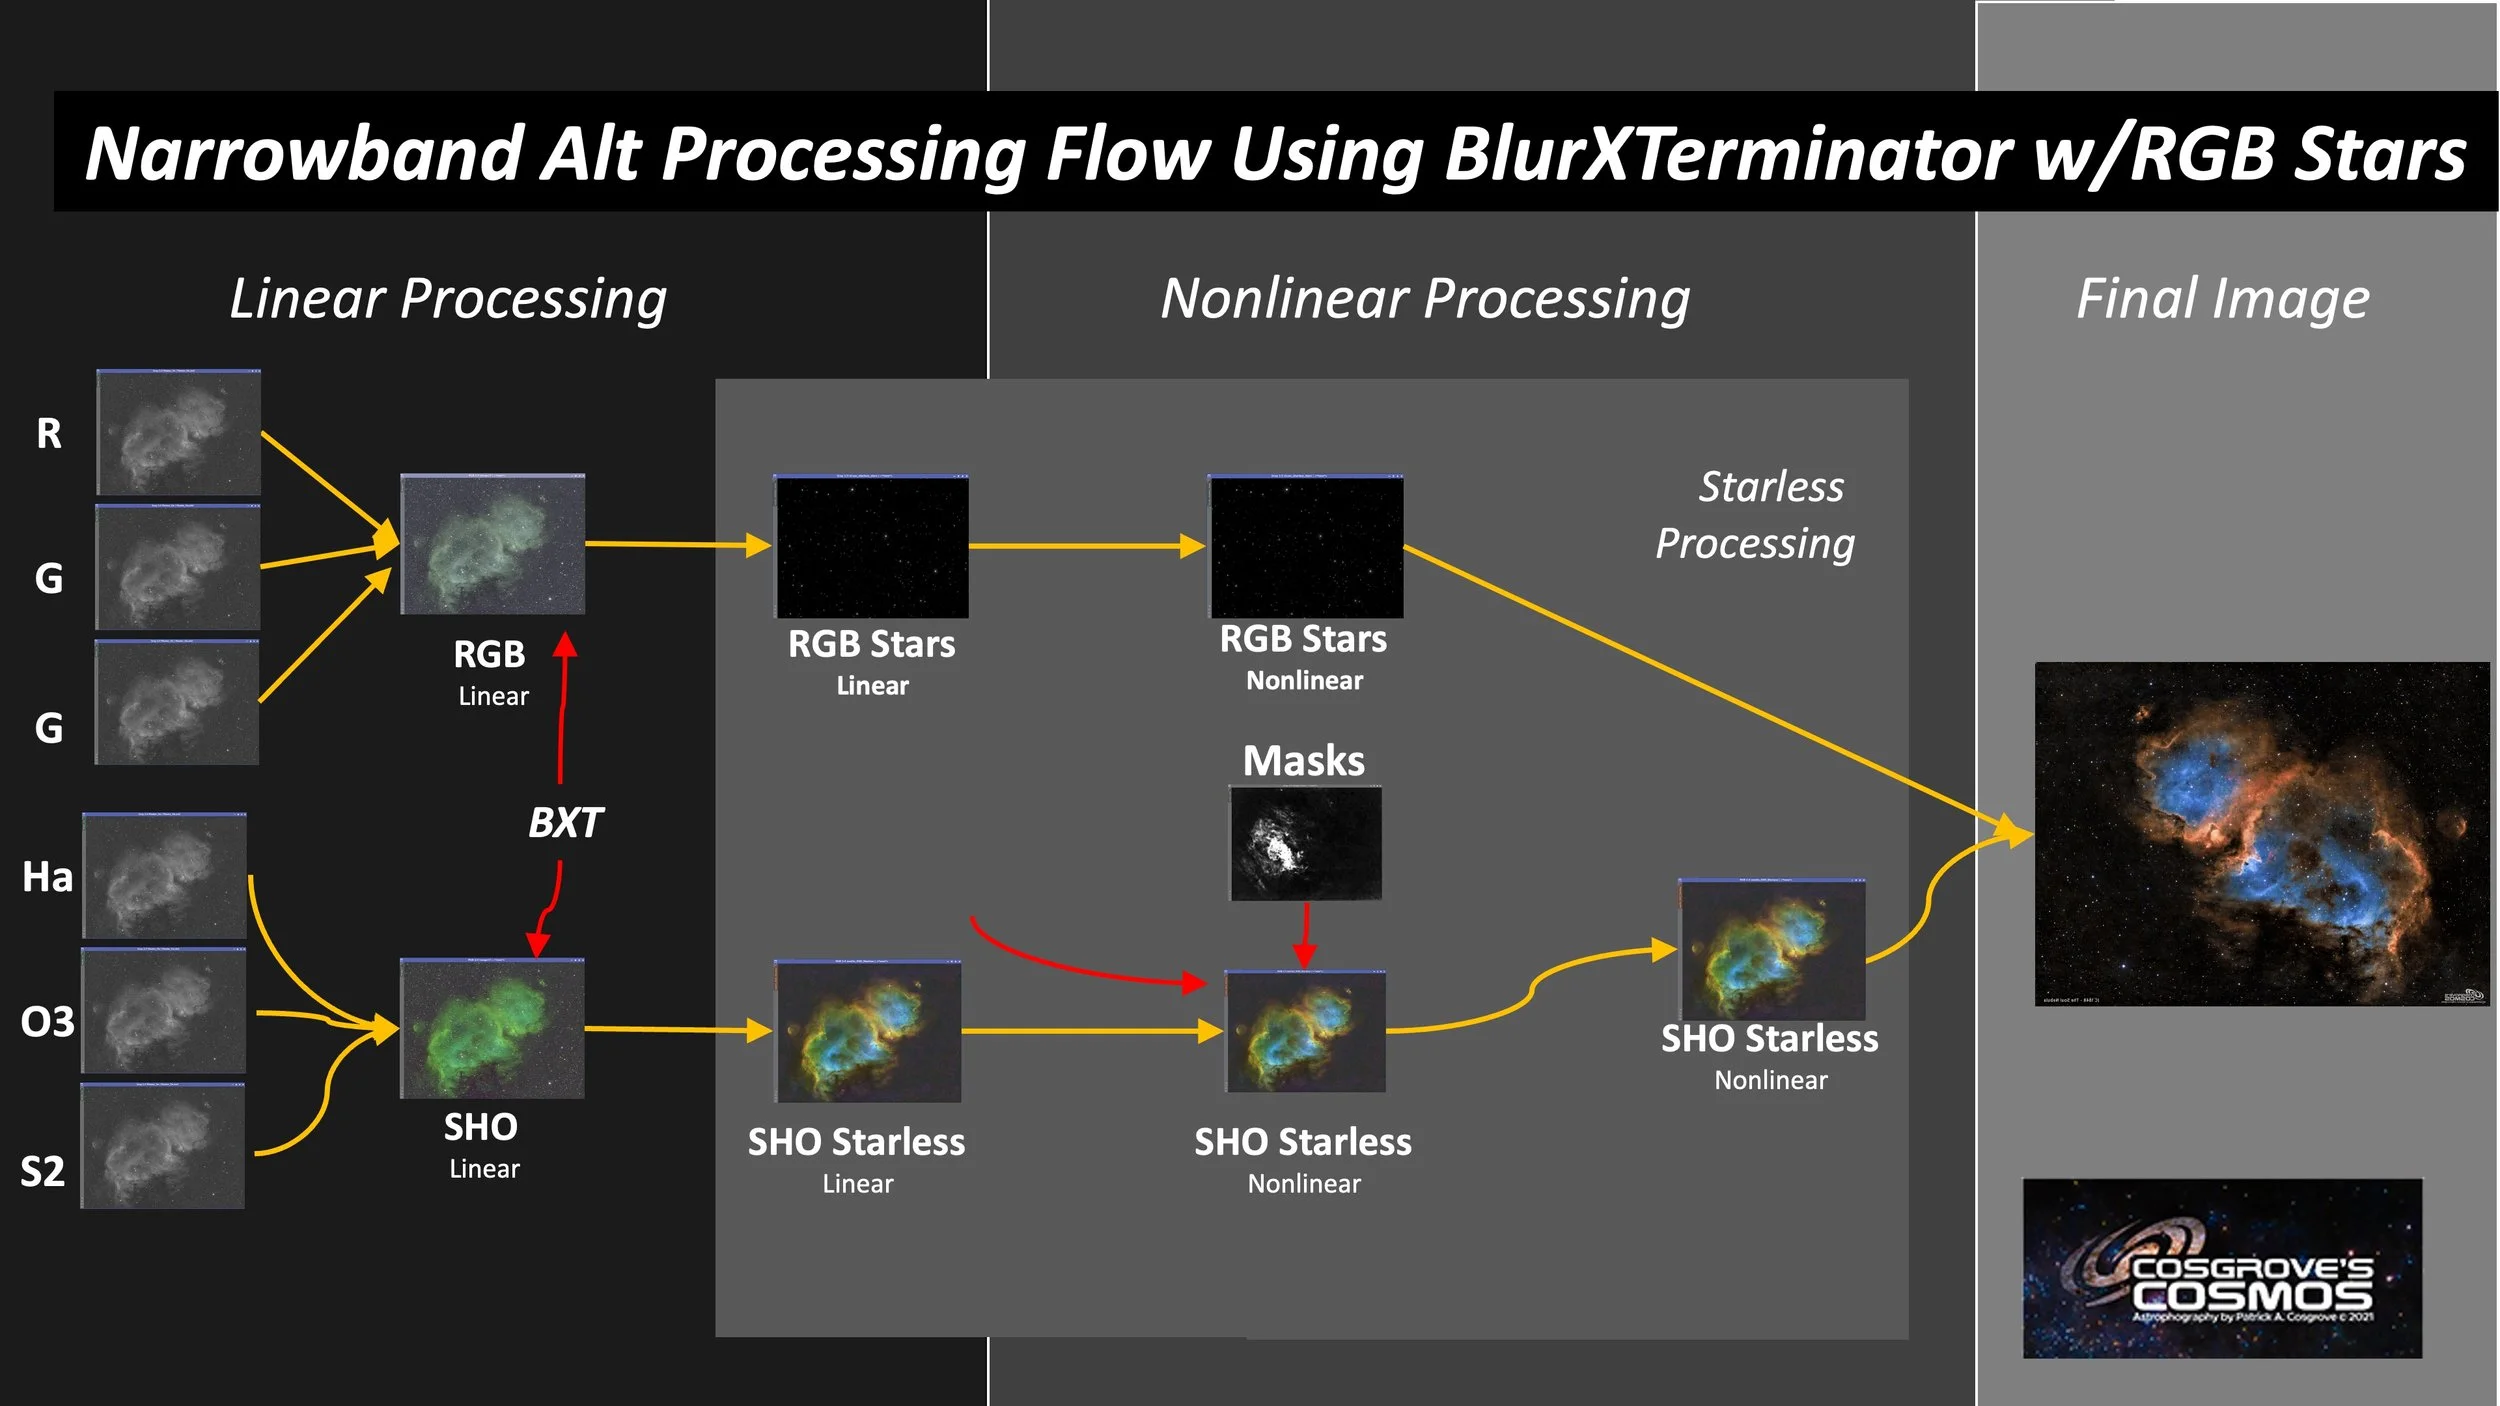
My standard SHOrgb workflow.
I was able to follow this plan pretty well, and the processing was reasonably straightforward.
These areas of sky have a very high star density, and that did cause two issues.
First, I had to go back several times and dial down the star images to avoid overwhelming the final image.
Second, there were so many stars for StarXterminator to remove that the starless image looked very rough and mottled. I was concerned about this, so early on, I did a test where I added the stars back in using the ScreenStars script, and the final image looked pretty nice. I was just going to have to get used to the starless image looking rough as I processed it.
I found that I was doing a lot of iterative processing on this image.
I would use a mask to focus on the core and then work on that region. Then I would invert that mask and work on the outer areas separately. Then I would feel compelled to go back to the core again.
I seemed to be sneaking up on the image I wanted - going back and forth as I did so.
I tried to capture what I actually did in the sequence I did things in the processing section. So if you see me going back and forth working with a mask, you can understand at least a little bit why that flow looks the way it does.
I tend to choose the next steps based on what I think the image needs at any given point af time. Often, this is a very strict path forward. Sometimes, like with this image, it is not! When the changes become smaller and smaller, I know I am almost done with the image!
Look below for the complete step-by-step processing walkthrough! Note: This walkthrough is based on Pixinsight.
Final Results
An awful lot is going on in this image.
This caused me to make numerous tweaks to it. But I am pretty satisfied with the final result. The color may be too high for some, but this is where I tend to like it. I was able to bring out some of the really faint portions of the nebula while preserving the brighter regions in the core.
It took me a while to converge on this final image position, but I am reasonably happy with the result!
All in all, this was a fun project to do, and I am glad I added another target that is not so well-known to my portfolio.
What do you think? Your feedback is always welcome!
More Information
🎯 Target Details & Catalogs
https://simbad.u-strasbg.fr/simbad/sim-id?Ident=Sh+2-124 — SIMBAD object page for Sh 2-124 with aliases (e.g., LBN 426, KR 7), basic data, and bibliography links.
https://in-the-sky.org/data/catalogue.php?cat=LBN&const=1&page=5&sort=0&view=1 — In-The-Sky catalogue list showing LBN 426 (the LBN designation tied to Sh 2-124) with position and constellation.
📜 History & Cataloging
https://ui.adsabs.harvard.edu/abs/1959ApJS….4..257S/abstract — ADS record for Stewart Sharpless (1959) “A Catalogue of H II Regions,” the second Sharpless catalogue that includes Sh 2-124.
https://vizier.cds.unistra.fr/viz-bin/VizieR?-source=VII%2F20 — VizieR access point for the Sharpless (1959) H II region catalogue (VII/20).
https://cdsarc.u-strasbg.fr/viz-bin/cat/VII/20 — Catalogue description and data for Sharpless H II regions via CDS.
https://en.wikipedia.org/wiki/Sharpless_catalog — Background on the Sharpless catalogues and related lists (Gum, RCW, BFS), with external links to the original data.
🔬 Science & Research (V645 Cyg / RAFGL 2789 & KR 7)
https://academic.oup.com/mnras/article/436/1/511/974299 — MNRAS study of massive YSOs: near-IR integral-field spectroscopy for V645 Cyg (associated with Sh 2-124) and its high-velocity wind signatures.
https://arxiv.org/abs/astro-ph/0606652 — Red MSX Survey follow-up: evidence for variable outflows in V645 Cyg from multi-wavelength data.
https://arxiv.org/abs/astro-ph/0205452 — VLBI mapping of H₂O and CH₃OH masers toward V645 Cyg (GL 2789), probing the immediate circumstellar environment.
https://ui.adsabs.harvard.edu/abs/2011AJ….141..153A/abstract — AJ paper on ring-like H II regions KR 7/81/120; KR 7 corresponds to Sh 2-124 and is analyzed with SCUBA 850 µm and CO data.
🧭 Sky Context & Imaging
https://www.iphas.org/ — IPHAS survey homepage; narrowband H-alpha imaging of the Northern Galactic Plane that reveals Sh 2-124’s extended structure.
https://astrodoc.ca/sh2-124-emission-nebula-colour/ — Astrodoc image page with a short lay summary and acquisition notes for Sh 2-124.
https://jthommes.com/Astro/Sh2-124.htm — Imaging write-up distinguishing Sh 2-124 from adjacent LBN regions (421/423/426) and noting surrounding dark nebulae.
https://astroanarchy.blogspot.com/2020/11/sharpless-124-sh2-124.html — Astro Anarchy mapped-color/H-alpha views with brief background on this seldom-imaged nebula.
💡 Interesting Notes & Highlights
https://www.aapod2.com/blog/22zef40692r76b60jektkl50rpguq4 — AAPOD2 feature and description noting Sh 2-124’s faintness and rarity in amateur imaging.
https://www.astroworldcreations.com/image-details/sh2-124 — Recent image page with a concise summary linking Sh 2-124 to RAFGL 2789/V645 Cyg and distance notes.
https://www.caprileobservatory.com/sh2-124/ — Observatory image page noting the association with infrared source RAFGL 2789 and providing an SHO rendition.
Capture Details
Lights Frames
Taken the nights of July 18, 19, 20, 21, and 23 of 2025.
55 x 300 seconds, bin 1x1 @ -15C, Gain 139.0, Astrodon 5nm Ha Filter - 1.25 inch
50 x 300 seconds, bin 1x1 @ -15C, Gain 139.0, Astrodon 5nm O3 Filter - 1.25 inch
50 x 300 seconds, bin 1x1 @ -15C, Gain 139.0, Astronomiks 6nm S2 Filter - 1.25 inch
13 x 120 seconds, bin 1x1 @ -15C, Gain 139.0, ZWO Red Filter - 1.25 inch
13 x 120 seconds, bin 1x1 @ -15C, Gain 139.0, ZWO Green Filter - 1.25 inch
12 x 120 seconds, bin 1x1 @ -15C, Gain 139.0, ZWO Blue Filter - 1.25 inch
Total - after culling bad subs - of 14 hours and 11 minutes.
Cal Frames
30 Darks at 300 seconds, bin 1x1, -15C, gain 139
30 Darks at 90 seconds, bin 1x1, -15C, gain 139
30 Dark Flats at Flat exposure times, bin 1x1, -15C, gain 139
One set of Flats done:
15 Ha Flats
15 O3 Flats
15 S2 Flats
15 R Flats
15 G Flats
15 B Flats
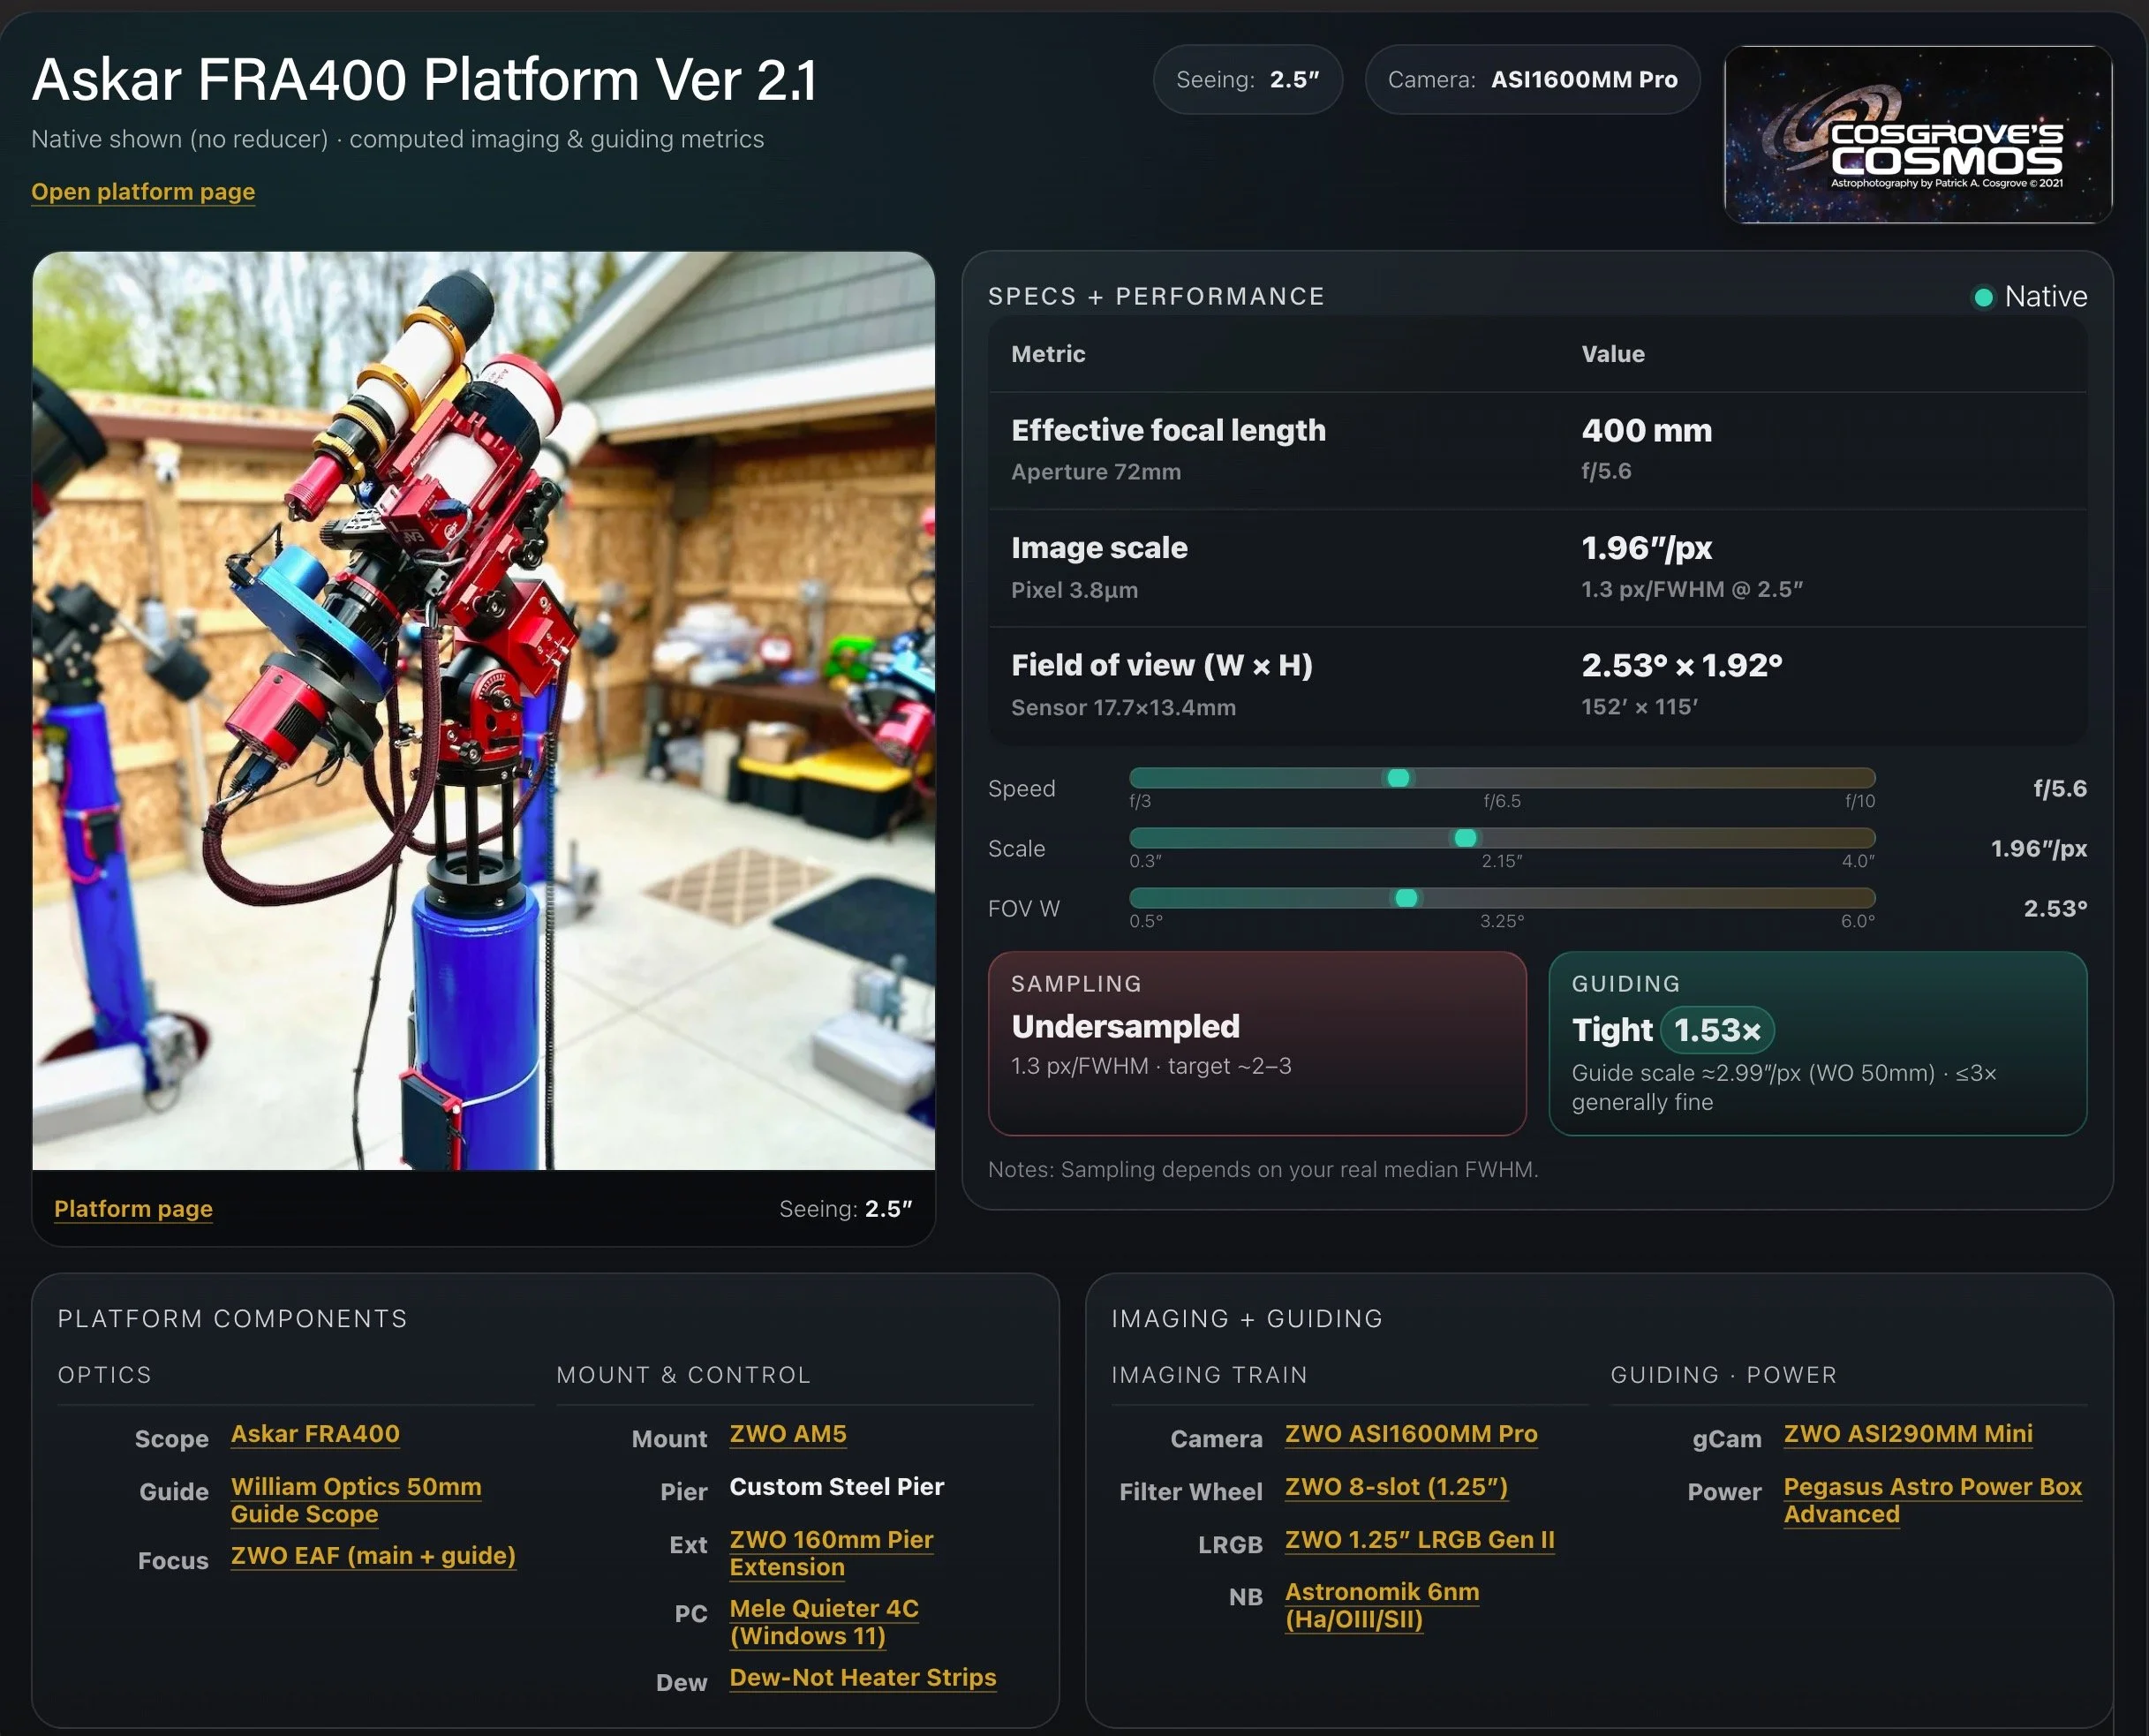
Platform used for this project
Software
Capture Software: PHD2 Guider, NINA
Image Processing: Pixinsight, Photoshop - assisted by Coffee, extensive processing indecision and second-guessing, editor regret and much swearing…..
Image Processing Walkthrough
(All Processing is done in Pixinsight - with some final touches done in Photoshop)
1. Blink Analysis
Ha Subs:
2 removed for clouds
1 removed for tracking
O3 Subs:
1 frames removed for tracking
1 frame removed as all stars were doubled (must have bumped the scope!)
S2 Subs:
A few satellites noted
1 removed for tracking
Red Subs:
None removed
Green Subs:
A few satellite trails noted
None removed
Blue Subs:
A few satellite trails noted
None removed
All Flats and Darks:
All looked good!
I discovered that I did not have the right darks for my RGB stars. I had 90 sec darks, but the RGB images were 120 secs. Since all I want is the stars, I'm going to leave it this way unless there is a big problem, then I will reaccess.
2. SubFrameSelector
I evaluated the narrowband subframes for sharpness and eccentricity. I expect to remove due ot star size but will allow more eccentricity since the BXT Correct Only helps this.

Ha Subframe Selector.
Ha: 2 frames removed
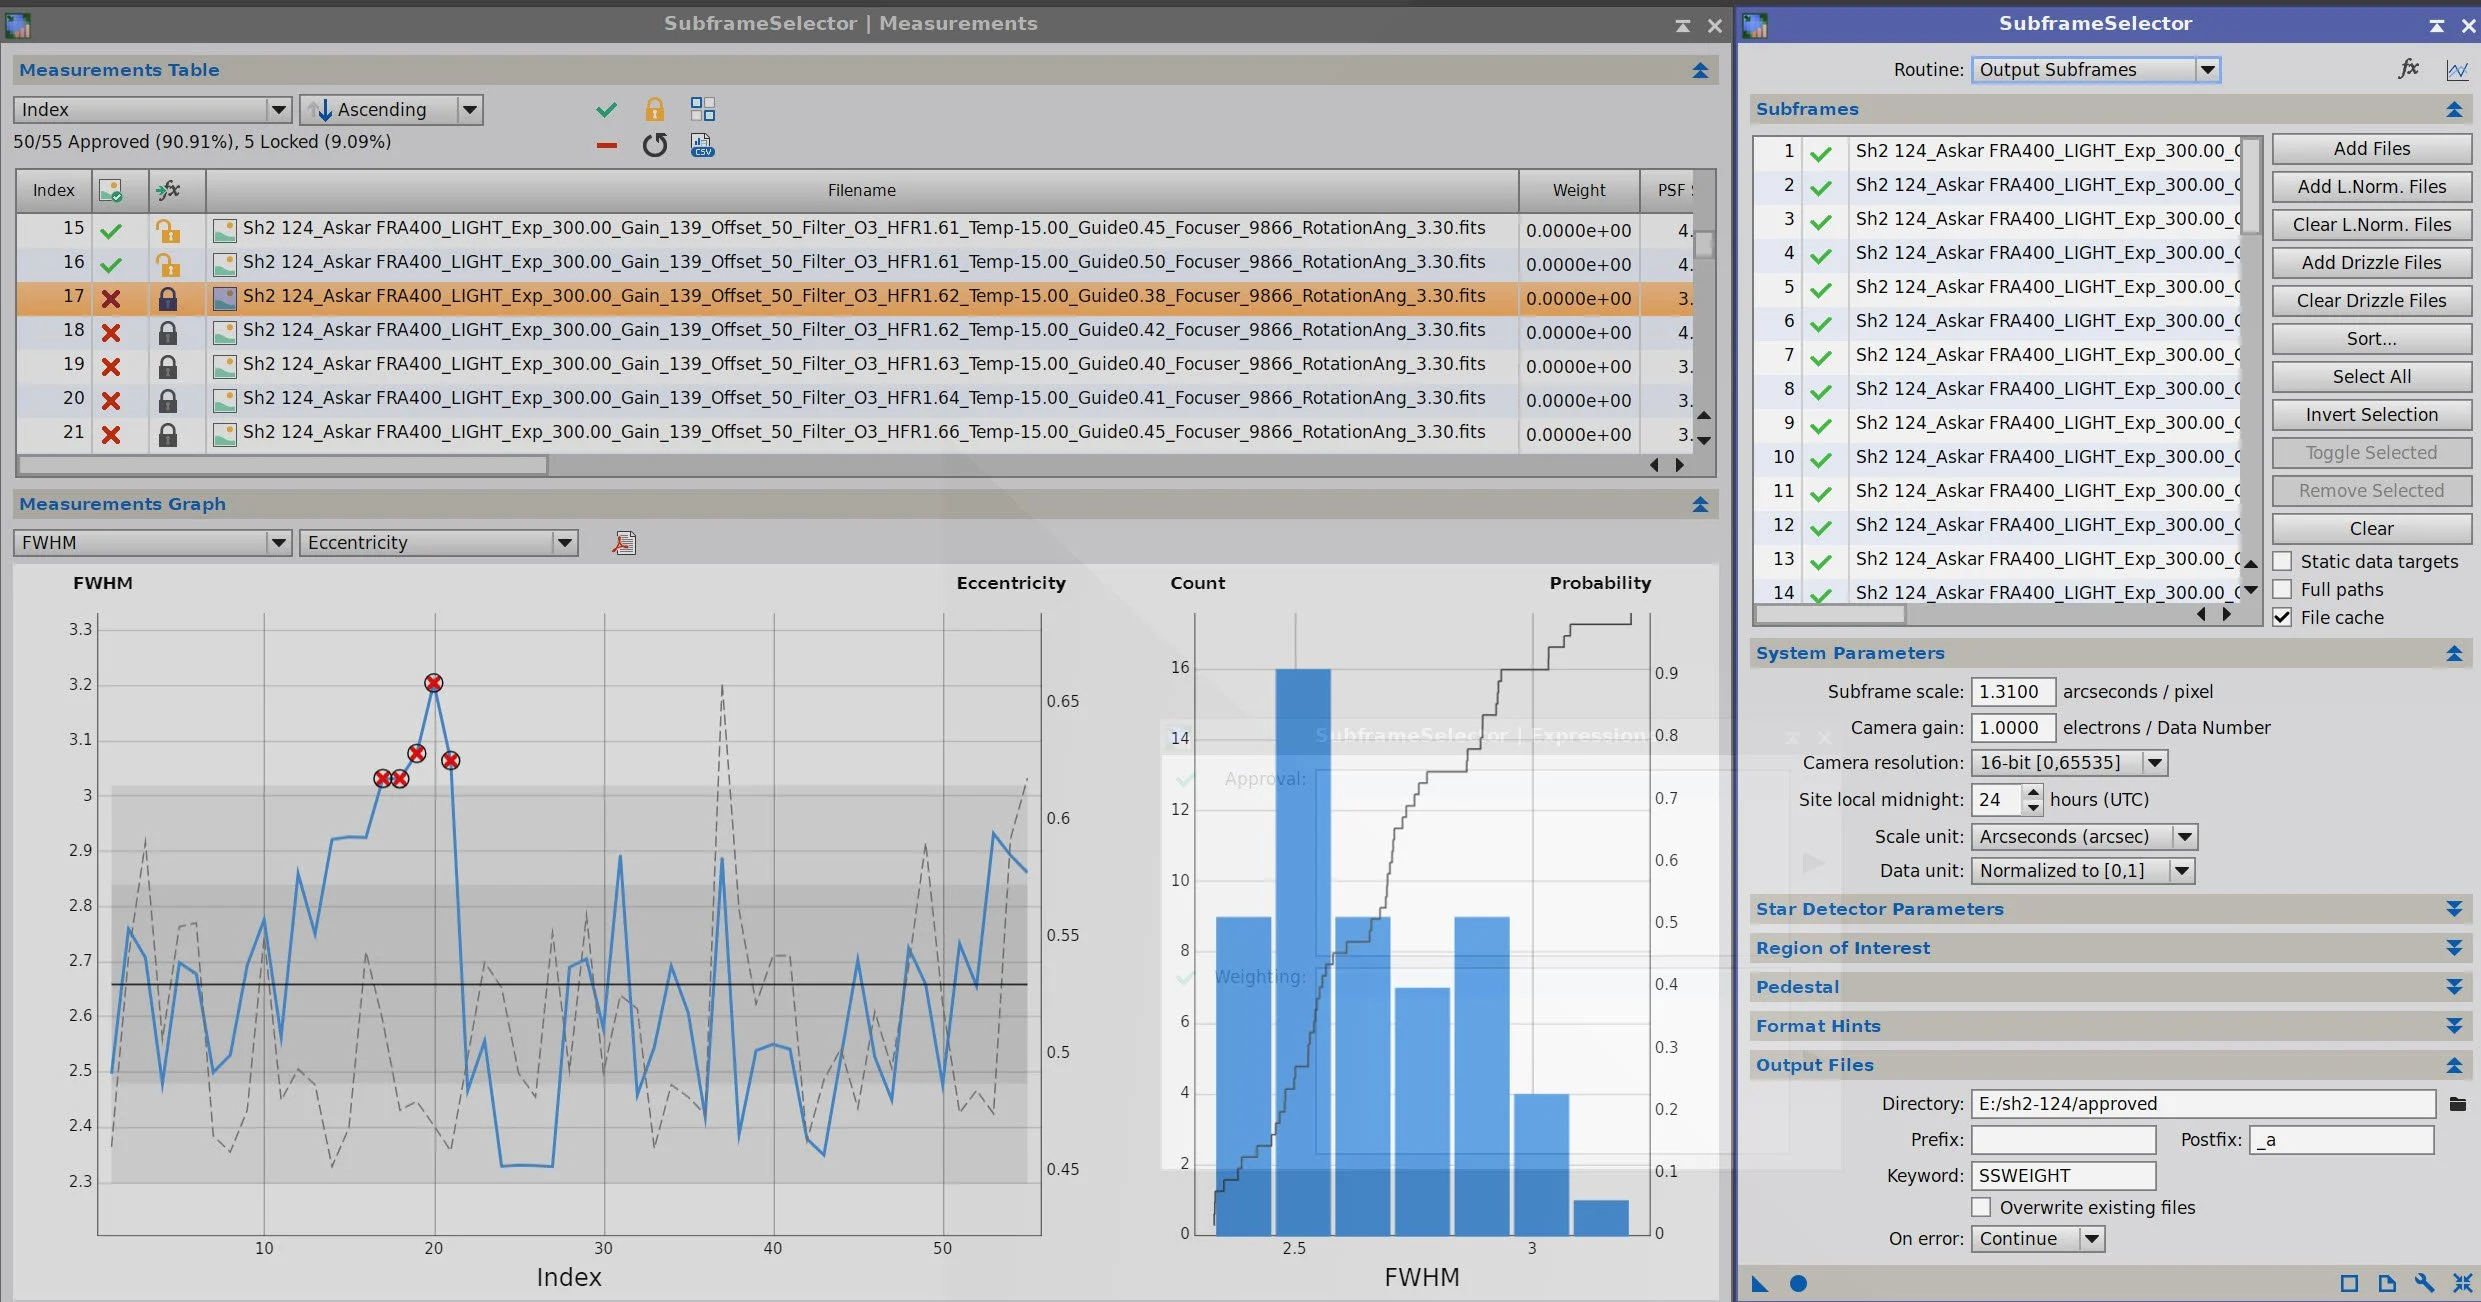
O3 SubFrameSelector
O3: 5 Frames Removed

S2 SubframeSelector
S2: 5 frames removed
Image Removal Summary: 18 300-second frames removed during blink or Subframe Selector. 1.5 hours of lost integration!!!
3. WBPP 2.8.9
Reset everything
Load all lights
Load all flats
Load all darks (note: darks for 90s used instead of 120)
Select - maximum quality
Reference Image - auto - the default
Select the output directory to wbpp folder
Enable CC for all light frames
Pedestal value - auto for all NB filters
Darks -set exposure tolerance to 0
Lights - set exposure tolerance to 0
Lights - all set except for linear defect
Integration - large-scale rejection layer 2x2
set for Autocrop
No Drizzle
Executed in 52 minutes - no errors!
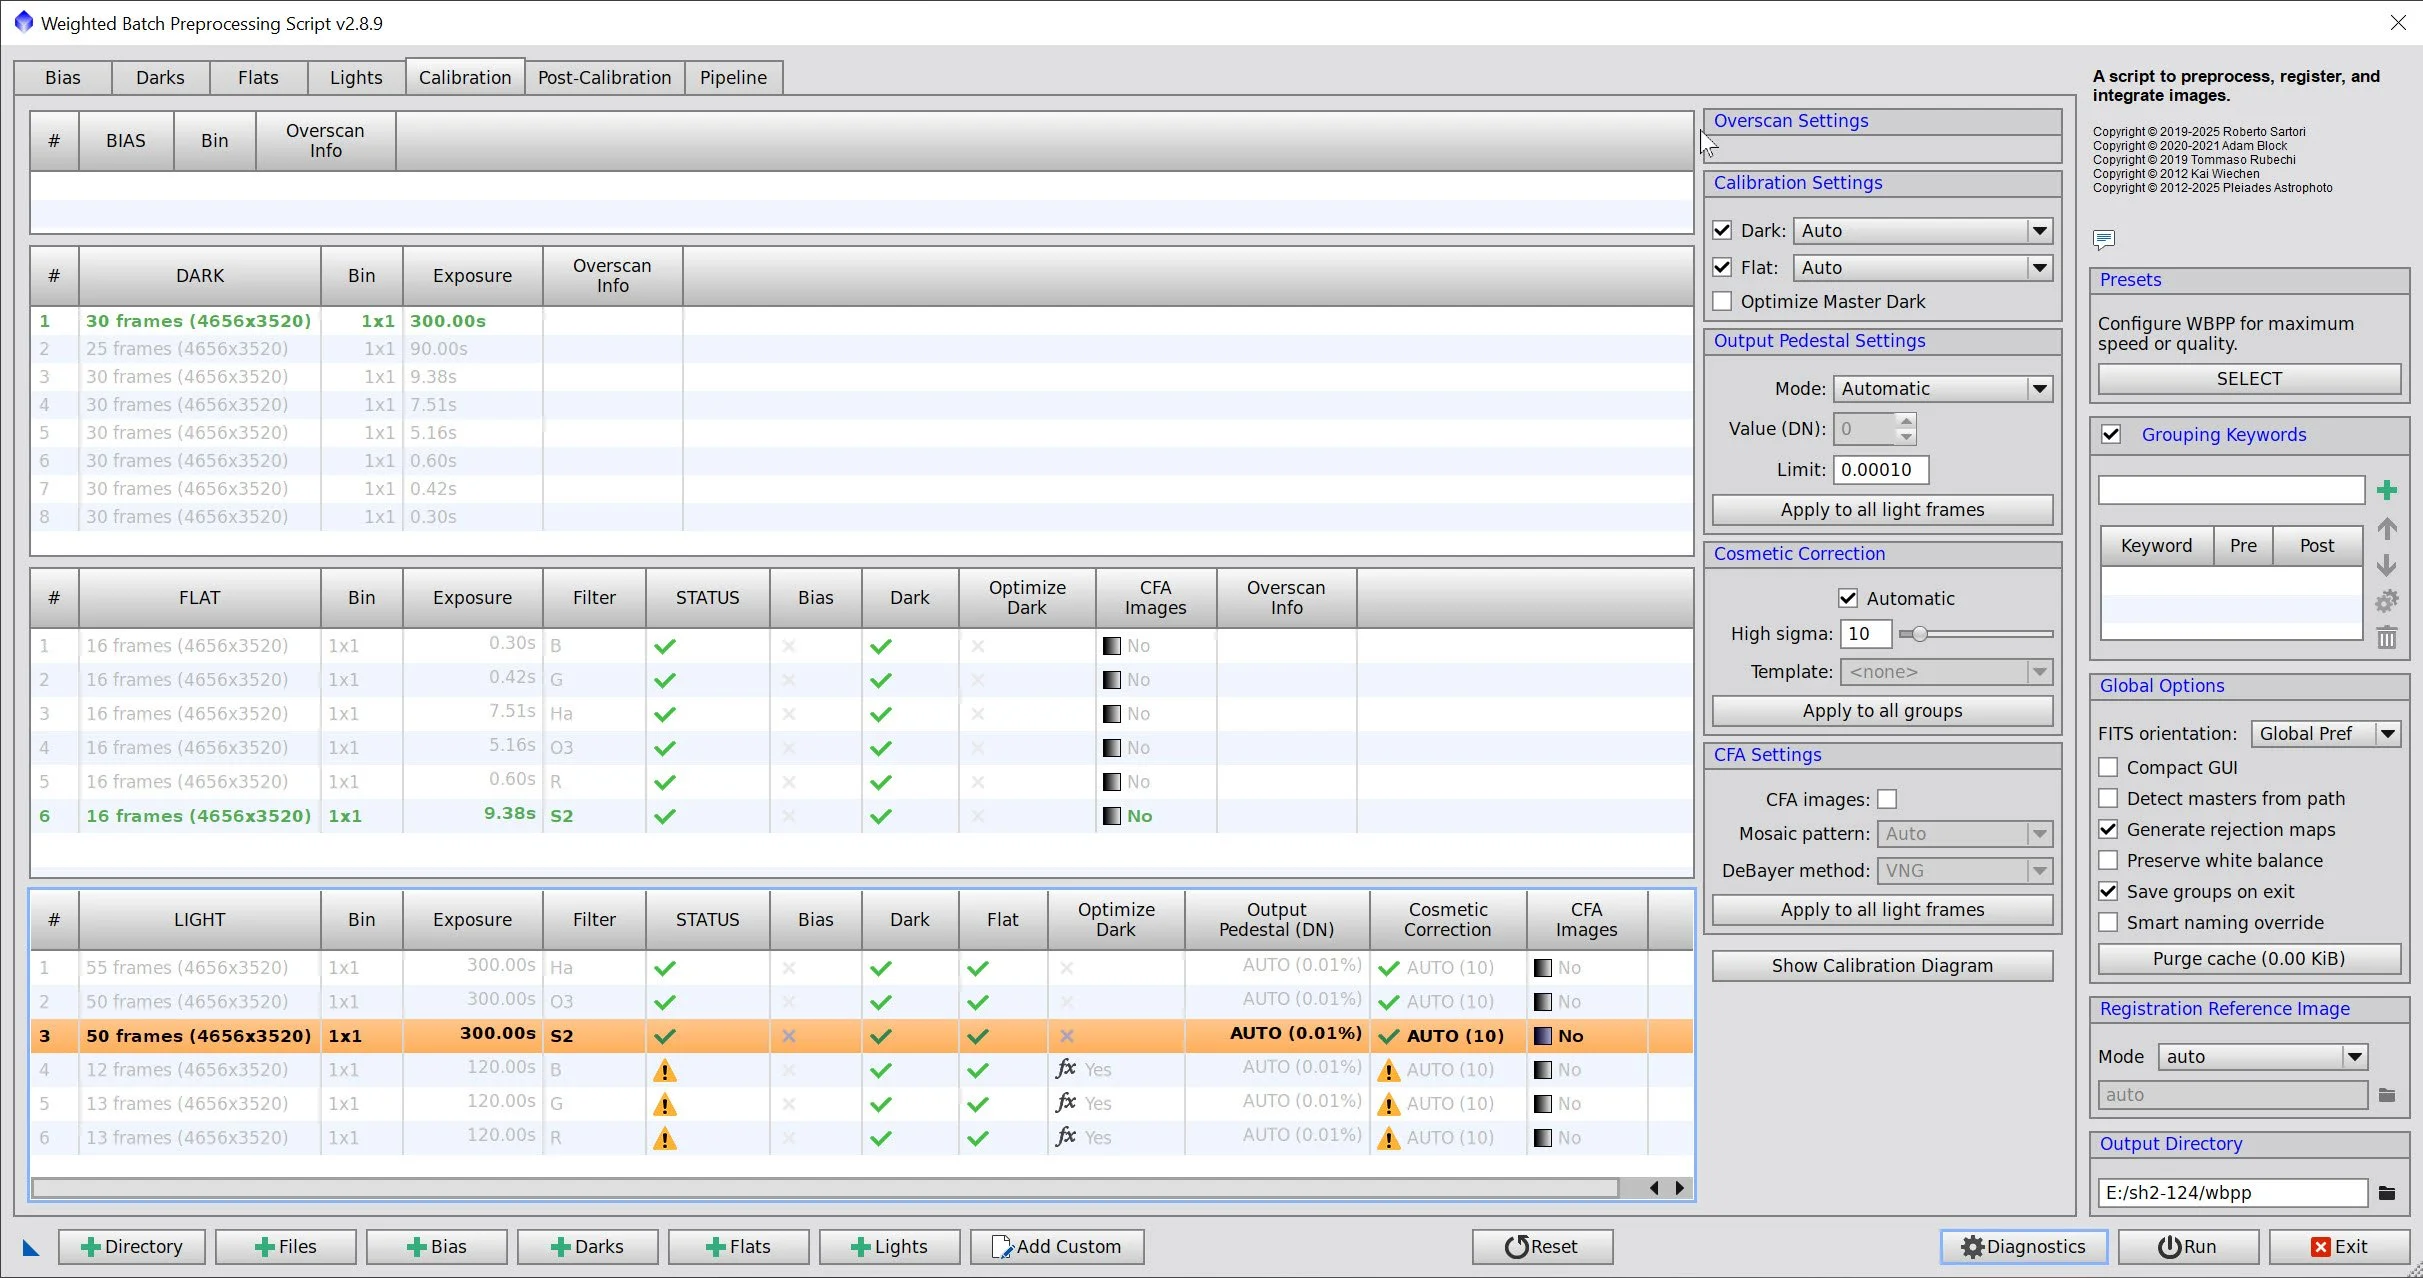
WBPP Calibration View

WBPP Post Calibration View

WBPP Pipeline View
4. Load Master Images
Load all master images and rename them.

Master Ha, O3, and S2 images
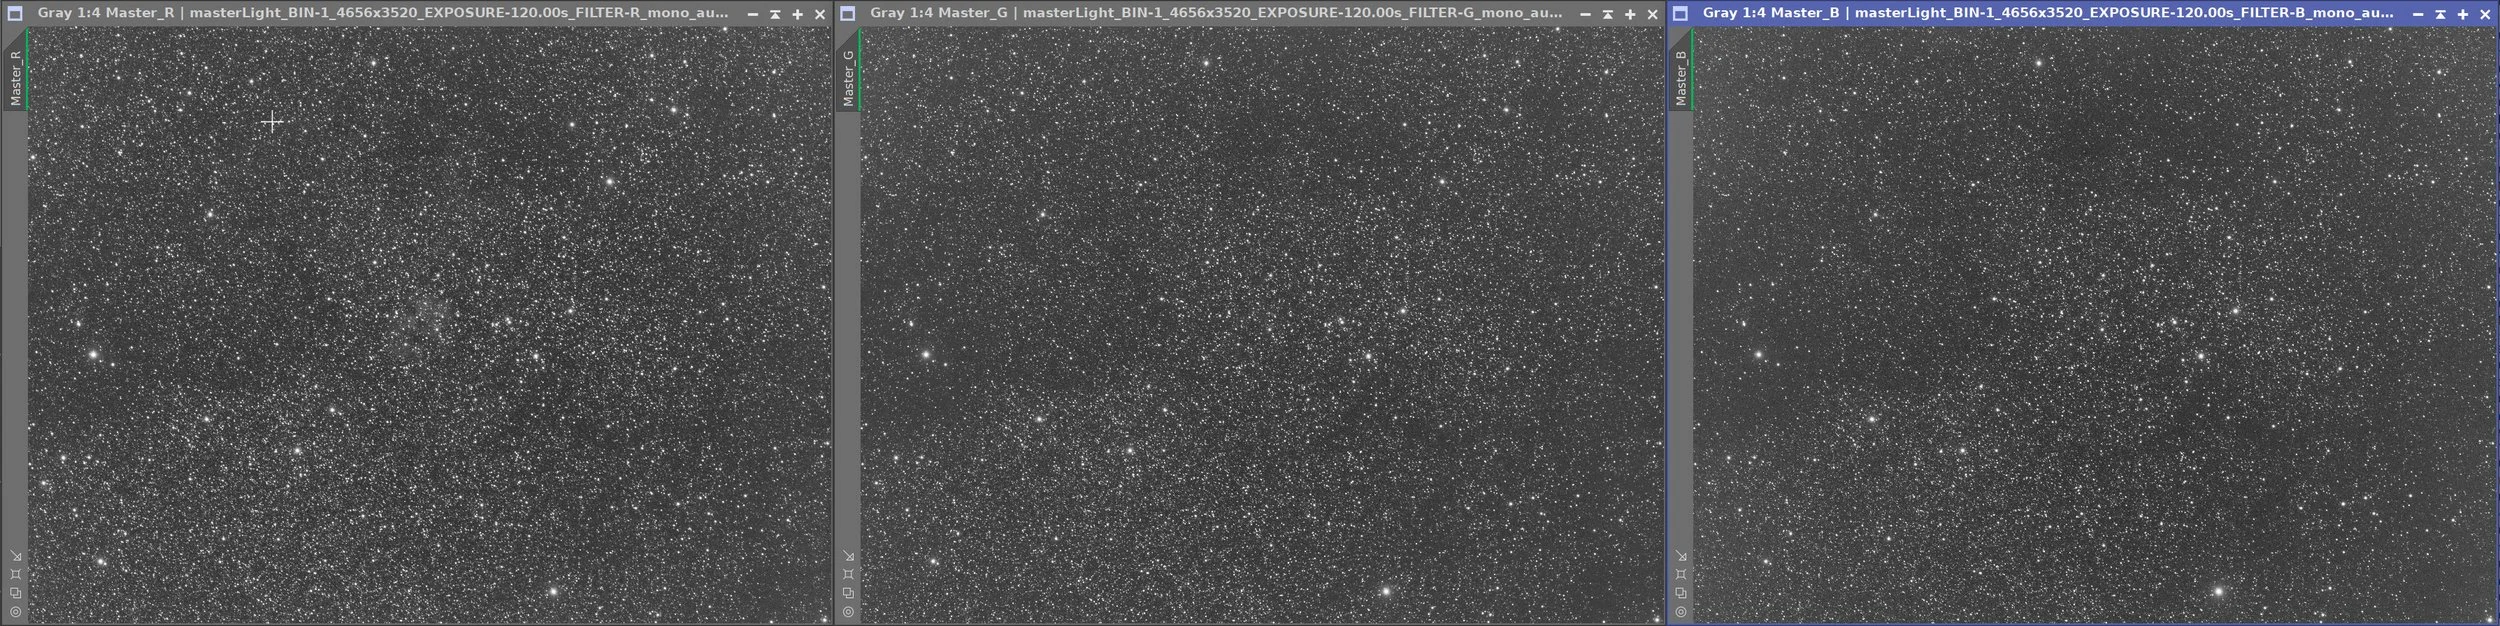
Master Red, Green, and Blue Images
5. Process Linear RGB data
I decided to create the color RGB image and work on that first
Channel Combination was used to create the initial RGB color image
The gradients were mild, but with so little nebulosity, there was no trouble running IDBE:
Set up the sample pattern as shown
Fix with subtraction
Run SPCC and calibrate color. Select a preview region with a good background sample. See the panel setup below.
Run BXT correct only - let’s make sure the stars are good. They look good now, but it does not seem to hurt to run this on them.
Run BXT Full correction - see settings used on the panel shot below.
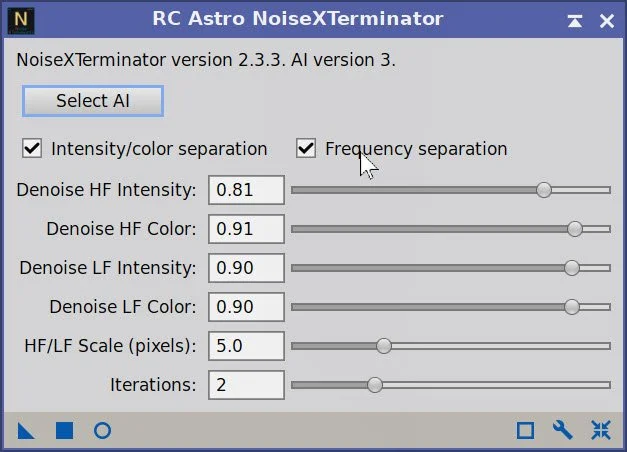
Apply NXT to remove noise. Be aggressive here, as I want smooth star edges. See the screenshot below for the parameters used.
Use STX with Saving Stars selected to create RGB Stars and RGB Starless images. What we want here is the stars, and we will not be using the RGB Starless Image.
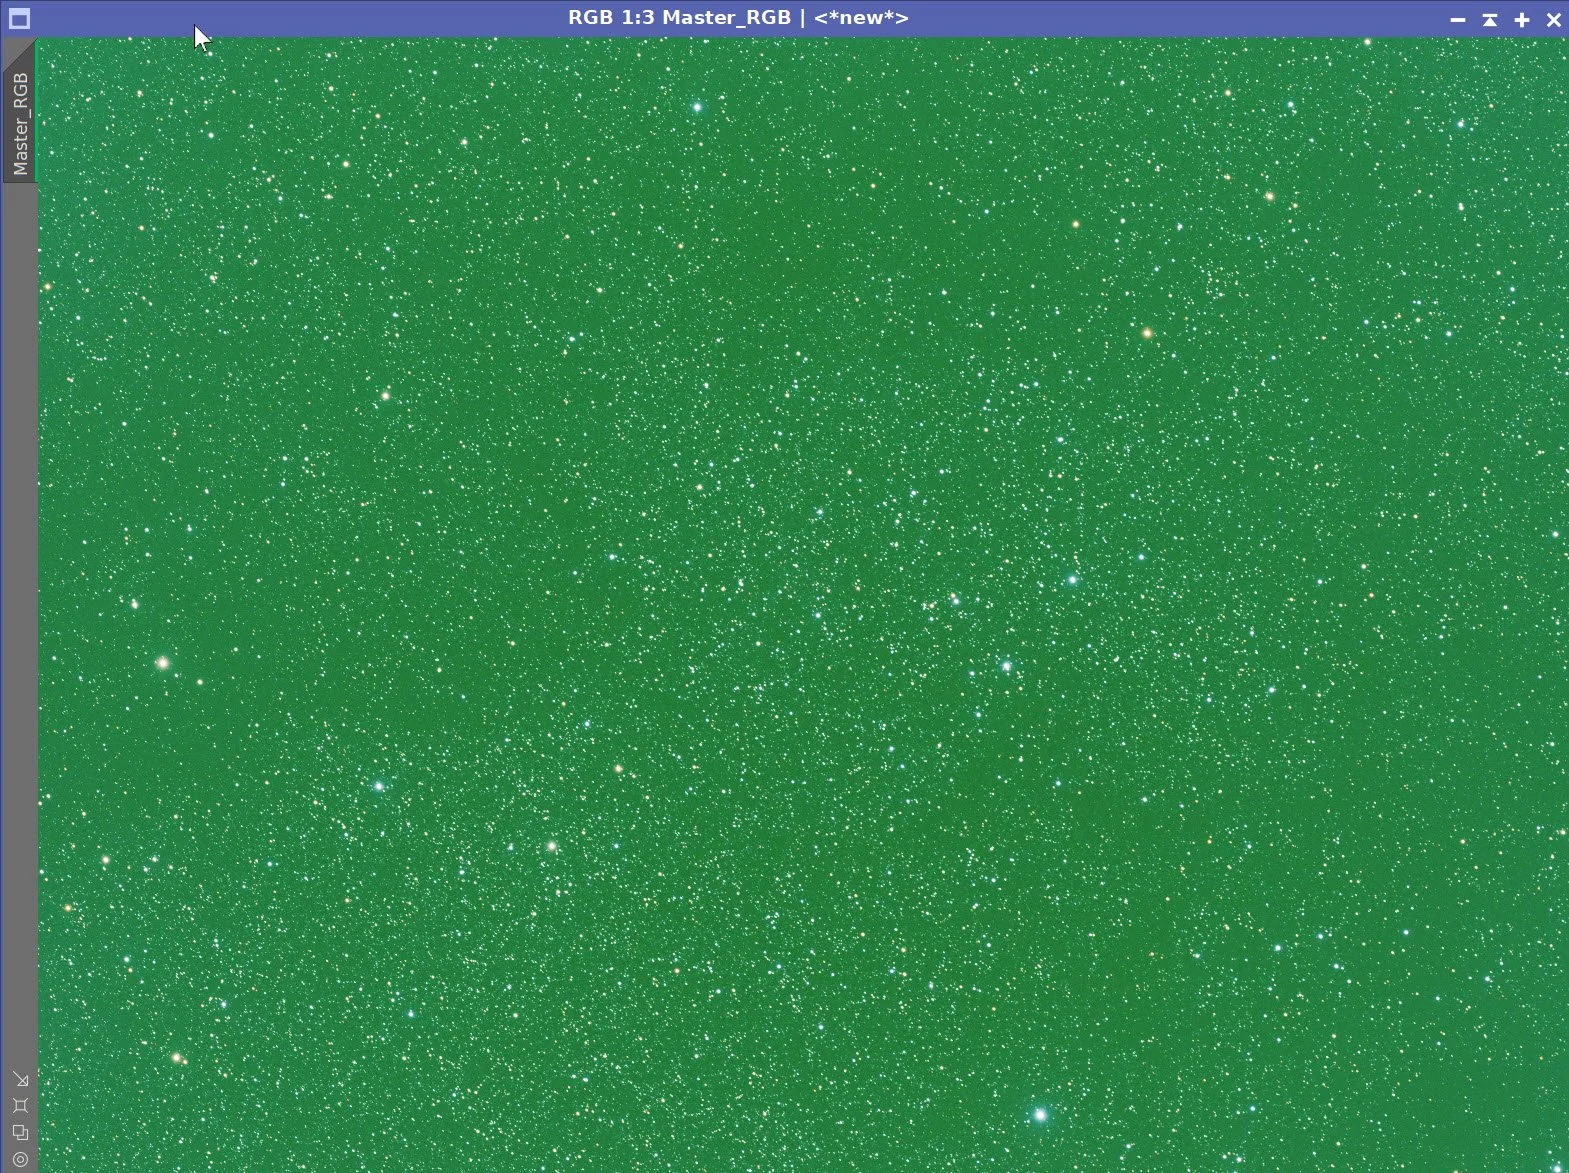
The initial RGB Linear Image.
Master RGB Sample Pattern (click to enlarge)
Master RGB Before DBE (click to enlarge)
Master RGB after DBE (click to enlarge)
MasterSHO Background
SPCC panel setting used. (click to enlarge)

The final regression result.
The RGB image before SPCC. (click to enlarge)
RGB image after SPCC. Note preview region used for a background estimate. (Click to enlarge)

How the BXT tool was configured for the Master SHO image
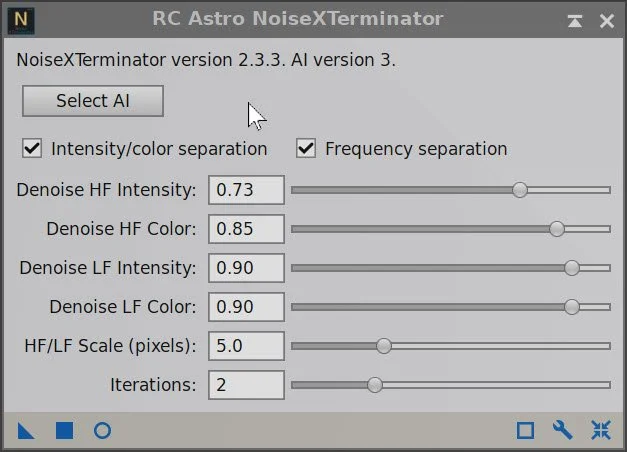
Parameters used for the RGB image.

The Master RGB Image before BXT, After BXT Correction only, After BXT Full Correction, and After NXT V3
RGB Stars Image resulting from STX. (click to enlarge)
6. Process the Linear SHO Images
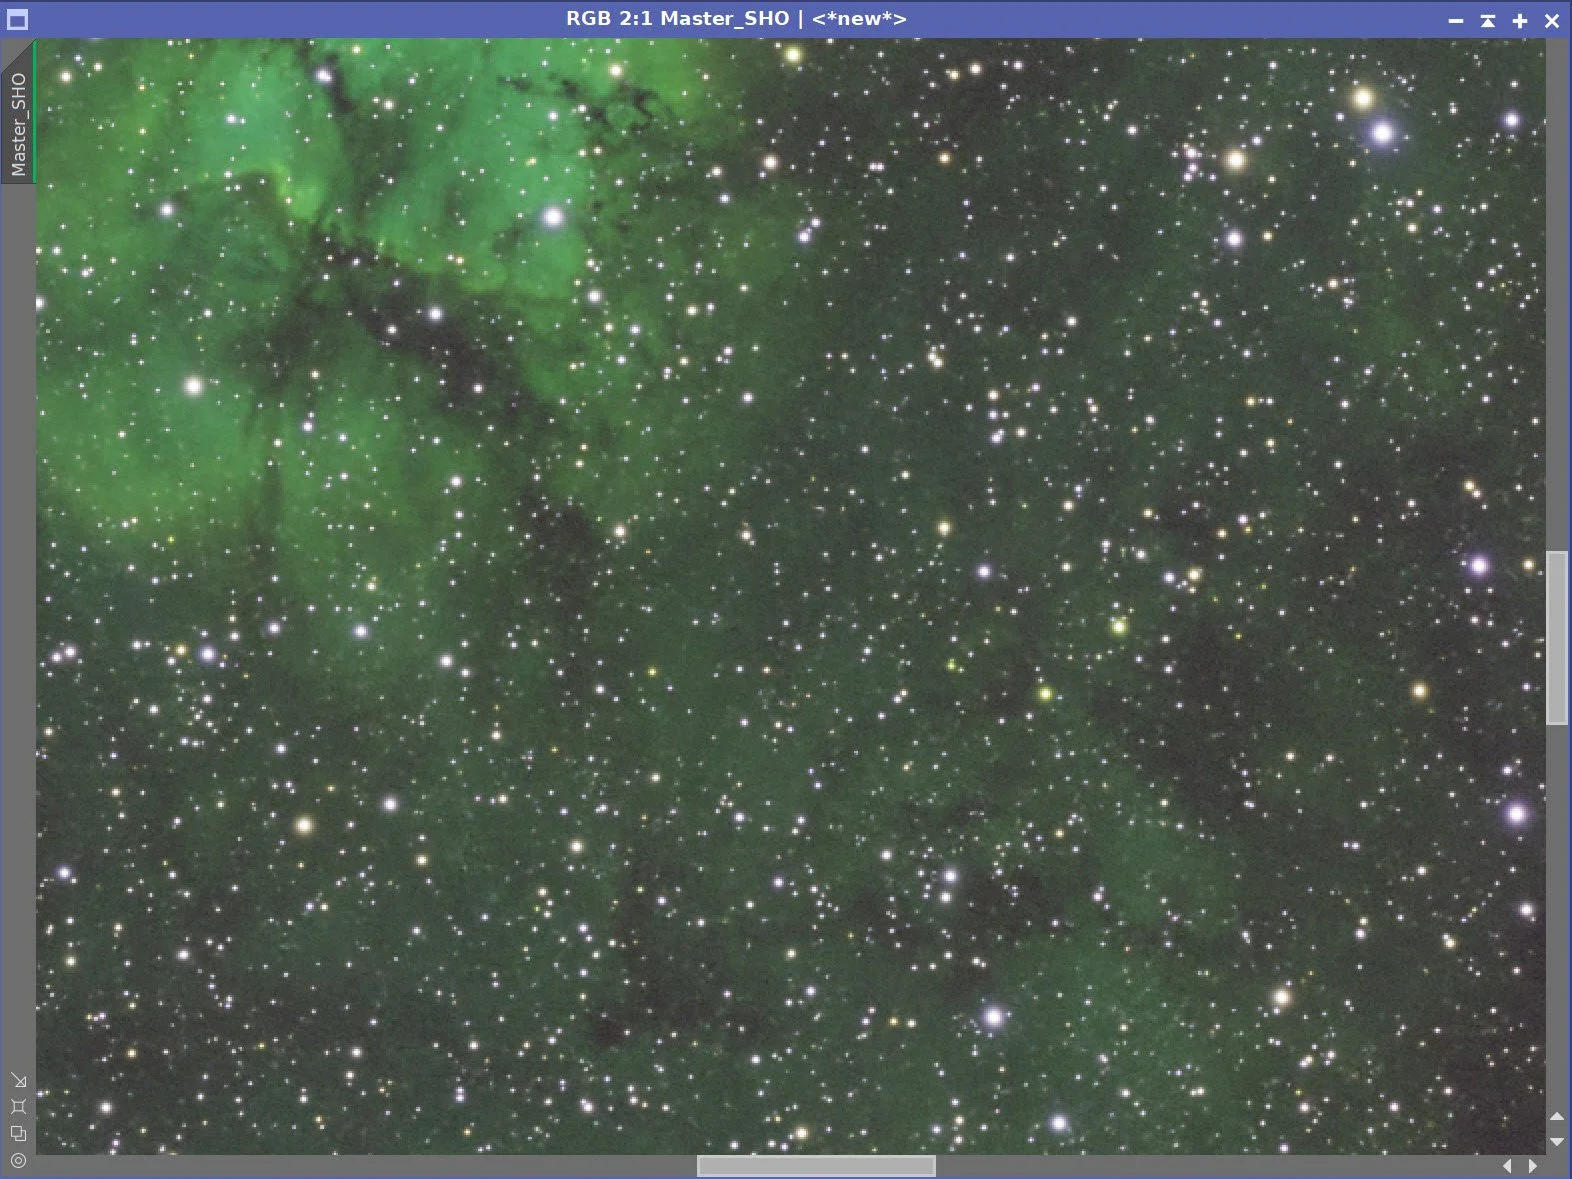
Create the color SHO image using ChannelCombination.
Apply DBE
Choose a sampling Pattern
Use Subtraction
Apply
Run PFSImage and get star sizes: X = 2.3, Y = 2.1
Run BXT in Correct Only Mode
Run BXT Full with parameters shown in the screenshot below - the PFSImage results and trial testing influenced these.
Run NXT V3 using the parameters shown in the screenshot below.
Run SPCC in narrowband mode
Select the Ideal device curve
Enter filter data specs
Check the Calibrate box
Create a preview in the main image background and use it in the panel
Run SPCC
Frankly, this did not seem to do much in this image. In my last image, it made important changes.
Update STF with unchained curves.
Use NarrowbandNormalization to adjust SHO color - see the params used in the screenshot below.
Take each image starless with SXT
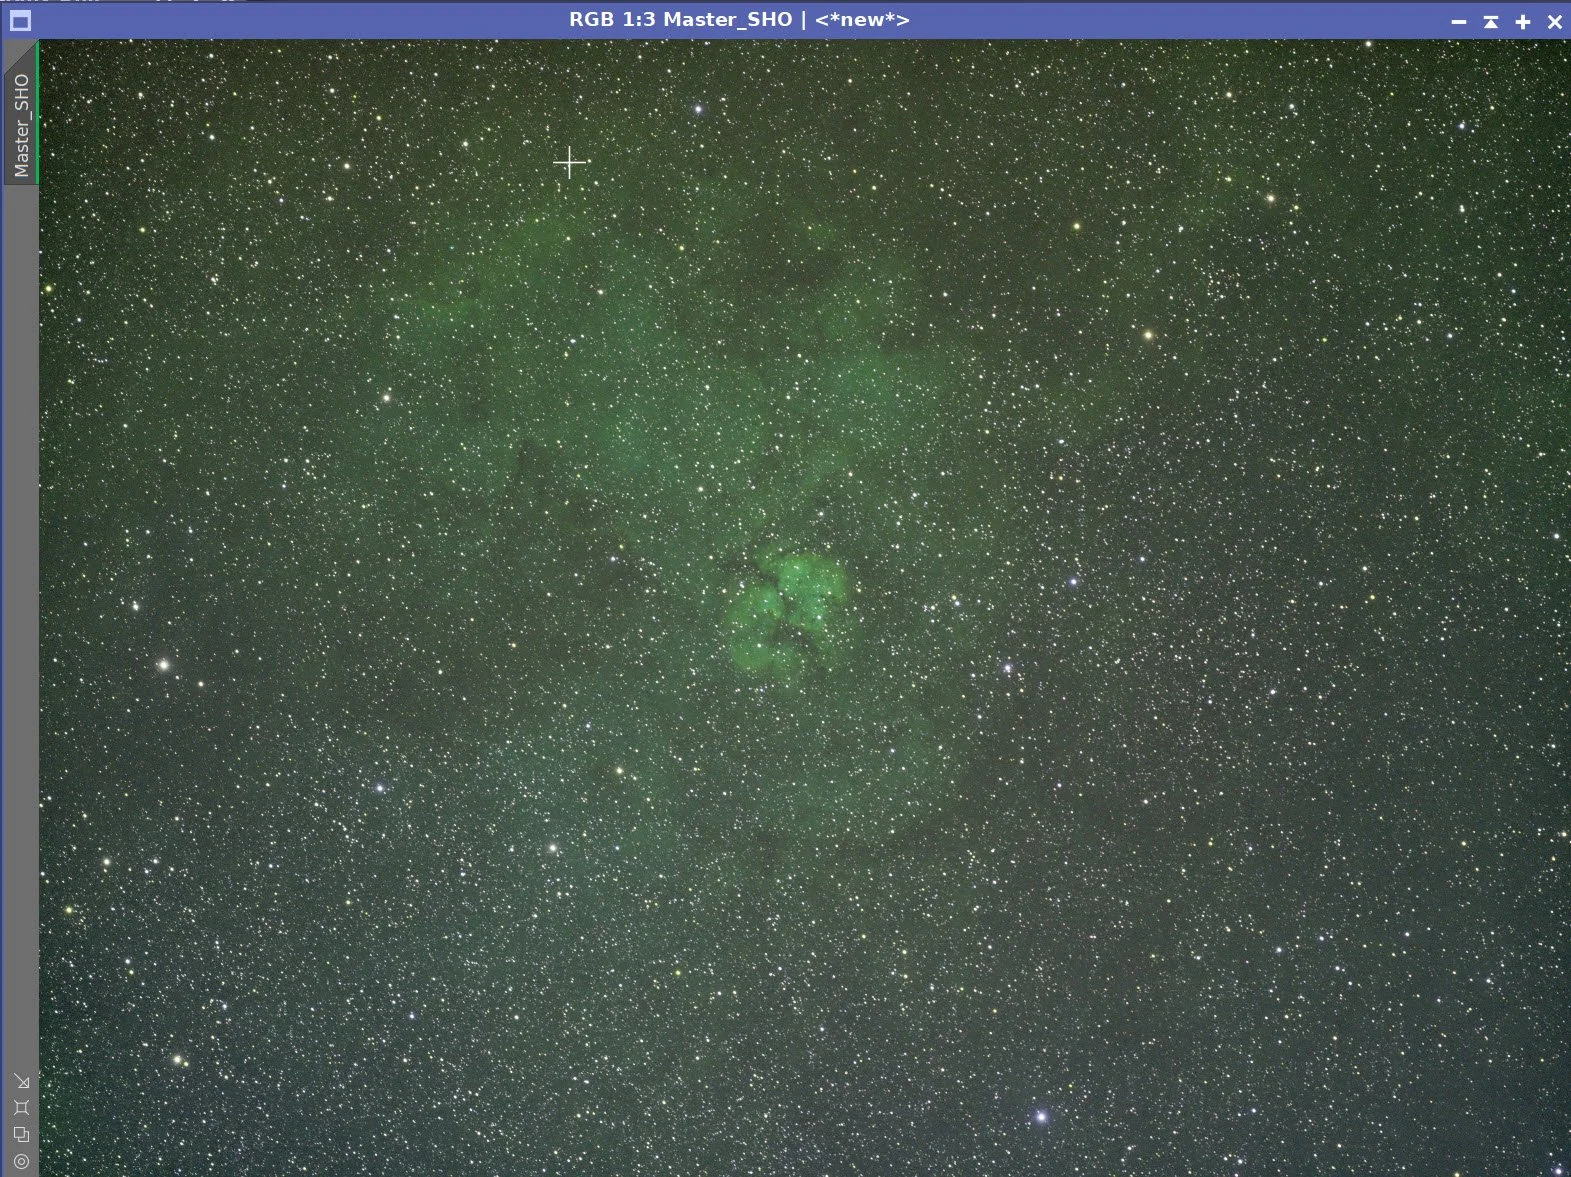
Initial SHO color image.
DBE Sample Pattern Chosen (click to enlarge)
Before DBE (click to enlarge)
After DBE (click to enlarge)

Background Removed (click to enlarge)
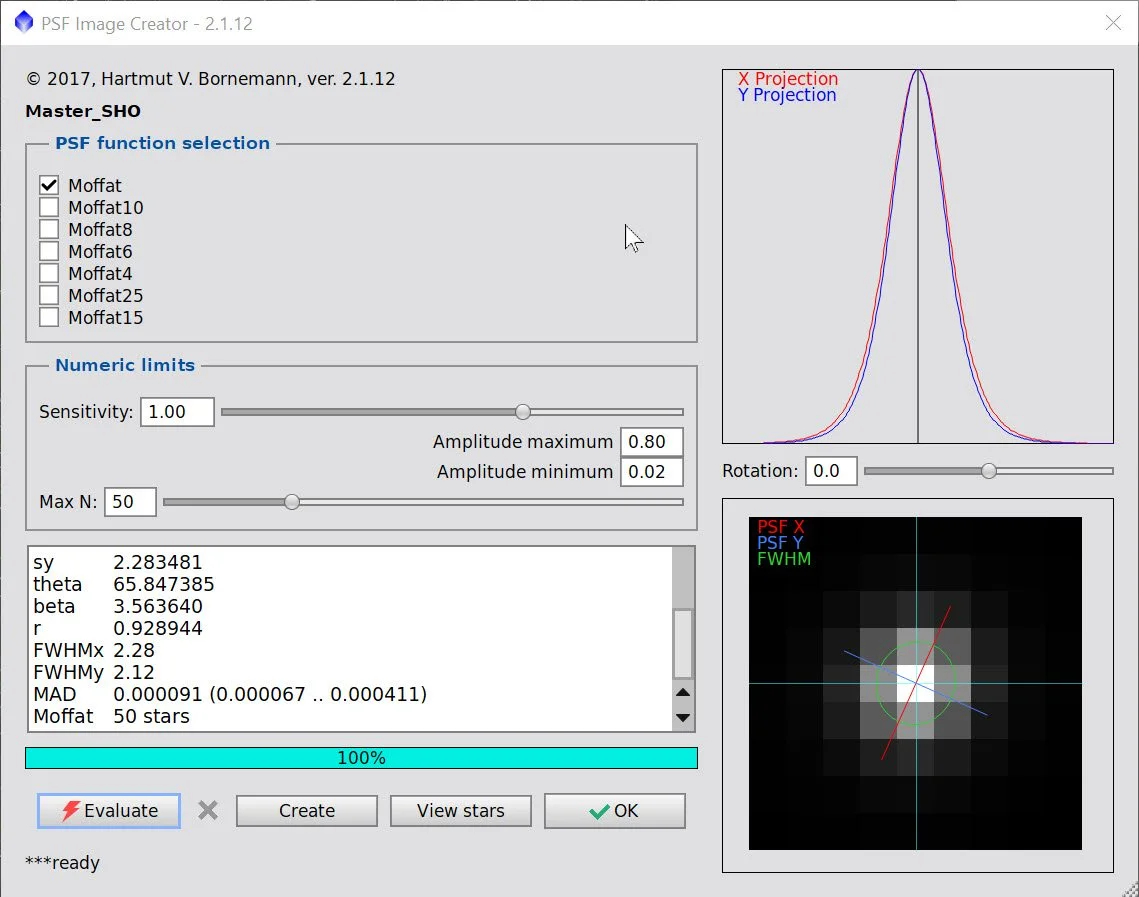
PFSImage Analysis
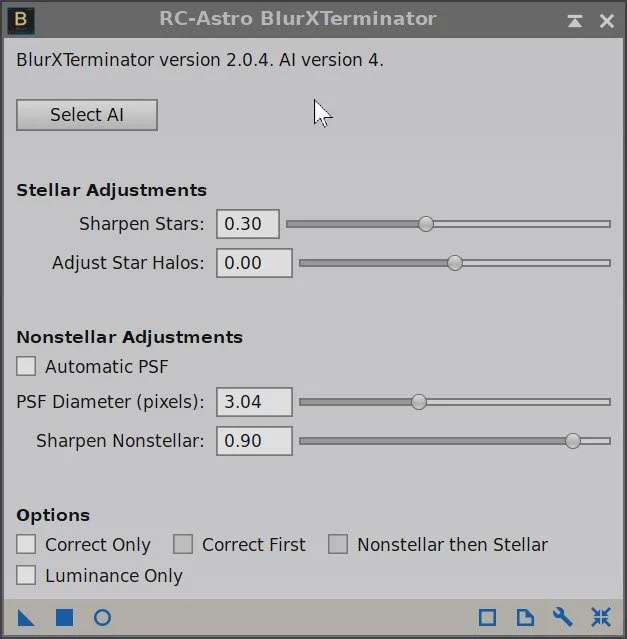
BXT Params Used,
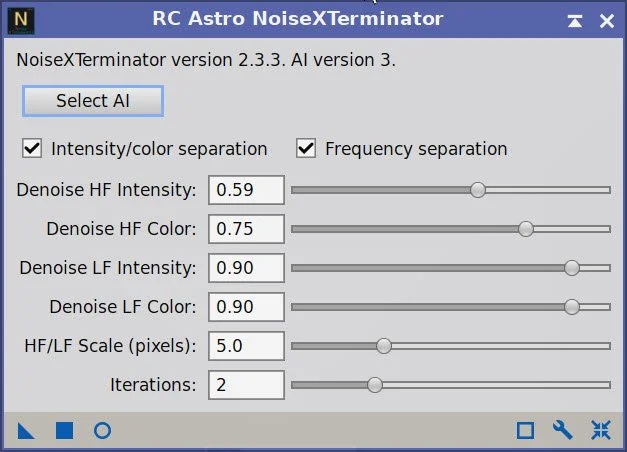
NXT Params used.


SHO Before BXT, After BXT Correct Only, After Full BXT, and NXT V3
SPCC set up for Narrowband Calibration.
SPCC Narrowband results.
Before Narrowband SPCC (click to enlarge)
After Narrowband SPCC (click to enlarge)
After Unchanged STF update (click to enlarge)

Paramters used for this image.
After NarrowbandNormalization (click to enlarge)

SHO Starless Image.
7. Move Images to the Nonlinear State
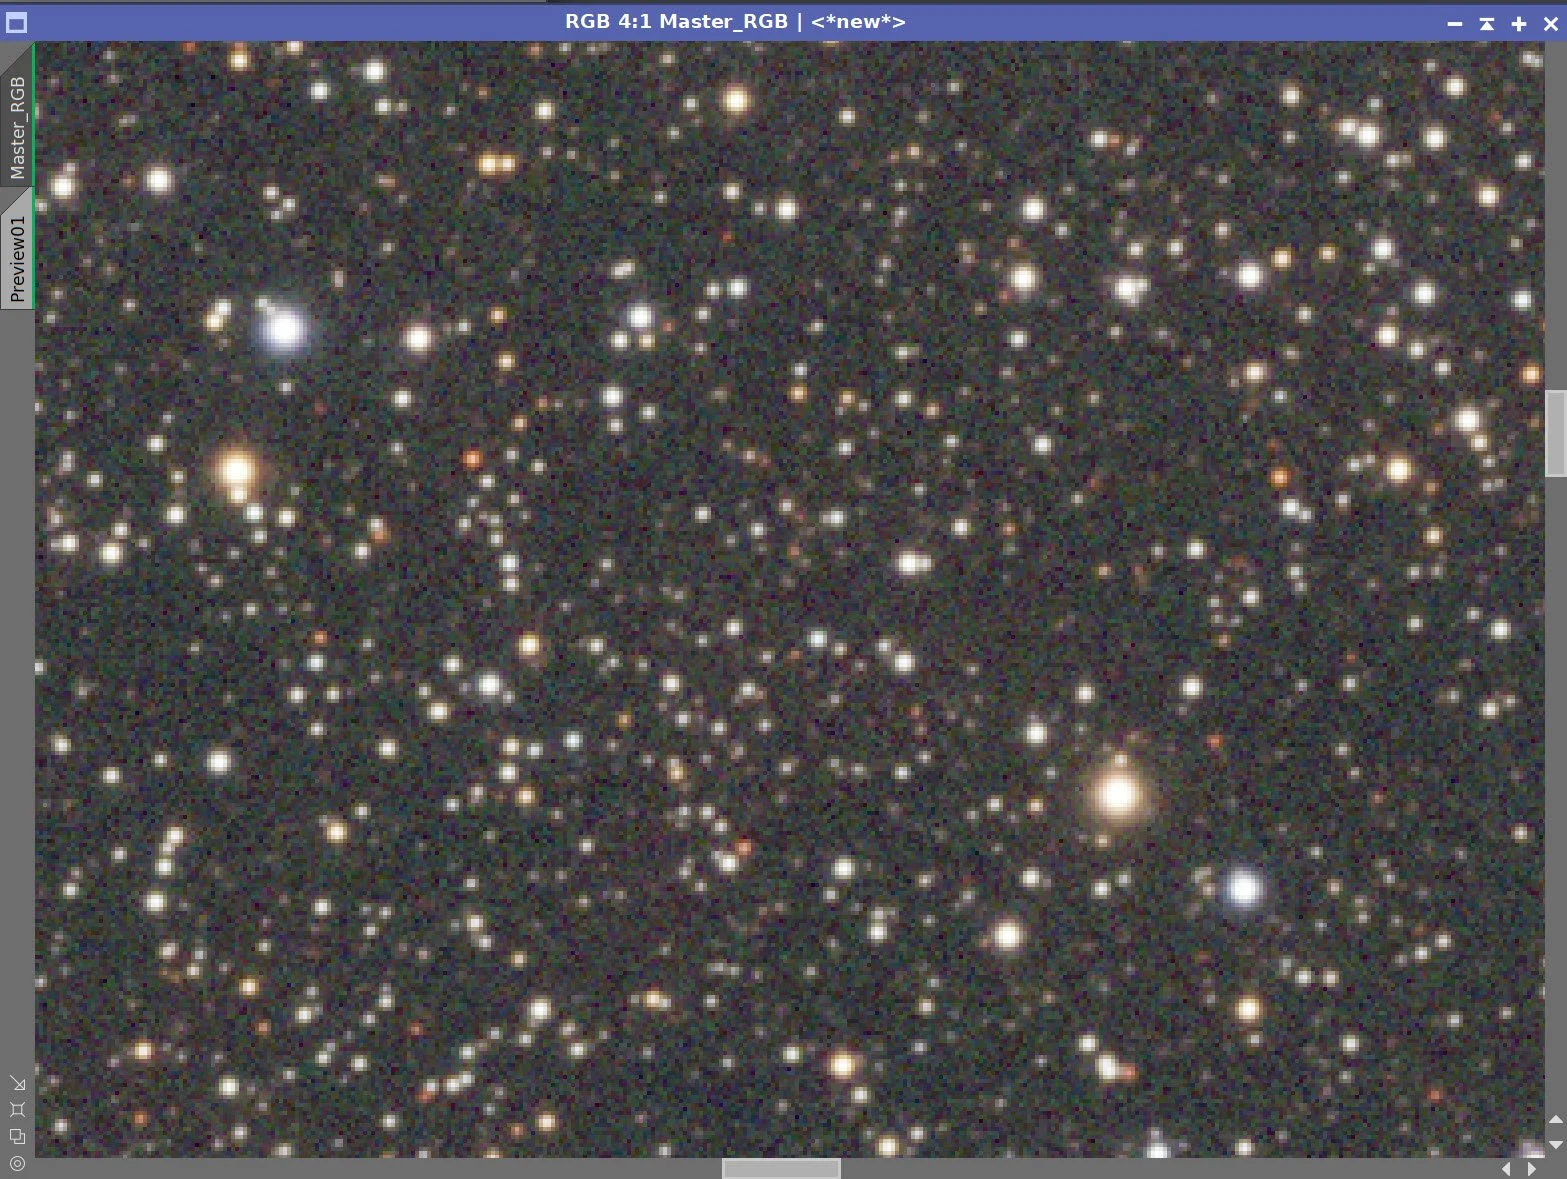
For RGB Stars, use use Seti Astro Star Stretch. This area is super rich in stars, so we need to dial it back a bit. I reduced the stretch away from the default
For SHO, use the current STF->HT method to go nonlinear.
With starless imaging, I can be much more relaxed about my nonlinear conversion as I can more easily protect my stars from being blown out!
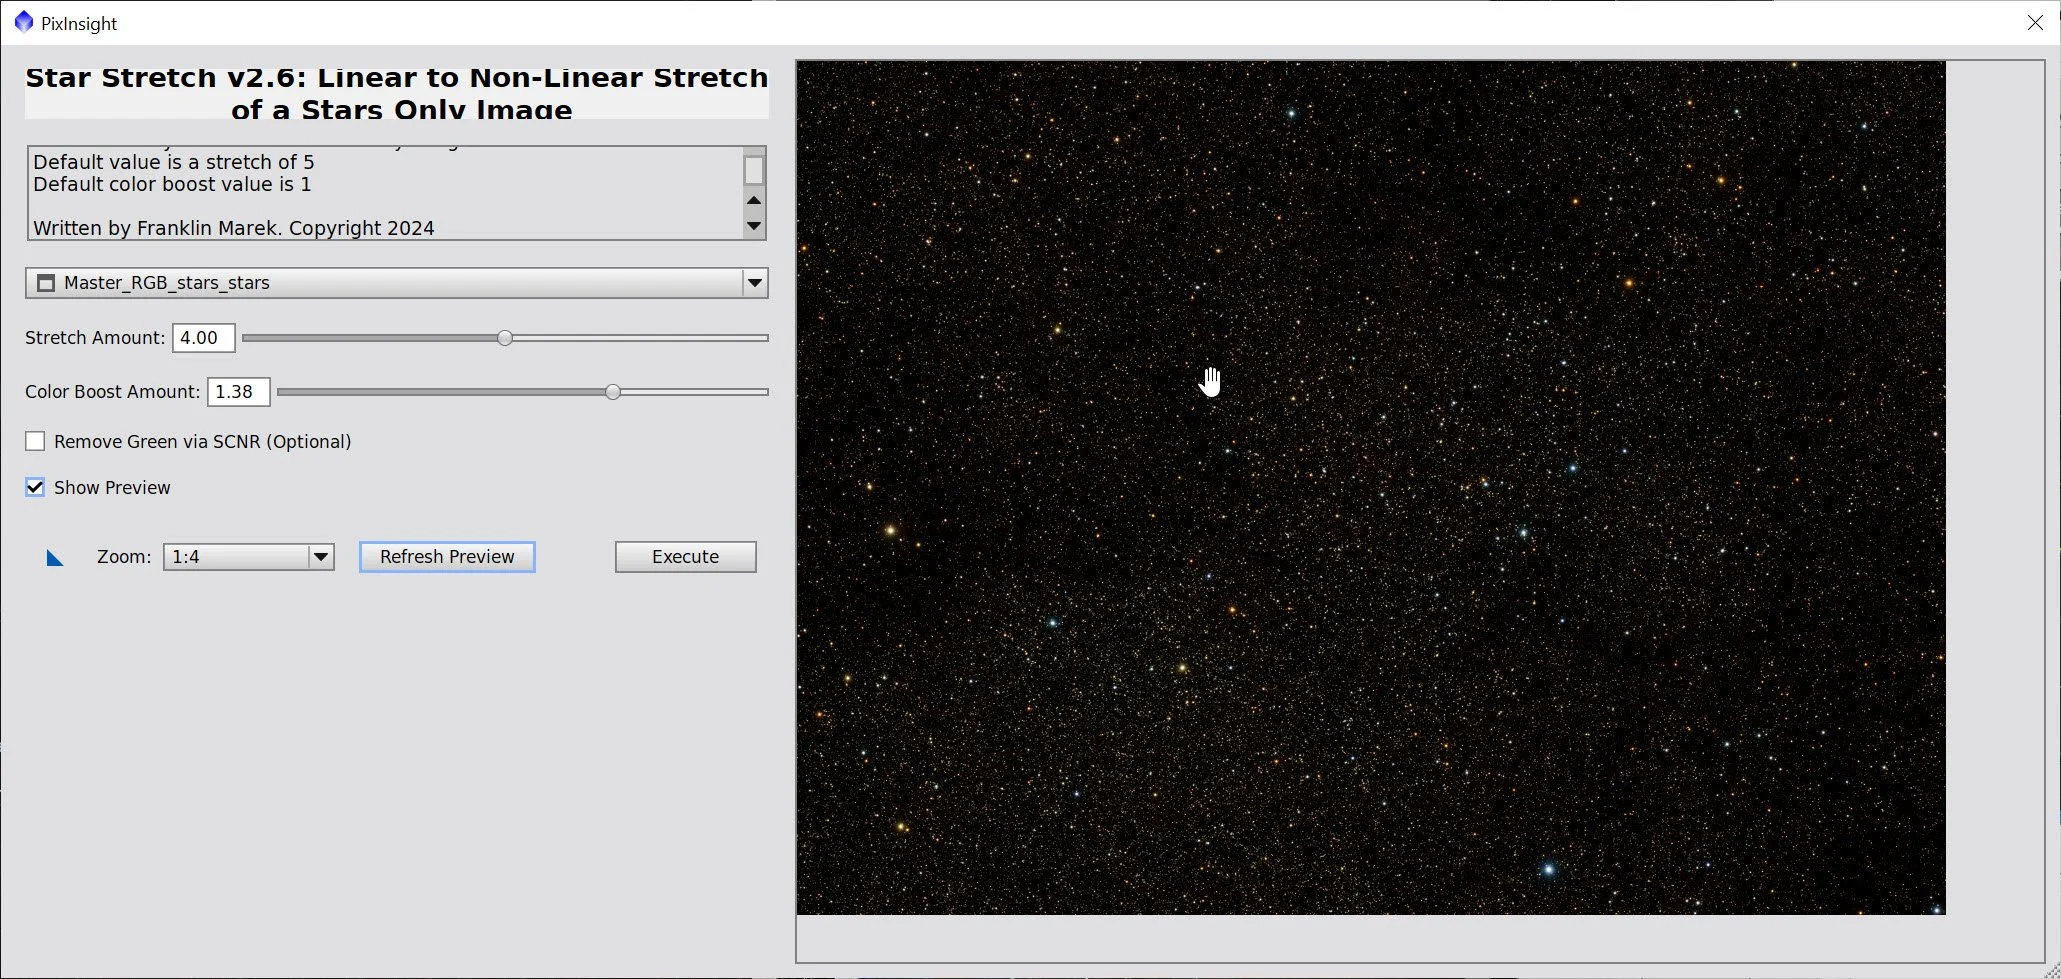
Star Stretch Panel Params used.
Initial Nonlinear RGB Stars Image (click to enlarge)
Initial Nonlinear SHO Starless image (click to enlarge)
8. Process the Nonlinear RGB Stars Image
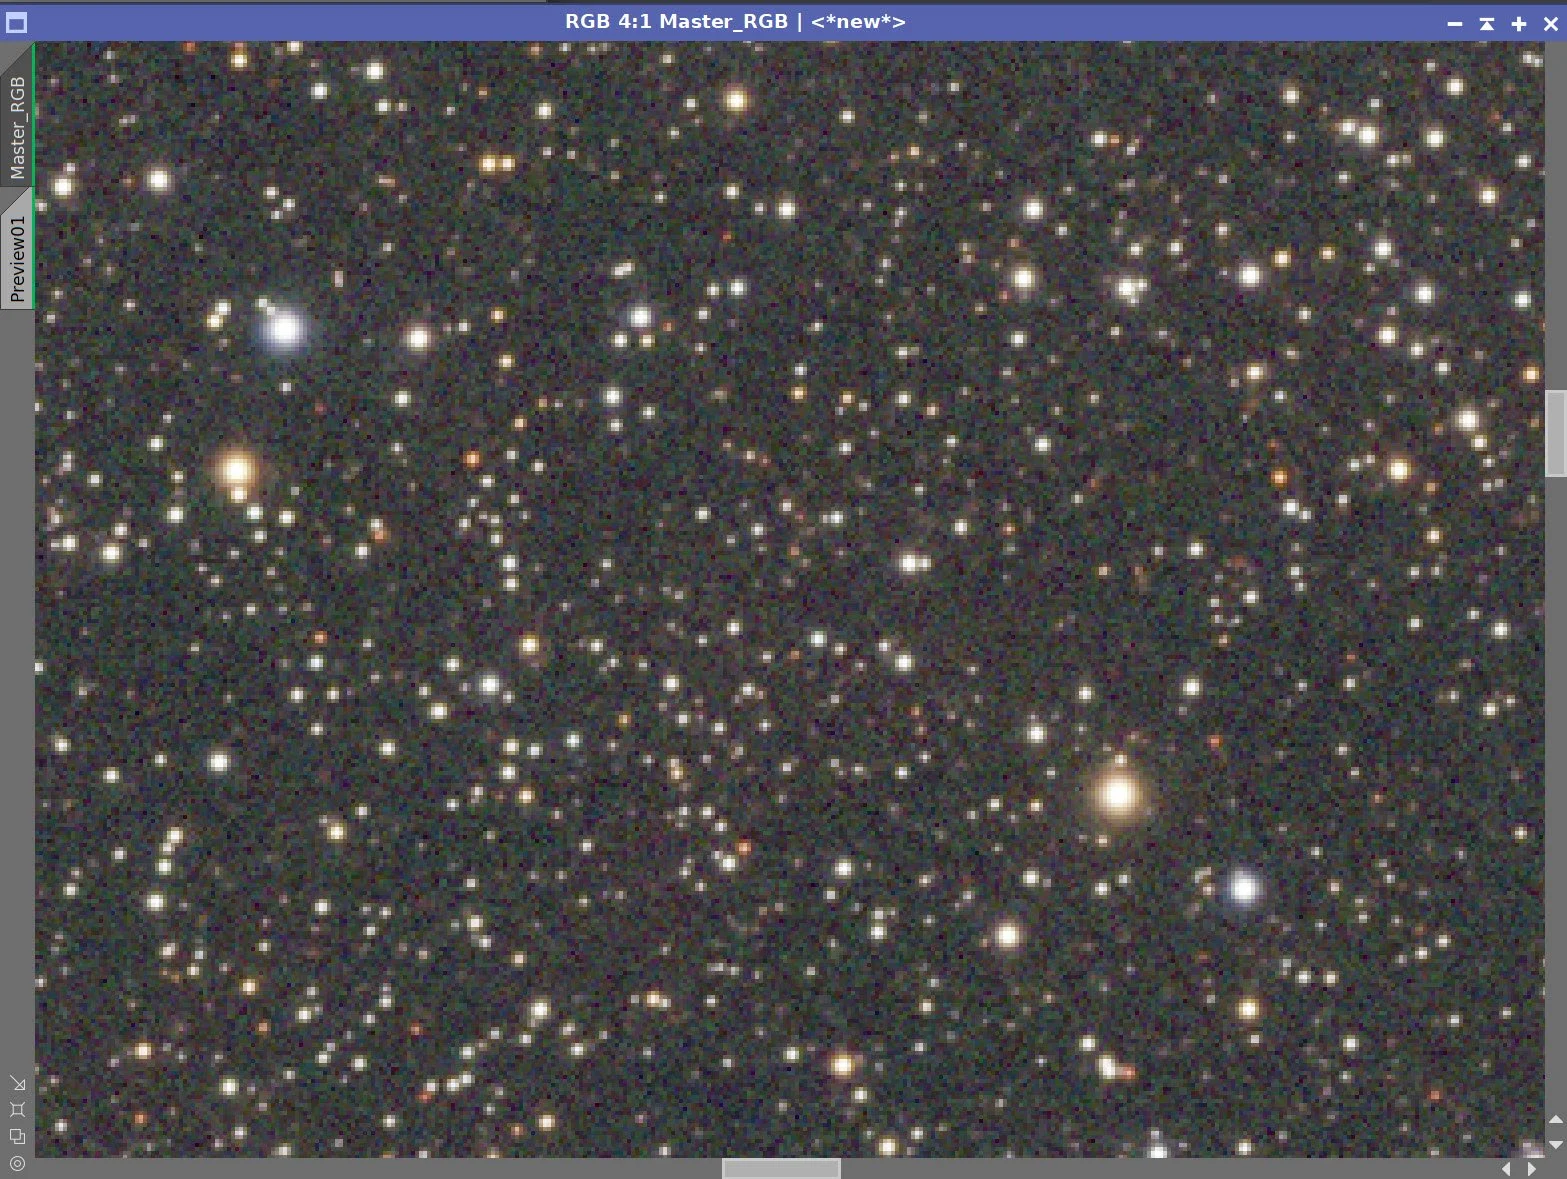
Use the CT tool to adjust and reduce the star intensity some more and increase color saturation.
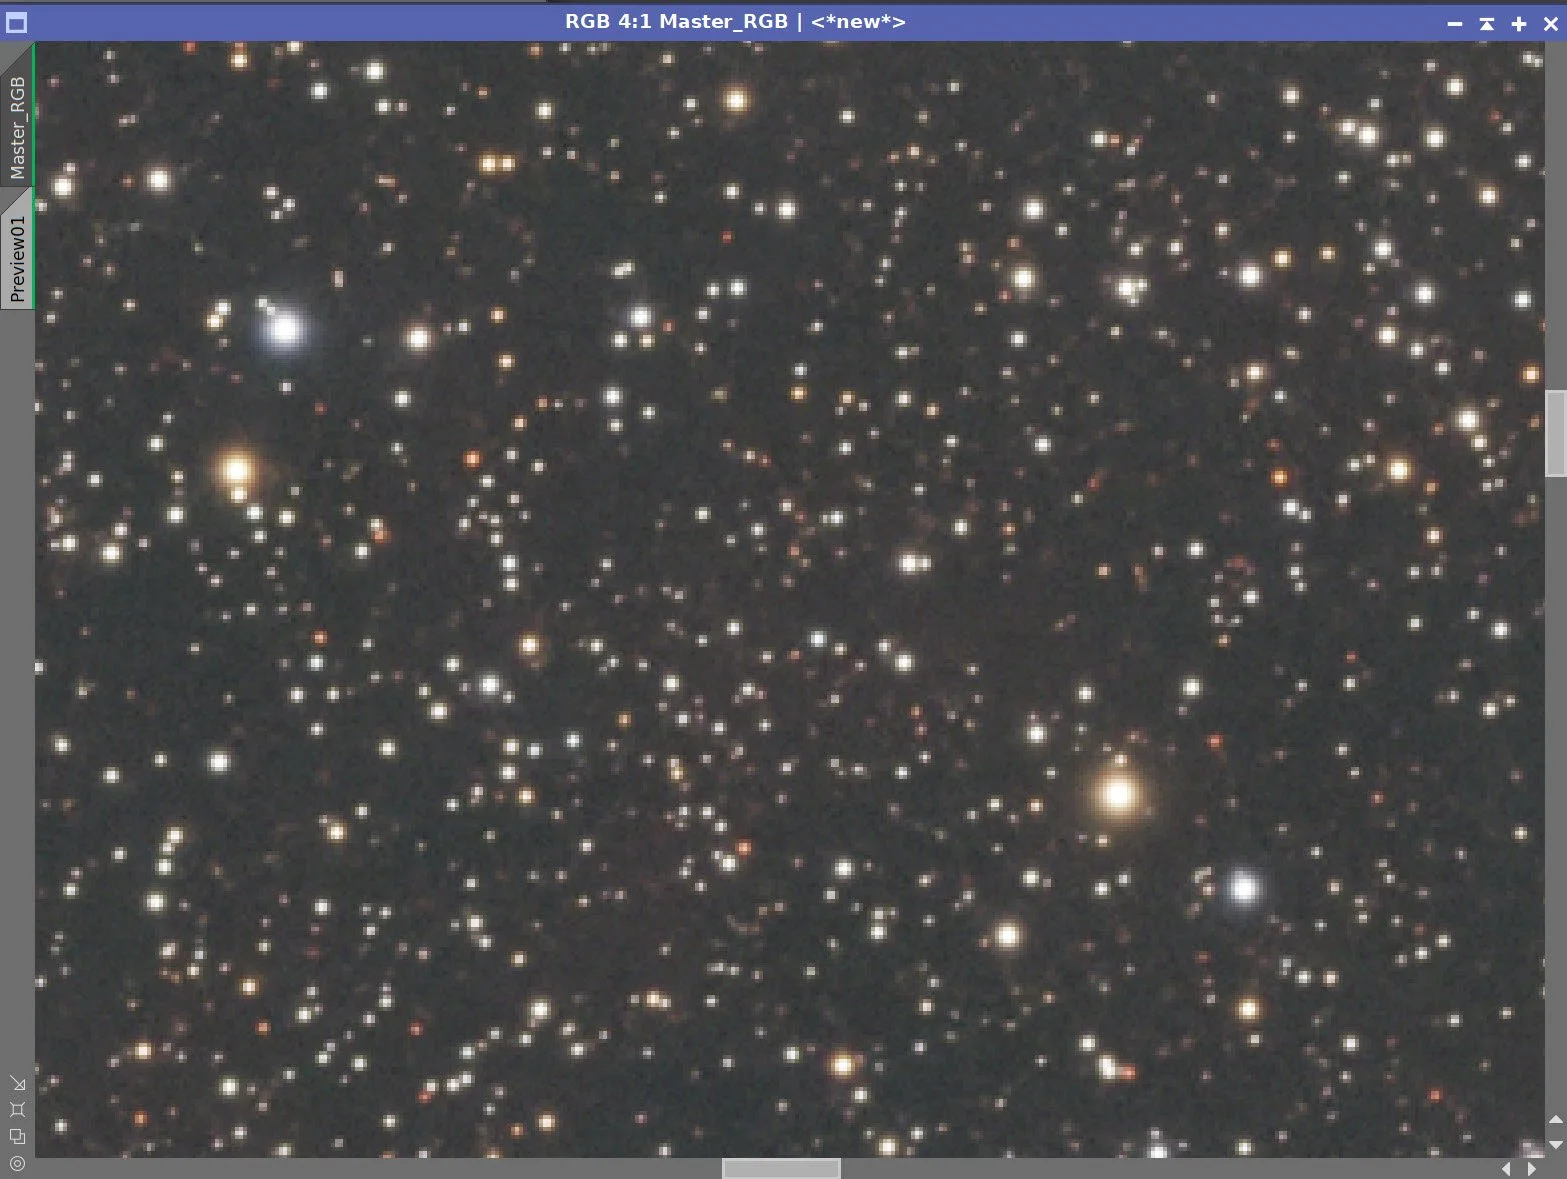
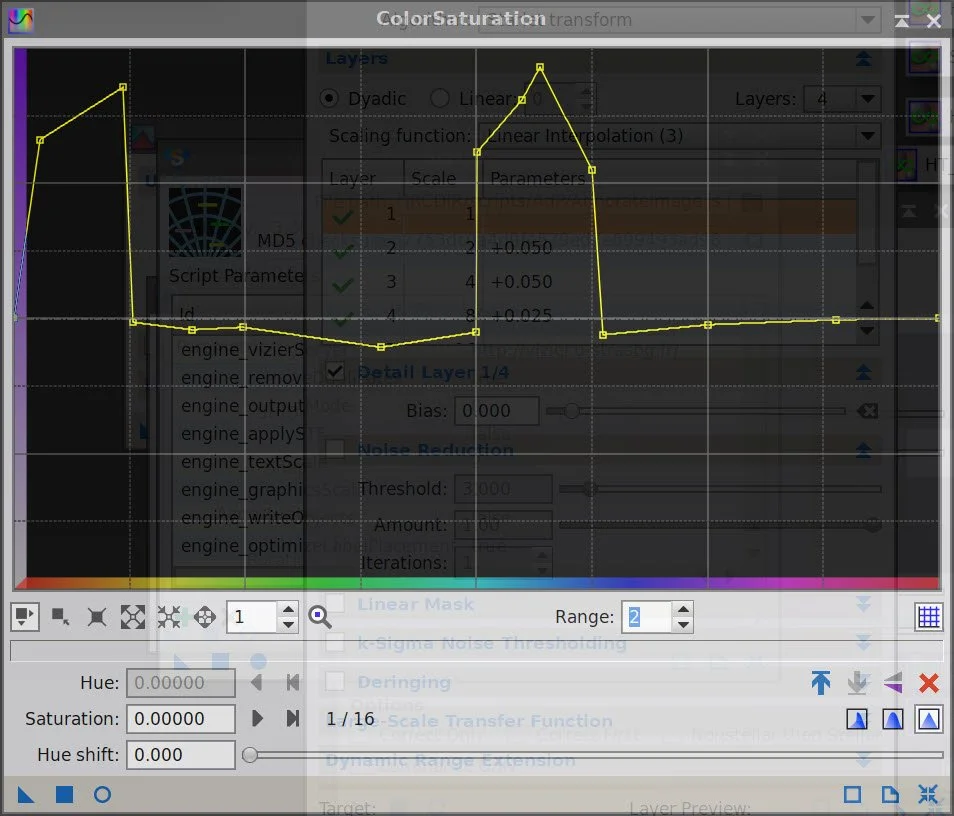
When I zoom in, I see some small stars that look like red hot pixels and some orange colored stars with red saturation rings. To reduce this, I created a custom ColorSaturation table to reduce these reds and applied.
Initial RGB Stars Image (click to enlarge)
After Curves tool used to decrese star intensity (click to enlarge)
After ColorSaturation cleanup (click to enlarge)

Color sat panel to handle red issues on stars.
After Coor Sat Fix. (click to enlarge)
9. Do the Inital Process the Nonlinear SHO Starless image
Apply the CT with a contrast and a saturation boost to bring out the colors.
There is some magenta in the dark regions that I want to remove.
invert the image,
run SCNR for green at 0.85
Invert again.
Apply CT to adjust the tone scale and boost color once again
All of this boosting has also boosted noise. Do an NXT run at with params shown in screen snap below to tame it.
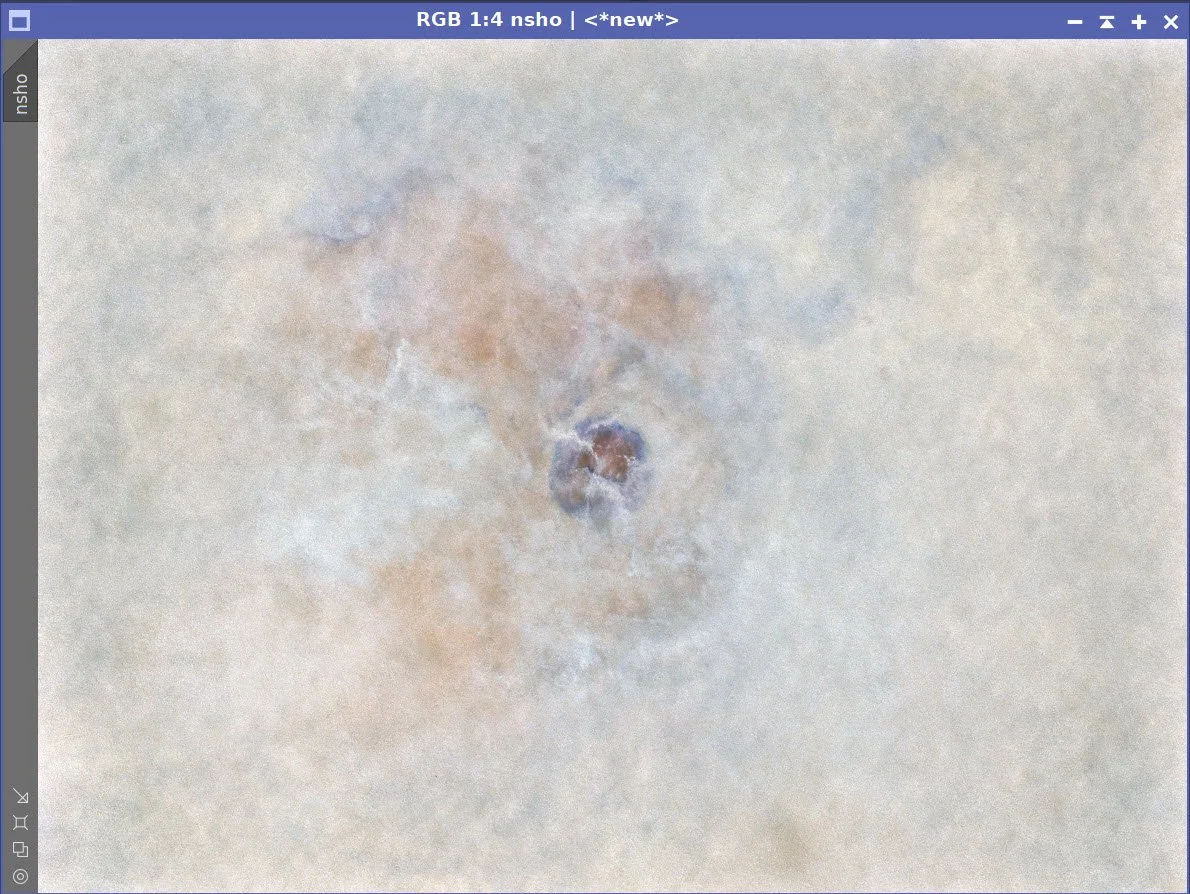
The Initial SHO image (click to enlarge)
Invert the image to make the magenta tones look green. (click to enlarge)
Invert the image again (click to enlarge)
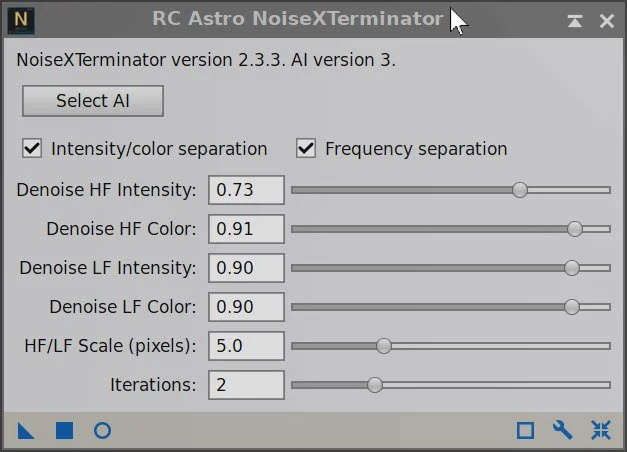
NXT Params used.
Apply CT to boost contrast and color Sat (Click to enlarge)
Run SCNR Green at 0.85 (click to enlarge)
CT to darken and boost color (click to enlarge)
Apply NXT reduce noise. (click to enlarge)
10. Create Masks Needed to Complete the Processing
Create a Warm Tone Mask:
We will use this to adjust the color, sat, and sharpness of warm-toned features.
Use the ColourMask Process to create a warm mask covering hues 18 to 90, blur of 0.0
Boost the contrast with CT
Do not blur the mask, I want to use this to sharpen details too!
Create a Cool Tone Mask:
We will use this to adjust the color, sat, and sharpness of cool-toned features.
Use the ColourMask process to create a warm mask covering hues 155 to 252, with a blur of 5
Boost the contrast with CT.
Using the Game script, create a CoreMask that covers the brightest central circle of the nebula.
Using the Game script, Create a Big CoreMask that cover the main extended body of the nebula
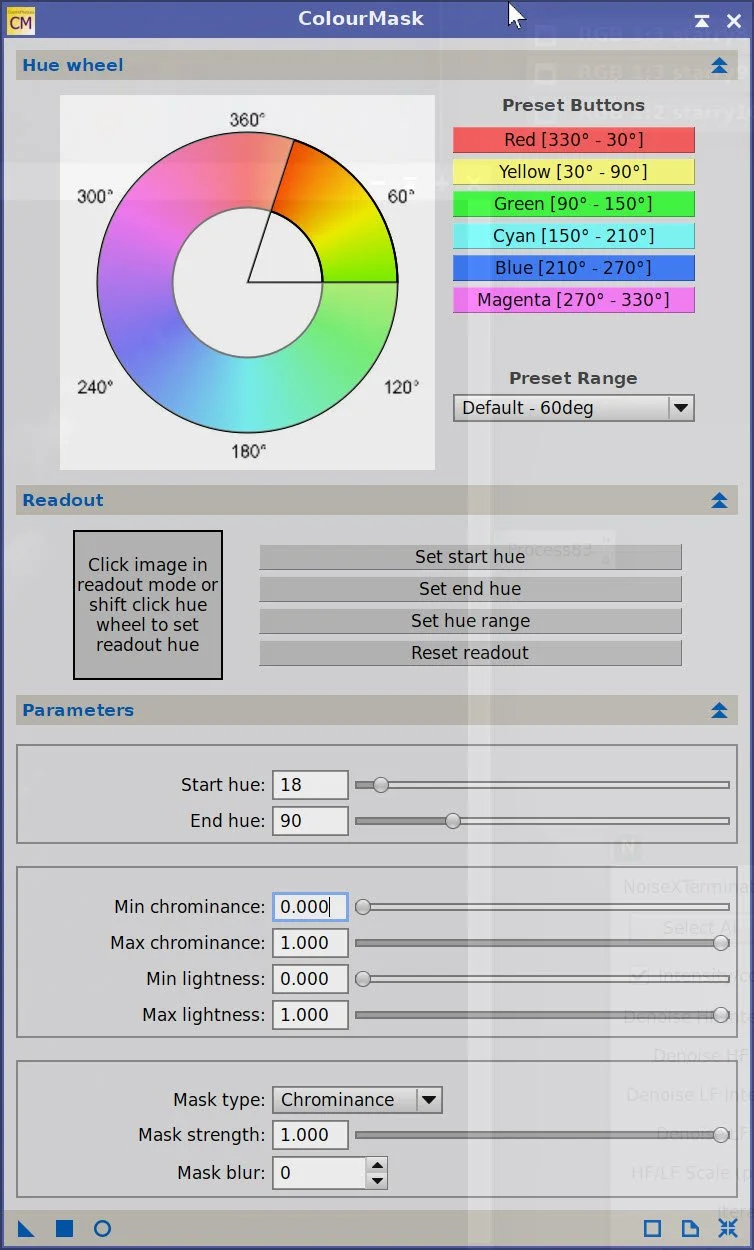
The Setup for creating the WarmMask.

Initial Warm Mask (click to enlarge)
After a CT boot we have the final mask (click to enlarge)
The Setup for creating the CoolMask (click to enlarge)
Core Mask created with GAME(click to enlarge)
Initial CoolMask (click to enlarge)
After CT contrast Boost (click to enlarge)
BigCoreMask created with GAME (click to enlarge)
11. Complete the Processing of the SHO Starless Image
Apply the Warm Mask - First, we will enhance the color and detail in the warm regions.
Apply CT to adjust the tone and saturation of the warm areas.
Apply LHE, which uses the parameters of a Radius of 22, a contrast limit of 2.0, an Amount of 0.28, and an 8-bit histogram. This enhances smaller-scale features.
Apply the Cool Mask - Now, we will work on the color tones. These areas have little detail, so no sharpening here.
Apply CT to adjust the tone scale and color saturation
Remove the mask
Apply CT for tone and color tweaks
Apply the CoreMask - let’s sharpen up the details in the core.
Apply LHE, which uses the parameters of a Radius of 22, a contrast limit of 2.0, an Amount of 0.28, and an 8-bit histogram. This enhances smaller-scale features.
Apply MLT Sharpening - see screen snap below with parameters used.
Invert the CoreMask - Focus on the outer region
Apply NXT with the values shown on the screensnap below.
CT to darken the outer areas
Invert the CoreMask again - focus on the core
Apply ColorSaturation to adjust core colors - see ColorSaturation Panel ScreenSnap below.
Invert the CoreMask Again - focus back on the outer regions
CT to boost color sats
Apply the Inverse BigMaskCore
Apply ColorSat to reduce the boue in the background sky of the other reaches. See the ColorSaturation Panel in the screen snap below.
Apply CT to darken the outer reaches some more.
After CT with Warm Mask (click to enlagre)
After CT with CoolMask (click to enlarge)
Apply the CoreMask (click to enlarge)
MLT Sharpening Params used (click to enlarge)
After LHE w/ Warm Mask (click to enlarge)
After CT with no mask (click to enlare)
After LHE w/ CoreMask (click to enlarge)
MLT Sharpening with CoreMask Applied (click to enlarge)
NXT Params used for the next step.
Darken the outer regions with a CT w/ the Inverse CoreMask (click to enlarge)
Apply ColorSaturation with the CoreMask to enhance core colors (click to enlarge)
MLT Sharpen with the CoreMask (click to enlarge)
Reduce Blue in outer area with ColorSat w/inverse BigCoreMask (click to enlarge)
NXT V3 applied with the Inverse CoreMask.
CT W/ THe Inverse Coremask - boost colors (click to enlarge)

Prepare to reduce the blue saturation in the background outer layers
CT with Inverse BigCoreMask (click to enlarge)
12. Combine the SHO Starless with the RGB Stars Image
Use the ScreenStars script to add the RGB Stars back in
It was at this point that I noticed there were some areas of green saturation in the nebula that I disliked. So I ran one last SCNR for green at 0.85.
The RGB Stars Image (click to enlarge)
The Final Starless SHO image (click to enlarge)

The ScreenStars Script ready to add stars back in.

Initial image with stars re-added. Note the green saturation in the parts of the nebula.

After a final SCNR Green at 0.85.
14. Export the Image to Photoshop for Polishing
I am pretty happy with the image and ready to polish it in Photoshop.
Save the image as Tiff 16-bit unsigned and move to Photoshop
Crop the image to a way that I find most pleasing
Make final global adjustments with Clarify, Curves, and the Color Mixer
Add Watermarks
Export Clear, Watermarked, and Web-sized jpegs.
The Final Image!