
LDN 1251 - The Rotten Fish Nebula (18.9 hours LRGB)
Date: Aug 10, 2025
Cosgrove’s Cosmos Catalog ➤#0149

My second Dark Nebula Image using my little FRA400 Astrograph! (click on the image for a high res view via Astrobin.com)
Table of Contents Show (Click on lines to navigate)
About the Target
Beverly Turner Lynds (1929-2024) Credit: Sky & Telescope Magazine.
Lynds Dark Nebula 1251—often nicknamed “The Rotten Fish Nebula”—is a dusty star-forming cloud in Cepheus, part of the nearby Cepheus Flare complex that lies above the Milky Way’s plane.
Its official designation, LDN 1251, comes from Beverly T. Lynds’ 1962 Catalogue of Dark Nebulae, compiled by visually inspecting red/blue Palomar Observatory Sky Atlas plates.
The unusual “rotten fish” moniker is community-grown, inspired by the object’s fish-like silhouette in wide-field photographs. The nickname has since shown up in mainstream outreach, including NASA’s Astronomy Picture of the Day.
Distance estimates converge around ~1,000–1,100 light-years (Gaia-based studies place L1251 near 340 ± 7 pc, i.e., ~1,110 ly), so it’s both relatively close and richly detailed in long-exposure images.
Historically, LDN 1251 wasn’t “discovered” as a bright nebula but systematically cataloged in 1962 when Lynds introduced the LDN numbering and opacity classes for dark clouds; that foundational work anchors its formal identity.
From the 1990s onward, L1251 became a nearby laboratory for low-mass star formation. Optical star counts and spectroscopy established a distance of ~300–330 pc for the cloud and revealed its elongated “head–tail” structure.
With the Spitzer “Cores to Disks” legacy survey, astronomers resolved embedded young stellar objects (YSOs) and flows in its subregions—commonly labeled L1251A, L1251B, and L1251C—including compact protostellar groups, jets and molecular outflows, and the reddish knots of Herbig–Haro objects. These studies show a cloud actively turning dust and gas into stars, with different pockets caught at different evolutionary stages.
For astrophotographers, the descriptive details that fuel its nickname are real science clues. The dark lanes are light-absorbing dust backlit by the dense Cepheus star field, while wispy patches of reflection nebulosity show starlight scattering off the finer grains.
Several papers even note a bow-shock-like front on the cloud’s eastern side—evidence that L1251 may be plowing through surrounding gas at roughly Mach ~2—which helps explain that “fish swimming through space” impression.
Images with long integration time also reveal distant background galaxies peeking through the less opaque regions, a striking contrast with the nearby, star-forming dust.
One can be seen near the snout of the fish. This is the small Sc spiral UGC 12160 (a.k.a. PGC 69472), which is estimated to be 50-60 million light-years away. It also hosted the Type II supernova SN 1995X, which was discovered on August 3, 1995.

Zooming in on PGC 694472
From the snout, drift slightly toward the right and above the darker mid-body to pick up PGC 166755, a compact, tilted spiral that many imagers can resolve. I could not find a red shift for this galaxy, so the distance seems to be unknown at this point.

Zooming in on PGC 166755.
On the upper left side and above the head, you can also see PGC 166762. It is classified as a late-type spiral (Sc), but there also does not seem to be a redshift determined for this galaxy either.
The Annotated Image

Created in Pixinsight using the ImageSolver and AnnotateImage scripts.
The Location in the Sky
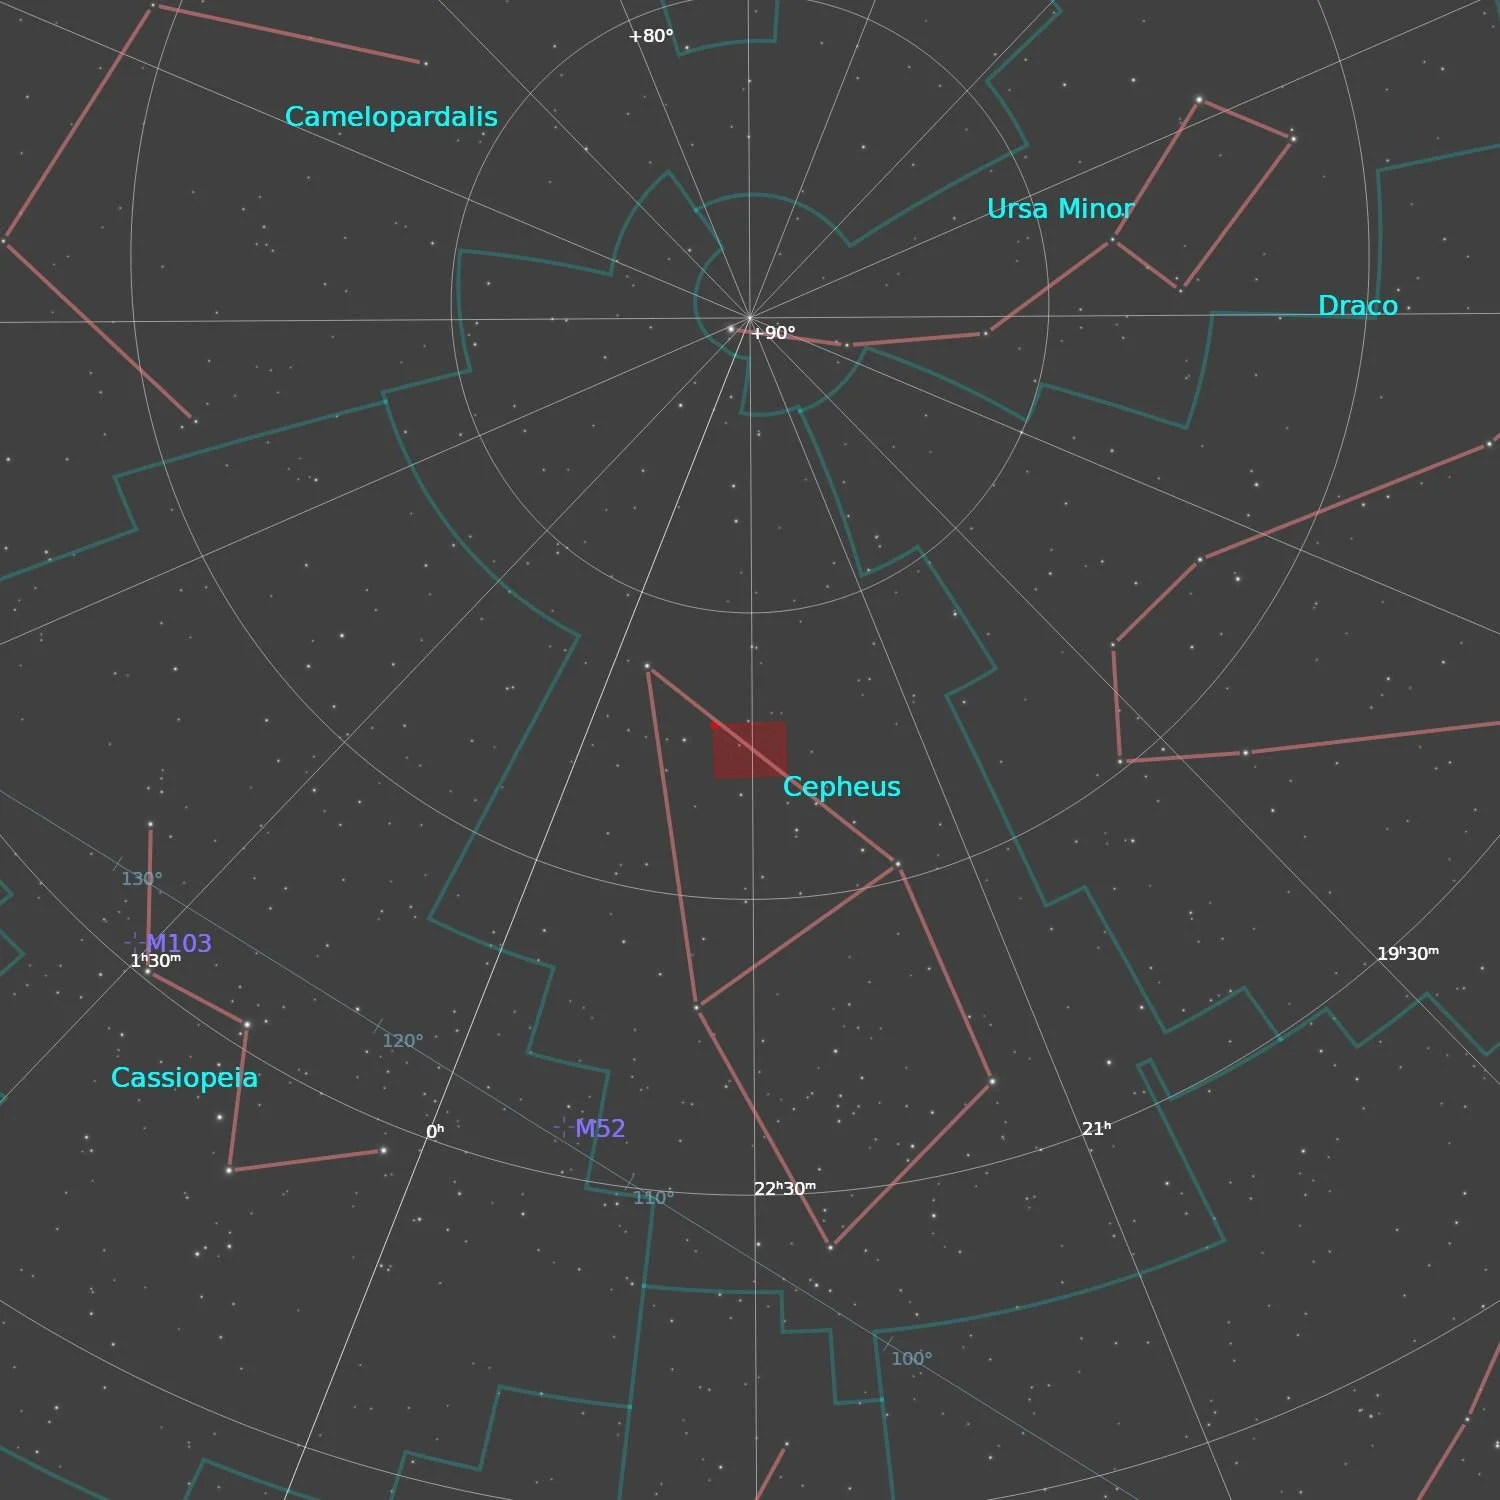
This annotated image created with Imagesolver and FInderChart Scripts in Pixinsight.
About the Project
Recently, I shot my very first dark nebula target - LDN 1235 - The Shark Nebula.
I did not expect this image to come out because I saw very little hint of it when viewing individual subframes. But the integrated masters showed good detail, and the final image came out well enough.
When I started looking for a new target for the last week of August, I was scanning through Cepheus and noted several dark nebulae that could be interesting targets as well.
I chose LDN 1251 for two reasons. One valid, and one kind of stupid.
First, the valid one. It looked like a complex entity. It was not just a dark silhouette as some of them are - it seems to have levels of transparency and structure that made it look interesting to me.
Now, the stupid one. The common name for this object was “The Rotten Fish Nebula.” What? That is one cool-ass interesting name. I would want to image something with a cool name like that - wouldn’t you? (Remember, I said it was stupid - but it did enter my thought process!)
This was a very large object - roughly 2 degrees across. So this was a great target for my Askar FRA400 Platform.
Data Collection
Data was collected over four nights at the end of August 2025: 22nd, 24th, 30th, and 31st.
The ASI1600MM-Pro camera was set up to take 120-second subs, in LRGB with an aim cooling temperature of -15 degrees.
Since this target is faint, I set up NINA so that for each cycle, I would take 2 Lum filter shots and then a one R, G, and B filter shot each. This should provide optimal exposure for the structure while allowing enough subs to color the image.
I was a bit concerned that there was a bright star near the head of the nebula. The ASI1600MM-Pro on this platform is currently my oldest camera, and it suffers from microlensing artifacts when a very bright star is in the field. I know I am going to encounter a problem here, but there is not much I can do about it during capture, and not much I can do to minimize it during processing. So we will have to see how bad it will be.
My shortest night was the night of the 22nd. The skies were variable, and a cloud deck moved in and shut things down early.
When I blinked the captured images, I had a LOT of frames that had to be removed from this particular night, as thin clouds attenuated them. But only for this night. I did not have to remove any subframes from any of the other nights.
With the nights getting longer, I ended up at about 19 hours of LRGB integration - which is now the longest integrations (just a few minutes longer than my last image!)
Processing Overview
I basically used my standard LRGB workflow, which you can see below.
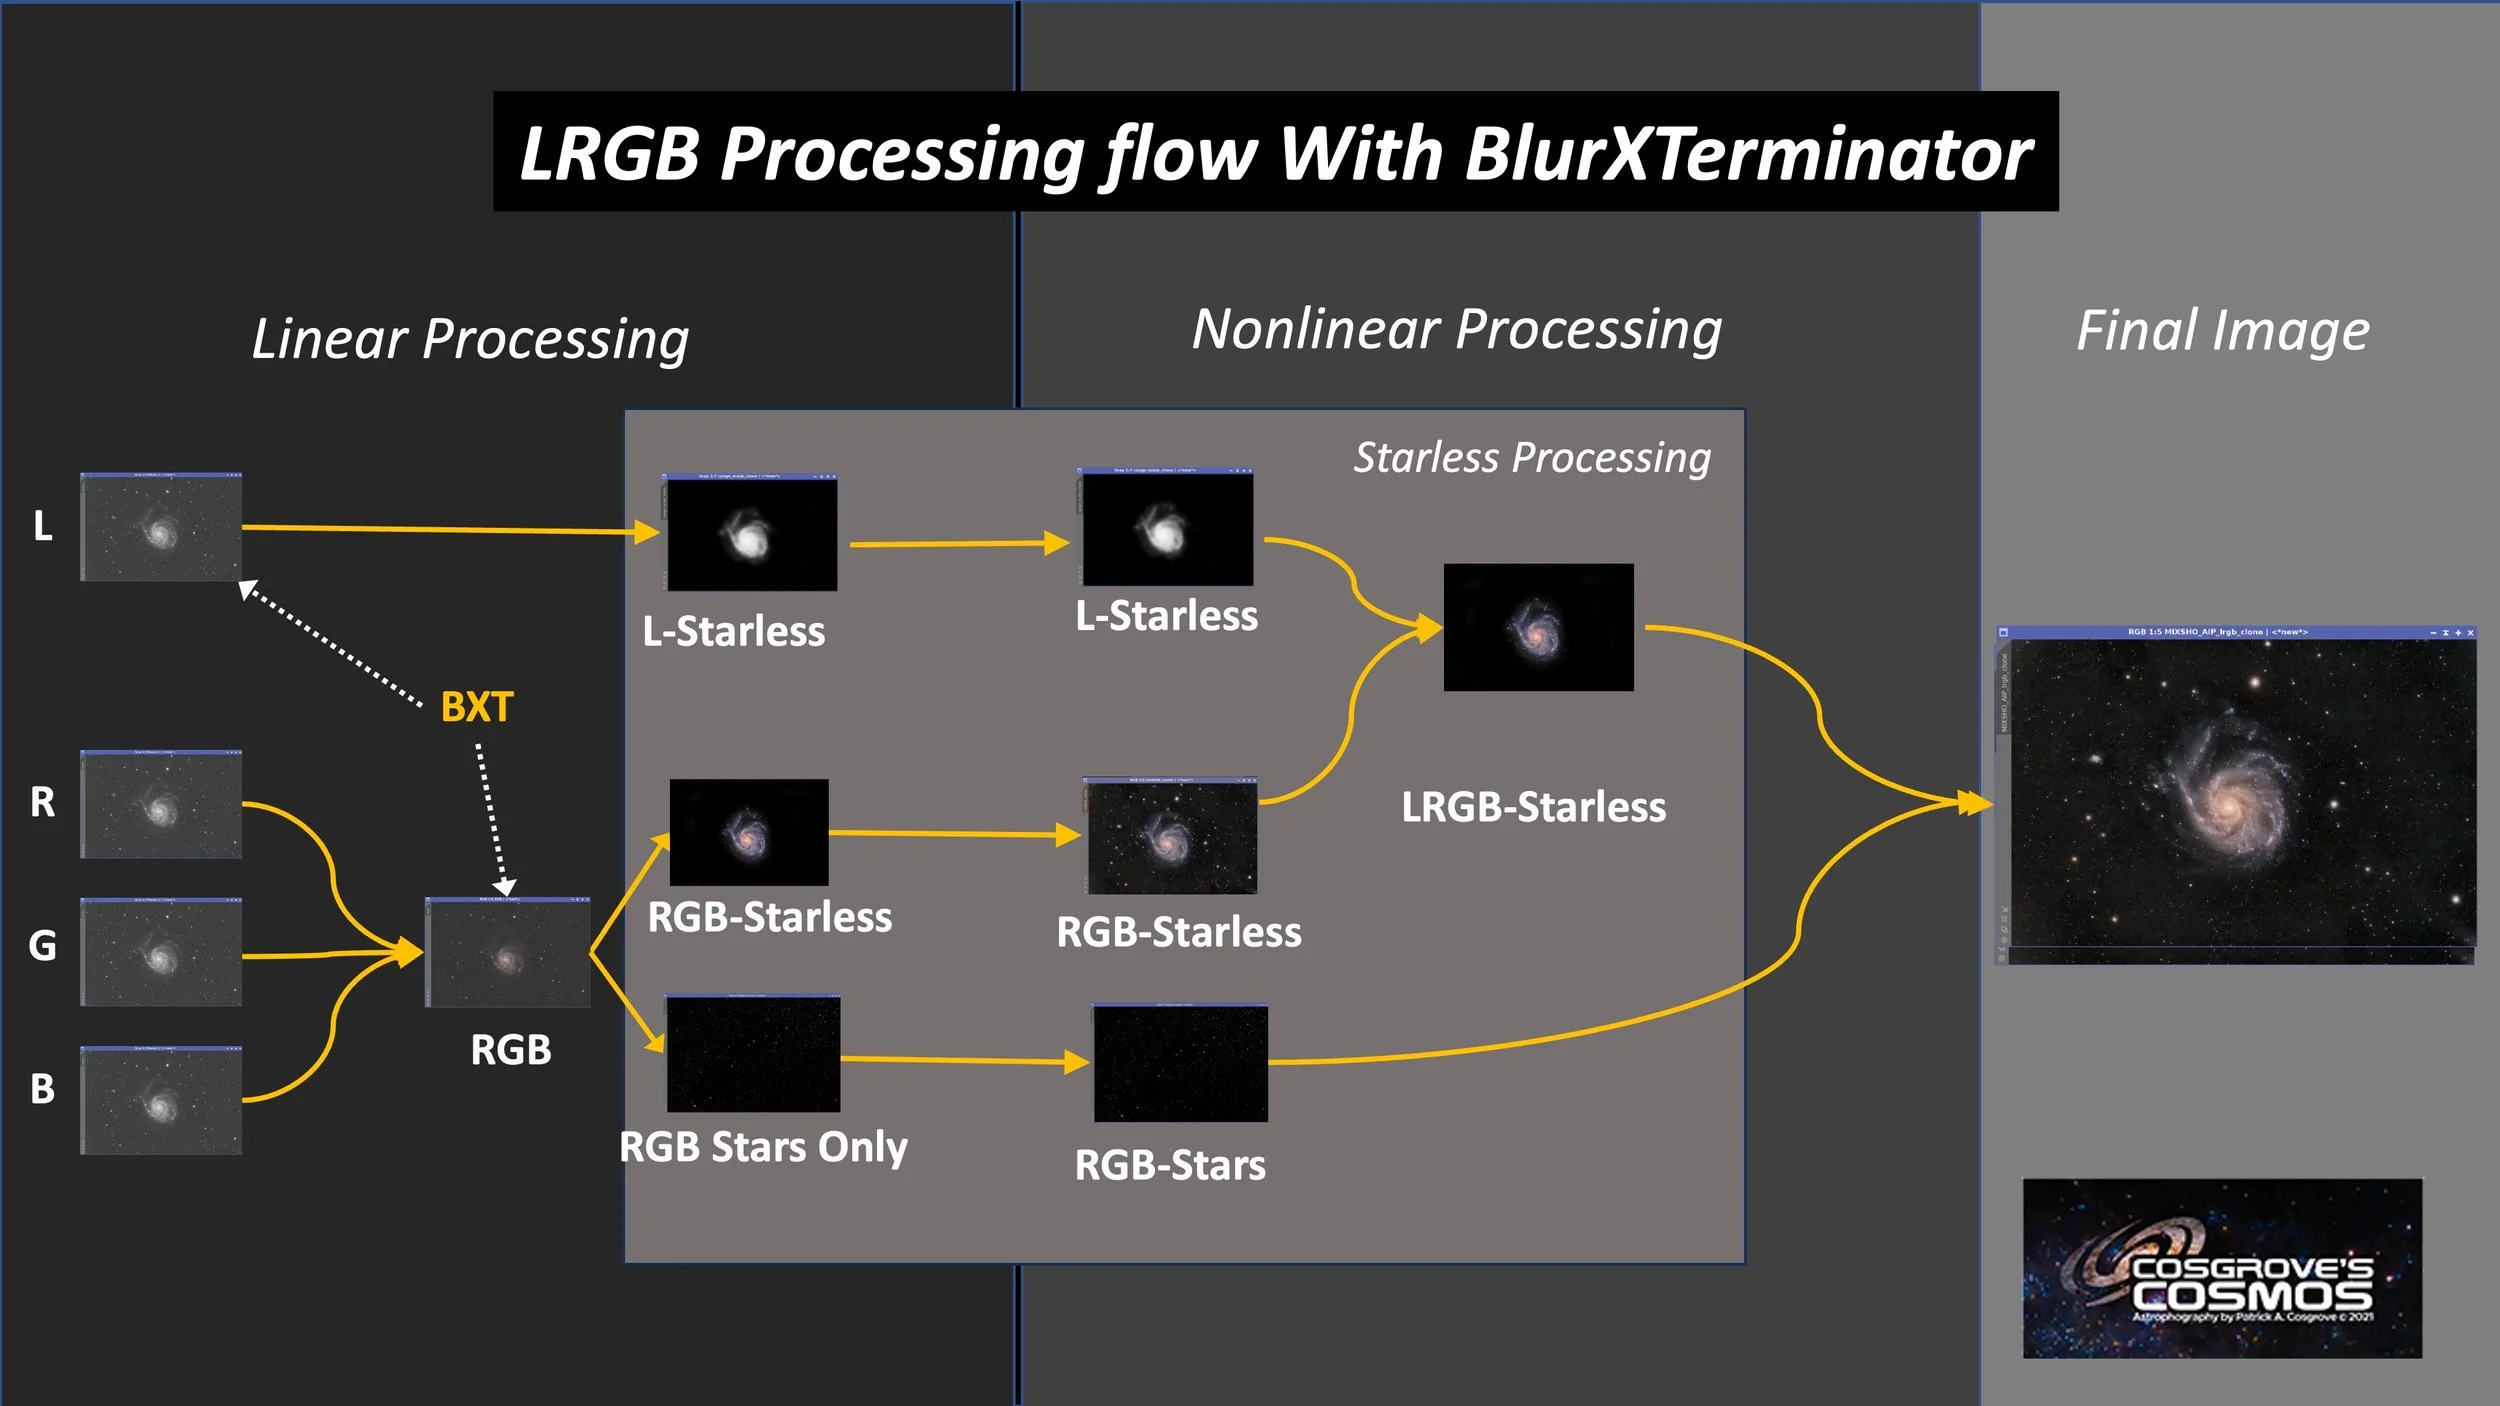
My typical LRGB Starless Workflow.
Blinking caused me to eliminate over 2 hours of subs due to clouds (Ouch!)
And, as expected, I did have microlensing artifacts on that bright star.
But other than that, the processing was straightforward. On my last image, I had 18.75 hours on a very bright Pelican Nebula - and I marveled at how little noise I had to deal with.
Here, with almost 19 hours, the story was very different. The signal was weak, and I needed to do a lot of creative stretching to bring the target to life. I had LOTs of noise to deal with! Thank God for NoiseXterminator!
This was one of those images where I had to remove the gradients twice!
I removed gradients in the Master Linear RGB image like I normally would. But once I took the RGB image nonlinear and finalized the stretches there, new gradients were revealed, and I needed to run DBE again on the nonlinear image.
However, my strategy of doubling up on the Lum Filter subs seems to have paid off, and things worked out well.
Because there were not a lot of saturated colors in this image, I did not need to create multiple color masks and work with them. Instead, I had two small galaxies that were very bright and had just hints of detail. So, I made tiny galaxy masks and enhanced them as well as I could.
Look below for the complete step-by-step processing walkthrough! Note: This walkthrough is based on Pixinsight.
Final Results
I have now doubled the number of Dark Nebula shots I have done!
Having said that, I am far from being an expert, and I am still learning how to best process these images. I also realize that all of my Dark Nebula shots were done on the wide-angle FRA400 platform with an older camera that is not well-suited to this work. Next year, I will be budgeting an upgrade for this camera.
But as a result of this, I do have microlensing artifacts marring this image, despite my efforts to mitigate these effects.
On the positive side, I was able to get what constitutes a very long image integration in this area. This clearly helped my efforts.
I am reasonably happy with the final result! These dark images have a moodiness and mystery to them that I appreciate, and I expect to be doing more of this nature in the future.
In one case, the very near future - as I already have the data for another one in the can, awaiting processing!.
More Information
🔭 Target Details:
NASA APOD — LDN 1251 (2025-07-10) – Overview image and write-up using the “Rotten Fish Nebula” nickname.
SIMBAD — LDN 1251 – Coordinates, identifiers, and basic database properties.
Aladin Lite — LDN 1251 field – Interactive sky view (zoom, change surveys, add overlays).
IRSA Finder Chart – Multi-survey finder (enter “LDN 1251” to load DSS/2MASS/WISE views).
Wikimedia Commons — LDN 1251 – Freely usable images for outreach/education.
📜 History & Naming:
Lynds’ Catalogue of Dark Nebulae (overview) – Background on Beverly T. Lynds’ 1962 catalog that defines the LDN designations.
Lynds 1962 ApJS — Catalogue of Dark Nebulae – Original catalog paper (survey method and opacity classes).
NASA APOD — Cepheus Flare Dust (2020-07-03) – Context for the Cepheus Flare region, including LDN 1251.
AAPOD2 — LDN 1251/1247 “Rotten Fish” – How the community nickname took hold, with annotated imagery.
🔬 Science & Observations:
Spitzer c2d — L1251B protostars – Embedded YSOs, jets, and small-group star formation.
ApJS 218:5 — L1251C multi-wavelength study (PDF) – Near-IR to mm observations and source list.
Cepheus Flare YSO census (Spitzer/Gould Belt) – Regional survey including L1251 subregions.
Extinction & bow-front morphology in L1251 (PDF) – Star-count distance (~330 pc) and evidence of a bow-shock-like leading edge.
💡 Interesting Facts & Outreach:
Capella Observatory — LDN 1251 annotated field – Labels background galaxies and key features.
AstroBin — LDN 1251 “Rotten Fish Nebula” – High-resolution community image for visual context.
AstroDoc — LDN 1251 – Outreach-oriented description and imaging notes.
Astronomers Do It In The Dark — annotated FOV – ~3.25° × 2.1° annotated field with multiple PGC galaxies.
Capture Details
Lights Frames
Taken the nights of August 22, 24, 30, and 31, 2025
229 x 120 seconds, bin 1x1 @ -15C, Gain 139.0, ZWO Lum Filter - 1.25 inch
112 x 120 seconds, bin 1x1 @ -15C, Gain 139.0, ZWO Red Filter - 1.25 inch
112 x 120 seconds, bin 1x1 @ -15C, Gain 139.0, ZWO Green Filter - 1.25 inch
113 x 120 seconds, bin 1x1 @ -15C, Gain 139.0, ZWO Blue Filter - 1.25 inch
Total - after culling bad subs - of 18 hours and 52 minutes.
Cal Frames
30 Darks at 120seconds, bin 1x1, -15C, gain 139
30 Dark Flats at Flat exposure times, bin 1x1, -15C, gain 139
One set of Flats done:
15 Lum Flats
15 R Flats
15 G Flats
15 B Flats

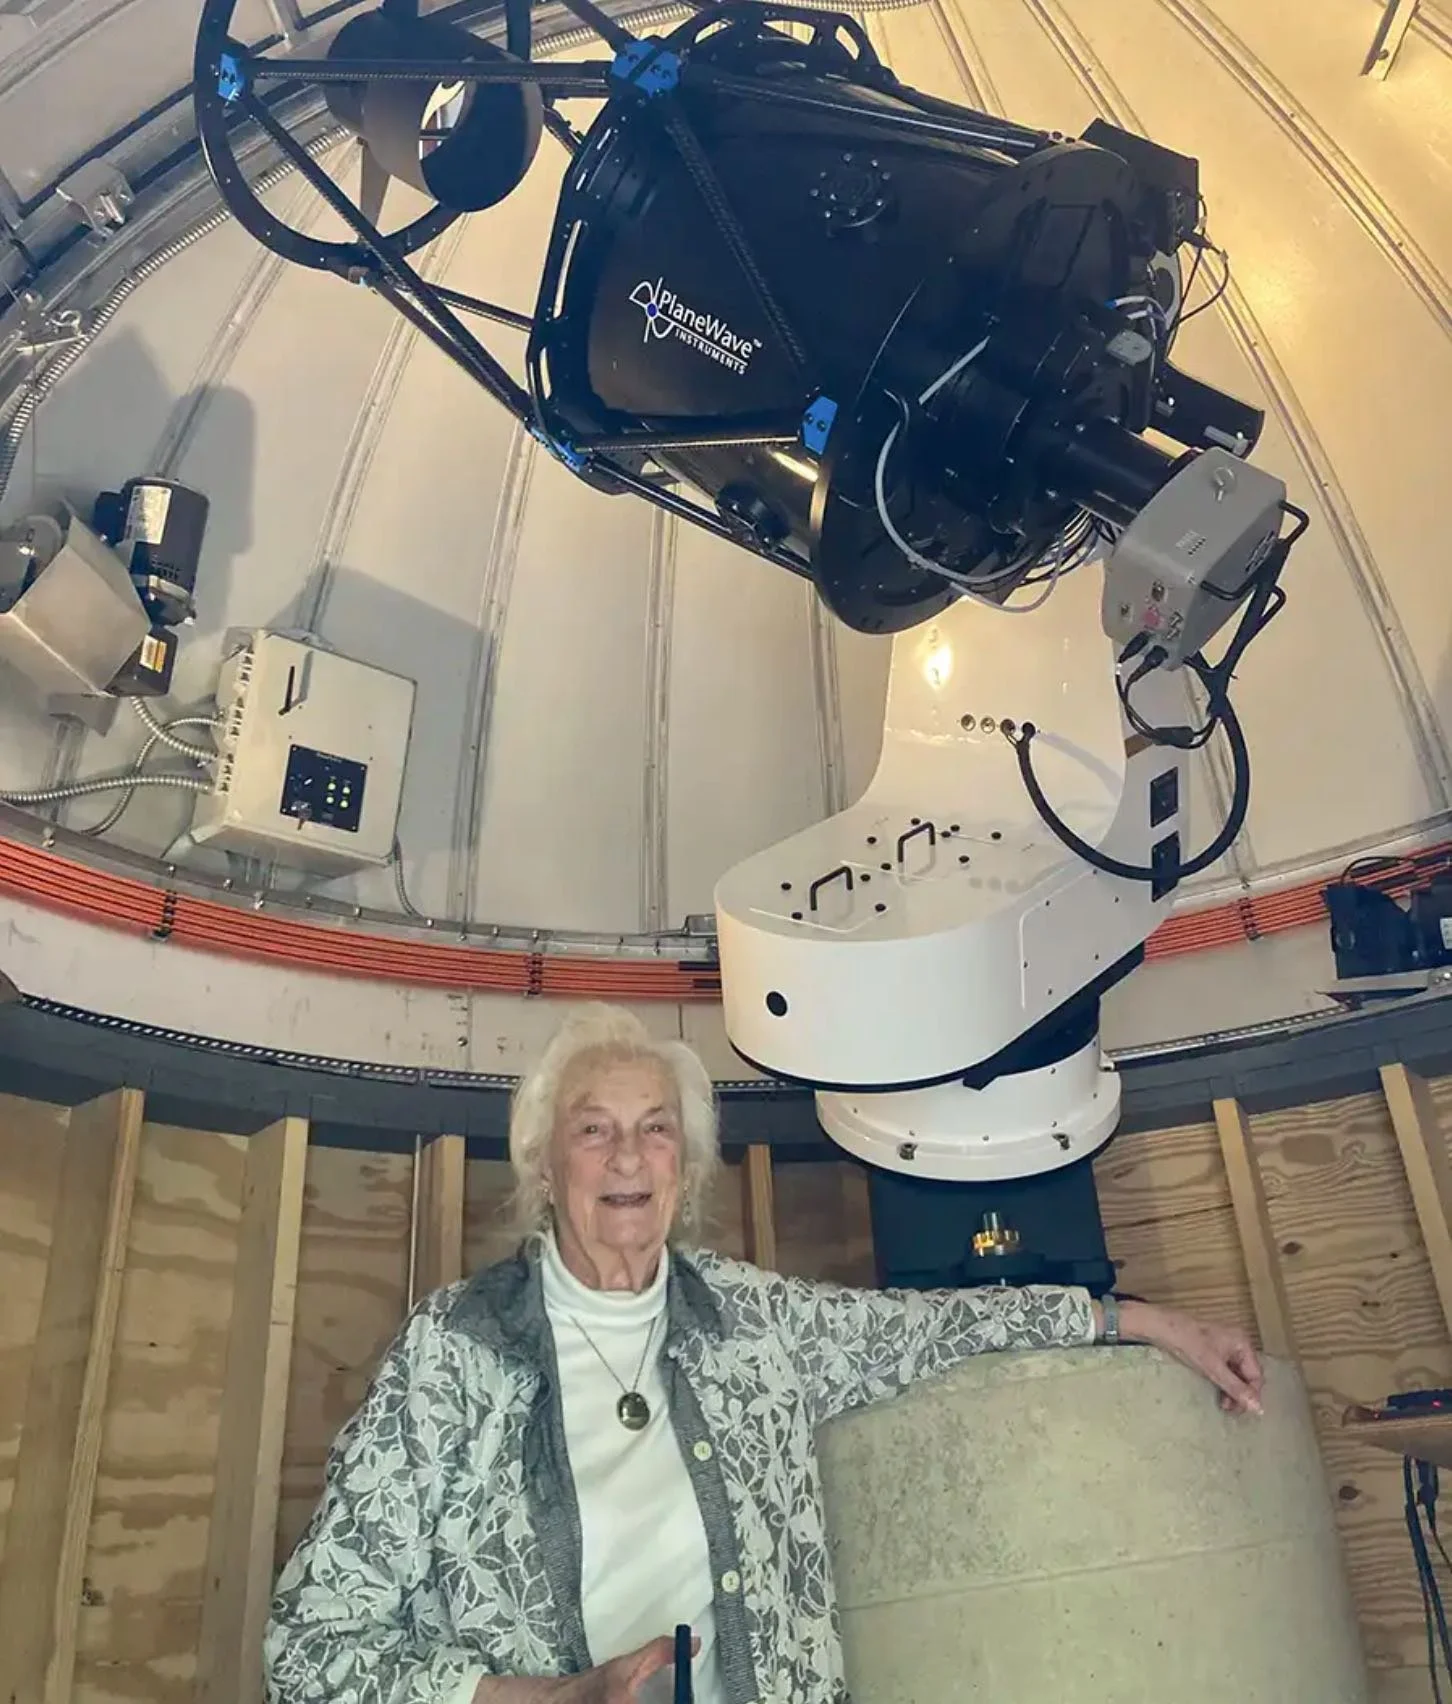
Platform used for this project
Software
Capture Software: PHD2 Guider, NINA
Image Processing: Pixinsight, Photoshop - assisted by Coffee, extensive processing indecision and second-guessing, editor regret and much swearing…..
Image Processing Walkthrough
(All Processing is done in Pixinsight, with some final touches done in Photoshop)
1. Blink and SubFrameSelector Analysis
Lum Subs:
Some thin clouds are coming through - some trails
24 frames removed!
Red Subs:
Some thin clouds are coming through - some trails
9 frames removed!
Green Subs:
Some thin clouds are coming through - some trails
12 frames removed!
Blue Subs:
Some thin clouds are coming through - some trails
10 frames removed!
All Flats and Darks:
All looked good!
Summary - a total of 55 frames removed, for a total of 110 minutes or 1.8 hours lost!
2. WBPP 2.8.9
Reset everything
Load all lights
Load all flats
Load all darks
Select - maximum quality
Reference Image - auto - the default
Select the output directory to the wbpp folder
Enable CC for all light frames
Pedestal value - auto
Darks -set exposure tolerance to 0
Lights - set exposure tolerance to 0
Lights - all set except for a linear defect
set for Autocrop
Executed in 1:31:36 - no errors - no more frames rejected.
Note: Screen captures below were taken after WBPP was run - I forgot to grab these screens beforehand!

WBPP Calibration View

WBPP Post Calibration View

WBPP Pipeline View
3. Load Master Images
Load all master images and rename them.

Master L, R, G, & B images
4. Create the Linear RGB Image and Process It
Using ChannelCombination, create the initial RGB image. It has a strong blue-green balance.
The nebula takes up a lot of the center of the frame, so I used DBE to set up a sampling plan to get the background frame:
Set up the sample pattern as shown - save for use on the Master_L image
Fix with subtraction - this removes the green balance and a slight left-to-right gradient.
Run BXT correct-only. Best to fix any star issues before SPCC. ( but no real issues expected here - stars are good!)
SPCC and calibrate the color. Use the Ideal QE curve and ZWO RGB filters. I also selected a sample of the background for SPCC’s use. See the panel setup below.
Run PFSIMage to get an idea of the star sizes. X = 1.73 Y = 1.65
After experimenting with BXT settings, I used 2.55 for non-stellar restoration, which was much larger than the PFSImage results.
Run BXT Full correction - see settings used on the panel shot below.
Apply NXT to remove noise. See the values used in the panel snapshot below. The shark is just barely visible!
Use SXT with Saving Stars. Set to a large sample box size
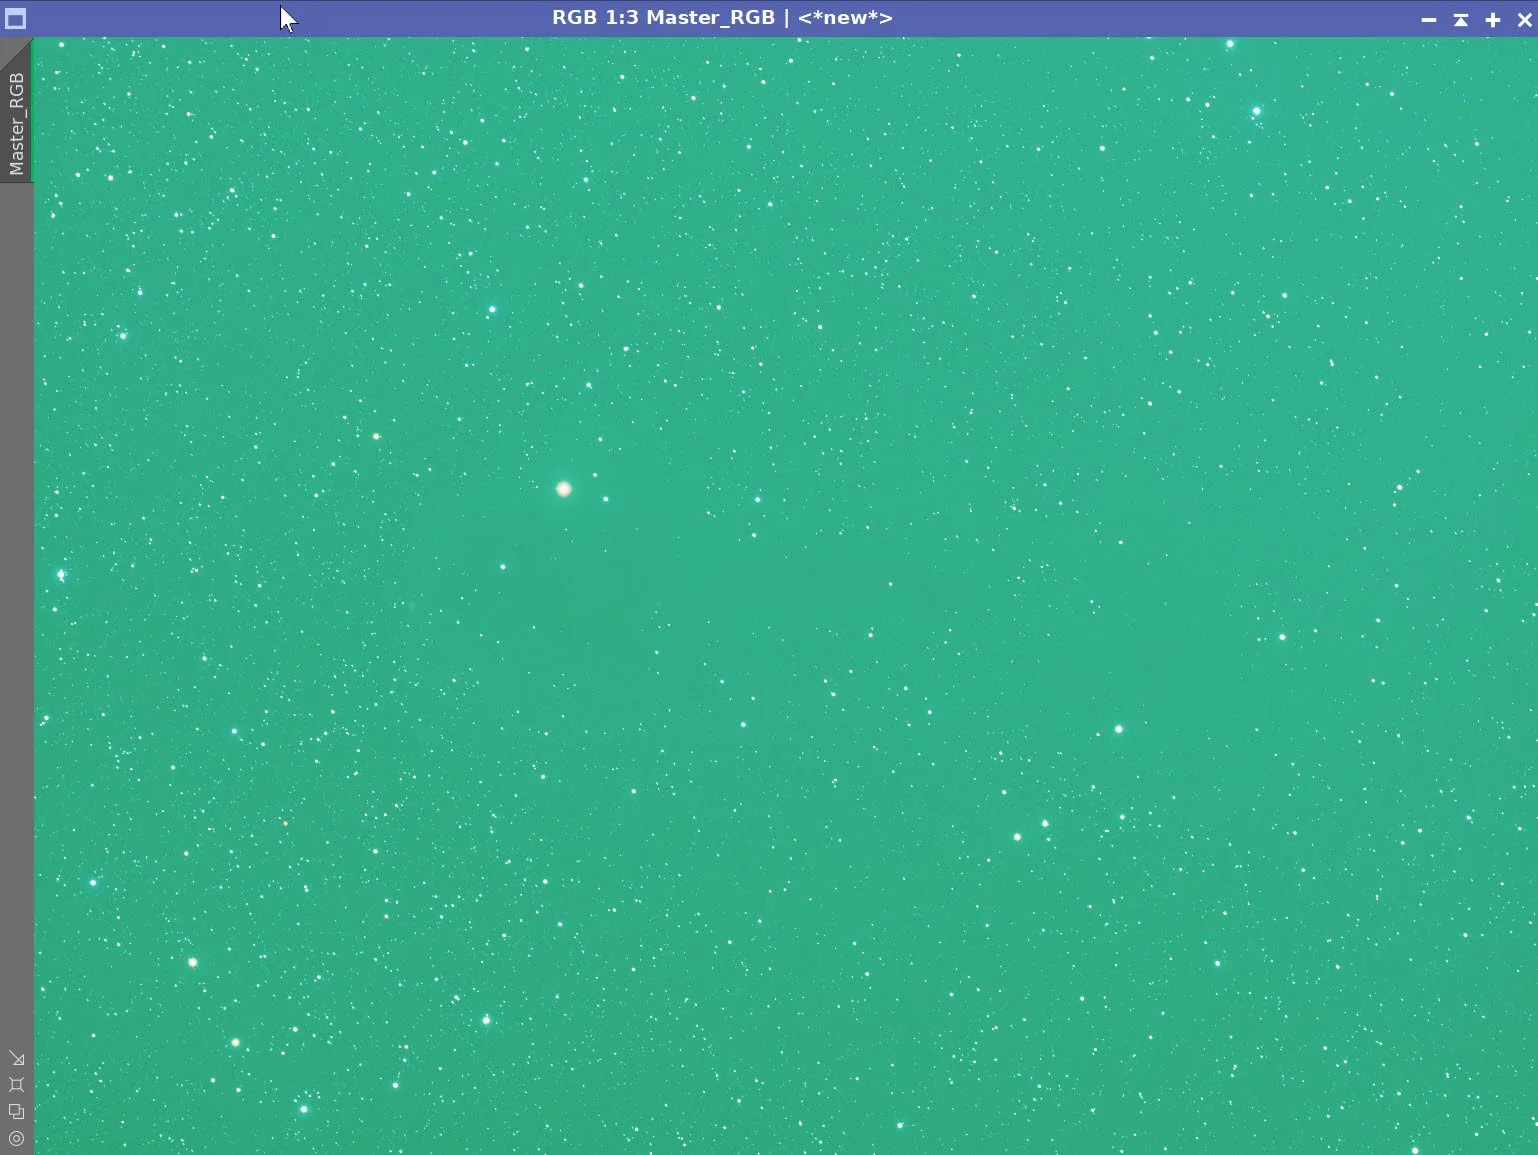
The initial RGB Linear Image.
Master RGB Sample Pattern (click to enlarge)
Master RGB Before DBE (click to enlarge)
Master RGB after DBE (click to enlarge)
Master RGB Background
The SPCC Params (click to enlarge)
The final regression result. (click to enlarge)
Before SPCC (click to enlarge)

PFSImage Panel with results
Master_RGB after SPCC run (click to enlarge)
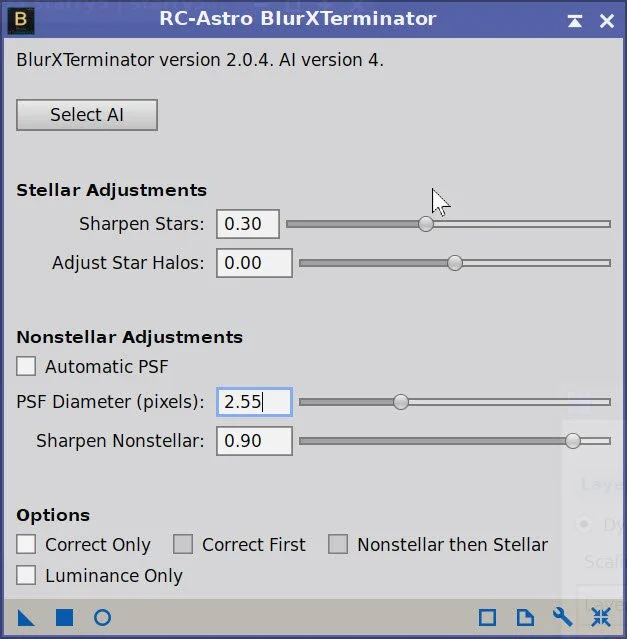
Final BXT settings used.
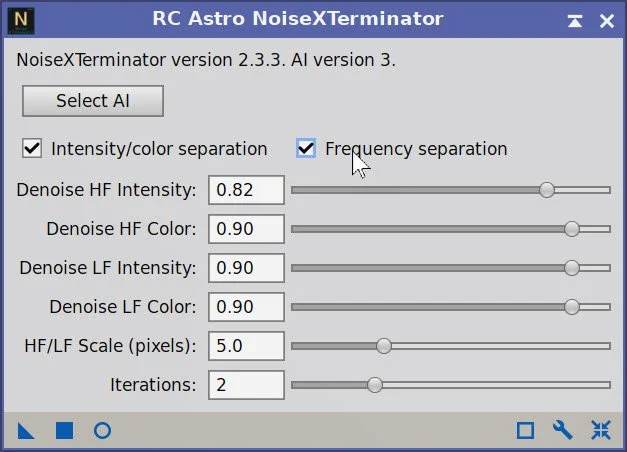
The NXT parameters used.
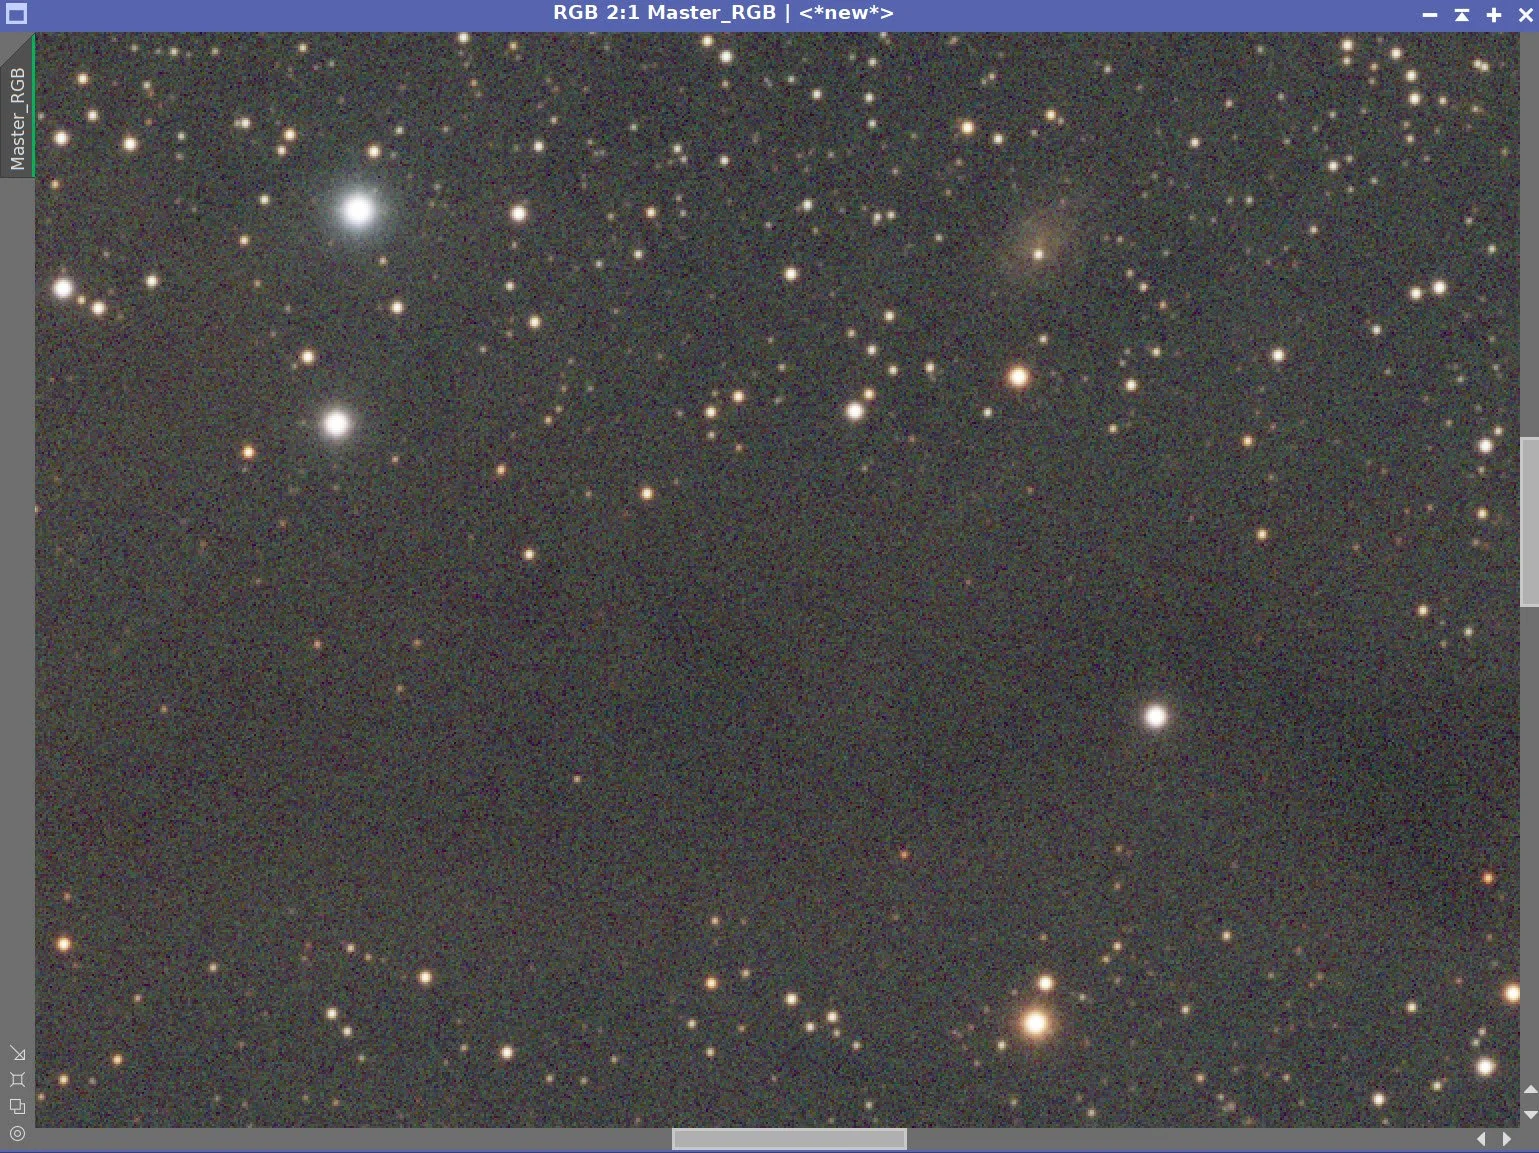
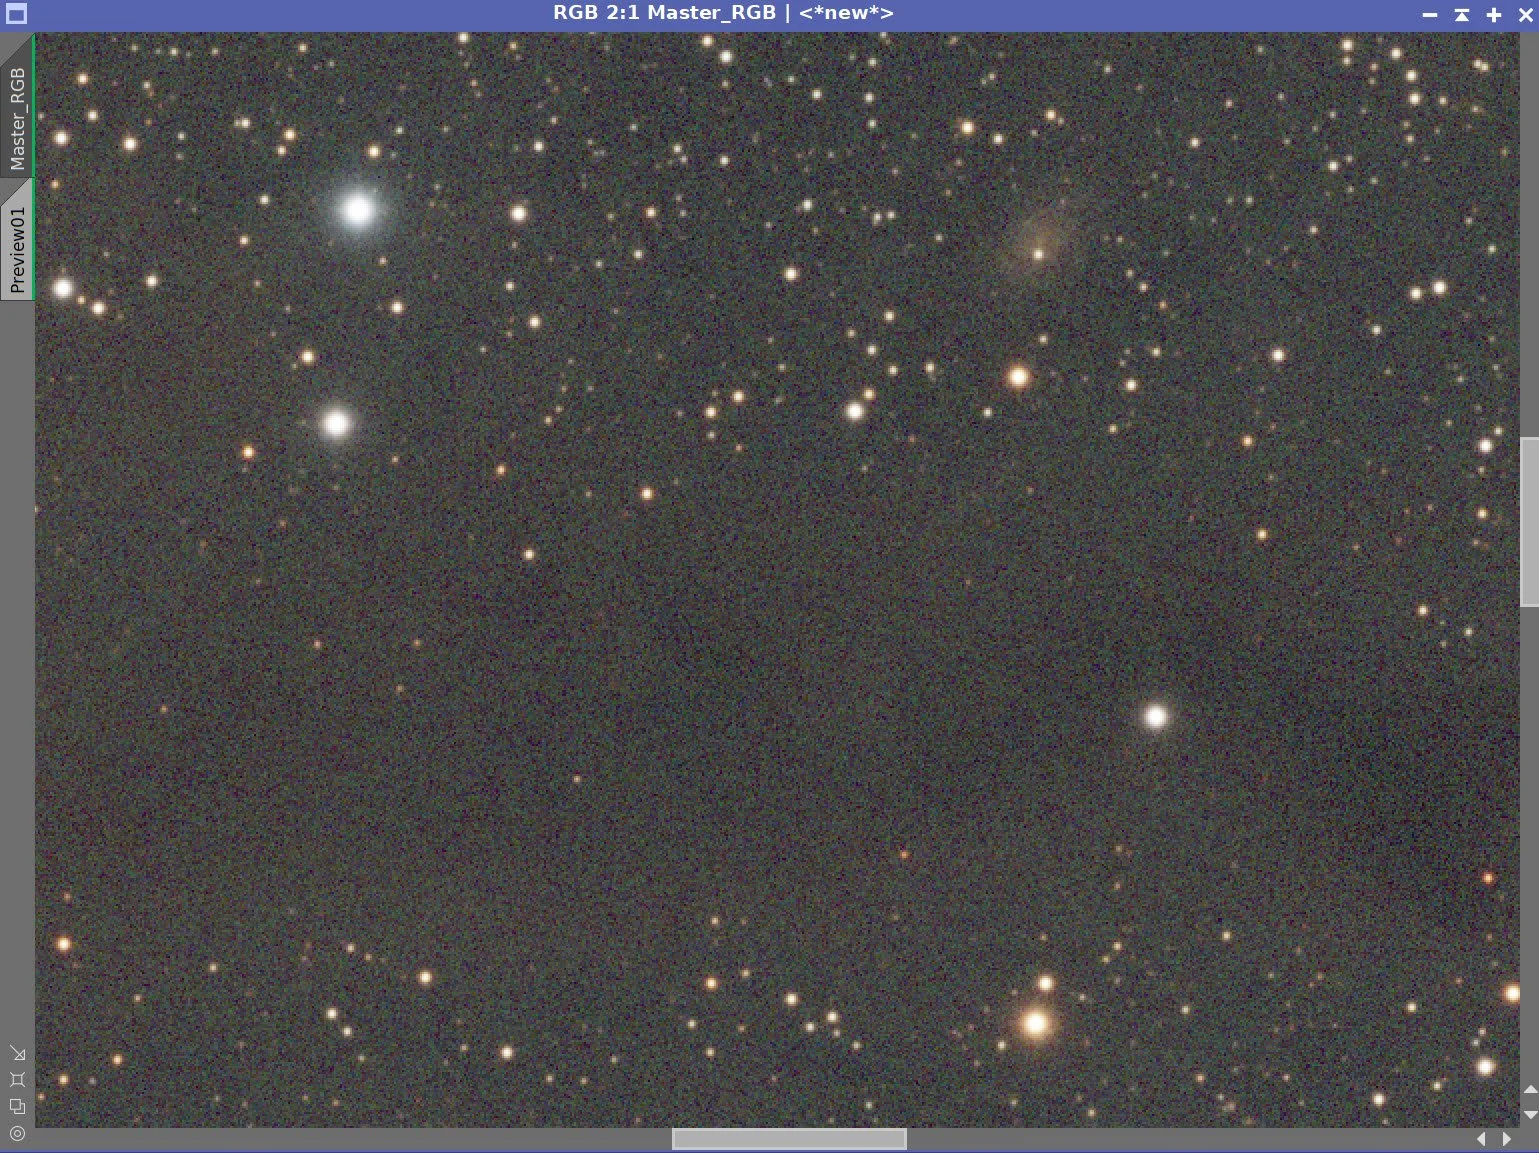


The Master RGB Image Before BXT, After BXT Correction only, After BXT Full Correction, and After NXT
Master RGB before Star Removal.
RGB Stars Image resulting from SXT. (click to enlarge)
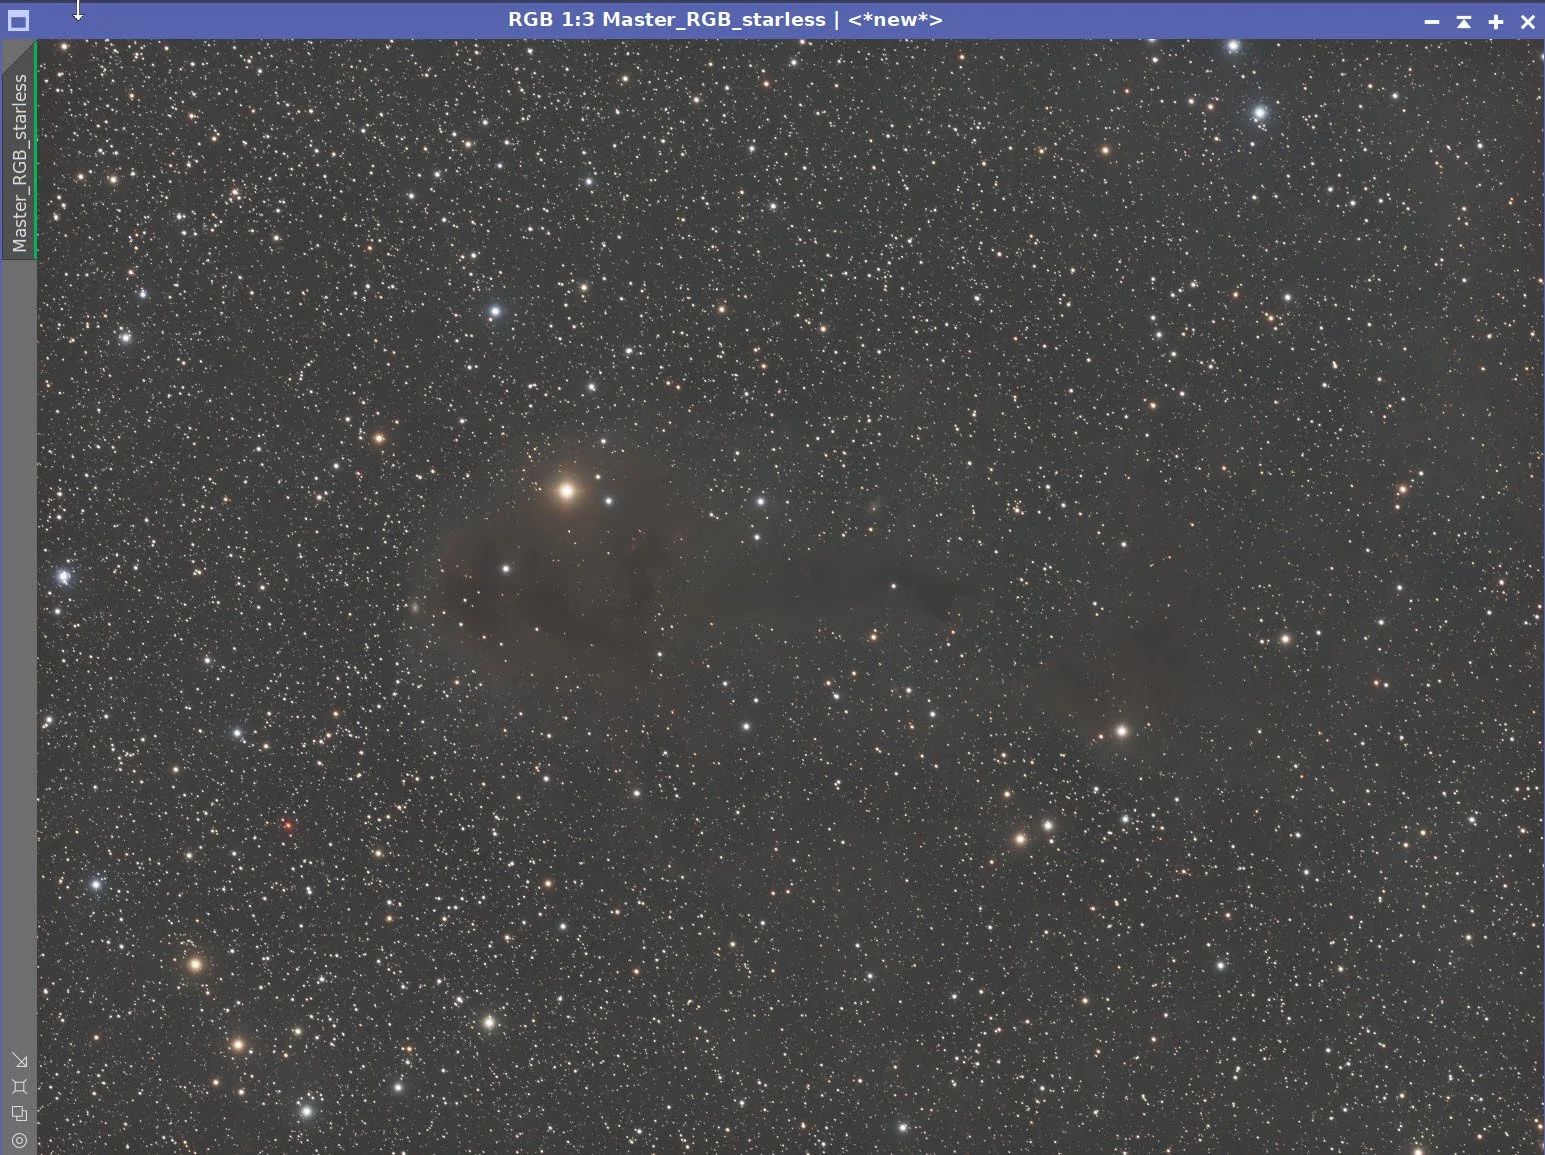
Master RGB Starless Image after SXT (click to enlarge)
5. Process the Linear Lum Image
Significant gradient seen running diagonal to the frame
Run DBE
Start with the RGB sampling plan from the RGB image, and then enhance
Use subtraction.
Run BXT Correct Only
Run PFSImage to get star sizes. X = 1.79 , Y= 1.72
Experiment with BXT settings for best results.
Run BXT Full using the star size of 2.0. Much higher than the PFSImage star size. See the panel shot below.
Apply NXT - see the NXT Panel snap below.
Take each image starless with STX - no need to save the stars.

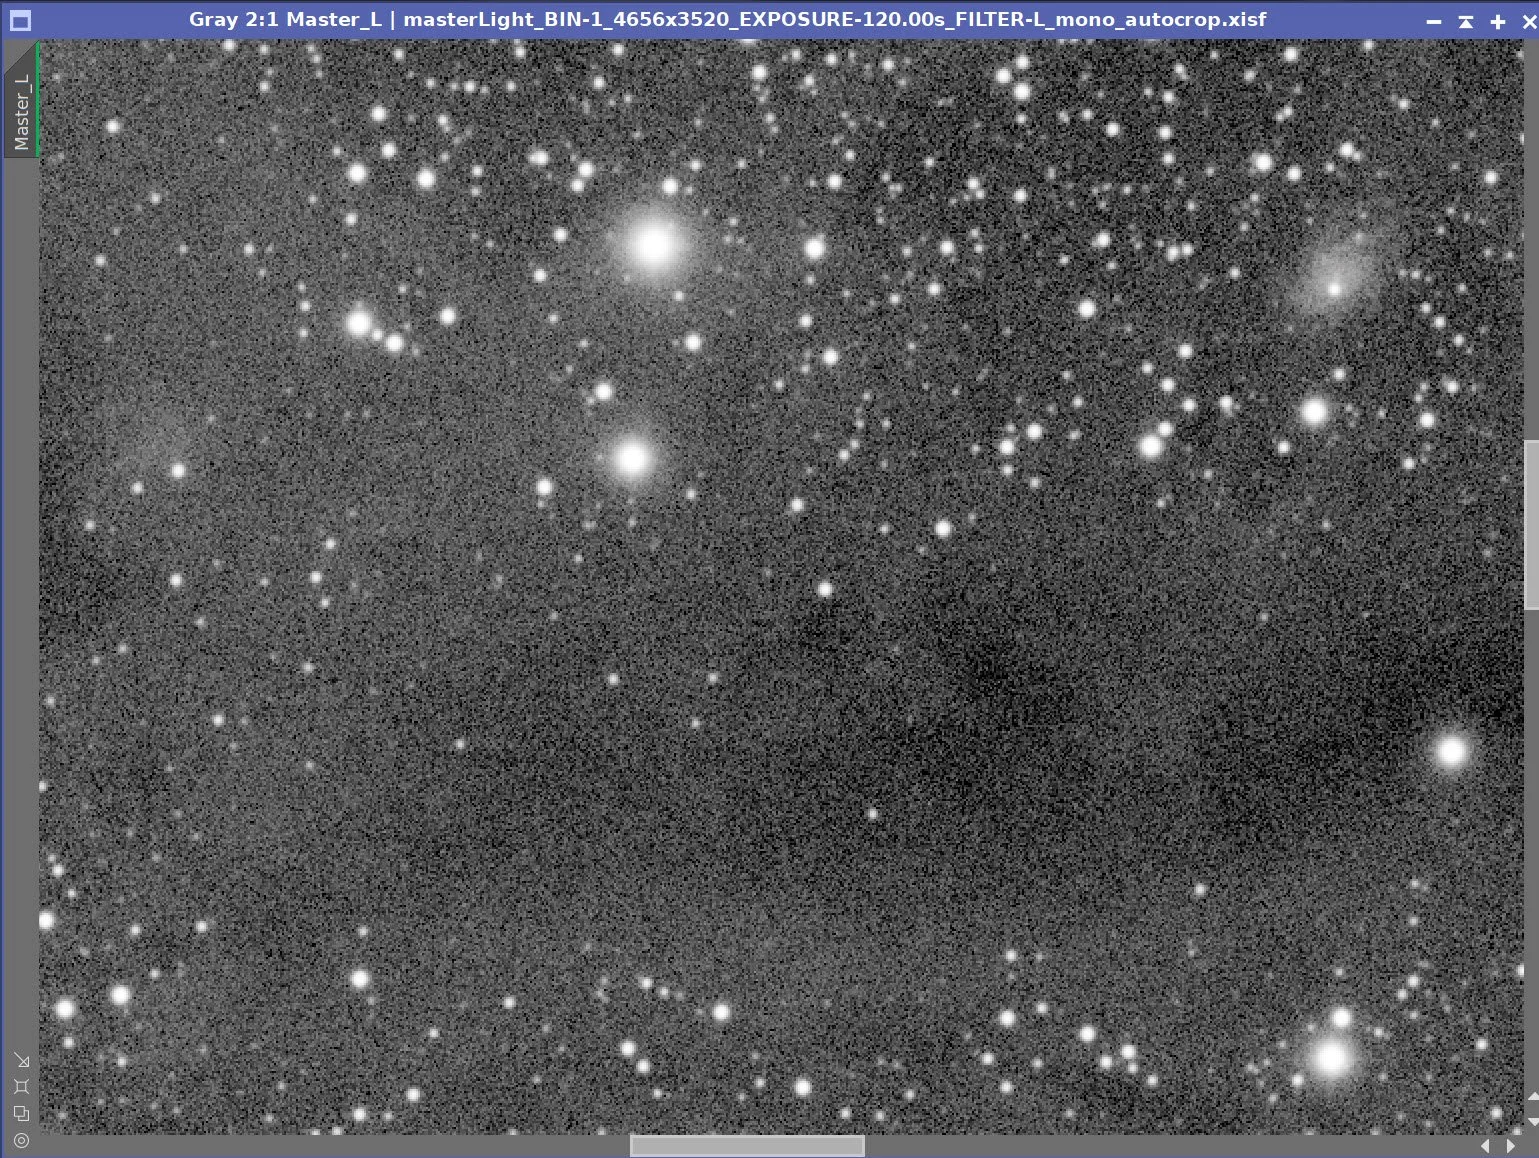
Initial Master L image
Master L image Sampling Plan (click to enlarge)
Maser L before DBE (click to enlarge)
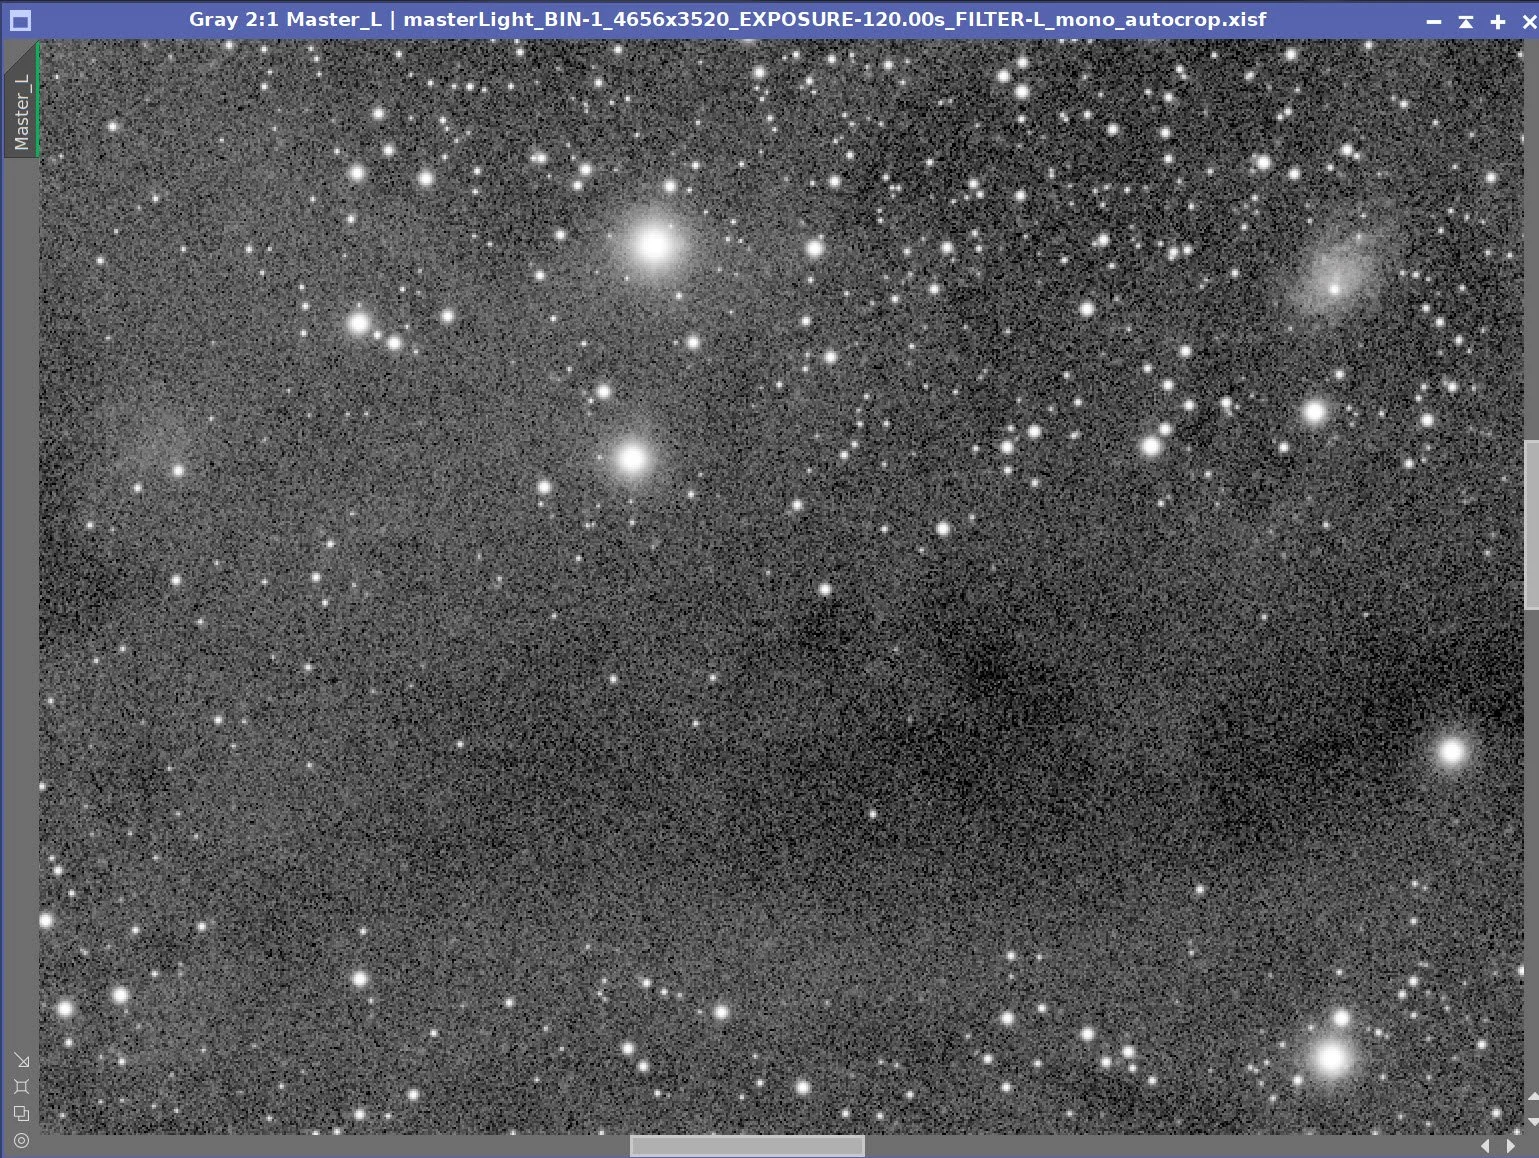
Master L after DBE. (click to enlarge)
Master L background removed. (click to enlarge)
PFSImage results for Master L (click to enlarge)
Final BXT Params used. (click to enlarge)
Params used with NXT V3. (click to enlarge)

Master Lum Before BXT, After BXT Correct Only, After BXT Full, and After NXT
Master L before Star Removal (click to enlarge)
Master L Starless. (click to enlarge)
6. Move Images to the Nonlinear State
For RGB Stars, use Seti Astro’s StarStetch with default settings.
For RGB Starless, use the current STF->HT method to go nonlinear.
For the Lum image, use the current STF->HT method to go nonlinear.
With starless imaging, I can be much more relaxed about my nonlinear conversion as I can more easily protect my stars from being blown out!
Seti Astro’s Star Stretch Panel (click to enlarge)
Initial Nonlinear RGB Stars Image (click to enlarge)
Initial Nonlinear RGB Starless image (click to enlarge)
Initial Nonlinear Lum Starless Image (click to enlarge)
7. Process the Nonlinear RGB Stars Image
CT used to adjust stars.
Then a second stars image is created again using CT to reduce star size and intensity. Now I have two levels of stars to use when adding them back in.
FRGB Stars version 1 Image - larger stars (click to enlarge)

RGB Version 2 stars - smaller stars (click to enlarge)
9. Do the Processing of the Nonlinear Lum image
Apply the CT to get a nice starting contrast.
Aply NXT - see the params used in the panel snap below.
Use LHE to enhance the larger structures - radius of 334, contrast limit of 2.0, amount of 0.18 and a 10-bit histogram.
The Initial Lum image (click to enlarge)
NXT params use (click to enlarge)d in the next step.
Apply CT (Click to enlarge)
After NXT (click to enlarge)
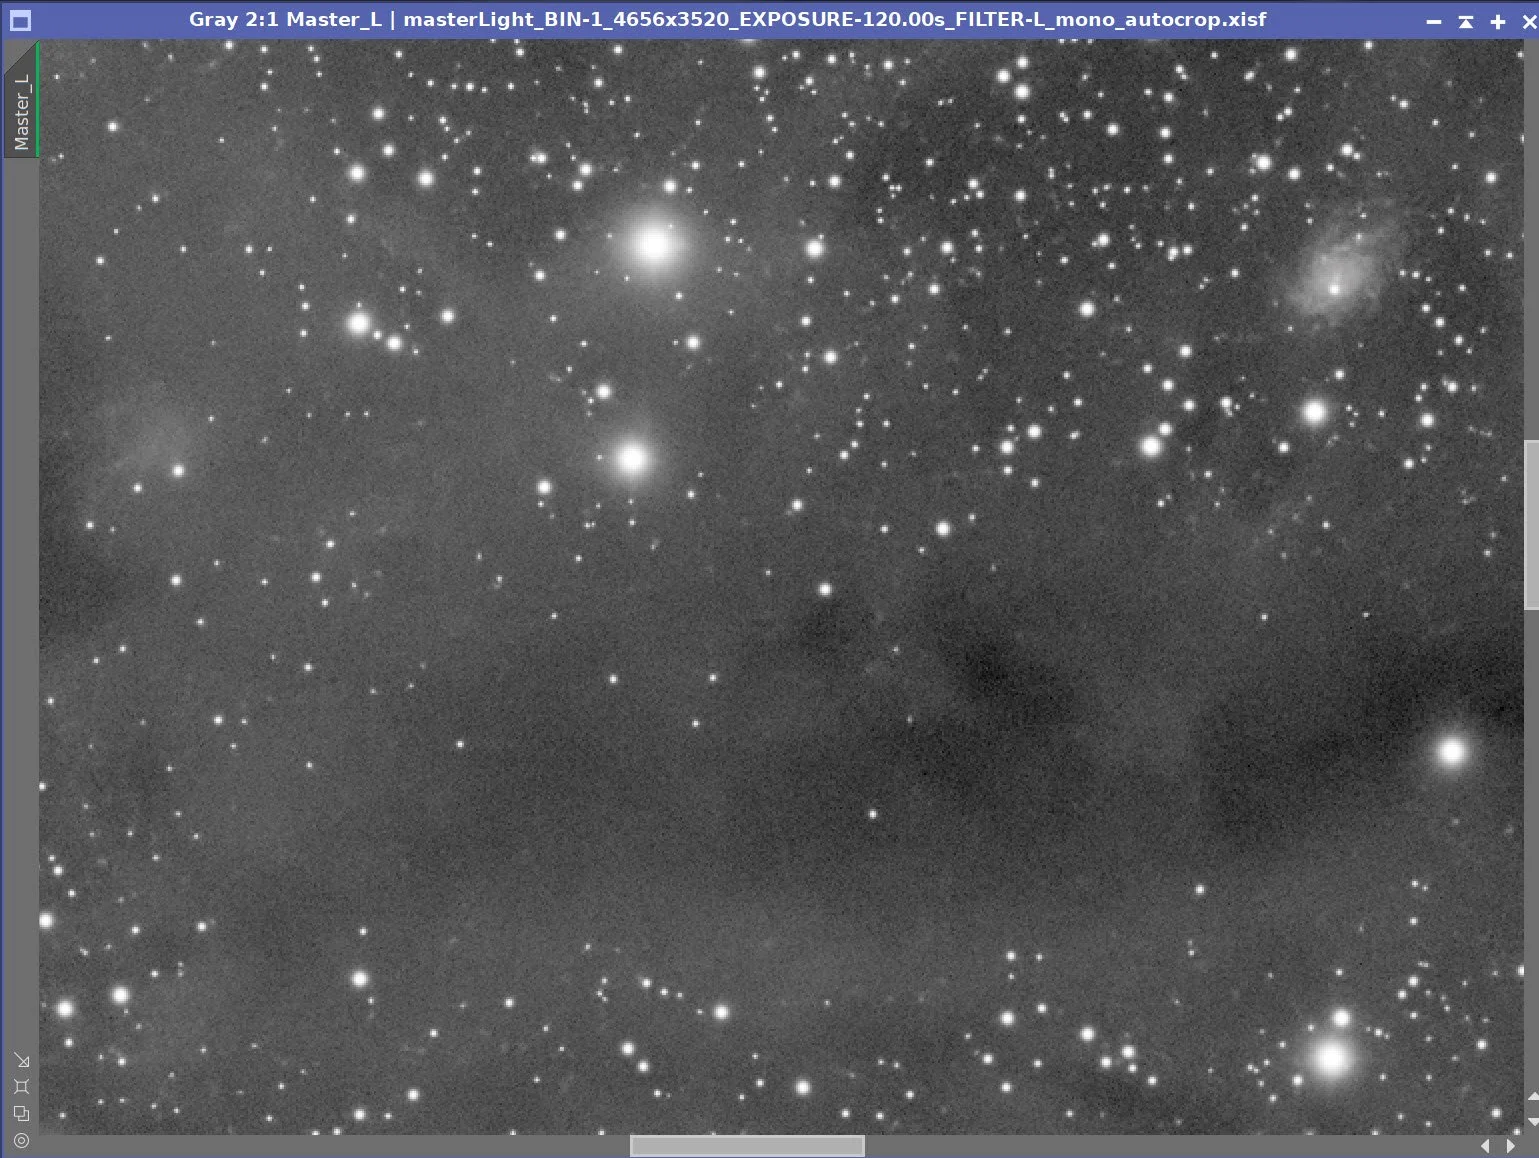
After LHE - final L Image. (click to enlarge)
10. Complete the Processing of the RGB Starless Image
Apply HT to adjust the black point
I am seeing magenta fall off at the extreme edges of the frame. Therefore, I will perform a second DBE operation at this point.
Create a sample map that stresses the edges
use subtraction
Apply NXT - see params used below. A simple denoise version 2 using 4X gave the best results here.
Apply CT to tweak the tonescale
Apply NXT V3 (see params used below in the screensnap)
Using ChannelCombination in CIE Lab mode and just enabling the L layer. Use this to field the Lum image into the RGB Image
We have two small galaxies near the nebula; let’s enhance those.
Galaxy #1: Mid-frame
Create a mask using GAME
Apply Mask
Run LHE with radios 16, max contrast, 2.0, amount of 1.0, and an 8-bit histogram.
Galaxy #2: At the head
Create Mask with GAME
Apply mask
Run HDRMT with levels = 4.0 with the lightness box checked
Run CT
Initial RGB Starles image (click to enlarge)
DBE Sample plan (click to enlarge)

Before DBE (click to enlare)
After HT(click to enlarge)
After DBE (click to enlarge)
Background pattern (click to enlarge)
After DBE (click to enlarge)
After CT(click to enlarge)
NXT params used in the nest step (click to enlarge)
After the NXT operation(click to enlarge)

ChannelCombination Setu p adding Lum data back in.

GalaxyMask created with GAME.
LHE applied with Galaxy Mask. (click to enlarge)

Mask fro second Galaxy created with GAME.
After HDRMT with second galaxy mask(click to enlarge)

After L image blended with the ChanelCombinaton Tool (click to enlarge)
Before Galaxy Enhancement (click to elarge)
LHE applied a second time with the galaxy mask (click to enlarge)
Second galaxy Before enhancement (click to enlarge)
After CT with the Second Galaxy Mask (click to enlarge)
Final RGB Starles image after last CT. (click to enlarge)
11. Combine the RGB Starless with the RGB Stars Image
Use the ScreenStars script to add the RGB Stars back in
Do this with each version of the Stars file
Pick the best one! I liked the smaller stars best.
Add one final CT to tweak midtones.

ScreenStars script used to recombine the stars with the starless images.
With Larger Stars (Click to enlarge)
The recombined Image (click to enalrge)

FInal Image using smaller stars and one final CT Tweak!
14. Export the Image to Photoshop for Polishing
I am pretty happy with the image and ready to polish it in Photoshop.
Save the image as a TIFF 16-bit unsigned and move to Photoshop
Crop the image slightly - eliminating the top and left edge.
Select thebright star and minimize microlensing effects from the 1600 sensor
Make final global adjustments with Clarify, Curves, and the Color Mixer
Added Watermarks
Export Clear, Watermarked, and Web-sized jpegs.

The Final Image!