
Messier 104 - The Sombrero Galaxy - 11 Hours in LRGB - Dealing with a Challenging Set of Issues…
Date: April 27, 2026
Cosgrove’s Cosmos Catalog ➤#0160
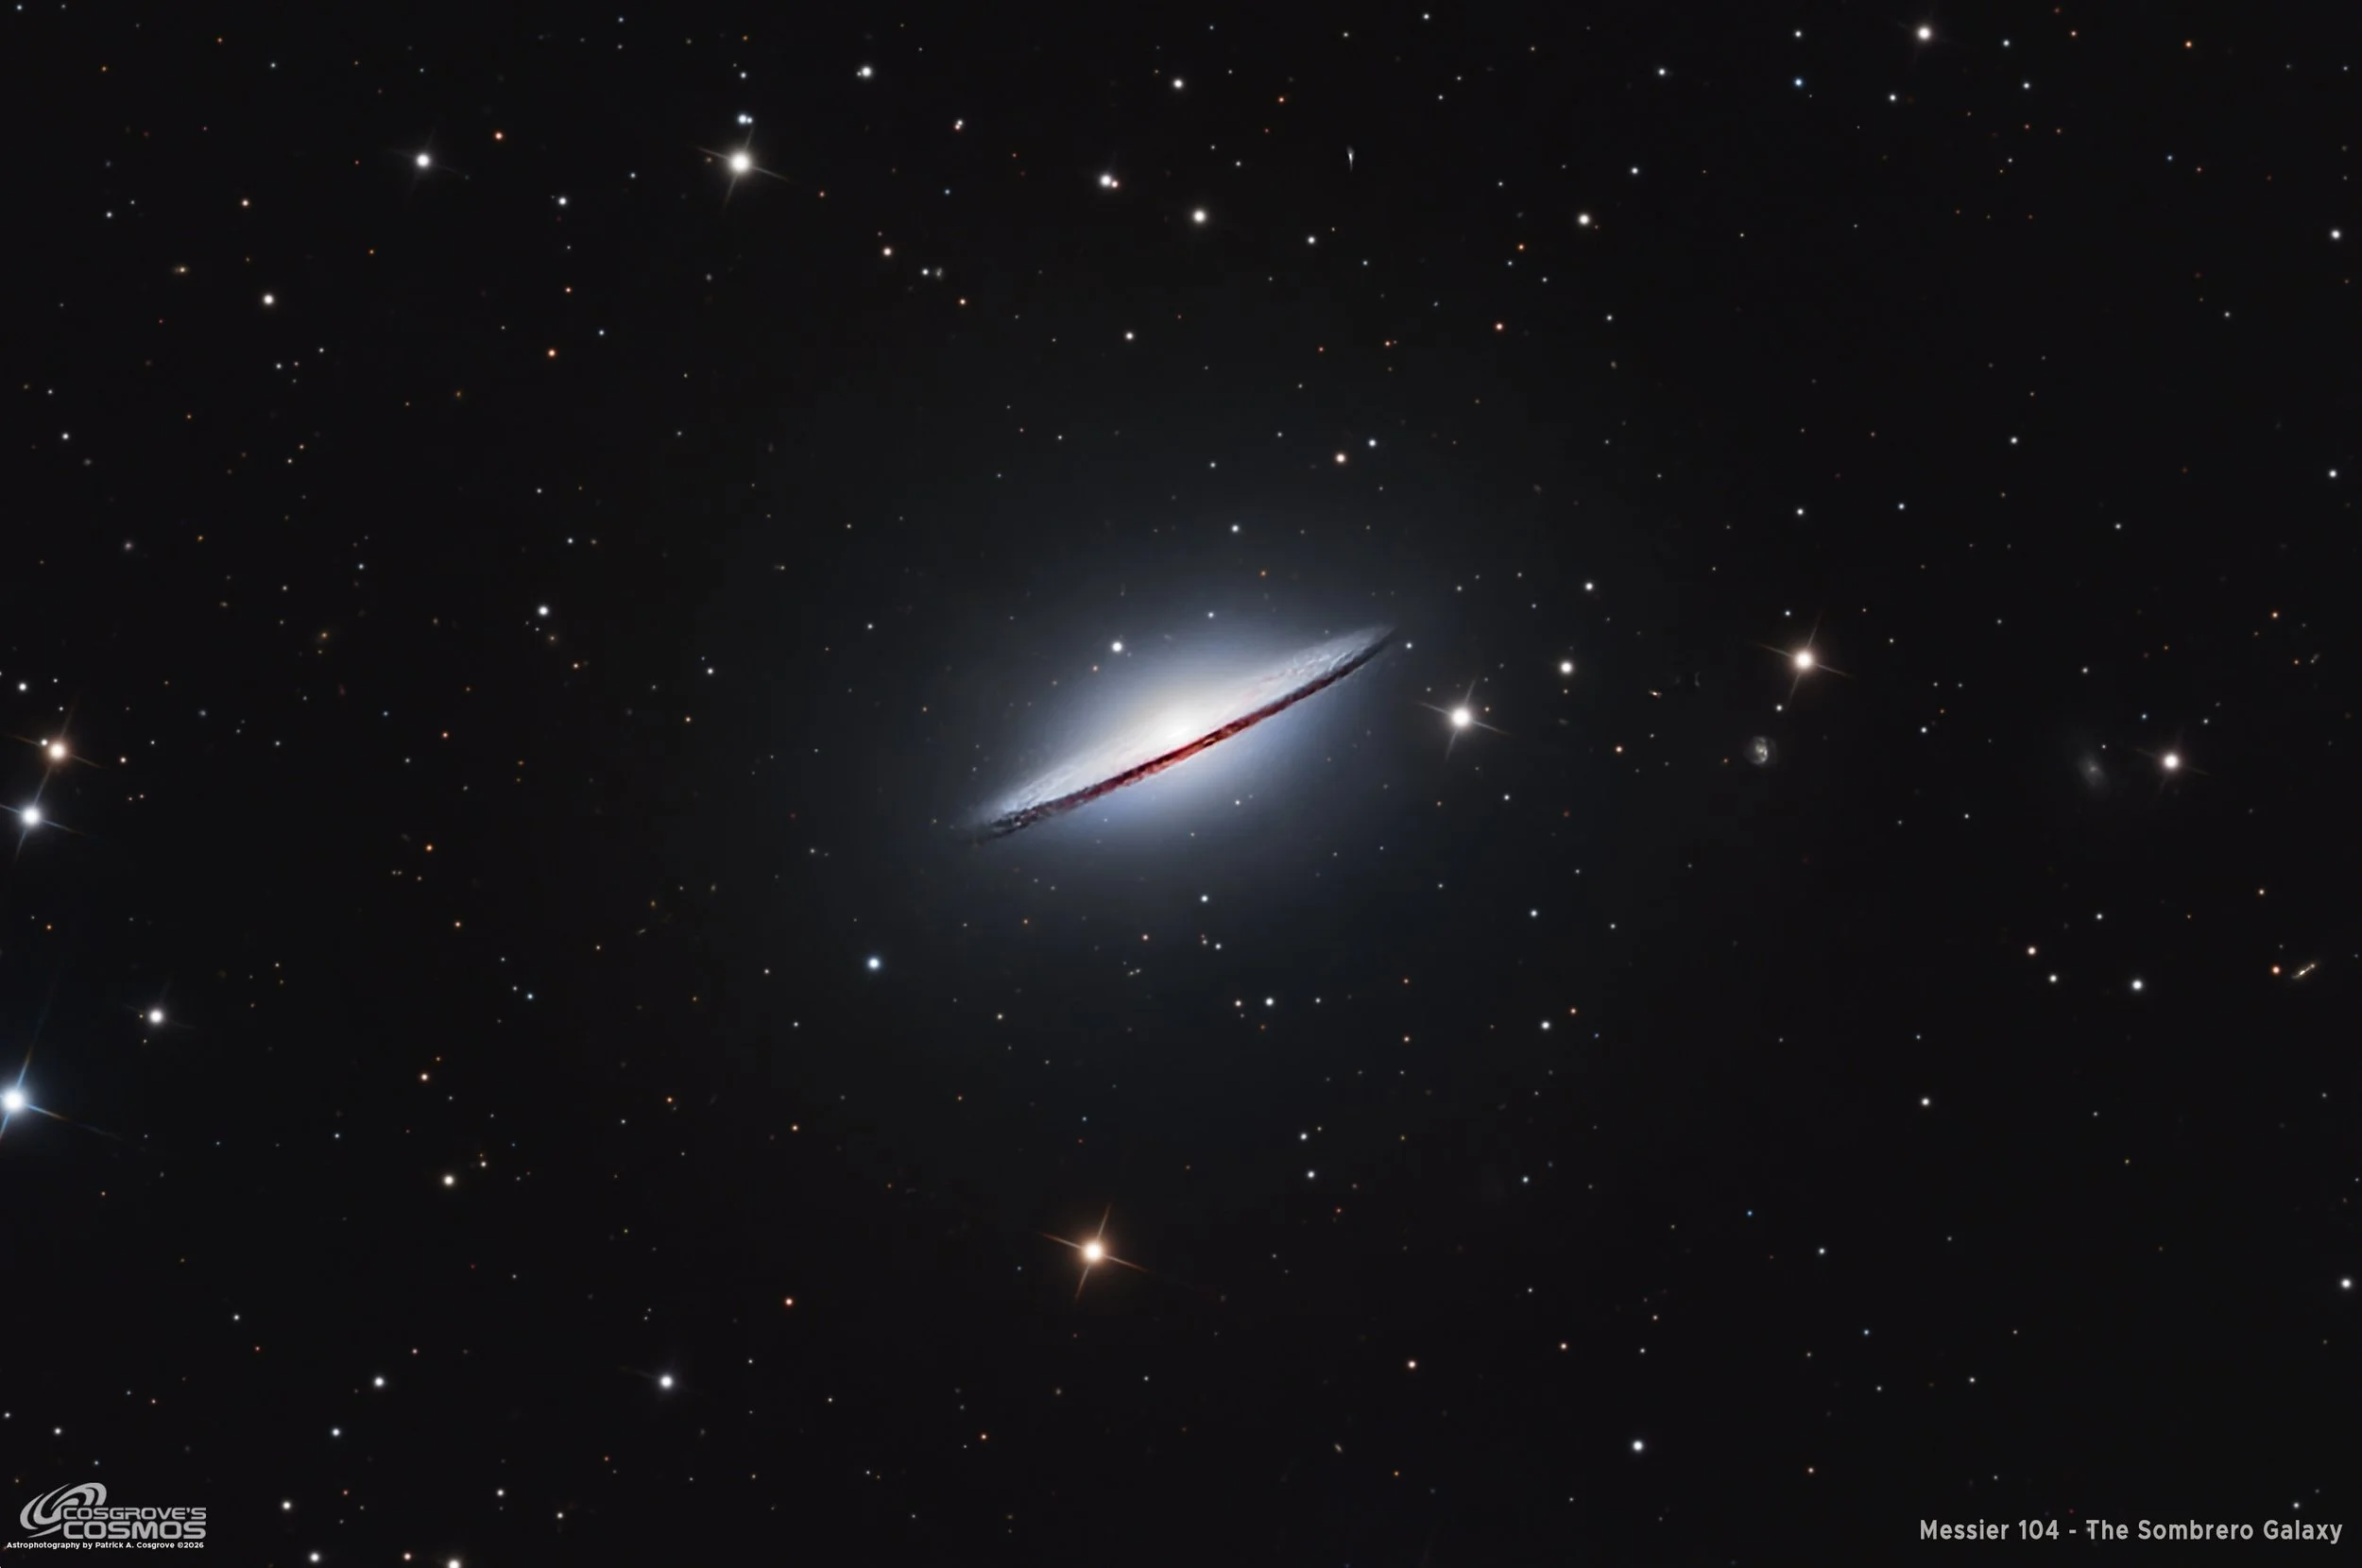
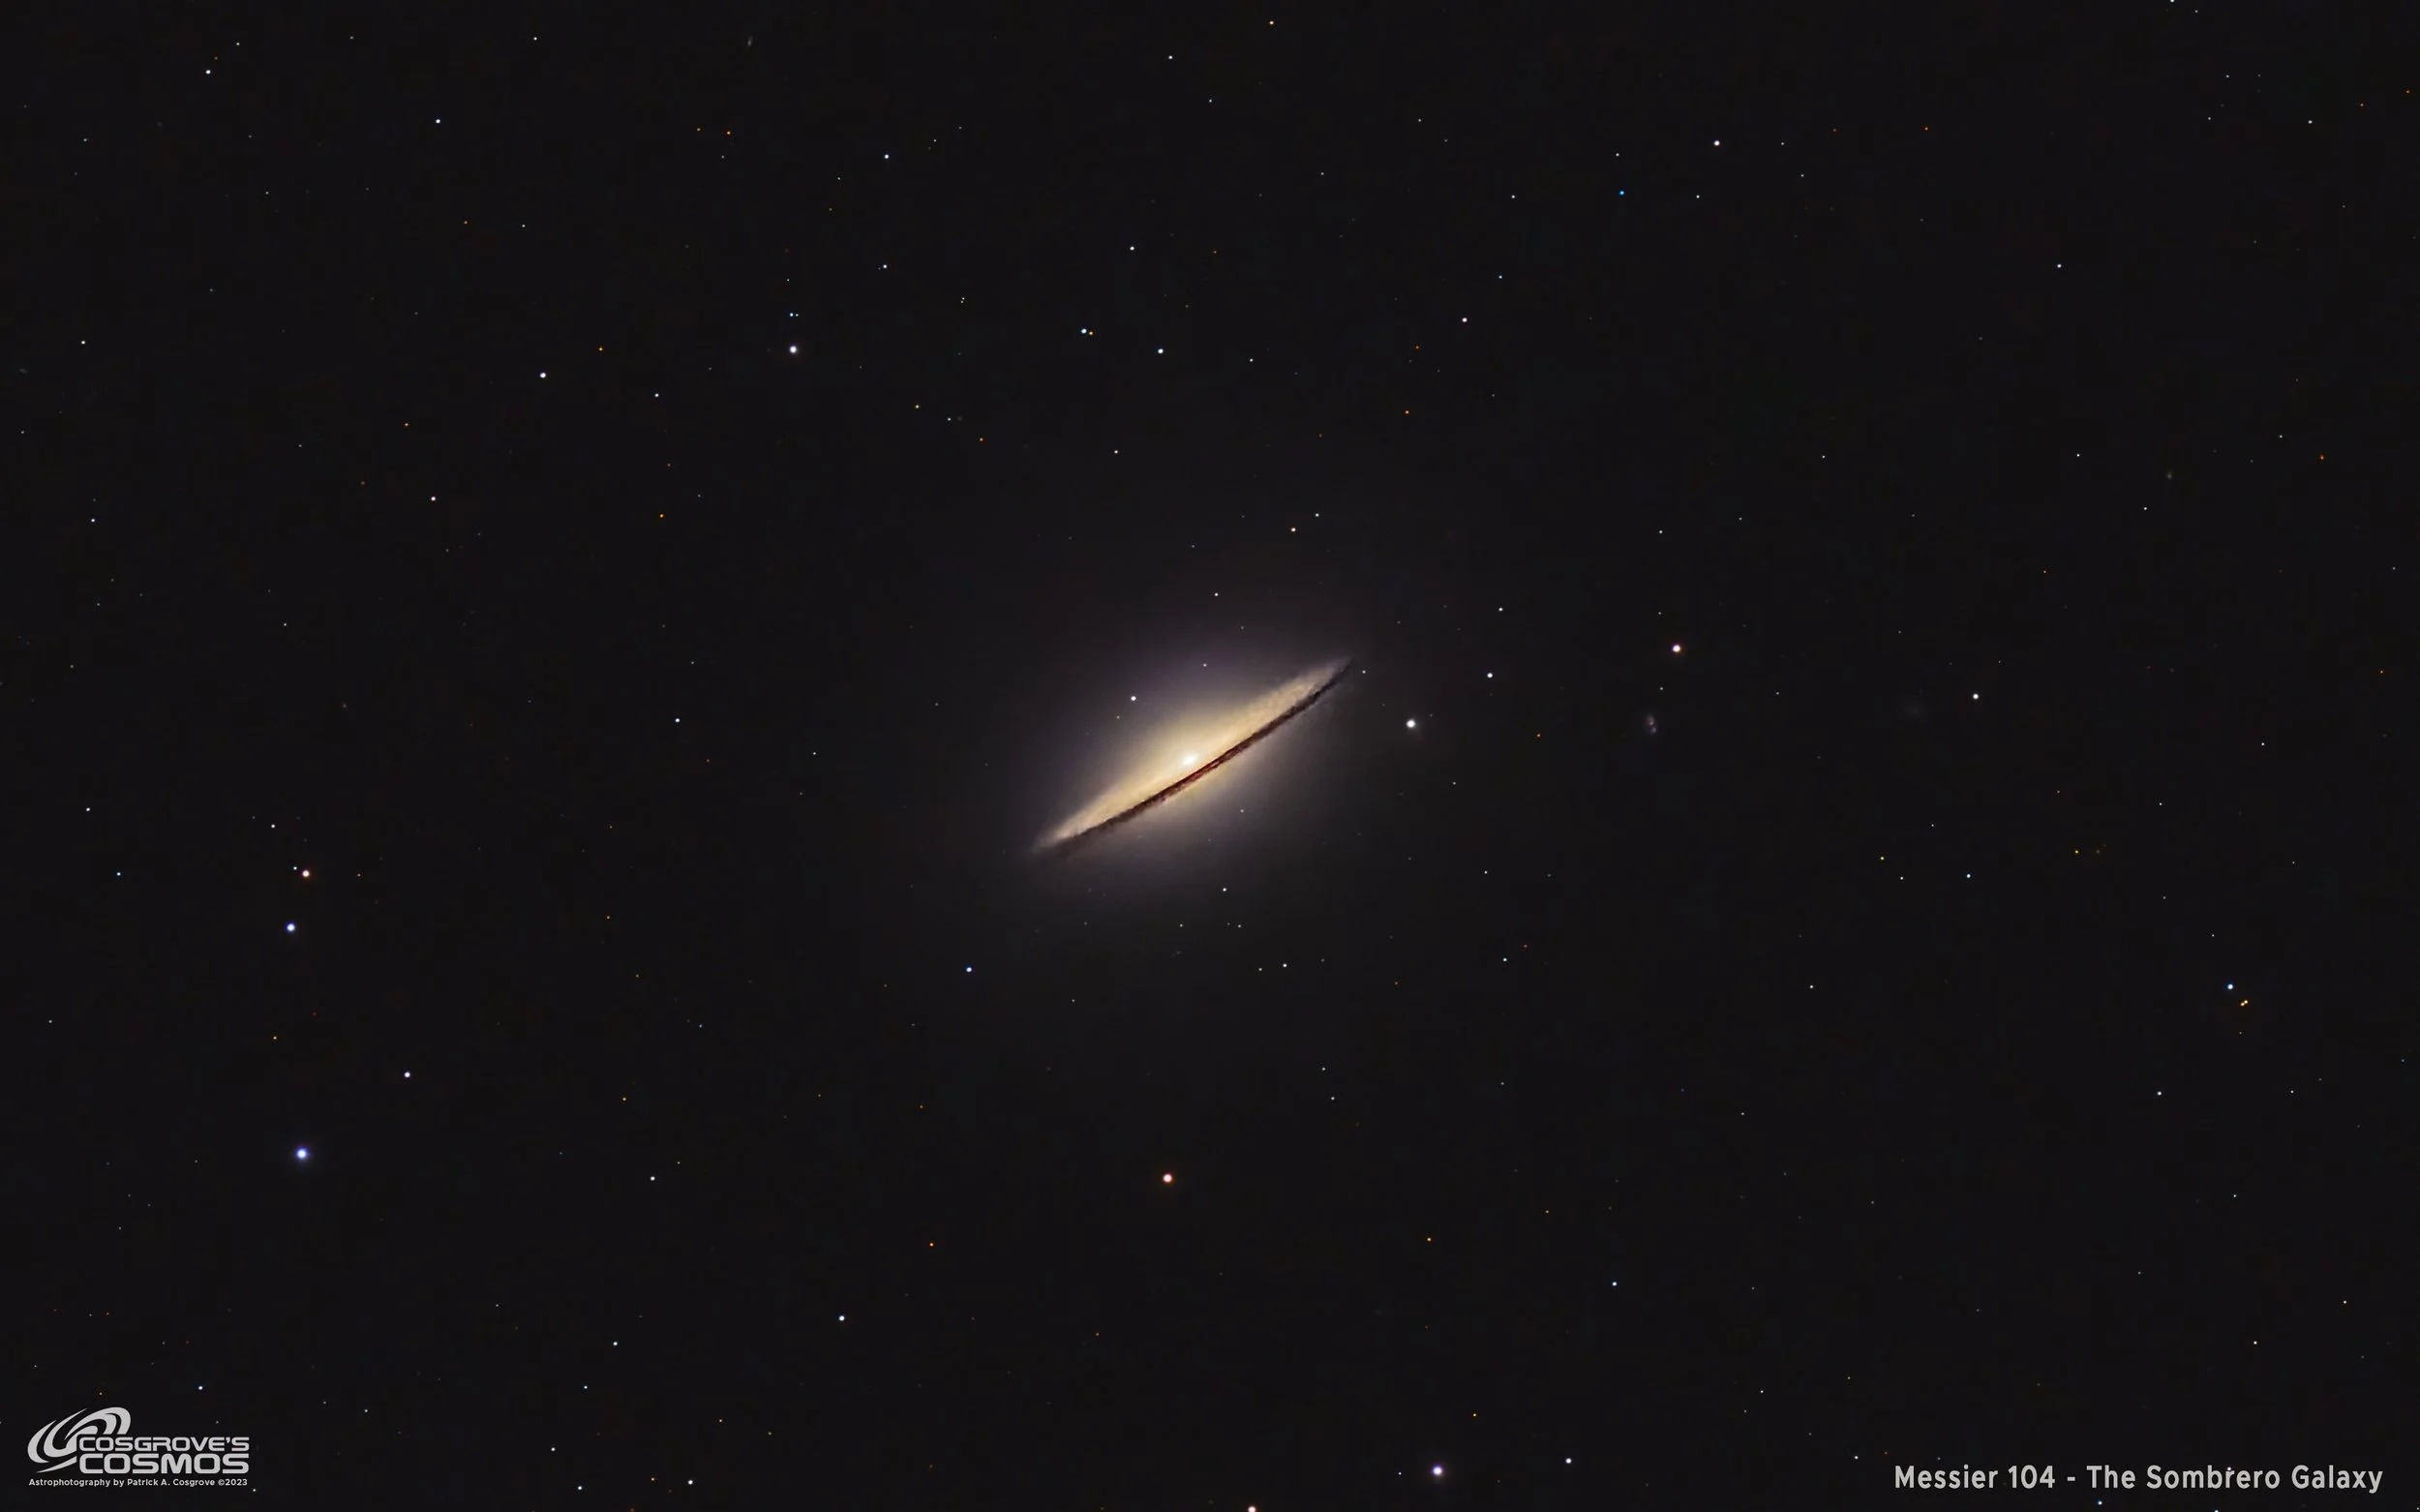
Messier 104 - The Sombrero Galaxy (Click image for hi-res version via AstroBin.com.)
M104 — The Sombrero Galaxy: a brilliant central bulge, a razor-sharp dust lane, and one of the most recognizable profiles in the Messier catalog.
Awarded Flickr “Explore” status!

🔭 Project Summary
Target: Messier 104 – The Sombrero Galaxy / NGC 4594
Capture Dates: April 11, 20, and 21, 2026
Constellation: Virgo • Distance: ≈ 28–30 million light-years
Type: Nearly edge-on spiral galaxy with prominent dust lane and bright central bulge
Imaging Period: April 11–21, 2026 • Total Integration: 11 h 00 m (LRGB)
Filters: L · R · G · B (ZWO 36 mm LRGB Gen II)
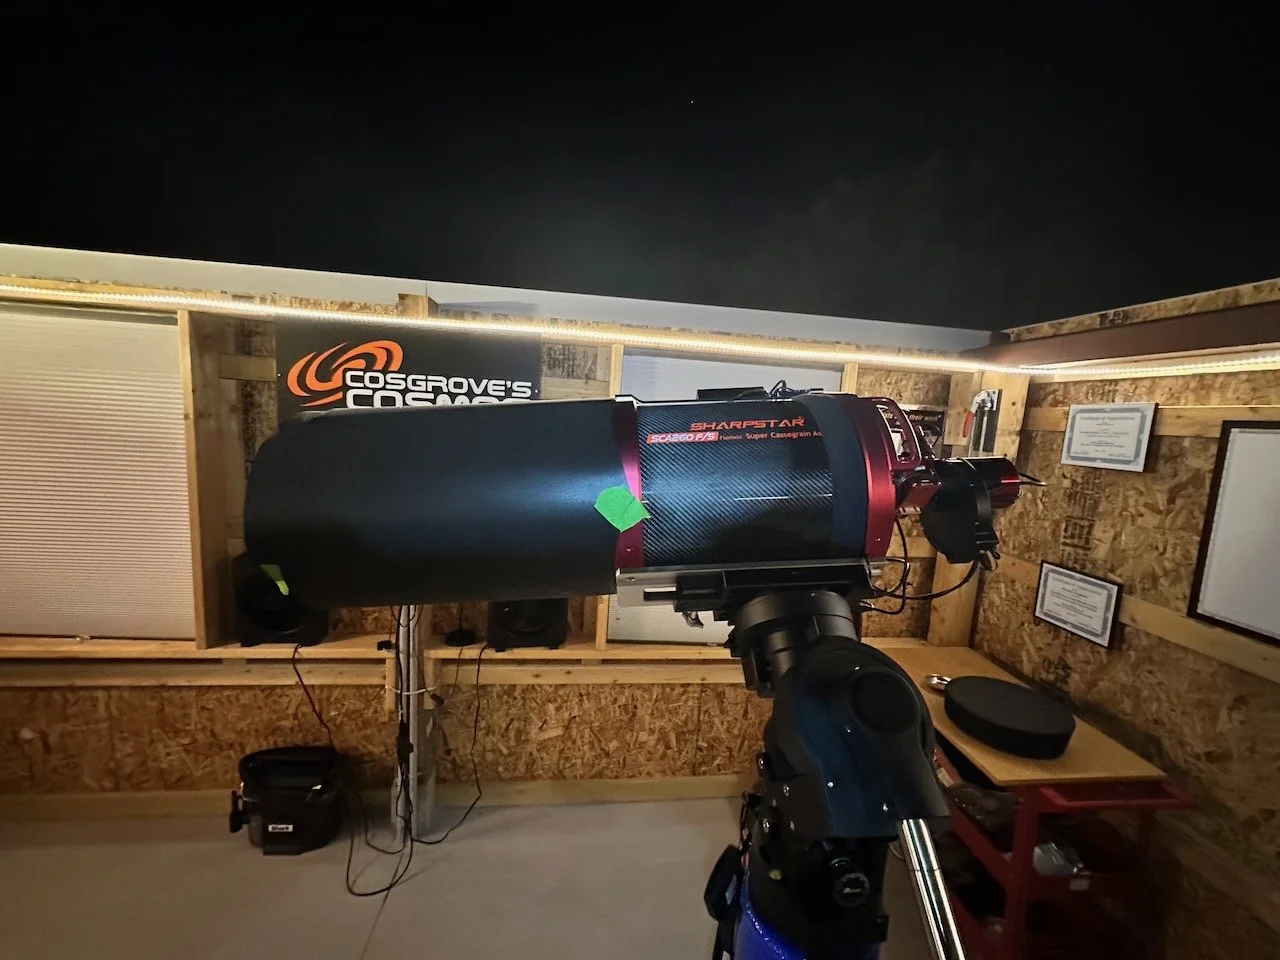
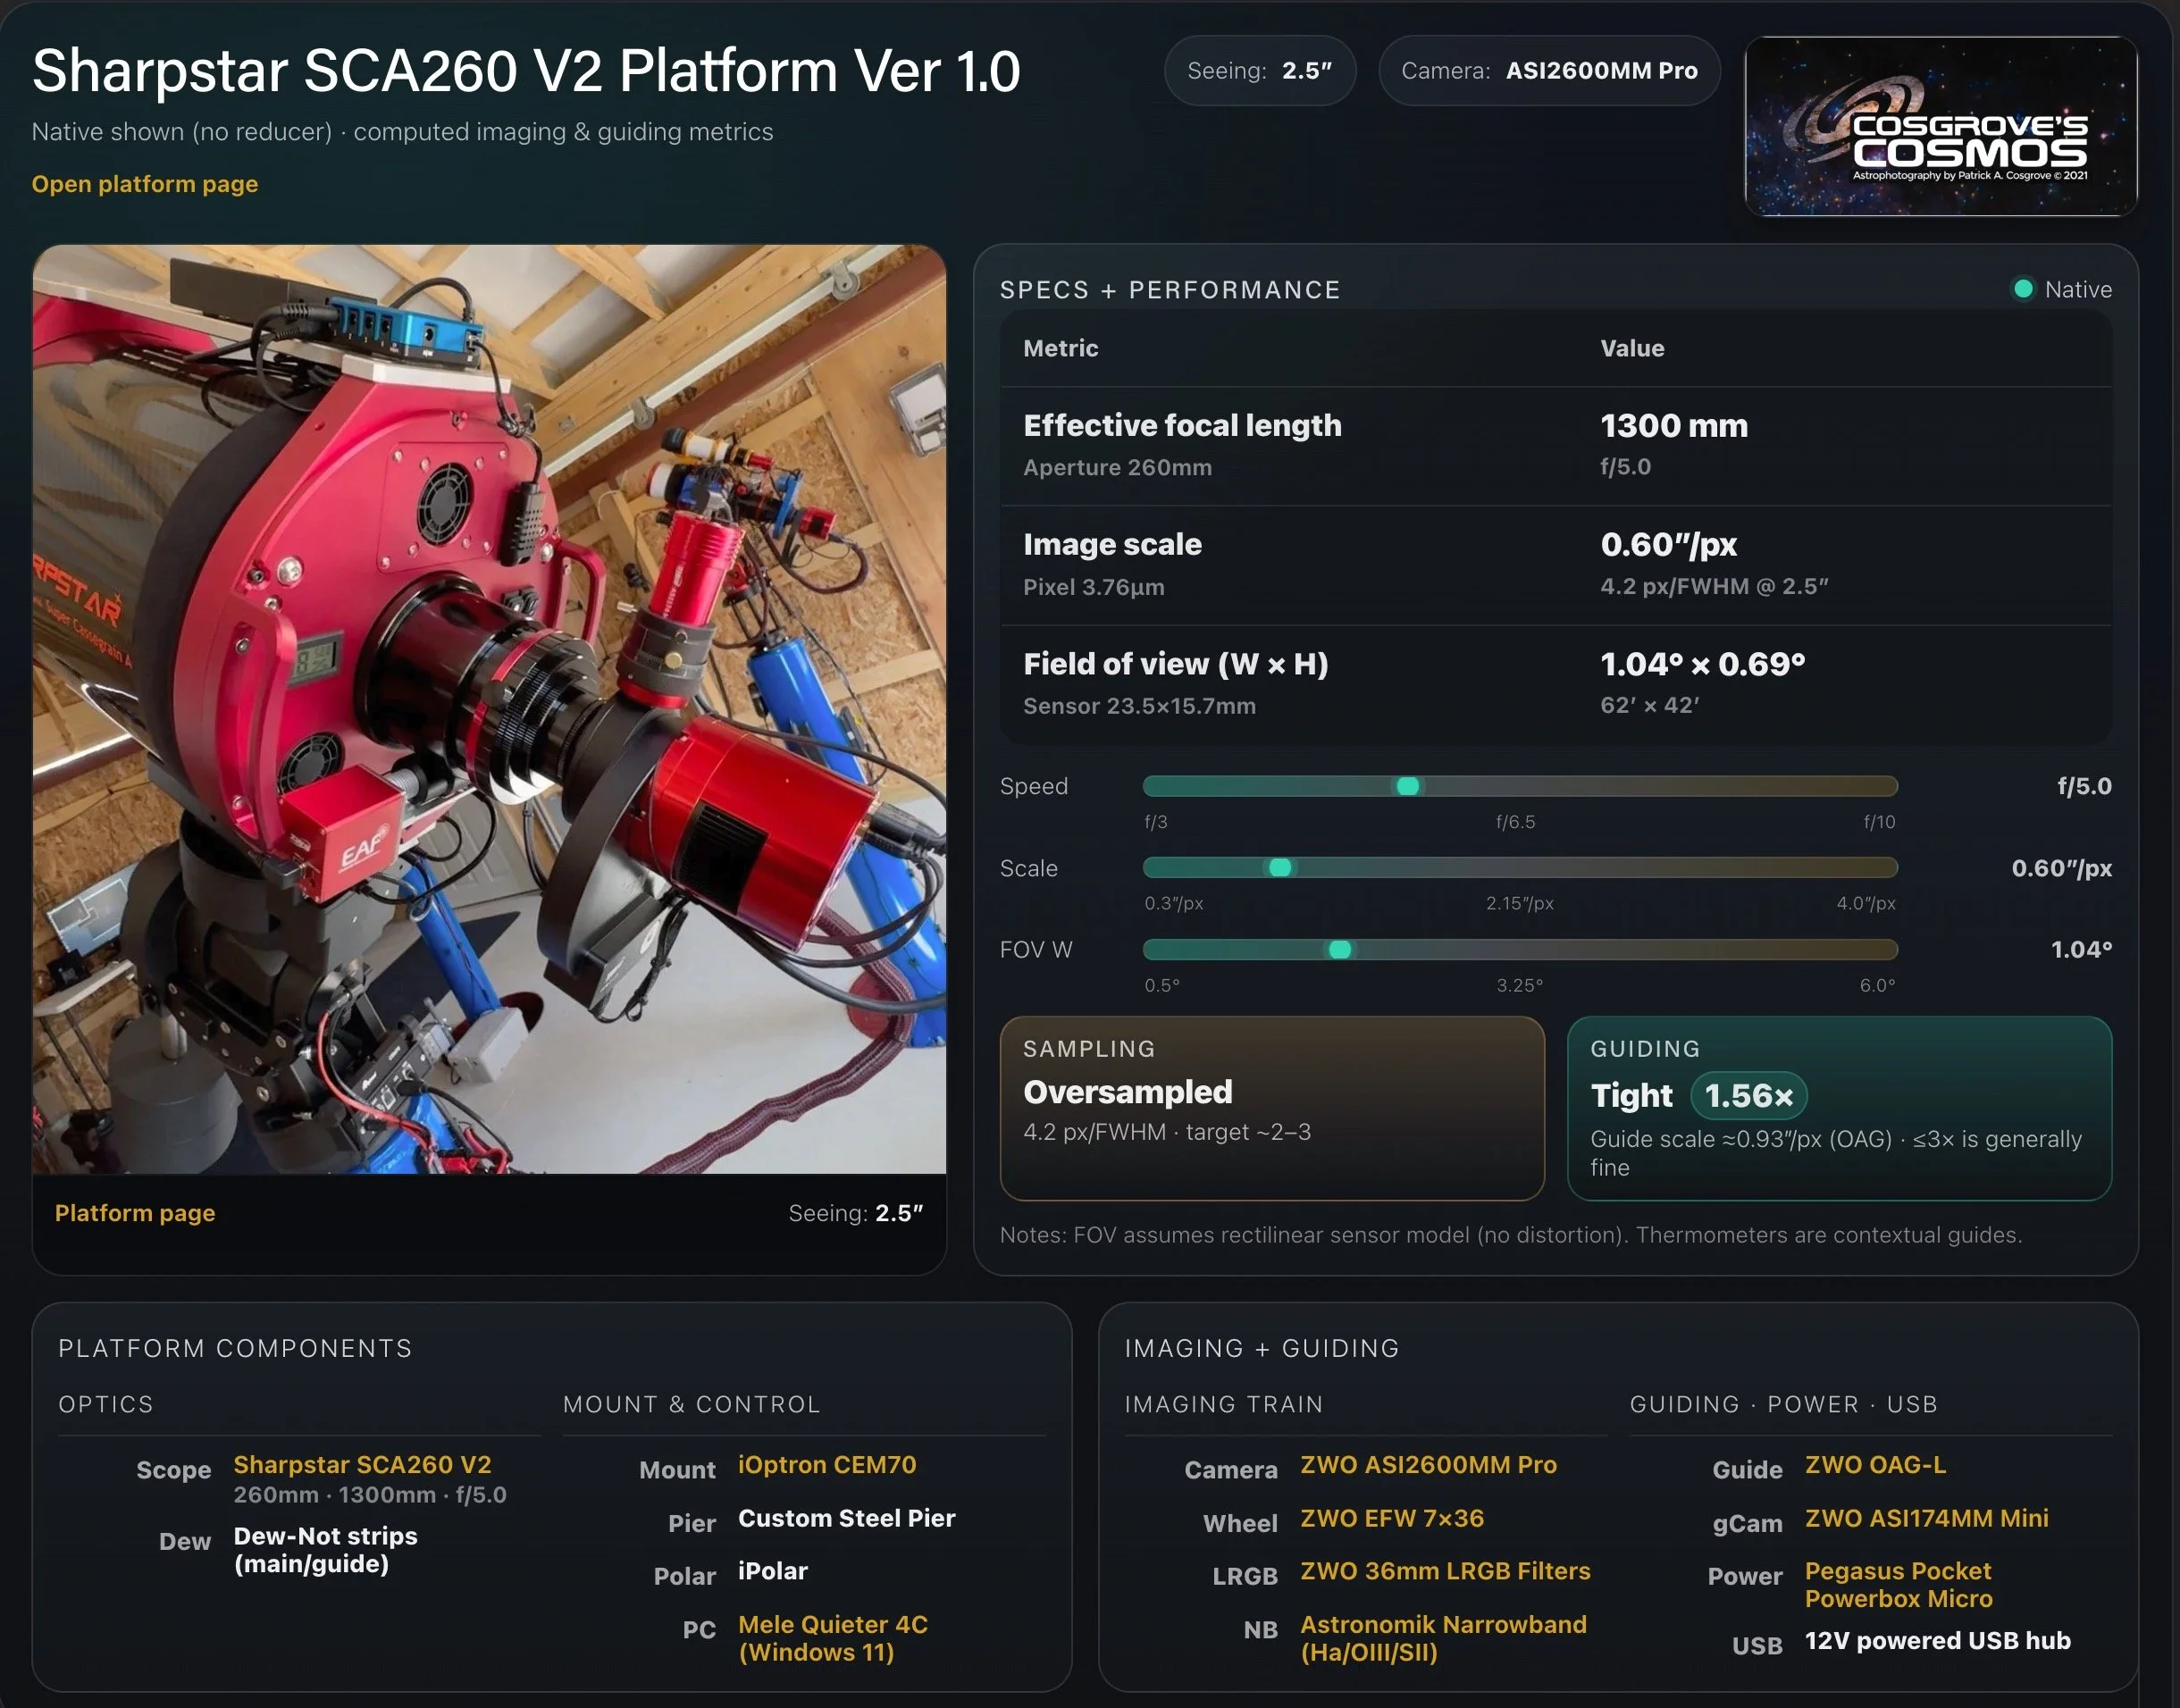
Telescope: Sharpstar SCA260 V2 260 mm f/5.0 Special Cassegrain Astrograph (≈1300 mm)
Camera: ZWO ASI2600MM-Pro (−15 °C; Gain 0 LRGB)
Mount: iOptron CEM70 on custom steel pier
Processing: PixInsight (LRGB) & Photoshop
Location: Whispering Skies Observatory · Honeoye Falls, NY (USA)
Acquisition notes: L: 193 × 90 s; R: 89 × 90 s; G: 80 × 90 s; B: 78 × 90 s at −15 °C, Gain 0; total 11 h 00 m after culling bad or questionable subs.
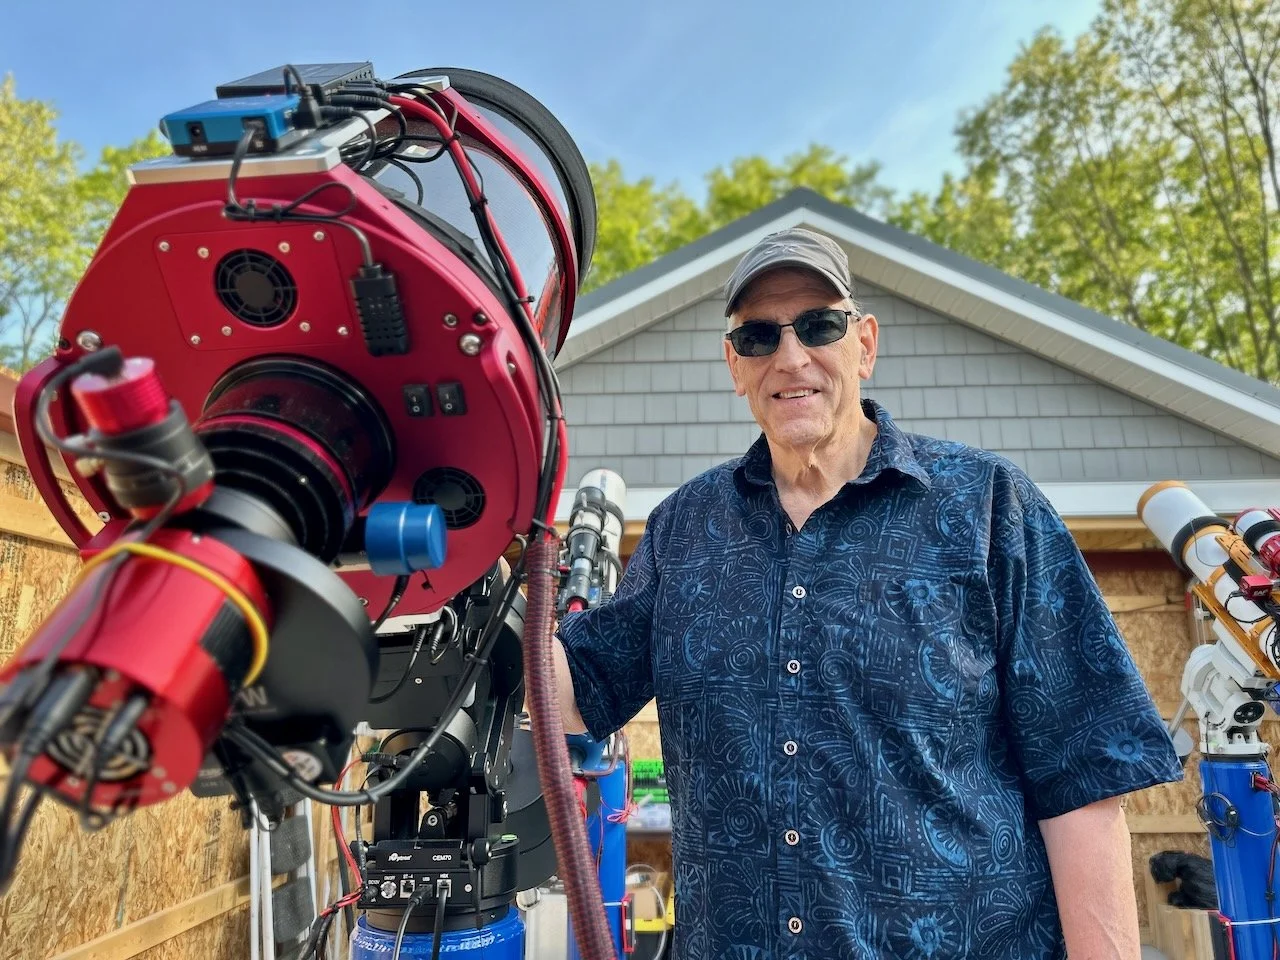
The Sharpstar SCA 260 V2 Platform (and yours truly!) (click on image to go to the blog entry for this scope_)
📸 Capture Details
Nights: April 11, 20, and 21, 2026
| Channel / Filter | Frames × Exposure | Settings | Total |
|---|---|---|---|
| L — ZWO Lum (36 mm unmounted) | 193 × 90 s | bin 1×1 • −15 °C • Gain 0 | 4 h 49 m 30 s |
| R — ZWO Red (36 mm unmounted) | 89 × 90 s | bin 1×1 • −15 °C • Gain 0 | 2 h 13 m 30 s |
| G — ZWO Green (36 mm unmounted) | 80 × 90 s | bin 1×1 • −15 °C • Gain 0 | 2 h 00 m |
| B — ZWO Blue (36 mm unmounted) | 78 × 90 s | bin 1×1 • −15 °C • Gain 0 | 1 h 57 m |
| Total Integration (after culling): 11 h 00 m (LRGB) | |||
Calibration Frames
- 30 × dark frames @ 90 s, bin 1×1, −15 °C, Gain 0
- 30 × dark-flats @ each flat exposure time, bin 1×1, −15 °C, Gain 100 or Gain 0 as needed
- Flats: 15 each — L, R, G, B
Table of Contents Show (Click on lines to navigate)
Annotated Image
This annotated image was created with the ImageSolver and FinderChart scripts in PixInsight.
The Location in the Sky
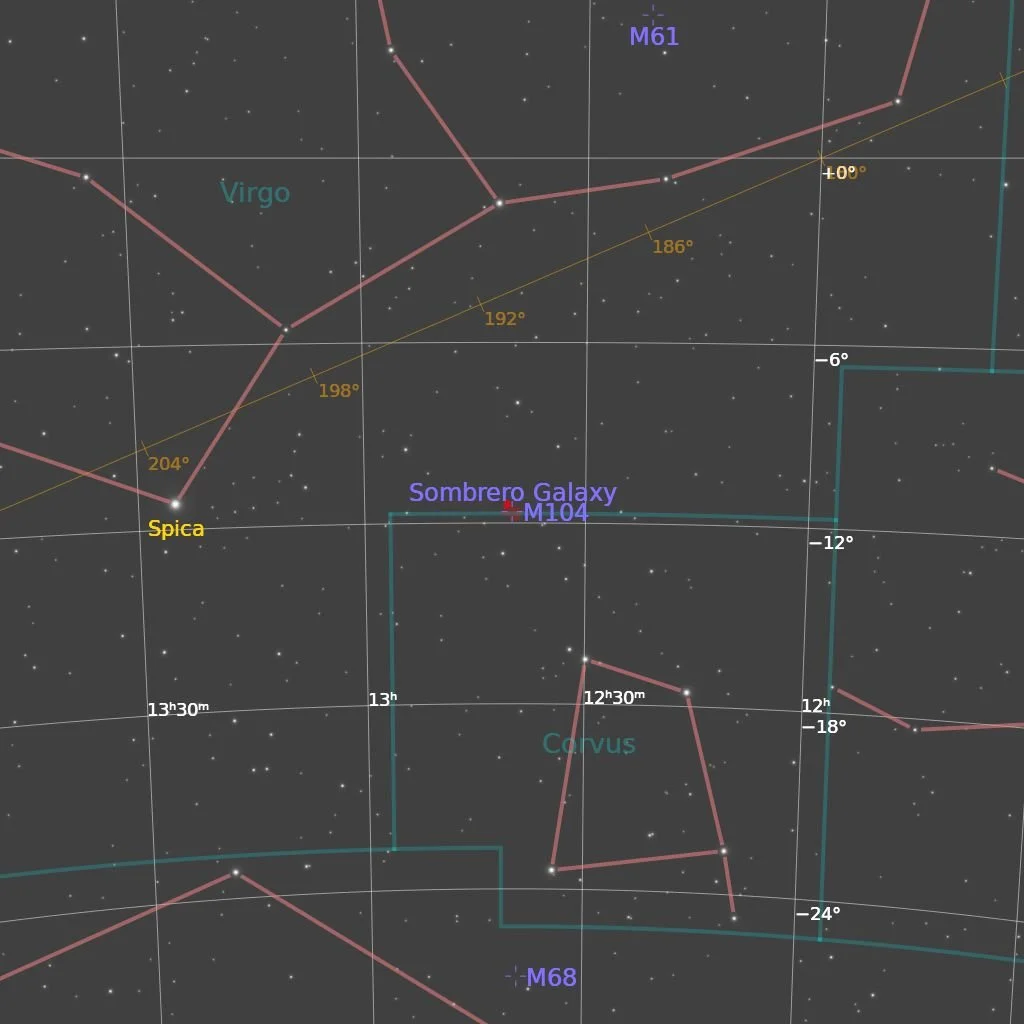
This annotated image was created with the ImageSolver and FinderChart scripts in PixInsight.
🔭 About The Target
Overview
Messier 104, better known as the Sombrero Galaxy, is one of the most recognizable galaxies in the spring sky. It is also cataloged as M104 and NGC 4594. The galaxy lies in the constellation Virgo, near the border with Corvus, and is roughly 28–30 million light-years from Earth. Its common name comes from its appearance: a bright central bulge surrounded by a broad, dark dust lane that gives it the look of a wide-brimmed hat. From our point of view, the galaxy appears nearly edge-on, making the dust band especially prominent.
Discovery and Naming
M104 was discovered in 1781 by the French astronomer Pierre Méchain, a close colleague of Charles Messier. It was not included in the original published Messier catalog, but Messier later added a note about it in his personal copy of Connoissance des Temps. Much later, in 1921, Camille Flammarion identified that note with NGC 4594, and the object became known as Messier 104. That makes M104 an interesting case: it carries a Messier number, but it was added after the original Messier catalog had already been published.

Charles Messier (1730-1817)

Pierre Méchain (1744-1804)
(Credit: By Hurle - Stoyan R. et al. Atlas of the Messier Objects: Highlights of the Deep Sky. — Cambridge: Cambridge University Press, 2008. — P. 23. Original painting is located at the Bibliothèque de l'Observatoire de Paris., Public Domain, https://commons.wikimedia.org/w/index.php?curid=9784
The Science
Scientifically, the Sombrero Galaxy is an especially interesting system because it does not fit neatly into the simple mental picture many people have of a spiral galaxy. It has a large, bright central bulge, a sharply defined dust lane, and a massive halo of stars and globular clusters. NASA describes it as one of the more massive objects associated with the Virgo galaxy region, with a mass on the order of hundreds of billions of suns. At its center is a supermassive black hole, and the structure of the galaxy suggests a complex evolutionary history, likely shaped by mergers and interactions over time.
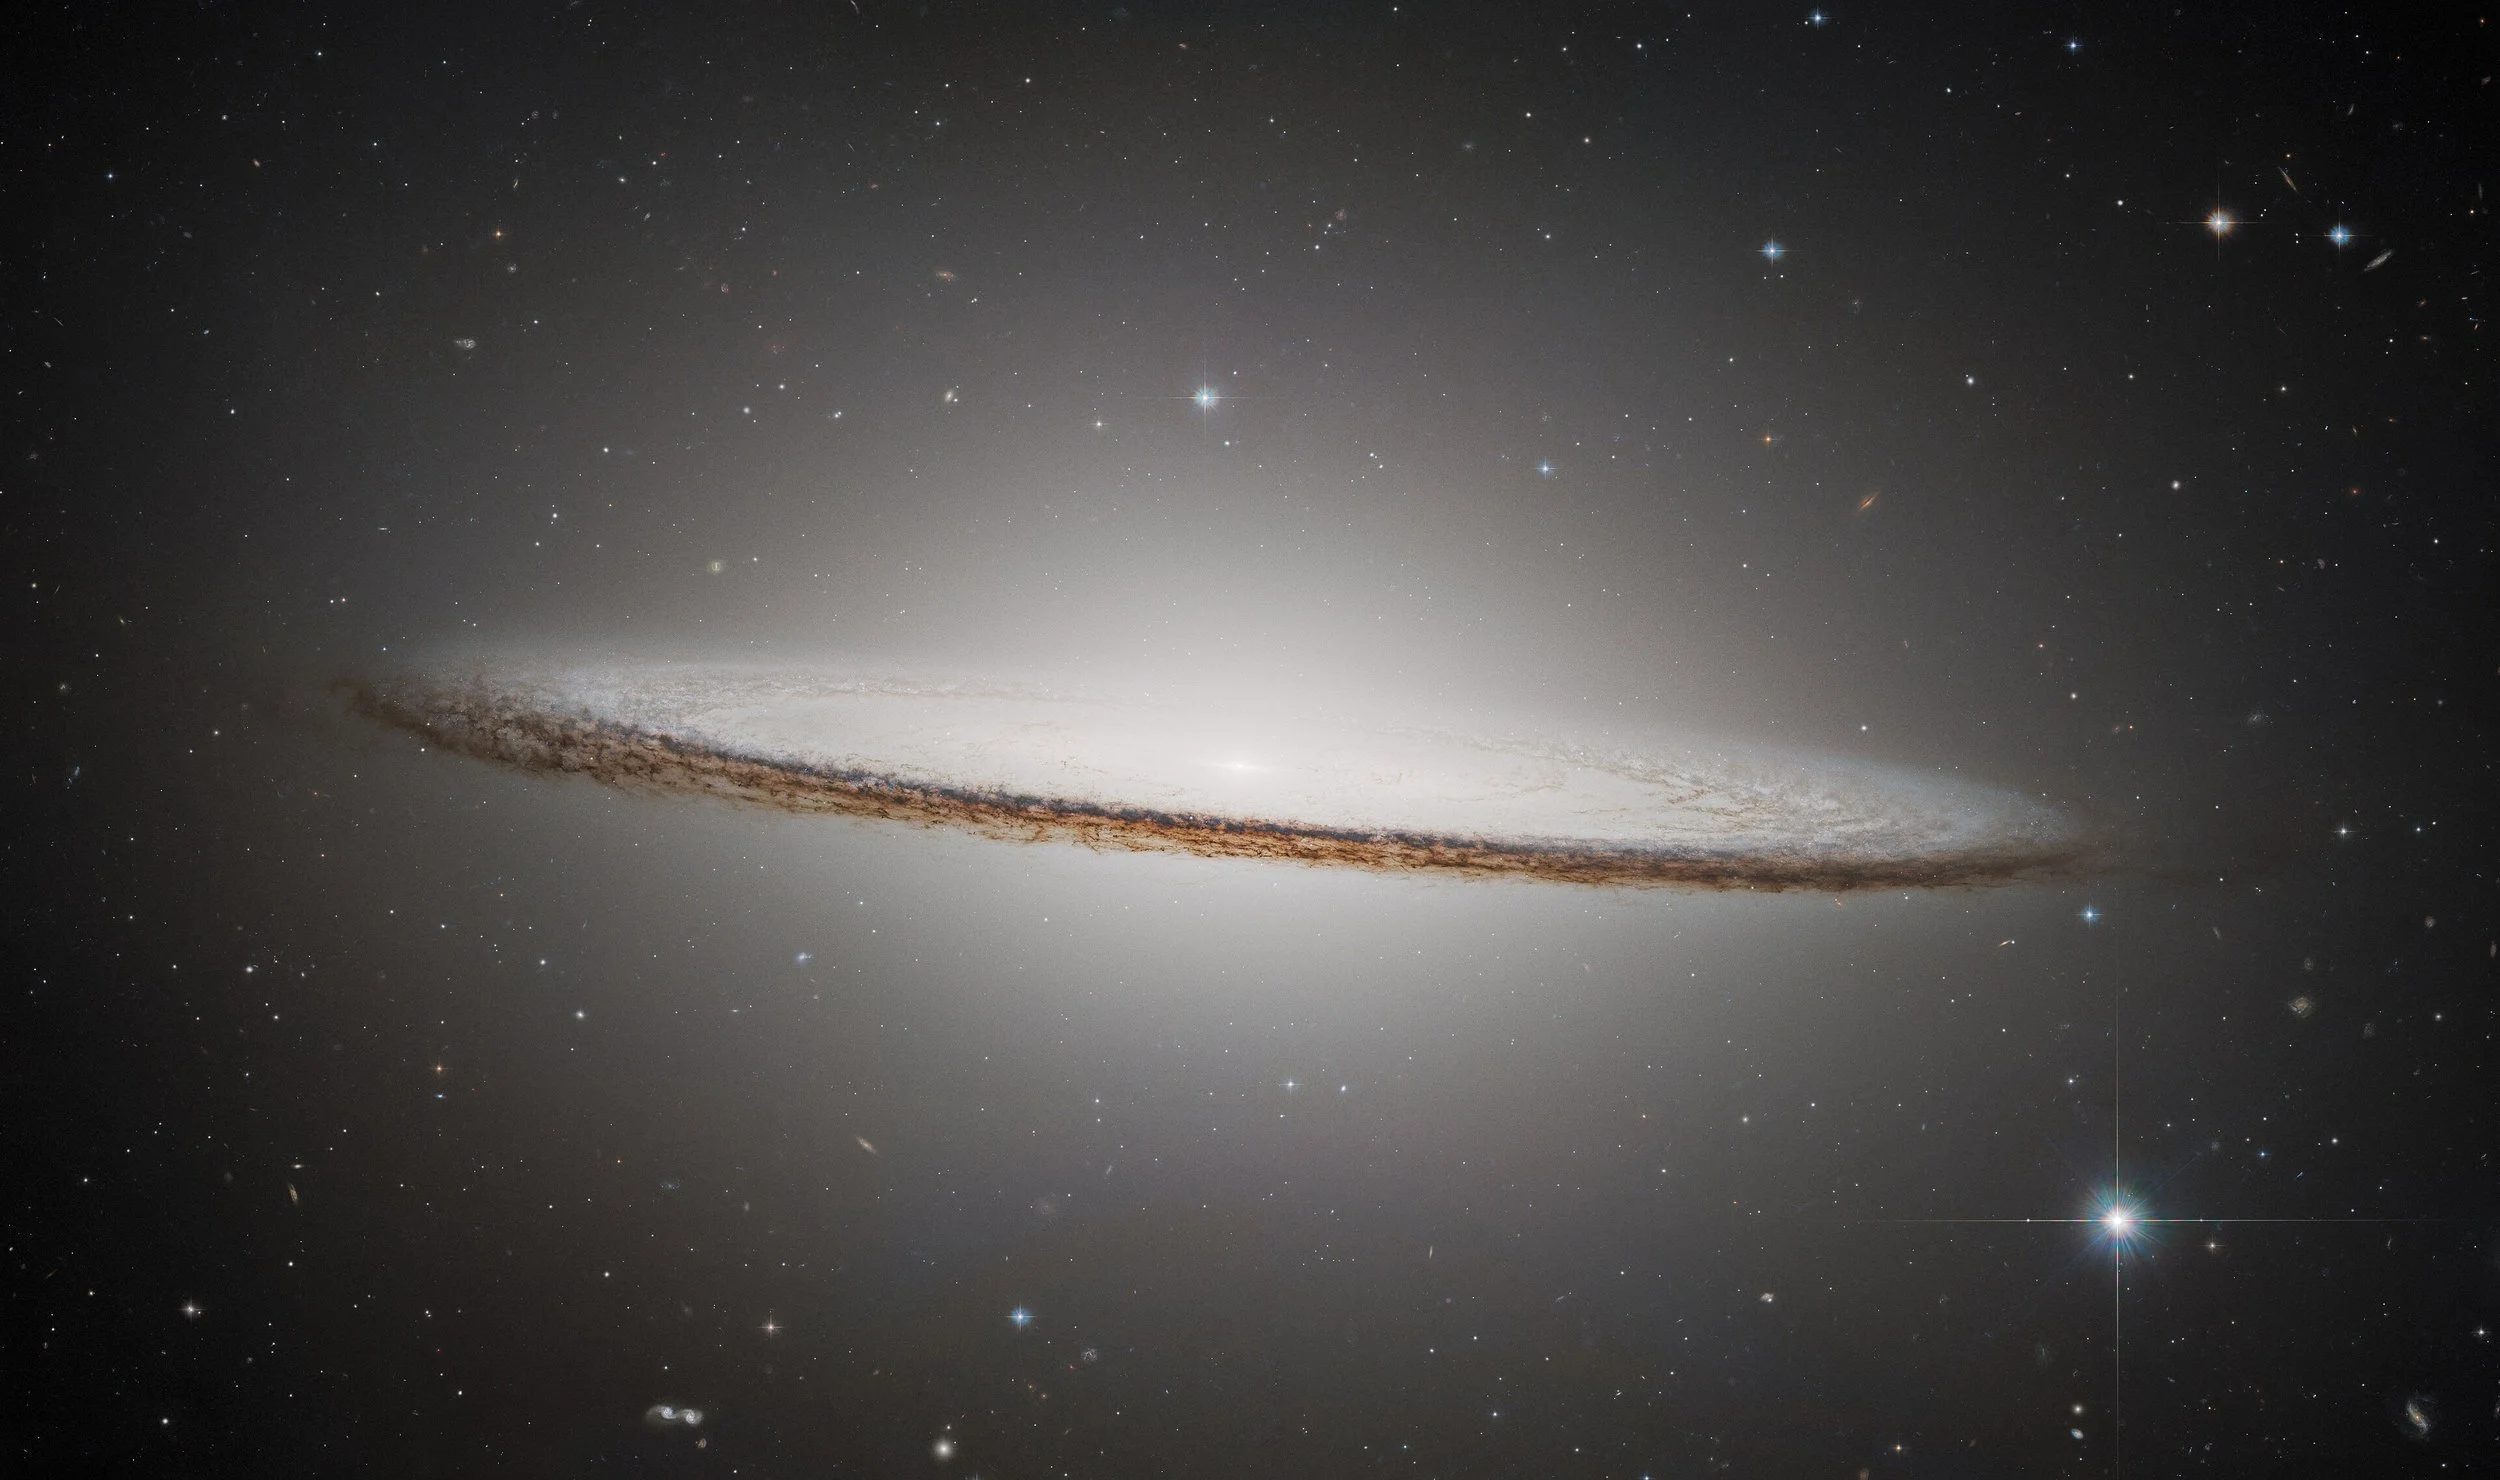
Incredible Hubble Telescope view of M104. (Credit: By ESA/Hubble, CC BY 4.0, https://commons.wikimedia.org/w/index.php?curid=163685254)
Interesting Facts
For observers and imagers, M104 is a rewarding but somewhat challenging target. It is bright enough to be seen in modest telescopes under decent skies, but the details that make it famous — the thin dust lane, bright nucleus, extended halo, and subtle outer structure — benefit from good seeing, careful processing, and enough integration time to hold the faint outer regions without blowing out the core.
One useful bit of trivia is that M104 has one of the most distinctive profiles of any Messier galaxy; even a small image often makes it immediately recognizable. Another is that modern infrared observations, including those from the James Webb Space Telescope, show structures hidden from ordinary visible-light views, helping astronomers study the stars, dust, and history behind the familiar “sombrero” shape.
About the Project
Planning and Weather
After a brutal winter and an early spring that brought cold, wet weather and very high winds, we finally had a break in the clouds on April 11th.
Gearing up for the first capture session of 2026, I chose my targets, and this being galaxy season, I was looking forward to choosing a great target for the SCA260. I finally chose Messier 104.
This target is low in our skies, so it provides a narrow window for capture. I had only shot this once before, in June of 2023.
At that time, I was only able to gather 1.7 hours of LRGB data, shot with my AP130 f/8.35 platform, while wildfire smoke was in the air. I wanted to see what I could do with the new scope and more time for integration.
That project can be seen here:
Messier 104 - June 2023 Effort
The image from that effort can be seen below:
My M104 effort of June 2023.
Telescope Concerns
While prepping the scope for use on the first evening, I happened to look through it and inspect the main mirror.
My heart froze for a second - it looked filthy!
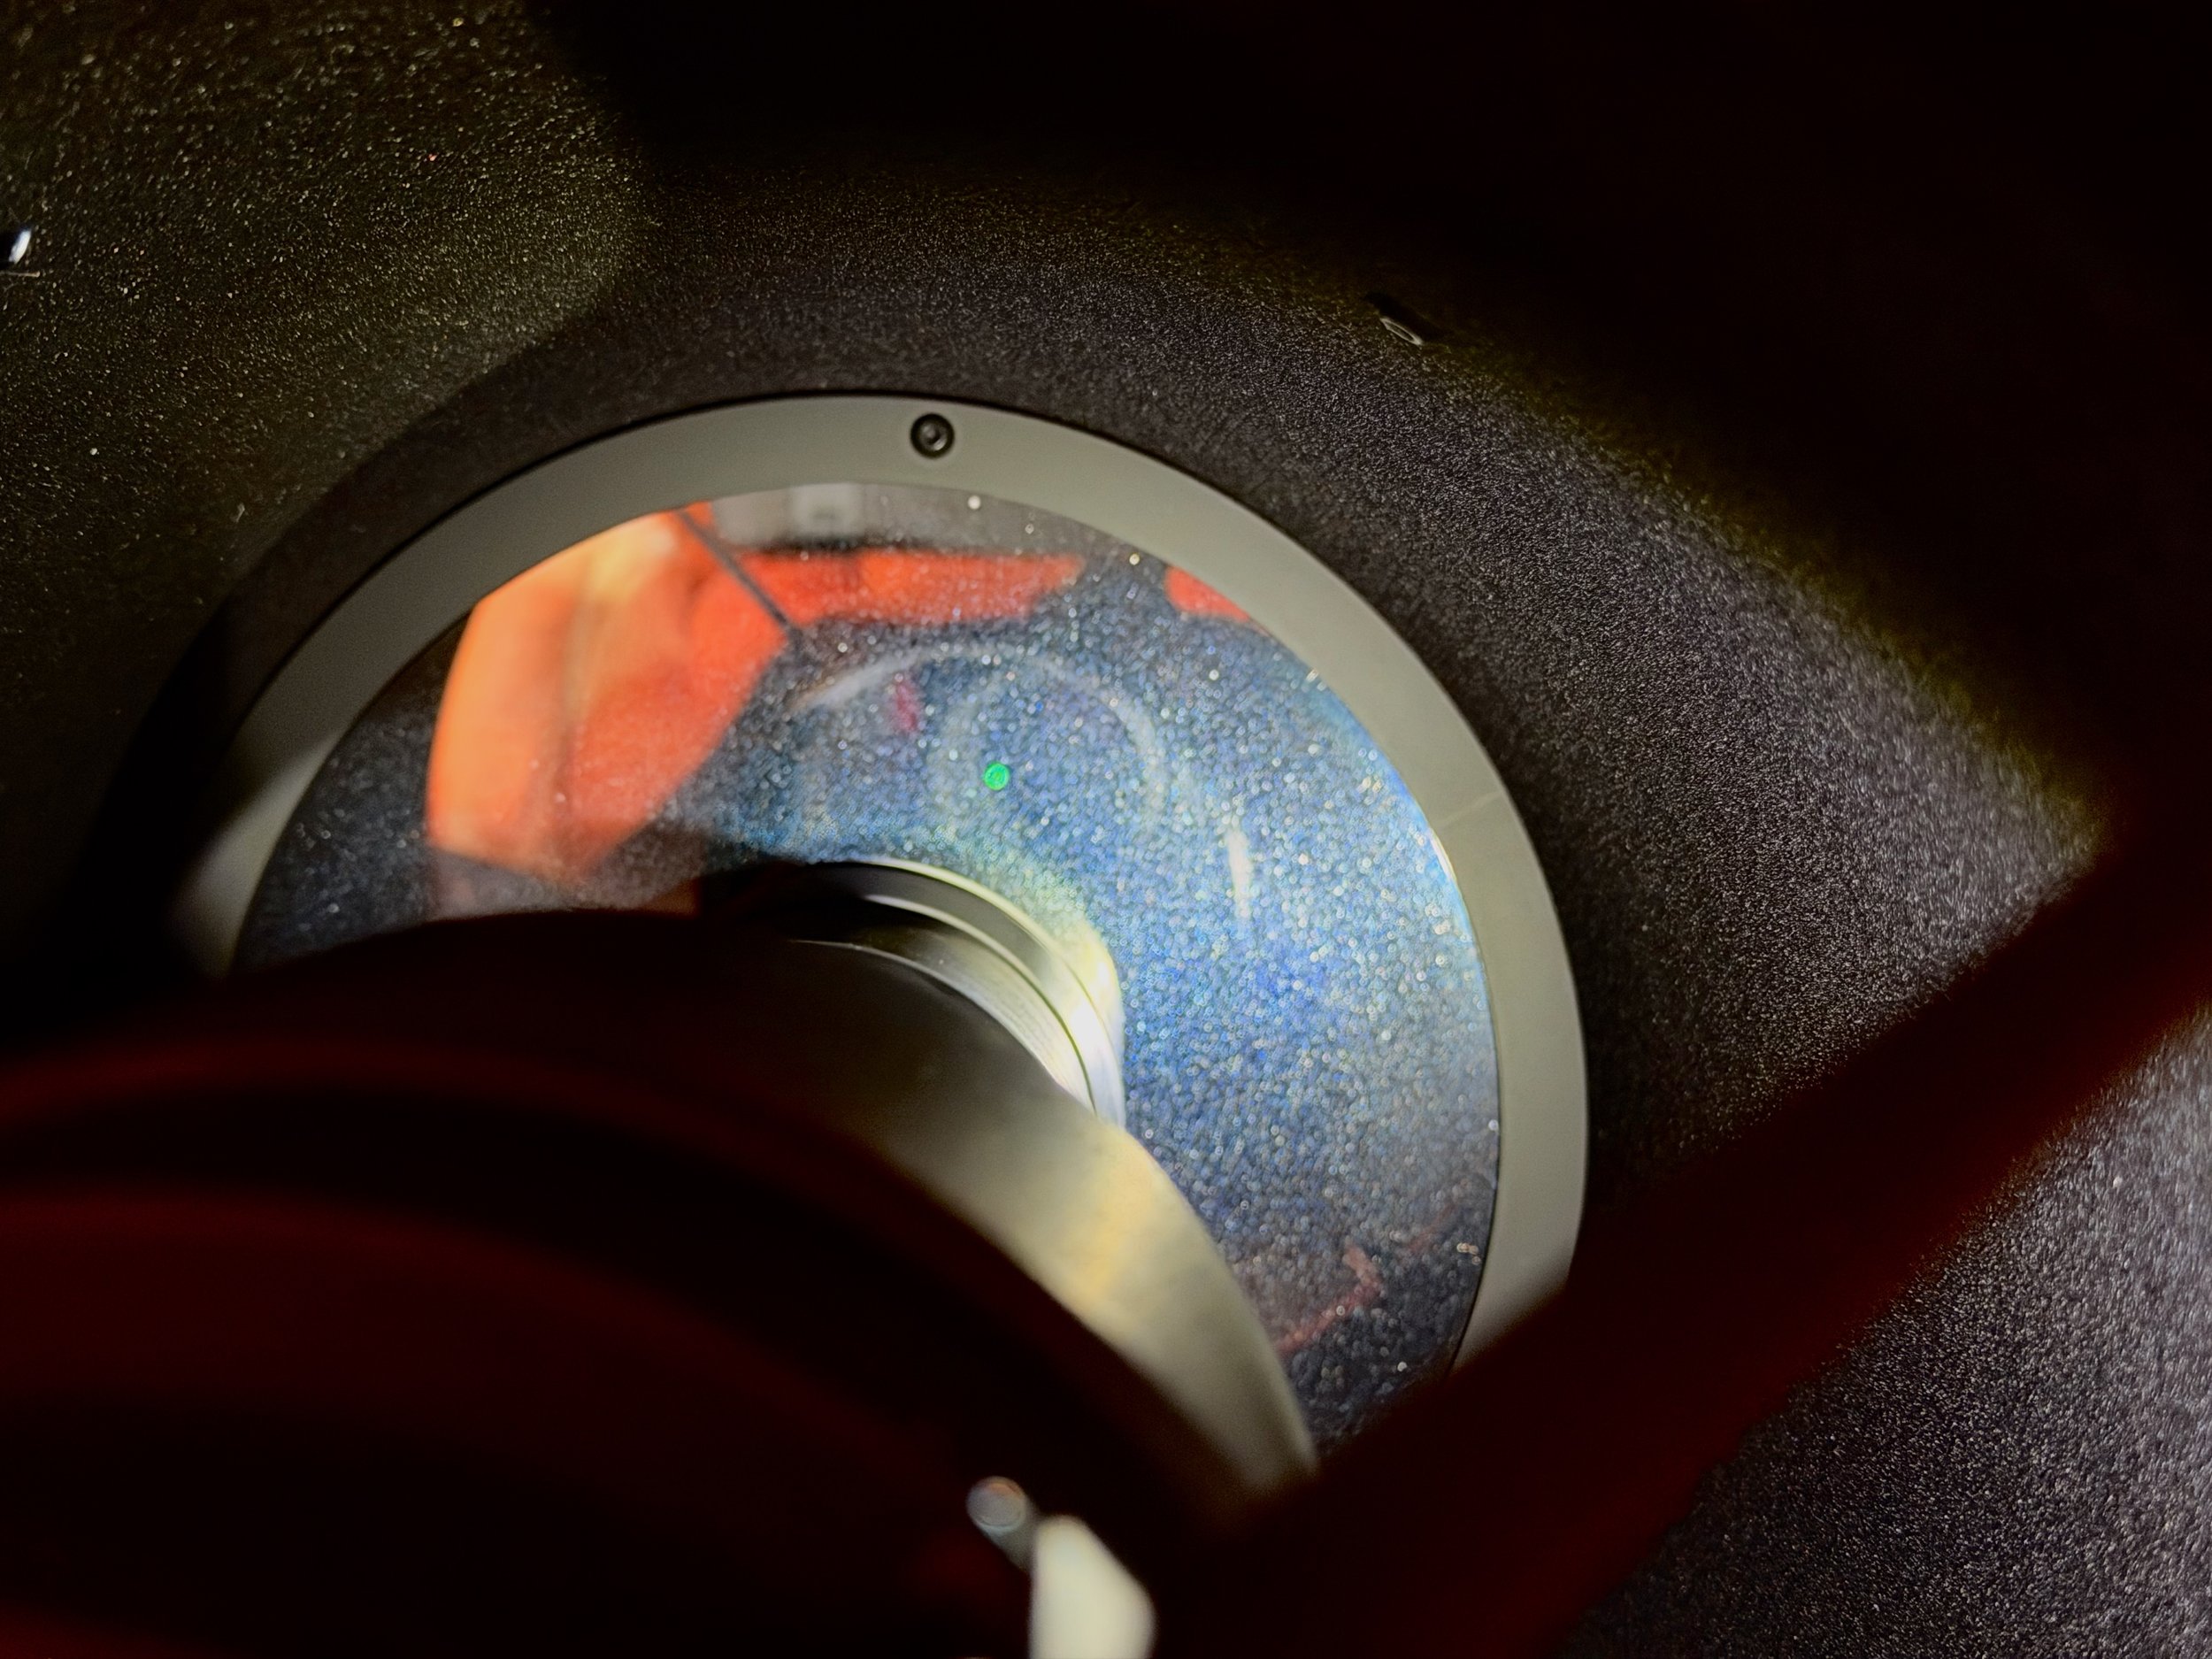
I need to clean this mirror!
During my last captures in October of 2025, I had run into a lot of dew problems, and the SCA260 was a dew magnet. I fashioned a crude dew shield out of plastic, but I still ended up with dew forming on the front of the secondary, and when the scope was pointing to the sky, dew could form and drip into the scope, hitting the main mirror. In addition to this, the fans on the scope circulate air around the mirror, and I am sure that also sucks in dust and whatnot.
My Crude Dew Shield.
Processing Overview
Preprocessing
Because I wanted the sharpest image possible, I spent a lot of time scrutinizing the data before running the WBPP stacking.
I blinked all the files and removed 17 subs, mostly due to thin clouds. From Blink's perspective, things did not look too bad.
But since I wanted the sharpest possible images, I also ran SubFrameSelector on the frames to assess star sizes. When my goal is super-sharp images, I often screen for frames where the star sizes are much larger than the rest and remove them.
When I did that here, I saw the following disturbing pattern:
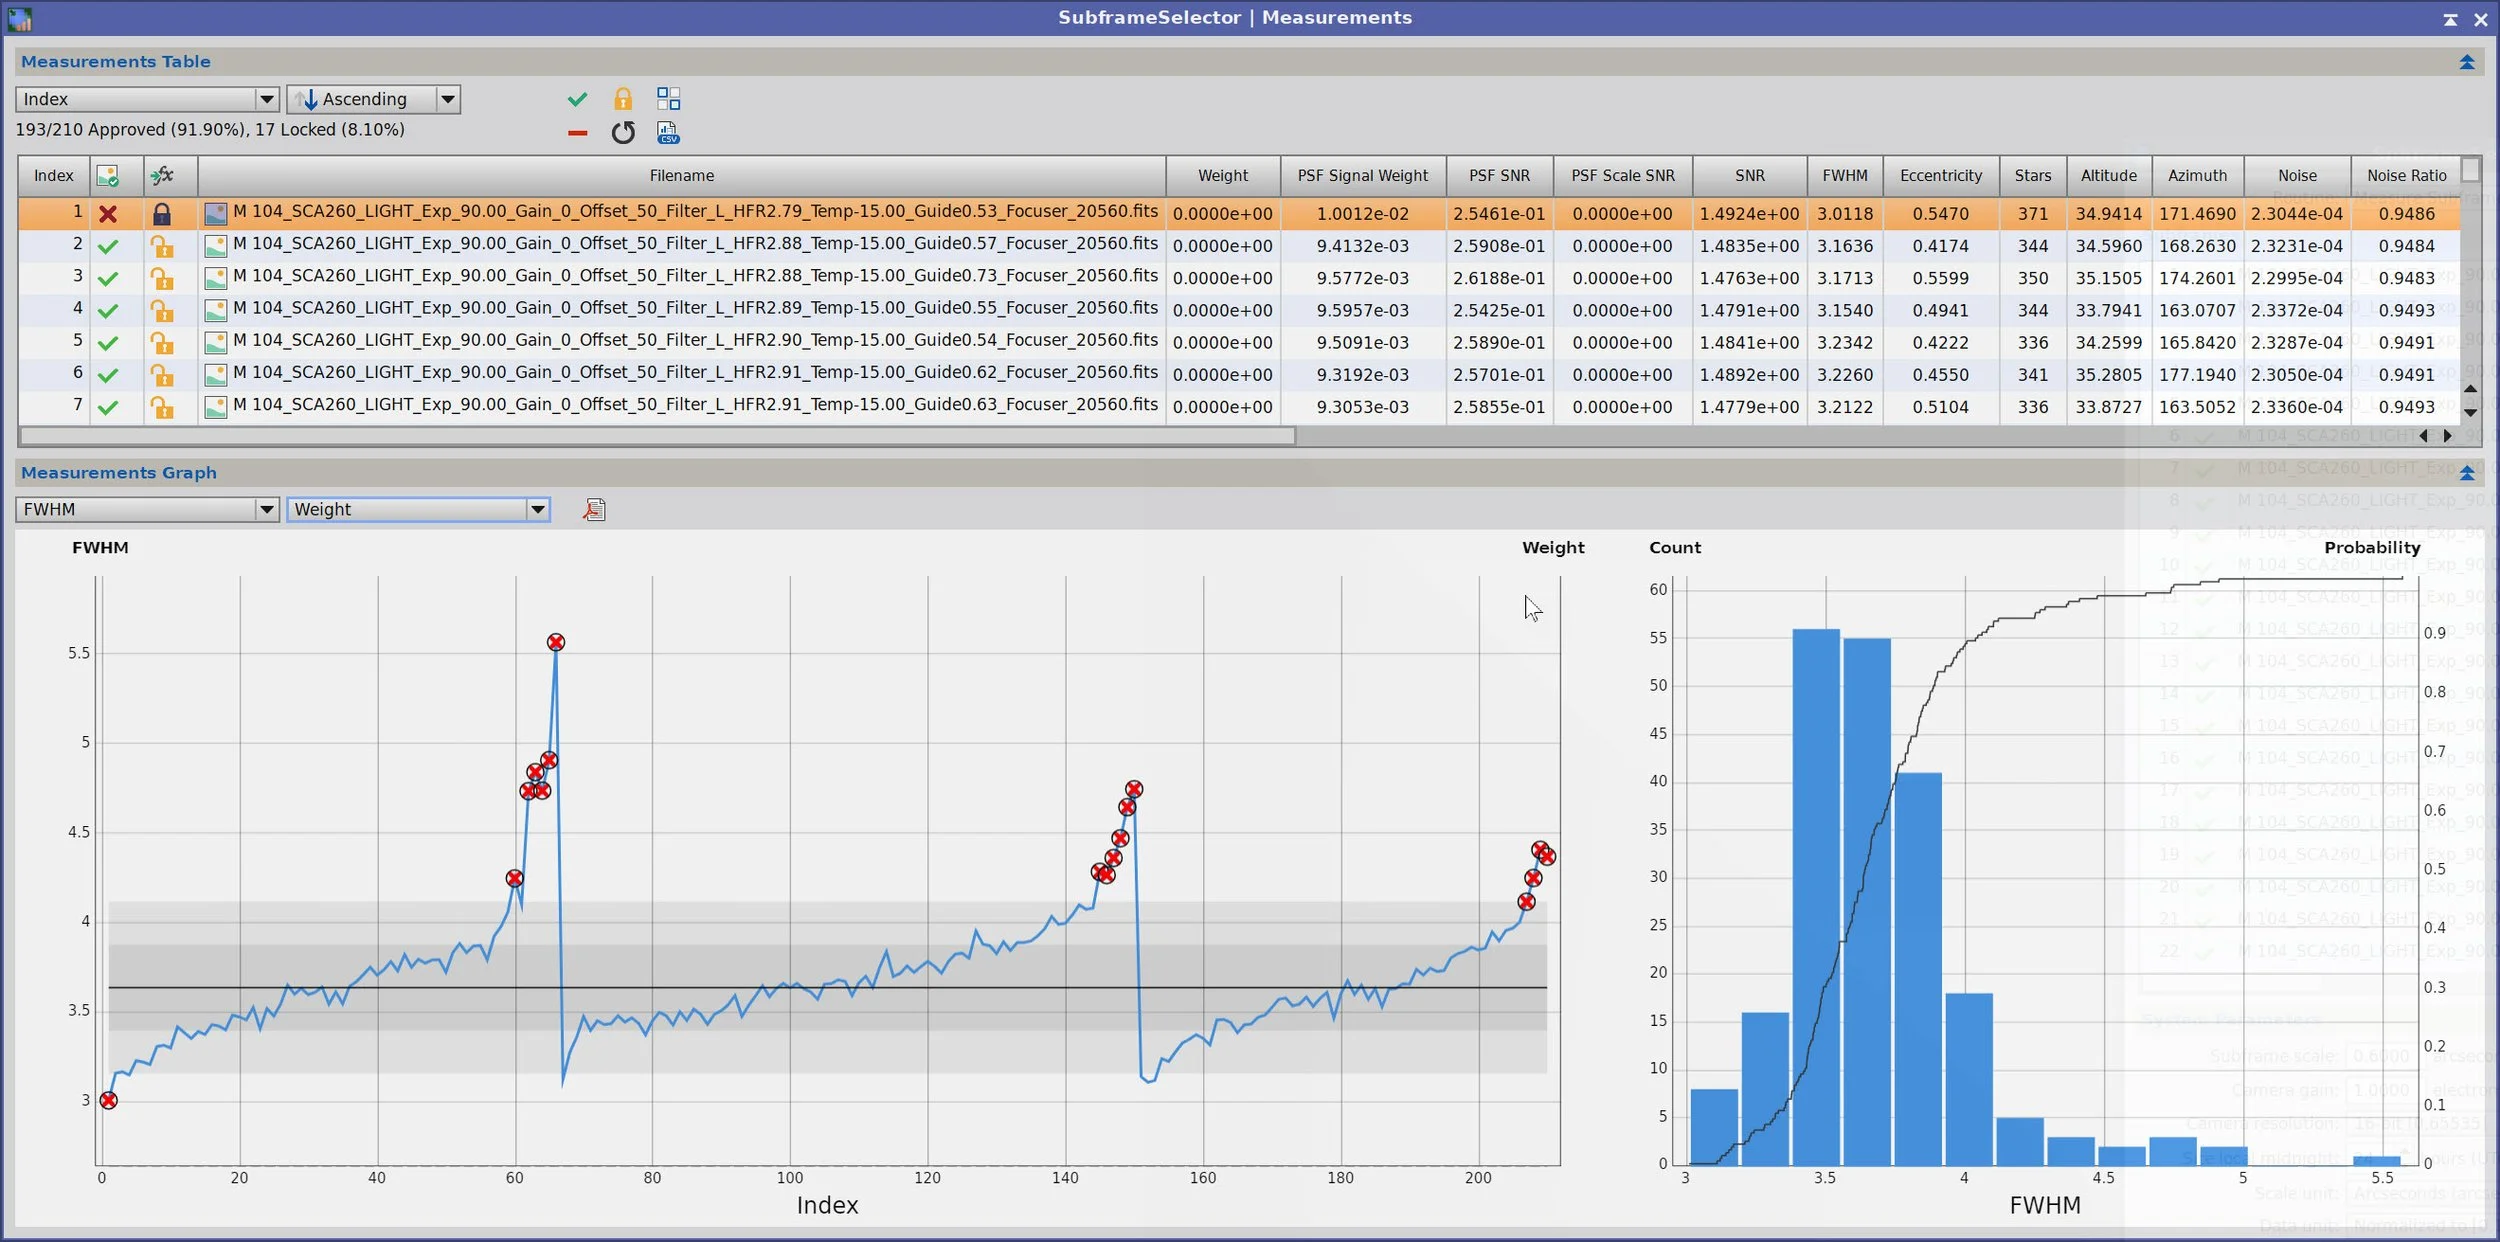
This is a plot for the subs taken with the L filter. This is a disturbing sequence!
Yow!
You can clearly see a trend here. We start the evening with small star sizes, and as the evening progresses, the star sizes grow and grow, and by the end of the evening, they are just terrible!
The same pattern was observed across all 3 nights and all 4 filters.
My first thought was that the slow buildup of dew could cause this. The SCA260 is a dew magnet, so that was possible. The other possibility is atmospheric absorption as the target set towards the west. For me, this is a low target, and as it set, I was looking through an increasing amount of atmosphere.
I really did not expect to run into any dew problems this time of year, but there was some dew.
So this trend could be caused by dew or the atmosphere - or both! Either way, it wasn't improving my image quality.
So I culled the worst frames. In total, between Blink and SubFrameSelector, I removed 62 frames, totaling 1.55 hours of integration.
Post-Processing
The processing plan for this image was pretty straightforward.
I used my typical LRGB workflow that looks something like this:
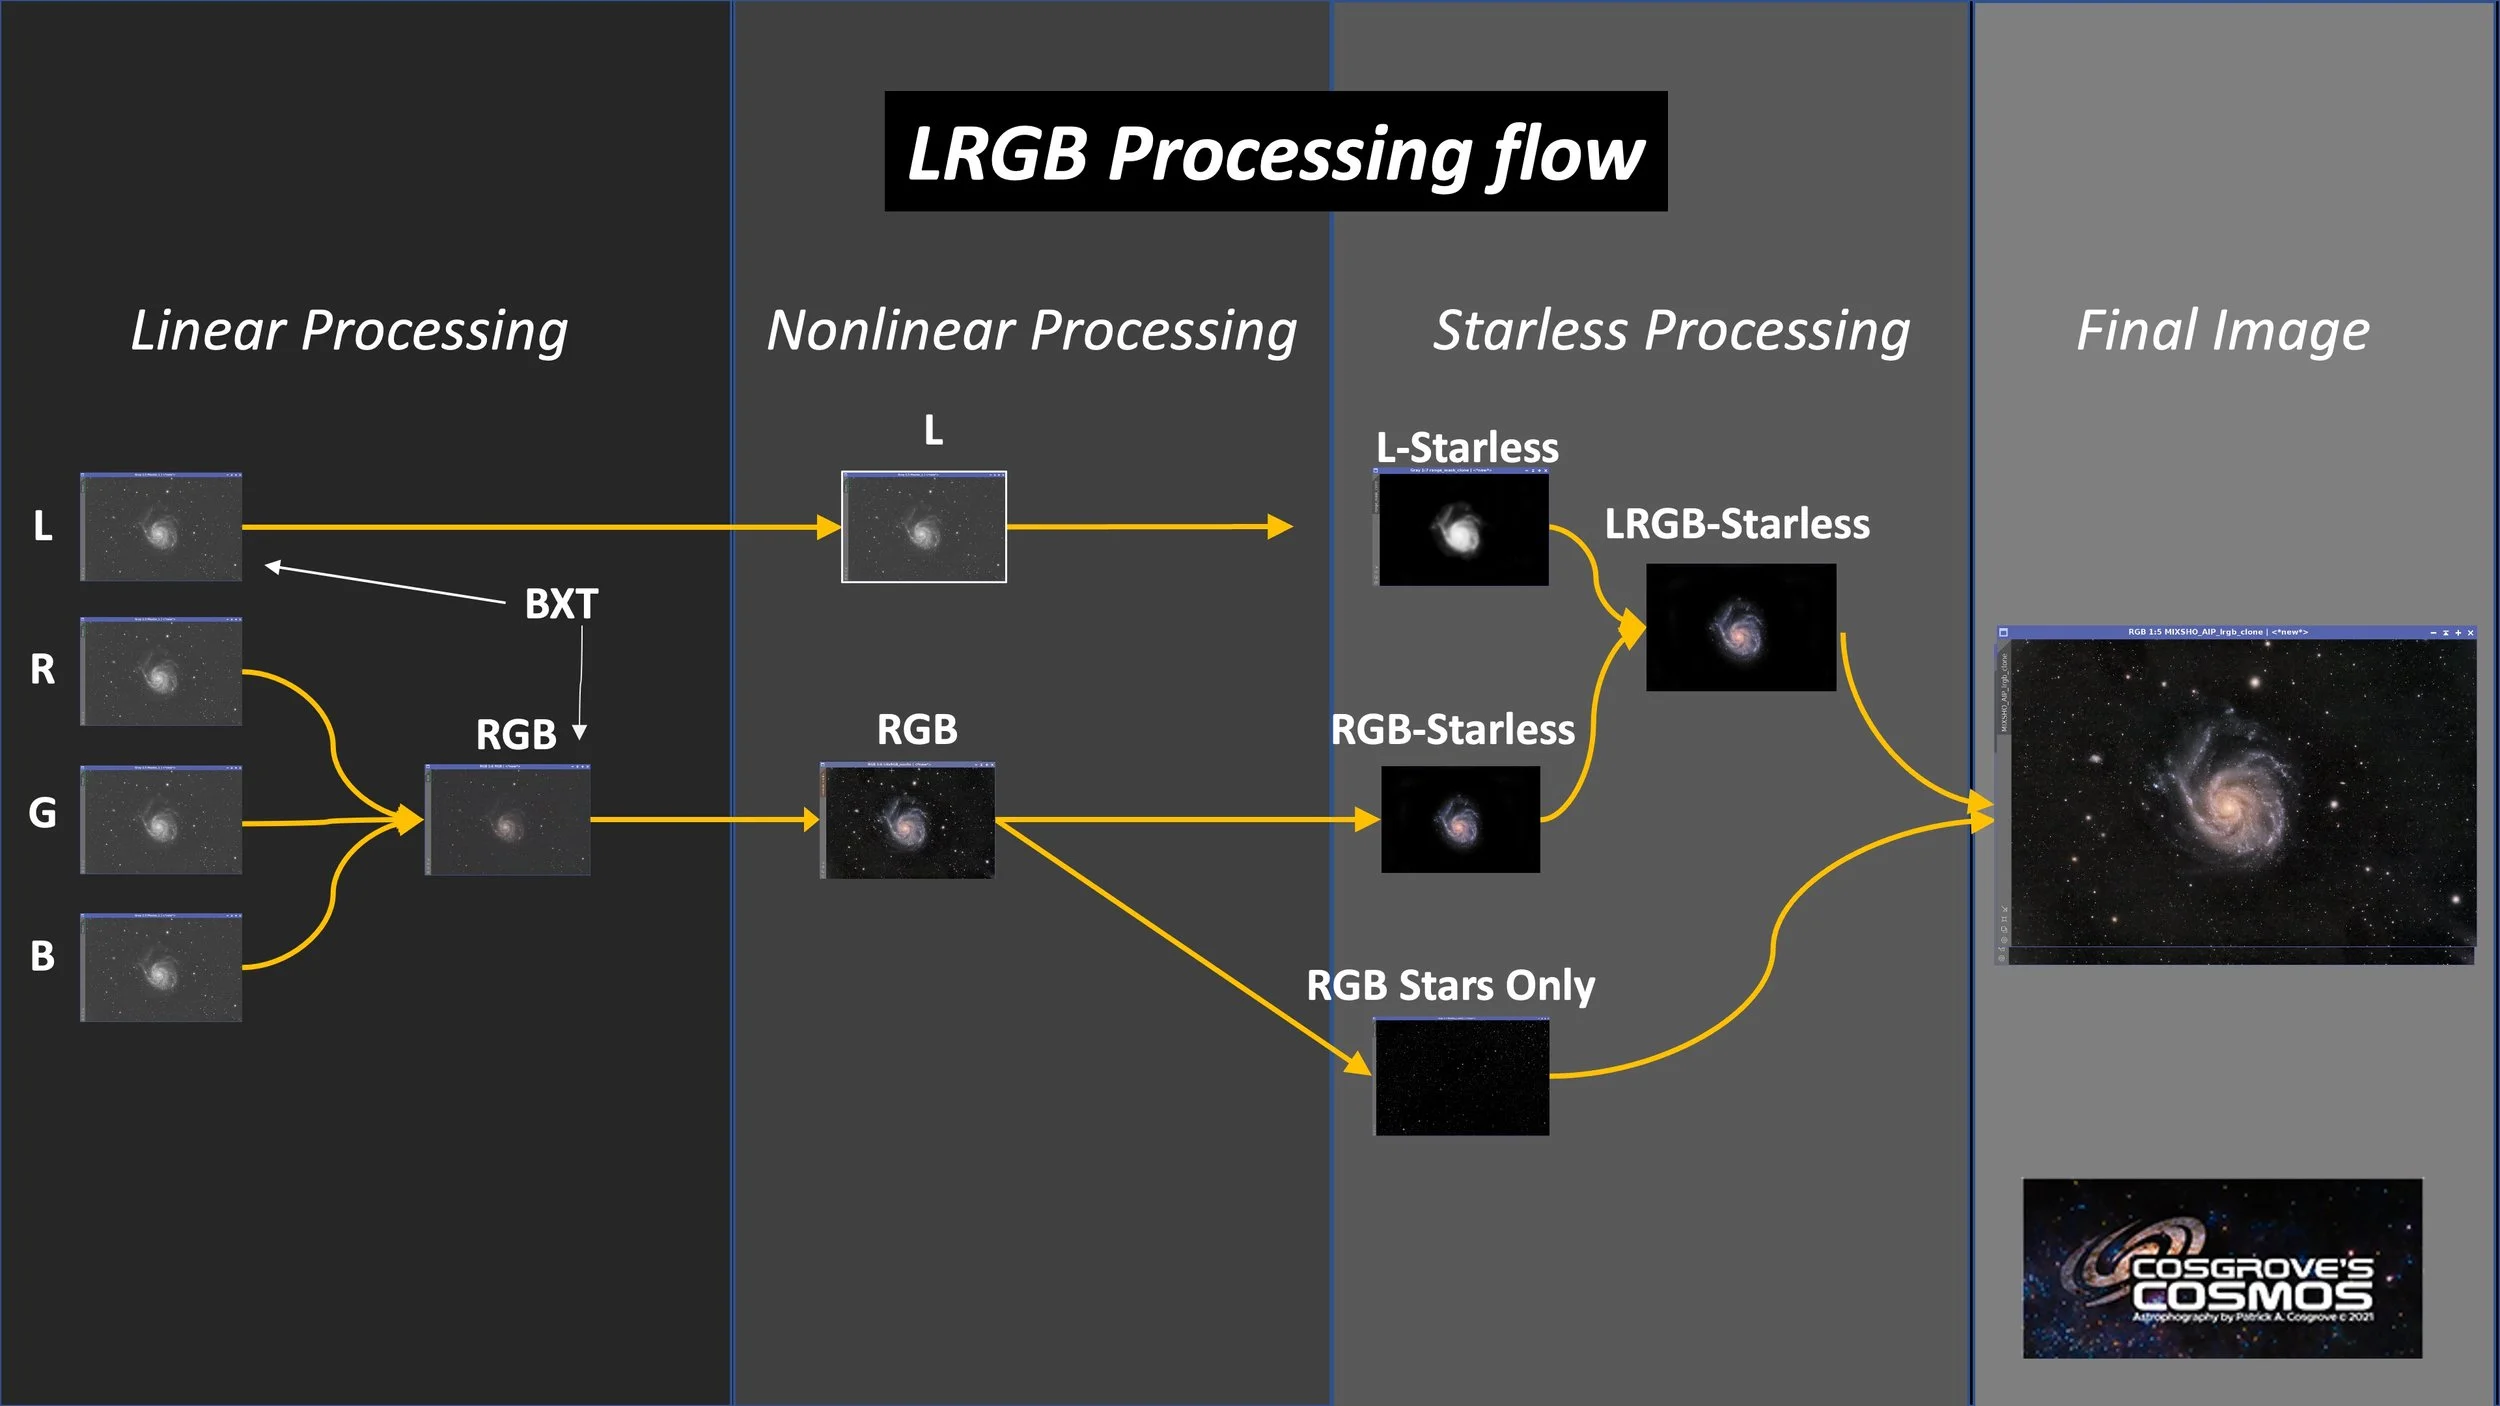
My typical LRGB Starless Workflow.
The processing itself should have been very simple. However, I found it fairly challenging.
The stars were larger than I liked and looked a bit bloated. Detail in the galaxy was not as crisp as I had hoped, and I had a challenge managing the color of the galaxy itself.
Some images are easy to process and practically process themselves! This was not one of those images.
I found that, with this target, the simplest processing worked best. Many of the things I typically do to bring out faint features did not produce results I liked with this target. So I ended up keeping things simple.
I did my first pass on processing the image and was not at all satisfied with the result. So I started over.
On the second pass, I took quite a bit of time working with the linear images. I tried a lot of variations with BlurXTerminator and found that I could get good results with it, but I had to run it at very aggressive levels.
I also tend to run LHE at the fine and medium scales to bring out detail, but in this image, I found it was causing artifacts in the bright regions that I did not like.
In the end, I greatly simplified my processing steps, and this gave the best results.
Lately, I have been creating several versions of the Stars-Only image. Each has a different stretch level, so I have three sets of star sizes to choose from. I try them all, seeing which seems to help the final composition the best. In this case, I thought the smaller stars would be better, given the bloating. But to my surprise, I liked the look with the larger stars, and so that is what I went with.
The final image was aggressively cropped to scale the galaxy. Unfortunately, this also tends to highlight the bloated stars. So, while the final image came out OK, it is not one I was pleased with.
Detailed and Annotated Image Processing Walkthrough
Typically, I conclude one of these imaging projects by documenting the processing steps I used on this image. But this section can make the overall post very large and, at times, slow to load.
I am now creating a secondary, standalone page to hold this information. You can access this page by clicking the link below. Returning to this page is as simple as clicking the back arrow in your browser or selecting a different menu option at the top of the page.
I hope you like this new format!
Use the link below to see the detailed image processing walkthrough for this imaging project.
Final Results
The final image is a disappointment for me, mainly because I know the system is capable of better. I had really hoped for a better result with more crisp details. Clearly, I have some work to do on the telescope.
I need to clean the optics and address any resulting collimation issues. I also need to address the dew issue more aggressively. I had purchased a large eyepiece dew heater and some flat wire; I plan to wrap the secondary with the dew heater and run flat wire along the edge of one of the secondary support vanes to reduce dew formation.
More Information
🔭 Target Details
- SIMBAD Astronomical Database — NGC 4594 / M104 – Core reference entry listing coordinates, identifiers, object type, radial velocity, and links to related astronomical literature for the Sombrero Galaxy.
- CDS Aladin Lite — Interactive Sky Atlas – Web-based sky viewer; enter “M104” or “NGC 4594” to pull up survey imagery, overlay catalogs, and explore the surrounding Virgo field.
- The Sombrero Galaxy — In-The-Sky.org – Observing-oriented summary with position, magnitude, constellation, rise/transit/set times, and visibility information from any location.
- Messier 104 — NASA Hubble Messier Catalog – NASA overview of M104 with distance, constellation, brightness, discovery notes, and Hubble-based background on the galaxy.
📜 History & Naming
- Messier 104: Sombrero Galaxy — Messier-Objects.com – Accessible target profile covering the galaxy’s discovery, catalog designations, physical properties, and observing information.
- Sombrero Galaxy — DeepSkyCorner – Compact observing and historical summary, including discovery notes, classification, and the origin of the Sombrero nickname.
- Sombrero Galaxy: Virgo’s Iconic Hat — Constellation Guide – Overview of M104’s location, naming, discovery history, physical structure, and modern scientific interest.
- Sombrero Galaxy — Wikipedia – Broad reference article covering the galaxy’s designations, observation history, Messier catalog status, structure, and scientific studies.
🔬 Science & Observations
- The Majestic Sombrero Galaxy — NASA/Hubble – Hubble image release describing M104’s bright central bulge, nearly edge-on viewing angle, and prominent dust lanes.
- Sombrero Galaxy: A Great Observatories View — Chandra – Multiwavelength view combining Chandra X-ray, Hubble optical, and Spitzer infrared data to show different physical components of the galaxy.
- Hats Off to NASA’s Webb: Sombrero Galaxy Dazzles in New Image — NASA/Webb – Webb mid-infrared release showing the dust ring and clumpy structure in a very different way than visible-light images.
- NASA’s Webb Rounds Out Picture of Sombrero Galaxy’s Disk — NASA/Webb – Near-infrared Webb follow-up showing how the galaxy’s bulge, dust, and stellar populations appear at different wavelengths.
- Tracing the Giant Outer Halo of the Mysterious Massive Galaxy M104 — Astrophysical Journal / ADS – Research paper focused on M104’s extended stellar halo and what it suggests about the galaxy’s mass and evolutionary history.
💡 Interesting Facts & Outreach
- Sombrero Galaxy — Webb NIRCam / MIRI Comparison – Side-by-side Webb view showing how near-infrared and mid-infrared observations reveal different parts of the galaxy.
- Sombrero Galaxy Fade: Visible, Near-Infrared, Mid-Infrared — NASA/Webb – Short comparison video showing how Hubble and Webb views change the appearance of the same galaxy across wavelengths.
- Messier 104 Sonification — Chandra – Outreach feature translating Chandra, Spitzer, and Hubble data from the Sombrero Galaxy into sound.
- Sombrero Galaxy — NASA Image Feature – Short NASA feature describing why M104’s nearly edge-on view, bright core, and dust lane create its familiar hat-like appearance.
- Sombrero Galaxy: The Universe’s Dusty Brimmed Hat — NSF NOIRLab – Recent wide-field view emphasizing M104’s extended halo and faint stellar stream, likely tied to an earlier galactic interaction.
Imaging Platform Used
Platform used for this project
Software
Capture Software: PHD2 Guider, NINA
Image Processing: PixInsight, Photoshop - assisted by Coffee, extensive processing indecision and second-guessing, editor regret, and much swearing…