
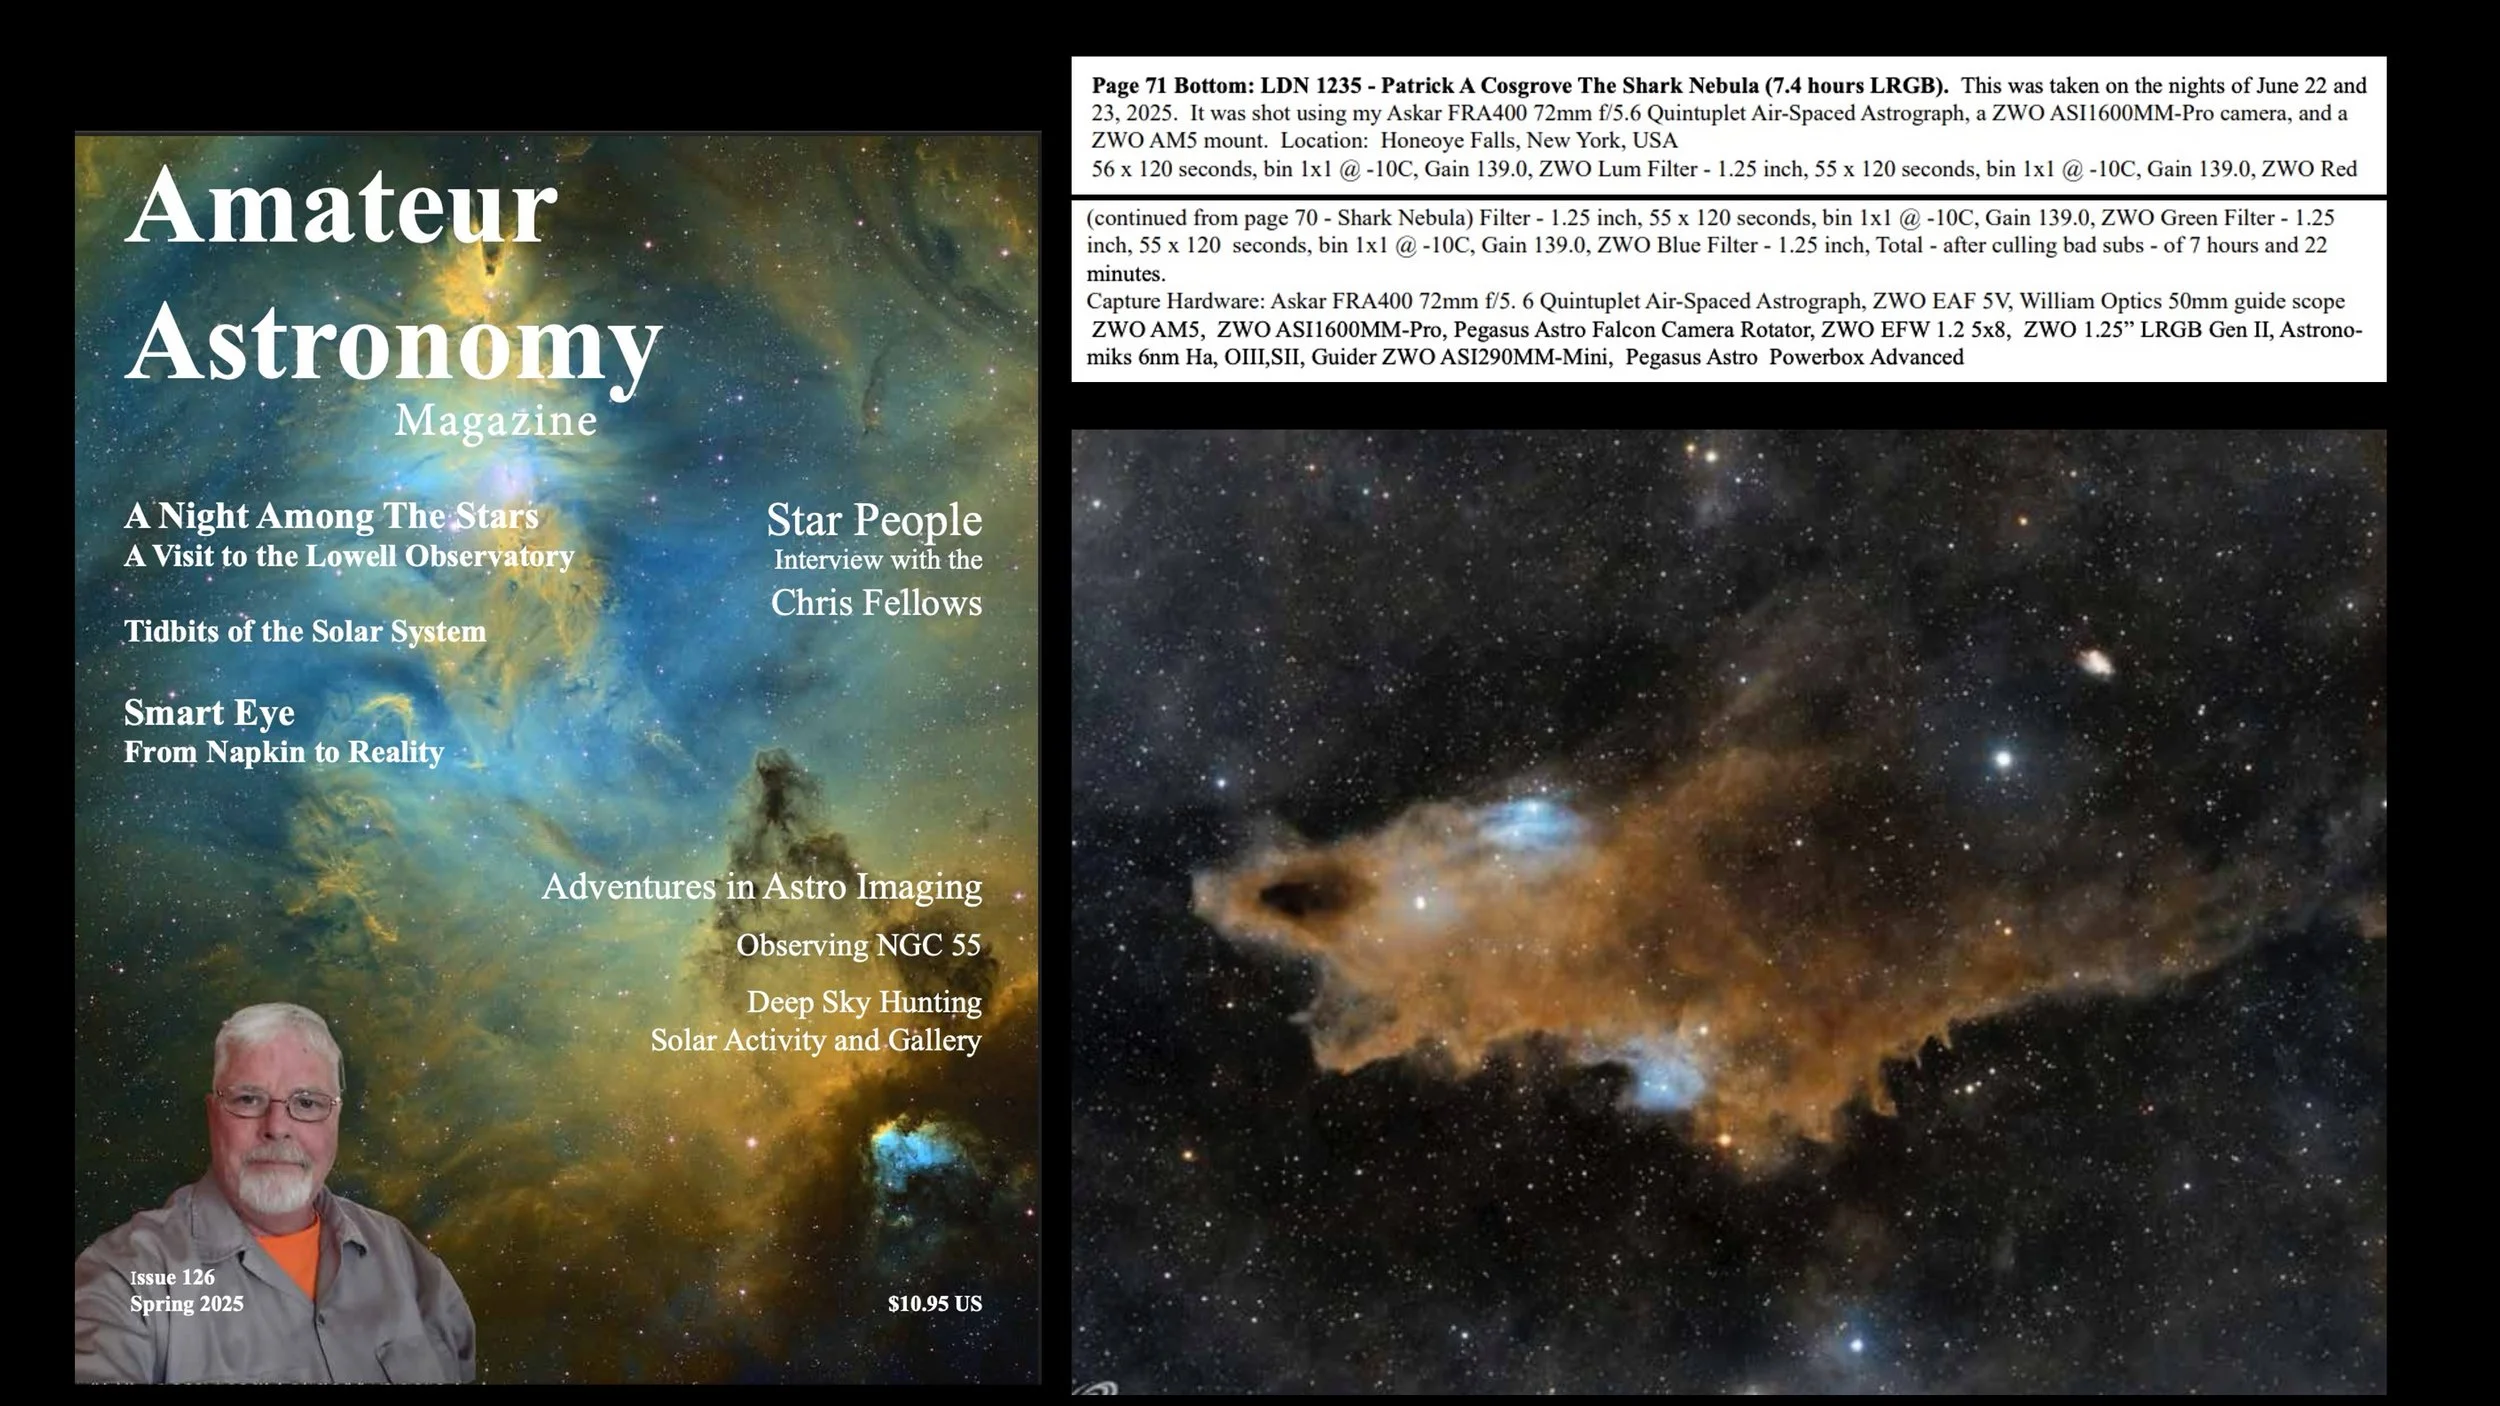
LDN 1235 - The Shark Nebula - My 1st Attempt at a Dark Nebula (7.4 hours LRGB)
Date: July 17, 2025
Cosgrove’s Cosmos Catalog ➤#0142

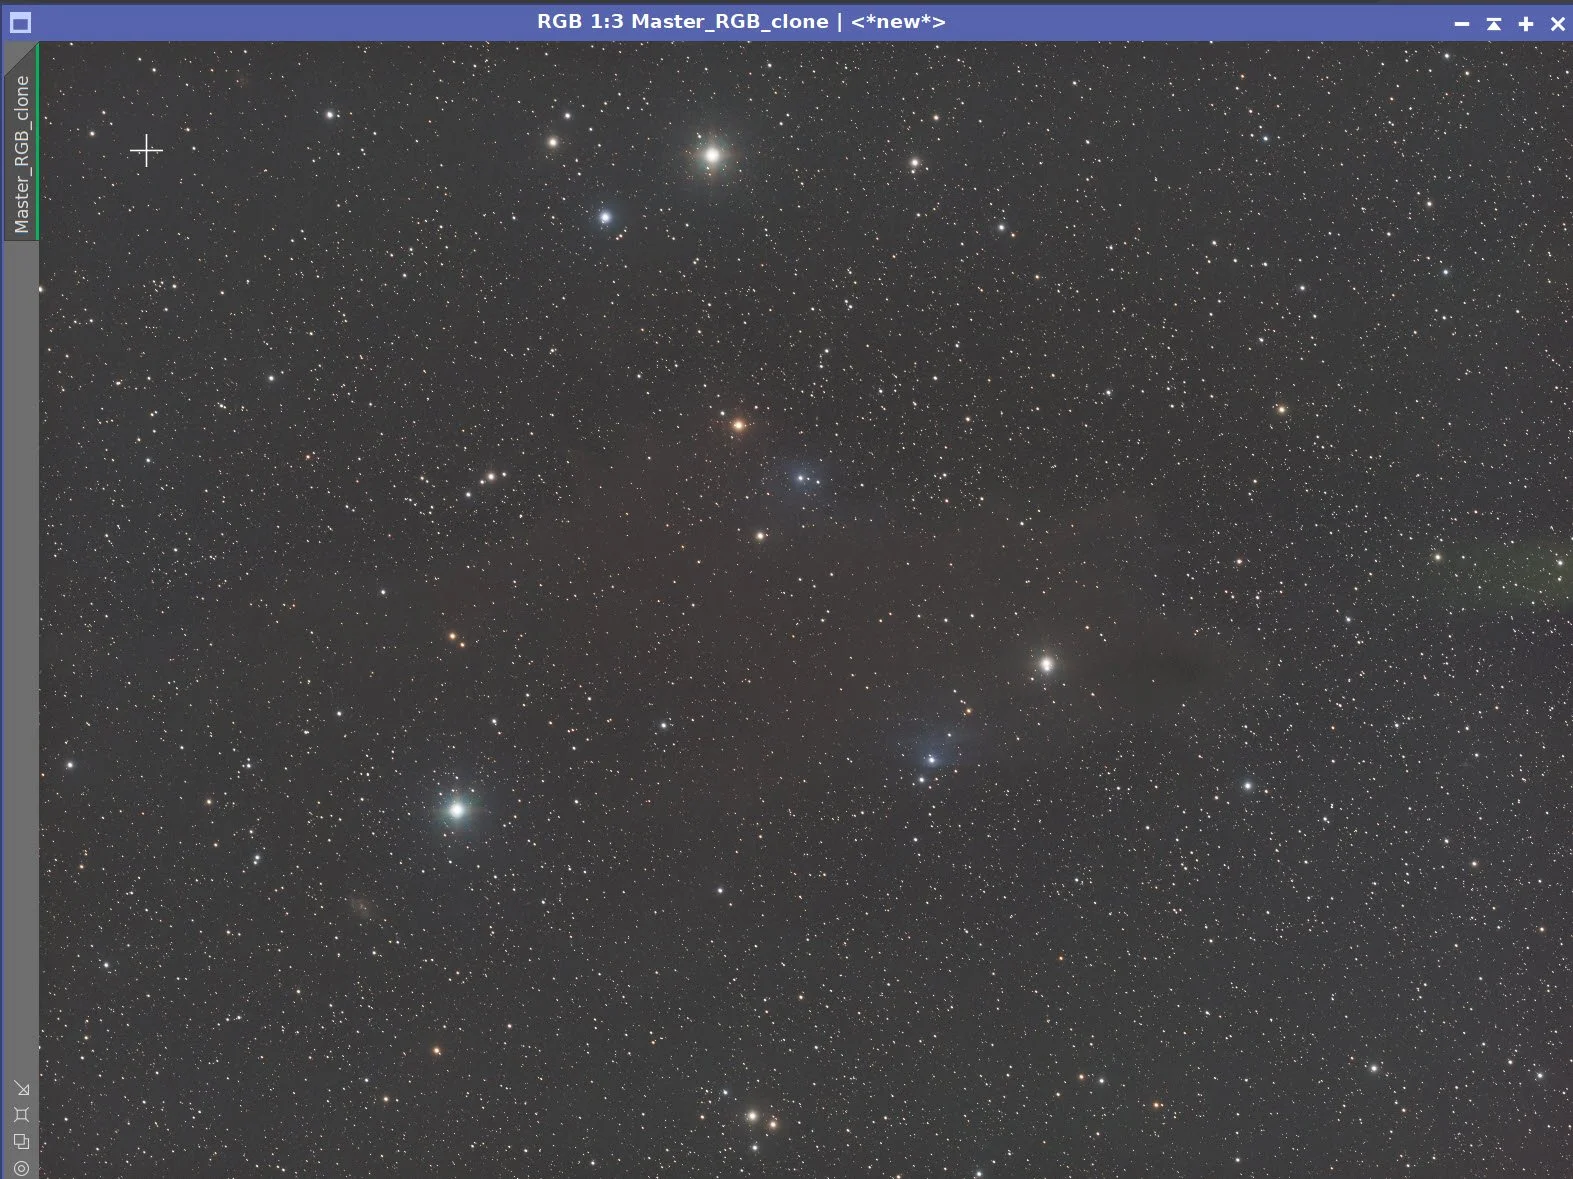
The first image from my Whispering Skies Observatory from my little FRA400 Astrograph! (click on the image for a high res view via Astrobin.com)
Table of Contents Show (Click on lines to navigate)
Published in the Amateur Astronomy Magazine, Fall 2025 - issue #128!
About the Target
The Shark Nebula (Lynds Dark Nebula 1235) is a striking interstellar cloud of gas and dust in the northern constellation Cepheus, appearing as a shark-shaped silhouette against a rich star field. This faint nebula gets its nickname from its uncanny resemblance to a cosmic shark swimming through the starry Milky Way background. Spanning roughly 15 light-years from “head” to “tail”, the Shark Nebula is located on the order of a thousand light-years from Earth (with recent data suggesting around 330–370 parsecs distance).
It is classified as a dark nebula because its dense dust clouds obscure the background stars; however, it also contains small reflection nebula components where dust is lit by nearby stars, giving parts of the “shark” a subtle blue-gray glow.
The nebula’s “head” contains faint blue reflection nebulae (vdB 149 and vdB 150) illuminated by embedded hot stars. The densest portion of the cloud – essentially the shark’s “nose” – is cataloged as LDN 1235 and completely blocks light from the stars behind it. Surrounding the nebula are myriad background stars of the Milky Way, which the intervening dust cloud partially obscures, enhancing the contrast of the shark shape against the starry sky.
Discovery and Catalog Designations
The Shark Nebula was first identified in the 1960s through photographic sky surveys rather than by early visual astronomers.
Beverly Turner Lynds (1929-2024) Credit: Sky & Telescope Magazine.
American astronomer Beverly T. Lynds noticed this dark cloud on the Palomar Observatory Sky Survey plates and in 1962 included it in her Catalogue of Dark Nebulae as LDN 1235. On those images, the dark portion (corresponding to the “shark’s eye” region) appeared as an opaque patch blocking the background starlight. A few years later, in 1965, Lynds also cataloged the faintly illuminated parts of this same cloud in her Catalogue of Bright Nebulae, listing the entire nebula as LBN 535 (also referenced by its galactic coordinates, LBN 111.07+14.08). Even on the survey photographs, LBN 535 was barely detectable on the red-sensitive plates, highlighting just how faint this nebula is in visible light .
In 1963, German astronomers Joachim Dorschner and Jürgen Gürtler discovered two small reflection nebulae within the Shark Nebula on those Palomar survey images. Lynds incorporated these into her catalog as LBN 541 and LBN 546, which correspond to little patches of light near the “head” of the shark.
Later, in 1966, Canadian astronomer Sidney van den Bergh studied these nebulae and formally cataloged them as van den Bergh 149 and vdB 150, identifying their light sources as a pair of B8-type stars in the nebula. The illuminating stars are listed in star catalogs as BD +72 1018 and BD +72 1020 (the latter also known as HD 210806). Because of this history, the Shark Nebula and its components carry multiple designations in astronomy: the dark core is LDN 1235, the faint diffuse glow of the cloud is LBN 535, and the two embedded reflection nebulae are LBN 541/546 or vdB 149/150 – all referring to features of the same cosmic “shark.”
Structure and Composition
Physically, LDN 1235 is the dense portion of a cold molecular cloud composed of interstellar dust and gas.
The dust grains in the nebula are microscopic, akin to fine smoke or soot, and they effectively block visible light. This creates the dark silhouette of the shark – we see the nebula mostly as an absence of starlight, where the thick dust is preventing light from background stars from getting through. However, along the edges of the cloud and around the “head” of the shark, the dust is less dense and is illuminated by nearby stars. These areas form reflection nebulae: the dust scatters and reflects the light of hot blue stars, producing the soft blue-white patches visible in images (cataloged as vdB 149 and vdB 150).
Not only does the dust reflect starlight, but the Shark Nebula also contains trace amounts of glowing gas. The region is known to host a star-forming region inside – young stars born from this cloud on the order of 1–5 million years ago are present within or behind the nebula. The radiation from these and other nearby stars has ionized some of the hydrogen gas in the cloud, creating a very faint H II region (ionized hydrogen region) noted as LBN 535. This means that in deep photographs, one can detect a dim red emission from hydrogen in and around the Shark Nebula, on top of the dust’s silhouette. In addition, the interstellar dust itself can emit a faint red photoluminescence when energized by high-energy ultraviolet light. This phenomenon, known as extended red emission, causes a subtle ruby-red glow in parts of the nebula when the dust grains re-radiate absorbed starlight . Together, these effects – opaque dust lanes, reflective blue nebulae, and a faint red glimmer of ionized gas/dust – make the Shark Nebula a complex and beautiful object, albeit an extremely dim one.
The Annotated Image

Created in Pixinsight using the ImageSolver and AnnotateImage scripts.
The Location in the Sky

This annotated image created with Imagesolver and FInderChart Scripts in Pixinsight.
About the Project
The last stretch of clear skies we had was back in June.
As I was searching for targets, I wanted something larger for my smaller FRA400 platform. As I searched around for an idea, I looked at what targets were available in Cepheus, and I came across the Shark Nebula.
This was large enough that I thought it would do nicely for the image scale of the FRA400.
However, I knew going in that this would be a challenging target. Why?
This target is towards the north, and I have quite a bit of light pollution in that direction due to the city of Rochester.
My FRA400 platform has an ASI1600MM-Pro camera - an older generation unit that has lower quantum efficiency and a bit more noise than the current 2600 series. It might not do as well with this faint object.
I had never shot a dark nebula before and was unsure how well I would do with it.
But I decided to give it a try for a very specific reason: I have been inspired by dark nebula images produced by Elmiko on Astrobin. Mike does an exceptional job of capturing and processing these kinds of images, and I wanted to give it a try.
My version is not as nice as his, but it sure gives me something to shoot for!
Data Collection
Data collection occurred on the nights of July 22nd and 23rd.
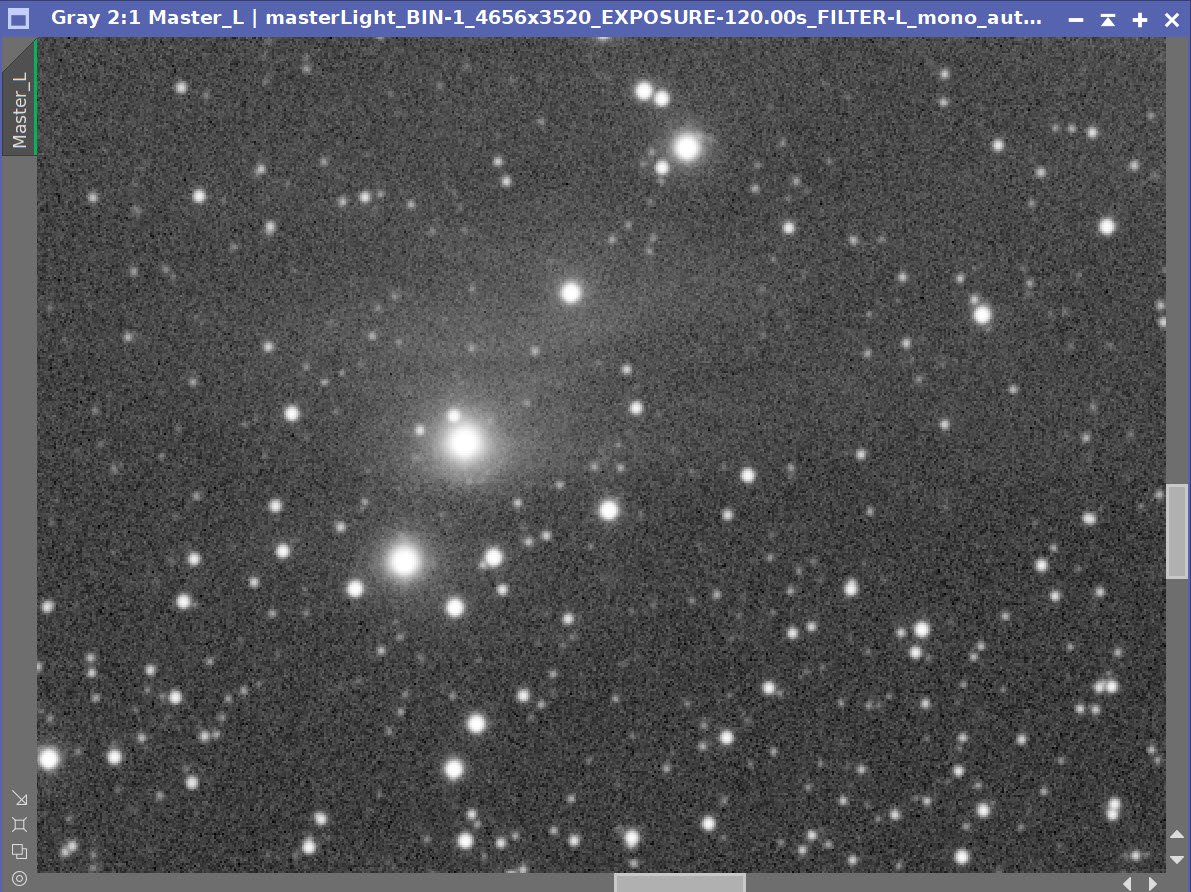
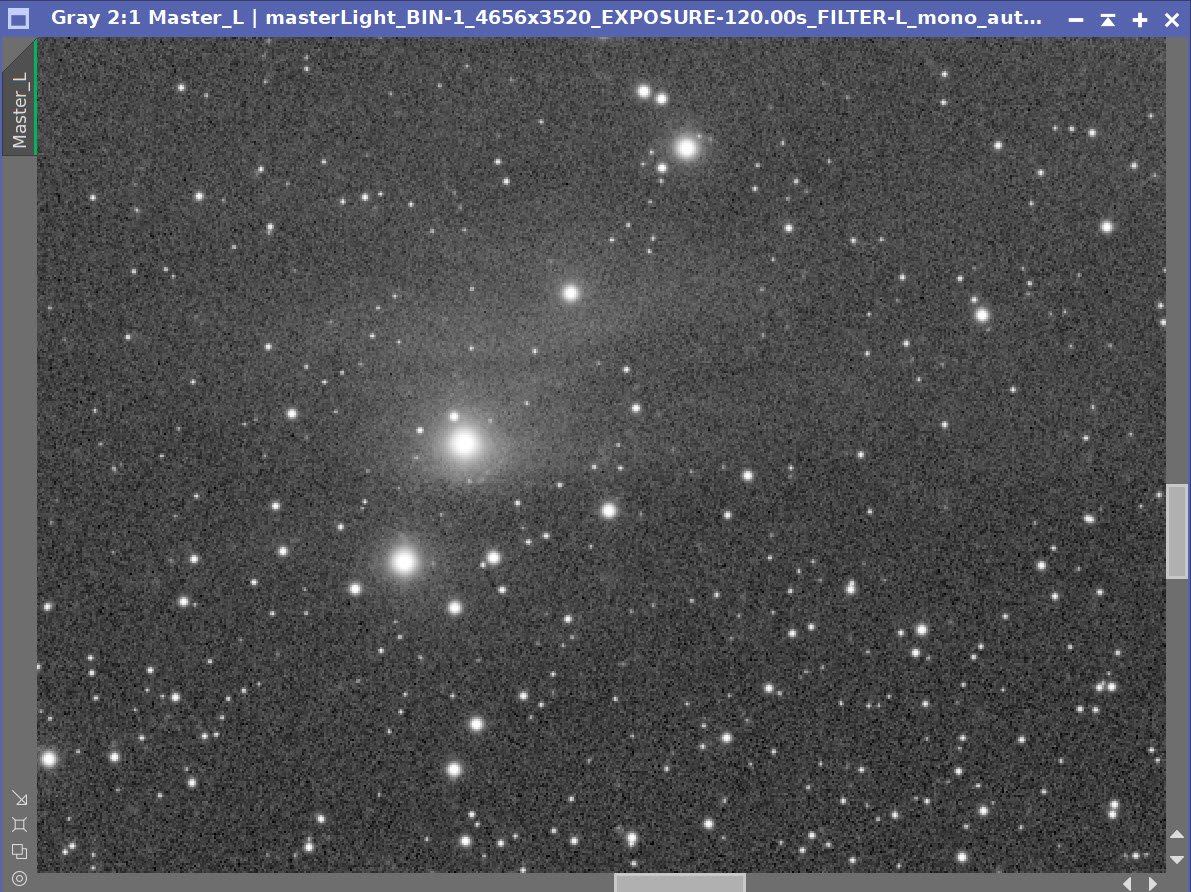
I looked at the subs as they came in, and I did not have high hopes for this image!
I saw no evidence of the dark nebula on any of the subs, and I thought that I was just not going to get it.
It was not until the subs were stacked that I saw the Shark!
I did have one problem during capture. At one point, the tracking went wonky - a quick check of the rig showed that the heavy power supply, which I had gel taped to the steel pier, had popped free and was hanging right off the scope! Not an optimal situation for fine tracking!
I killed that sub and then strapped the power supply in position with heavy cable ties so I would not have the problem again.
The flats and cal frames were collected on the following night, once the clouds had moved in.
Processing Overview
I basically used my standard LRGB workflow, which you can see below.
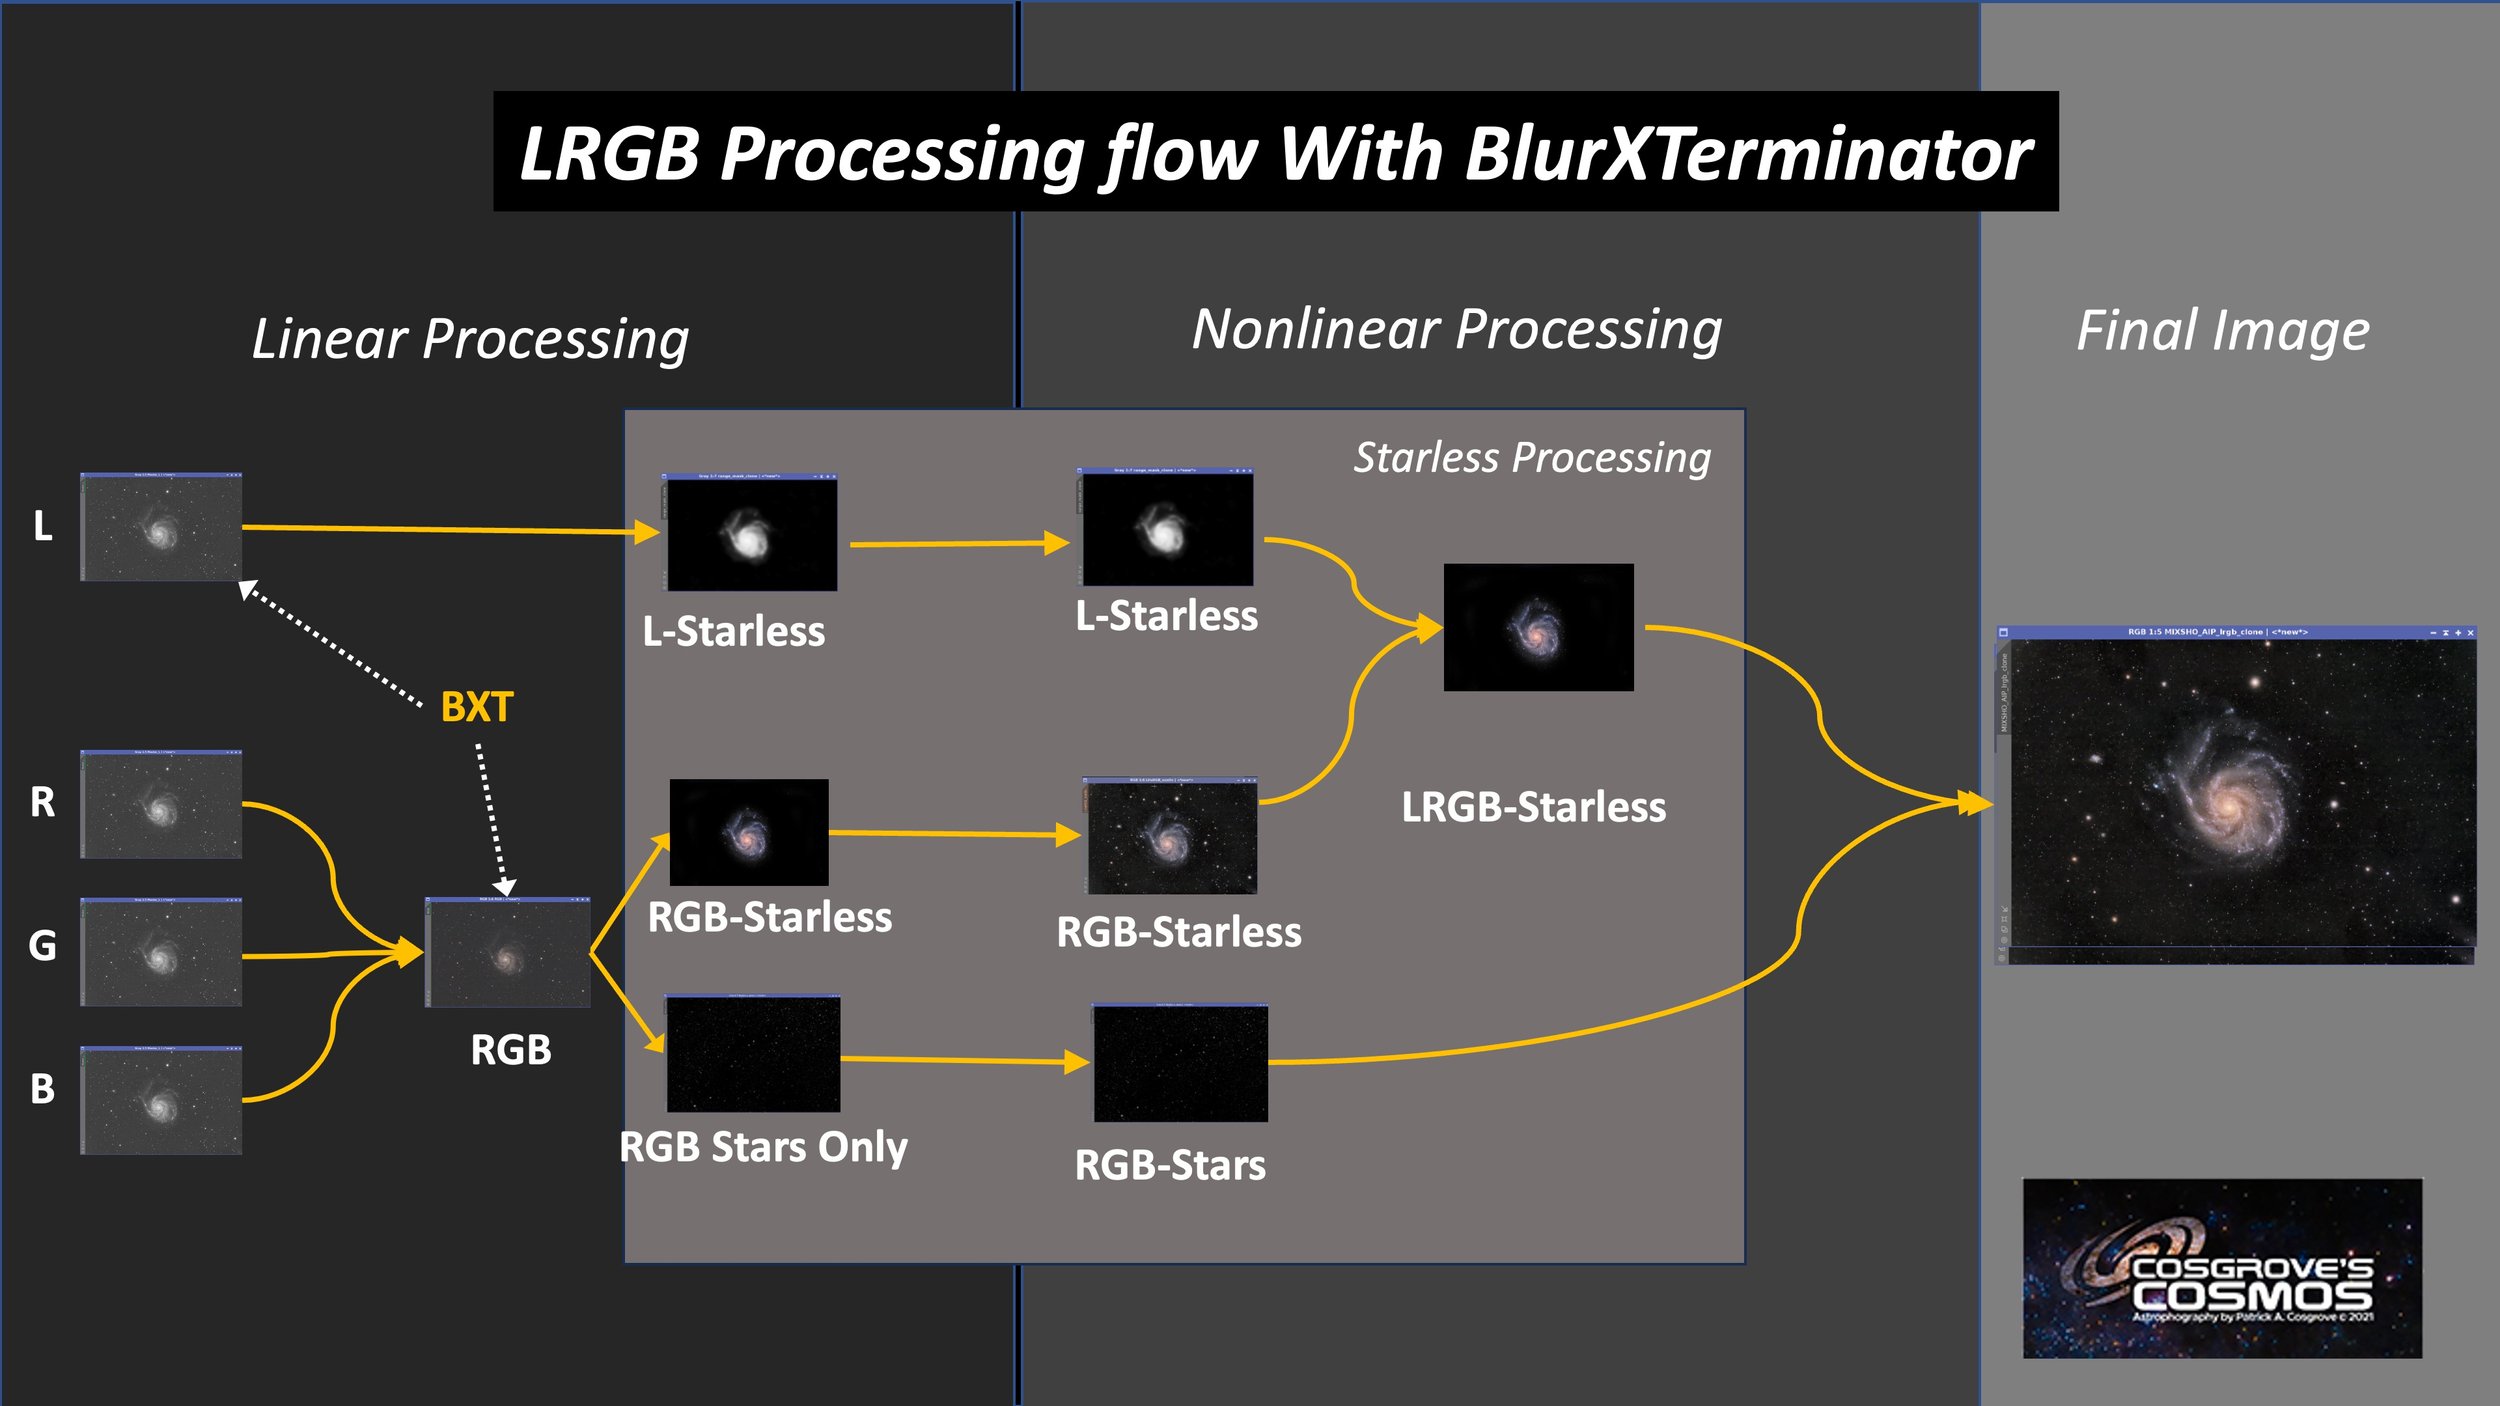
My typical LRGB Starless Workflow.
I had two challenges here.
First, the signal level was very low, so this was an exercise in noise suppression. While NoiseXterminator does a great job - run aggressively, it can cause artifacts rather than a smooth field. I found I had to be very careful there. The final image still has some noise to it, but I thought it looked more natural than going further, so I left it.
The second problem had to do with micro-lensing effects from the 1600 camera on bright stars. This is a known problem and was expected. I still don't have a way to fix these stars cleanly; all I can really do is minimize the artifacts created.
At some point, I will replace the camera with a 2600, but for now, I have to live with what I have.
Another comment is that I don’t usually use the Exponential Transform, but for this particular image, it was very helpful in bringing out the nebula in the starless Lum image.
Look below for the complete step-by-step processing walkthrough! Note: This walkthrough is based on Pixinsight.
Final Results
I can now say that I have done a dark nebula shot. I am pretty happy with the results:
On one hand, it came out way better than I expected when I was reviewing the captured subs
On the other hand, it does not have the smooth, silky-smoke look that I so admire in images of this type. So I have some work do do!
More Information
🔭 General Overviews & Imagery
NASA APOD – “LDN 1235: The Shark Nebula” (18 Mar 2025) — Recent wide-field portrait with a concise astronomer’s explanation of the nebula’s structure and distance. A simply beautiful version of this image!!
NASA APOD – “The Shark Nebula” (07 Sep 2015) — Classic image that popularised the “shark” nickname while discussing dust composition and the ~15-light-year span.
📈 Catalog & Technical Data
SIMBAD Object Page: LDN 1235 — Up-to-date astrometry, cross-identifications (LBN 535, vdB 149/150) and bibliography.
Lynds’ Catalogue of Dark Nebulae — entry 1235 — Original 1962 listing with coordinates and opacity class.
https://en.wikipedia.org/wiki/Lynds%27_Catalogue_of_Dark_Nebulae#1235
🔬 In-Depth Profiles & Imaging Guides
DeepSkyCorner — “Shark Nebula (LDN 1235)” — Discovery history, distance estimates (330–370 pc), physical properties and finder charts.
Galactic Hunter Blog — “LDN 1235 – The Shark Nebula” — Hands-on imaging story, gear list and processing tips from a Bortle 2 site.
📚 Scientific Literature
Kun et al. 2008 — “Star-Forming Regions in the Cepheus Flare” (A&A / arXiv 0809.4761) — Comprehensive study of the Cepheus molecular-cloud complex that includes LDN 1235.
💬 Community Imaging & Discussion
AstroBin Gallery Search — “LDN 1235 / Shark Nebula” — High-resolution user images with acquisition metadata for gear and settings inspiration.
🗺 Observational Planning & Charts
In-the-Sky.org — vdB 150 Object Page — Interactive finder charts, rise/set times and visibility forecasts for the illuminated “shark-head” region.
Capture Details
Lights Frames
Taken the nights of June 22nd and 23rd, 2025
56 x 120 seconds, bin 1x1 @ -10C, Gain 139.0, ZWO Lum Filter - 1.25 inch
55 x 120 seconds, bin 1x1 @ -10C, Gain 139.0, ZWO Red Filter - 1.25 inch
55 x 120 seconds, bin 1x1 @ -10C, Gain 139.0, ZWO Green Filter - 1.25 inch
55 x 120 seconds, bin 1x1 @ -10C, Gain 139.0, ZWO Blue Filter - 1.25 inch
Total - after culling bad subs - of 7 hours and 22 minutes.
Cal Frames
25 Darks at 200 seconds, bin 1x1, -10C, gain 139
30 Dark Flats at Flat exposure times, bin 1x1, -10C, gain 139
One set of Flats done:
15 Lum Flats
15 R Flats
15 G Flats
15 B Flats
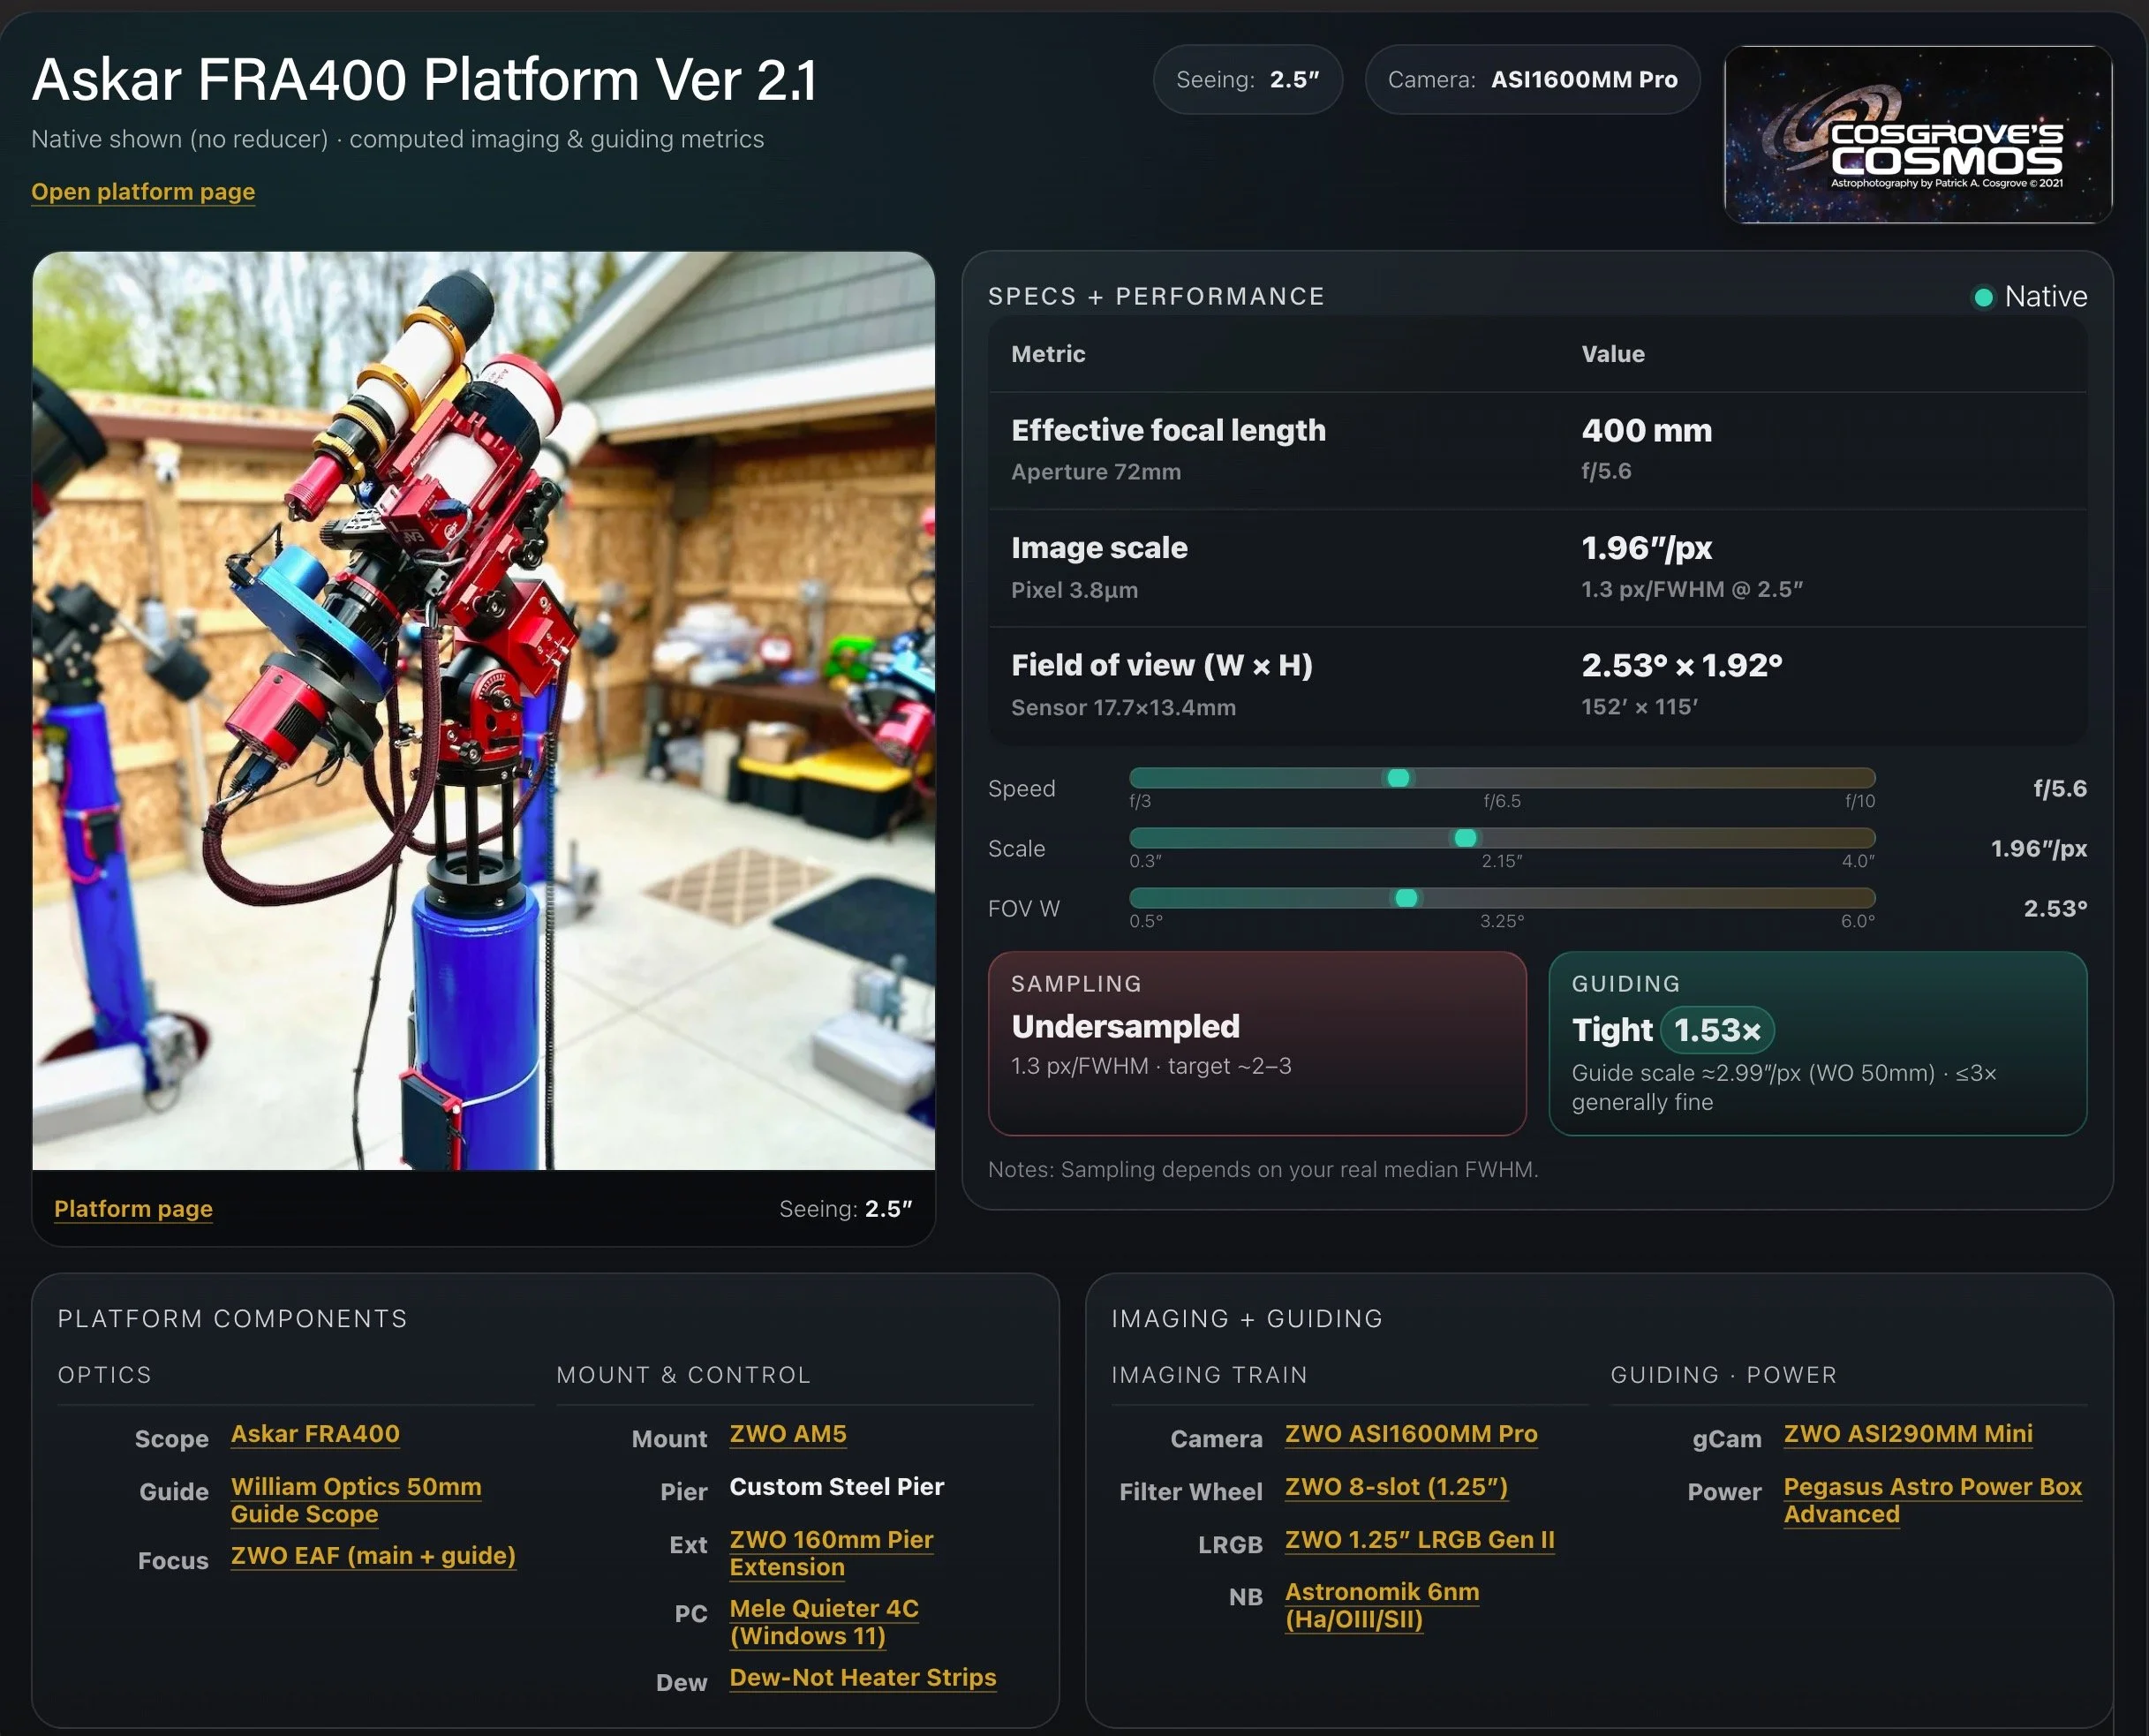
Platform used for this project
Software
Capture Software: PHD2 Guider, NINA
Image Processing: Pixinsight, Photoshop - assisted by Coffee, extensive processing indecision and second-guessing, editor regret and much swearing…..
Image Processing Walkthrough
(All Processing is done in Pixinsight, with some final touches done in Photoshop)
1. Blink and SubFrameSelector Analysis
Lum Subs:
Some thin clouds are coming through - some trails
No frames removed!
Red Subs:
Some thin clouds are coming through - some trails
No frames removed!
Green Subs:
Some thin clouds are coming through - some trails
No frames removed!
Blue Subs:
Some thin clouds are coming through - some trails
No frames removed!
All Flats and Darks:
All looked good!
2. WBPP 2.8.9
Reset everything
Load all lights
Load all flats
Load all darks (note: darks for 200 seconds, not 120 as they should have been!)
I choose to optimize darks.
Select - maximum quality
Reference Image - auto - the default
Select the output directory to wbpp folder
Enable CC for all light frames
Pedestal value - auto
Darks -set exposure tolerance to 0
Lights - set exposure tolerance to 0
Lights - all set except for linear defect
set for Autocrop
Executed in 46 minutes - no error!

WBPP Calibration View

WBPP Post Calibration View

WBPP Pipeline View
3. Load Master Images
Load all master images and rename them.

Master L, R, G, & B images
4. Create the Linear RGB Image and Process It
Using ChannelCombination, create the initial RGB image. It has a strong green balance.
The nebula takes up a lot of the center of the frame, so I used DBE to set up a sampling plan to get the background frame:
Set up the sample pattern as shown - save for use on the Master_L image
Fix with subtraction - this removes the green balance and a slight left-to-right gradient.
Run BXT correct-only. Best to fix any star issues before SPCC
SPCC and calibrate the color. Use the Ideal QE curve and ZWO RGB filters. I also selected a sample of the background for SPCC’s use. See the panel setup below.
Run PFSIMage to get an idea of the star sizes. X = 1.77 Y = 1.70
After experimenting with BXT settings, I used 2.33 for non-stellar restoration, which was much larger than the PFSImage results.
Run BXT Full correction - see settings used on the panel shot below.
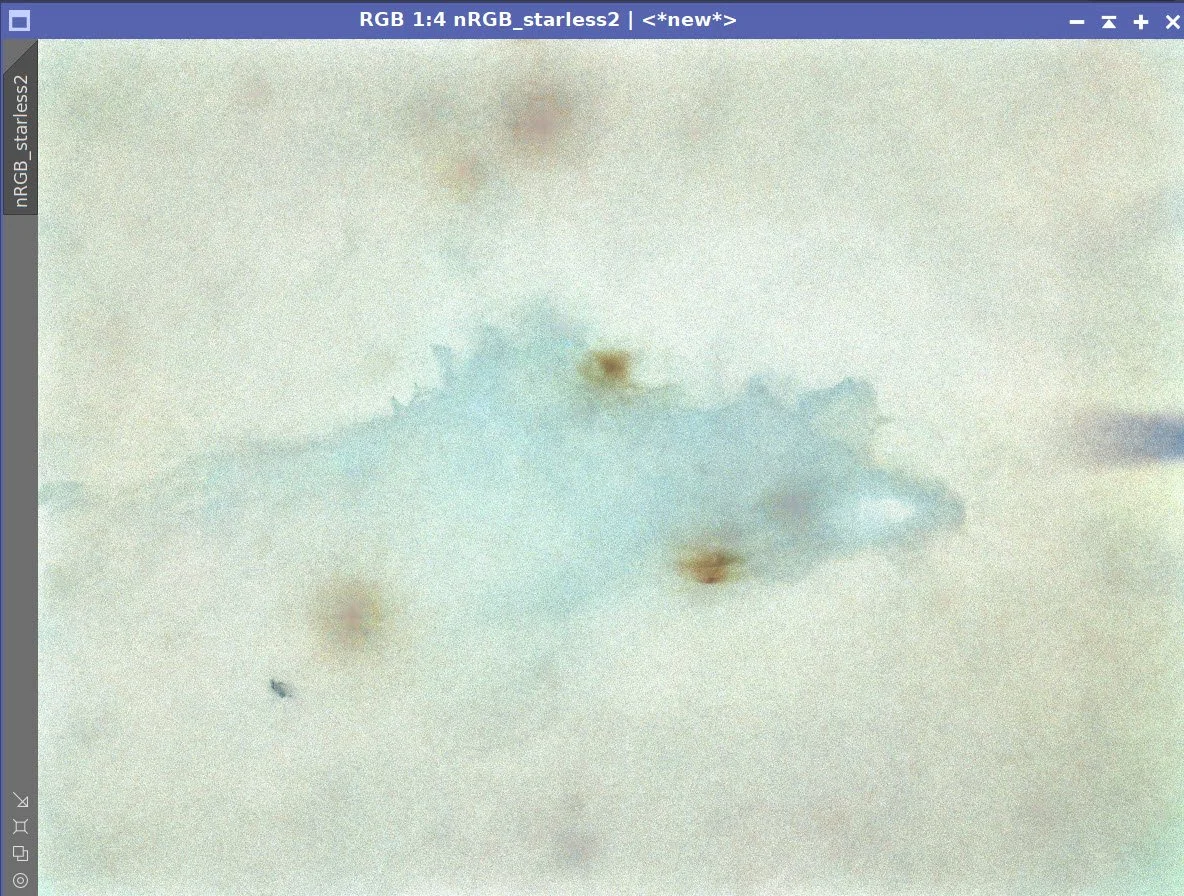
Apply NXT to remove noise. See the values used in the panel snapshot below. The shark is just barely visible!
Use SXT with Saving Stars. Set to a large sample box size
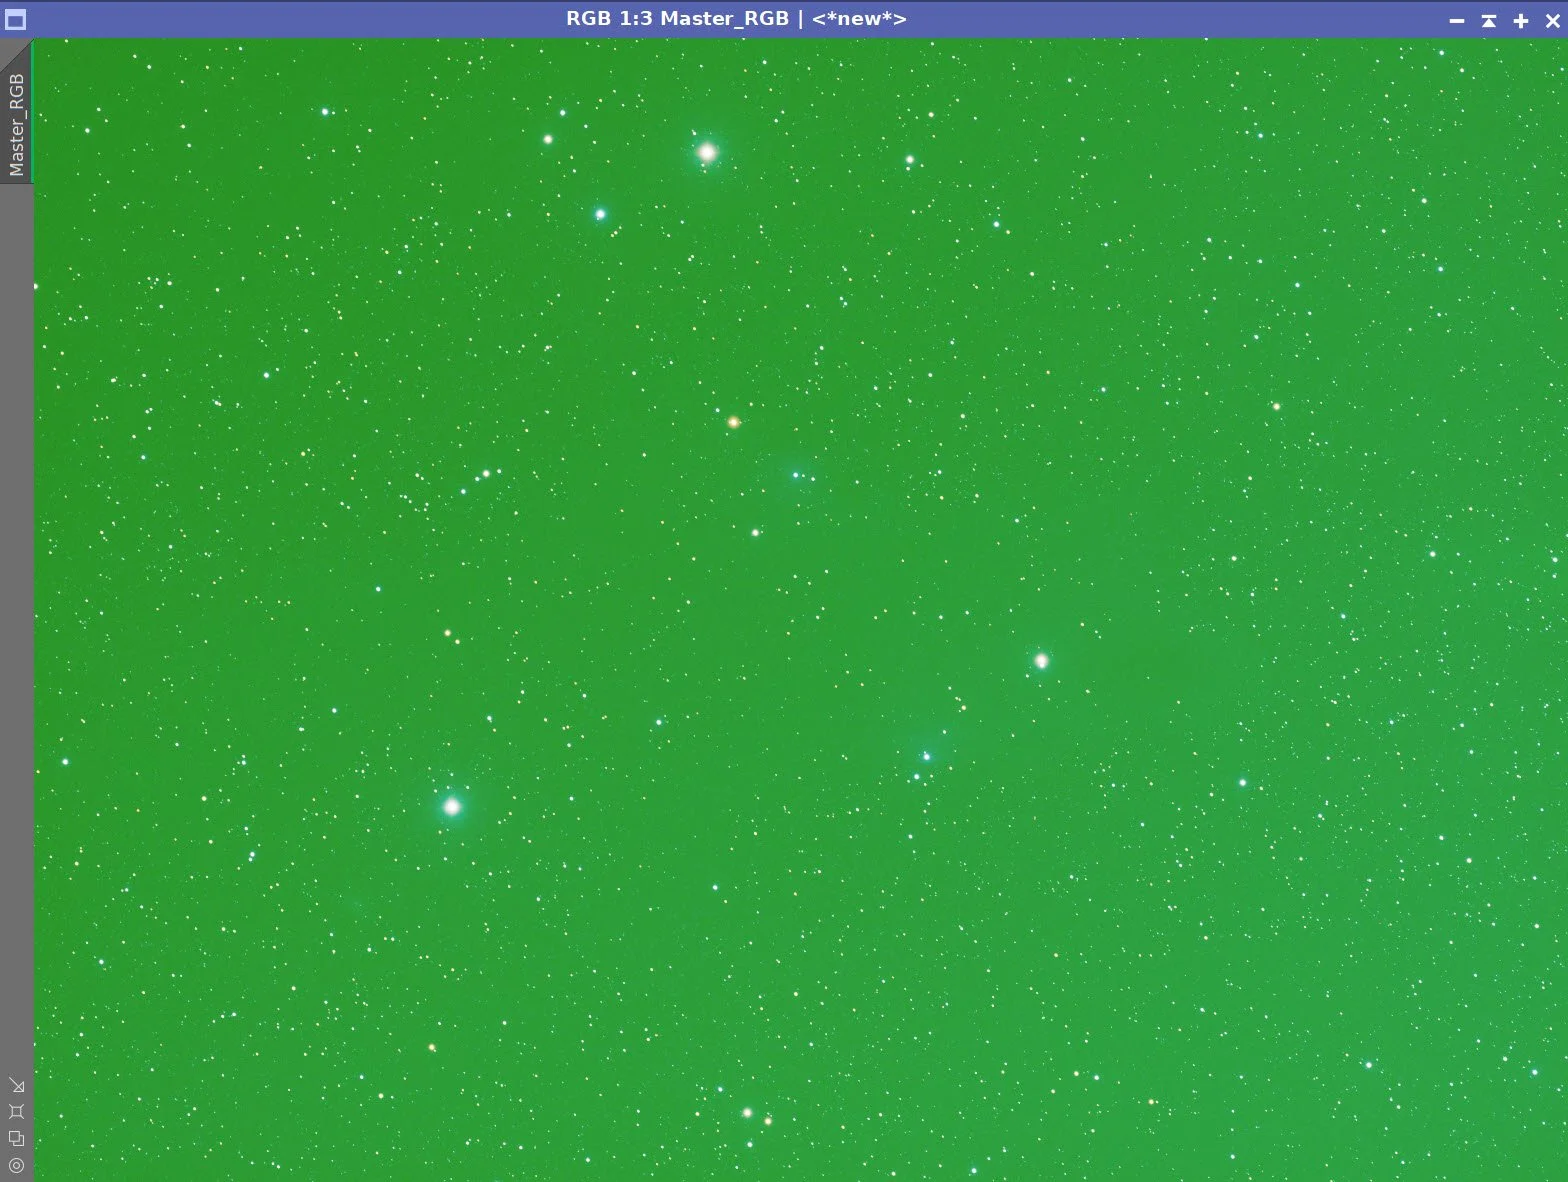
The initial RGB Linear Image.
Master RGB Sample Pattern (click to enlarge)
Master RGB Before DBE (click to enlarge)
Master RGB after DBE (click to enlarge)
Master RGB Background

SPCC panel settings used.
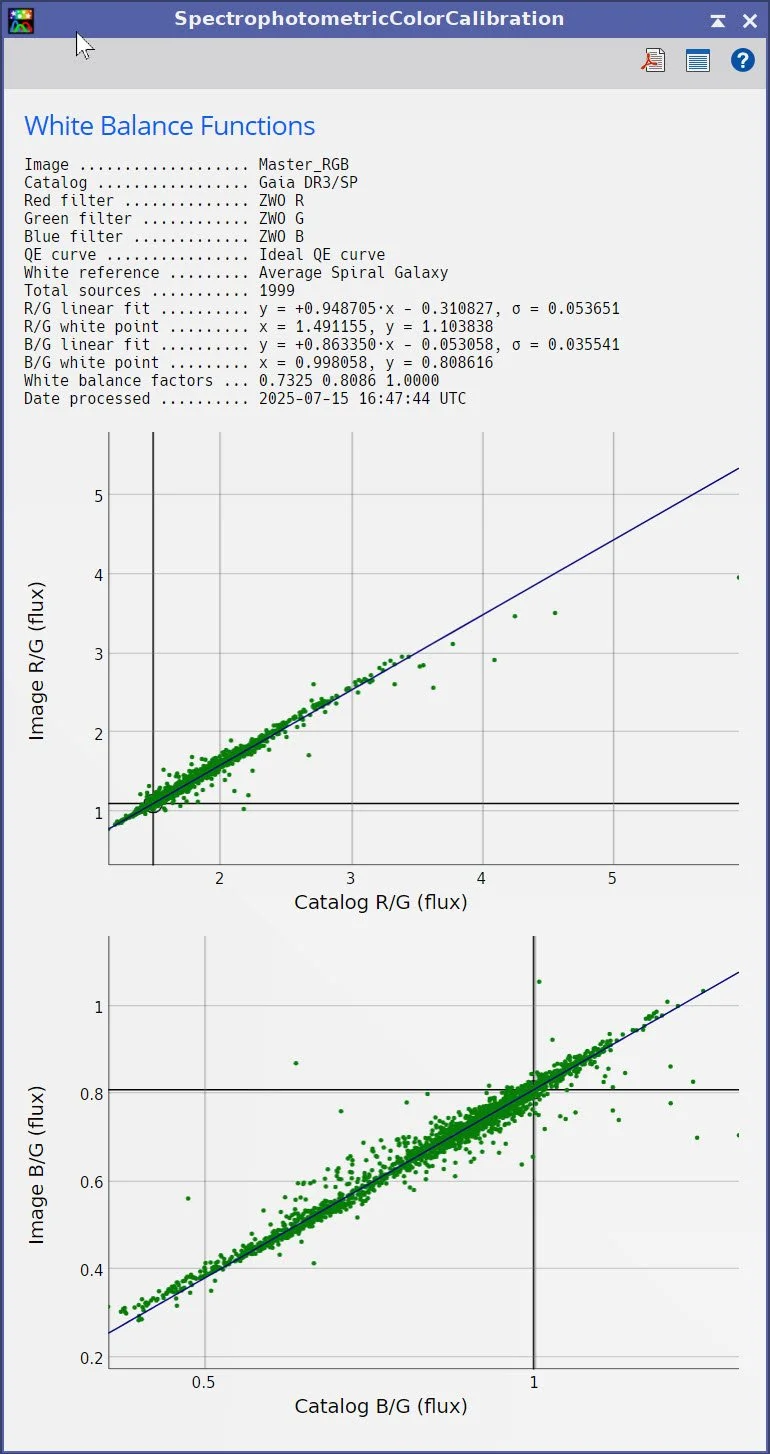
The final regression result.
Master_RGB before SPCC run. (click to enlarge)
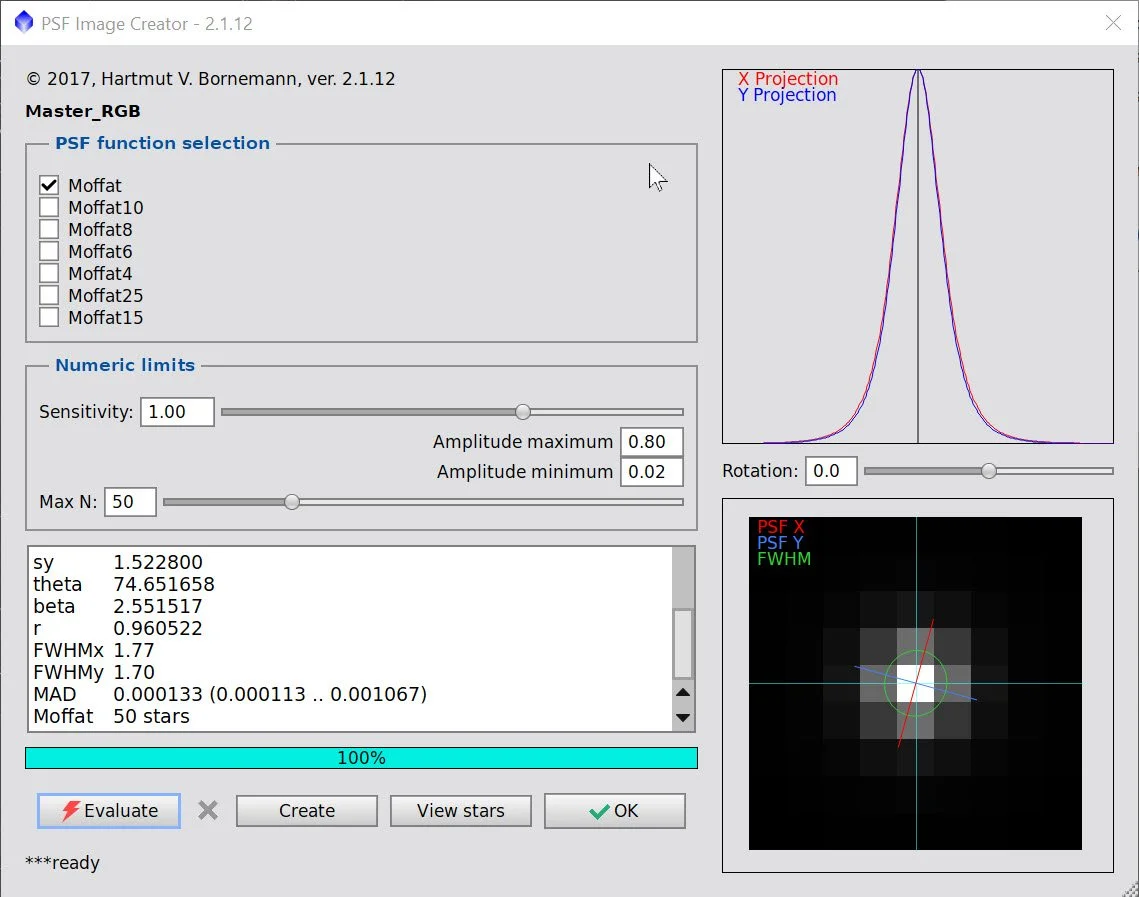
PFSImage Panel with results
Master_RGB after SPCC run (click to enlarge)
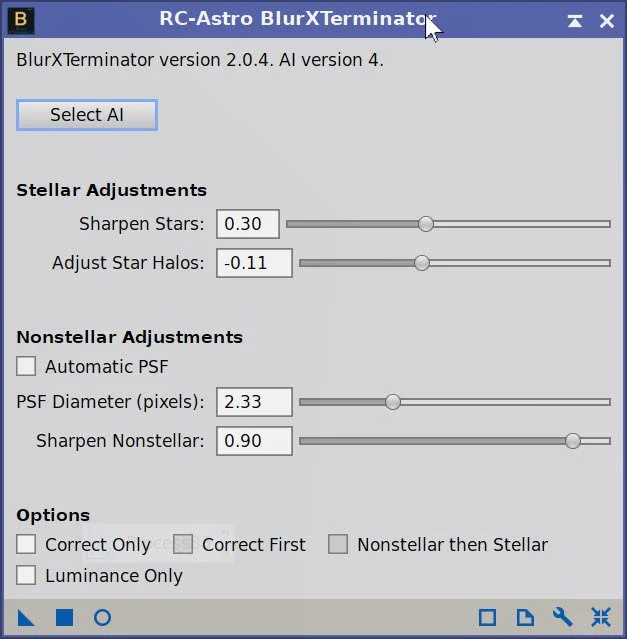
Final BXT settings used.
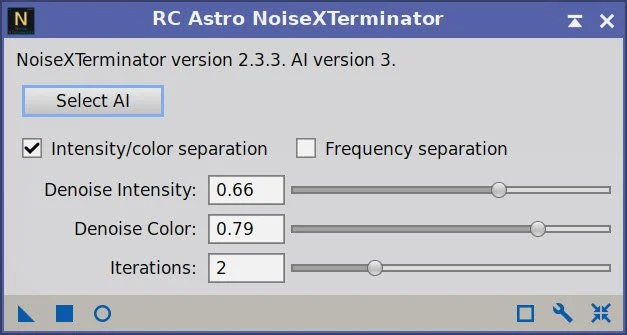
The NXT parameters used.
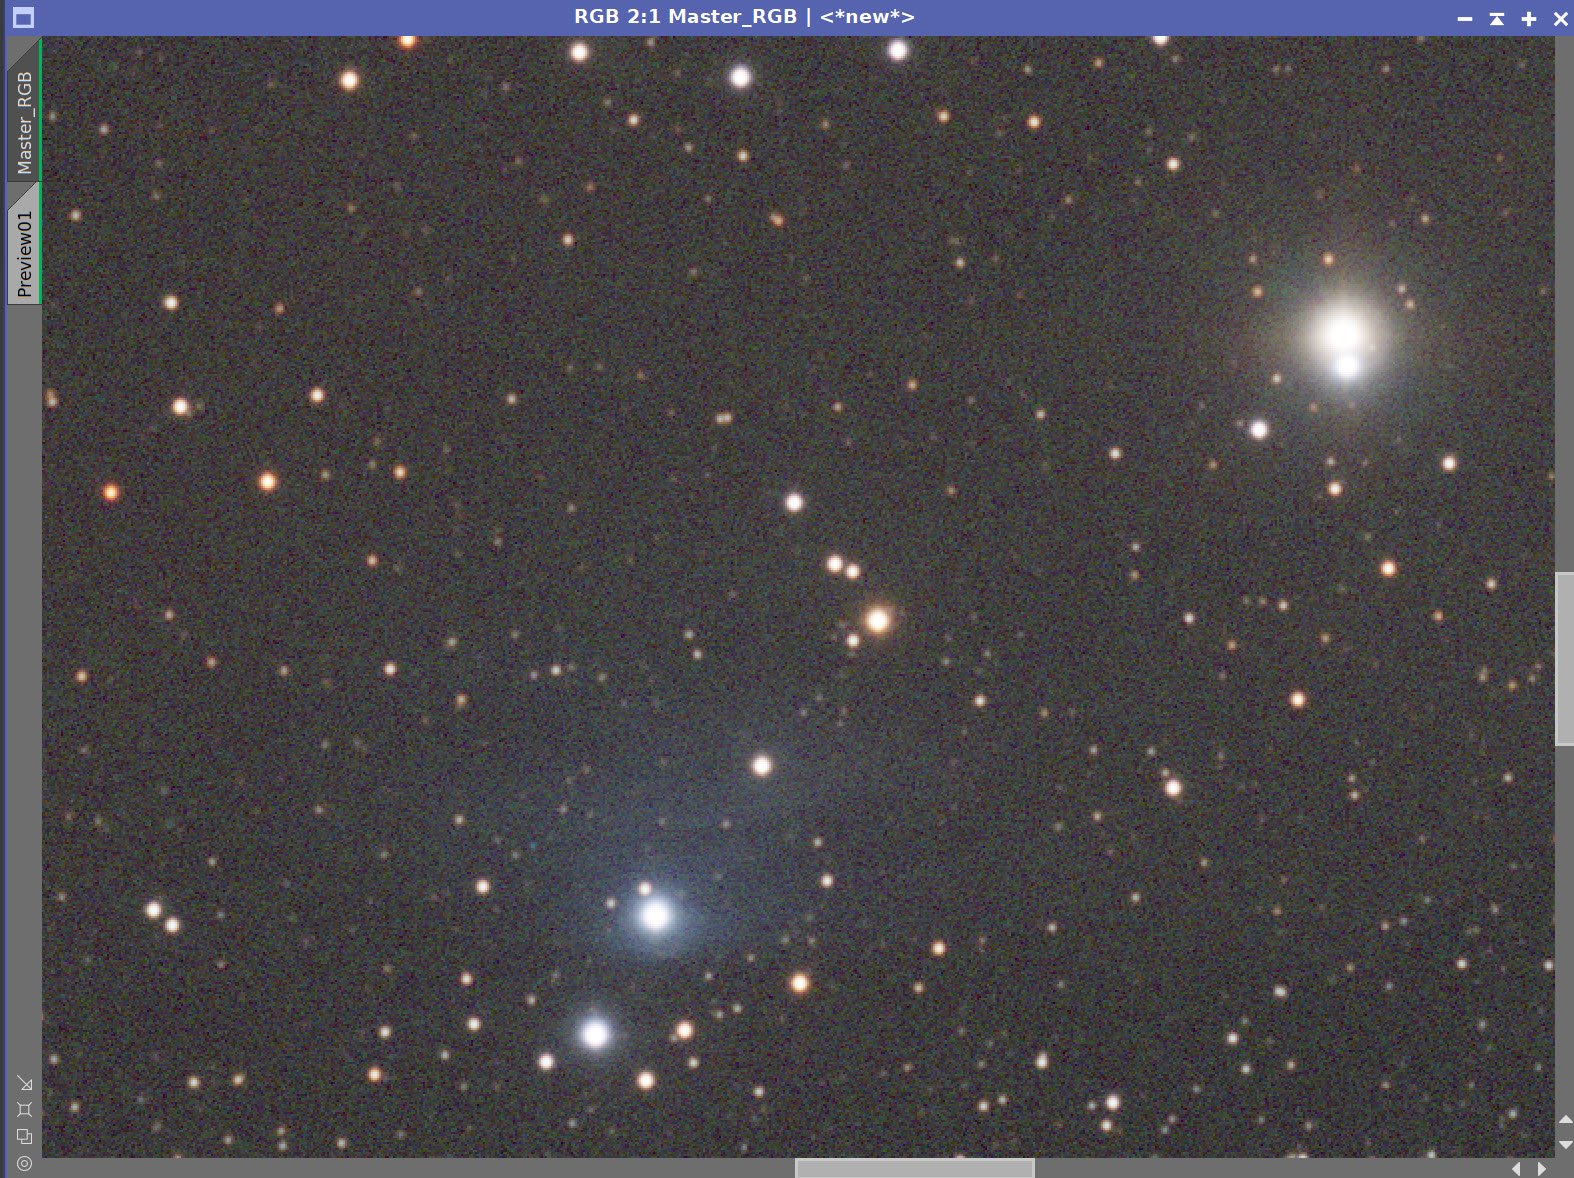

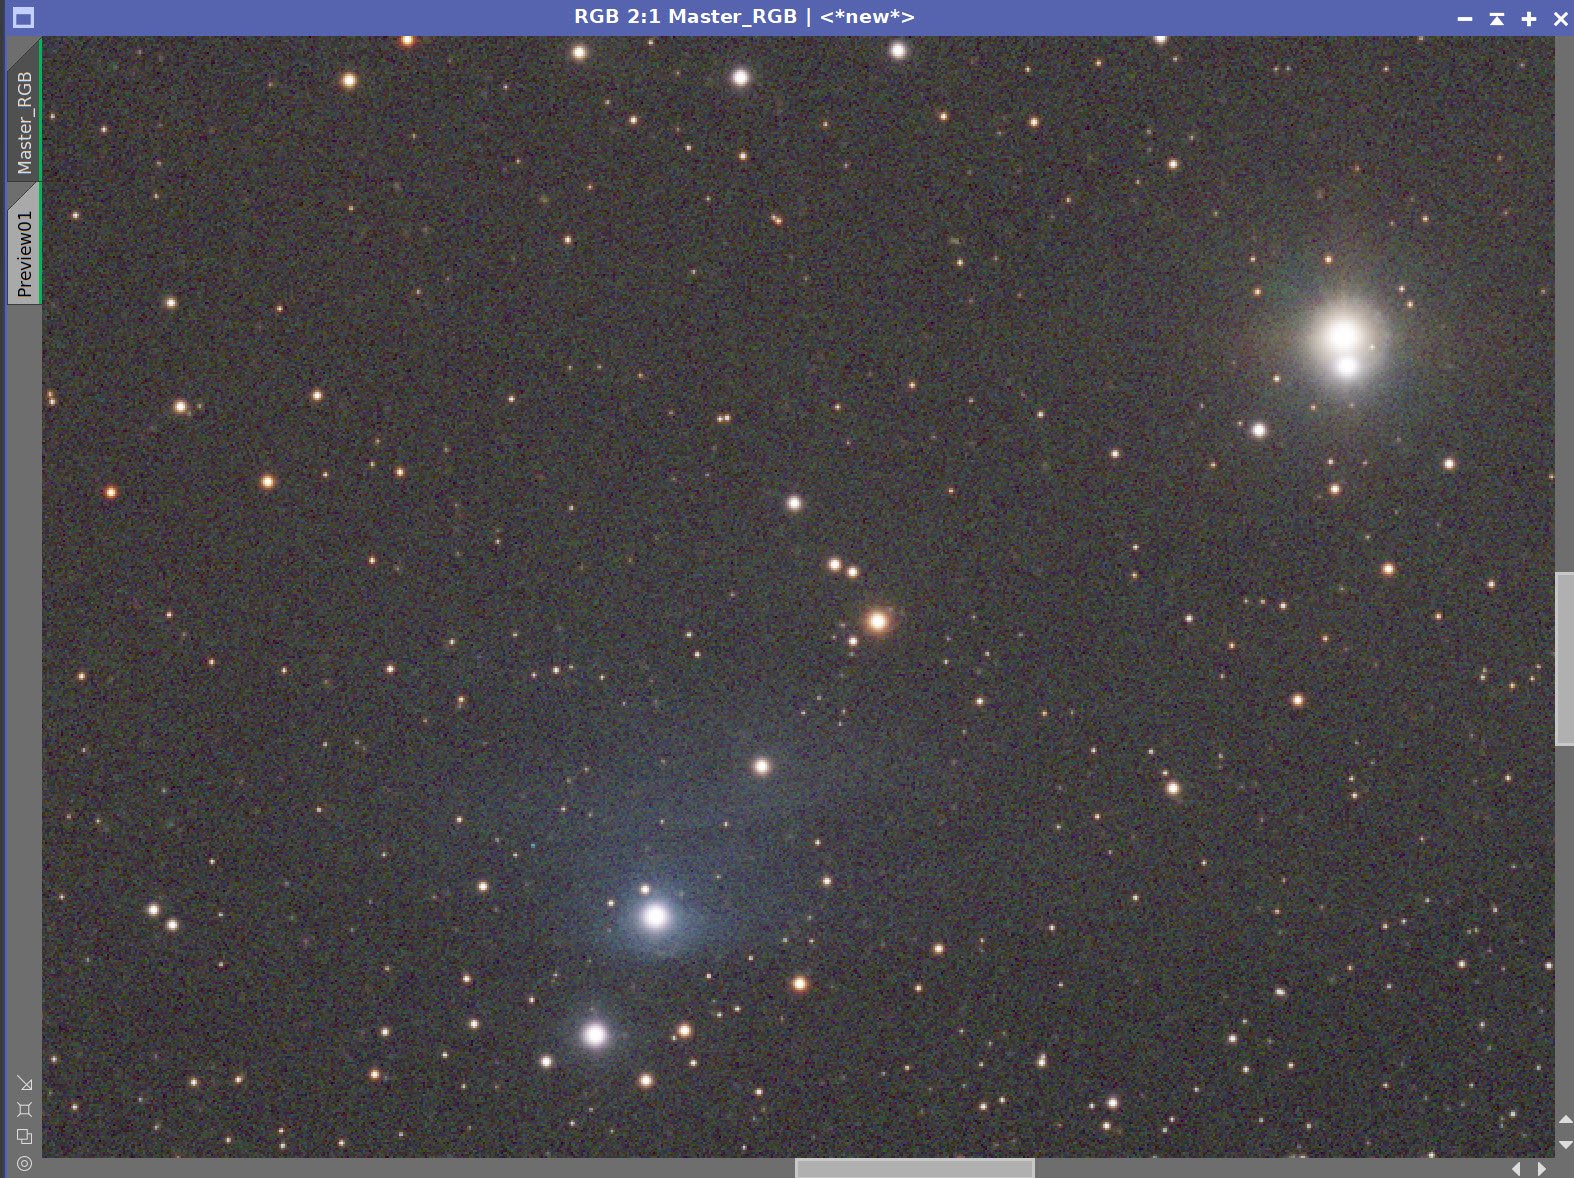
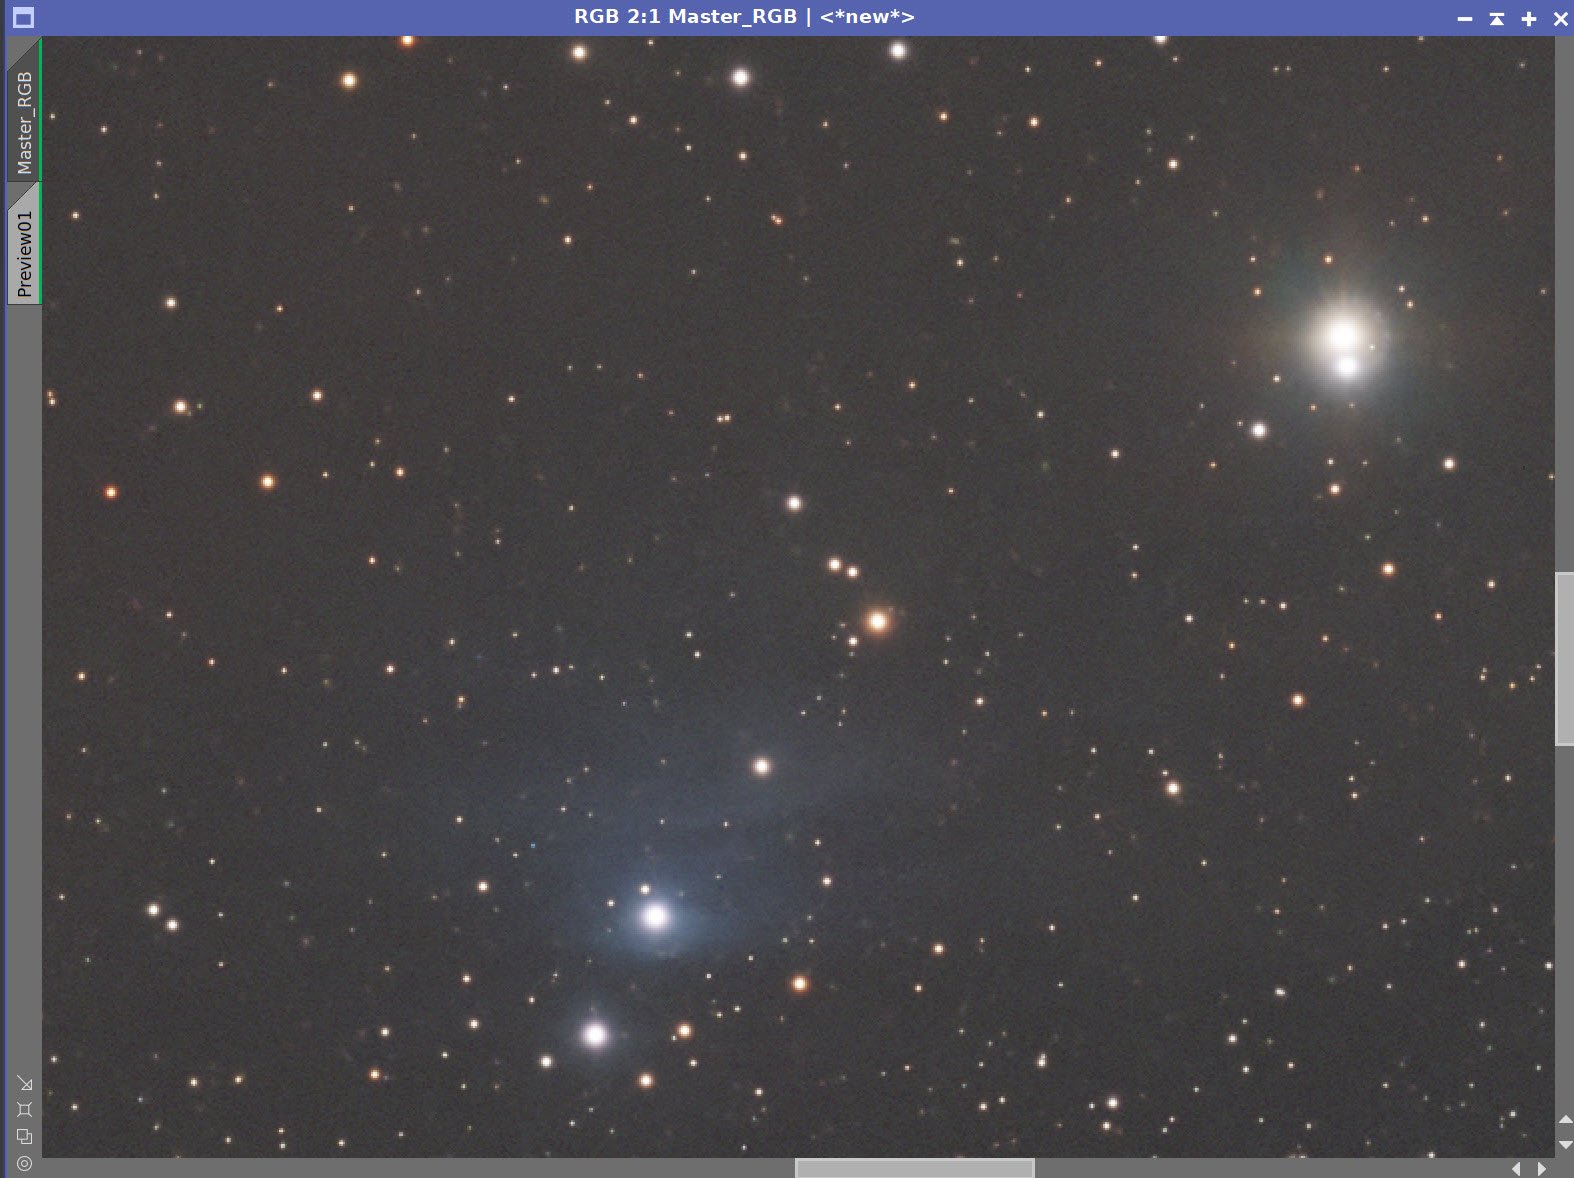
The Master RGB Image Before BXT, After BXT Correction only, After BXT Full Correction, and After NXT
Master RGB before Star Removal.
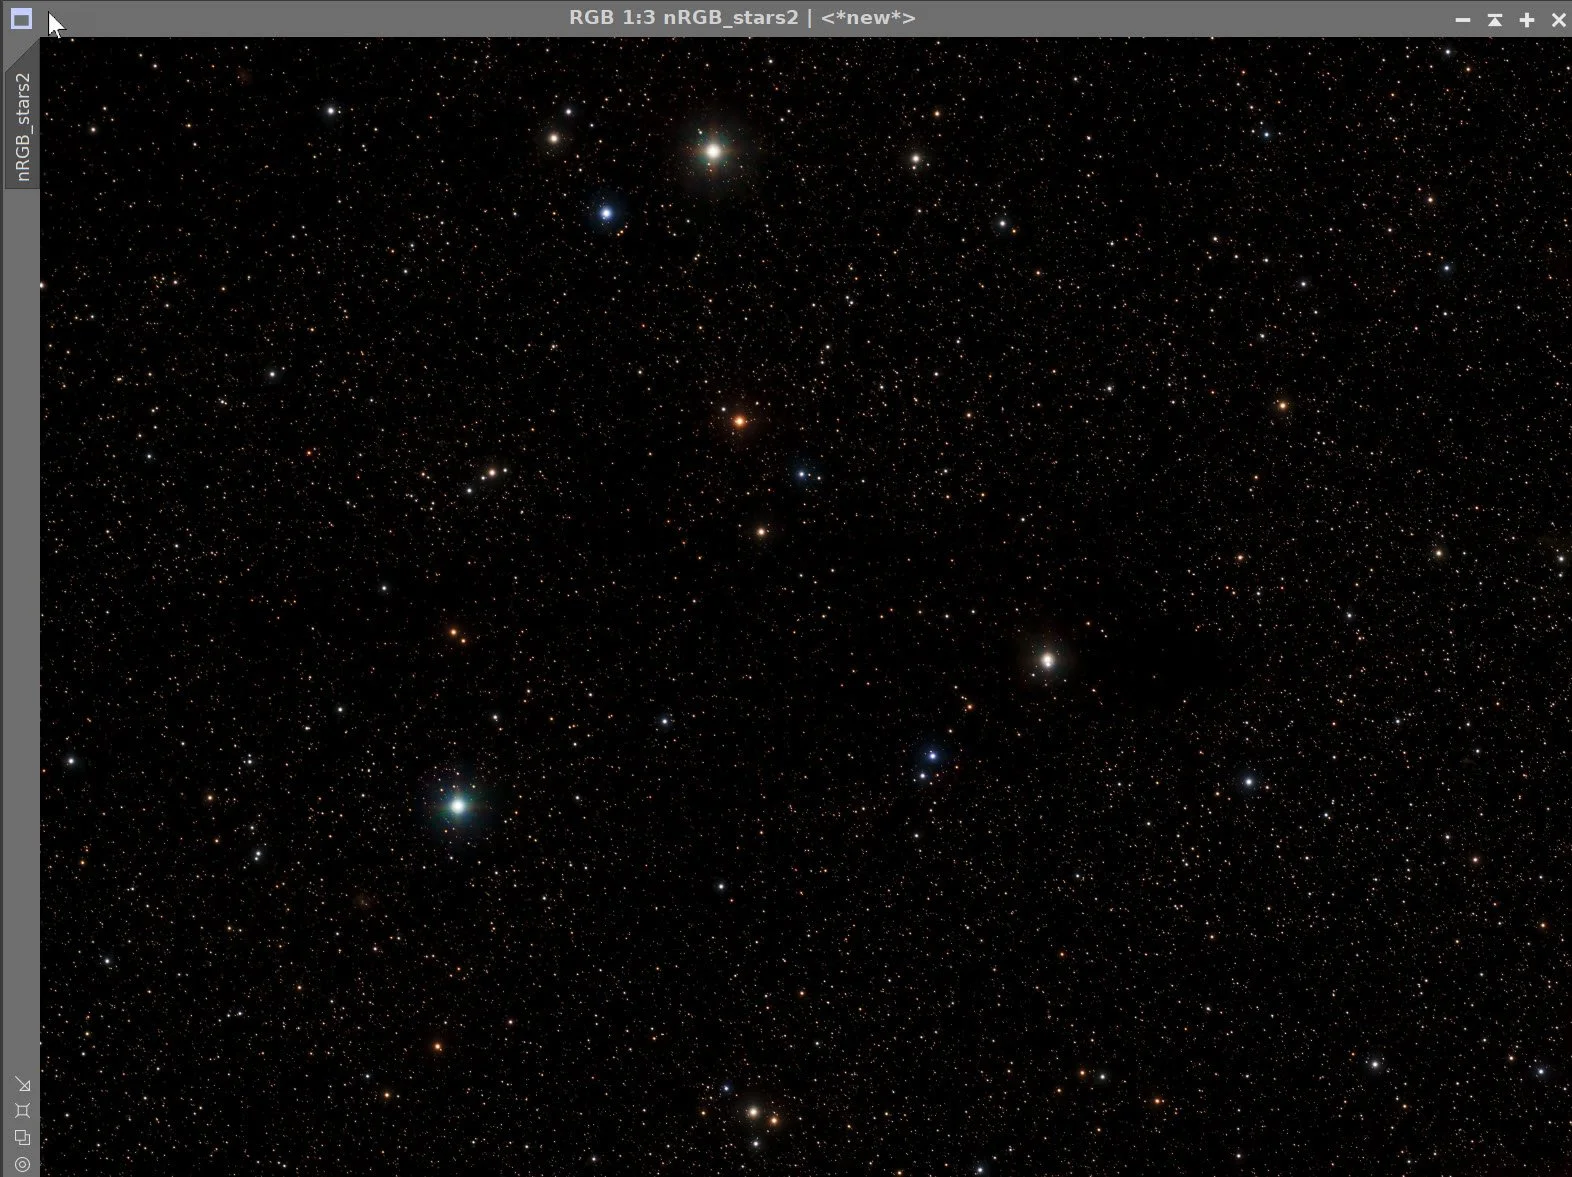
RGB Stars Image resulting from SXT. (click to enlarge)
Master RGB Starless Image after SXT (click to enlarge)
5. Process the Linear Lum Image
Run DBE
Start with the RGB sampling plan from the RGB image and then enhance
Use subtraction.
Run BXT Correct Only
Run PFSImage to get star sizes. X = 1.61 , Y= 1.55
Experiment with BXT settings for best results.
Run BXT Full using the star size of 2.0. Much higher than PFSImage star size. See the panel shot below.
Apply NXT - see the NXT Panel snap below.
Take each image starless with STX - use large sample box - no need to save the stars.
Master L image Sampling Plan (click to enlarge)
Maser L before DBE (click to enlarge)
Master_L after DBE. (click to enlarge)
Master_L background removed. (click to enlarge)

PFSImage results for Master L

Final BXT Params used.

Params used with NXT V3.


Master Lum Before BXT, After BXT Correct Only, After BXT Full, and After NXT
Master_L before Star Removal (click to enlarge)
Master L Starless. (click to enlarge)
6. Move Images to the Nonlinear State
For RGB Stars, use Seti Astro’s StarStetch with default settings.
For RGB Starless, use the current STF->HT method to go nonlinear.
For the Lum image, use the current STF->HT method to go nonlinear.
With starless imaging, I can be much more relaxed about my nonlinear conversion as I can more easily protect my stars from being blown out!
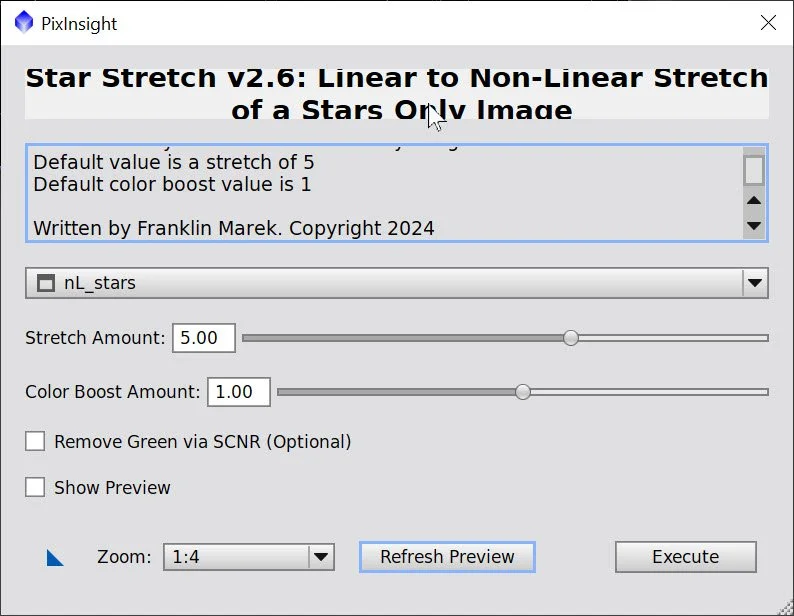
Seti Astro’s Star Stretch
Initial Nonlinear RGB Stars Image (click to enlarge)
Initial Nonlinear RGB Starless image (click to enlarge)
Initial Nonlinear Lum Starless Image (click to enlarge)
7. Process the Nonlinear RGB Stars Image
All I am going to do here is use the ColorSaturation tool to adjust the stars until I am happy.
Final RGB Stars Image - ignore the paper clip!! (click to enlarge)
After using ColorSaturation to tweak colors of the stars.
9. Do the Processing of the Nonlinear Lum image
Apply the CT to get a nice starting contrast.
Aply NXT - see the params used in the panel snap below.
Use the ExponentialTransform to enhance the faint nebula - see panel snal for params used.
Use a final CT to tweak
The Initial Lum image (click to enlarge)
After NXT (click to enlarge)
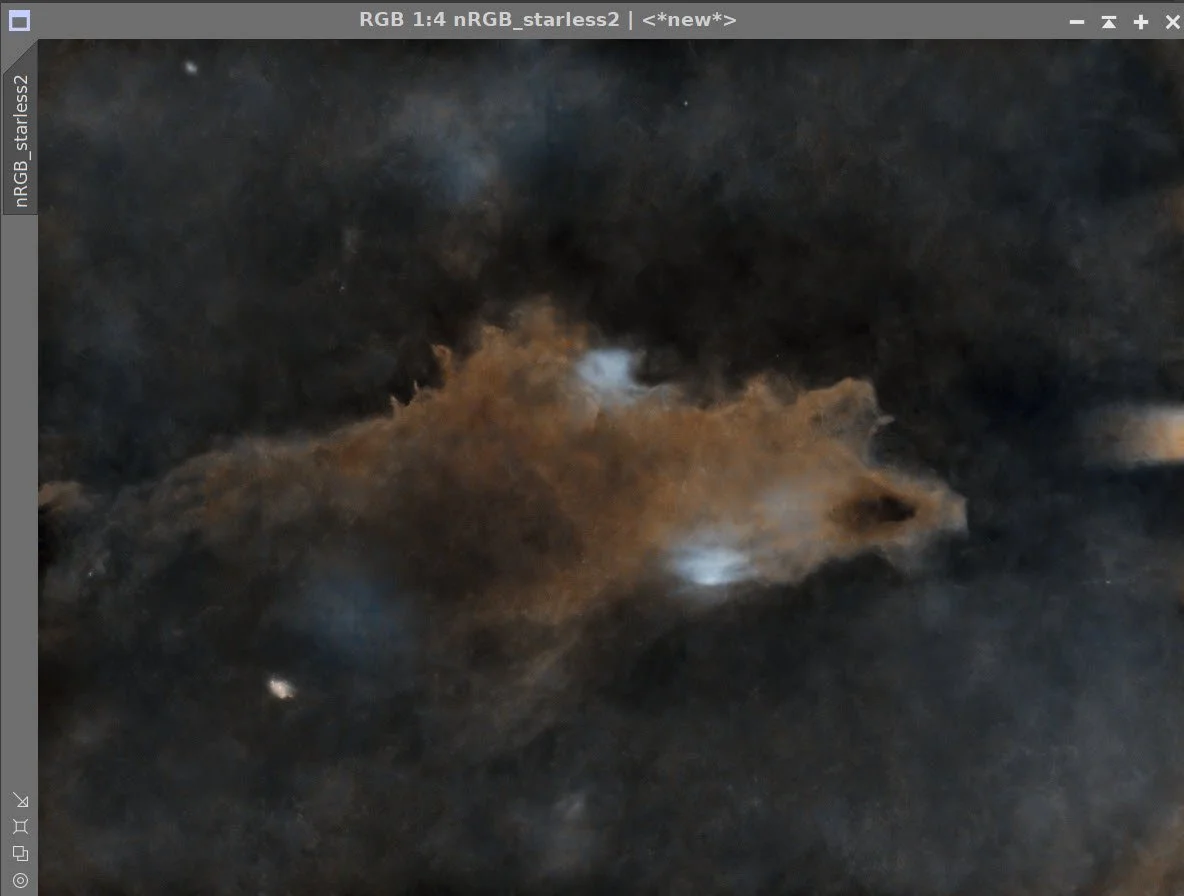
After ExponentialTransform (click to enlarge)
Apply CT (Click to enlarge)
NXT settings used.
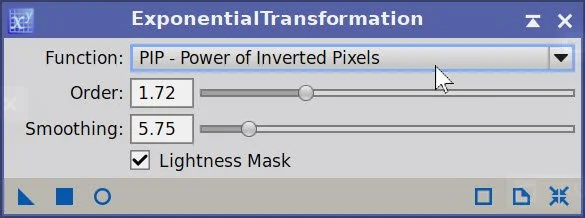
Params Used.
After CT with lum_mask (click to enlarge)
10. Complete the Processing of the RGB Starless Image
Apply CT to adjust contrast and saturation.
Apply SCNR Green 1.0 to remove green noise. This leaves a bit of magenta in the shadows.
Invert
Run SCNR Green 1.0 again
Invert
Apply NXT - see params used below. A simple denoise version 2 using 4X gave the best results here.
Apply CT to tweak the tonescale
Using ChannelCombination in CIE Lab mode and just enabling the L layer. Use this to field the Lum image into the RGB Image
Apply CT to adjust the tonescale on the now combined image
Use NXT V3 to lower noise. See the panel shot for the parameters used.
Initial RGB Starles image (click to enlarge)
SNCR GReen 1.0 (click to enlarge)
SCNR Green 1.0 (click to enlarge)
After NXT (click to enlarge)
After CT (click to enlarge)
Invert(click to enlare)
Invert again(click to enlarge)
NXT Params used (click to enlarge)
Use CT to tweak (click to enlarge)
After L image blended with the ChanelCombinaton Tool (click to enlarge)

ColorSaturation Curve Used
Final LRGB Starless image After ColorStauatin Adjust.
11. Combine the RGB Starless with the RGB Stars Image
Use the ScreenStars script to add the RGB Stars back in
Rotate the image 180 degrees to look better
Doa final NXT - see params below
The RGB Stars Image (click to enlarge)
The Final Starless LRGB image (click to enlarge)

ScreenStars Panel.

The recombined Image
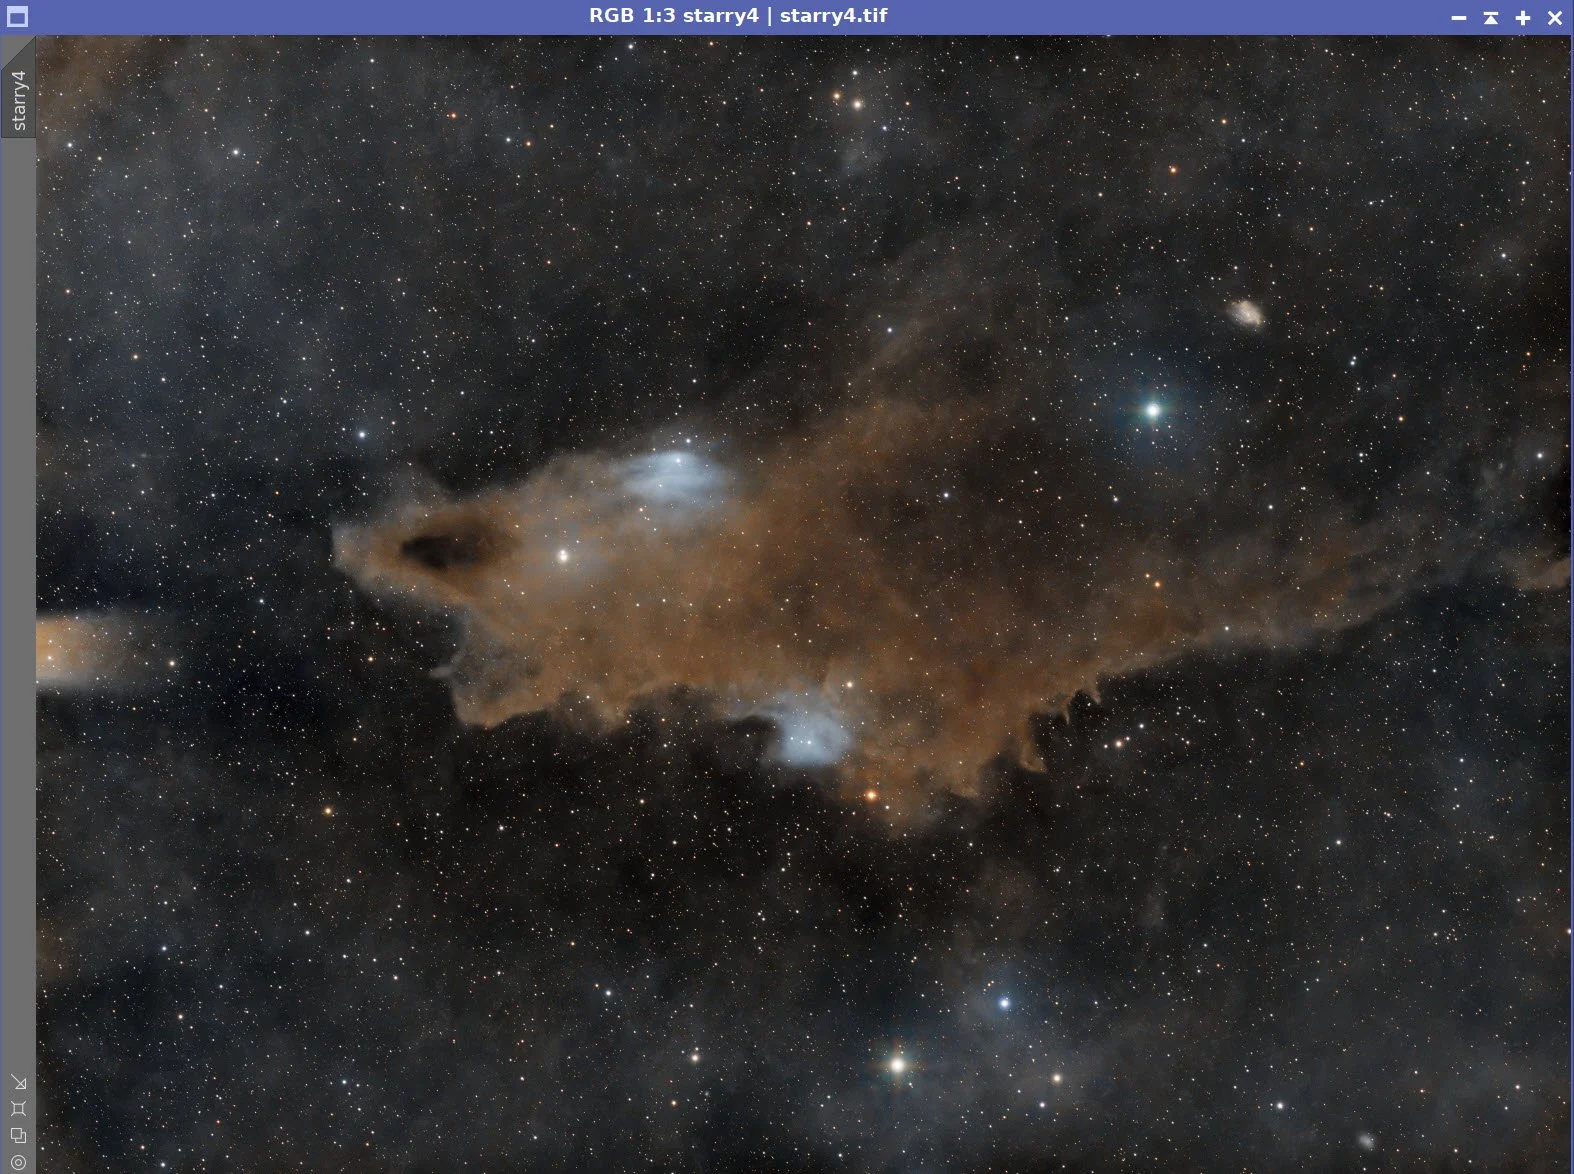
Rotated Image
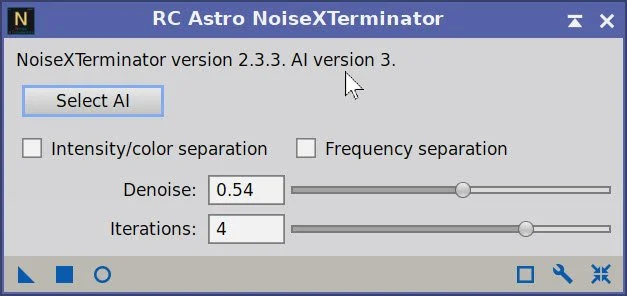
NXT Params Used

Image ready for polishing
14. Export the Image to Photoshop for Polishing
I am pretty happy with the image and ready to polish it in Photoshop.
Save the image as a TIFF 16-bit unsigned and move to Photoshop
Crop the image slightly
Select bright stars and minimize microlensing effects from the 1600 sensor
Make final global adjustments with Clarify, Curves, and the Color Mixer
Added Watermarks
Export Clear, Watermarked, and Web-sized jpegs.
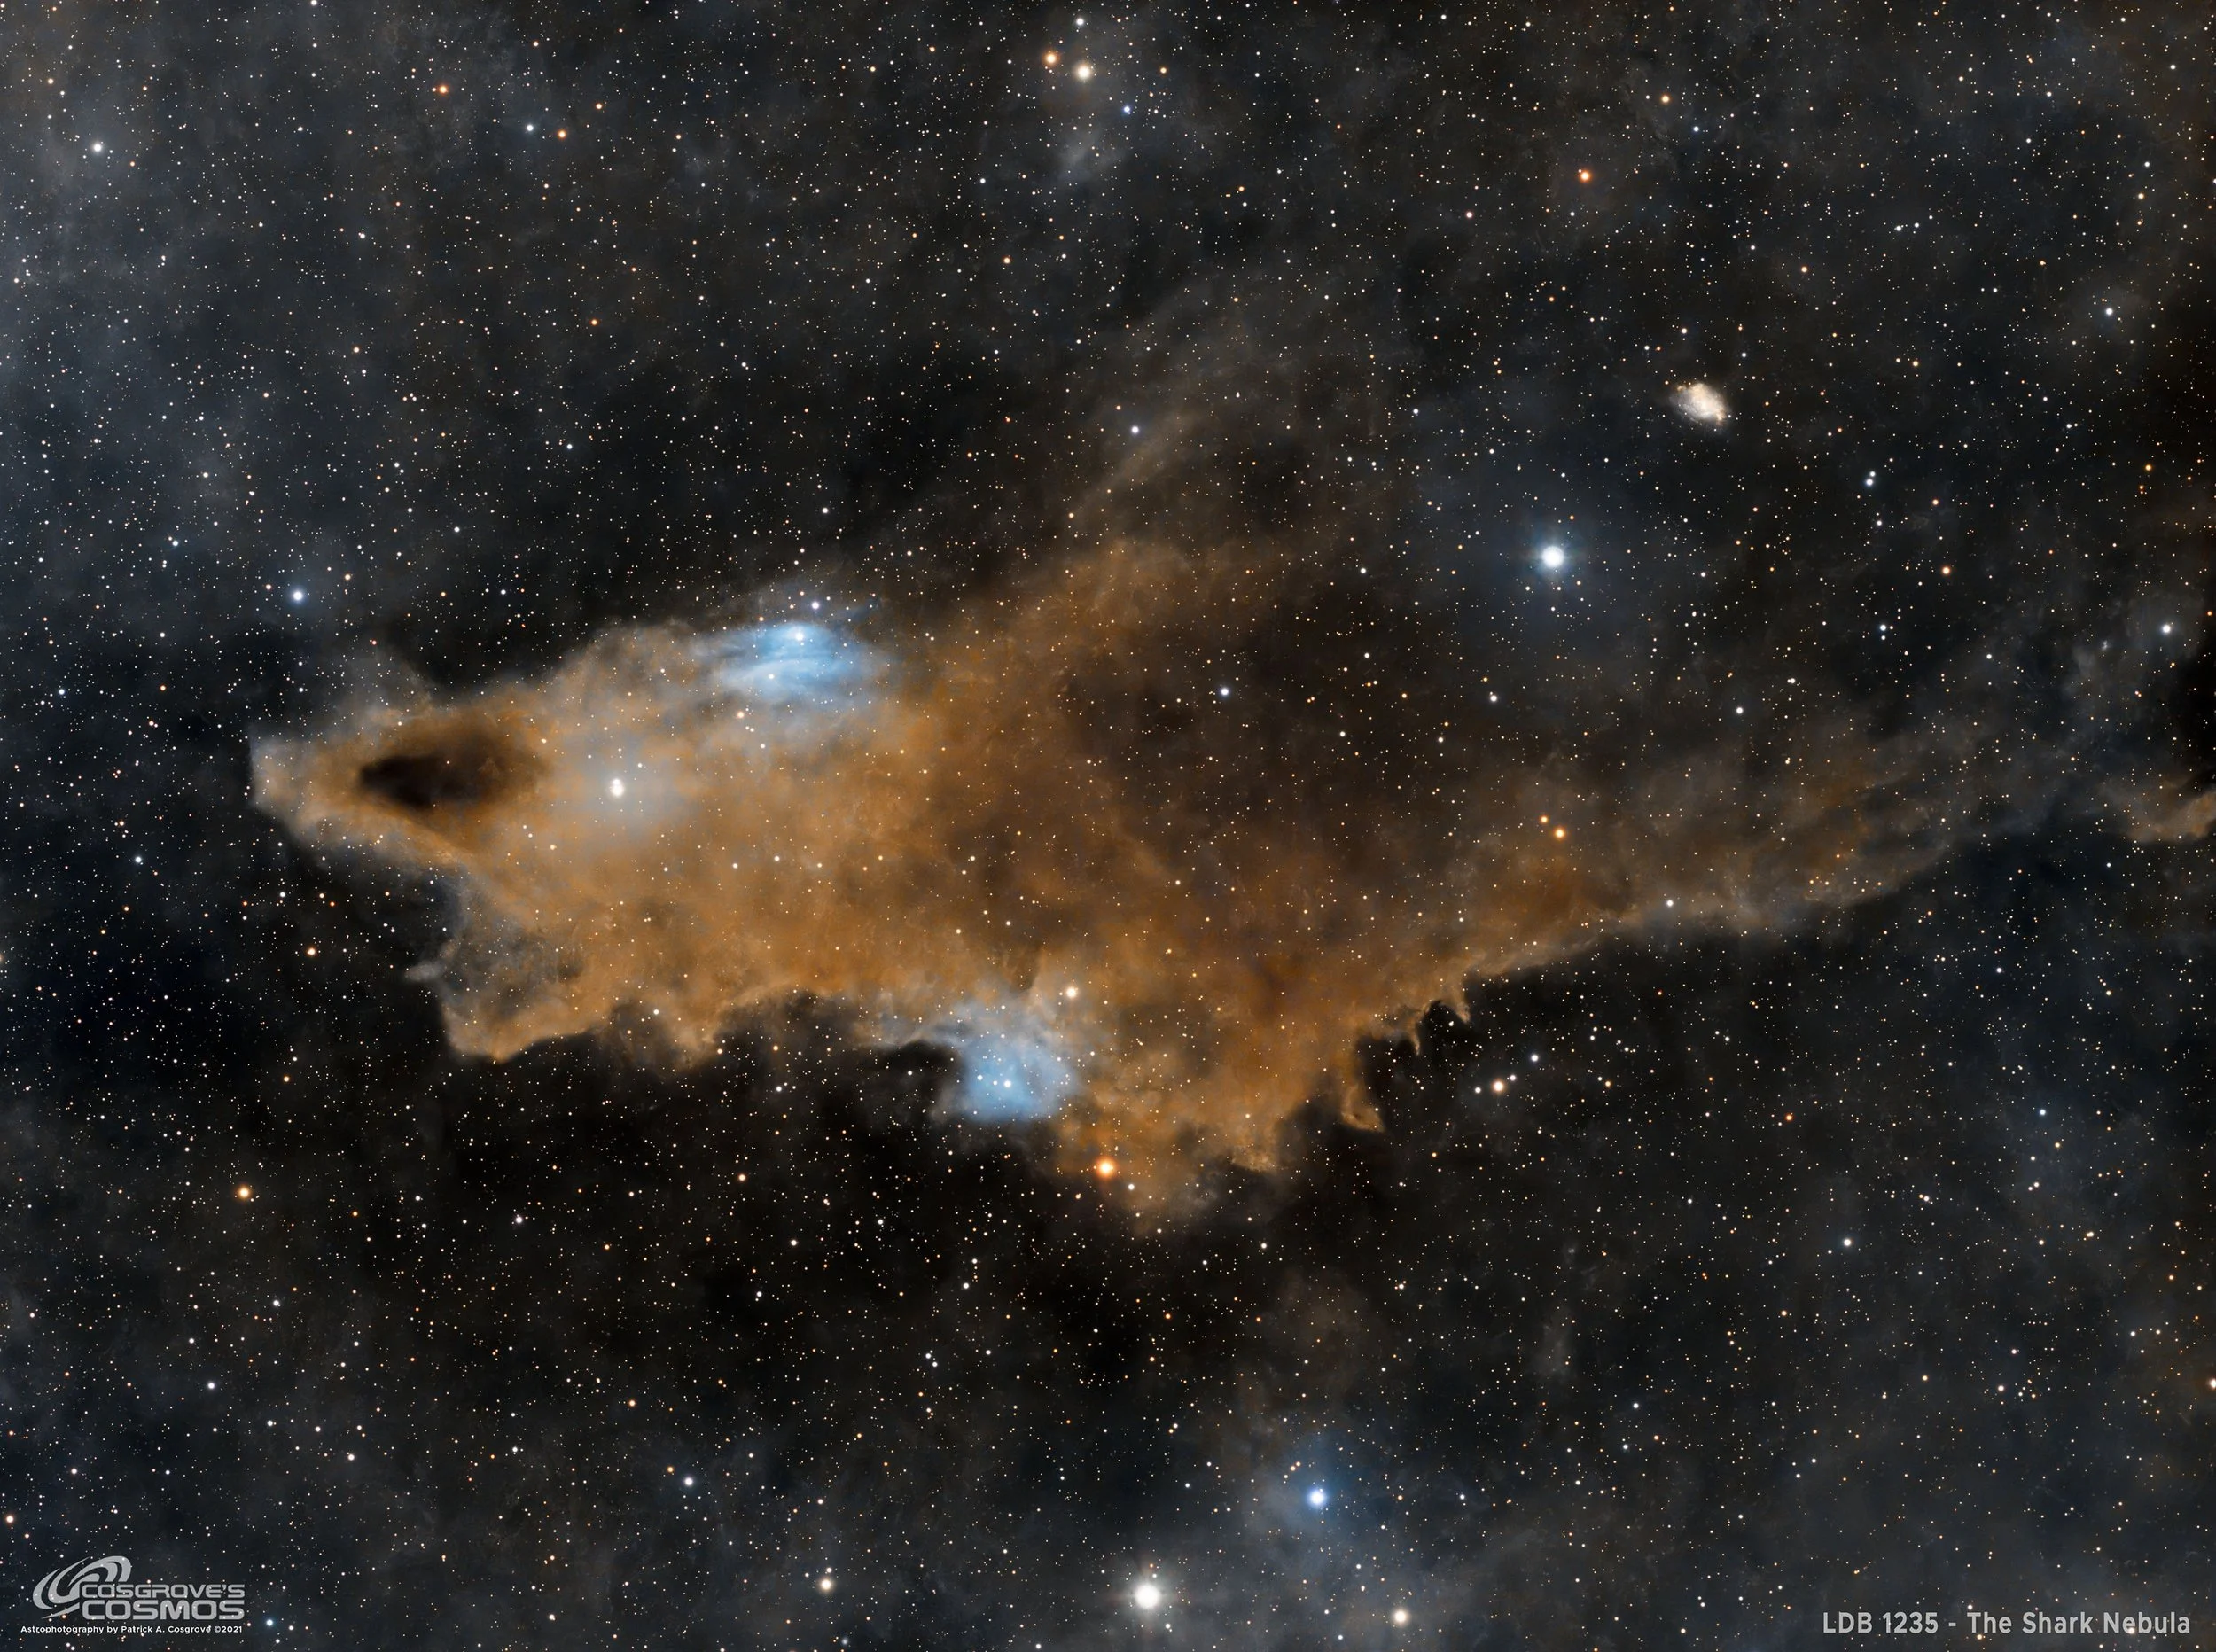
The Final Image!