
NGC 2359 - Thor’s Helmet in SHO ~only 2.5 hours!
Date: April 1, 2022
Cosgrove’s Cosmos Catalog ➤#0096

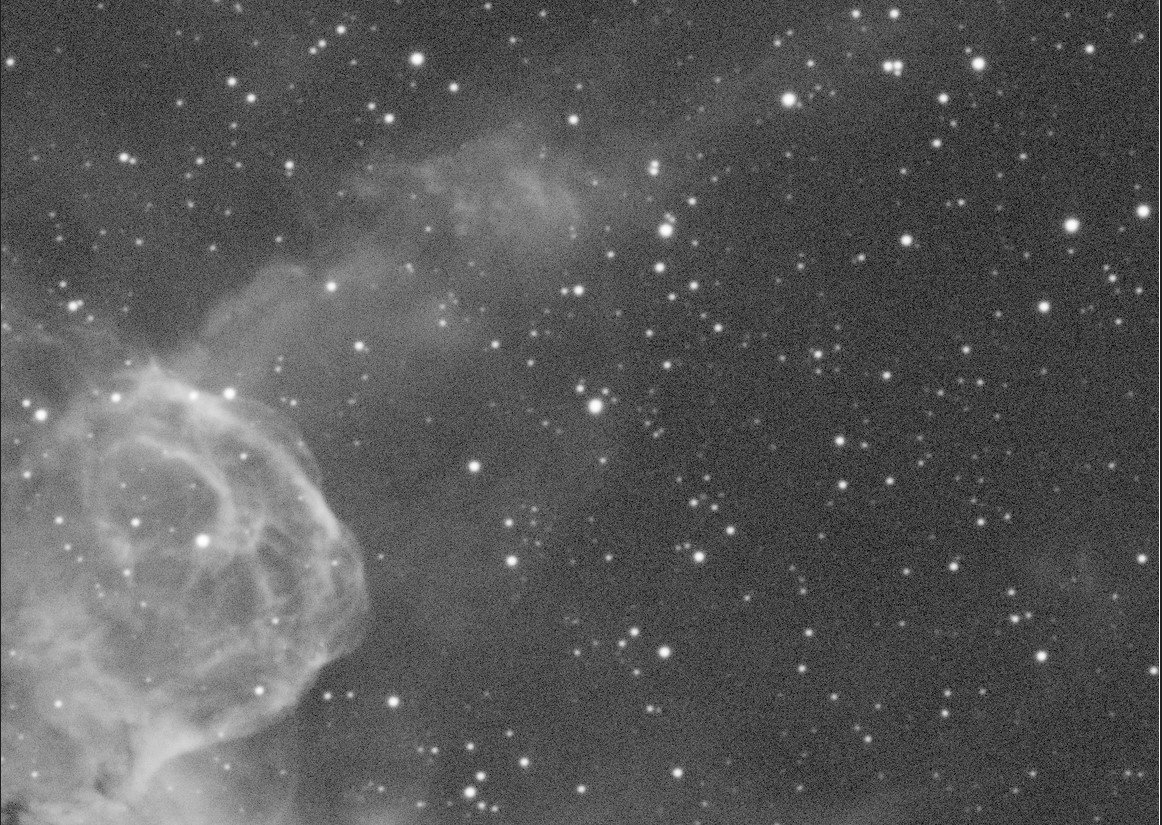
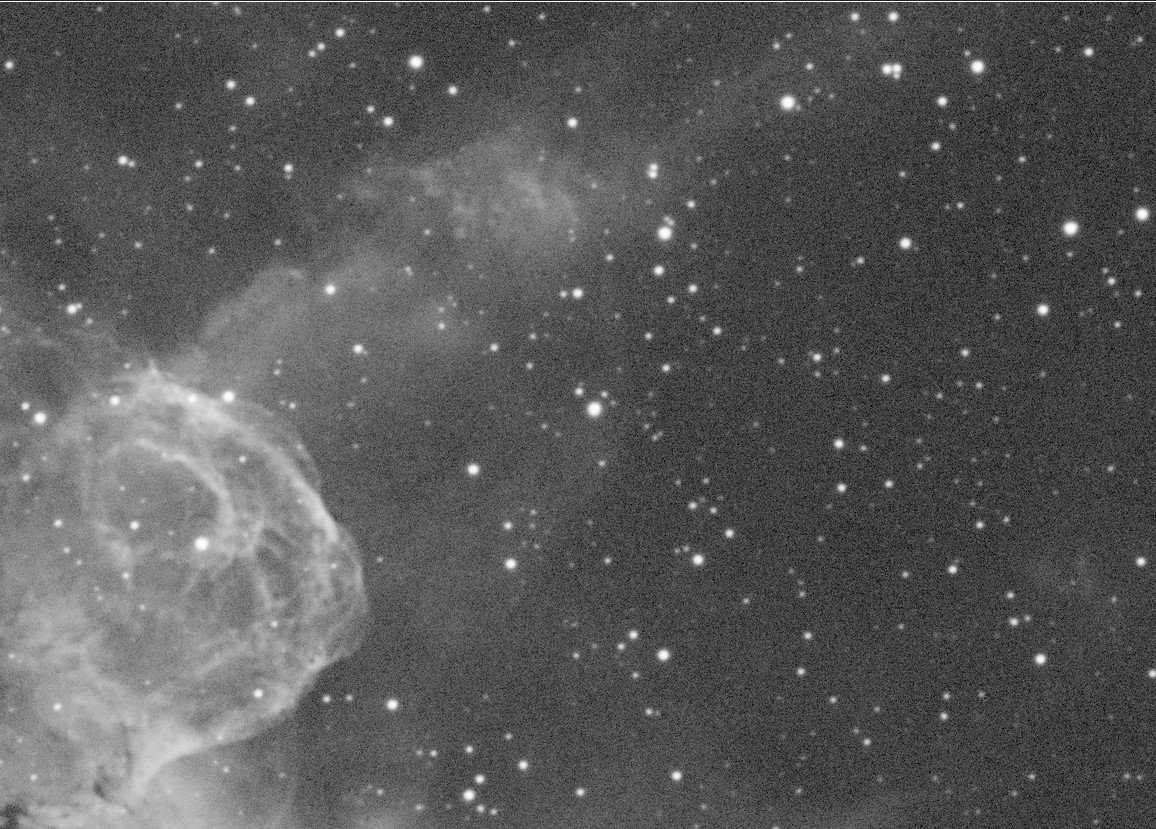
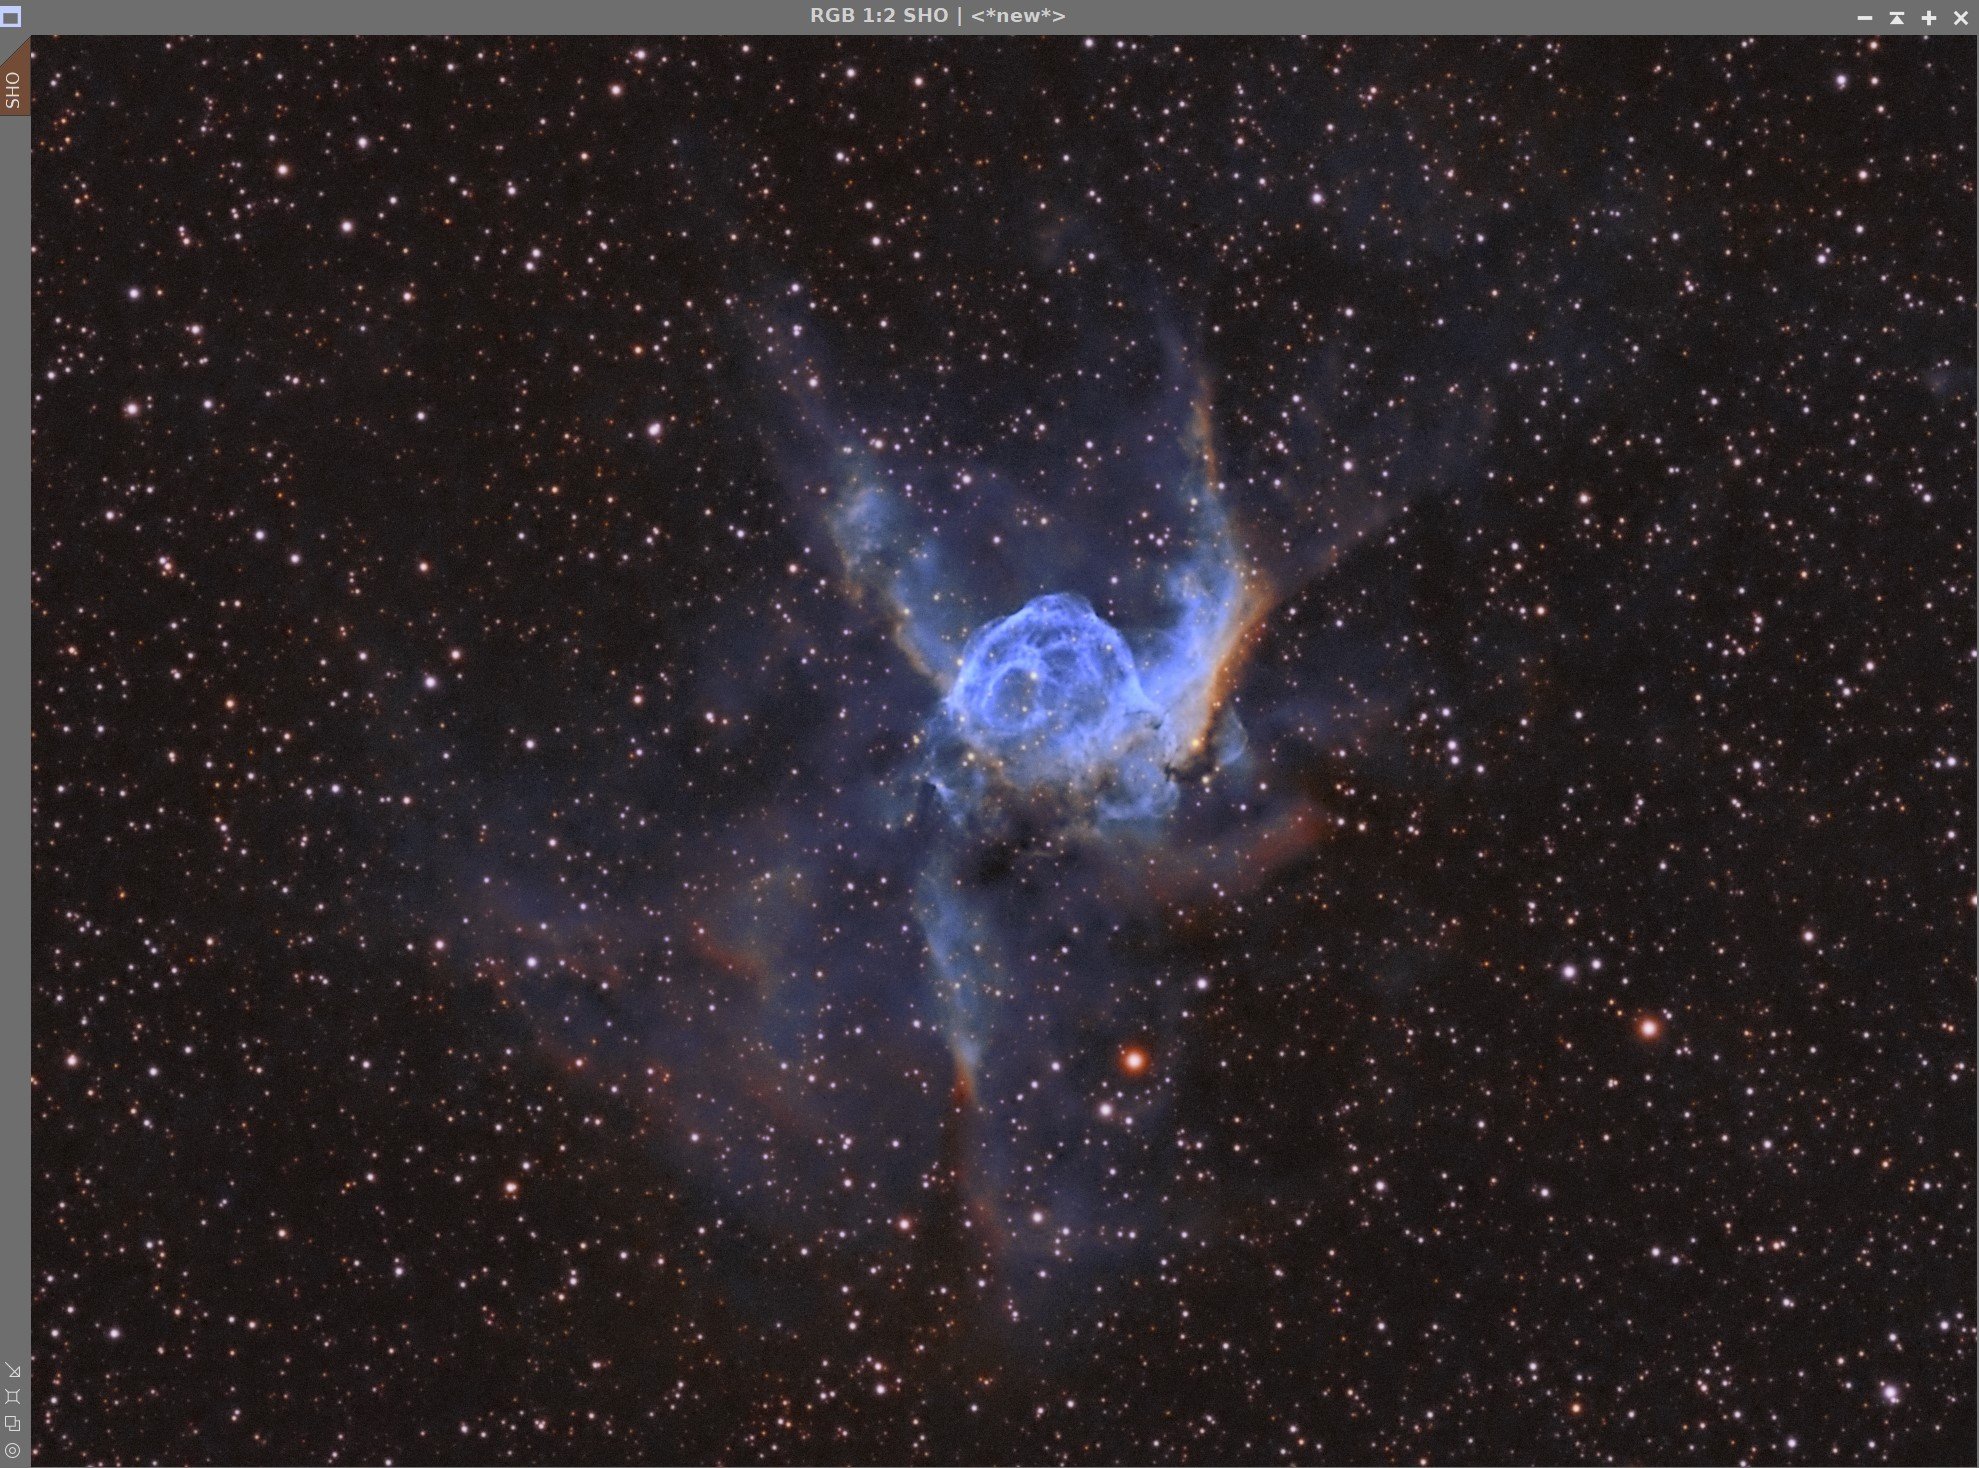
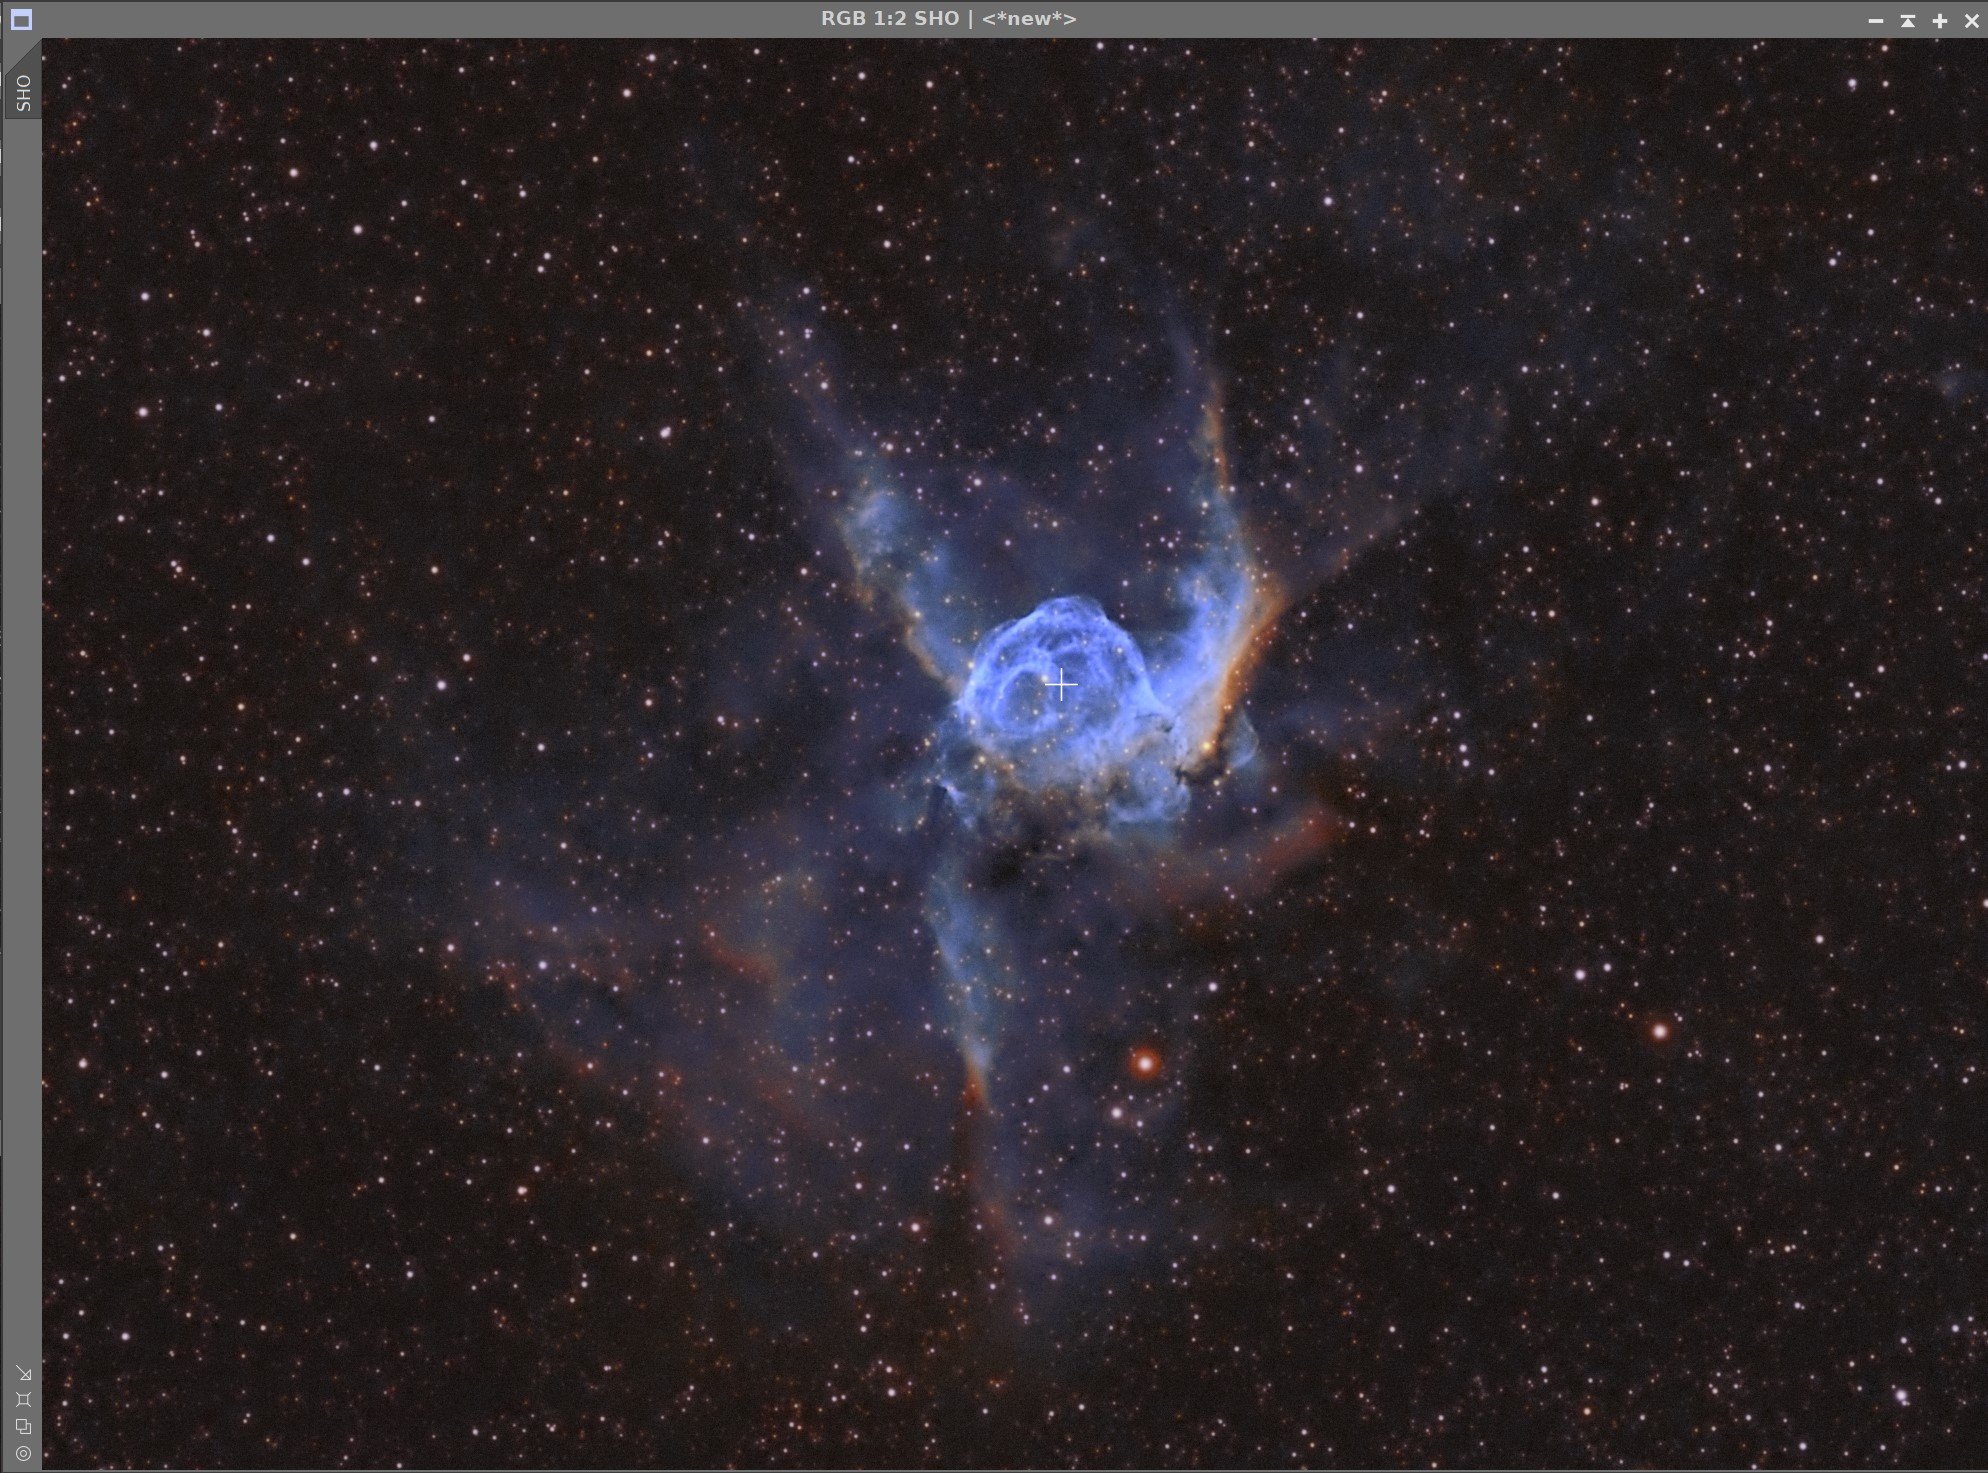
NGC 2359 - Known as Thor’s Helmet. Poorly placed in my yard between the trees, it only ended with 2.5 hours of integration time - pitifully low for such an object! (click for full resolution version via Astrobin.com)

Awarded Flickr “Explore” Status on April 2, 2022!

This image was published in the Digital Edition of BBC The Sky at Night, Aug 2022 edition!
Table of Contents Show (Click on lines to navigate)
About the Target
NGC 2359, more commonly known as “Thor’s Helmet”, is an Emission nebula located about 12,000 light-years away in the constellation of Canis Major. Also known as Sh2-198 and Gum 4, NGC 2359 is a “bubble” nebula measuring approximately 30 light-years across in size. It has a very complex structure and is powered by its central star, WR7, a Wolf-Rayet star, an extremely hot star that is thought to be in the pre-supernova stage.
Wikipedia tells us more:
The nebula has an overall bubble shape, but with complex filamentary structures. The nebula contains several hundred solar masses of ionised material, plus several thousand more of unionised gas. It is largely interstellar material swept up by winds from the central star, although some material does appear to be enriched with the products of fusion and is likely to come directly from the star.[5] The expansion rate of different portions of the nebula varies from 10 km/s to at least 30 km/s, leading to age estimates of 78,500 - 236,000 years. The nebula has been studied at radio and x-ray wavelengths, but it is still unclear whether it was produced at the class O main sequence stage of development, as a red supergiant, luminous blue variable, or mainly as a Wolf-Rayet star.[2]
NGC 2361 is a bright knot of nebulosity on one edge of the central ring of NGC 2359.
The Annotated Image

This annotated image of Thor’s Helmet is the result of the ImageSolver and ImageAnnoate scripts in Pixinsight.
The Location in the Sky

This finding chart was created with the new FindingChart process in Pixinsight. The image rectangle is shown in red.
About the Project
This is my first image of 2022! Here we are at the start of April, so we are off to a very slow start this year. In 2021, I had three clear nights with no Moon starting on March 7th. I was not so lucky this year.
My first clear night was on March 9th, but the Moon was going to be an issue later in the evening, so I was looking for narrowband targets I could shoot before this.
(This is galaxy season, and since galaxies are very broadband in their nature -it is hard to capture them with the Moon. But emission nebulae can be shot with narrowband, which rejects so much broadband light that you can get away with shooting it to an extent with the moon in the way.)
As I searched, I realized that I would have a limited opportunity to shoot Thor’s Helmet - a target that has been on my “want” list for a while. It is a striking target, and because it consists mainly of molecular clouds excited by a hot central star - it is a great target for narrowband imaging.
However - this would be a challenging target with very limited opportunity for capture. For me, it is located very low in the sky, near a part of my property where the access through the trees means that my time for shooting this target was perhaps 1.5 hours a night.
Data Collection
And limited it was.
Being the first session this year, I ran into laptop problems where an update seemed to re-assign all of my com ports and I was no longer connecting to my gear. It took me a while to sort this out and I lost valuable imaging time while that took place. In the end, I only ended up capturing a little over an hour’s data, split between the Ha and OIII filters. Not enough for any decent image.
But surely I would get a chance soon to add to this data, right? Ha! My next clear night was not until 3-29-22, almost three weeks later! At this point, Thor’s Helmet was already at its zenith when it became dark out, so I had an even more limited time to grab subs.
Everything seemed to come together better this time around and I was able to start my captures as soon as it was dark enough and ended up gathering a number of SII images, along with some more Ha and one more OIII sub.
After tossing a few frames where the wind impacted tracking, I ended up with 2.5 hours of data in total.
This is not a lot of data. The words “sad” and “Pathetic” come to mind.
I would much rather have 9-12 hours of data. In fact, many very accomplished astrophotographers do go on to collect 20-30 hours for a target. However, with the tree on my property - I can only get 3 hours a night on any given target, so that length of integration is not really possible for me. But 2.5 hours is pathetic - and since my window for shooting this object has come to an end for this year - I am stuck with what I have.
But - what can I do with it?
Only one way to find out It’s time to flex my Pixinsight-fu muscles!
Image Processing
Since I knew that noise would be a huge issue for this image, I decided I would change my processing strategy from what I typically do.
In the past, I processed narrowband images as three straight channels and then combined them in the nonlinear stage to form an SHO color image.
This time I was going to do a more traditional Luminance vs. color approach.
The L Image
First - I would need to create a synthetic luminance image. Since the Ha and OIII images were very strong images in this set, I decided to do this by combining them. I did this by simply adding the Ha and OIII together in PixelMath. This would give me an L image that had a larger combined integration time and thus better noise characteristics.
Next, I used EZ-Decon to apply deconvolution to this image. I just finished posting an article to this website about EZ-Decon (you can see that HERE). I was eager to use it for this image. I had good results from this process. Then I experimented with linear denoising methods - comparing EZ_Denoise and MLT Linear Noise Reduction. I ended up going with an MLT-based approach. Going nonlinear, I then applied LocalHistogramEqualization on it, and it was ready for integration into the color image.
The Color Image
I took the Ha, OIII, and SII images for the color image and focused on getting a low noise and good color position. I applied MLT for linear noise reduction - and was fairly aggressive with it. I then went nonlinear and spent some time manually balancing each image to the other. These were then combined with ChannelCombination. At this point, I did some preliminary color processing.
I then folded the L image into the color and ended up with a pretty decent-looking image. The color was still not where I wanted it to be so I tried something else that was new for me.
I used the new Starnet2 process to split the image into stars and nonstar versions. Each was processed to get them to look as I desired, and then I recombined the images.
Two points to make here.
Starnet2 - WOW! - what an improvement over the original StarNet! Almost flawless separation without many of the “scars” seen with the original.
Secondly, I could push my color processing and get things where I wanted without impacting the stats in this approach.
The final thing I did was use the latest version of Topaz Denoise AI. With images that have low integrations times, this tool was amazingly helpful! I could dial in just enough NR to reduce the visible noise - but not too much - and sharpen the image at the same time.
Note: the Image processing details section can be found at the end of this post.
Image Critique
Given the short integration time- I was pretty pleased with the results. I like the new L vs. Color processing workflow for narrowband and will adopt this for my future images.
I am still unhappy with how my brightest stars are being handled. This has always been a problem for me and I need to seek a solution that I feel good about!
Capture Details
Software
Capture Software: PHD2 Guider, Sequence Generator Pro controller
Image Processing: Pixinsight, Photoshop - assisted by Coffee, extensive processing indecision and second-guessing, editor regret, and much swearing…..
Lights Frames
Taken the nights of March 9th & March 29th, 2022
13 x 300 seconds, bin 1x1 @ -15C, Gain 100.0, Astrodon 5nm Ha Filter
9 x 300 seconds, bin 1x1 @ -15C, Gain 100.0, Astrodon 5nm O3 Filter
8 x 300 seconds, bin 1x1 @ -15C, Gain 100.0, Astronomiks 6mm S2 Filter
Total of 2 hours 30 minutes
Cal Frames
25 Darks at 300, bin 1x1, -15C, gain 100
25 Dark Flats at Flat exposure times, bin 1x1, -15C, gain 100
Flats darks, 12 at each flat exposure time.
Capture Hardware
Click below to visit the Telescope Platform Version used for this image.
Scope: Astrophysics 130mm Starfire F/8.35 APO refractor
Guide Scope: Televue 76mm Doublet
Camera: ZWO AS2600mm-pro with ZWO 7x36 Filter wheel with ZWO LRGB filter set, Astrodon 5nm Ha & OIII, and Astronomiks 6nm SII Narrowband filter set
Guide Camera: ZWO ASI290Mini
Focus Motor: Pegasus Astro Focus Cube 2
Camera Rotator: Pegasus Astro Falcon
Mount: Ioptron CEM60
Polar Alignment: Polemaster camera
Image Processing Log
1. Blink Screening Process
All light images were reviewed with the Blink process.
Ha Subs
Two subs have wind-related tracking issues and were rejected
O3 Subs:
1 removed - focus issue
S2 Subs:
All OK
FLats, and Flat Darks, and Darks looked very good
2. WBPP 2.4.1 Run
All frames loaded
setup for calibration only - no integration
CosmeticCorrection setup
Pedestal image of 50 used for all images
Local Normalization used
Subframe weighting: psf signal - this is a new feature of version 2.3
Run completed with no issues

WBPP Calibration Panel

WBPP Post-Process Panel
3. Image Integration
Using ImageIntegration, all three images sets were integrated and Master images were saved.
See panel images for parameters used.

Ha Integration settings used.
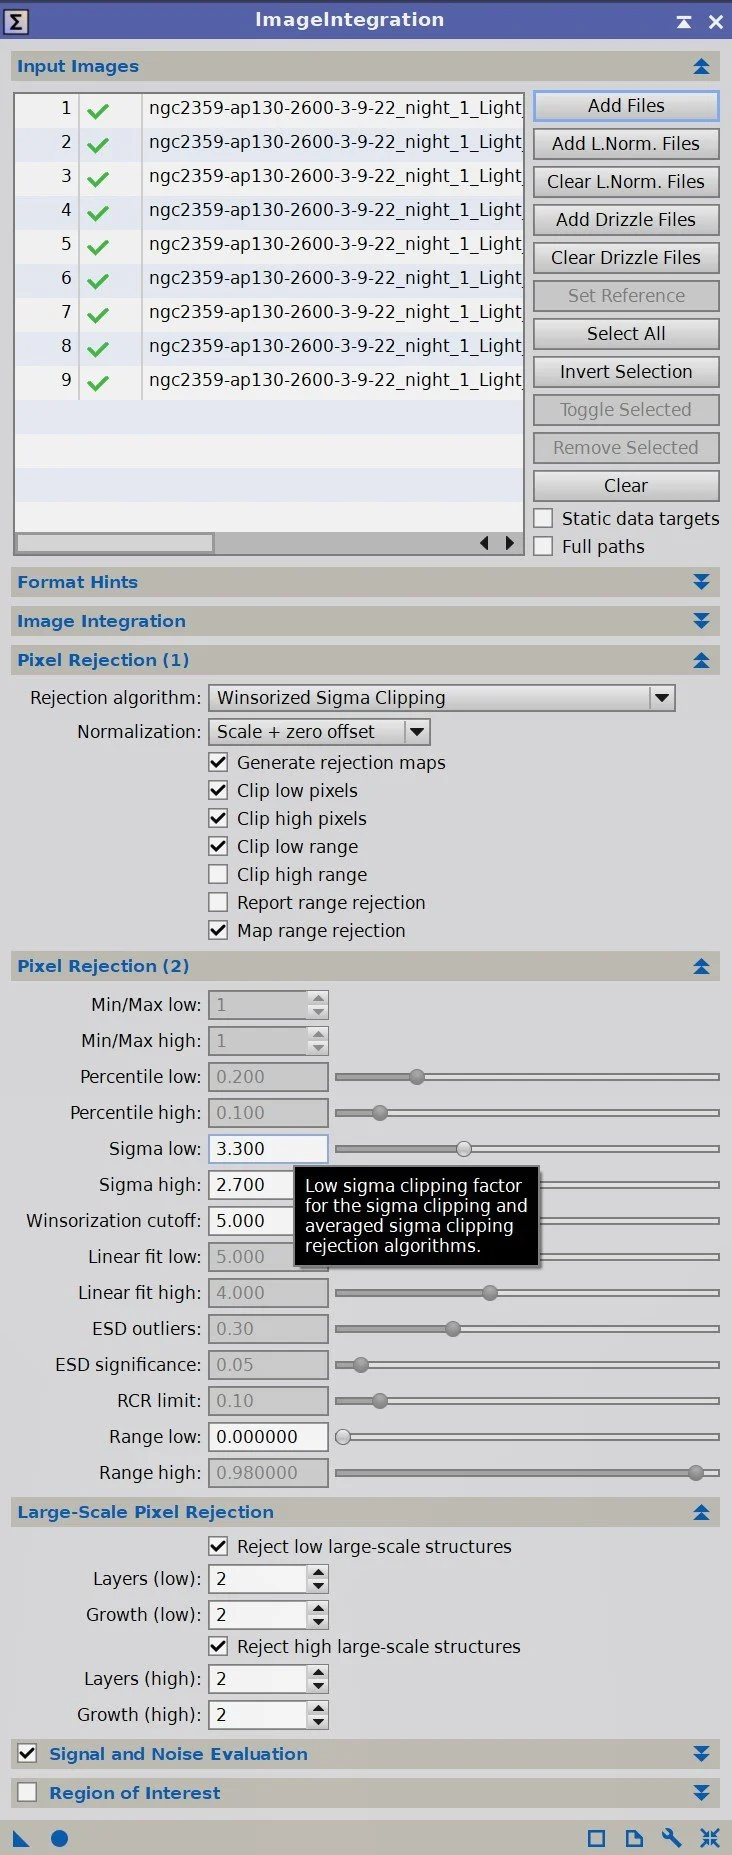
O3 Integration settings used.

S2 Integration Setting Used. With a smaller sample size I tried ESD.
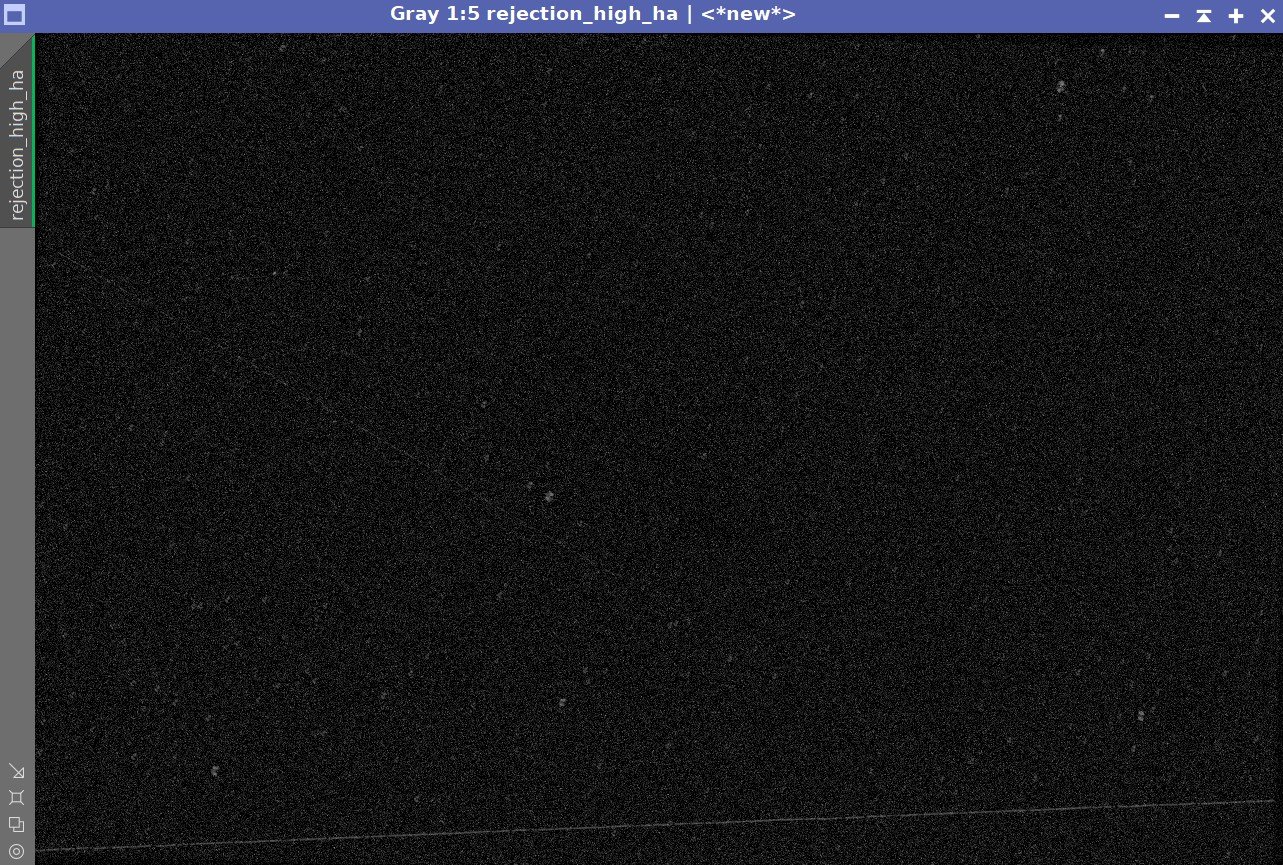
This Rejection-High Map for Ha shows some satellite trails removed

The Rejection-Low for O3 shows that we had some rotation shifts from the first night to the second night of shooting.
4. Crop all of the images
Since we have rotation differences, we need to not only crop the image to get rid of ragged images; we need to crop a little bit more to eliminate unmatched image areas.
5. Dynamic Background Extraction
DBE was run for all images using Subtraction as the correction method.
The sampling plan was similar for each image but it was customized as needed. See actual sample plans below.
Ha image DBE sampling plan (click to enlarge)
O3 Image DBE Sampling Plan (click to enlarge)
S2 Image DBE Sampling Plan (click to enlarge)
5. Create A Synthetic Luminance image:
Ha and O3 images have the strongest signal, so I used PixelMath to create a combination by simple addition and rescaling.

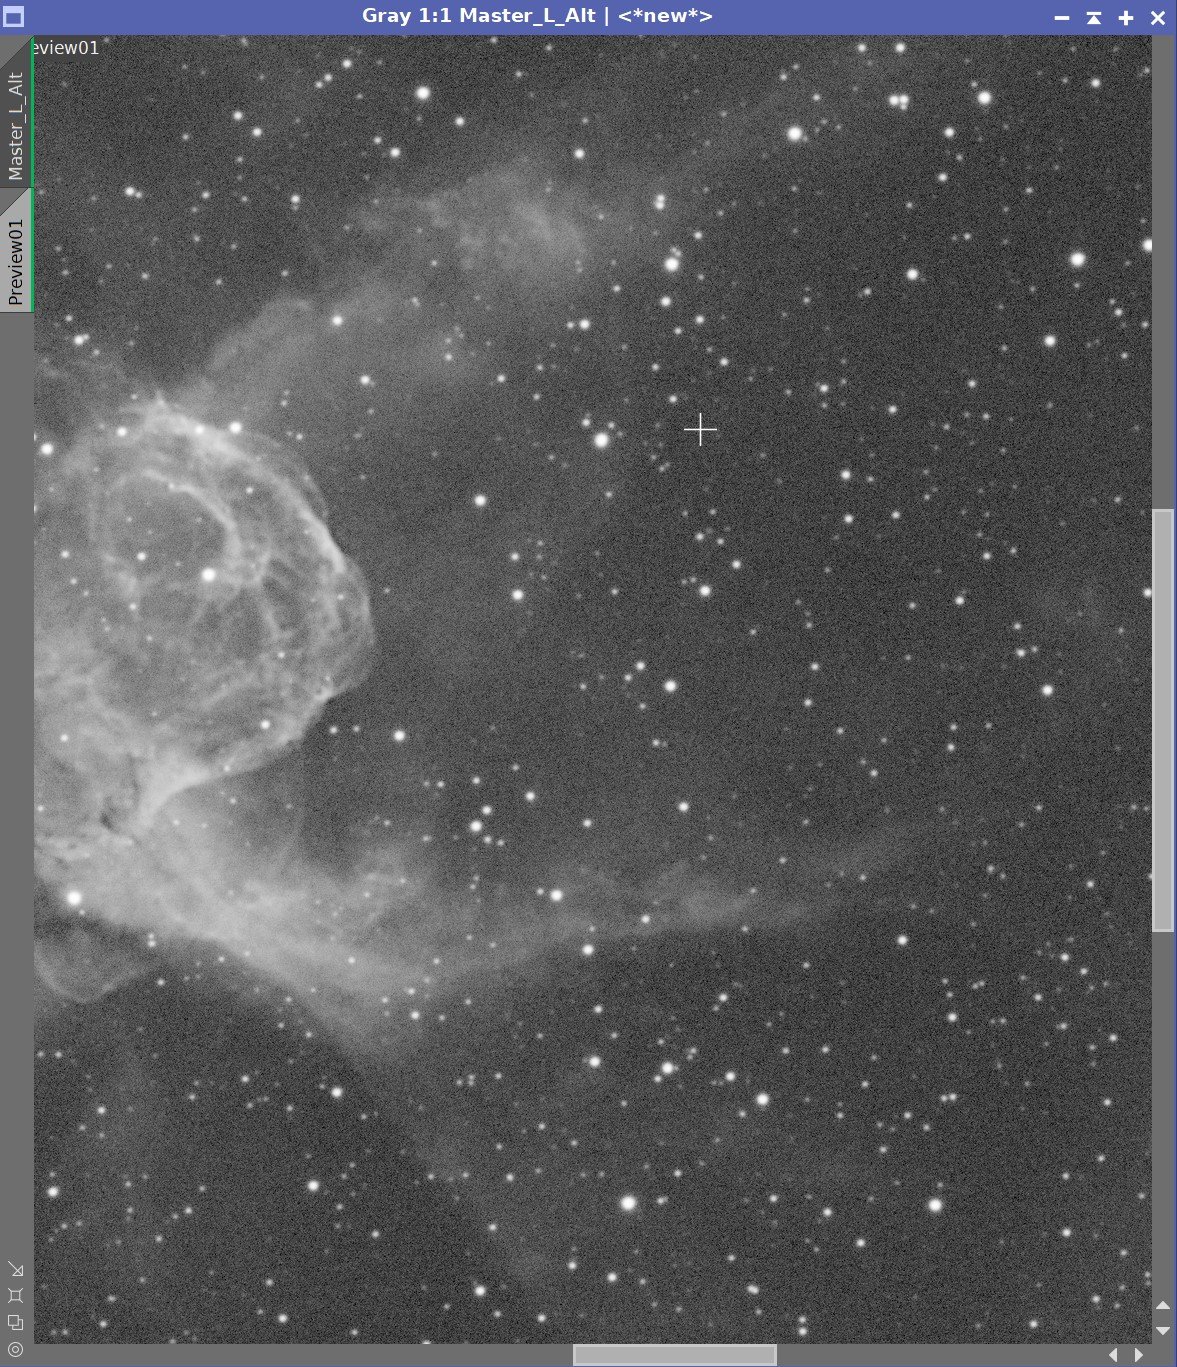
Linear Synthetic L image - showing Preview selected for Deconvolution work.
6. Run EZ-Decon
Select preview to work on
Create Star mask
Created with the “Processed Star Mask”
A few stars were missed. It is very important to cover all stars, so I added ellipses to fix this. .

Original Star Mask

Zoomed view: A few stars missed (see red boxes)

The Ellipse tool used to cover missed stars.

The Final Corrected Star Map
Build the Background mask using the standard process. No Adjustments made.

The Background Mask
Create the PSF image.

The PSF image
Test Decon with various iteration values. Final Values used were 35 iterations and 10 PM iterations.
Before and After Deconvolution
7. Apply MLT Noise Reduction
MLT was applied with a Linear Mask amplification of 470. See the Parameter set up used in the image below.

MLT Panel Settings for Denoise
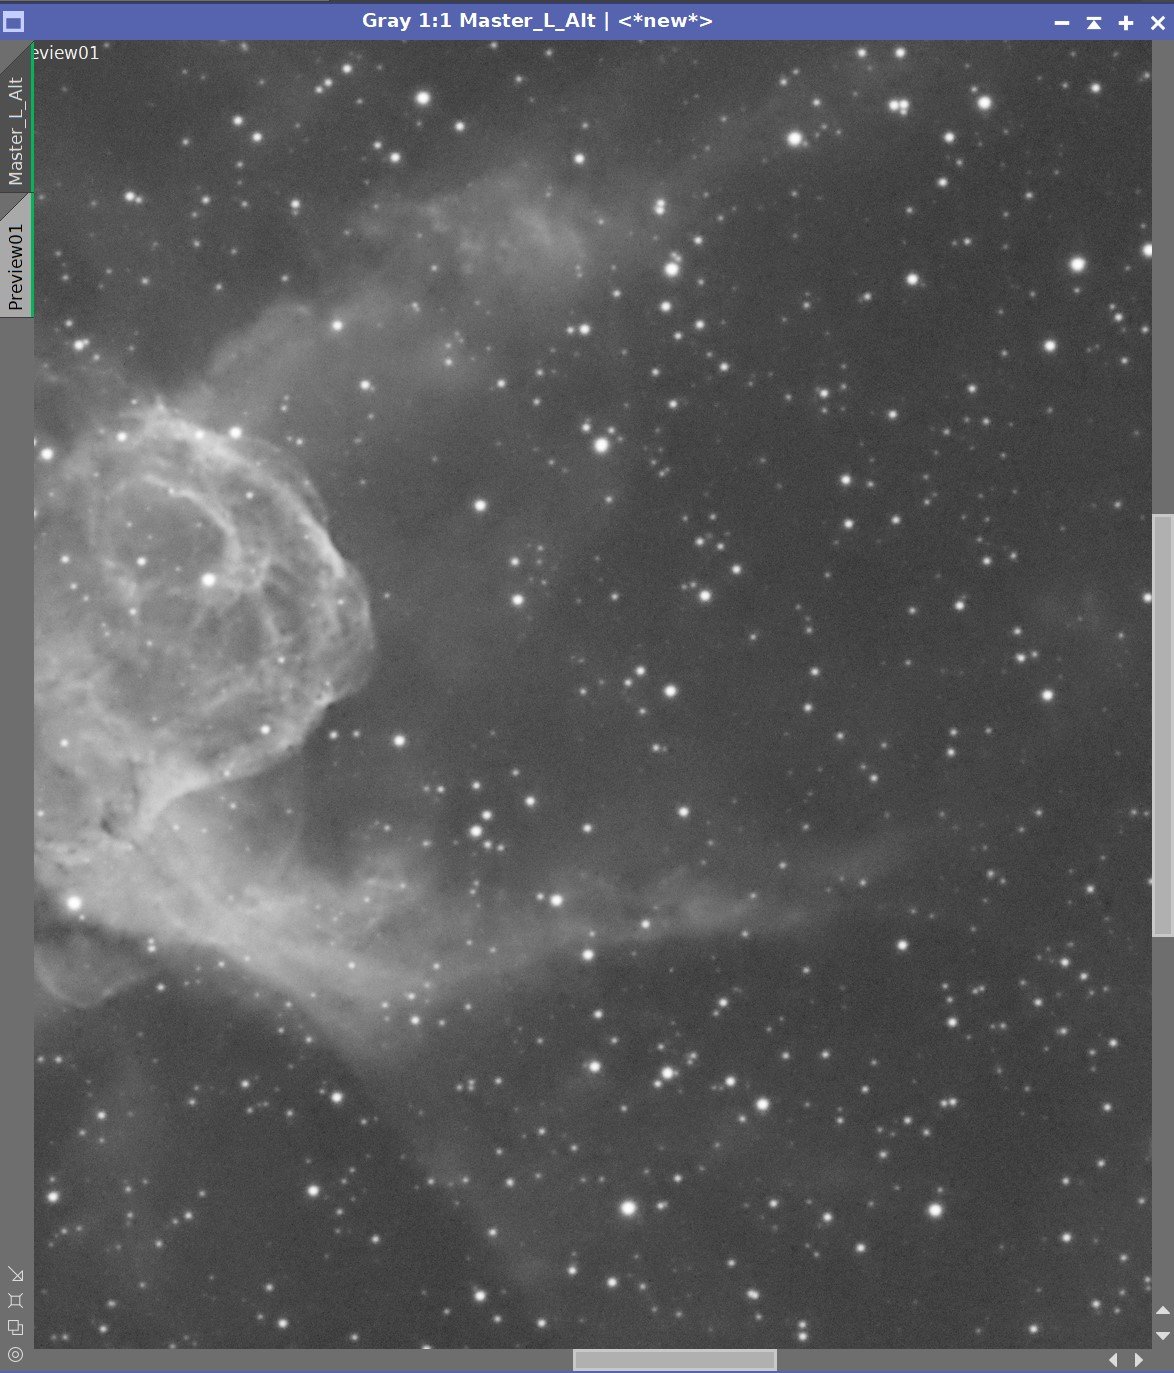
Before and After MLT Denoise
8. Take the Synthetic Luminance Image Nonlinear and finalize the processing
For L image
Select the background sky reference regions and create a preview for it.
Run MaskedStretch using the established preview area
Run CT and adjust the tone scale to get a good-looking image. Basically, this just needed an “S” curve.
Final CT run - tweak black point.
Run LHE with radius: 64, contrast: 2.0, and Amount: 0.15. 8-bit histogram
10. Create the Color SHO Image
For the HA, O3, and S2 images:
Select the background sky reference and create a preview for it.
Run MaskedStretch using the preview of each image for the background reference.
Run CT and adjust the tone scale to get a good-looking image with lower brightness colors - balance images by eye.
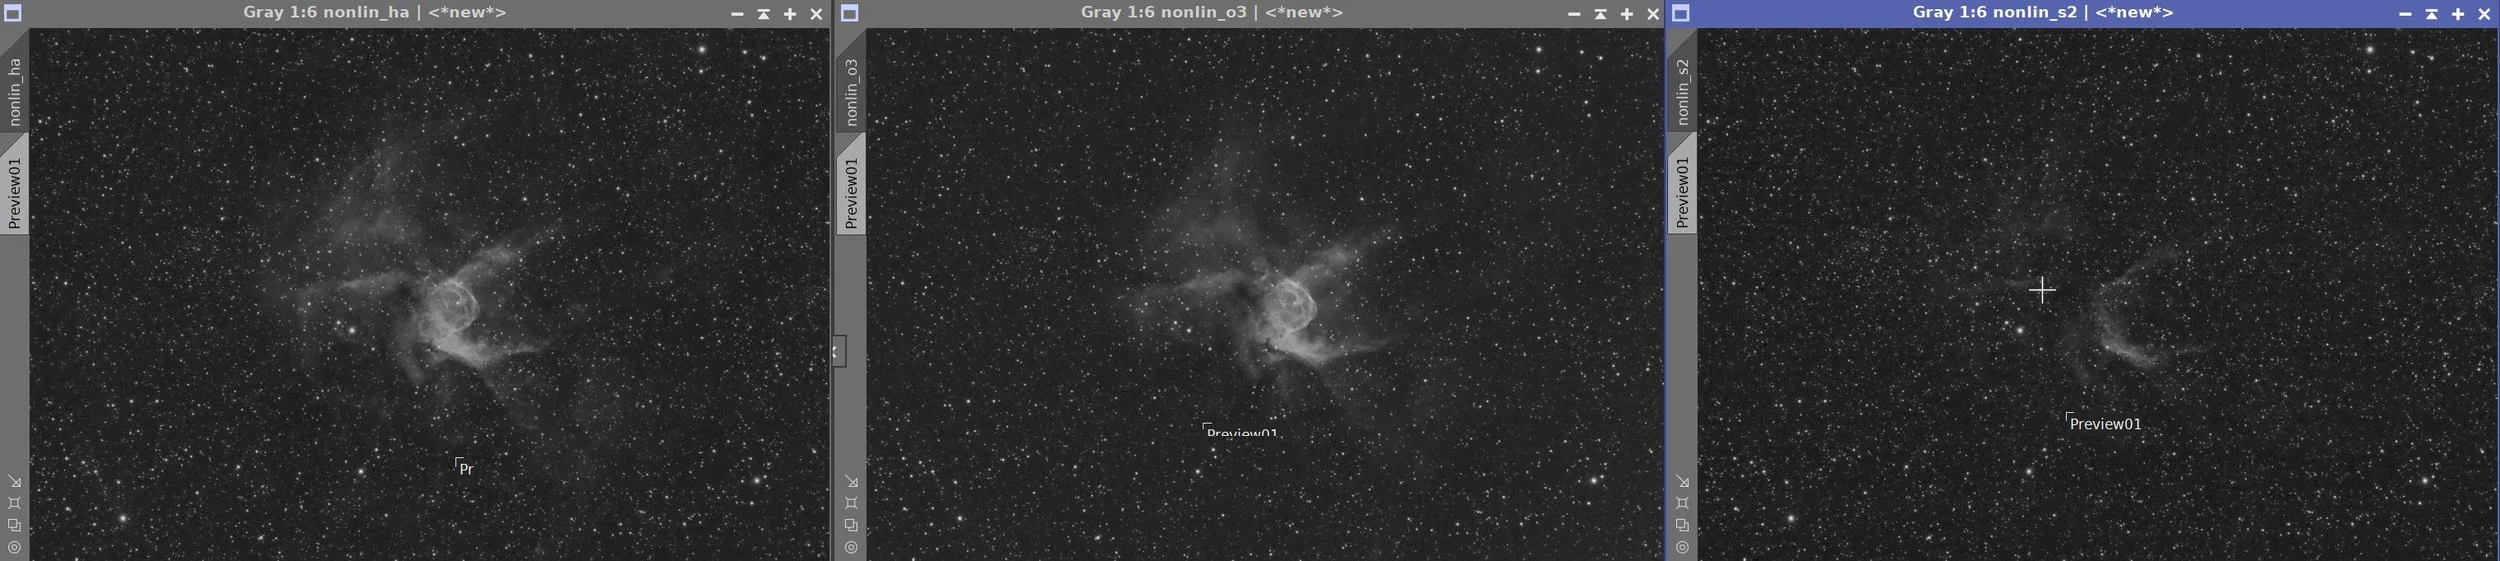
Ha, O3, and S2 Nonlinear Images
11. Initial Process of the Color Image
Combine the three images into one SHO color image using ChannelCombination.
Adjust image color
run SCNR for green
Create Range Mask and apply
Run CT adjusting r,g,b curves in lice preview mode
Fold the L image into the color SHO image using LRGBCombination
FInal Process of the color image
Zoom and crop for better composition
Create a Starless and StarsOnly version of the image using StarNet2
Run CT on the Starless image - adjusting R, G, B, and RGB/K - I was aggressive here.
Run ColorSat on the Starless image - See panel snapshot
Add them back together, forming a new color image
Newly created SHO color image (click to enlarge)
Create a Range Mask that allow for changes while protecting the background (click to enlarge)
L image folded in with LRGBCombination (click to enlarge)
Starless Image before adjust(click to enlarge)
Star Only Image (click to enlarge)
Starless and Star images recombined: The result of the color process step. (click to enlarge)
SCNR Applied (click to enlarge)
CT Tweaks Applied (click to enlarge)
Crop and Rotate for framing (click to enlarge)

Starless Image after being adjusted(click to enlarge)

The ColorSat process used to boost yellow, oranges and red, as well as blue.
13. Run Ez-StarReduction
Run EZ-StarReduction with default parameters.
Before and After EZ-StarReduction
14. Darkstructure Enhance
Run DarkStreuctureEnhance with default paramters.
Before and After DarkStructureEnhance
15. Save images as 16-bit Tiff and Move to Photoshop
Select the bright red stars with a small circle, select with a feather and enhance our edges
Use Camera Raw Filter to adjust Global Clarity, Texture, and Color Mix
Use StarShrink filter to reduce large stars radius 35 strength 6, sharpness -1
Use StarShrink filter to reduce small stars radius 2, strength 6, sharpness -1
Use Topaz Denoise AI to reduce noise and sharpen things further
Use the color mixer to make a final adjustment of hue and saturation.
Add watermarks
Export Clear, Watermarked, and Web-sized Jpegs.

Adding the next generation ZWO ASI2600MM-Pro camera and ZWO EFW 7x36 II EFW to the platform…