
SH2-115 and Abell 71 - 4.0 hours in SHO
Date: January 13, 2022
Cosgrove’s Cosmos Catalog ➤#0095

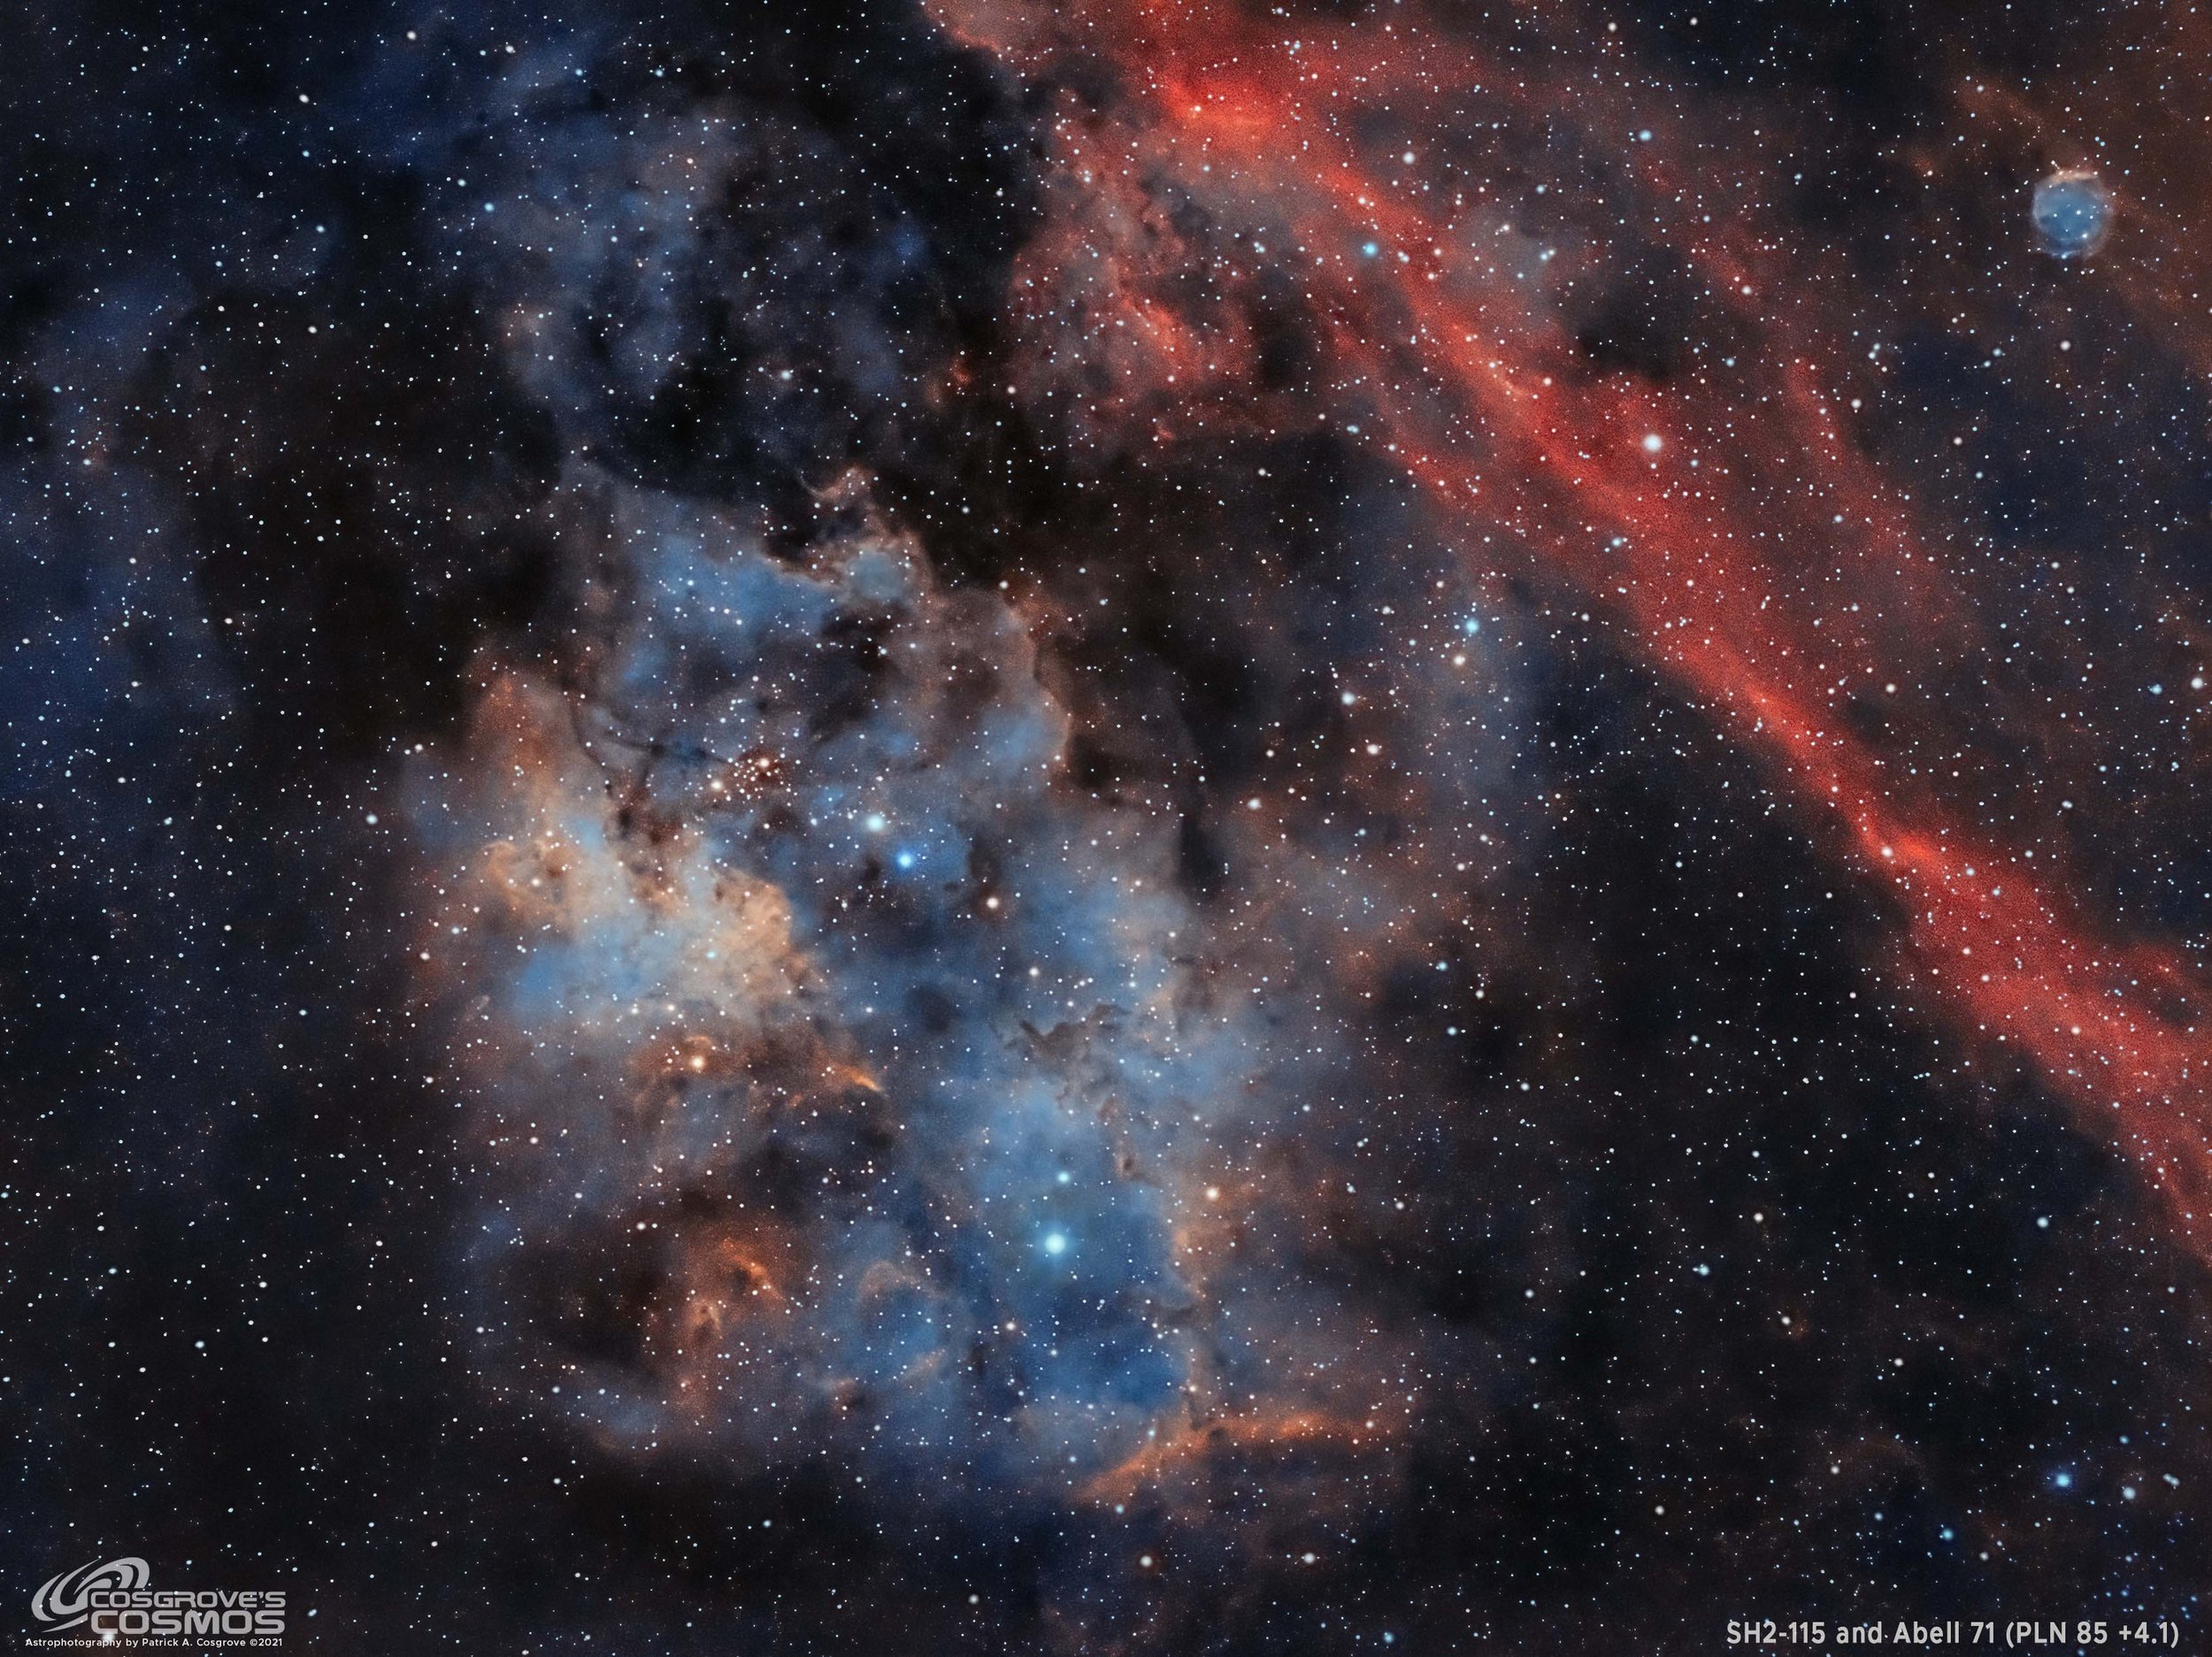
This image of SH2-115 and Abell 71 was taken with my William Optics 132mm APO and the ASI1600MM-Pro camera. This is the second revision of this image where a “bubble pack” pattern in layer 7 was addressed. (click for full res image via Astrobin.com)
Table of Contents Show (Click on lines to navigate)
About the Target
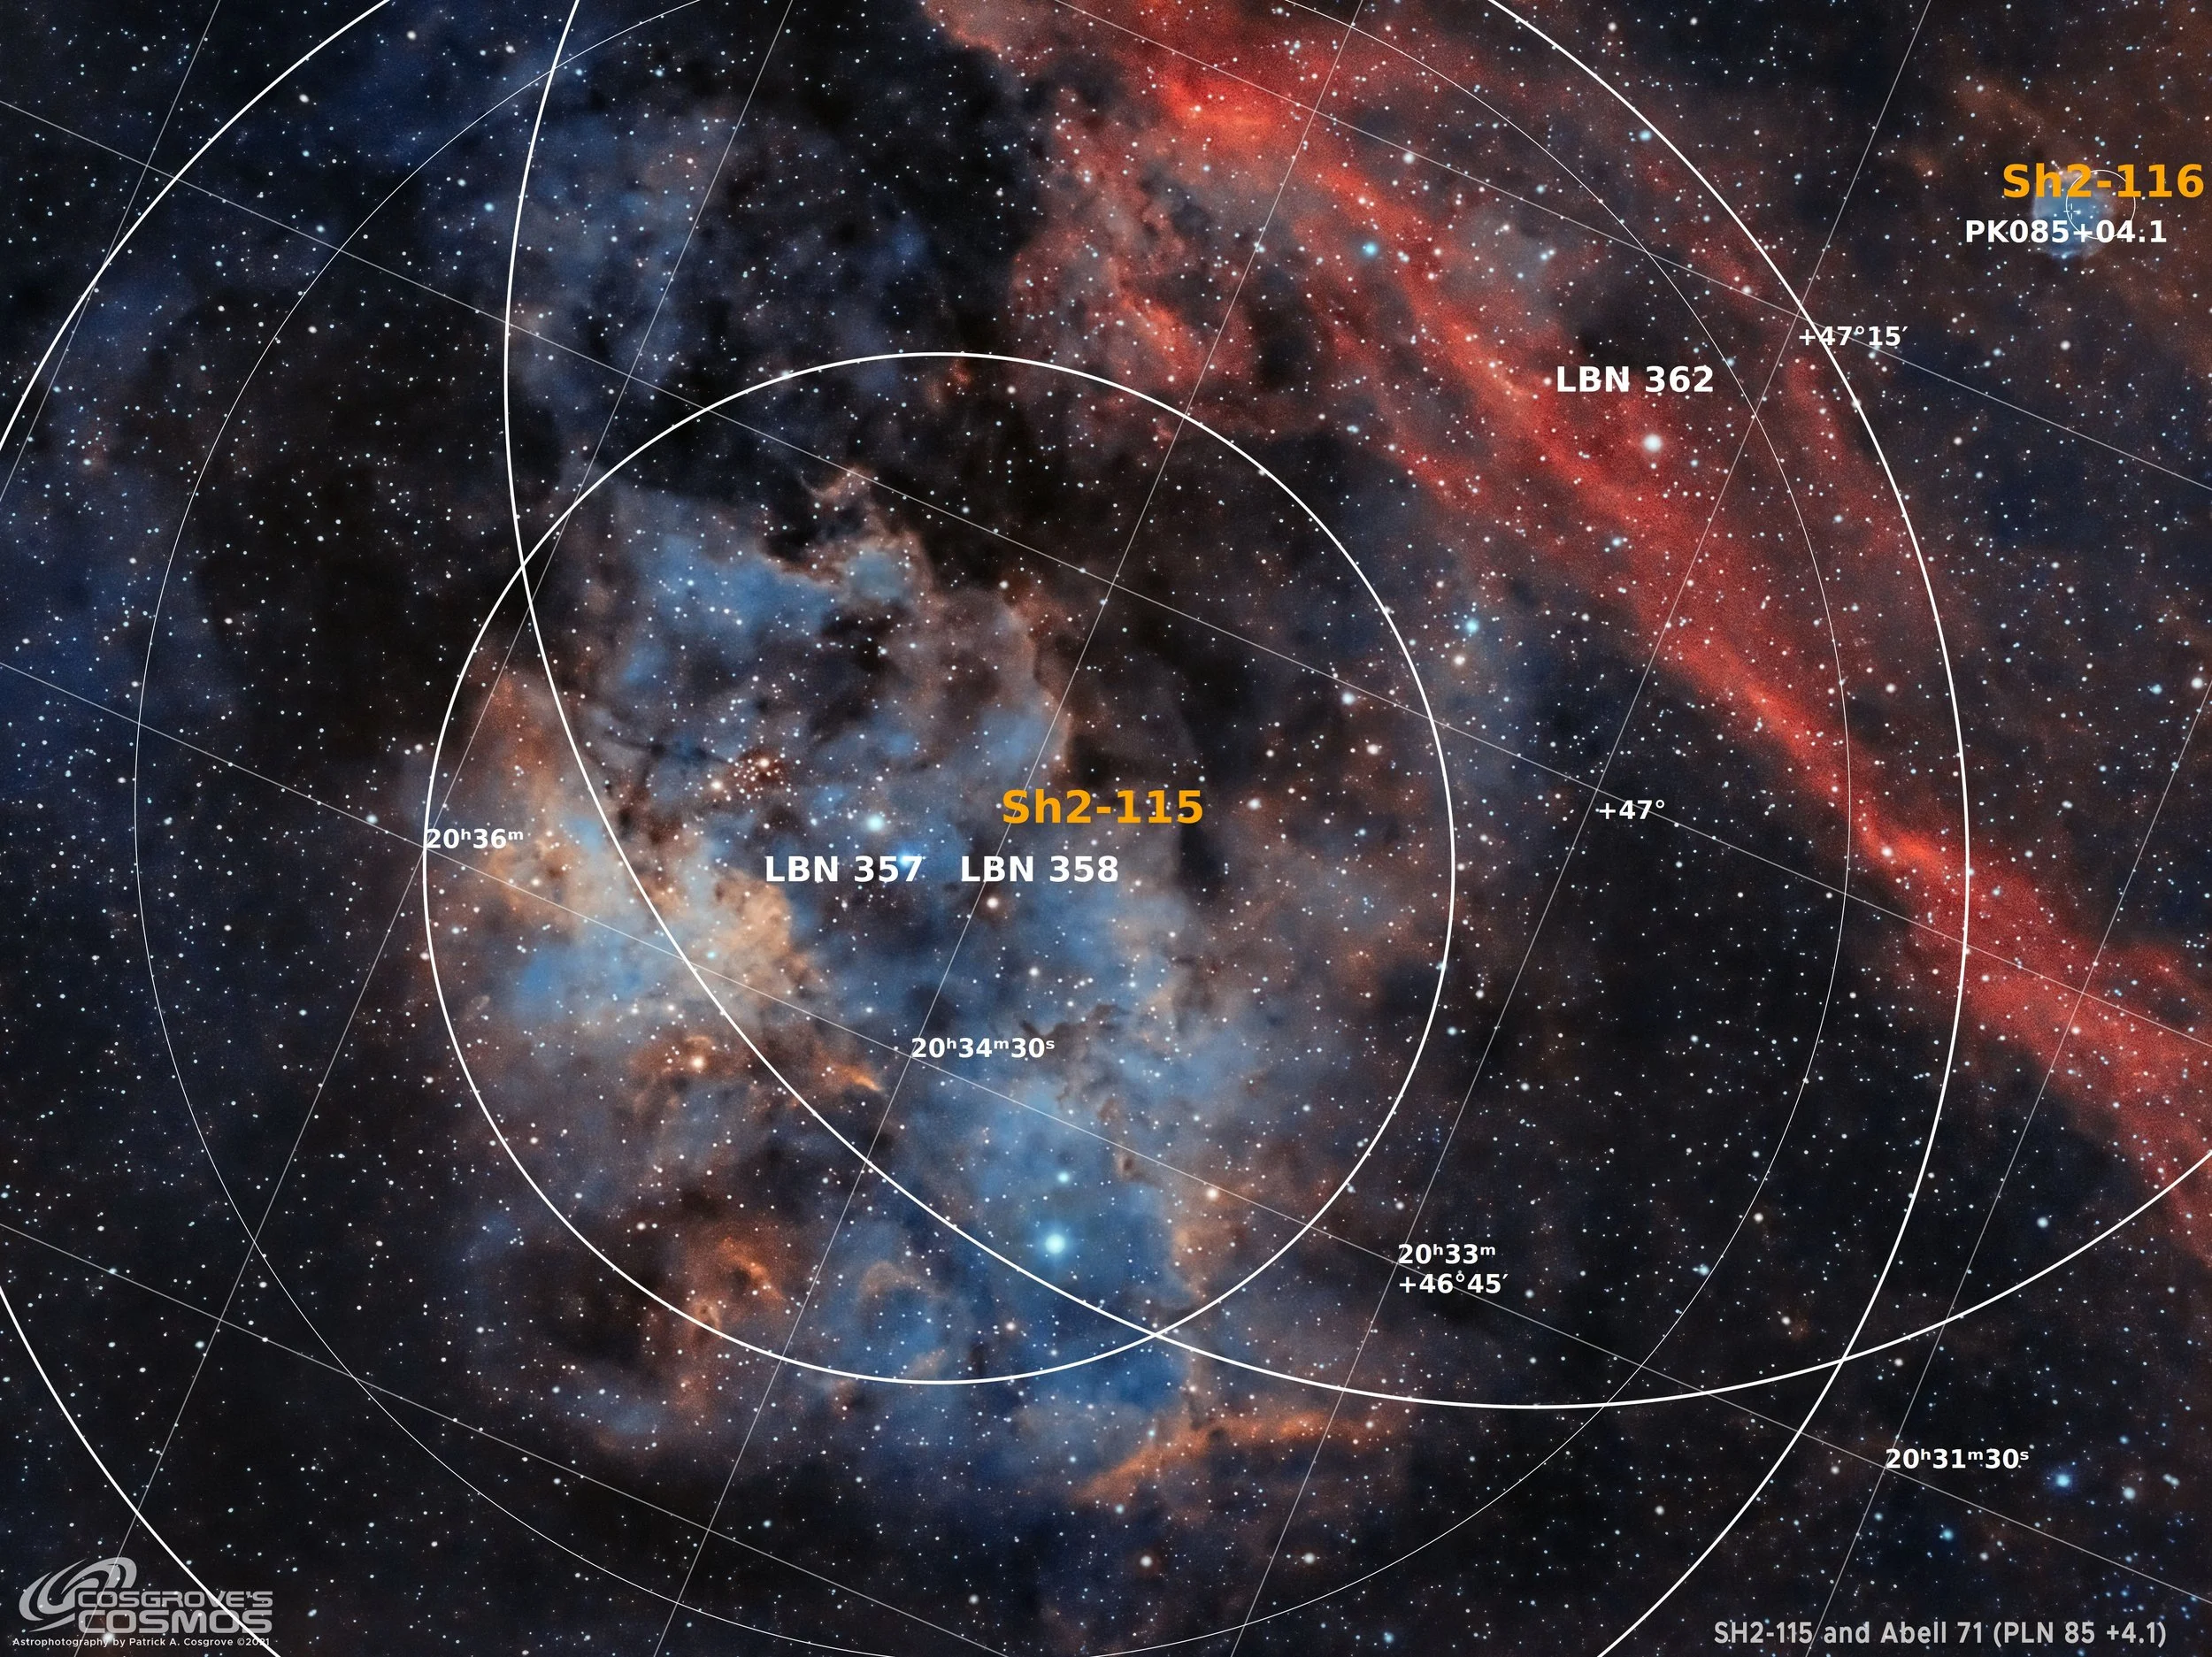
SH2-115 is a large emission nebula found in the northern regions of the constellation Cygnus, about 2° northwest of the bright star Deneb. Located about 7,500 light-years away, this extensive HII region is broken into two basic parts - one being roundish and associated with a bright cluster known as Berkley 90- which is shown in this SHO rendering to be a mix of blue and red colors. The other section is a long linear feature that is shown in red in this rendering.
Also in this view is Abell 71 (Pk 85+04.1). This is recorded as a faint planetary nebula with a magnitude of 18.9 central star. It was counted as one of four planetary nebulas found in Cynus by G. Abell in 1955. However subsequent studies by P.Pismis, I.Hasse & A.Quintero in 1991 are suggesting this is actually just a region of H-alpha gasses. Analysis showed that while there was a significant Ha signal found almost no O-III was seen - and O-III is usually associated with planetary nebulas. It is now thought that this object is an HII cloud associated with SH2-115.
The Annotated Image
This annotated image was created with the ImageSolver and AnnotateImage scripts in Pixinsight.
The Location in the Sky

The area covered by this image can be seen in the red square above. This finder chart was created with the new FinderChart process in Pixinsight.
About the Project
For those that have seen my recent imaging projects, you have heard about an amazing period of great weather we had here in Rochester from November 5th through 8th. Having four nights of clear skies and with no Moon in Rochester in November is incredibly rare! The fact that I could shoot for almost 12 hours a night was amazing!
So during this stretch of time, I ran 3 telescopes simultaneously in my driveway and managed to capture a treasure trove of data for 10 targets.
Since then, I have been slowly working my way through the data and doing the image processing needed to complete each imaging project.
SH2-115 is the tenth and final image from that set!
On one hand, I am really happy to complete work on this data set. On the other hand, I am realizing that I may not get another chance to collect new data until March of this year! I’m kind of sad about that.
I will spend my time re-processing old image data with new methods, and writing method articles for this website - I have a long list of articles that I would like to get to so now I will have no excuses and should be able to make some progress on it.
Why this Target?
I knew very little about this large target but images that I have seen suggested a dynamic and interesting structure. That’s one of its attractions for me. I have slowly been targeting objects from the Sharpless Catalog of HII regions. There are 456 objects in this catalog and I have found that many of them are:
1) Relatively unknown by the broader amateur astronomy community.
2) Rich and complex regions that are photographically interesting to explore.
In looking over the Sharpless catalog, I was struck by the strong linear feature in red (when the Hubble Palette is used) and decided to add this to my shooting list.
Data Collection
By the fourth night, I had completed the collection on several projects and I had some open slots in my shoot list. Normally the best I typically get in terms of time on target is about 3 hours. This is due to the trees in my yard. But the positioning of SH2-115 was fortuitous as it threaded through gaps in my tree branches and ended allowing me to collect 4 hours of data in one night.
On these faint nebulae, more is always better but when you live in Rochester, NY, and it’s November, you take what you can get!
Thi image was captured with my William Optics 132mm APO and the ZWO ASI1600MM-pro camera.
I could see from the subs coming in that the Ha signal was very strong and that I would get good results from that. However the signals from the O-III and S-2 filters were very slight - noise would certainly be an issue. This, of course, could be resolved with more integration time, but that was not likely to happen anytime soon - so my challenge is to see what I can do with the data I have.
Image Processing
Image processing followed my standard workflow for narrowband captures. I did have some problems with my stars. I was getting a colored ring around some of them. I had to use some masking techniques to correct this.
But how did I get them?
At this point I am uncertain. I think it may come back to how I am doing deconvolution. I am running this on all three mono images and it is possible that the star size reduction I am getting with one filter is more or less than another. This may cause the color rings when the three mono images are combined to make the SHO color image.
I think I will test this by only running deconvoution on a synthetic L image and then injecting this into the color image on my next narrowband project.
Other than that - no special processing was used for this image and I was pretty pleased with the result given the relatively short integration times.
Note: the Image processing details section can be found at the end of this post.
More Information
Wikipedia: SH2-115 (note: this is in Italian - use the Goole translate function)
Wikipedia: Abell 71, SH2-116
Galaxymap.org: SH2-115
SharplessCatalog.com: SH2-115
Capture Details
Software
Capture Software: PHD2 Guider, Sequence Generator Pro controller
Image Processing: Pixinsight, Photoshop - assisted by Coffee, extensive processing indecision and second-guessing, editor regret and much swearing…..
Lights Frames
Taken the night of November 8th, 2021
23 x 300 seconds, bin 1x1 @ -15C, Gain Unity, Astrodon 5nn Ha Filter
10 x 300 seconds, bin 1x1 @ -15C, Gain Unity, Astrodon 5nn O3 Filter
15 x 300 seconds, bin 1x1 @ -15C, Gain Unity, Astronomiks 6mm S2 Filter
Total of 4 hours
Cal Frames
25 Darks at 300, bin 1x1, -15C, gain Unity
25 Dark Flats at Flat exposure times, bin 1x1, -15C, gain unity
Flats darks, 12 at each flat exposure time.
Capture Hardware
Click below to visit the Telescope Platform Version used for this image.
Scope: William Optics 132mm f/7 FLT
APO Refractor
Focus Motor: Pegasus Astro Focus Cube 2
Cam Rotator: Pegasus Astro Falcon
Guide Scope: Sharpstar 61EDPHII
Guide Focus Motor: ZWO EAF
Mount: Ioptron CEM 60
Tripod: Ioptron Tri-Pier
Camera: ZWO ASI1600MM-Pro
Filter Wheel: ZWO EFW 1.25” 8 slot
Filters: ZWO Gen II 1.25” LRGB,
Astrodon 5nm Ha & O3 filters,
Astronomiks 6nm S2 filer
Guide Camera: ZWO ASI290MM-Mini
Dew Strips: Dew-Not Heater strips for Main and Guide Scopes
Power Dist: Pegasus Astro Pocket Powerbox
USB Dist: Startech 8 slot USB 3.0 Hub
Polar Align Cam: Polemaster
Image Processing Log
1. Blink Screening Process
O3 Sub:
All light images were reviewed with the Blink process.
Ha Subs
one removed for movement
One removed for focus
O3 Sub:
subs look good but not much signal seen
S2 Subs:
subs look good but not much signal seen
Flats, and Flat Darks, and Darks
Taken from Cal library using data from 11-15-21
2. WBPP 2.3 Run
all frames loaded
setup for calibration only - no integration
Cosmetic Correction setup
Pedastal image of 50 used for all images
Subframe weighting: psf signal - this is a new feature of version 2.3
Run complete with no issues

WBPP Calibration Panel
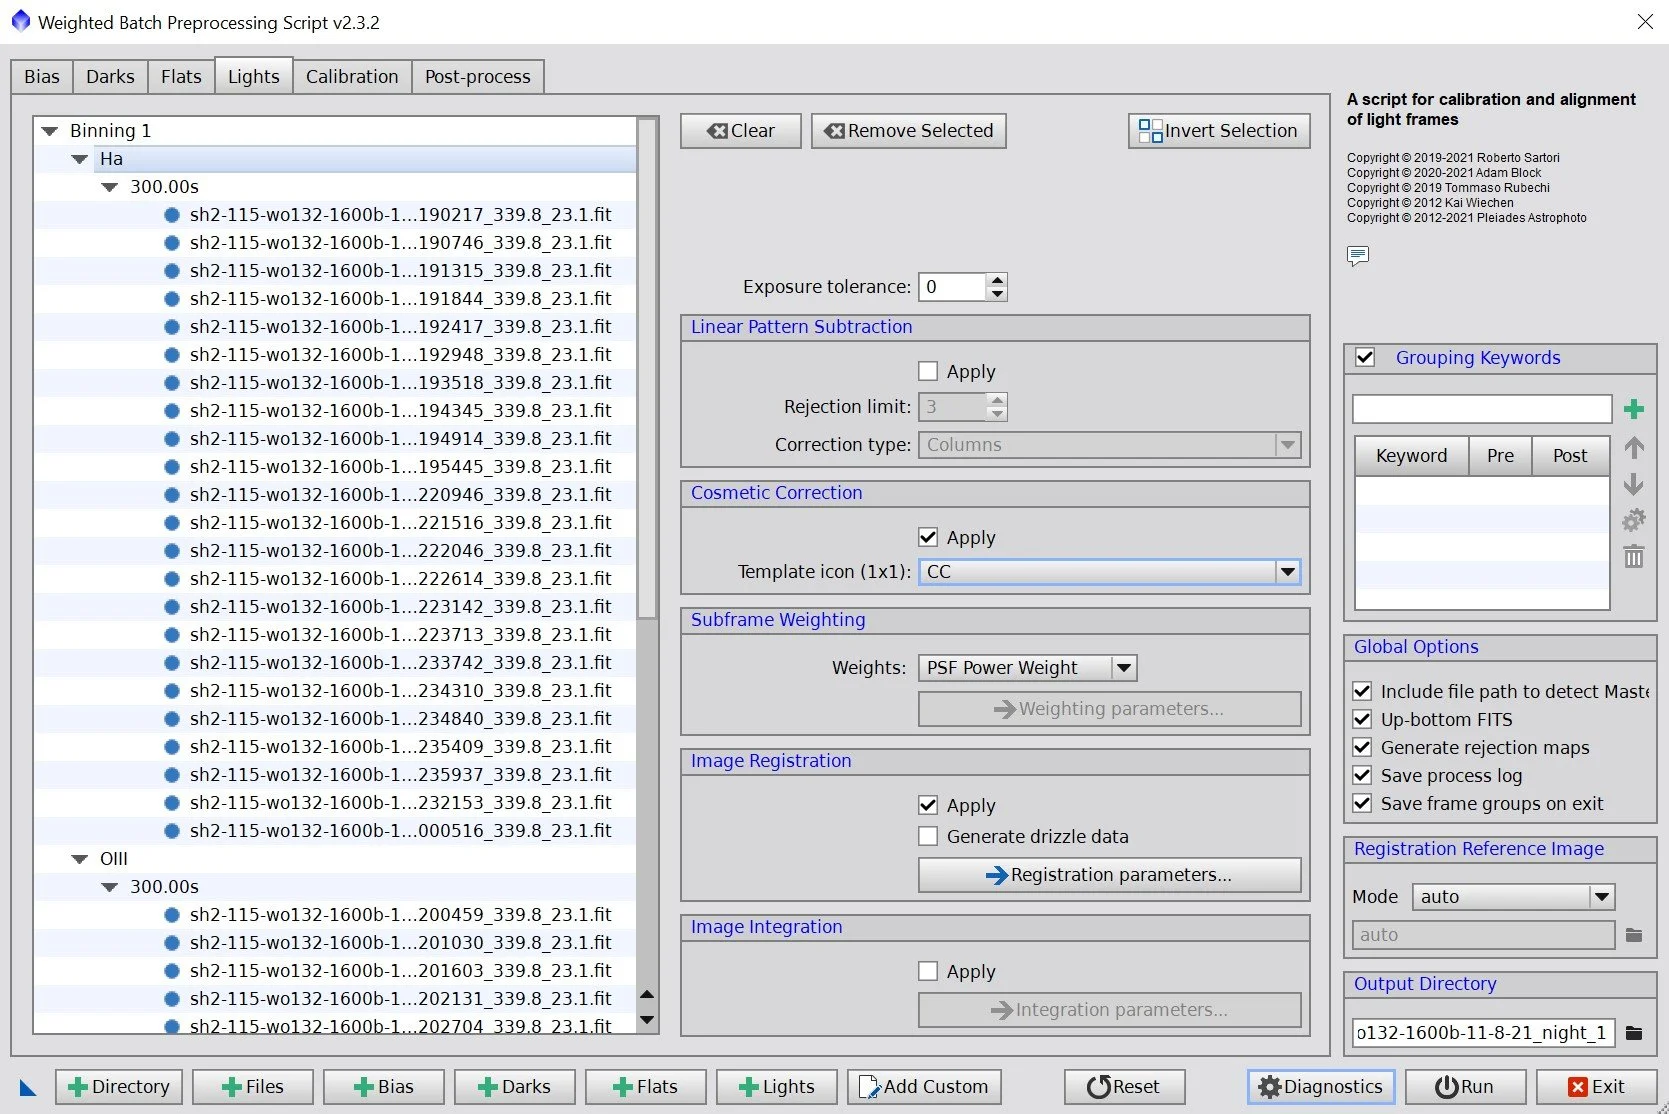
WBPP Lights Panel

WBPP Post Process Panel
3. Image Integration
Because very few gradients were seen, ImageIntegration was used for creating image masters
Panels for each integration can be seen below.
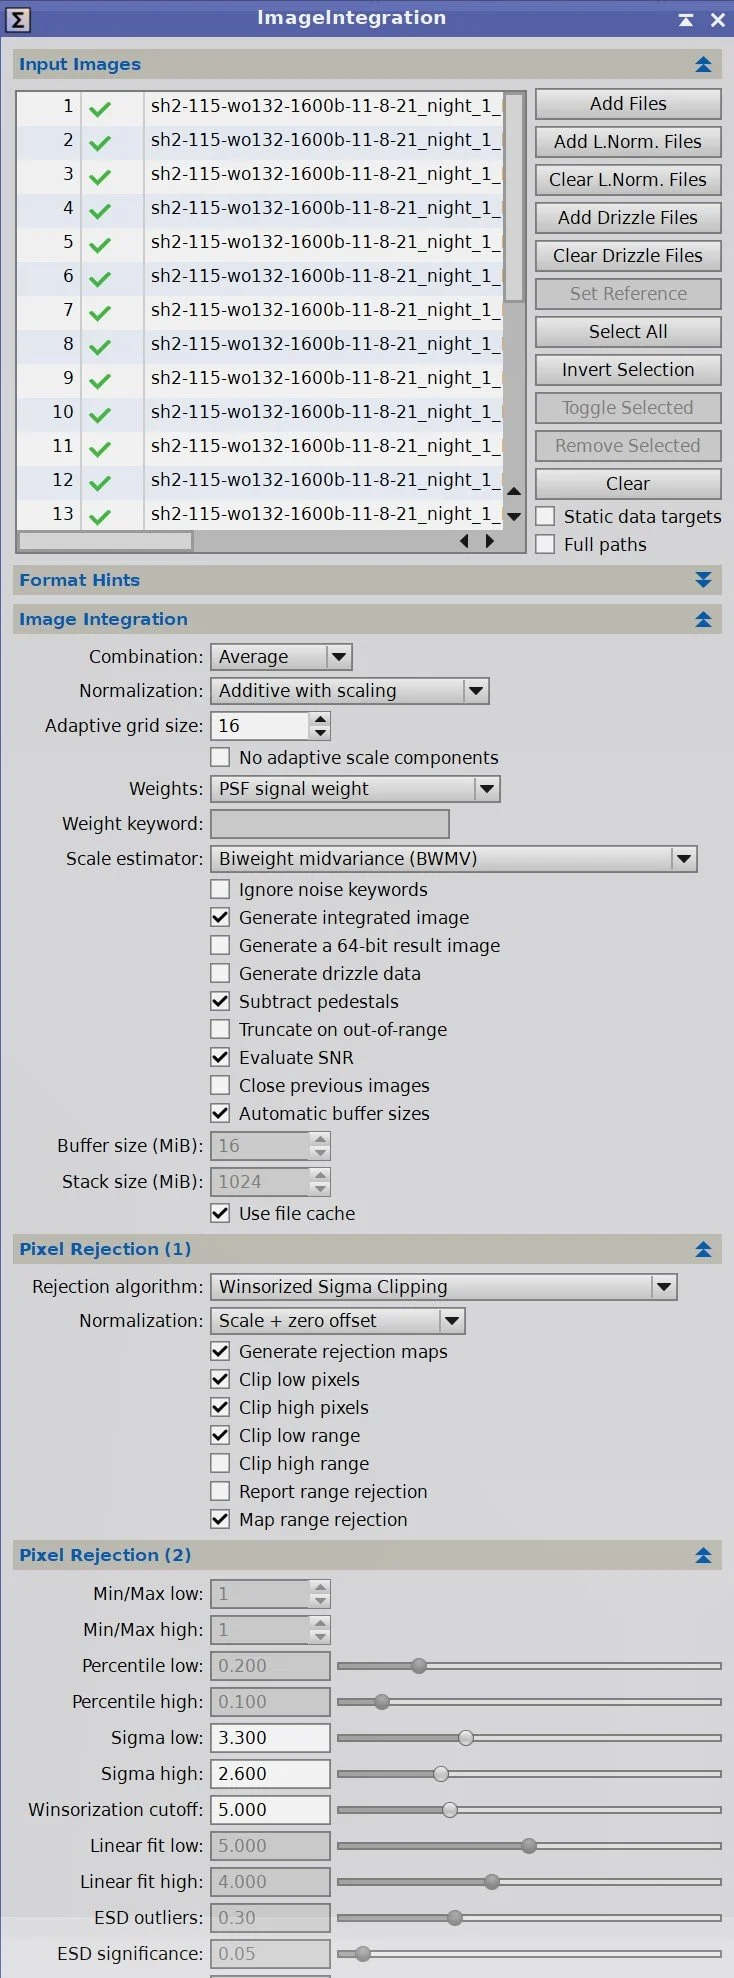
ImageIntegration set up for run on Ha Images

ImageIntegration Panel for O3 Image

ImageIntegration Panel for S2 Image
4. Crop all of the images
a common crop level was selected and DynamicCrop was used to trim all of the master frames.
5. Dynamic Background Extraction
Ha image is pretty much all nebula so no DBE was run
DBE Run for O3 and S2 images. See sampling maps below.
Subtraction used for correction method
O3 image DBE sampling plan (click to enlarge)

O3 image gradient removed
S2 Image DBE Sampling Plan (click to enlarge)

S2 Image Gradient removed
5. Deconvolution Prep for the L image.
Prepare image for all masters:.
Object mask created
A nonlinear version of the image was created using the STF->HT method
Use HT to clip blacks and push stars and nebula to white
Create Local protection images
Run StarMasks with layers = 6, all else default
Boost slightly with HT
Create PSF image with PSFImage Script.
Object Mask for Ha (click to enlarge)
Object Mask for O3 (click to enlarge)

Starmask Panel used
Object Mask for S2 (click to enlarge)
Local Support Image for Ha (click to enlarge)
The PSFImage Panel for Ha.

PSF for Ha
Local Support Image for O3 (click to enlarge)
The PSFImage Panel for O3

PSF for O3
Local Support Image for S2 (click to enlarge)
The PSFImage Panel for S2

PSF for S2
6. Apply Deconvolution for the L image
For All images
Apply object mask to the image
Set psf to the right one for the image
add the right local support image
Create 3 preview sections on the image
Test different global dark settings until optimal found
Ha: 0.005
O3: 0.007
S2: 0.007
Ha image before Deconvolution

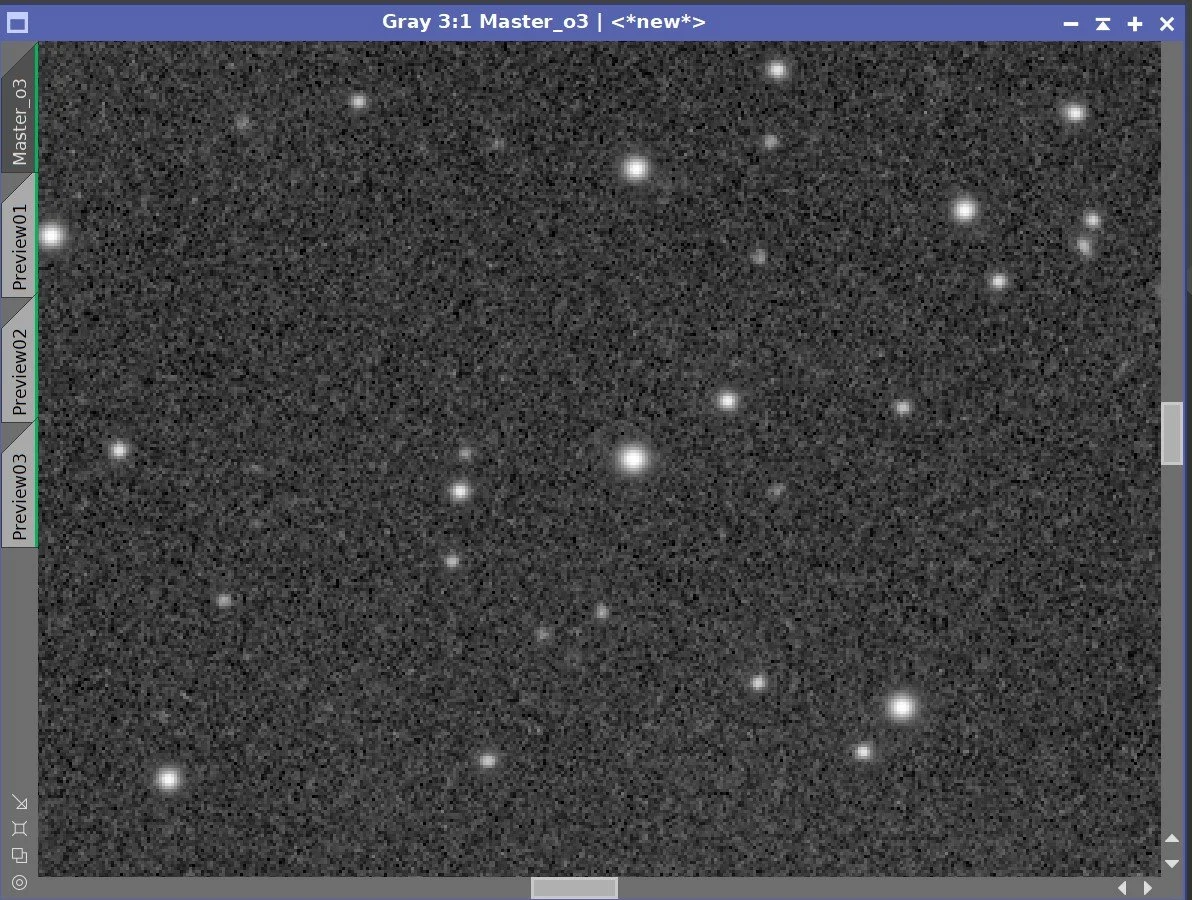
O3 image before Deconvolution

S2 Image before Deconvolution
Ha image after deconvolution.

O3 after Deconvolution

S2 After Deconvolution
7. Run Denoise on all images
Run EZ-Denoise on the all Image using default parameters.
Ha before EZ-Denoise
O3 before EZ-Denoise

S2 before EZ-Denoise

Ha after EZ-Denoise

O3 after EZ-Denoise

S2 after EZ-Denoise
8. Go Non-Linear and Combine image into initial SHO color image
For Each image
Select background sky reference and create a preview for it.
Run MaskedStretch using the preview of each image for the background reference.
Run CT and adjust the tone scale to get a good-looking image.
Run Channel Combination Process to create initial Color Image

Nonlinear mono image set: Ha, O3, S2

9. Process Color Image
Run SCNR to remove green bias
Run DBE to remove color gradients. See sampling panel and gradient found below.
Run CT to adjust tone scale and sat.
Use ColorSaturation to boost selective colors

SHO image after SCNR.

SHO Image DBE Sampling

DBE image gradient found

SHO after DBE correction

SHO after CT adjust of Tone Scale and Sat

ColorSaturation setup for image

SHO Image after Color Sat Adjustment
10. Fine-Tune Stars
Some of the stars have stronger colors than desired and some stars have color rings. We will deal with that here.
Reduce star color
Create a master star mask
Run Starnet and select create a mask
Remove smaller stars with range select: 0.24 - 1.0
Apply Mask
Use CT and reduce star saturations.
Now deal with color rings
make a copy of the star mask
use MorphologicalTransform in the dilation mode and run twice on the star map to grow the size of the stars to cover the color rings.
Apply the mask
Experiment with CT curve settings to adjust star ring colors and intensity. See panel screen snap to see what I used.
Run EZ-ReduceStars
Master Star Mask made with Starnet (click to enlarge).
Dilated star mask to cover rings (click to enlarge)

CurveTransform Settings used to reduce star ring color. (click to enlarge)

Before the star color ring fix (click ot enlarge)

Before EZ-StarReduction
After the color ring fix - subtle but definitely better. (click to enlarge)

After EZ-StarReduction
11. Final Pixinsight Processing
Adjust two small circular areas
Create small round feature masks to tweak the color and saturation of Abell 71 and one other small region in the left side nebula
Apply mask
Use CT to Tweak
Apply final Noise Reduction
Note - I usually use ACDNR for this step but in this case, I did not like how the color reduction was looking to so I opted to get some experience with TVGDenoise - this worked out great!
Use MLT to remove the first layer of detail
Use TVGDenoise as interactive setup - see screen snap
Apply TVGDenoise

GAME Mask for the two small areas that need saturation adjustment.
After adjustment with the GAME mask.(click to enlarge)


Before TVGDenoise


After TVGDenoise
Save images as Tiff and move to Photoshop
In Photoshop:
Use Camera Raw Filter to adjust Global Clarity, Texture, and Color Mix
ColorMix is much easier to use to adjust hues in an image compared to the tool provided by Pixinsight and I tend to do this final operation in PhotoShop
Use StarShrink to reduce stars further - see screenshot panels.
Use Topaz AI Denoise to reduce noise and sharpen things further - see screenshot panels - careful with this - is way too easy to take this too far!
Using Lasso with a father of 150 pixels, select dark regions, and other regions of interesting detail and boost clarity and curves.
Some bright stars had circular regions of color around them - use the circle selection tool and colormix to adjust.
Add watermarks
Export Clear, Watermarked, and Web-sized Jpegs.

Further reduced Mid-sized stars

Further reduce small sized stars

Topaz AI Denoise screen showing settings used.
The image before Topaz AI Denoise applied. (Click to enlarge)
The image after Topz AI Denoise Applied (Click to enlarge)
The image when first brought into Photoshop (click to enlarge)
The final Image (click to enlarge)
Processing Follow-up
After releasing my first version of the image, Dan Kutcha noticed that when viewed at certain scales, a “bubble pack” like pattern could be seen. At first, I did not see the issue but when viewed at certain scales it does seem visually more evident.
So I investigated further. I used MLT to extract image layers one by one, looking to see if one or more layers held the pattern. I found that layer 7 - which corresponds to the 65-pixel scale - seemed to have it the most.
An image of extracted layer 7 - this is close to the pattern I wanted to remove.
Since this is where the problem seemed to lie, I used the Noise Reduction feature of MLT and applied it to just that layer. The resulting image seems to reduce the pattern without losing too much other detail or sharpness.

Here is the MLT Panel settings used.

First version of the image.
This is after the layer 7 NR has been done.
The effect is subtle but seems much better. Below is a difference image between the original and new image to give you a sense of the change made.

I was very excited to get the ZWO ASI2600MM-Pro camera a while back. I ordered it when it was announced and then prepared to wait a long time to get it. When I did get it - I decided to put it onto the AP130 platform. That meant that I could move the ZWO ASI1600MM-Pro, along with its filter wheel over to my William Optics Platform. This now means that all of the platforms have been moved over to a mono camera and my ZWOASI924MC-Pro is now not in use.