
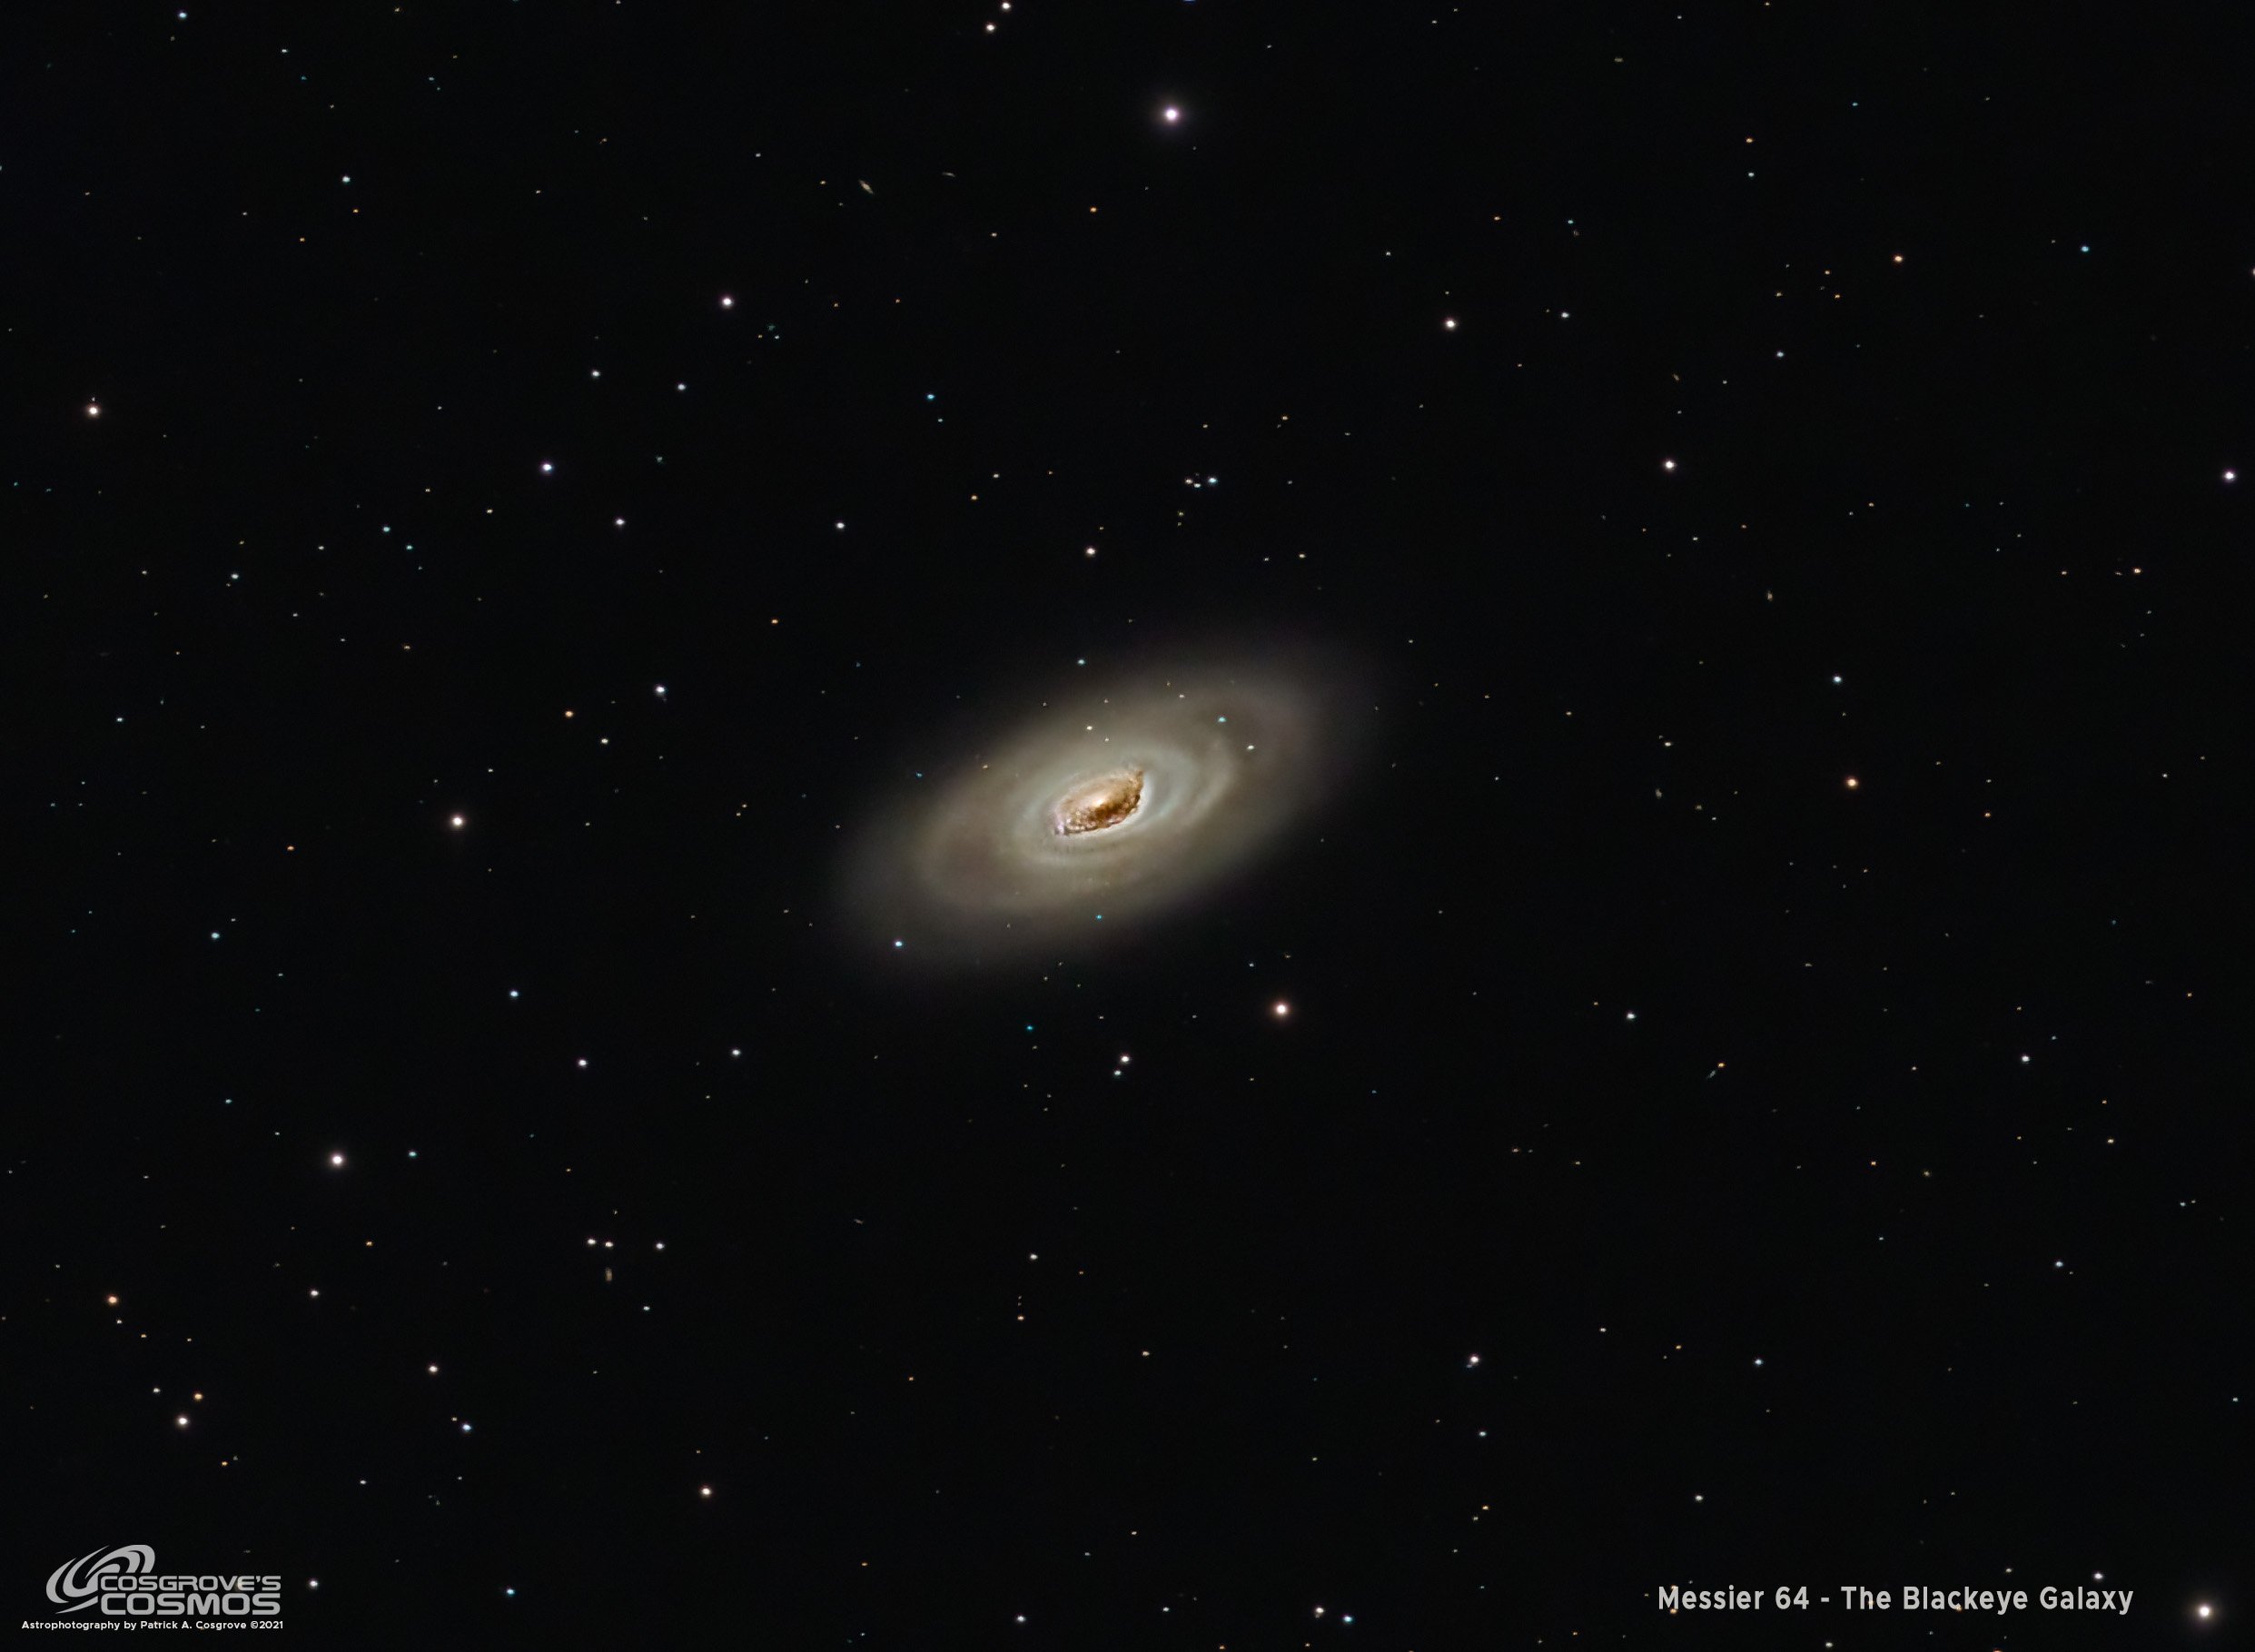
Messier 64 - The Black Eye Galaxy - 2.6 hrs in LRGB
Date: June 21, 2022
Cosgrove’s Cosmos Catalog ➤#0102
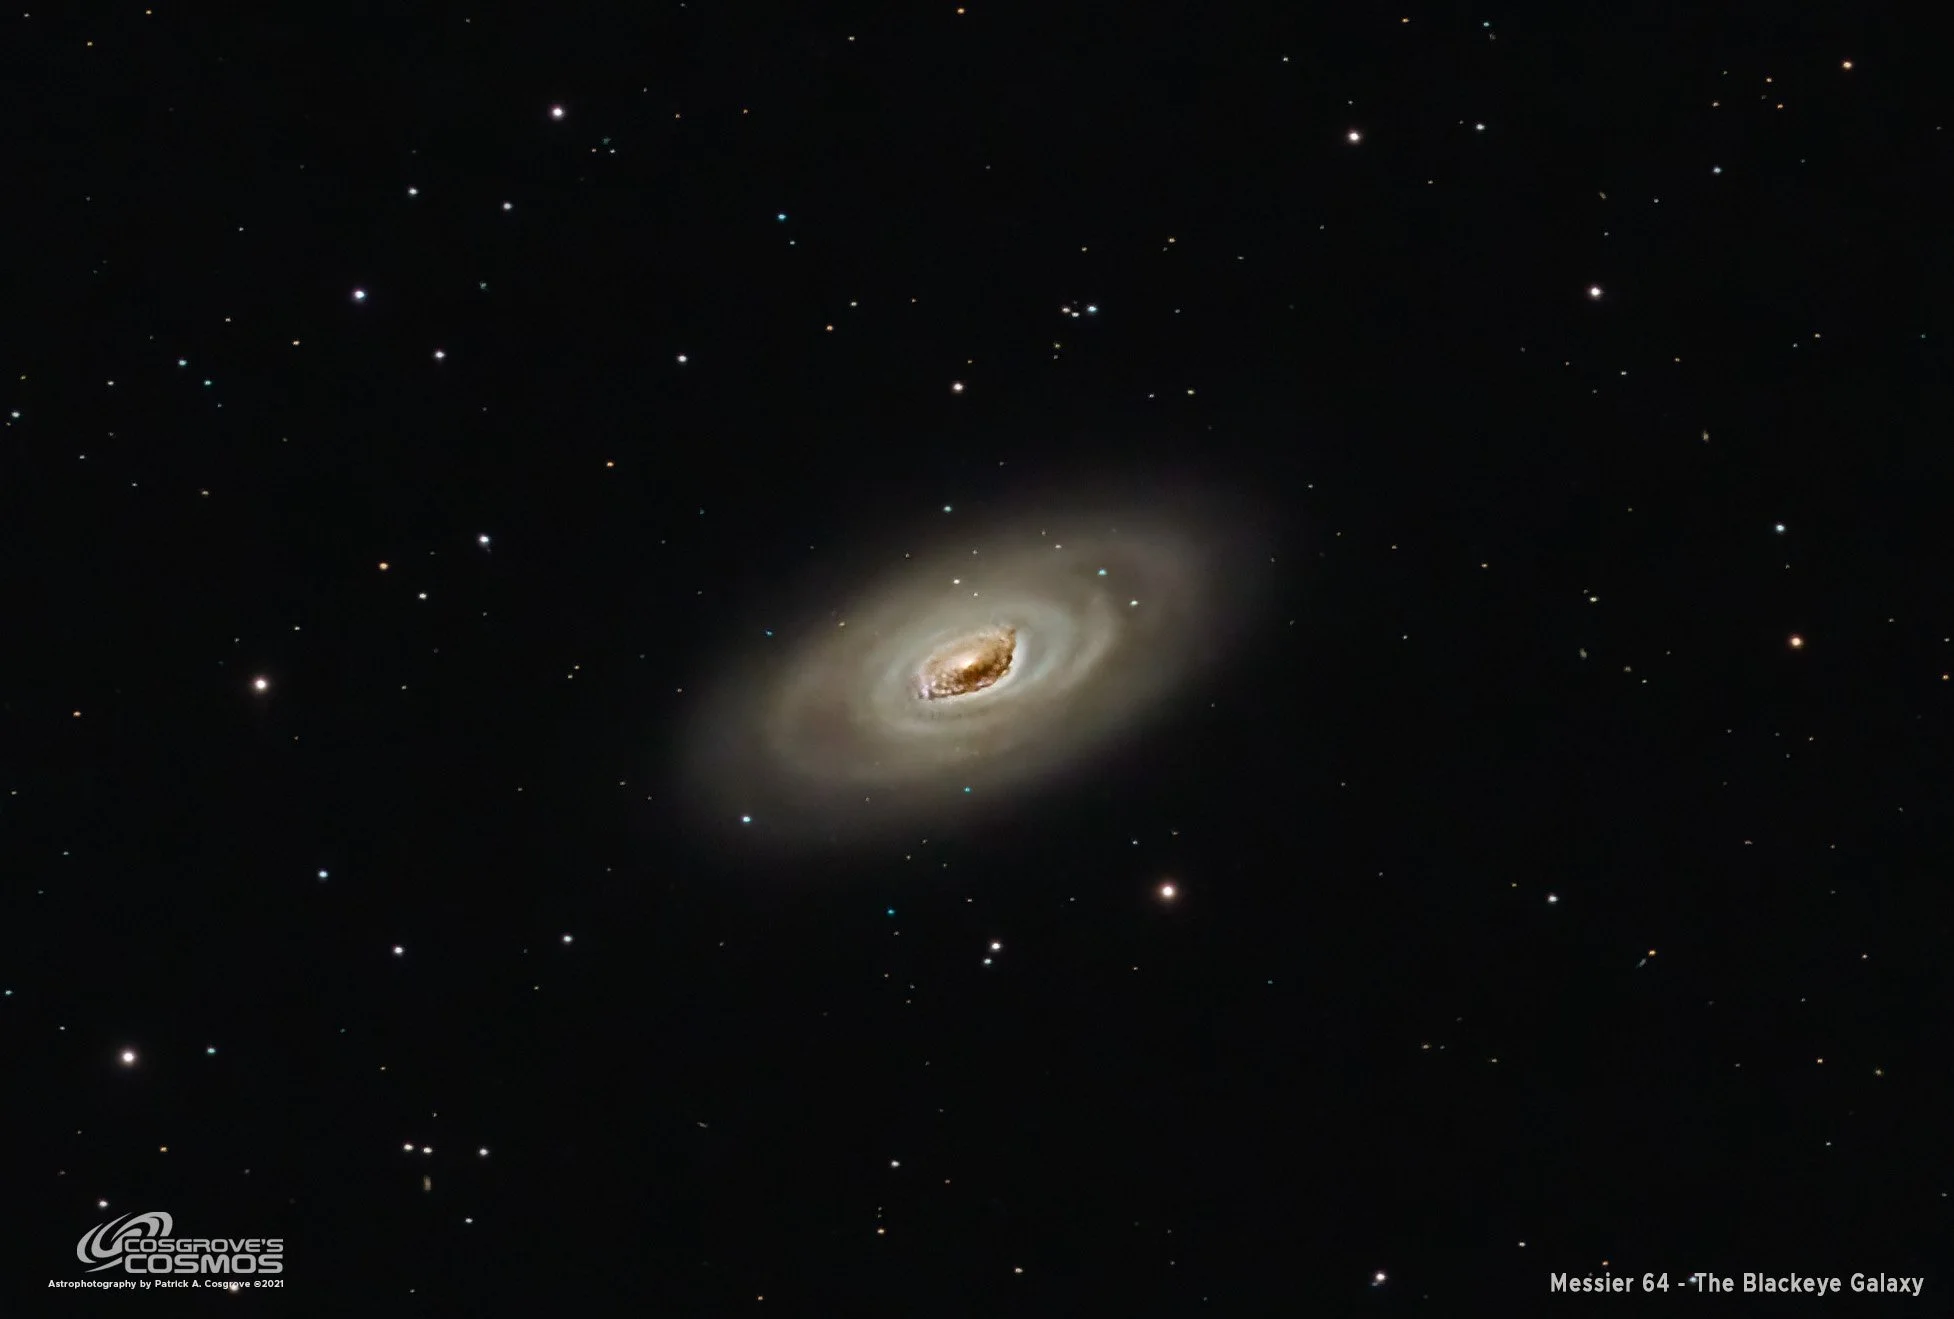
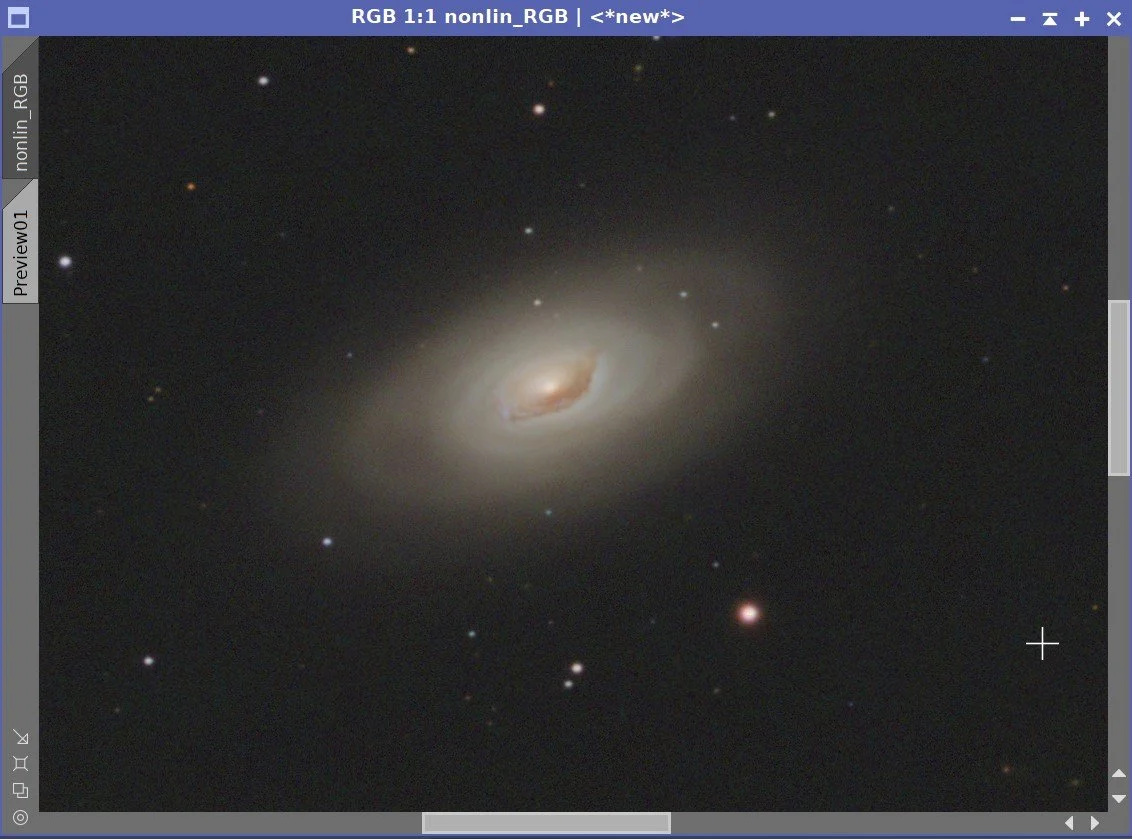
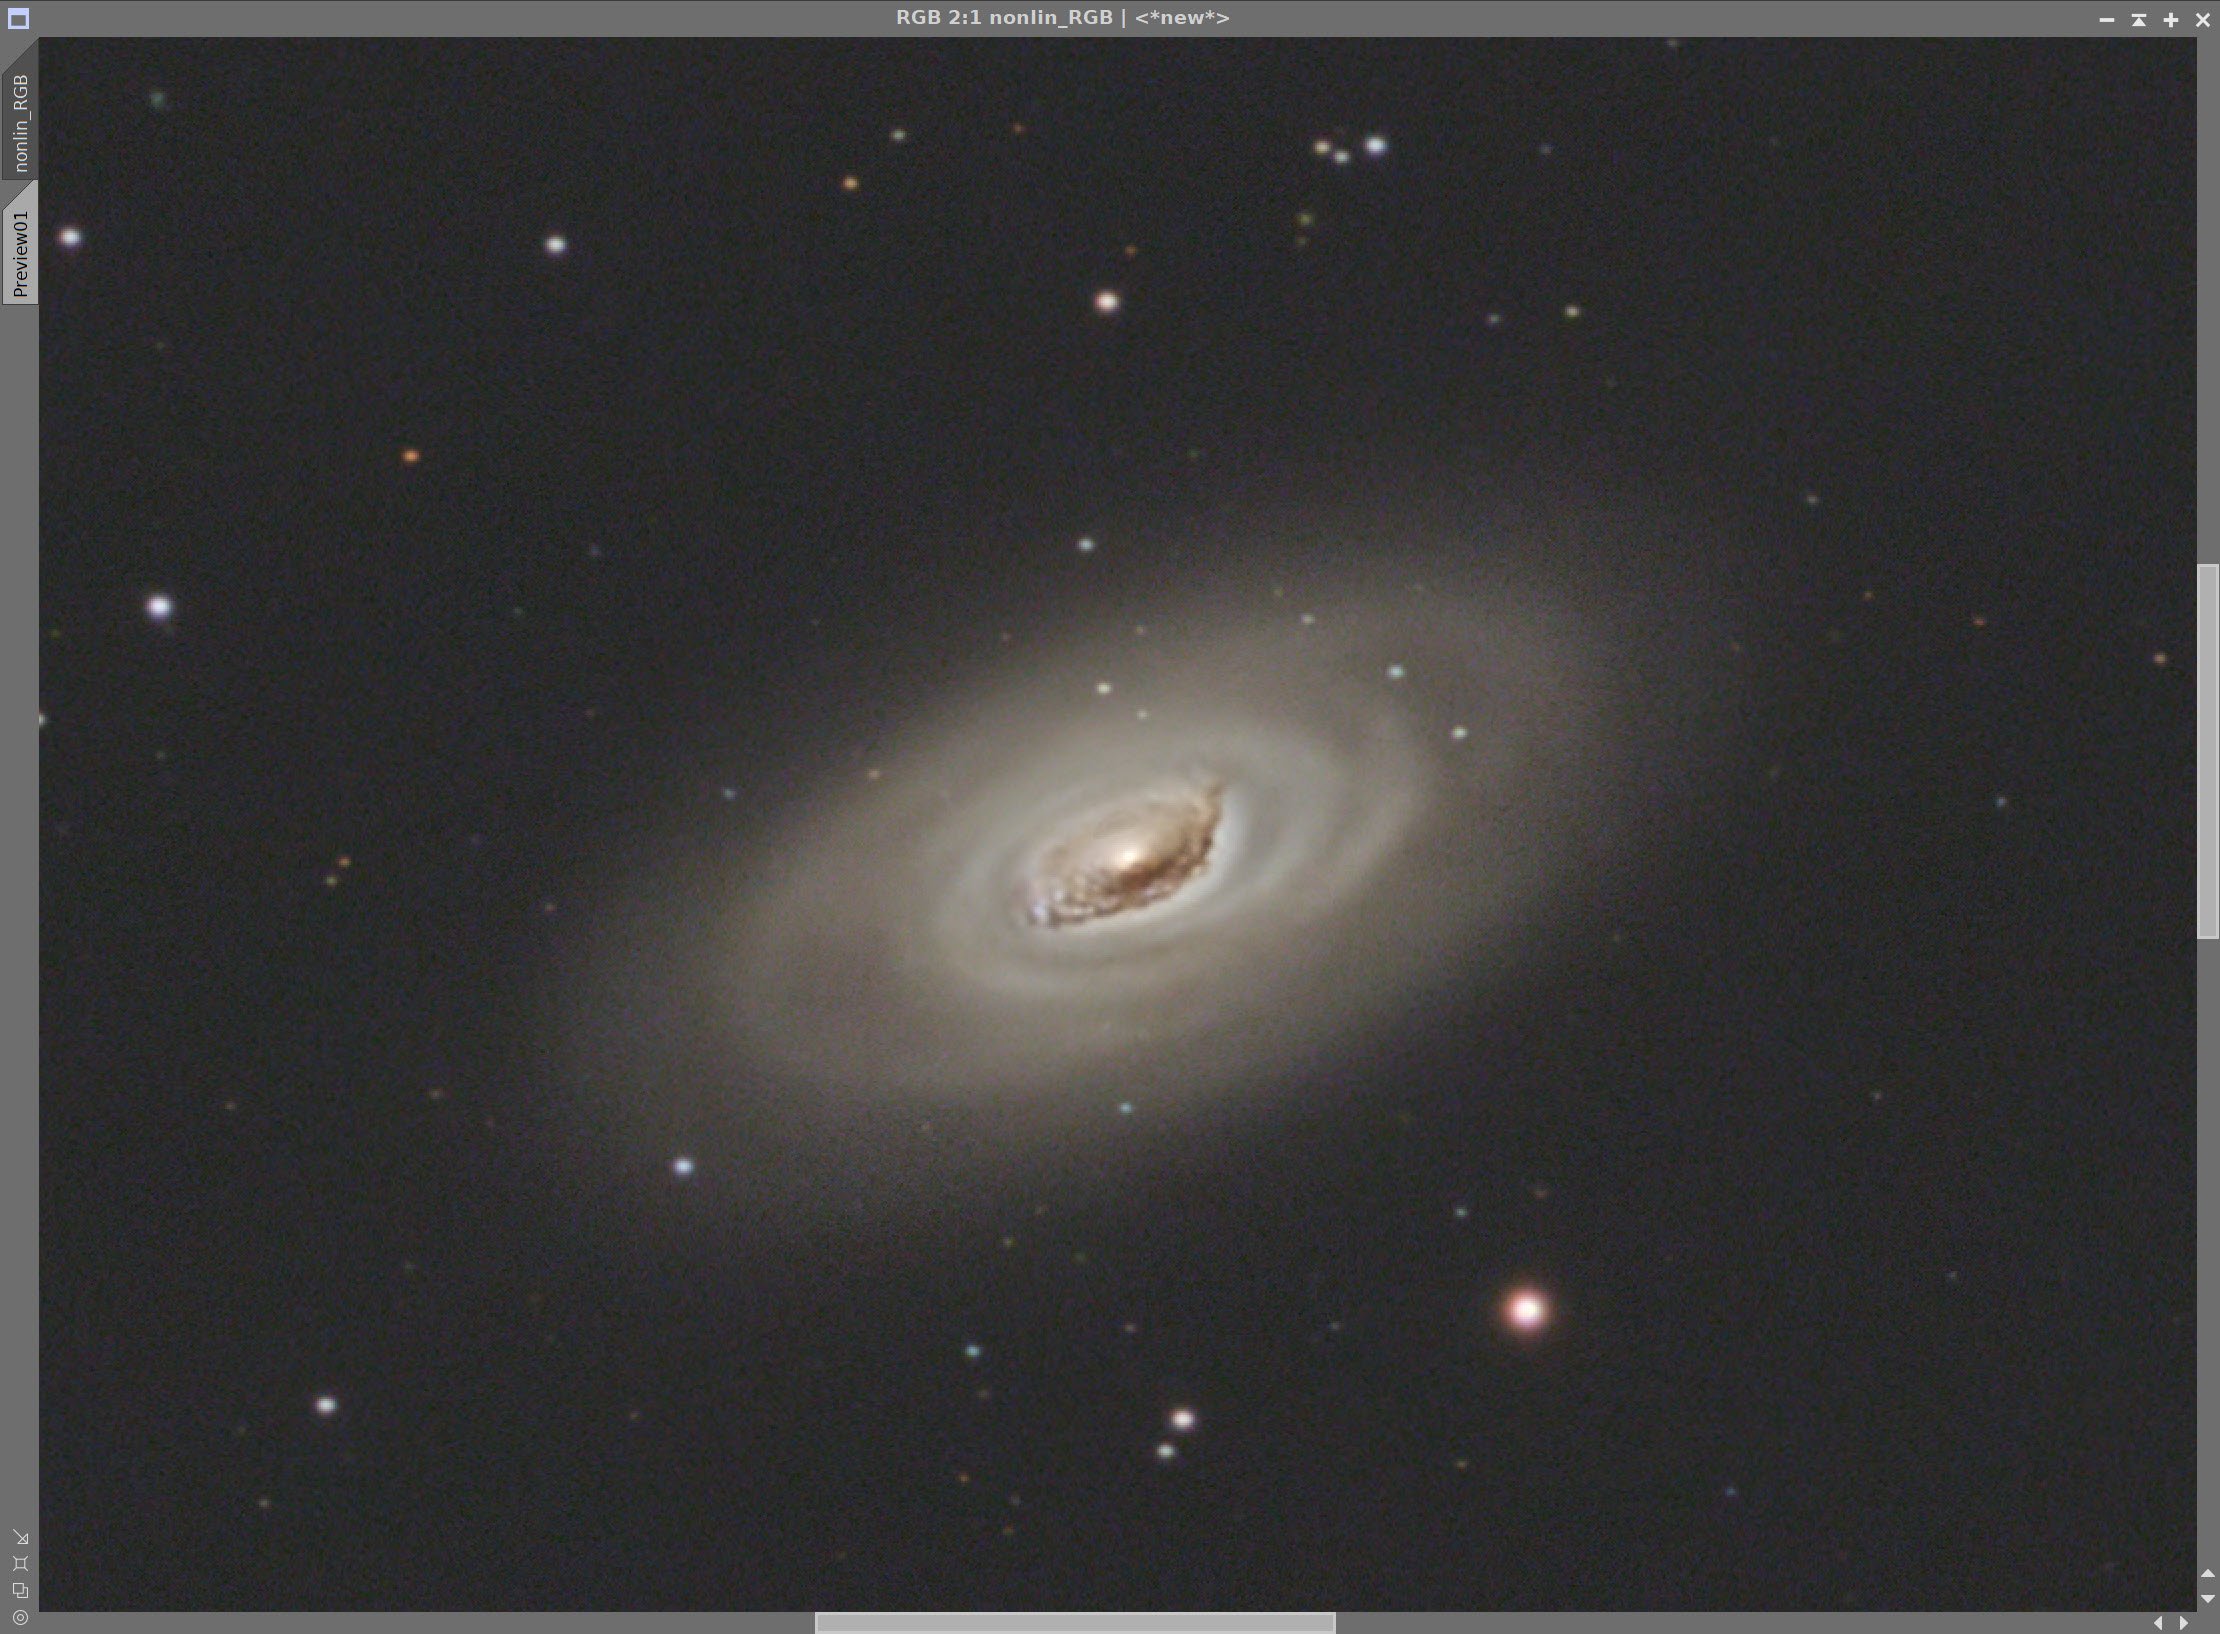
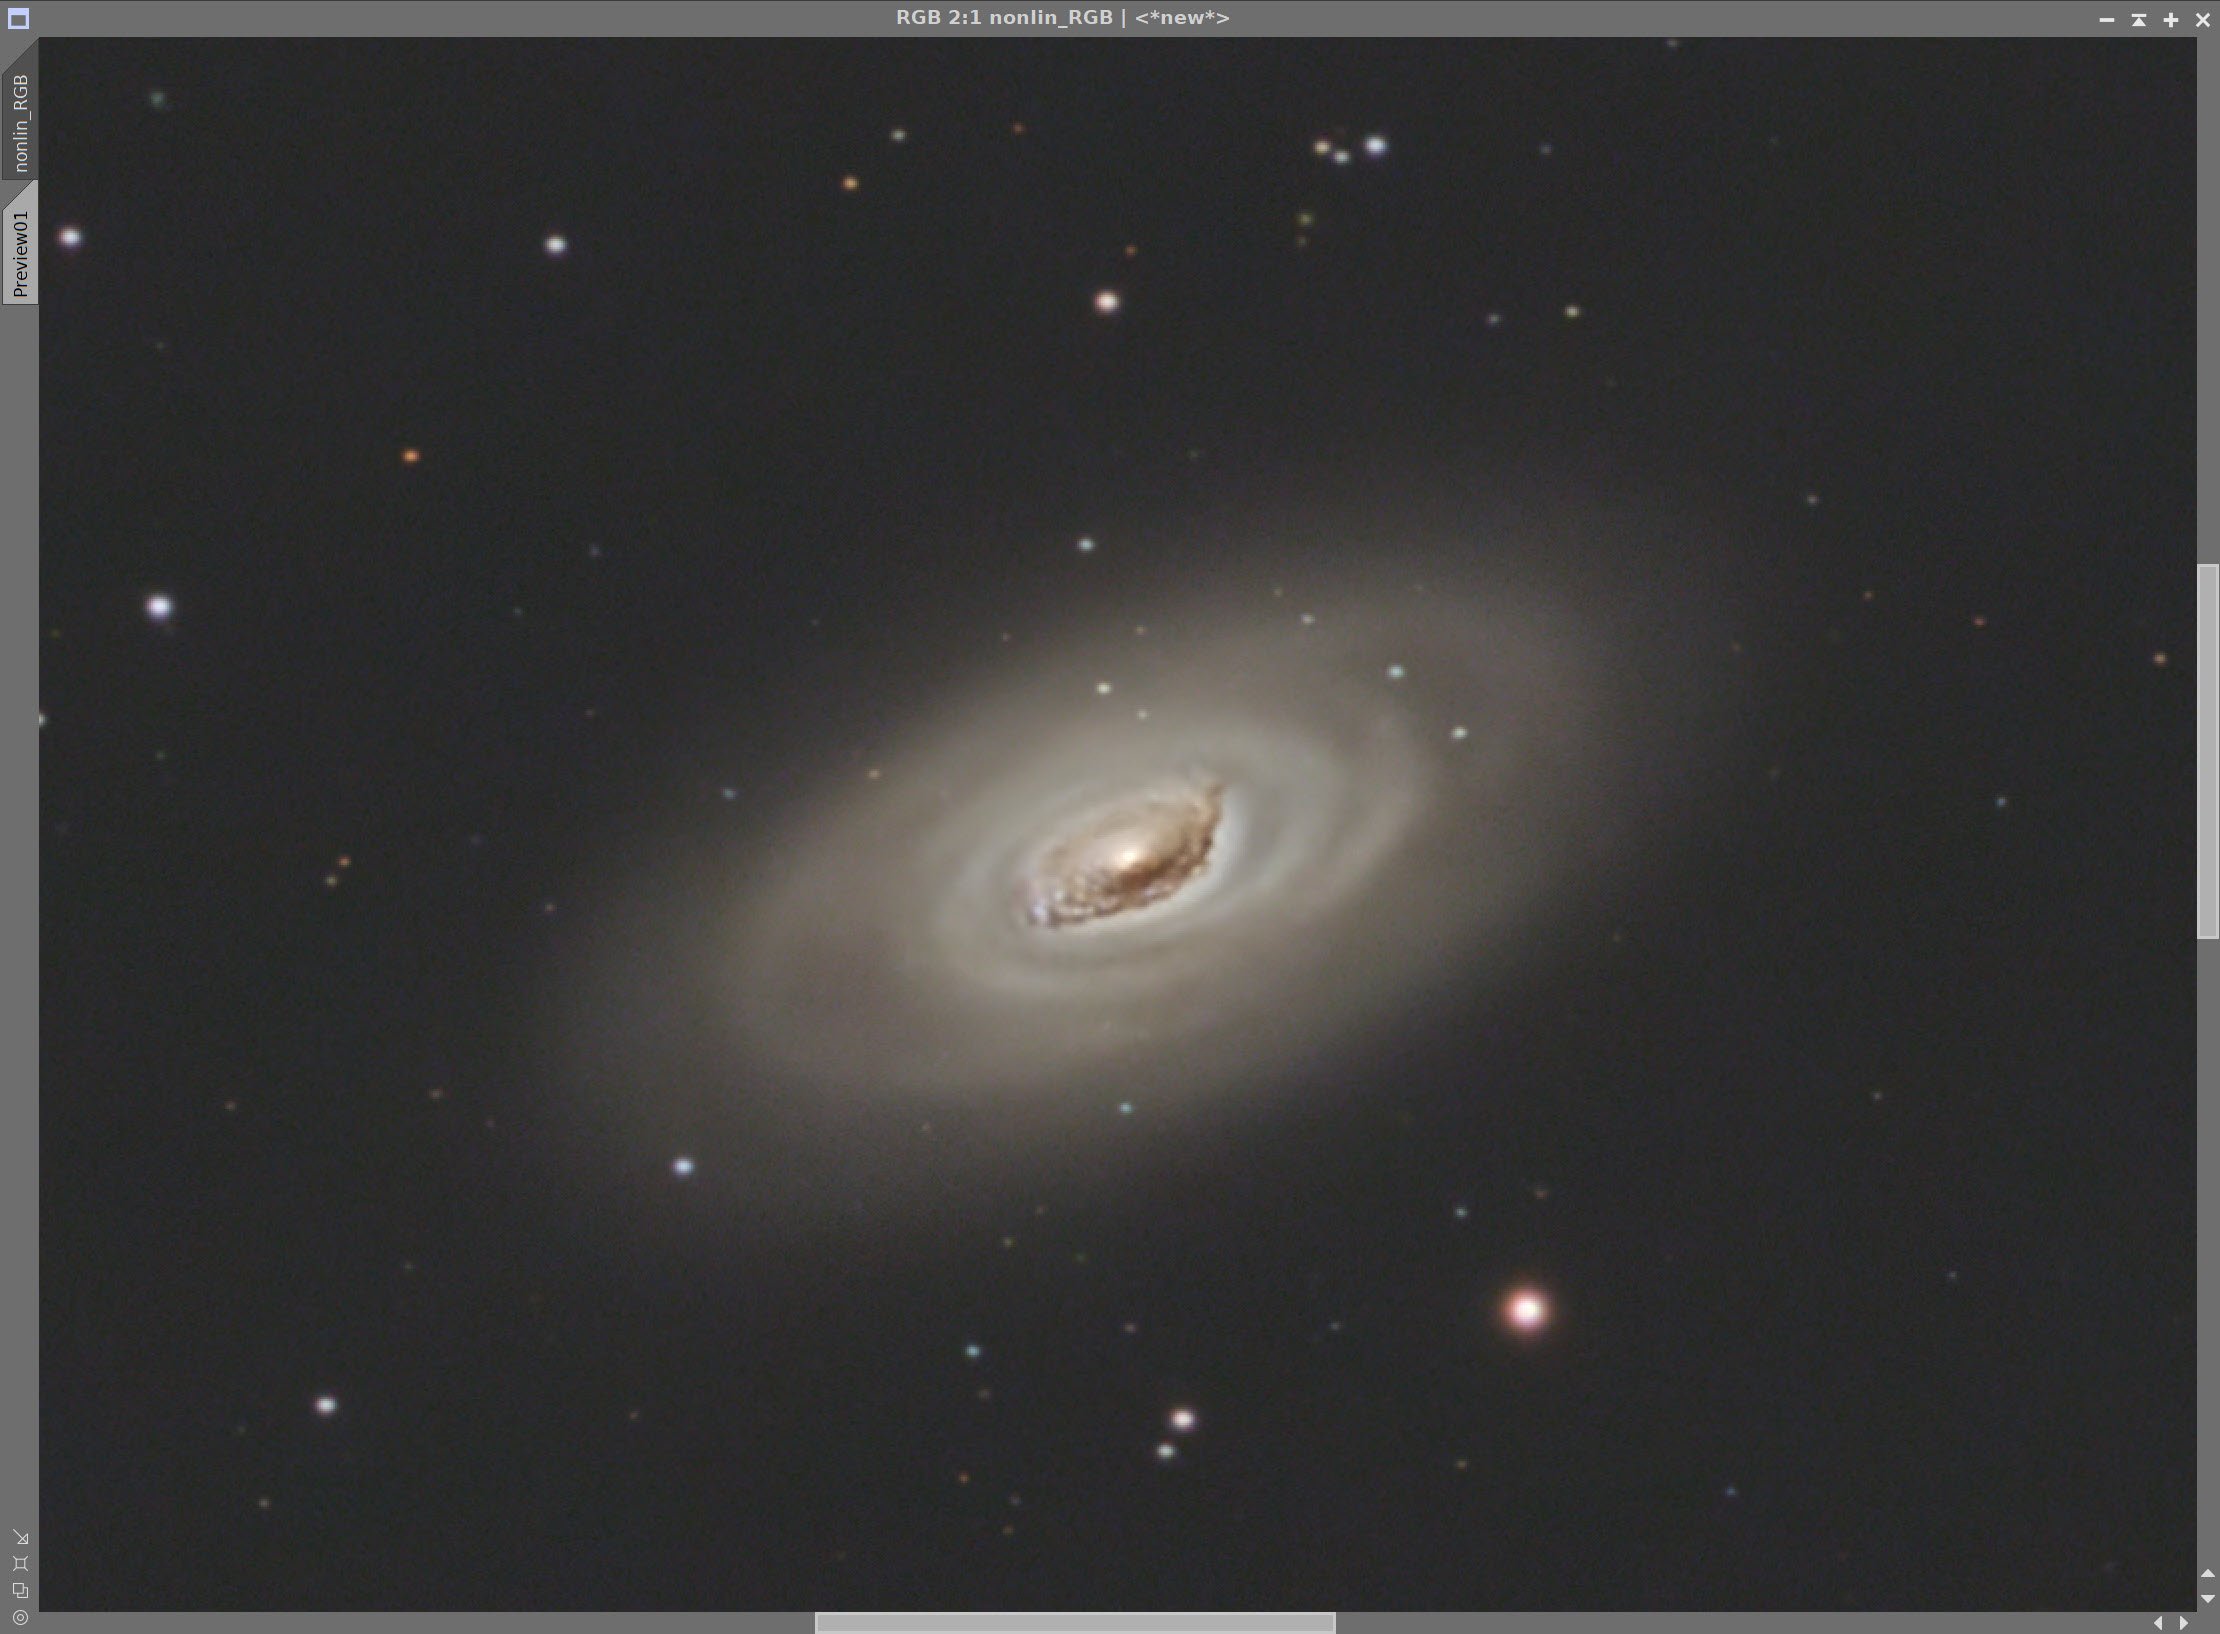
My second try at M64 - with fairly limited data. (Click for full resolution image via Astrobin.com)
Table of Contents Show (Click on lines to navigate)
About the Target
Messier 64, better known as the Black Eye Galaxy, is also known as NGC 4826 and the Evil Eye galaxy, and the Sleeping Beauty Galaxy.
It is a spiral galaxy that is located 17 million light-years from Earth, in the constellation of Coma Berenices.
It was first discovered by Edward Pigott in March of 1779 and independently by Johann Elert Bode in April of the same year. It was first seen by Charles Messier the next year and was added to his now-famous catalog.
The galaxy has a dark disk of material around the center and to one side of the galaxy, which is the source of its many common names. It is easily observed with modest telescopes and is well known in the amateur astronomy community.
Wikipedia provides some additional details of interest:
This galaxy is inclined 60° to the line-of-sight and has a position angle of 112°.[7] At the distance of this galaxy, it has a linear scale of 65 ly (20 pc) per arcsecond.[7] The morphological classification in the De Vaucouleurs system is (R)SA(rs)ab,[4] where the '(R)' indicates an outer ring-like structure, 'SA' denotes a non-barred spiral, '(rs)' means a transitional inner ring/spiral structure, and 'ab' says the spiral arms are fairly tightly wound.[12] Ann et al. (2015) gave it a class of SABa,[13] suggesting a weakly barred spiral galaxy with tightly wound arms.
M64 is a type 2 Seyfert galaxy[14] with an HII/LINER nucleus. The central region is a weak source of radio emission.[7] A soft X-ray source has been detected at the nucleus, which is most likely coming from the circumnuclear region rather than directly from an active galactic nucleus.[15] There is an inner disk of molecular gas that is truncated at a radius of 2,300 ly (700 pc). At present, the non-rotational motions of this disk do not significantly feed the core, but the disk does produce a vigorous rate of star formation, with also approximately 100 billion stars inside the galaxy.[10] There is also evidence of a recent large inflow of mass.[16]
The interstellar medium of Messier 64 consists of two counter-rotating disks that are approximately equal in mass.[17] The inner disk contains the prominent dust lanes of the galaxy. The stellar population of the galaxy exhibits no measurable counter-rotation.[18] Possible formation scenarios include a merger with a gas-rich satellite galaxy in a retrograde orbit, or the continued accretion of gas clouds from the intergalactic medium.[17][18] It has a diameter of 54,000 ly (17 kpc).[19]
The Annotated Image

This annotated version of the image was created with the Pixinsight scripts: ImageSolve and AnnotateImage.
The Location in the Sky

This finder chart was created with the Pixinsight Script ImageSolve and the process FinderChart
About the Project
Choosing the Target
We are still in galaxy season, and as I was picking targets for my last imaging session, I mostly had… galaxies… to choose from! Funny how that works….
I noticed that M64 was a possibility. While I had captured this galaxy before - it was over two years ago and I was curious if a new attempt would bring about an improved image.
Image Capture
Imaging was done on the nights of May 29th, 30th, and 31st. The weather was somewhat unsettled during this period, and it was not obvious that it would cooperate.
By the time it was dark out, M64 was already at zenith, or perhaps a bit beyond, and I would have a pretty short window of capture before it set into my western tree line.
The first night was a bit of a fiasco.
I shot this with my William Optics 132mm FLT APO platform. For some reason, it was not behaving well that evening. First, I was unable to connect to my main imaging camera. Fooling around trying to fix this problem caused me to lose a great deal of potential exposure time.
When I later looked at the subs, I found that M64 was not even in the field of view after a few shots! It’s kind of hard to build up a good image integration when the target is not even in the frame!
From what I was able to figure out, the mount did a meridian flip and then platesolving seems to have failed when it was centering the image after the flip. I have never had this happen before.
After throwing out all these problem frames I only ended up with 2 frames for the evening! Not exactly an auspicious start.
For the next two evenings, I was careful to reboot my capture laptop and carefully initiate the software sessions and this seemed to resolve my problems. I ended up with good subs for the next two nights but given the narrow capture window for each evening, I only ended up with a total of 2.6 hours of LRGB data by the time our streak of clear Moonless skies came to an end.
Image Processing
So the bad news is that my total integration time was rather short.
The good news is that M64 is a fairly bright galaxy and imaging with a mono camera and LRGB filters can be quite efficient. And the final time was greater than what I was able to do in my previous effort.
The key thing in my mind was to carefully process this image with an eye toward maximizing sharpness and detail in the galaxy.
In this sense, the challenge was very similar to my previous images of this year and so I followed the same prescription that seemed to work well for them.
First, I blinked all images and eliminated any subs that were obviously impacted by clouds or other issues. Then I ran SubFrameSelector and culled any subs with FWHM or Eccentricity attributes that we outliers and too high compared to the other subs captured.
Next, I was meticulous when it came to running deconvolution. As with the previous images, I wanted to bring out dust lane details, so I again used EZ-Deconvolution to help restore lost sharpness.
These efforts seemed to work pretty well, and I was pretty pleased with the detail I could bring out.
The Results Compared to My Earlier Attempt
I first shot M64 in May of 2020. The story of this image can be seen HERE.
This was shot with the same telescope as my current one, but at that time I was using an OSC camera - the ZWO ASI294MC-Pro.
The current effort is using the same telescope but I have now swapped cameras out and I am now using a ZWO ASI1600MM-Pro mono camera.
The first attempt had an integration time of 1.6 hours - compared to the 2.6 hours that this one has.
Another difference is in the processing. Back in May of 2020, I was just learning to use Pixinsight. Today I am much more competent in using this tool and I have two years of processing experience to leverage.
Let’s compare the results:
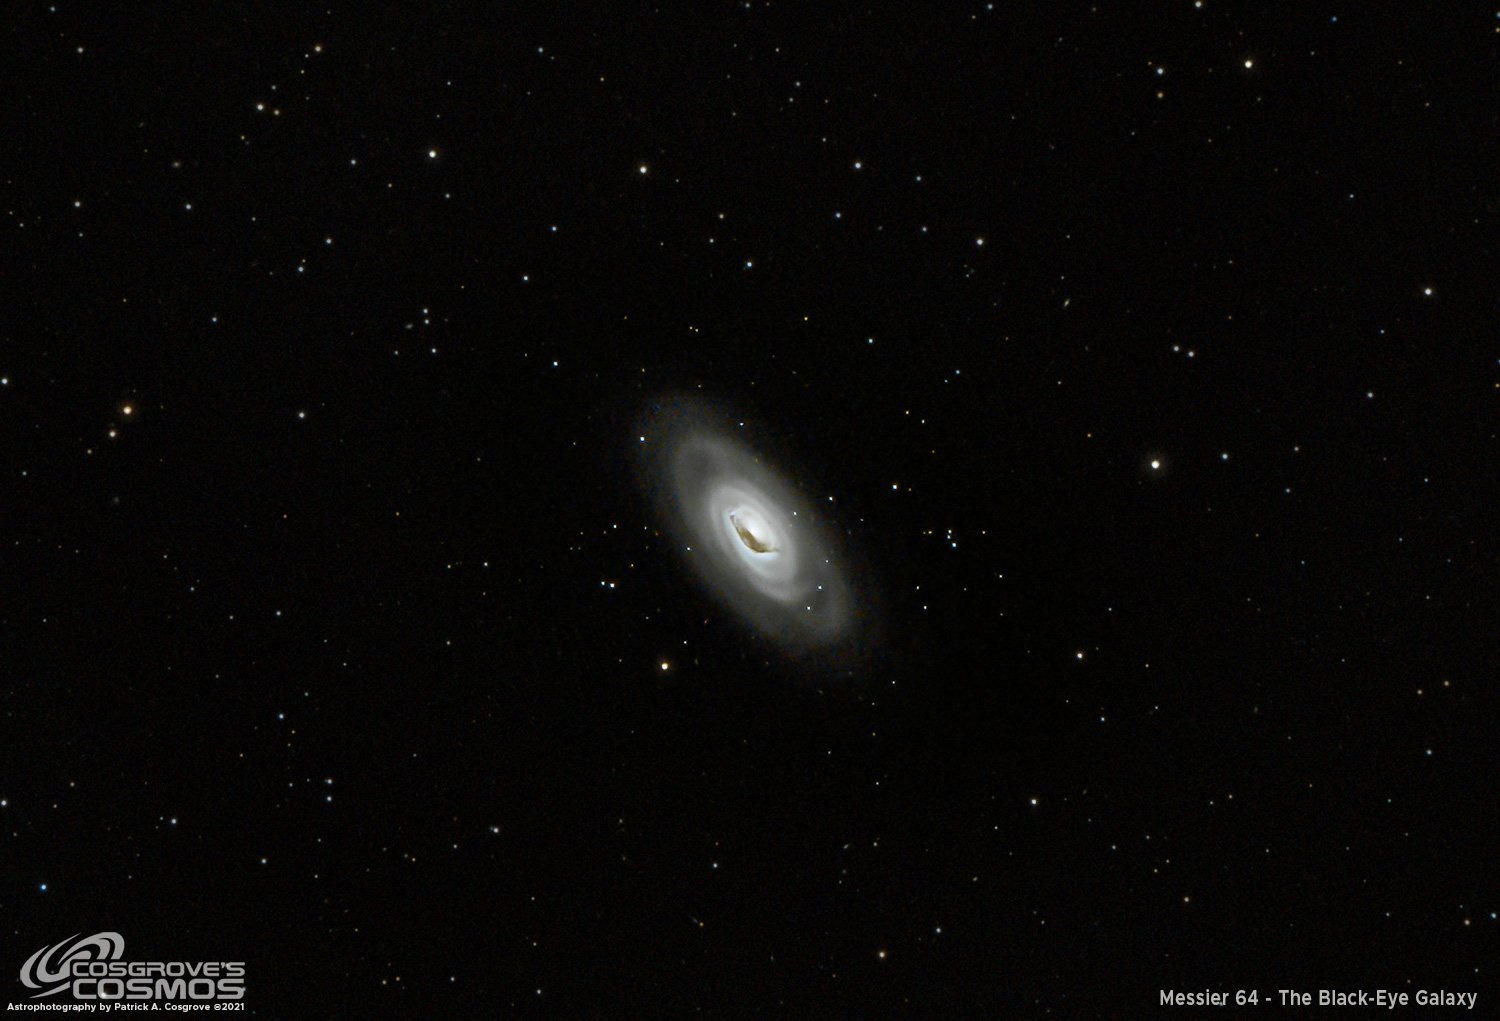
Messier 64: May 2020 attempt vs Current Attempt
Discussion of Results
I am pretty happy with my final results given my short integration time. The color is much better and if you zoom in, the detail of the black eye portion is much greater. Even better - I have captured the subtle details of the two counter-rotating ring structures that the Wikipedia article mentions.
Note that at the end of this post, I will include a detailed step-by-step walk-through of the processing done on this image.
More Information
Wikipedia: Messier 64
The Sky Live: Messier 64 Entry
Capture Details
Light Frames
Data was collected during the Nights of 5-29-22, 5-30-22, and 5-31-22
28 x 120 seconds, bin 1x1 @ -15C, unity gain, ZWO Gen II L Filter
19 x 120 seconds, bin 1x1 @ -15C, unity gain, ZWO Gen II R Filter
17 x 120 seconds, bin 1x1 @ -15C, unity gain, ZWO Gen II G Filter
16 x 120 seconds, bin 1x1 @ -15C, unity gain, ZWO Gen II B Filter
Total of 2 hours 40 minutes
Cal Frames
30 Dark exposures
30 Flat Darks at appropriate flat exposure times
15 L Flats
15 R Flats
15 G Flats
15 B Flats
Image Processing Detail
(Note this is all primarily based on Pixinsight with some Photoshop polishing at the very end.)
1. Assess all captures with Blink
Light images
Lum
Some Satellite trails
One tree shadow - I left it in. Rejection should handle it.
Minor gradients
Red
Two frames dropped:
One had tracking errors
One had poor centering
Green
Some trails are seen - minor
Four frames remove for centering issues.
One frame was removed for clouds
Blue
Some trails
No frames removed
Calibration Images
Flats looked good
Darks looked good
Flat Darks - looks good!
Darks - taken from earlier cal files
2. WBPP Script 2.45
All images - lights, flats, and flat darks loaded into the tool.
The script panel was set up for:
Cosmetic Correction
Local Normalization
Calibration and registration only

The WBPP Calibration screen.

WBPP - Post-Calibration View.
3. SubFrameSelector
Once the images were calibrated, I took all of the subs from each filter and evaluated them for Star size (FWHM) and Eccentricity.
Lum: 2 removed for being outliers for both FWHM and Eccentricity
Red: 1 removed for FWHM
Green: 3 removed for FWHM, one for Eccentricity
Blue: 4 removed, two for FWHM and two for Eccentricity
Lum images - FWHM (click to enlarge)

Red images - FWHM (click to enlarge)
Green images - FWHM (click to enlarge)
Blue images - FWHM (click to enlarge)
Lum Image - Eccentricity (click to enlarge)

Red Images - Eccentricity (click to enlarge)
Green Images - Eccentricity (click to enlarge)
Blue Images - Eccentricity (click to enlarge)
4. Image Integration
Each image was integrated by hand after calibration was done. Robust Chauvenet Rejection (RCR) was used as the rejection method with default parameters. Rejection seemed to be done well with this configuration.
L, R, G, B Images were integrated, and the resulting master images were pulled into Pixinsight.
Below is how the ImageIntegration Panel was set up for this.

The Image Integration Panel is set up for Robust Chauvenet Rejection. Other color images were done in the same fashion.
5. Dynamic Crop
Master Images were imported into Pixinsight, and a common best crop position was used and implemented with DynamicCrop.
6. Dynamic Background Extraction
There were some images with residual gradients that had to be dealt with, and DBE was used on each.
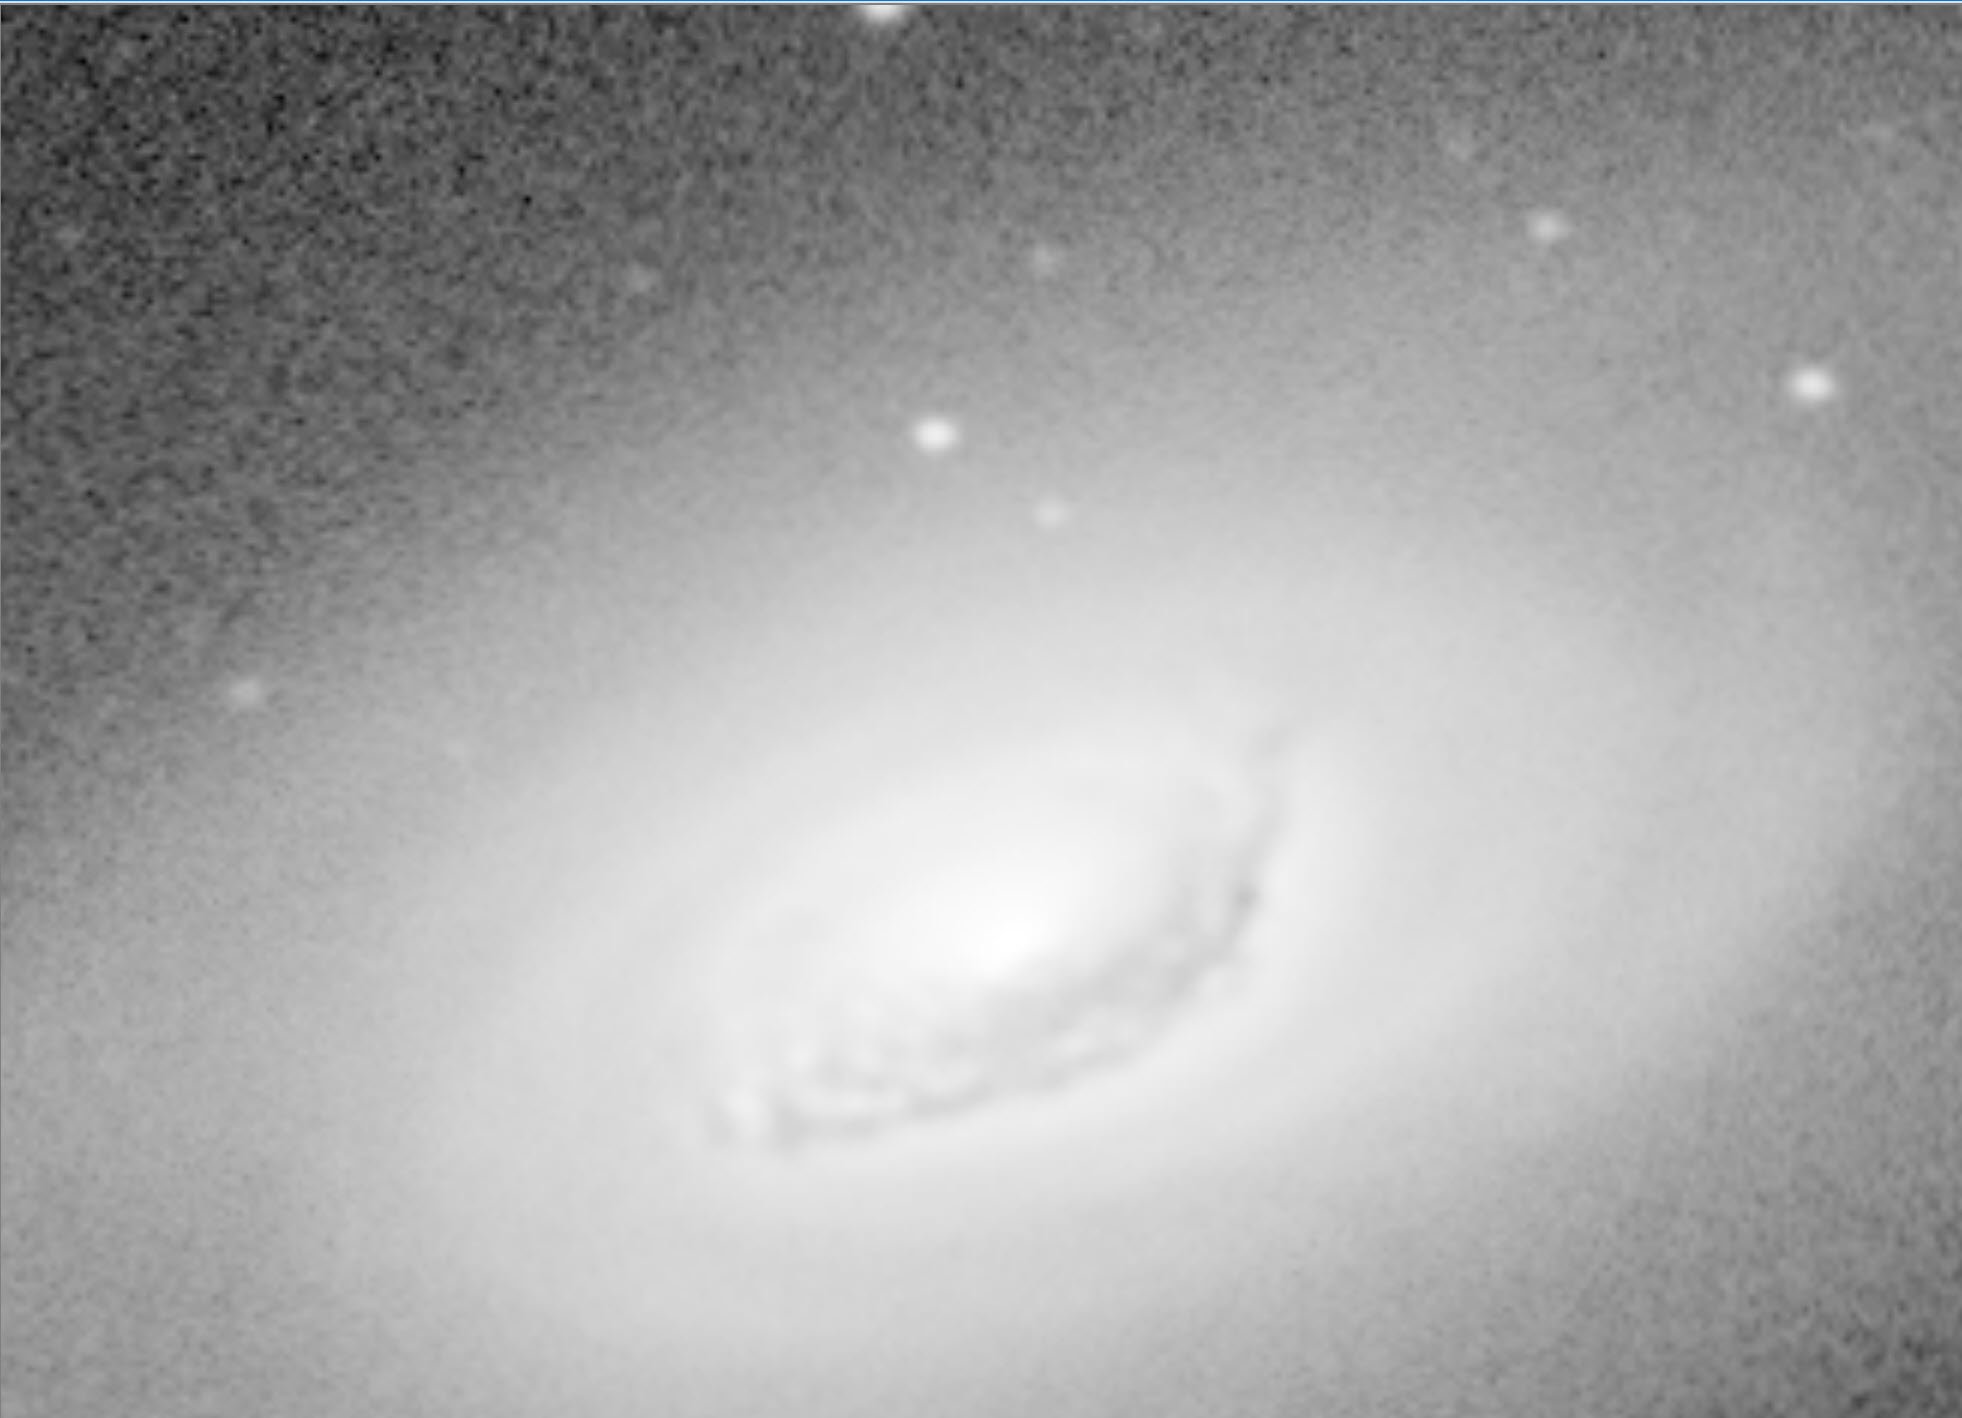
Note the artifact on the upper left side of the image. This is a flare from a bright star just out of the field of view. I ignored this as I plan on cropping the image towards the end of processing and this area will be removed at that time.
Lum Sampling (Click to enlarge)
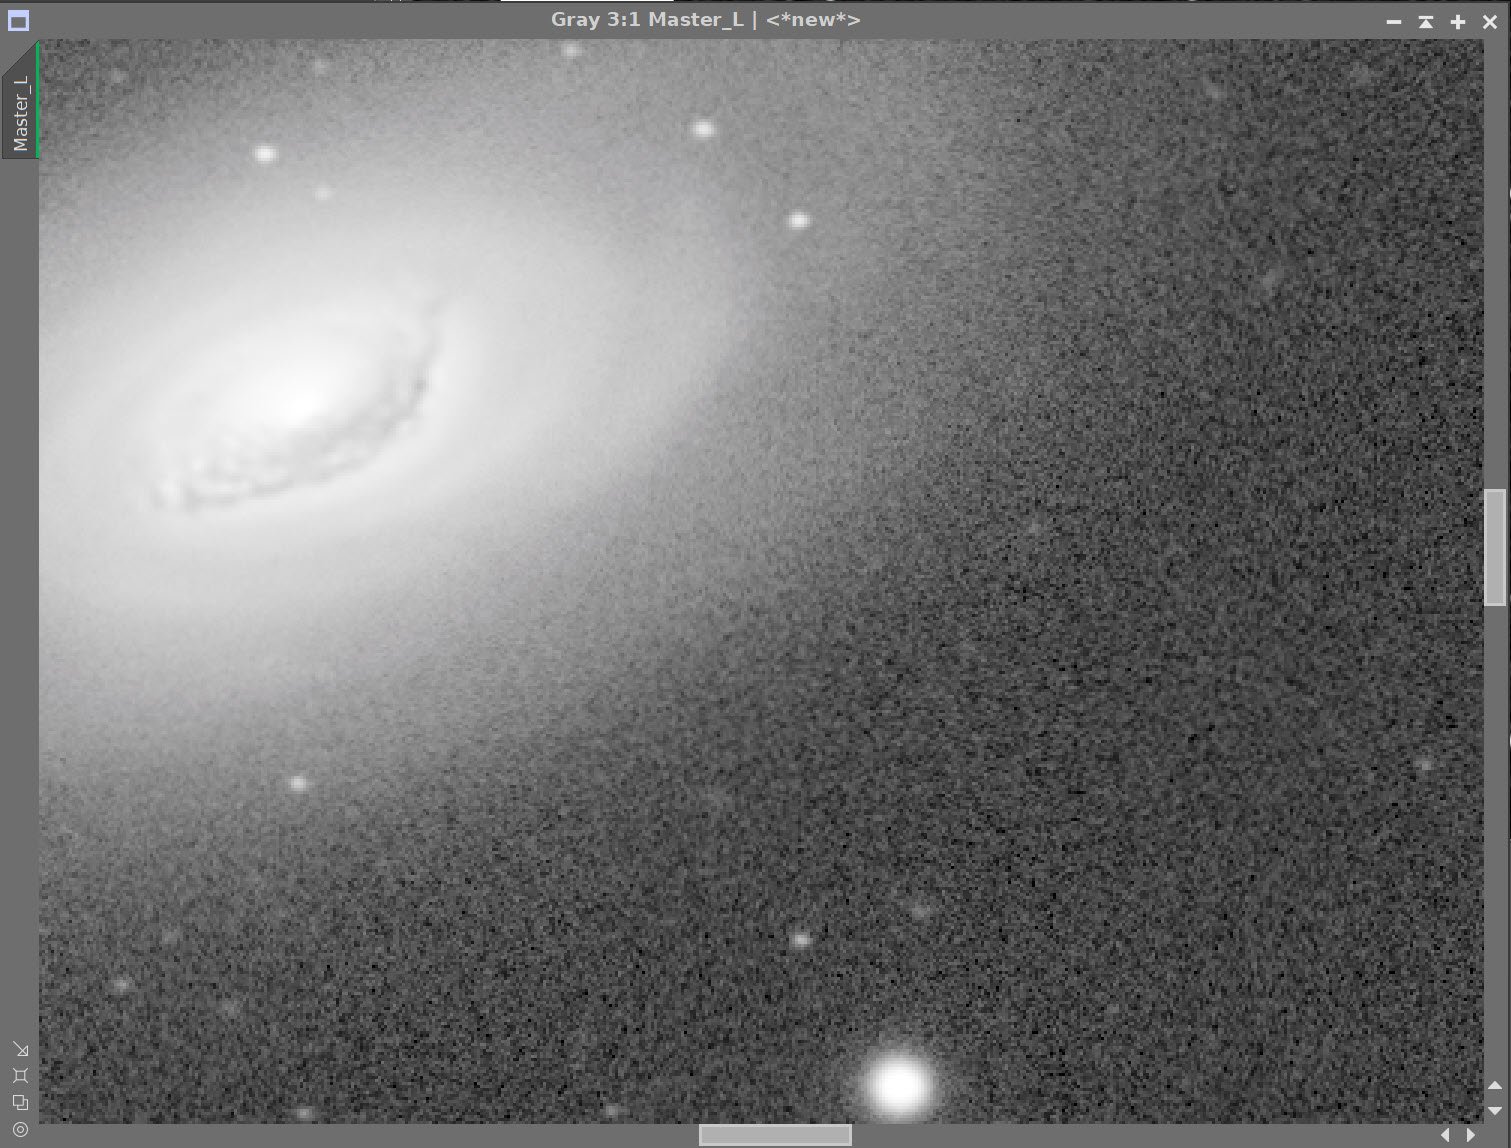
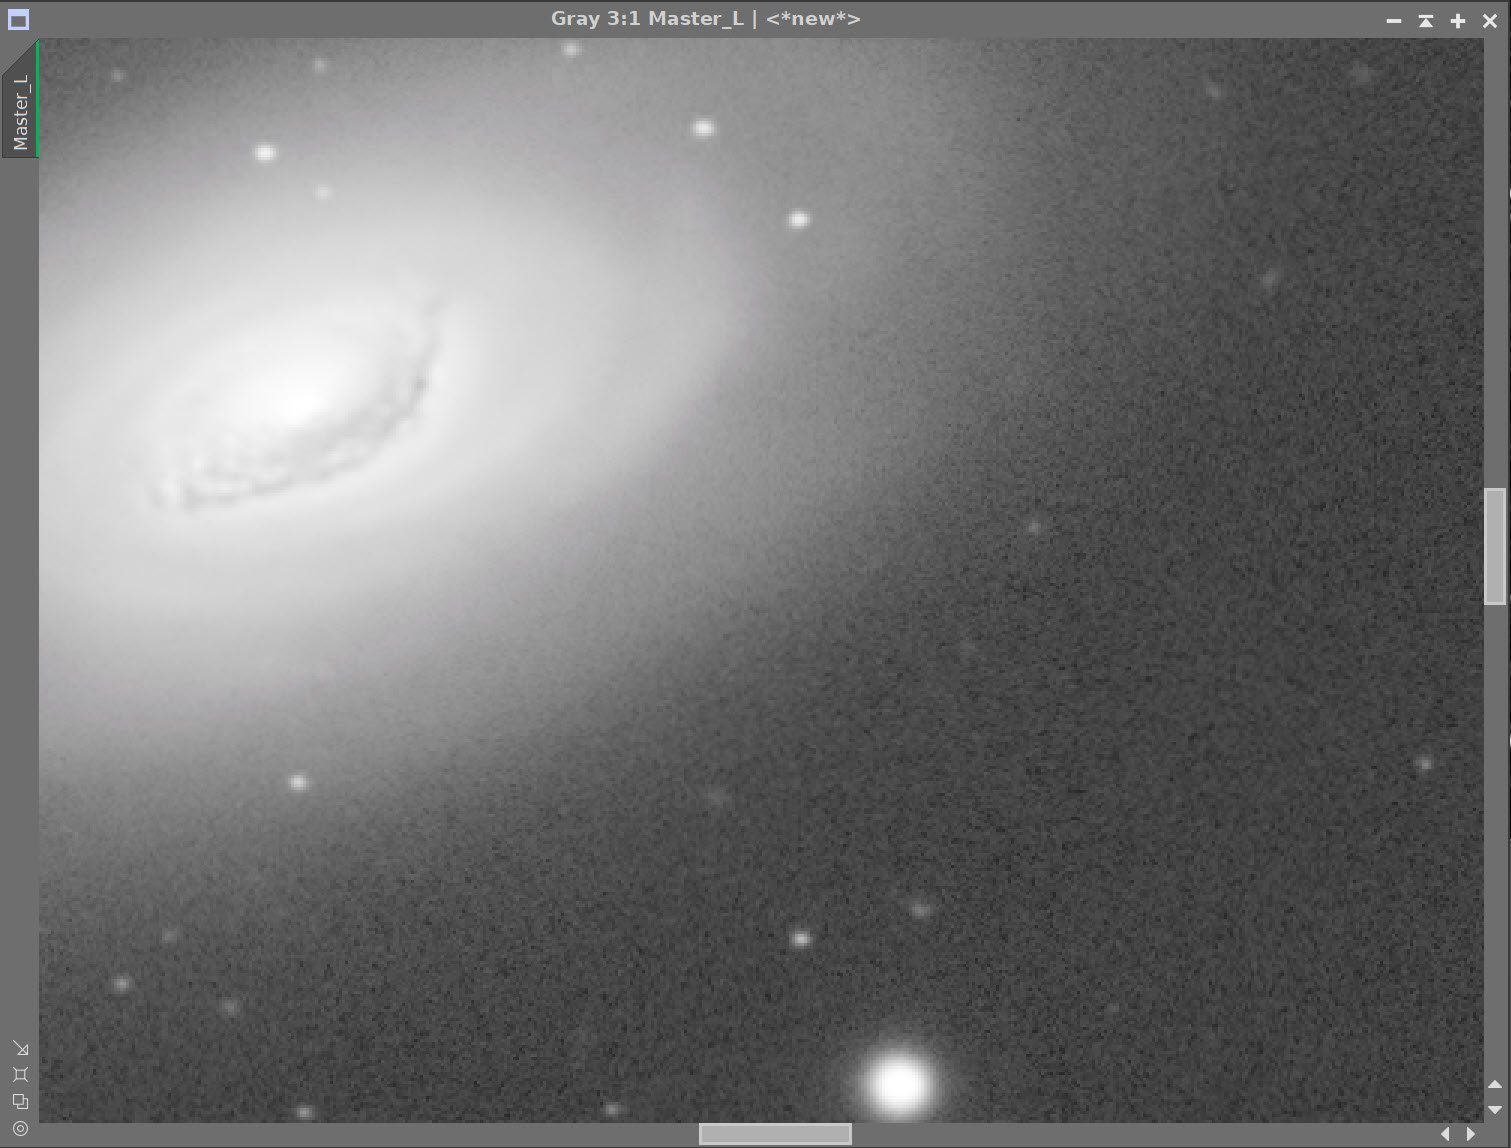
Lum - Before DBE (click to enlarge)
Lum - After DBE (click to enlarge)
Lum - Background removed (click to enlarge)
Red Sampling (Click to enlarge)
Red - Before DBE (click to enlarge)
Red - After DBE (click to enlarge)
Red - Background removed (click to enlarge)
Green Sampling (Click to enlarge)
Blue Sampling (Click to enlarge)
Green - Before DBE (click to enlarge)
Blue - Before DBE (click to enlarge)
Green - After DBE (click to enlarge)
Blue - After DBE (click to enlarge)
Green - Background removed (click to enlarge)
Blue - Background removed (click to enlarge)
7. Linear L Processing
Deconvolution
Decided to use EZ-Deconvolution for this image.
Created the star mask, and then processed it to make sure all stars were covered. I used the ellipse tool on the top left to cover up the flare from the bright star. I also covered some residual portions of brighter stars that were missed.
Created the background mask
Created the PSF Image.
Apply EZ-Deconvolution.


The Background Protection Mask

The computed PSF image

Before and After EZ-Deconvolution
Do linear Noise Reduction
The goal here is to just “knock the fizz” off of the image
I used RC Noise XTerminator in the linear mode with a value of 0.6.
Before and After Noise XTerminator (0.6)
8. Initial Processing of the Color Image
Create a linear color image
Run ChannelCombination and create the first RGB image
Run DBE on the image with subtraction to remove color gradients.
Run PCC on this image.
Used the default settings along with specific values for my scope combination
Denoise the image
Noise XTerminator was run with a value of 0.6 - I go a little heavier on the color image prior to inserting the Lum image (where most of the sharpness will come from).

The Initial RGB Color Image.
Then we apply DBE….
Sampling used (click to enlarge)
Before DBE (click to enlarge)
After DBE (click to enlarge)
Background Removed (click to enlarge)
This is the PCC Regression line. (click to enlarge)
RGB linear image after PCC applied. (click to enlarge)


RGB Linear before and After Noise XTerminator with a value of 0.6
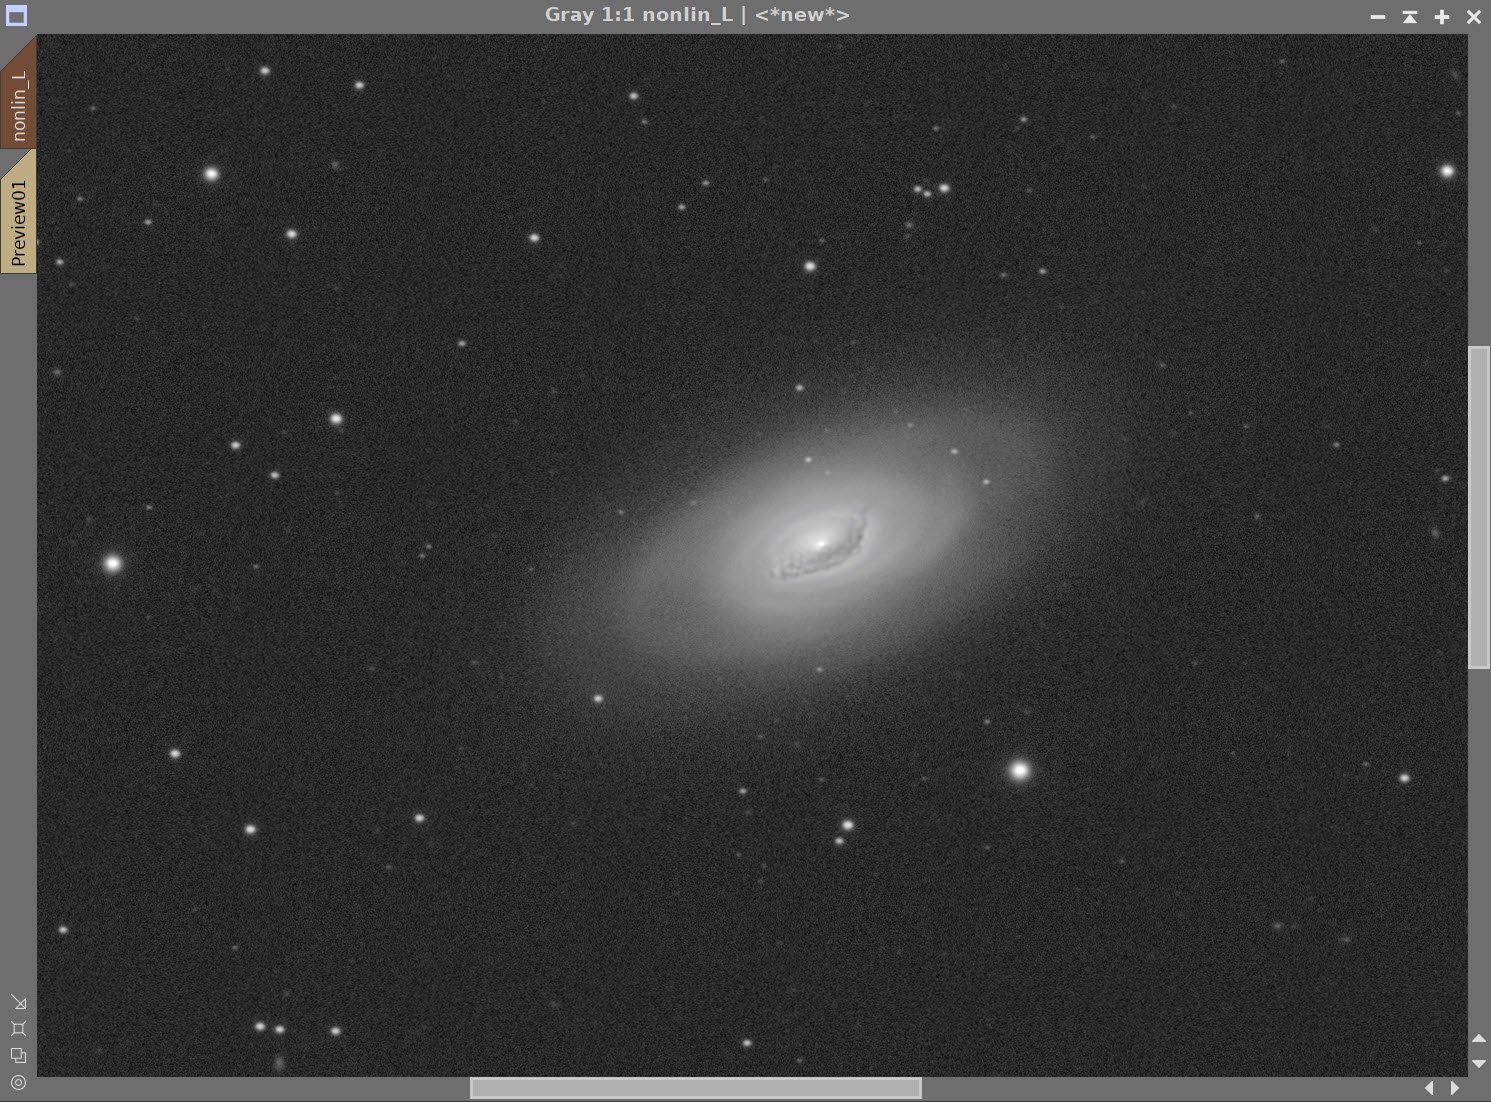
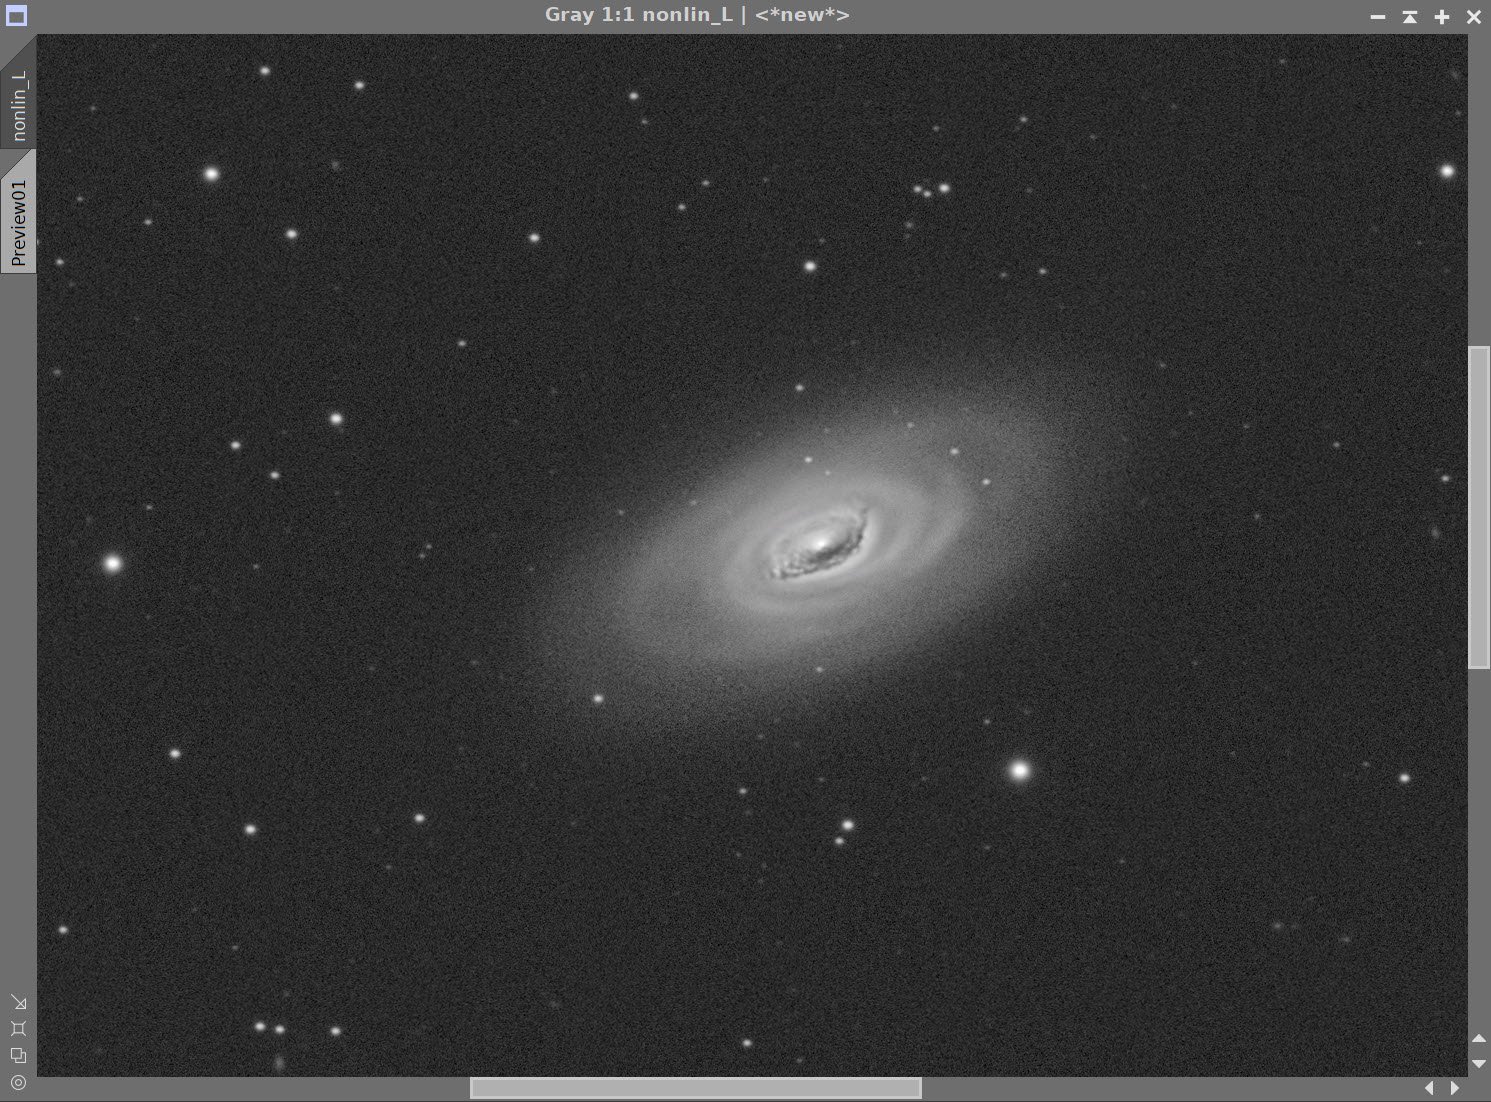
9. Take Lum image Nonlinear and Process
Take the image Nonlinear
Create a Preview with an area of the background sky
Run MaskedStretch using this preview
Run CT tweak tone scale
GAME - make galaxy mask
Apply the Galaxy Mask
Enhance the fine detail:
LHE #1: Run LHE with a radius of 20, contrast limit of 2.0, amount of 1.0, and 8-bit histogram.
LHE #2: Run LHE with a radius of 84, contrast limit of 2.0, amount of 0.3, and 8-bit histogram.
Apply Noise XTerminator with a value of 0.6
Nonlin L image after MaskedStretch (click to enlarge)
Nonlin L image after tone scale tweak via CT(click to enlarge)

This galaxy Mask was created using the GAME script.

Before and After LHE #1, and After LHE #2


Nonlinear Lum image: Before and After Noise XTerminator 0.6
10. Take the Color Image Nonlinear and Process it
Select a background sky Preview region
Run MaskedStretch
Run CT and adjust tone scale and saturation
Apply the Galaxy mask
Run CT to adjust sat
Run ColorSaturation boosting blue and orange colors
Invert the mask and tweak star saturations.
Run Noise XTerminator with a value of 0.7

After MaskedStretch

After CT adjustment for Tone and Saturatuion
11. Create Nonlinear LRGB image and Finish Processing the Image
Use LRGBCombination to insert the nonlinear Lum image into the Nonlinear RGB image. Do not check color noise options.
Apply Galaxy Mask
Use CT to adjust color Saturation
Use ColorSaturation to Adjust oranges and blues.
Invert Galaxy Mask and Adjust star colors with CT

Nonlim Lum image before creating LRGB image via L insertion
Nonlin RGB image

The new LRGB image.
Before and After Noise XTerminator
12. Export to PhotoShop
Export as 16-bit tiff
Open in Photoshop
Determine best crop and crop the image.
Use the Filter Starshrink to selectively reduce the bloated,the bright stars
Use Camera Raw filter to tweak color, tone, and Clarity
Use Noise XTerminator to fine tune noise level
Select the black eye region with a feather of 25
Carefully use Topaz AI Denoise on the selection with denoise set to the lowest level and sharpening to a modest level.
Add in watermarks
Save image files.
The Final Image!
Capture Hardware
Scope: William Optics 132mm f/7.0 FLT APO
Guide Scope: Sharpstar 61EDPHII
Camera: ZWO ASI1600mm-pro with ZWO Filter wheel with ZWO LRGB filter set,
and Astronomiks 6nm Narrowband filter set
Guide Camera: ZWO ASI290Mini
Focus Motor: Pegasus Astro Focus Cube 2
Camera Rotator: Pegasus Astro Falcon
Mount: Ioptron CEM60
Polar Alignment: Polemaster camera
Software
Capture Software: PHD2 Guider, Sequence Generator Pro controller
Image Processing: Pixinsight, Photoshop - assisted by Coffee, extensive processing indecision and second-guessing, editor regret and much swearing…..
I was very excited to get the ZWO ASI2600MM-Pro camera a while back. I ordered it when it was announced and then prepared to wait a long time to get it. When I did get it - I decided to put it onto the AP130 platform. That meant that I could move the ZWO ASI1600MM-Pro, along with its filter wheel over to my William Optics Platform. This now means that all of the platforms have been moved over to a mono camera and my ZWOASI924MC-Pro is now not in use.