
Messier 81/82 Wide Field: 3.5 hours LRGB - A Failed Quest for IFN!
Date: May 21, 2022
Cosgrove’s Cosmos Catalog ➤#0100
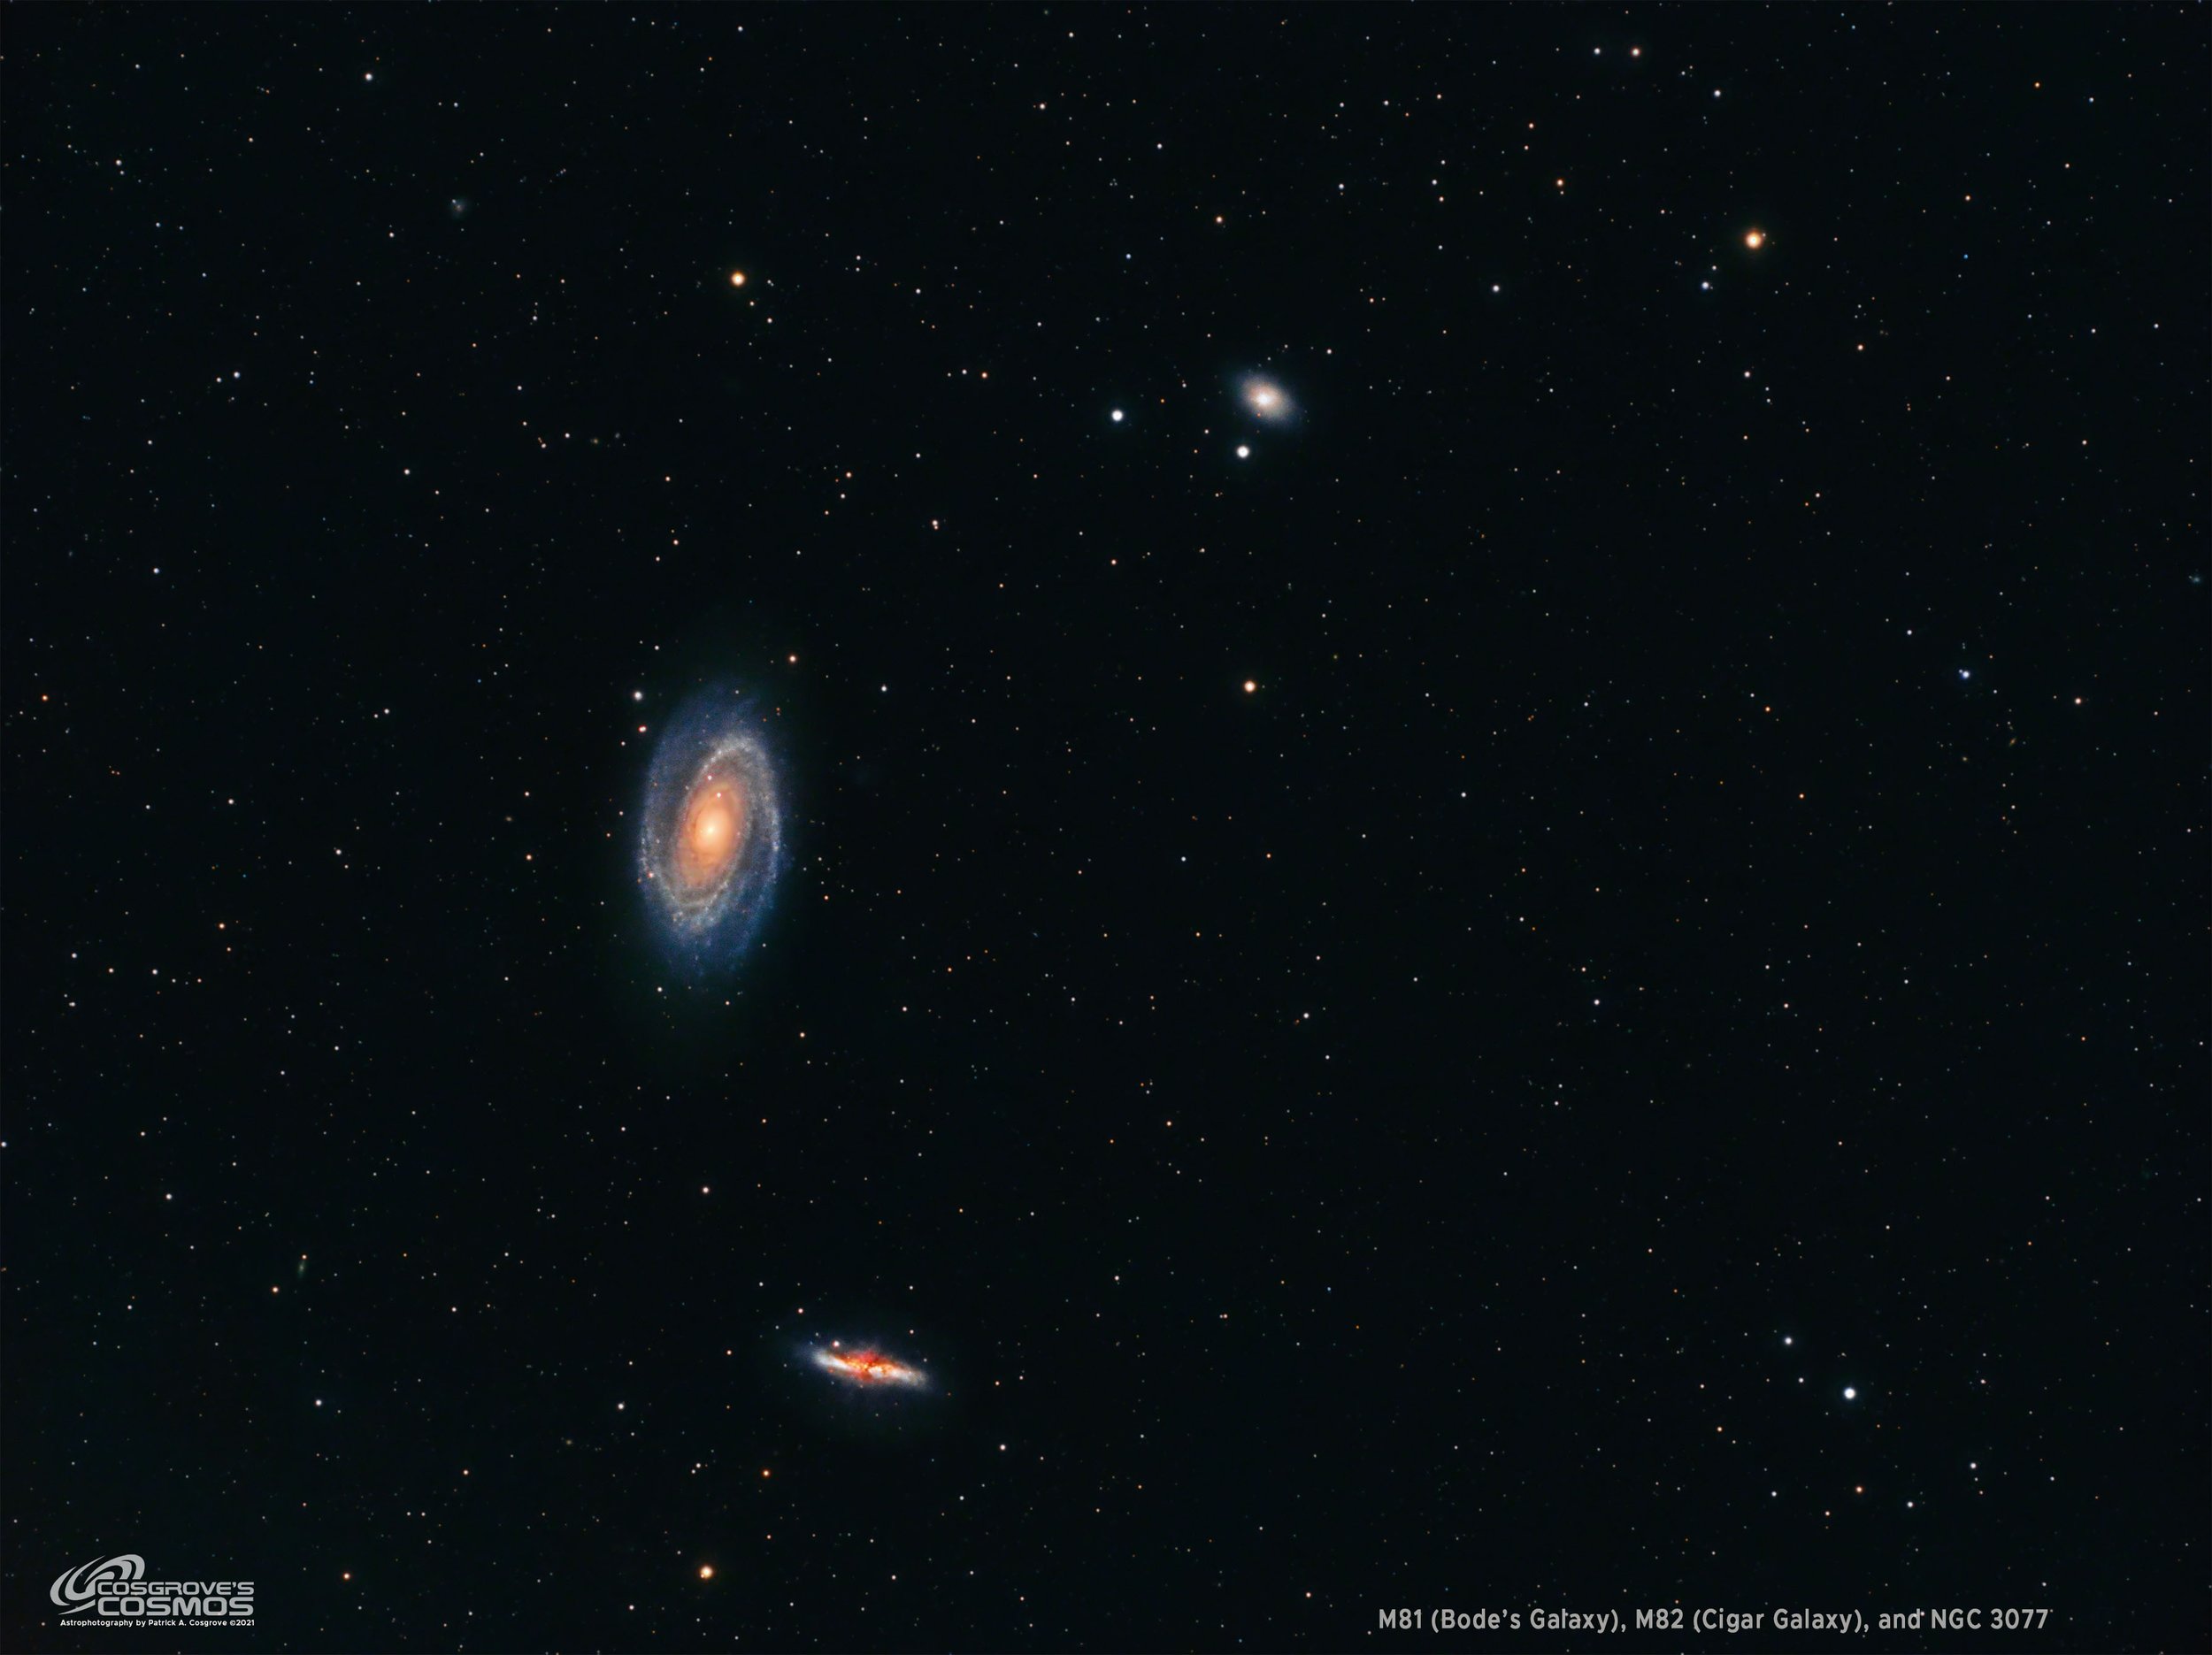
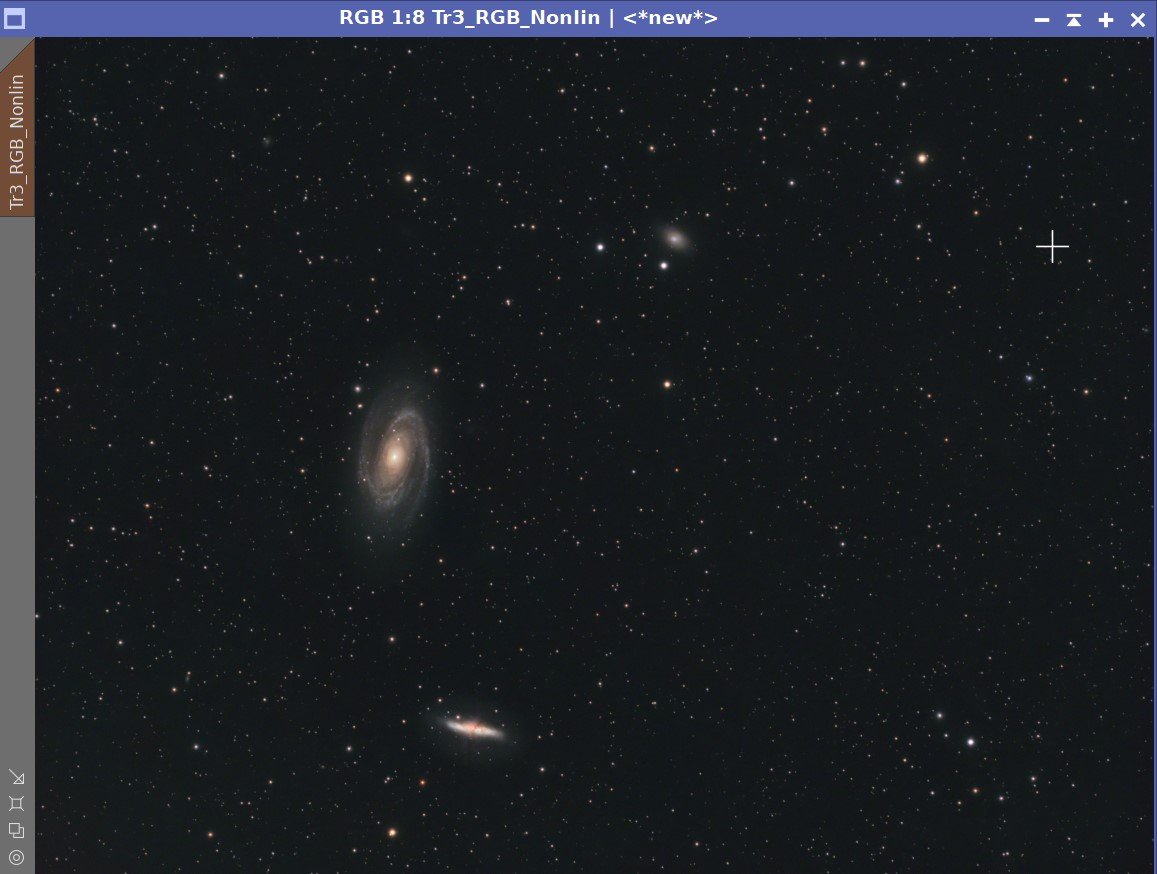
Messier 81 (middle left), along with M82 (lower) and NGC 3077 (top right). (Click for full resolution image via Astrobin.com)
Table of Contents Show (Click on lines to navigate)
About the Target
Messier 81, also known as NGC 3031 and Bode's Galaxy, is a beautiful spiral galaxy located 12 Million light-years away in the constellation Ursa Major. It was first discovered by the German astronomer Johann Elert Bode on 31 December 1774, thus the common name of Bode's Galaxy. M81 is the largest galaxy in a group of 34 galaxies, known appropriately enough as the M81 Group.
Messier 82, also known as the NGC 3034 and the Cigar Galaxy, was also discovered by Bode. It is also located 12 million light-years away and is part of the same M81 group of galaxies. M82 is an extremely luminous galaxy - five times brighter than our own Milky Way, and has a core that is 100 times brighter! This is due to intense star formation caused by gravitational perturbations from interactions with M81. M82 is known for its complex network of dusty filaments that extend to the side of the galaxy.
We can see one further galaxy a the top middle of the image - this NGC 3077. This is a disrupted elliptical galaxy also part of the M81 group. it was discovered by William Hershel in 1801. It is known for its wispy edges and scattered dust filaments (which are not resolved in this wide-field image). It also has a very active core region which caused it to originally be listed as a Seyfert Galaxy, today, it is no longer classified as such.
The Annotated Image

Johann Elert Bode (1747-1826)

William Herschel (1738-1822)

This annotated image was created in Pixinsight, using the ImageSolver and Annotate Image Scripts.
The Location in the Sky

This finger chart was created in Pixinsight using the FinderChart process.
About the Project
April and May are smack-dab in the middle of Galaxy Season, with a plethora of galaxies that can be targeted. While some galaxies can be quite large, most are of very small size and really need a telescope platform with the right image scale to capture them well.
When we have a clear night, I tend to run three telescope platforms at the same time, each going after its own target. Two of my platforms have longer focal lengths and they can do reasonably well with galaxies. My third platform, however, has a focal length of only 400 mm. The creates an image scale that is very challenged when dealing with smaller objects like galaxies. It does a much better job imaging large nebulae and other larger targets.
Target Selection
Over the past month, I have had precisely three clear nights to image: April 28th and 29th, and May 5th. In preparing for those sessions, I chose M101 and NGC 4565 as targets for the two longer focal length platforms. I needed a target for the widefield scope.
To be honest, I was having a hard time coming up with a good target that I wanted to do. Gary Opitz gave me a link to a youtube video called “Deep Sky Astrophotography Target Guide for the Northern Hemisphere APRIL”, by Martin’s Astrophotography. This gave me the idea to go after some galaxy groups, specifically - Markarian's Chain. Dan Kuchta suggested I try a widefield shot of Messer 81 and 82 - as this is a region that is rich in IFN.
IFN stands for Integrated Flux Nebula. This consists of interstellar gas and dust that is illuminated not by a single star, but by the light from all of the stars in the galaxy! This can be best seen when choosing targets that are seen toward the northern and southern celestial poles - away from the main concentration of stars from the main band of the Milky Way. Messier 81 and 82 are located in just such a region, and I had seen images with wonderful examples of IFN.
This sound like a great idea - and I set this as the target for my Askar FRA400 camera platform.
IFN typically requires long integration times to capture. I was hoping to get about three hours a night and was holding for the hope that I might get four good nights with the current clear stretch. That would give me a total of about 12 hours of integration and since my FRA400 is my fastest system (f/5), I hoped this would prove to be enough.
Data Capture
I always have to deal with the tree lines on the east and west side of my driveway when shooting a target. I have mapped out this tree line and with these boundaries, I can use Stellarium to estimate when a target will clear the trees on one side of my driveway - and set back into the trees on the west side. According to this, M81/82 would clear the trees around 9 pm and would renter the tree line around midnight.
While 9 pm was the end of astronomical twilight, and M81/82 had indeed cleared the treeline by this time - I had failed to consider that the larger field of view of the FRA400 meant that to get a good sub, I really needed the entire area to clear the treeline - not just the center of the target field!
That was my first mistake!
So useful exposures would have to start later than anticipated and would have to also end earlier for the exact same reason. Ouch.
M81/82 hitting the offending branch that caused my session to end sooner that hoped!
Another problem I ran into was just bad luck!
While I have mapped the treelines out as a border - we know that treelines are not just simple lines. There is a wild fractal geometry in the way that branches from a tree make up this border.
It just so happened that the center of the M81/82 field happened to hit a branch that stuck far out from the normal tree line, causing me to lose even more time! As a result, I ended up only getting about 1.5 hours of subs captured per night rather than my planned 3 hours.
I began to realize that there was no way that this integration was going to get accumulate enough time to show the IFN. Sigh….
A final concern was around seeing, atmospheric transparency, and humidity.
The first two nights had periods of very poor seeing. While we typically have 2.5-3.0 arcseconds of seeing, on these nights it got as bad as 5 arcseconds! Adding to this was the fact that the final night came after a full day of heavy rain. That evening we had measured humidities of 100%! Not exactly the best condition for picking up faint tendrils of galaxy-illuminated dust!
Disappointing Results
After preprocessing my subs, I had the first chance to evaluate the Master images. The good news was that the image was not bad by most standards. The bad news was that I saw zero evidence of IFN in the background sky!
I had completely failed in my main goal.
Without IFN, the image was OK but far from great. In fact, I had composed my image to allow for a larger space to the right side to highlight the IFN. Without the IFN, that part of the image would highlight… well … nothing!
So what to do?
I could always just tuck this image and its data away into some dark unused folder and let it lie there forever. This was clearly an option. I think a lot of Astrophotographers would do just that.
But I had decided long ago, that I would set up Cosgrove’s Cosmos to be an honest record of my astrophotographic efforts. That means I share the bad with the good. I figure it this way - Failures are often a teachable moment - why not document the failure and why it occurred? Maybe someone will learn something from it. Maybe even I will learn something from it!
Learnings
So - that being the case - what did I learn?
When estimating time on target, I clearly need to take the field of view into account when dealing with wide-field systems. It may not make much of a difference for longer focal lengths but it can with much shorter wavelength systems!
My mapped treeline borders have a lot of variances in them. Sometimes these variances will help me. Sometimes they will hurt me. In this case, they really hurt me - that rogue branch was just perfectly positioned to cause me a real issue on this project!
I had clearly not allowed enough integration time to capture the signal I wanted.
Given the weather, the scarcity of clear nights, the typical sky conditions, and the trees on my property - having IFN as a primary goal is not very practical. If things should come together just so - I may pick up some IFN - but gunning for it is probably unrealistic.
Since this post went live, I’ve received a few comments from folks who have successfully imaged IFN themselves. Their guidance focused on:
how difficult IFN is to capture - we are talking about extremely faint signals here.
the need for super dark and light pollution-free skies
the need for LONG integration times.
Based on this, it may not be possible for me to capture IFN from this location!
So learn from my mistakes!
If nothing else, this gives another example of an image processing flow that is unique to the circumstances of this image. A detailed Processing Walk-Through is provided for this image at the end of the posting…
More Information
Wikipedia: Messier 81
Wikipedia: Messier 82
Wikipedia: M81 Group
Wikipedia: NGC 3077
NASA: Messier 81 Core
The Sky Live: Messier 81
The Sky Live: Messier 82
Capture Details
Lights Frames
Taken on the nights of April 29th, 29th, and May 5th
24 x 90 seconds, bin 1x1 @ -15C, Gain Unity, ZWO Gen II Lum filter
27 x 90 seconds, bin 1x1 @ -15C, Gain Unity, ZWO Gen II Red filter
50 x 90 seconds, bin 1x1 @ -15C, Gain Unity, ZWO Gen II Green filter
38 x 90 seconds, bin 1x1 @ -15C, Gain Unity, ZWO Gen II Blue filter
Total of 3.5 hours
Cal Frames
25 Darks at 120 seconds, bin 1x1, -15C, gain Unity
25 Dark Flats at Flat exposure times, bin 1x1, -15C, gain unity
12 flats Flats at bin 1x1, -15C, gain unity
Software
Capture Software: PHD2 Guider, Sequence Generator Pro controller
Image Processing: Pixinsight, Photoshop - assisted by Coffee, extensive processing indecision and second-guessing, editor regret, and much swearing…..
Capture Hardware:
Scope: Askar FRA400 73MM F/5.6 Quintuplet Astrograph
Guide Scope: William Optics 50mm
Camera: ZWO ASI1600mm-pro with ZWO Filter wheel with ZWO LRGB filter set, and Astronomiks 6nm Narrowband filter set
Guide Camera: ZWO ASI290Mini
Focus Motor: Pegasus ZWO EAF 5V
Mount: Ioptron CEM 26
Polar Alignment: Ipolar camera
Software:
Capture Software: PHD2 Guider, Sequence Generator Pro controller
Image Processing: Pixinsight, Photoshop - assisted by Coffee, extensive processing indecision and second-guessing, editor regret and much swearing…..
Click below to see the Telescope Platform version used for this image
Image Processing Walk-Through
(All Processing done in Pixinsight - with some final touches done in Photoshop)
1. Blink Screening Process
Lum Images: some trails are seen - very minor. Some gradients. Not bad.
Red: 9 sub showing tree involvement - removed. Some trails - are minor. some gradients.
Green: 8 sub showing tree involvement - removed. Some trails - are minor. some gradients.
Blue: 4 sub showing tree involvement - removed. Some trails - are minor. some gradients.
Flats - all looks good
Darks - all good
2. Use SubFrameSelector to analyze the remaining subs
Subs for each filter were loaded into the tool and metrics were computed. FWHN and Eccentricity were the key metrics I used in this analysis. Screenshots for each filter are attached below.
Lum Images: 7 deleted for having either too high an FWHM or Eccentricity value
Red Images: 3 deleted for having either too high an FWHM or Eccentricity value
Green Images: 4 deleted for having either too high an FWHM or Eccentricity value
Blue Images: No frames deleted for having either too high an FWHM or Eccentricity value

Lum Sub FWHM - Note eliminated frames

Red Sub FWHM - Note eliminated frames

Green Sub FWHM - Note eliminated frames
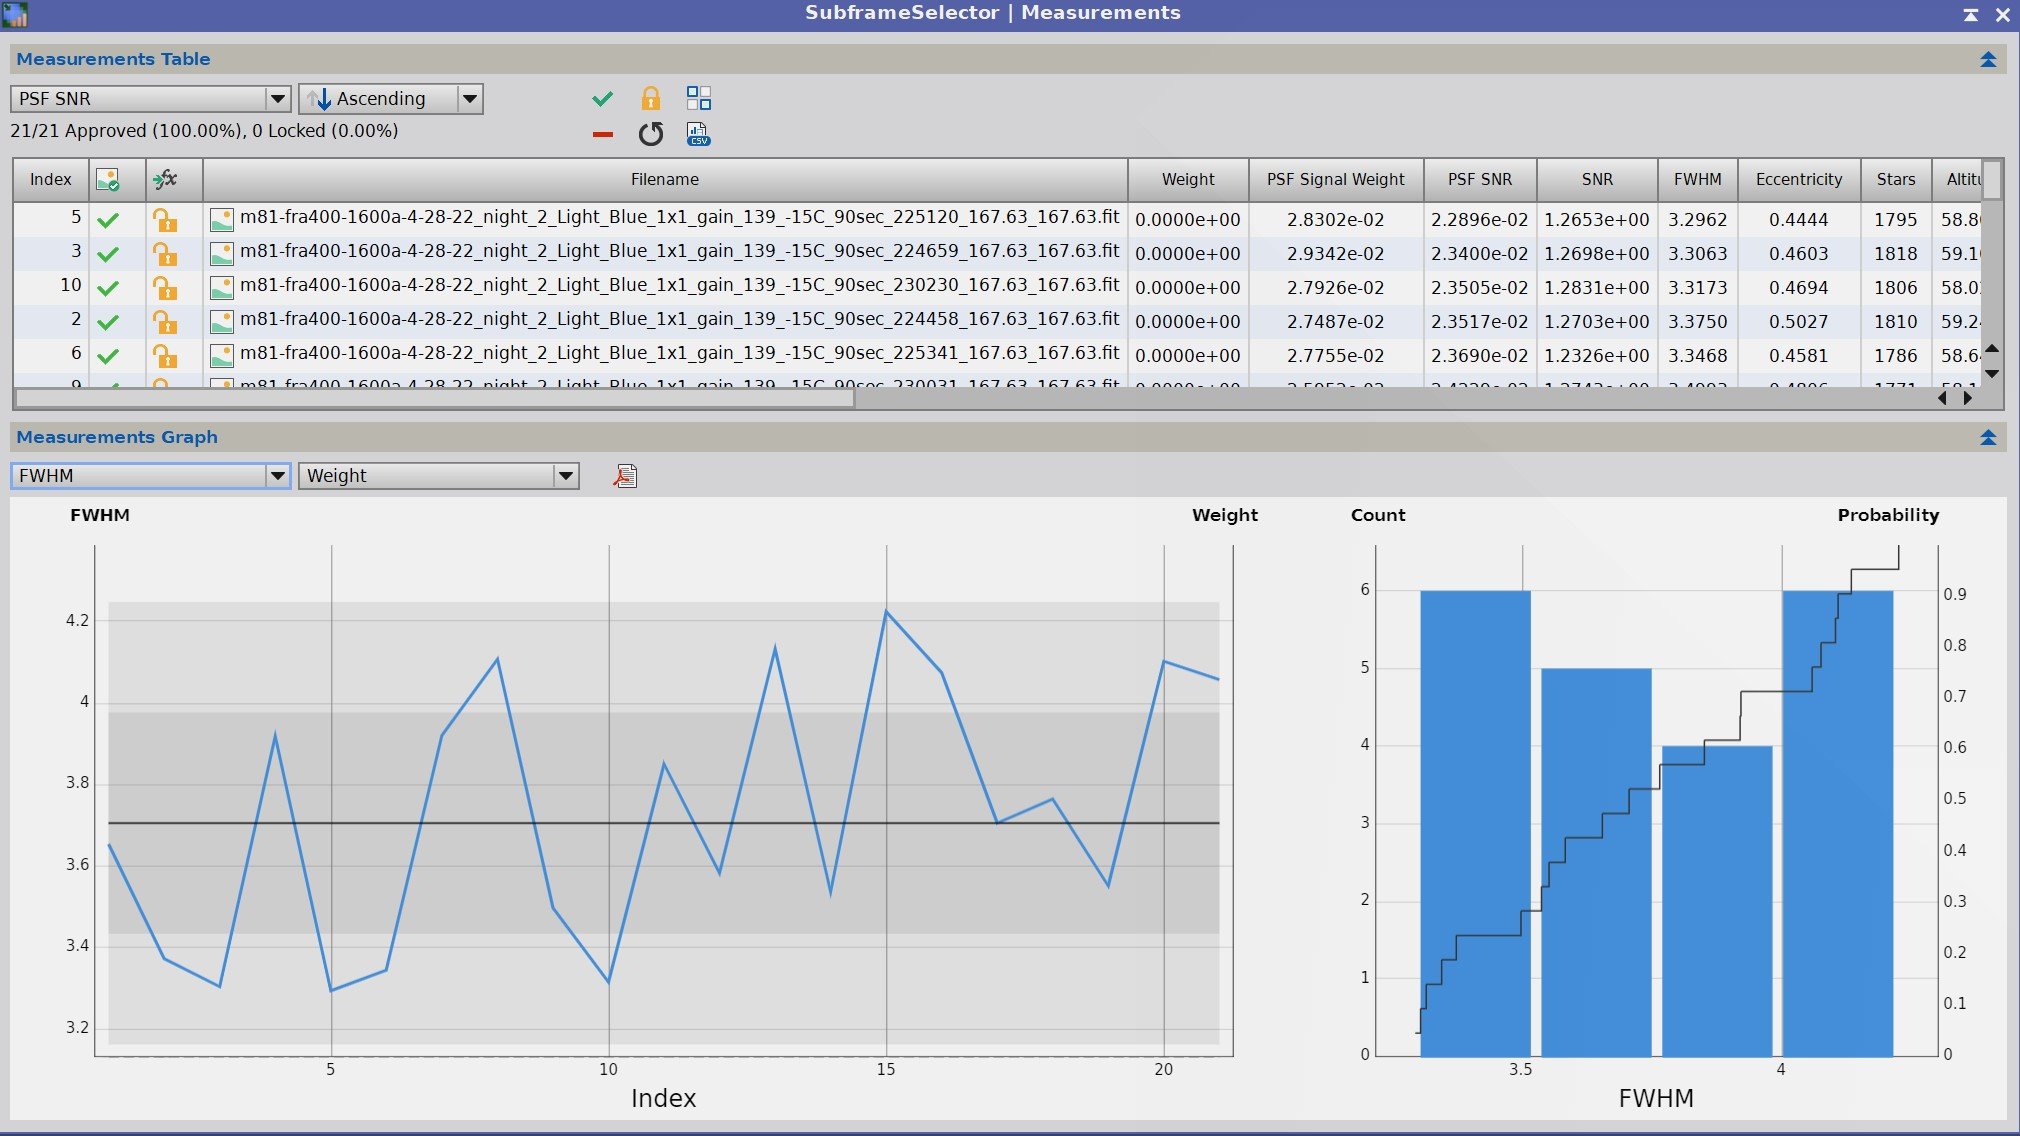
Blue Sub FWHM - Note eliminated frames

Lum Sub Eccentricity - Note eliminated frames

Red Sub Eccentricity - Note eliminated frames

Green Sub Eccentricity - Note eliminated frames
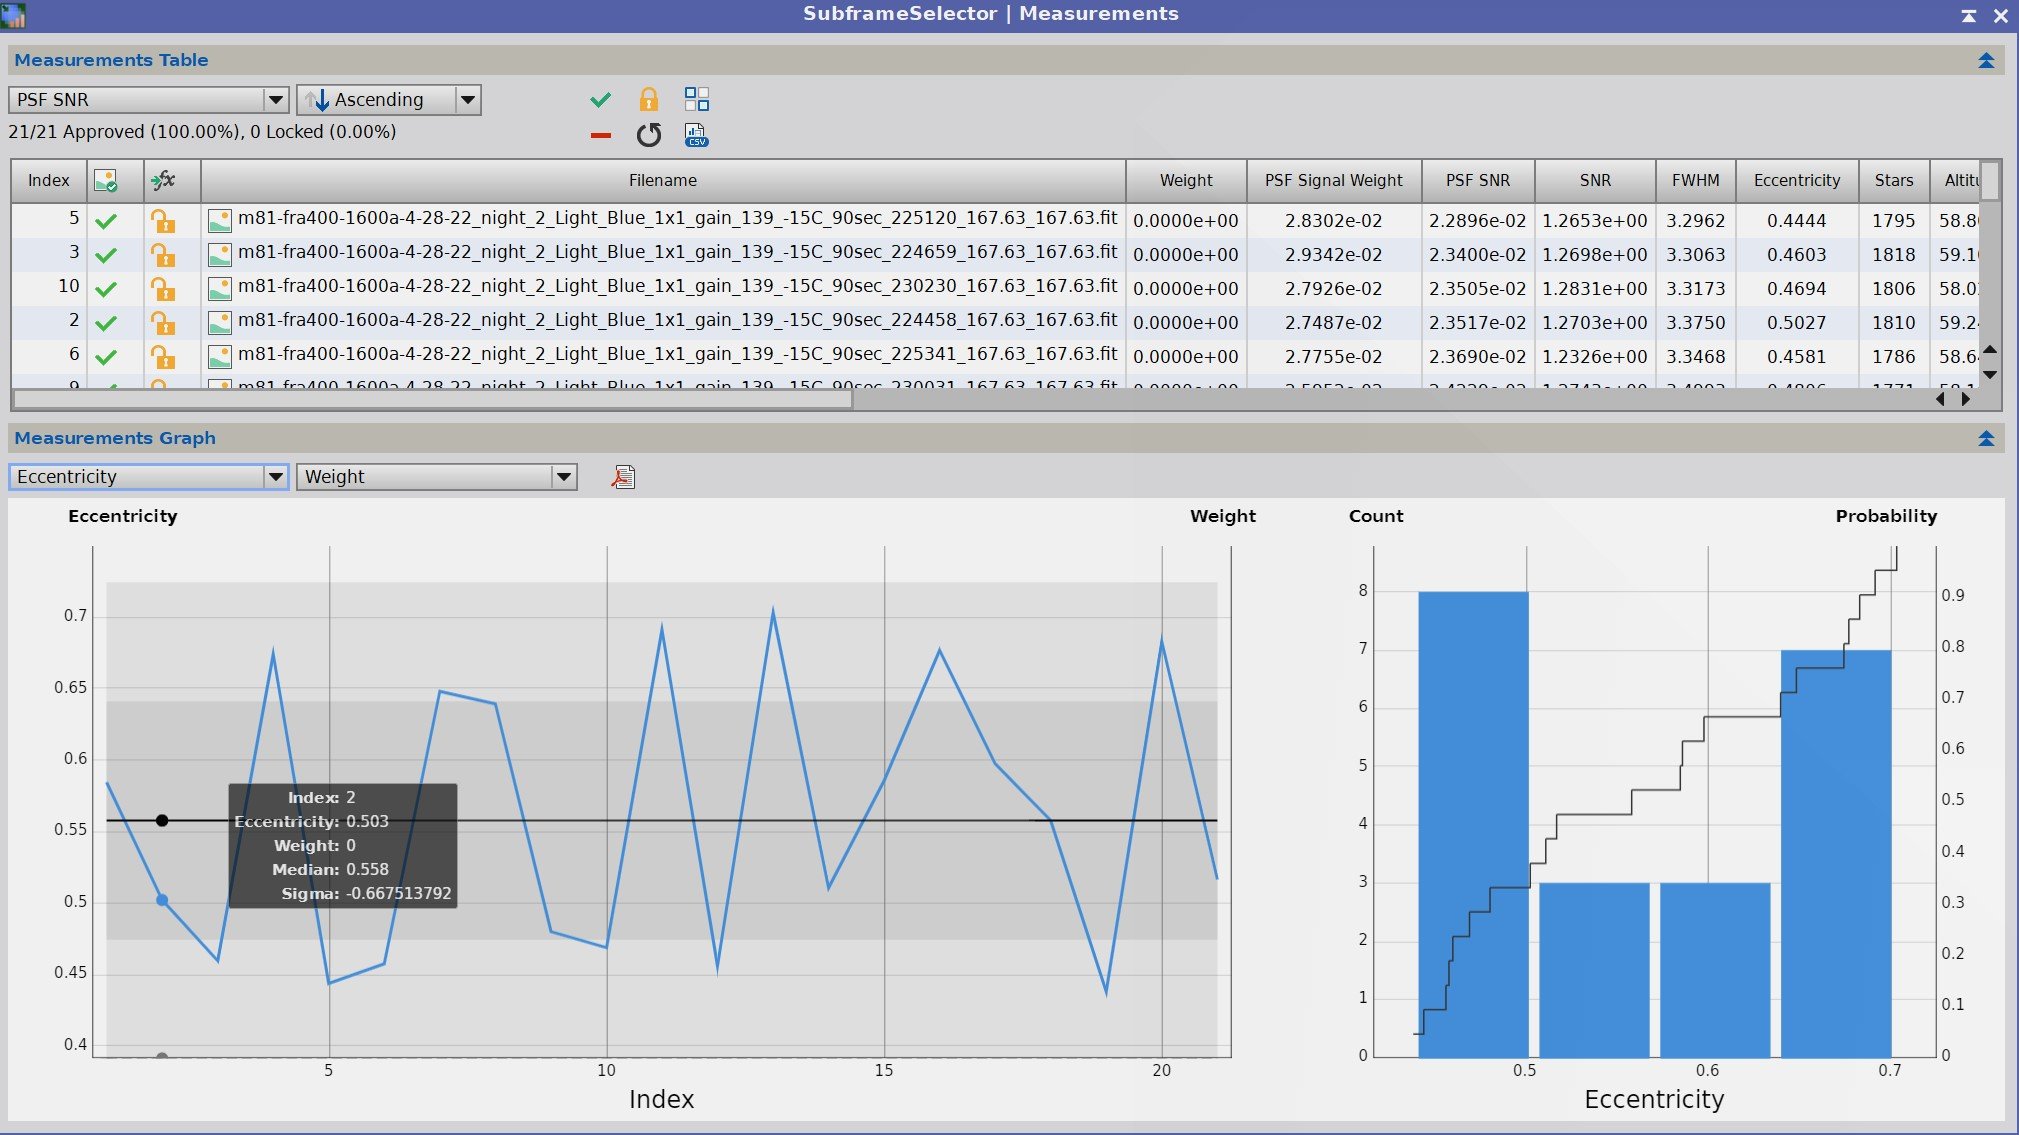
Blue Sub Eccentricity - Note eliminated frames
3. WBPP 2.41 Run
All frames loaded
Set up for calibration only - no integration
Cosmetic Correction setup
Pedestal image set up for “Literal”
Subframe weighting: psf signal
Local Normalization enabled
Reject Low and High
Set for Drizzle Processing
Run complete with no issues

WBPP Calibration View

WBPP Post-Calibration View
4. Integration
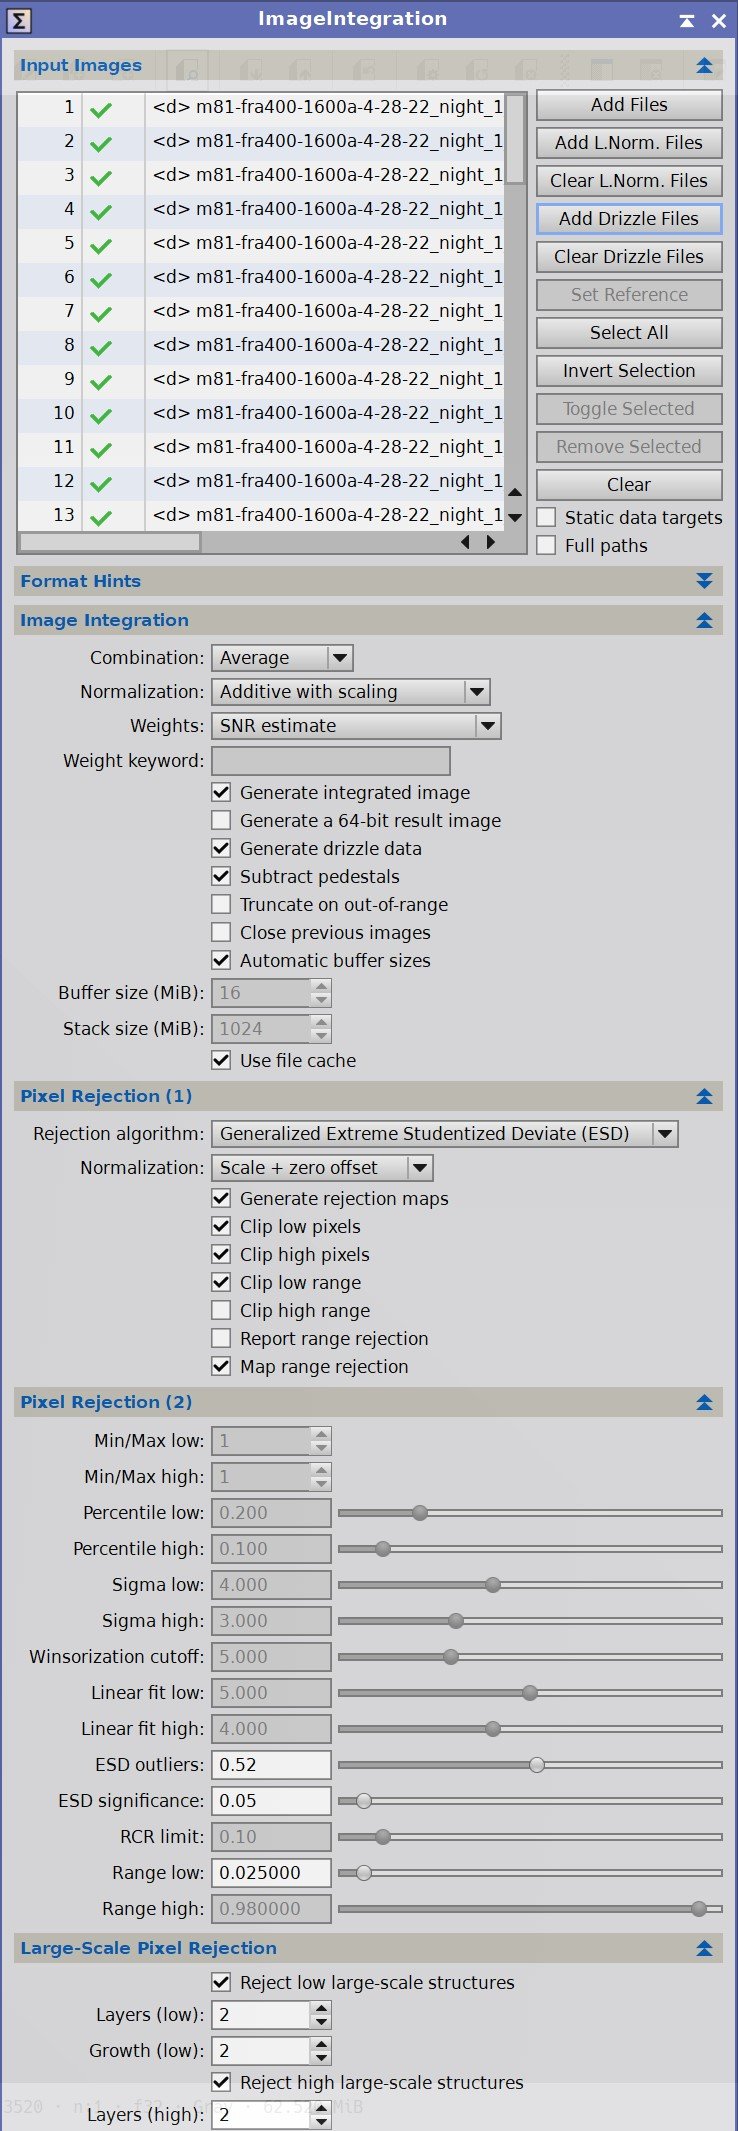
ImageIntegration
ImageIntegration was run for each Master image.
It used the same setup for each run.
Subs and the drizzle data computed by WPBB that was added for each run.
The Weighting scheme chosen was SNR Estimate
ESD was chosen for rejection
Generate Drizzle Data was checked.
A sample panel for ImageIntegration can be seen below
DrizzleInteration
Drizzle Data Loaded
Run as default.
ImageIntegration panel settings.

DrizzleIntegration Panel Settings
5. Crop all of the images
a common crop level was selected and DynamicCrop was used to trim all of the master frames.
6. Dynamic Background Extraction
DBE was run for each image using the subtraction method. Below are the Sampling plans, the before image, the after image, and the removed background images.
DBE: L Sampling (Click to enlarge)
DBE: R Image Sampling (Click to enlarge)
DBE: G Sampling (Click to enlarge)
DBE: B Sampling (Click to enlarge)
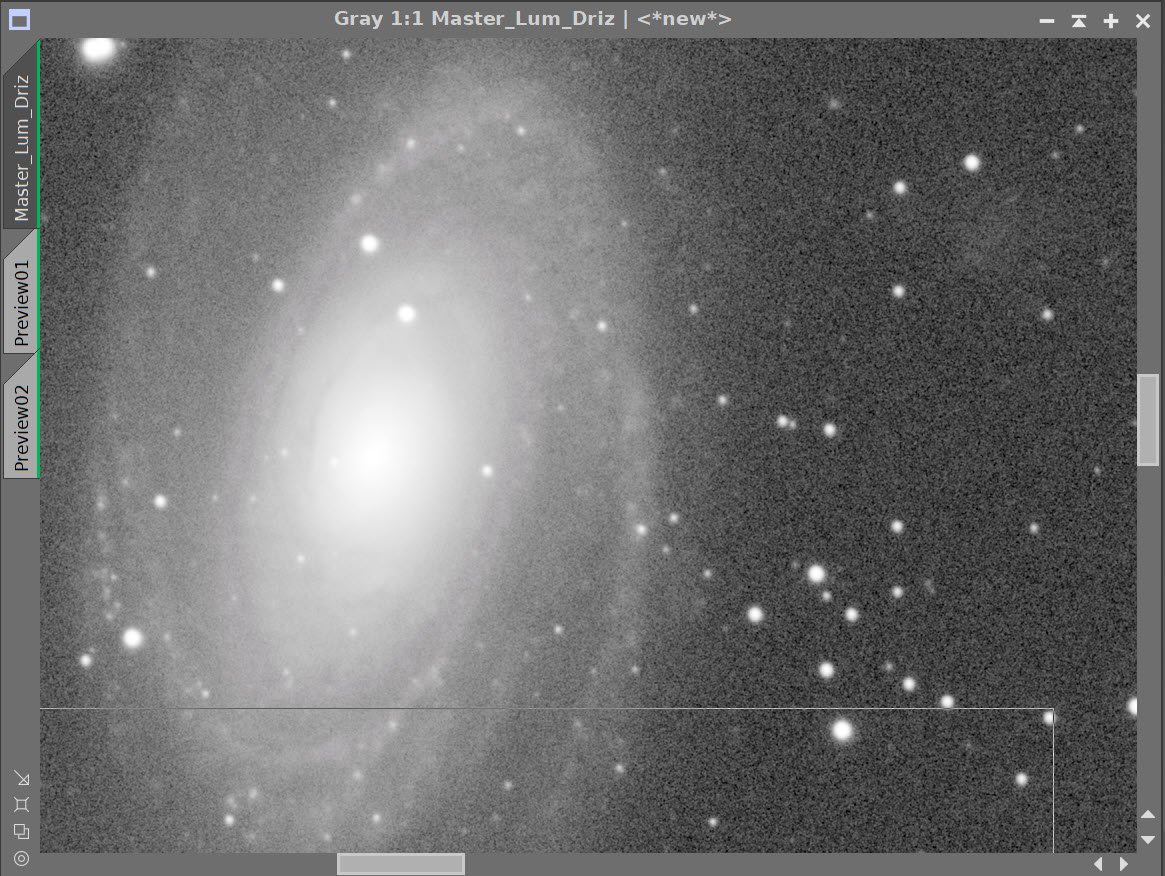
L image Before DBE (click to enlarge)
R Image Before DBE (click to enlarge)
G image Before DBE (click to enlarge)
B image Before DBE (click to enlarge)
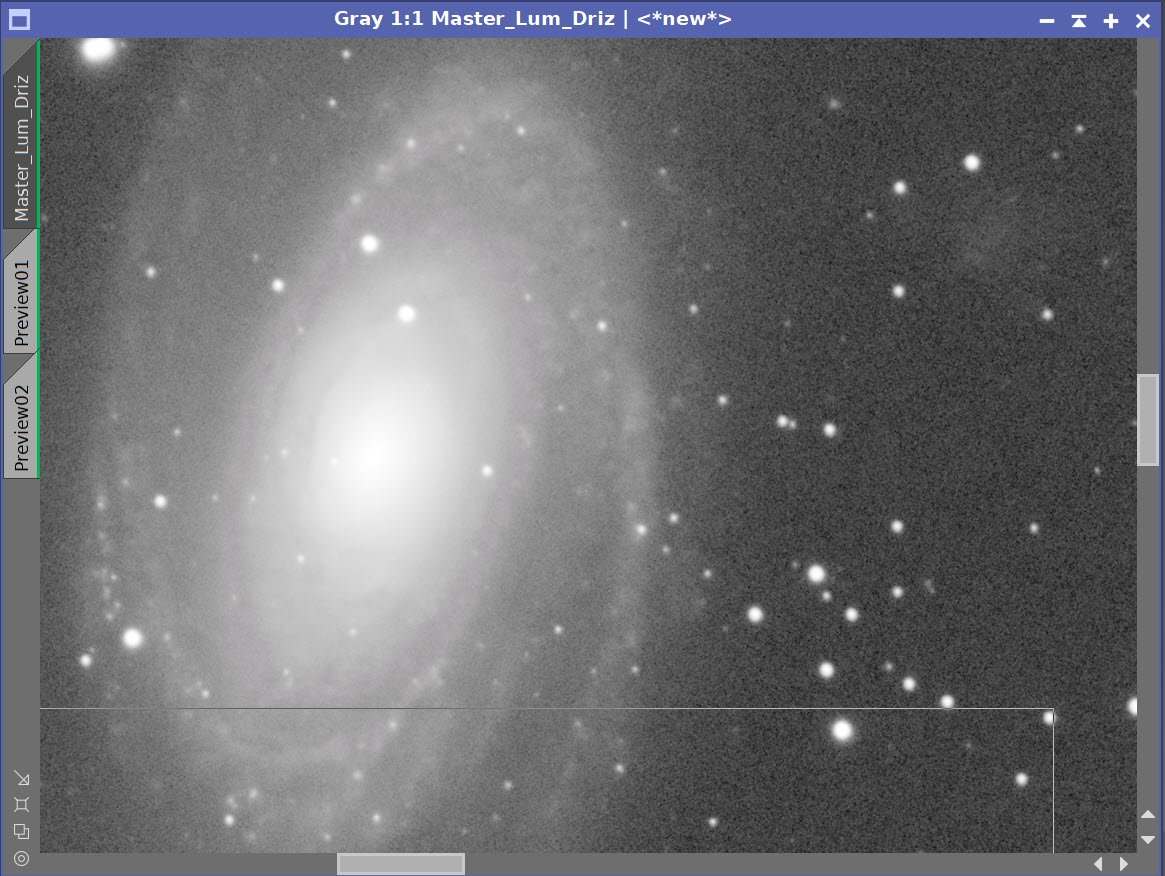
L image After DBE (click to enlarge)
R Image After DBE (click to enlarge)
G Image After DBE (click to enlarge)
B image After DBE (click to enlarge)
L image background removed (click to enlarge)
R Image background removed (click to enlarge)
G Image background removed (click to enlarge)
B image background removed (click to enlarge)
7. Create and Process the Linear Color Image
Use ChannelCombination process to create an initial RGB image.
Run DBE on the image to remove any color gradients. Use sampling similar to that used on the mono images, and use subtraction as the correction method,
Run PCC to color calibrate the image
Run Noise XTerminator with a value of 0.5 to “knock the fizz off”
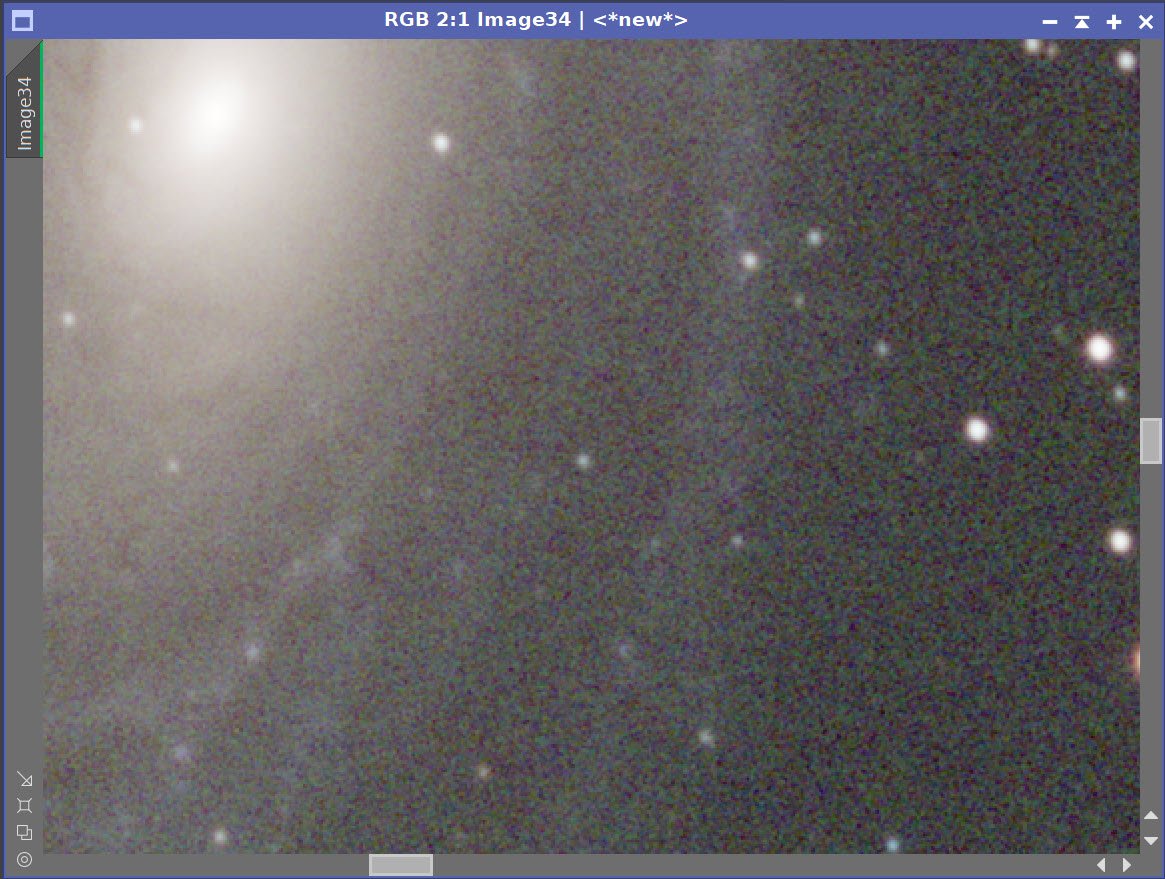
Initial RGB Linear Image
RGB Linear after application of DBE
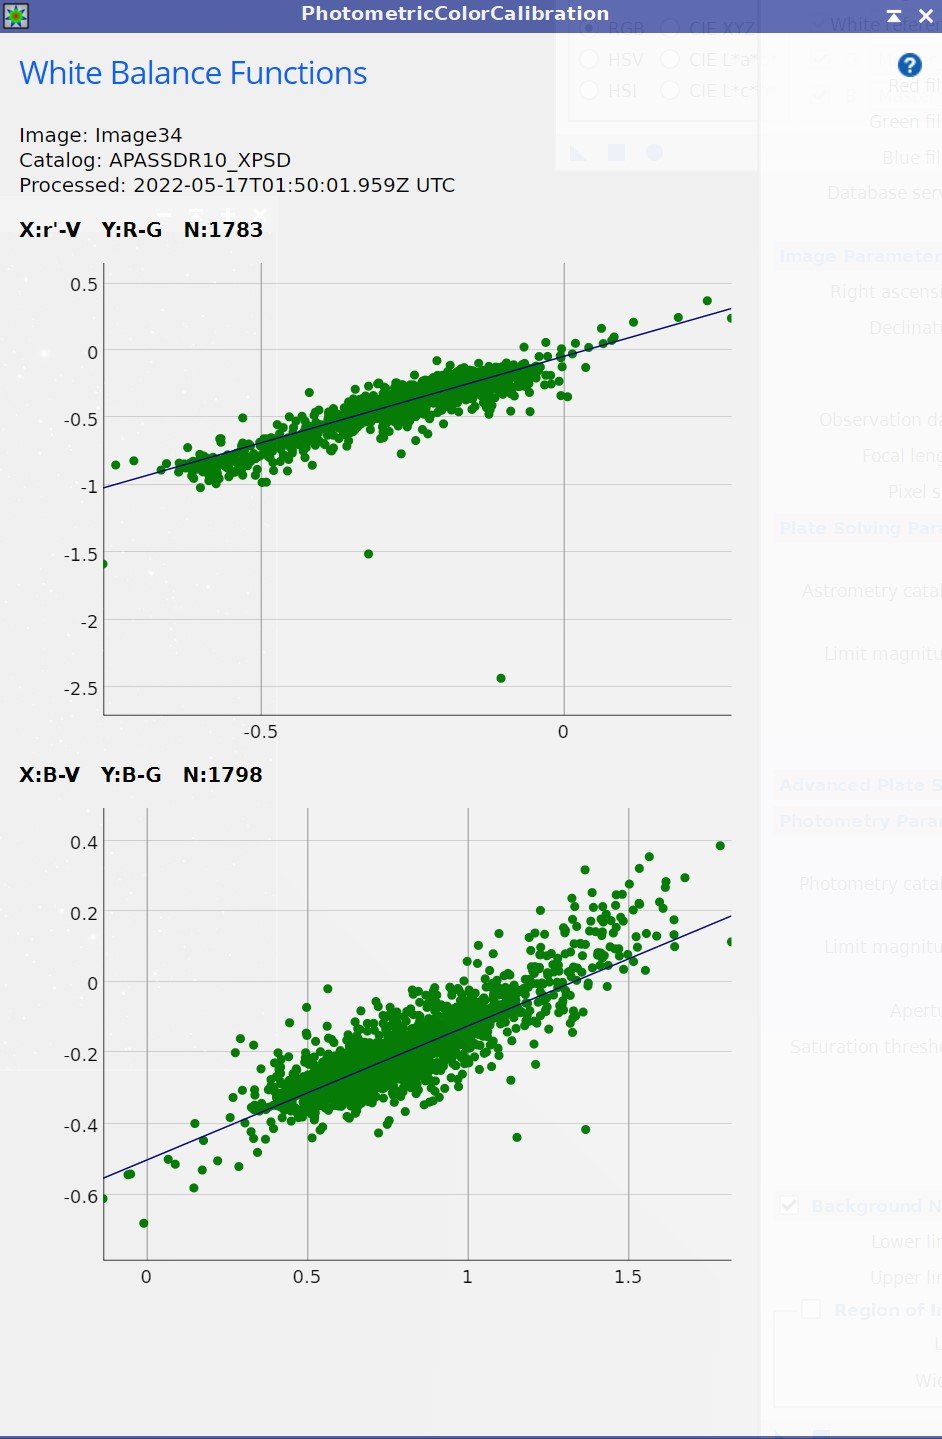
PPC was run and the following balance function were computed.
RGB Linear after PCC applied.

Before and After application of RC Noise XTerminator with a value of 0.5
8. Take Color Image Nonlinear and Process.
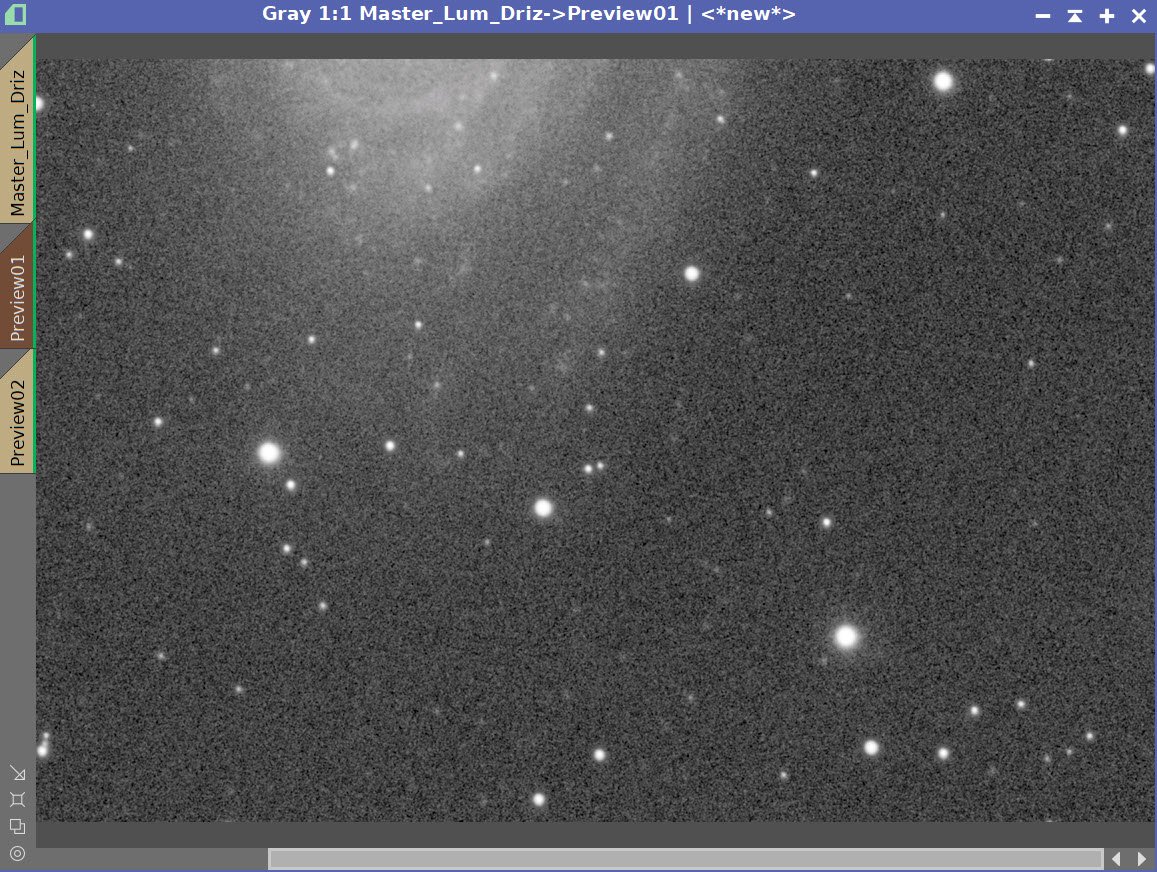
Create a Preview of a good sample of the background sky
Run MaskedStretch on the image - using the sky background preview as a reference.
Use ArcsinhStretch to bring up the stretch more while protecting the highlights. See the tool panel screen snap below to see the parameters used. The image should appear darker and more saturated than desired in preparation for the L image injection.
Using the CT tool, adjust tone scale and saturation.

Initial Nonlinear RGB image.

After Adjustment with ArchsinhStretch

ArcsinhStretch parameters used.

Final RGB nonlinear Image
9. Process the Linear L image.
Create a PSF image by running PFSImage Script
Create the Local Deringng Support Image (LDSI)
Create a mask using the StarMask Process - with layers = 6
Adjust with HT to boost stars a bit.
Establish previews on the L image to test deconvolution values.
Test deconvolution parameters iteratively, first determining Global Dark and Global Bright values, then iterations, and finally the Regularization values.
I found that I could not manage noise with the regularization Parameters. The number of layers does not seem to go up enough for a drizzle processed image
Use the fallback of creating an Object Mask
Create a copy of the L image
Use HT to click blacks and whites
See the values used and results below.
Run Noise XTerminator with a value of 0.4


The final PSF image computed

The Local Deringing Support Image (LDSI)
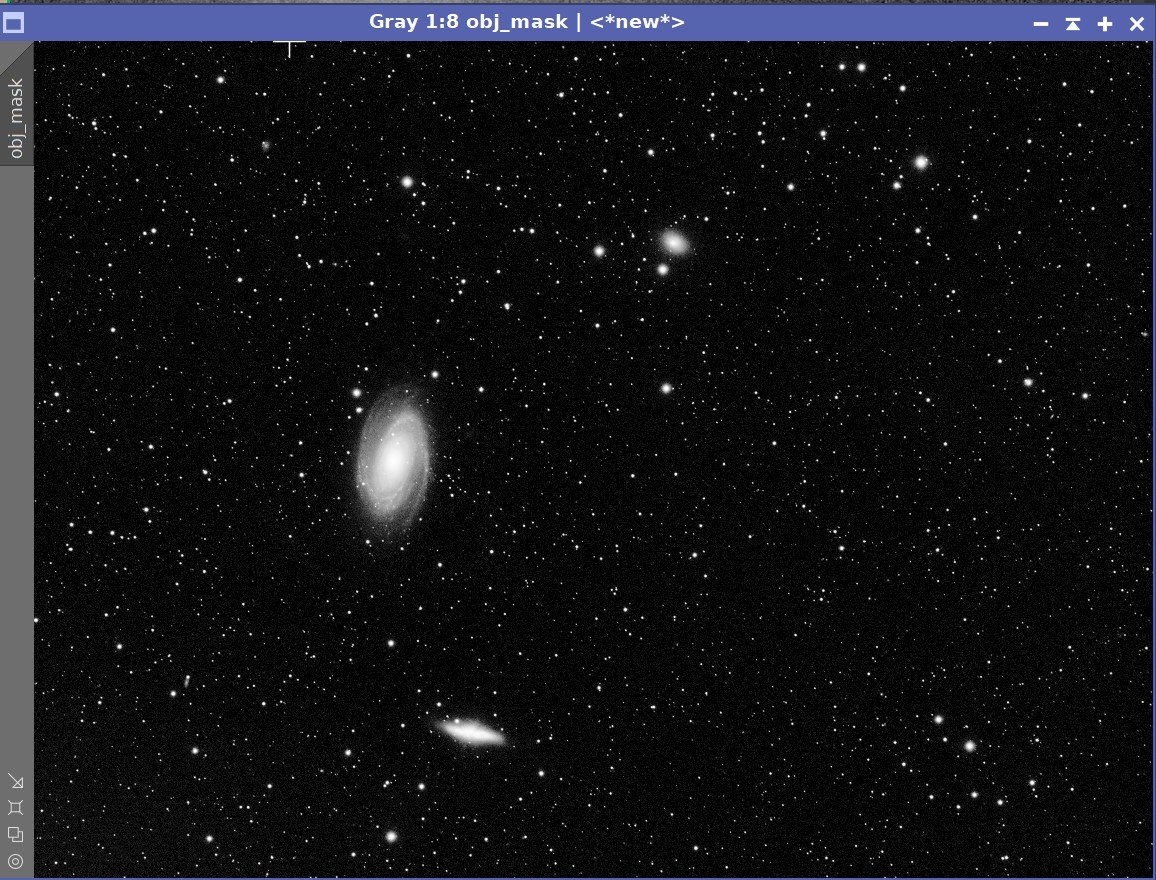
The Object Mask I ended up needing to use.

The deconvolution parameters I ended up using.

L image: Before and After Deconvolution
L image: Before and After Noise XTerminator with a value fo 0.35
10. Take L image Nonlinear and Process
Create a range mask
Create Galaxy Masks
Copy range mask and remove stars with the Dynamic Paintbrush - this makes a galaxy_protection mask
Make 3 copies of the galaxy protection mask
On each, use the Dynamic Paintbrush to remove two galaxies so that there are now three masks, each one covering one galaxy
Run Convolution with a sigma of 3.0 on each mask 3 times to smooth it out. a bit.
All of these masks will be used as we go forward.
Take the L image nonlinear
Create a preview that selects a black portion of the sky
Run MaskedStretch using the preview on the liner L image
Using CT, adjust the image
Run starnet2 and make a starless and stars images from the L image.
Tweak the star image
Run convolution with a sigma of 2.0 to smooth it out slightly
Process the Starless Image
Apply the Three-Galaxy Protection Mask
Run HDR_MT on the image using 7 layers
Enhance the smaller features of each galaxy by running LHE: Kernel radius of 64, contrast limit of 2.0, Amount of 0.3, and an 8-bit histogram'
Invert the mask
Run CT to adjust the tone scale on the sky and stars.
Remove the mask
Do a final CT tweak
Use PixelMath to recombine the Star and Starless image.

Range Mask - created with RangeSelection Tool.

Galaxy Protection Mask - made from a copy of the Range Mask - stars cleared out with the DynamicPaintBrush.

M81_Mask

M82_Mask

NGC3077_Mask

The L nonlinear image just after MaskedStretch was applied. Note the Preview region used to create a background reference.
Starless version of the L nonlinear image. This is just afterStarNet2 was applied. (click to enlarge)
Starless Image after processing step listed in the text above. (click to enlarge)
Star Image (click to enlarge)

L nonlinear final image.
11. Create the Initial LRGB Image
Using LRGBCombination tool, fold the L image into the RGB image, creating the first LRGB imagel
Initial LRGB Nonlinear image.
12. Process the final Image
Apply Galaxy Protection Mask
Run CT to adjust tone scale and color
Run LHE 64, 2.0, 0.3, 8-bit histogram
Run a final CT to adjust tone scale and color
Apply M82_mask
Use CT to adjust tone scale and color saturation
Enhance small scale detail with:
LHE with a kernel radius of 25, contrast limit of 2.0, and an amt of 0.7, 8-bit histogram
Fix Red Ring around Stars Issue.
I noticed that brighter stars seemed to have developed a red ring artifact (see image below).
Create a Red mask using the ColorMask script
Use DynamicPaintBrush to remove Galaxies
Apply to LRGB image
Use CT to reduce saturation
Remove mask
Apply the M81_range_mask
Use CT to adjust tone scale and color saturation
Enhance small scale detail with:
LHE 20,2,0,3 8-bit
Apply the NGC 3077 galaxy mask
Use CT to adjust tone scale and color saturation
Enhance small scale detail with:
LHE: Kernel size of 20, contract limit of 2, amount of 0.3, 8-bit histogram
Adjust each galaxy
For each galaxy, apply the appropriate mask
Use CT to adjust tone and color saturation
Use ColorSaturation to enhance core vs galaxy arm color
Further Enhance the structure of M81
Create a red mask with ColorMask
Use DynamicPaintbrish to erase everything but M81.
Apply M81 Red Mask
Apply LHE 20, 0.3, 8-bit histogram
Run Noise XTerminator with a value of 0.5
3 Galaxy Mask - CT adjustment of tone scale and saturation (click to enlarge)
3 Galaxy Protection Mask: LHE on all three galaxies (click to enlarge)

Final CT for with 3 galaxy mask.
M82 Mask - CT run for color and tone scale (click to enlarge)
M82 mask: After LHE (click to enlarge)
Red ring around star problem (click to enlarge)
Red Star Ring mask - zoomed (click to enlarge)
Red Star Ring Fix (click to enlarge)
Apply M81 mask amd adjust with CT & LHE (click to enlarge)
Apply NGC 3077 mask and adjust with CT & LHE (Click to enlarge)
Use ColorMask to create red mask. Modify so that only M82 is showing (click to enlarge)
Use the M81 Red mask to enhance the filaments with LHE (click to enlarge)
Before final Noise XTerminator Application (click to enlarge)
After final Noise XTerminator Application (click to enlarge)
13. Reduce Stars
Run EZ-Start Reduction with the Adam Block method.
Before EZ-Star Reduction (click to enlarge)
After EZ-Star Reduction (click to enlarge)
13. Export to Photoshop
Save images as Tiff 16-bit unsigned and move to Photoshop
Use Camera Raw Filter to adjust Global Clarity, Texture, and Color Mix
ColorMix is much easier to use to adjust hues in an image compared to the tool provided by Pixinsight and I tend to do this final operation in PhotoShop
Use StarShrink to reduce the largest stars further.
Use Topaz AI Denoise to reduce noise and sharpen things further - see screenshot panels - careful with this - is way too easy to take this too far!
Clean up some stars by doing a small area selection and the burn tool and the blur tool.
Add watermarks
Export Clear, Watermarked, and Web-sized Jpegs.
The portable scope platform is supposed to be, well, portable. That means light and compact. In determining how to pack this platform for travel, I realized that the finder scope mounting rings made no sense in this application and I changed them out with something both more rigid and compact - the William Optics 50mm base-slide ring set.