
IC 1396/1396A - The Elephant's Trunk Nebula
Date: October 26, 2021
Cosgrove’s Cosmos Catalog ➤#0086
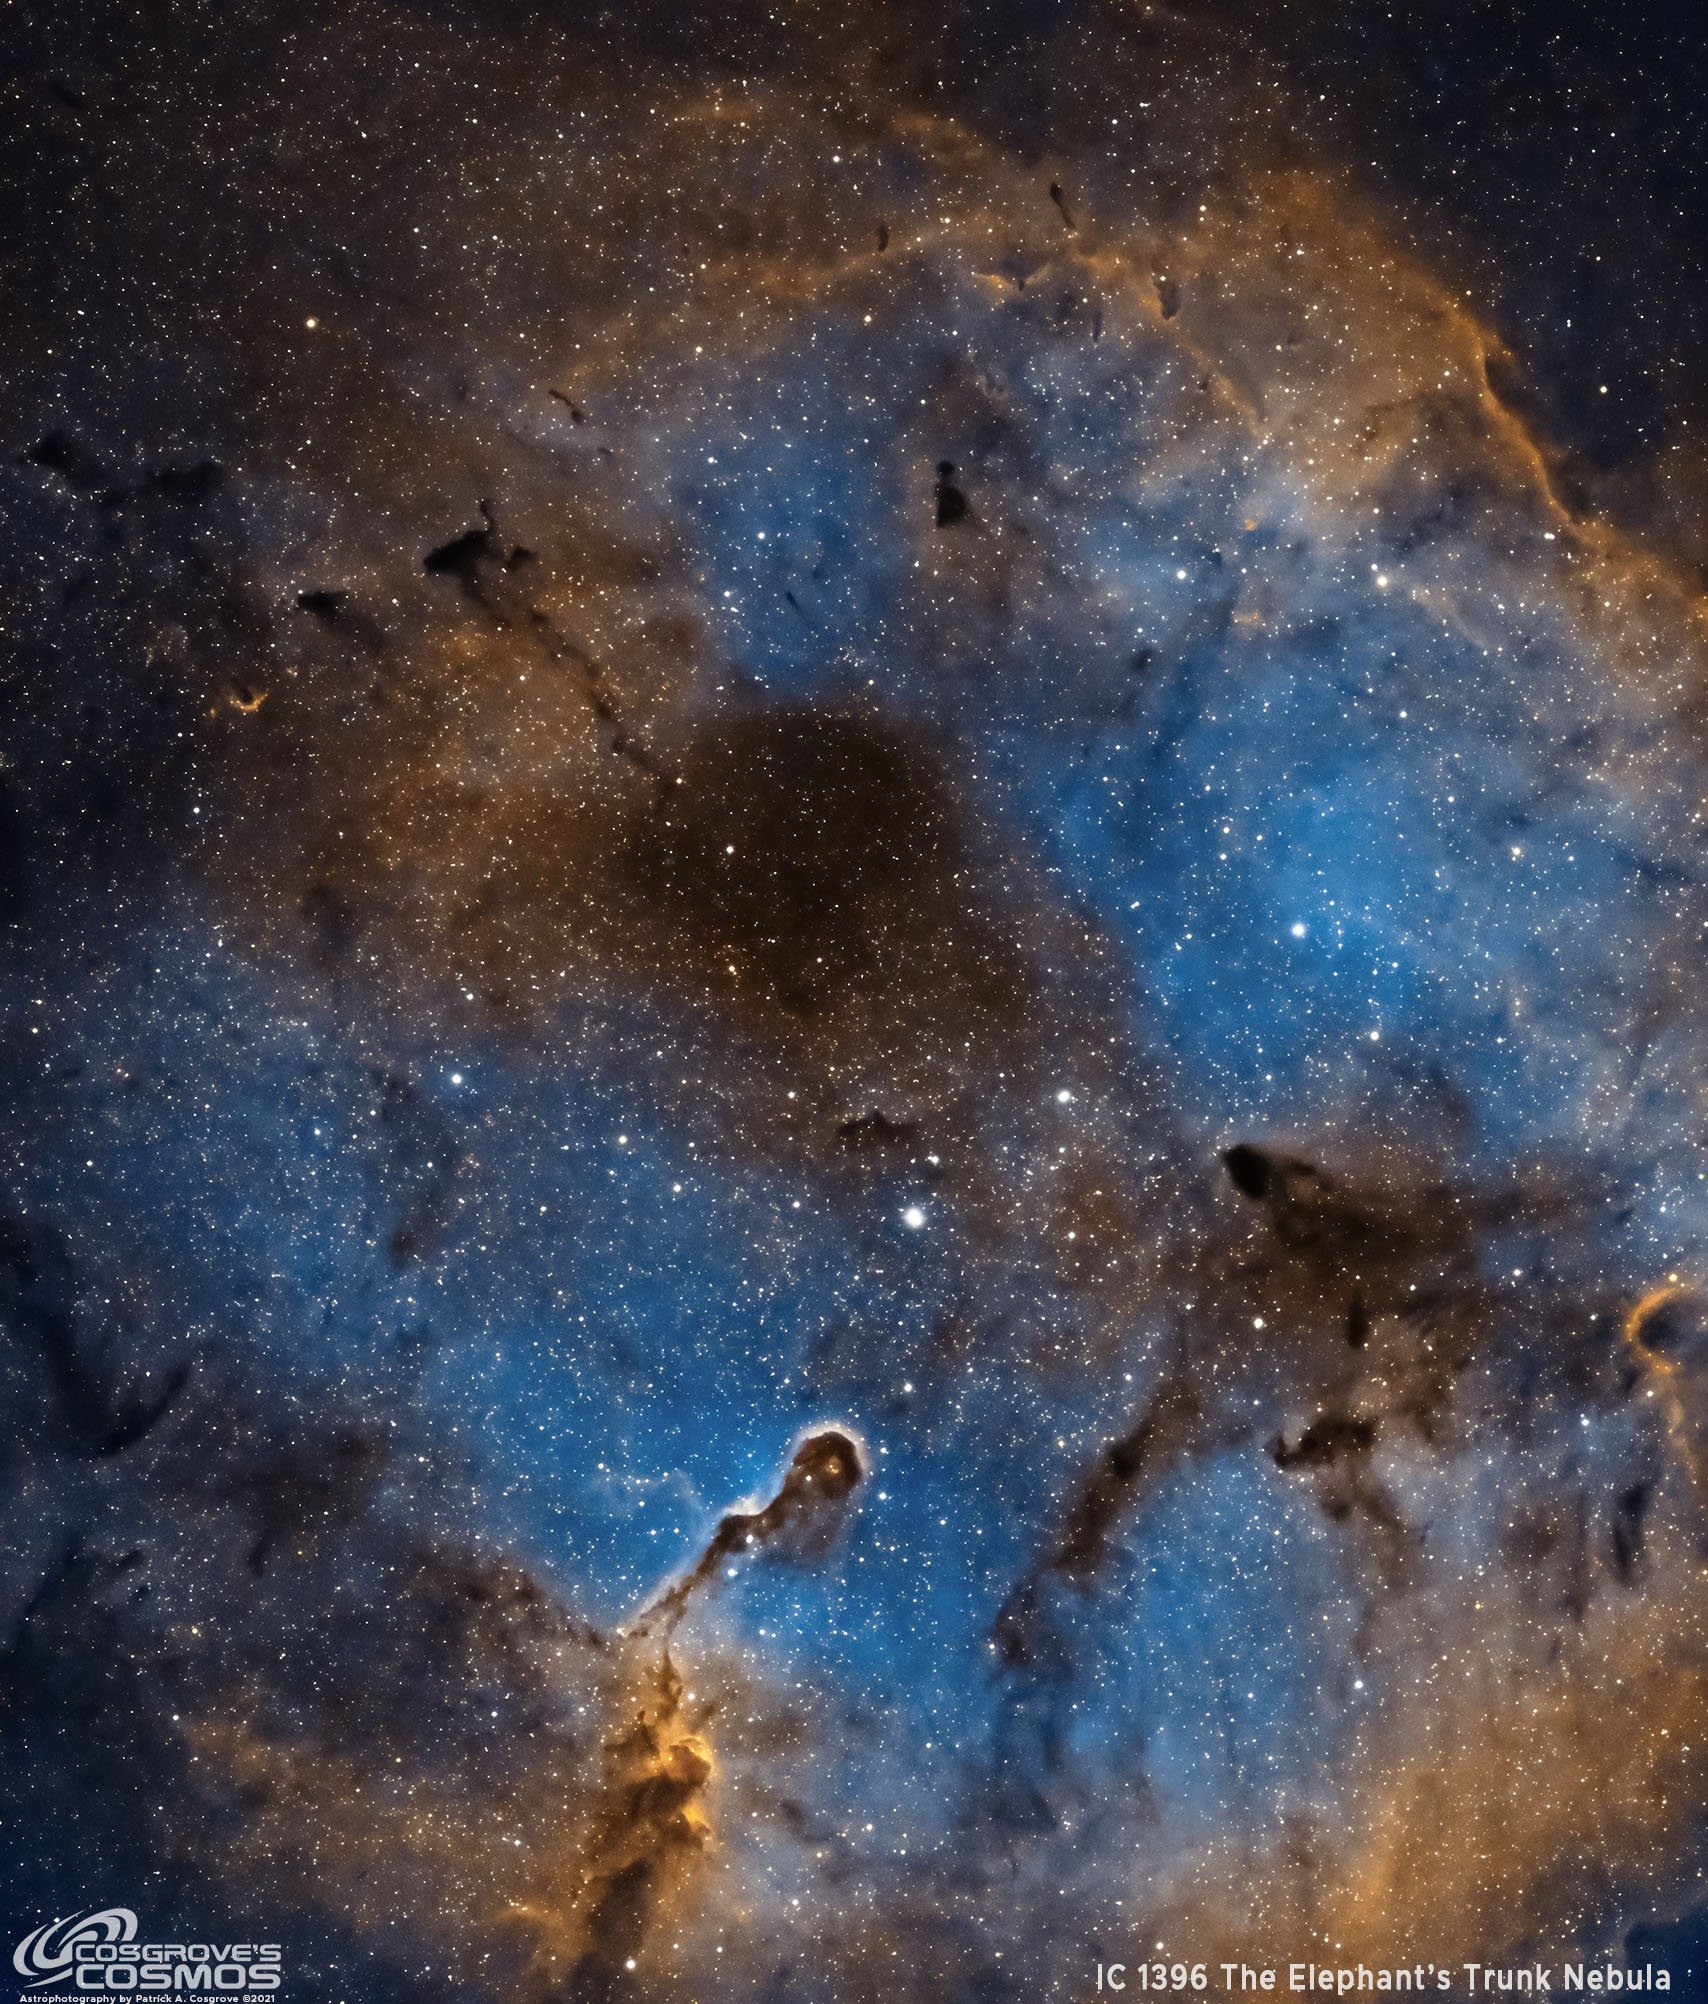
IC 1396/1396A The Elephant Trunk Nebula, Note this is a mid-color level image (see comments below) (click to image for full resolution via Astrobin.com).

Awarded Flickr “Explore” Status on Oct 28, 2021!


Published in the September 2022 Issue of Astronomy Magazine!
Table of Contents Show (Click on lines to navigate)
About the Target
IC 1396 is a large circular region of glowing gas and dust in the constellation of Cepheus and is located about 2400 light-years from Earth. Measuring approximately 100 light-years across, this region is energized by a bluish central multiple star called HD 206267.
The ionized gas glows bright while dark dust concentration in the area can also be seen.
The Elephants Trunk, IC 1396A, is one feature that stands out prominently in images taken of the area. Pressure from bright stars in the core blows dust from that area leaving behind a darker region at the center of the nebula while compressing dust around the edges, which drives new star formation. As a result, up to 250 young stars- all less than 100,000 years old, have been detected in infrared images taken of the Trunk region in 2003. The Trunk itself is about 20 light-years long.
The Annotated Image
The annotated image was created using the ImageSolver and AnnotateImage scripts in Pixinsight. (Click to enlarge)
The Location in the Sky

This IAU/Sky & Telescope Constellation Chart shows the location of the IC1396 indicated by the yellow arrow.
About the Project
My first attempt at IC 1396A
This is the second time I have imaged IC 1396. The first time can be seen HERE, taken with the William Optics 130mm FLT APO platform. This produces a much narrower field of view, and you can only see IC 1396A, the "trunk" portion of the nebula.
This most recent image was taken with my portable FRA400 Astrograph Platform. Being a much wider angle system, you can see most of the circular nebula surrounding the Elephants' Trunk.
This was also the very first time I have used the FRA400 Platform as a portable device. We took a trip down to North Carolina to visit my older son Brian and his family, and I took the scope with me for the first time.
I created a posting in the Tips & Techniques section discussing how I prepared the scope for transport and set it up, given that I can not see Polaris from the back of my son's townhouse. You can see that posting HERE.
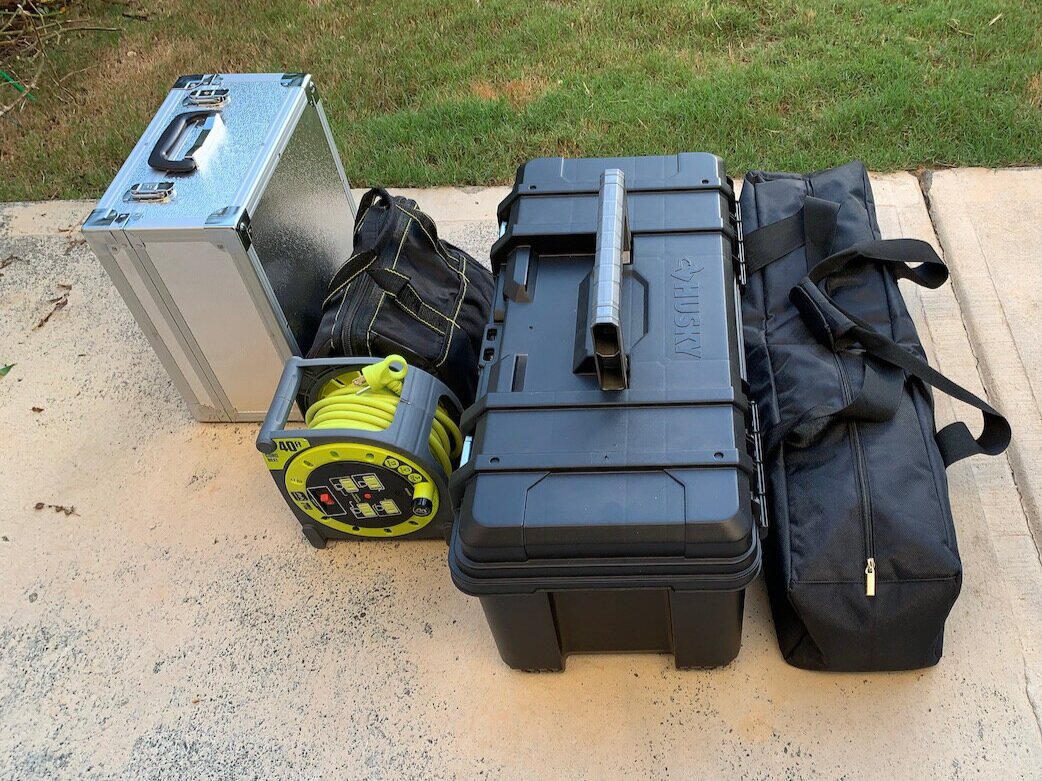
Packed and ready to go!

The Askar FRA400 packed away.

Preparing to rough align the mount using a smartphone app….
Anyplace has to have better weather than Upstate NY!
North Carolina tends to have much nicer weather than what we experience here in Western New York. So I anticipated having lots of opportunities to shoot many targets while down there. But, of course, this is not the way it worked out. Apparently, the clouds from New York State followed us down to NC, and we had no clear nights in the first few weeks of our visit, which also happened to be when there was no Moon. But of course, as the Moon began to make its entrance into the night sky, the weather cleared right up! So I ended up having only one night where it was clear before the Moon got in the way of things.
IC 1396 came up over the roofline of the townhouse about 11:30 pm, and from there, I ended up grabbing one hour of subs for each of the main narrowband filters before shutting down. After this, I shot flats and flat darks for the project. The next day I also shot a fresh batch of 300-second dark frames.
I tried to process the images using my Macbook Pro and Pixinsight, but I found the combination tedious and unworkable. I know - I am spoiled. I built a computer for my home dedicated to processing Astro images (you can read about that HERE). This rig is super fast and has twin 32" 4K screens. Unfortunately, the laptop... does NOT. The small screen and the lack of extensive memory or fast disk drives made the work too awkward, so I opted to wait until I went home to do this.
Challenges with the Data
As I inspected the data, it was clear that I would have a few significant processing challenges.
The first challenge is simply the fact that 3 hours of integration time is just not sufficient. This meant that I had more noise to deal with than I would like. Despite this, I was pretty happy with the result. I ended up using several noise reduction techniques at various stages of processing to get these results. See how I accomplished this in the processing notes section below.
I also discovered that I had some elongated stars in this project. OUCH!!
These were noticeable in the Ha, O3, and S2 images, but they were particularly elongated in the O3 Images.

Yikes! These stars are, shall we say, horrible!
Why did this happen?
I think there are two reasons for this. First, I could not use my normal iPolar camera to set up the PA as I could not see any part of the northern sky (blocked by a building). So I used the PHD2's drift method to set things up. As I documented HERE, This was a slow and tedious process. I spent 45 minutes on it and thought I had it close, but it was further off than the results I usually achieve with the camera. I was also shooting Narrowband with exposures that were 5 minutes long per sub. With this length of time, some field rotation might be noticeable if the PA was off. Finally, I have a heavy bundle of wires coming off the mount, and I usually set this up in a coil so that I won't have cable drag playing a role in the guiding. The reported guiding errors were higher than I am used to seeing, and they went even higher when the O3 subs were being collected. I stopped the sequence after the O3 frames were done and adjusted the cabling - after this, I noticed that the results of the S2 sub showed reduced tracking errors.
In the past, I would have just given up on the project. But with some additional processing experience, I was confident that I could minimize the problem and get a reasonable image.
The details are in the processing log below. I did a couple of things to help here. First, I worked very carefully with my image integration step to set the rejection criteria so that subs with more guide error would have some of the extra elongations rejected as part of the integration method. Secondly, I used the deconvolution Motion Blur operation on each of the master images to minimize the elongation. By the time the color image was assembled, and I did further star reduction, the results looked reasonable, if not perfect.
High Color or Low Color?
A lot of Astrophotographers tend to go for lower contrast and lower color look to their images. Often they describe them as looking more "Natural" that way.
On the other hand, I often go for a higher color, and higher contrast look.
Why? I spent most of my adult professional life working on automated image enhancement algorithms for consumer imaging. We found that consumers often liked bright saturated images over images that were lower in color but were more realistic looking. So I tend to go that way for my images.
So high color? Low color? Who is right?
Well, no one.
My images are taken with narrowband images and rendered in the Hubble SHO palette. What's natural about that? First, our eyes don't see in narrowband. Second, these are false-color images done so that technical details of an object are made more visible.
One step that all astrophotographers must do is to go from the linear domain to the non-linear domain for our final images. Linear domain images have pixel values that are proportional to what the sensor saw. These are "real" images. But linear images have little to offer human eyes - they are too dark to show much of anything.
We put an image through a non-linear transformation to greatly enhance the contrast and color of the image so that the signal is evident to human eyes. The images don't look like that in nature - we enhance them so we can see them clearly.
Once we go non-linear with an image, reality goes clean out the window
Here is a linear image - in fact, this is the Master Ha image from this project. This is what the REAL image looks like. (click to enlarge)
Now turn on the Screen Transfer Function that applies a nonlinear transform and suddenly we can see whats there. But it had to be highly enhanced to be seen at all…. (click to enlarge)

Here is the Histogram for that image. What? Where? Look at the extreme left edge. This a tiny narrow peak there that has ALL of the image data in it!

I changed the scale on the X-Axis to a 9 and now you can just begin to see the histogram of the whole image. Not a lot there right?
So at the end of the day, I would contend that final image color and contrast is a preference asserted by the astrophotographer - using his vision of the image and his ability to deliver on that image via image processing.
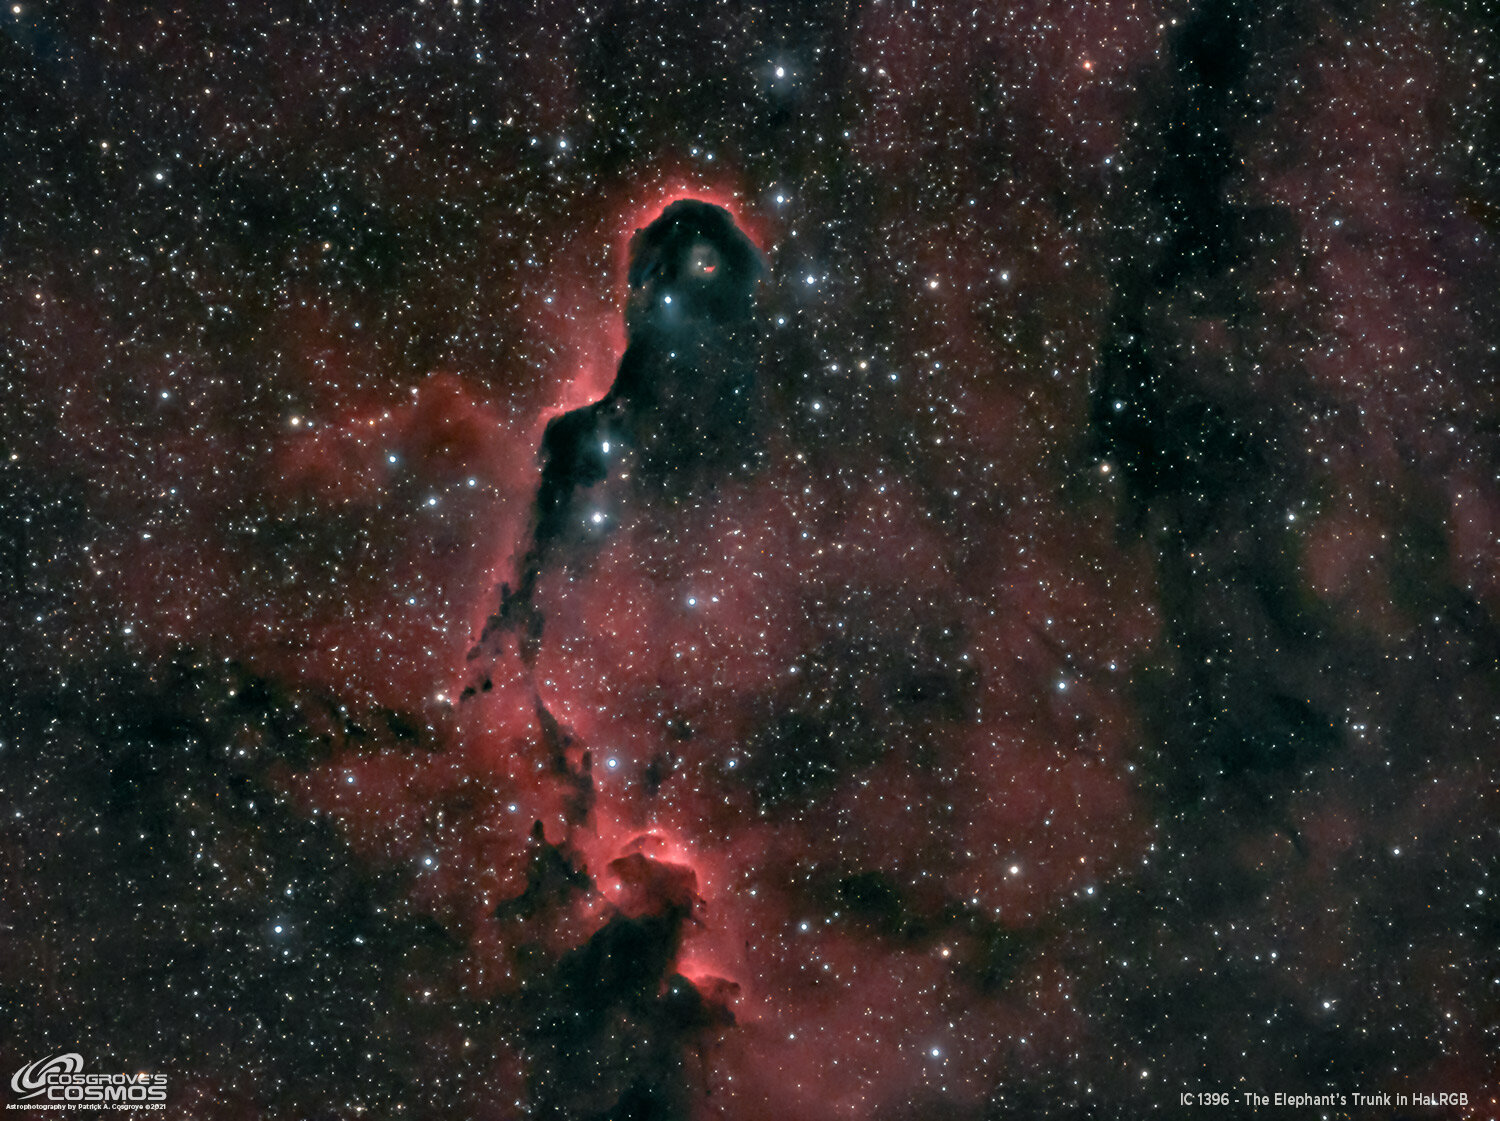
But despite that, I have been challenging myself on different looks. For this project, I created two final images. One that is high color and contrast, and one that has lower color and contrast.
Here is the low color version. (click to enlarge)
And here is the High Color Version (click to enlarge)
And here is the final version based on reduced color sat on the gold tones. This a slight adjustment but I like it best of all. (click to enlarge)
I often share my images with my local AP friends to get another set of opinions on my processing before finalizing them. Two of the three liked the higher color version better.
One of them, Dan Kuchta, sent me an email response that I think hit the nail on the head, and I wanted to include it here - with his permission:
"Our senses are funny things because they're all tied up with how our brain works. :-) We don't see with our eyes; we see with our eye/brain system. Viewing an image single-stimulus is one thing. But then comparing two side by side gives your brain a chance to evaluate things in a relative sense, which affects the outcome.
Initially, I looked at the more saturated one first and liked it. Moving to the second one, it seemed too muted. But after staring at the 2nd one for a while, when I went back to the first, it seemed oversaturated. After flipping back and forth between the two for a while, my brain tells me that something in the middle is "right". :-)
Bottom line, I think either one is excellent. It truly is a matter of your choice. Neither is right or wrong, and neither is so extremely over/under-saturated as to be out of the range of normal, great quality Astro images.
Gun to my head, I'd go with the more saturated one. These images are not for scientific review, but for enjoyment by normal people. And people like color! :-)
In terms of "realistic" colors, and colors that "exist" in space, let's face it, none of these images we produce is anywhere close to what our eyes would see. Unlike what SciFi movies show, if you were to fly into space and get close to one of these things, you'd see … nothing! The particles in these nebulae are so spread out that they would look like empty space. And the light coming from them to us on Earth is so dim that our eyes would never pick up any color at all. So while the wavelengths our sensors detect provide the right spot on the color spectrum, the amount of color is purely our own fabrication. And of course, a narrow band even tosses the "right wavelength" out the window. Even LRGB images don't get the colors right because they lack the spectral overlap of our eyes' light detectors.
-Dan"
I could not have said it better!
I like the higher color one, and when I back off, I can't help but feel that I am leaving something on the table. Others shy away from bolder colors - I completely respect and often admire their artistic vision. There is no wrong here. But we have to be honest with what we like and I tend to like more color.
Which do you like better?
Twitter Weighs In….
I submitted both images in a Tweet to the #Astrophotography Community and I received a lot of feedback. Twice as many people tended to like the lower color version compared to the higher color version!
This caused me to reconsider. I REALLY like the blues in this image and when you back off, the blues go a milky white. But I think that perhaps I did go too far on the Gold tones. So as a compromise, I left the blues where they were and backed off on the gold saturation just a bit. I think I do like this version better. This “mid-color” version is what I have gone with for the main image.
IC 1396 Processing Log
1. Blinking the Images
All lights and cal frames were blinked
I was disappointed to see that all subs had some elongated stars, with some subs worse than others. O3 subs seemed to be the worst.
O3 and S2 subs had a few images with some gradients due to passing clouds.
No subs were eliminated.
2. WBPP v2.1 was loaded with all subs and cal frames
I then set up WBPP to handle calibration. I typically use drizzle processing on images from the FRA400 platform but this time I decided against it because of the elongated star images.
I set up cosmetic correction
Setup a Pedestal image @ 50 counts
loaded all lights, flats, and darks
ran it for just calibration.
3. Integration
Ha
Ran normal integration for Ha image. The high rejection threshold used was 3.3 std dev, low 2.5 std dev - seemed to do a good job. Large structure growth checked and 2x2 params on that.
O3 & S2
Run the NormailizedScaleGradient script followed by ImageIntegration. Experimented with different rejection thresholds and ended up with one that did remove some star elongation pixels. High rejection used was 3.5 std dev, low 2.7 std dev used.
Large structure growth checked and 2x2 params on that
4. DynamicCrop - all master images were cropped in a consistent fashion to exclude ragged edges.
5. Run DBE on O3 image only
Ha and S2 showed no gradients
set up samples to sample corners where there seemed to be some brightening going on. The fix looked good.
6. Fixed Elongated stars
Ran deconvolution with Motion Blur option
Ha -Blur length len = 5, angle = 90, deringing - 0.003 global dark
O3 - Blur length len = 7, angle = 90 ,deringing - 0.008 global dark
S2 - Blur length len = 5, angle = 90, deringing - 0.00098 global dark
This is a sample of how the O3 image looked. (click to enlarge)
After correction with Deconvolution Motion-Blur mode correction. (click to enlarge)
Prep for Deconvolution
Object Masks created for each layer. HT was used to adjust the mask so that the background sky was black, and most Nebula areas were white. Convolution run on mask 2X, with std dev = 2.
Local support images were created. These are basically star maps of the biggest and brightest stars. Since these are usually saturated and clipped, they never have normal point spread functions, so they don’t fit the deconvolution model and it does bad things to them. I used Starmap with 6 layers and every else set to default for this.
Psf files created- These are point spread function files. I created the using the PSImage Script. Piece of cake!
7. Run Deconvolution
Setup several preview areas to test on each image
Apply the object mask
Set the deconvolution tool to use the right psf and local support maps
For each layer - explore what global dark value gives the best response without dark rings.
Ha: 0.01
O3: 0.03
S2: 0.01
8. Linear noise reduction
EZ -Denoise was used with default parameters on all images
The Linear Ha, O3, and S2 Images (Click to enlarge)
9. Go Nonlinear and Combine Images
Now I was ready to go nonlinear. For each image:
Used STF->HT method. Adjusted the Histogram to set zero point and lighten for all three image
Used CT to reduce background sky and boost nebula signal to look about equal to Ha. This was done for both O3 and S2 to make them visually equal.

Nonlinear Ha, O3, and S2 Images (Click to enlarge)
10. Create a Color SHO Image.
Use ChannelCombinaton tool to create the initial SHO image.

The first color image in SHO.
11. Initial Color Balance of the SHO image.
Use SCNR to remove excess green In the image. This leaves some sky area and stars looking magenta.
Invert the image - this gives it a color-negative look
Magenta regions of the image now look green. Use SCNR-Green to remove the excess green
Invert the Image again.
Use the Curves, Transform Tool, to
Boost sats
Apply S-curve on neutral channel
You now have a pretty good base image for the Hubble palette with no magenta star issues that are so common in this realm.
12. Create Color Masks
Blue mask - use ColorMask script with Blue chosen
Adjust mask
Fix star-rings in the mask by eliminating them with the DynamicPaintBrush or CloneStamp tool
Run deconvolution on the mask to smooth it out
Boost mask contrast with HT to recover loss of intensity from Convolution operation
Green mask - ColorMask script with Green Chosen
Adjust mask as in the blue example above
13. Adjust colors
Apply Blue mask
With CT, adjust Sat and color curves to get the color effect you want on blue
Apply the Green Mask
With CT, adjust Sat and color curves to get the color effect you want on the Golden areas of the image
SCNR applied to remove Green (click to enlarge)
The Curves Tool to boost color and contrast (click to enlarge)
Create color masks and adjust. Rotate image and crop for better framing. (click to enlarge)
Apply Local Histogram Equalization, ACDNR noise reduction, an EZ-Star Reduction. (click to enlarge)
14. Do First Non-Linear DeNoise
Use ACDNR with Chrominance set to 7.7, and Lightness set to 3.0. Note I was very aggressive with the Chrominance setting as there was a lot fo noise in this image yet.
Use a lightness map
Verify lightness map coverage - adjust as needed.
Test on several previews and adjust as needed.
Apply on image
15. Improve Image Composition
Rotate image 90 degrees clockwise
Crop the top of the image to be asymmetric around the circular nebula.
16. Tweak color and sat with CT.
17. Do Star Reduction
Run EZ-Star Reduction with defaults.
18. Enhance Medium-Range Image Structures
Run Local Histogram Equalization Tool with radius 64, contrast 2.0, Amount 0.25, and 8-bit nistogram
19. Enhance Darks Structure
Run DarkStructureEnhane Script with default values.
20. Do another ACDNR run - lightly this time:
Chrominance: with mask, setting of 2.5
Lightness: With mask setting of 1.5
21. Shift over to Photoshop
Export image as a TIFF file - 16 bit.
Run Photoshop, load image
22. Global Tweaks using the Camera Raw filter
Light adjustment of Clarity
Light adjustment of Texture
Tweaked Curves
Run color mixer and tweaked blues and oranges.
23. FInal Star Reduction
I used the StarShrink Filter with the following parameters to do a further reduction in the smallest stars: radius 24, strength 5, sharpness -1
FInal run with radius 2, strength 4, sharpness -1
24. Final Noise Reduction
A careful inspection of the image showed a great deal of chroma noise around the gold areas.
I ran Topaz Denoise AI with the low light model, remove noise = 45, enhance sharpness = 2, Recover details = 61, Color noise= 87
25. Create lower sat version of Image by using Camera Raw Filter and backing off of Sat and contrast.
25. Share the image with some friends for feedback
Feedback received:
most liked the higher contrast version.
26. Finalize image
Add my custom watermarks
Save image.
Export a clean image - full res - no watermarks
Export a full res image - with watermarks
Export a subsampled image with higher jpeg compression for web use.
27. Final Note
Based on Twitter feedback, I create a third and final version of my image by dialing back the saturation of the gold tones a bit. I am much happier with this image.
More Information
There is not a lot of information to be found on this target, but here are a few sources I found:
Wikipedia: The Elephants Trunk Nebula
Spitzer Space Telescope: IC 1396 in Infrared
Capture Information
Light Frames
12 x 300 seconds, bin 1x1 @ -15C, unity gain, Astronomiks 6nm Ha Filter
12 x 300 seconds, bin 1x1 @ -15C, Unity gain, Astronomiks 6nm OIII Filter
12 x 300 seconds, bin 1x1 @ -15C, unity gain, Astronomiks 6nm SII Filter
Total of 3.0 hours
Cal Frames
25 Darks at 300 seconds, bin 1x1, -15C, gain unity
25 Dark Flats at Flat exposure times, bin 1x1, -15C, gain unity (taken for each night)
Flats:
15 Ha Flats
15 OIII Flats
15 SII Flats
Capture Hardware
Scope: Askar FRA400 73MM F/5/5 Quintuplet Astrograph
Guide Scope: William Optics 50mm
Camera: ZWO ASI1600mm-pro with ZWO Filter wheel with ZWO LRGB filter set,
and Astronomiks 6nm Narrowband filter set
Guide Camera: ZWO ASI290Mini
Focus Motor: Pegasus ZWO EAF 5V
Mount: Ioptron CEM 26
Polar Alignment: Ipolar camera
Software
Capture Software: PHD2 Guider, Sequence Generator Pro controller
Image Processing: Pixinsight, Photoshop - assisted by Coffee, extensive processing indecision and second-guessing, editor regret and much swearing….. Given the problems on this image, more than the usual whining….
The portable scope platform is supposed to be, well, portable. That means light and compact. In determining how to pack this platform for travel, I realized that the finder scope mounting rings made no sense in this application and I changed them out with something both more rigid and compact - the William Optics 50mm base-slide ring set.