
A Computer, Storage, and Networking Strategy for Astrophotography
Date: Aug 18, 2021

My Main Workstation.

Here is the computer after being rebuilt….
Table of Contents Show (Click on lines to navigate)
Computer and Storage Needs were Simple in the Beginning
When you think of astrophotography, you typically think of telescopes, guide scopes, Tracking mounts, and cameras. And of course, you need all of those things. But it would help if you also had computers and storage and a way to connect those things together.
When I first started, I had a pretty powerful desktop computer with a 6-core CPU, a powerful gaming graphics card, and twin 32" 4K screens. I have been involved in photography my whole life, so it would not be too surprising to discover that I had a pretty decent setup for that kind of activity.
But when I started my journey into astrophotography, I soon discovered I needed more.
First, I needed a laptop to connect to the telescope mount and the cameras of my first rig. I had an old laptop lying around, and so I put that to work. While several apps have to run simultaneously during a capture session - they are not very demanding when it comes to computing power, so that was not an issue
My early sessions started with a One-Shot-Color camera and relatively short capture sessions. So it was easy to store the captured subs on the computer itself. I moved the subs from my laptop to my main computer with a thumb drive in the morning. Simple!
Processing would be done on my main computer. At first, I just used Adobe Photoshop and Lightroom - tools I normally used for my photography - and this was just fine and dandy.
Things Begin to Bog Down
Then - as I became more serious about astrophotography - and added a second telescope platform with a mono camera with an 8-slot filter wheel, the amount of data being collected began to grow. Once you start doing mono camera imaging, Pixinsight becomes more attractive as it is better suited to dealing with multiple sets of image subs by filters. Pixinsight can be very demanding when it comes to computer resources - and thus, things began to bog down.
I needed two laptops to control two capture sessions.
The mono camera with the filter wheel generated a LOT more files - both for subs and the required calibration files.
As I became more experienced, sessions were running much longer, spanning the entire night - or in many cases spanning several evenings.
Storage on the laptops became an issue as they had relatively small hard drives, and I was collecting a LOT more data.
Thumb-drive data swaps began to take much longer as the size and number of files increased.
Pixinsight bases a lot of its image processing routines on spatial frequency band processing. The image is decomposed into various spatial frequency bands, the processing is done on each band, and then the image is re-assembled. This can do some pretty sophisticated things - but it can be quite demanding from a compute perspective. Things really slowed down with my work. I spent a lot of time waiting for the computer to finish each operation.
When I contemplated adding the 3rd imaging platform, I realized that I had to make some changes.
Building a System Optimized for Astrophotography & Image Processing
I have a technical background, but I would not say that I have any great expertise in building computers. So to do this with confidence, I needed to bring in some expert consultants to assist me. These were, of course, my two sons - who between them have built many computers. And they work cheap. So bolstered with this support system, I went down the path of rebuilding my desktop system into something that would be better enabled to handle the processing loads encountered. First I started with the main computer. A total rebuild was in order.

CPU
Pixinsight spends a lot of cycles walking through image data and doing operations. This kind of thing can be sped up if you have multiple CPU cores to process the image. So more CPU cores are a good thing. I wanted to upgrade to as many cores as I could with a reasonable investment. Since the CPU is the heart of the system, I decided to start here and work my way through the rest of the system.
I chose the AMD Ryzen 9 3900X 12-core, 24-thread CPU. Those threads could really “rip” into the Pixinsight processing chores.
Amazon: AMD Ryzen 9 3900X

Motherboard
Once I had the CPU, then I needed a motherboard to support it. I wanted to load it with memory, and I knew I wanted plenty of fast NVMe M2 connectors for fast solid-state hard drives. There are many motherboards that would work, but I choose the GIGABYTE X570 AORUS Ultra motherboard for my build.
Amazon: GIGABYTE X570 AORUS Ultra motherboard.
Next, I loaded it with four 16GB sticks of RAM for a total of 64GB. Again, I needed the elbow room!

Fast SSDs
CPU operations are one thing - but another thing that slows Pixinsight processing is moving data around. So to facilitate that, I installed two 1TB NVMe M2 SSD drives - specifically two SAMSUNG 980 PRO 1TB PCIe NVMe Gen4 drives. The first one I set up to be the main system drive for the computer. The second I set up as a super-fast workspace drive that I use when working on a project.
Amazon: 980 PRO 1TB PCIe NVMe Gen4 drive

CPU Cooling
Now let's Talk about cooling. When the computer is under heavy load, the CPU temps can climb very quickly. To combat this, I chose a Cooler Master MasterLiquid ML240L RGB V2 Cooling system. This mounts a pump right on the CPU and then coolant is pumped through a radiator that has two fans pumping air through it. This is a very effective way of dissipating CPU heat.

Computer Case
This was all mounted in a large case that allowed for good airflow - the Fractal Design Define 7. This case is well-engineered and has plenty of room for mounting drives, cooling fans, and a very nice cable routing system.
Amazon: Fractal Design Define 7.

Fans
I mounted a set of 4 additional Corsair ML120 Pro LED fans to aid in ventilation. Two were mounted on the front panel, one on the back panel, and finally one on the bottom.
Most of the time, this combination is very quiet. However, when Pixinsight is really driving all of the CPU cores, temperatures will quickly begin to rise and the fans will kick into high gear. When this happens, it sounds like a jet airplane taking off!
Amazon: Corsar ML120 Pro LED fans

Data Archives
When you do a lot of projects, you need a lot of storage.
You can't keep your project data on the fast workspace drive forever - at some point, you must clear that drive off to make room for new projects. When you are using a high-resolution next-generation camera, project subs and cal files can quickly swell to be 80GB of data - or more. When you preprocess them with Pixnsight - this storage load can grow as high as 250GB per project. So you really need to move the data off of the workspace drives as soon as you are done.
But where does all of this data go? You will need large archival storage capability and you also need solid backup capability. My choice here was to use Seagate IronWolf 12TB NAS Internal Hard Drive HDDs.
This is a reasonably fast and reliable drive. I mounted two in my system.
One acts as the primary Data Archive. The second acts as a local backup.
Before moving a project from the workspace drive to the Data Archive drive, I delete some of the interim files created by Pixiinsight. I figure that these deleted files can be recreated from the root files in the future if I ever have the need.
Off-Computer Backup

So having one level of backup mounted in the main computer case is very convenient. but ultimately, it is insufficient. I wanted to have another level of backup that was external.
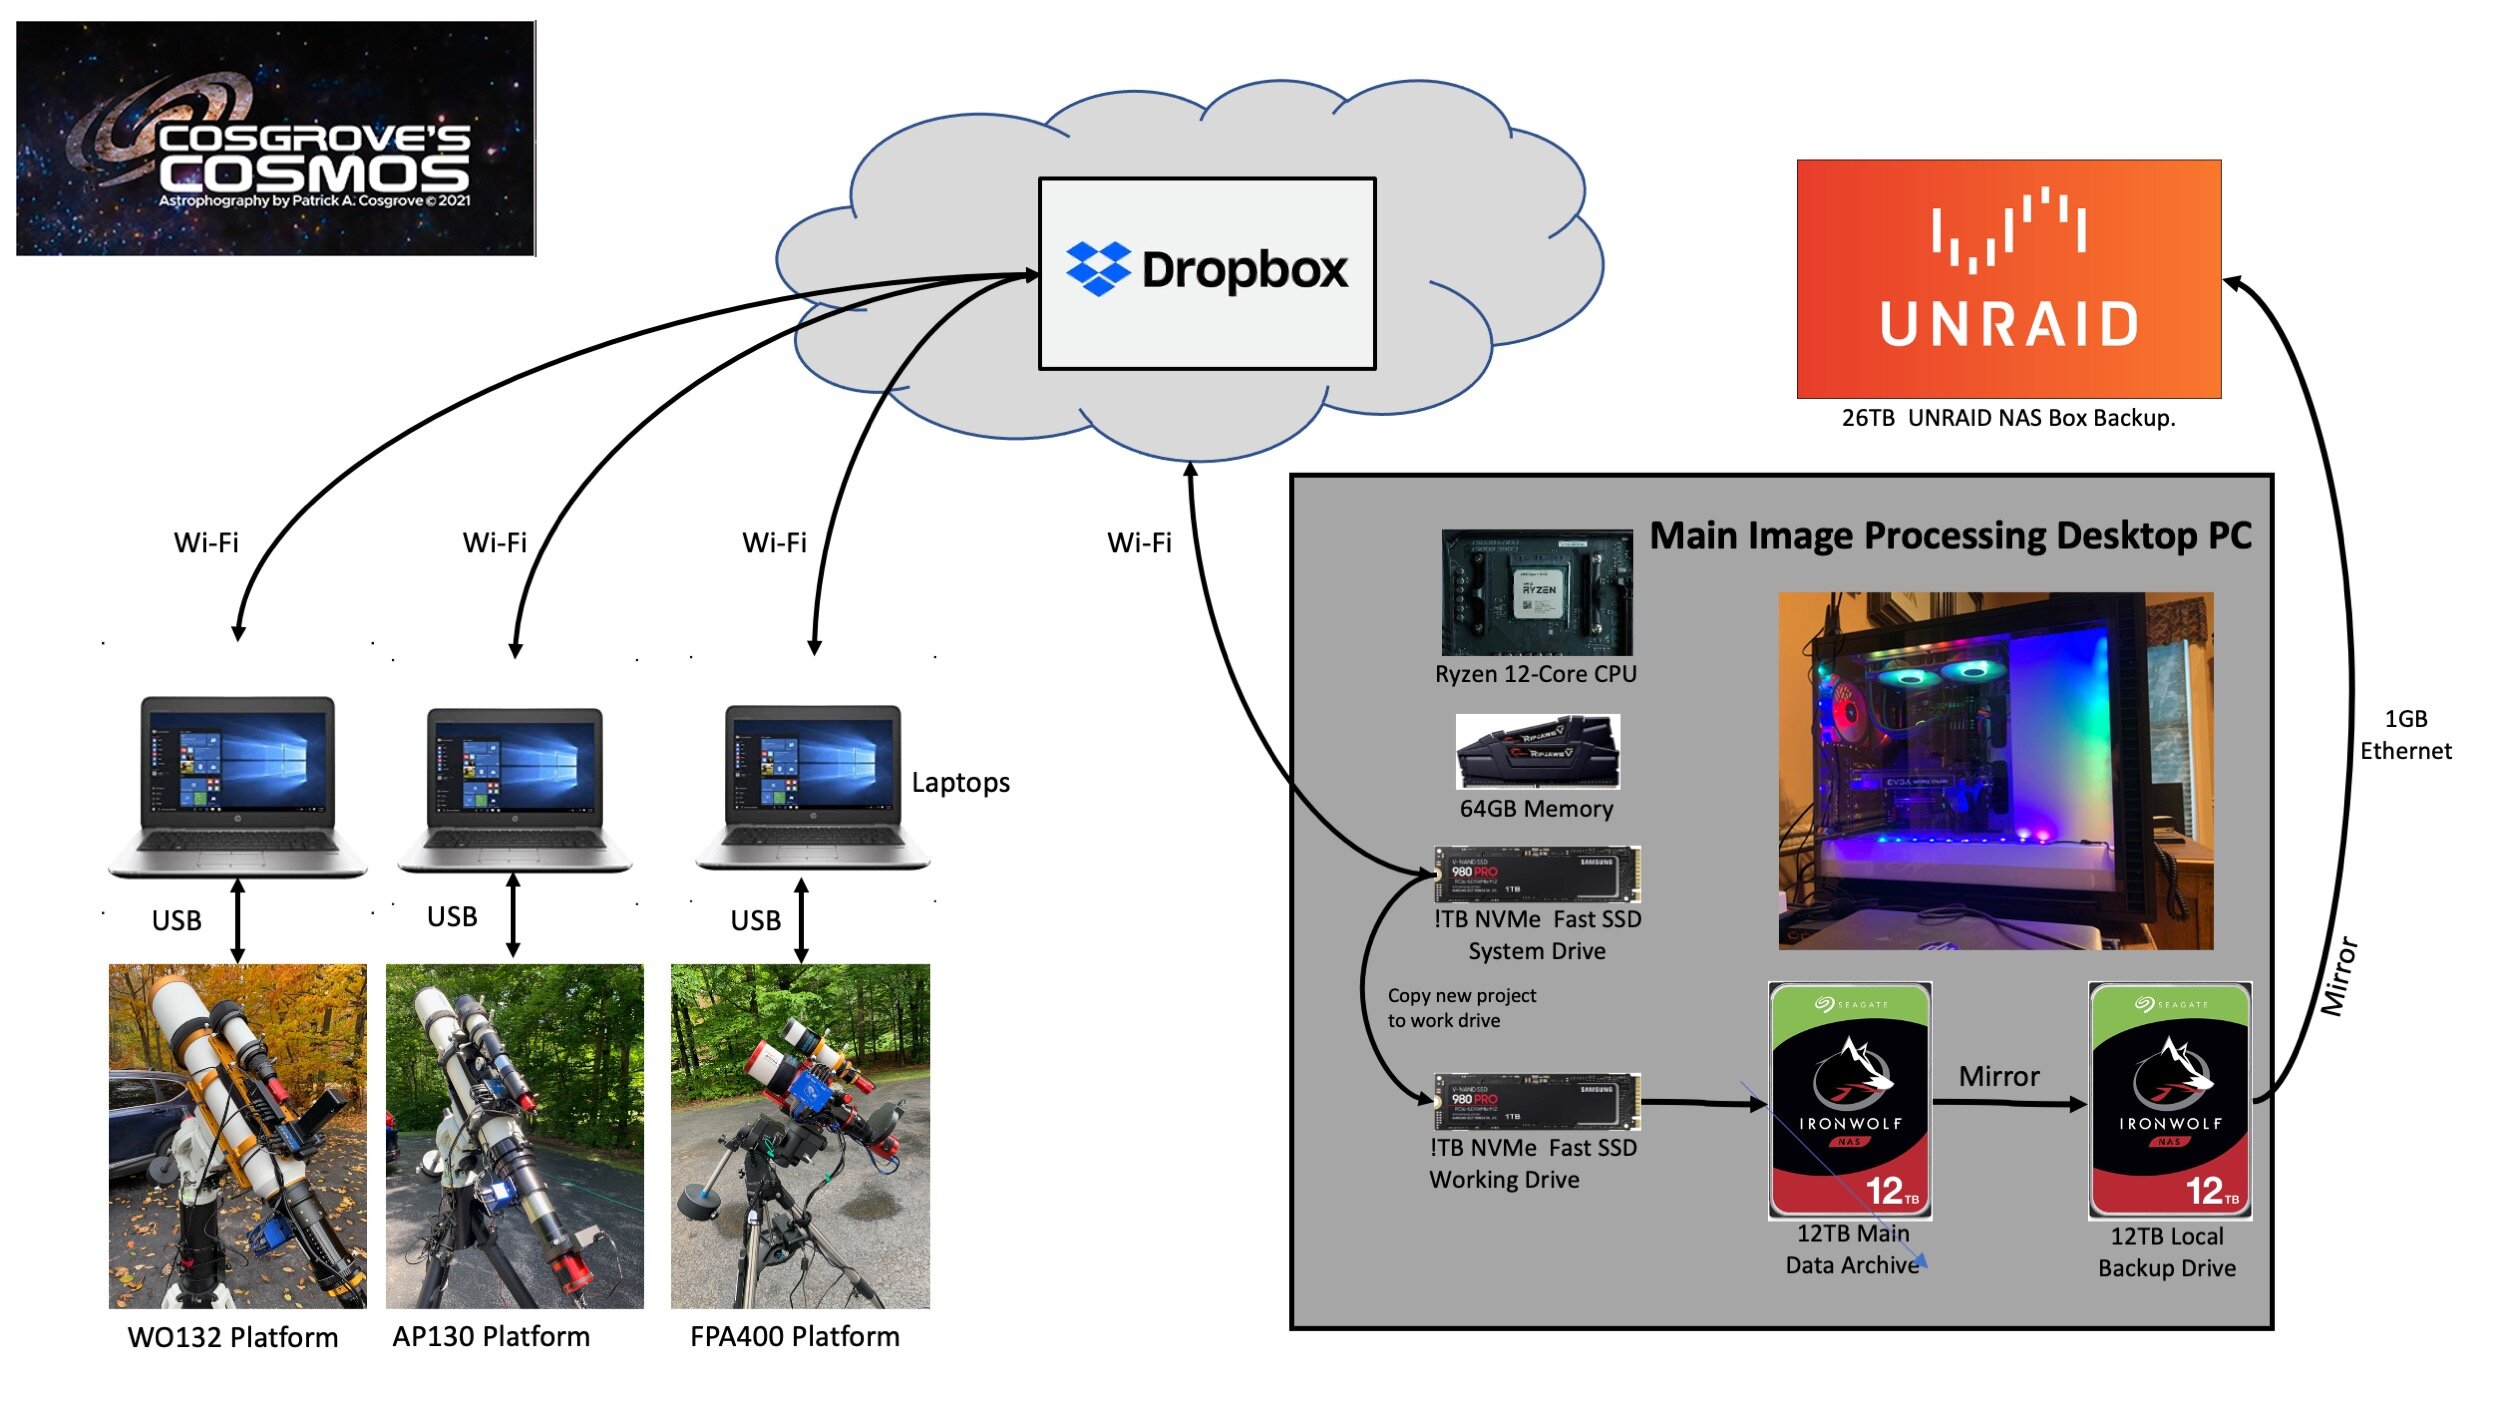
I decided to build a NAS Box. For those unfamiliar with this, NAS stands for “Network Attached Storage”. My son Kevin had experience with building these and so I took an old computer that I had, installed UNRAID on it. UNRAID is NAS Box operating system that replaces windows and turns the computer into a dedicated NAS Box. I loaded it with 26TB of old and new drives and then located it as far away as I could in my house. In this case, it was installed in my HAM Shack in a remote corner of the basement. Both it and my main computer are connected via hardline 1 Gigabit Ethernet connection. I use FreeeFileSync software to do mirror backups from the main Data Archive drive to the local backup drive and to the NAS box.
In addition to the data backup, I also use the NAS Box for doing laptop and main system drive backups.
This setup has proved itself to be both robust and reliable.

Capture Laptops and Dropbox
Now let's revisit the capture side of the equation.
I am now running 3 telescope platforms at the same time. Each is driven by a laptop. Standardizing these laptops simplifies things and makes setup easier to do. I ended up buying 3 reconditioned HP laptop computers. Specifically, the EliteBook 820 G3 Business Laptop with a 12.5 inch IPS anti-glare FHD (1920x1080) screen.
Before COVID-19 and the lockdowns, I could pick these up reconditioned for about $200 each. After the lockdown, remote education needs caused a huge jump in demand on the used laptop market - I had to scramble to get one at $300. But I like these units as they are small, thin, lightweight, and work extremely well for this application. The FHD screen allows for just enough screen real-estate to allow SGP to present a very useful screen display during capture. I have set these up so that they store all of the app profiles on a Dropbox drive. In addition, all subs are written to a DropBox Smart Drive. This means they are stored in the cloud and not on the laptop - alleviating Laptop storage concerns. I adjusted some Wi-Fi mesh points in my house so that the laptops have good connections when they are set up in the driveway.
This works out well. Subs are written to the cloud as they are captured. Dropbox mirrors them to the system drive of my main computer. This means that I have access to them during capture. Then, using Pixinsight, I can inspect the files - or I can even run EZ-livestack. This stacks the images as they are captured and displays them - giving me a sense of how the capture is going.

When I am ready to begin processing, I copy all of the capture files over to the workspace drive. When the project is done, I do a little cleanup of the files and then migrate them to the main Data Archive disk. Once this is done, I use FreeFileSync to move the files onto the two backup drives overnight.
Once a project is complete, the final version of the image is stored in a portfolio file on Dropbox. Finally, the finished image is also stored on various social networking sites as yet another level of backup.
The Computer, Storage and Networking Setup I am using today.
Collecting subs on three platforms - 3 SGP windows and one remote controlled security camera all mapped on to one of my screens. (click to enlarge)
The Results
The diagram above shows the final system as it now exists. The new computer delivers Pixinsight Benchmark scores that are 3X what there were before the rebuild. Moving data around with the super-fast SSDs is also a lot more convenient.
With this design, the life-cycle for a set of data is very consistent and easy to control.
I should also mention that I use the main computer to remote connect to each laptop during the capture process. I have 3 screens mapped onto one of my 4K monitors and I can easily control the telescope platforms from the comfort of my den. As you can see with the attached image, I also have a pan-tilt remote-controlled security camera mounted on the cart that holds two of the laptops. This allows me to keep an eye on the scopes and even listen to the sound of the mounts when they slew!
Now I am sure that a lot of very different choices could be made in building such a system. But I wanted to share with you the approach I took - perhaps it will give you some ideas for how you may develop your own system.