
NGC 7380 - The Wizard Nebula 2025: Image Processing Walkthrough
November 1, 2025

My Image of the Wizard Nebula!
Table of Contents Show (Click on lines to navigate)
Special Note
Welcome to the New Image Processing Page for this project! You got here by following a link in the main Image Project Report, and you can easily return to that by using the back button on your browser.
Abbreviations Used
BXT BlurXTerminator by RC-Astro
CC Cosmetic Correction
CT CurvesTransformation Process
DBE Dynamic Background Extraction Process
ET ExponentialTransformation
HT HistogramTransformation
NXT NoiseXerminator by EC-Astro
SCNR Subtractive Chromatic Noise Reduction Process
SPCC SpectroPhotometric Color Calibration
STF Screen Transfer Function
STF->HT Method - dragging the STF triangle to the base of the Historgam Transformation tool and
then applying this to the image to go nonlinear
SXT StarXterminator by PC-Astro
WBPP Weighted Batch Preprocessing Script
Processing this Image
(All Processing is done in Pixinsight, with some final touches done in Photoshop)
1. Blink
General
Lots of satellite tracks - easy to handle
Ha
6 frames removed for thin clouds or obstructions at the end of the night
O3
9 frames removed, three obstructions, six for clouds
S2
10 frames removed, 3 obstructions and 7 for clouds
Red
No frames removed!
Green
No frames removed for clouds.
Blue
No frames removed for clouds.
Darks
All looks ok
Dark Flats
All looks ok
Flats
all good
2. WBPP 2.8.9
Reset everything
Load all lights
Load all flats
Load all darks
Select - maximum quality
Reference Image - auto - the default
Select the output directory for the WBPP folder
Enable CC for all light frames
Pedestal value - auto
Darks -set exposure tolerance to 0
Lights - set exposure tolerance to 0
Lights - all set except for a linear defect
set for Autocrop
WBPP run 1:55:50 - no errors
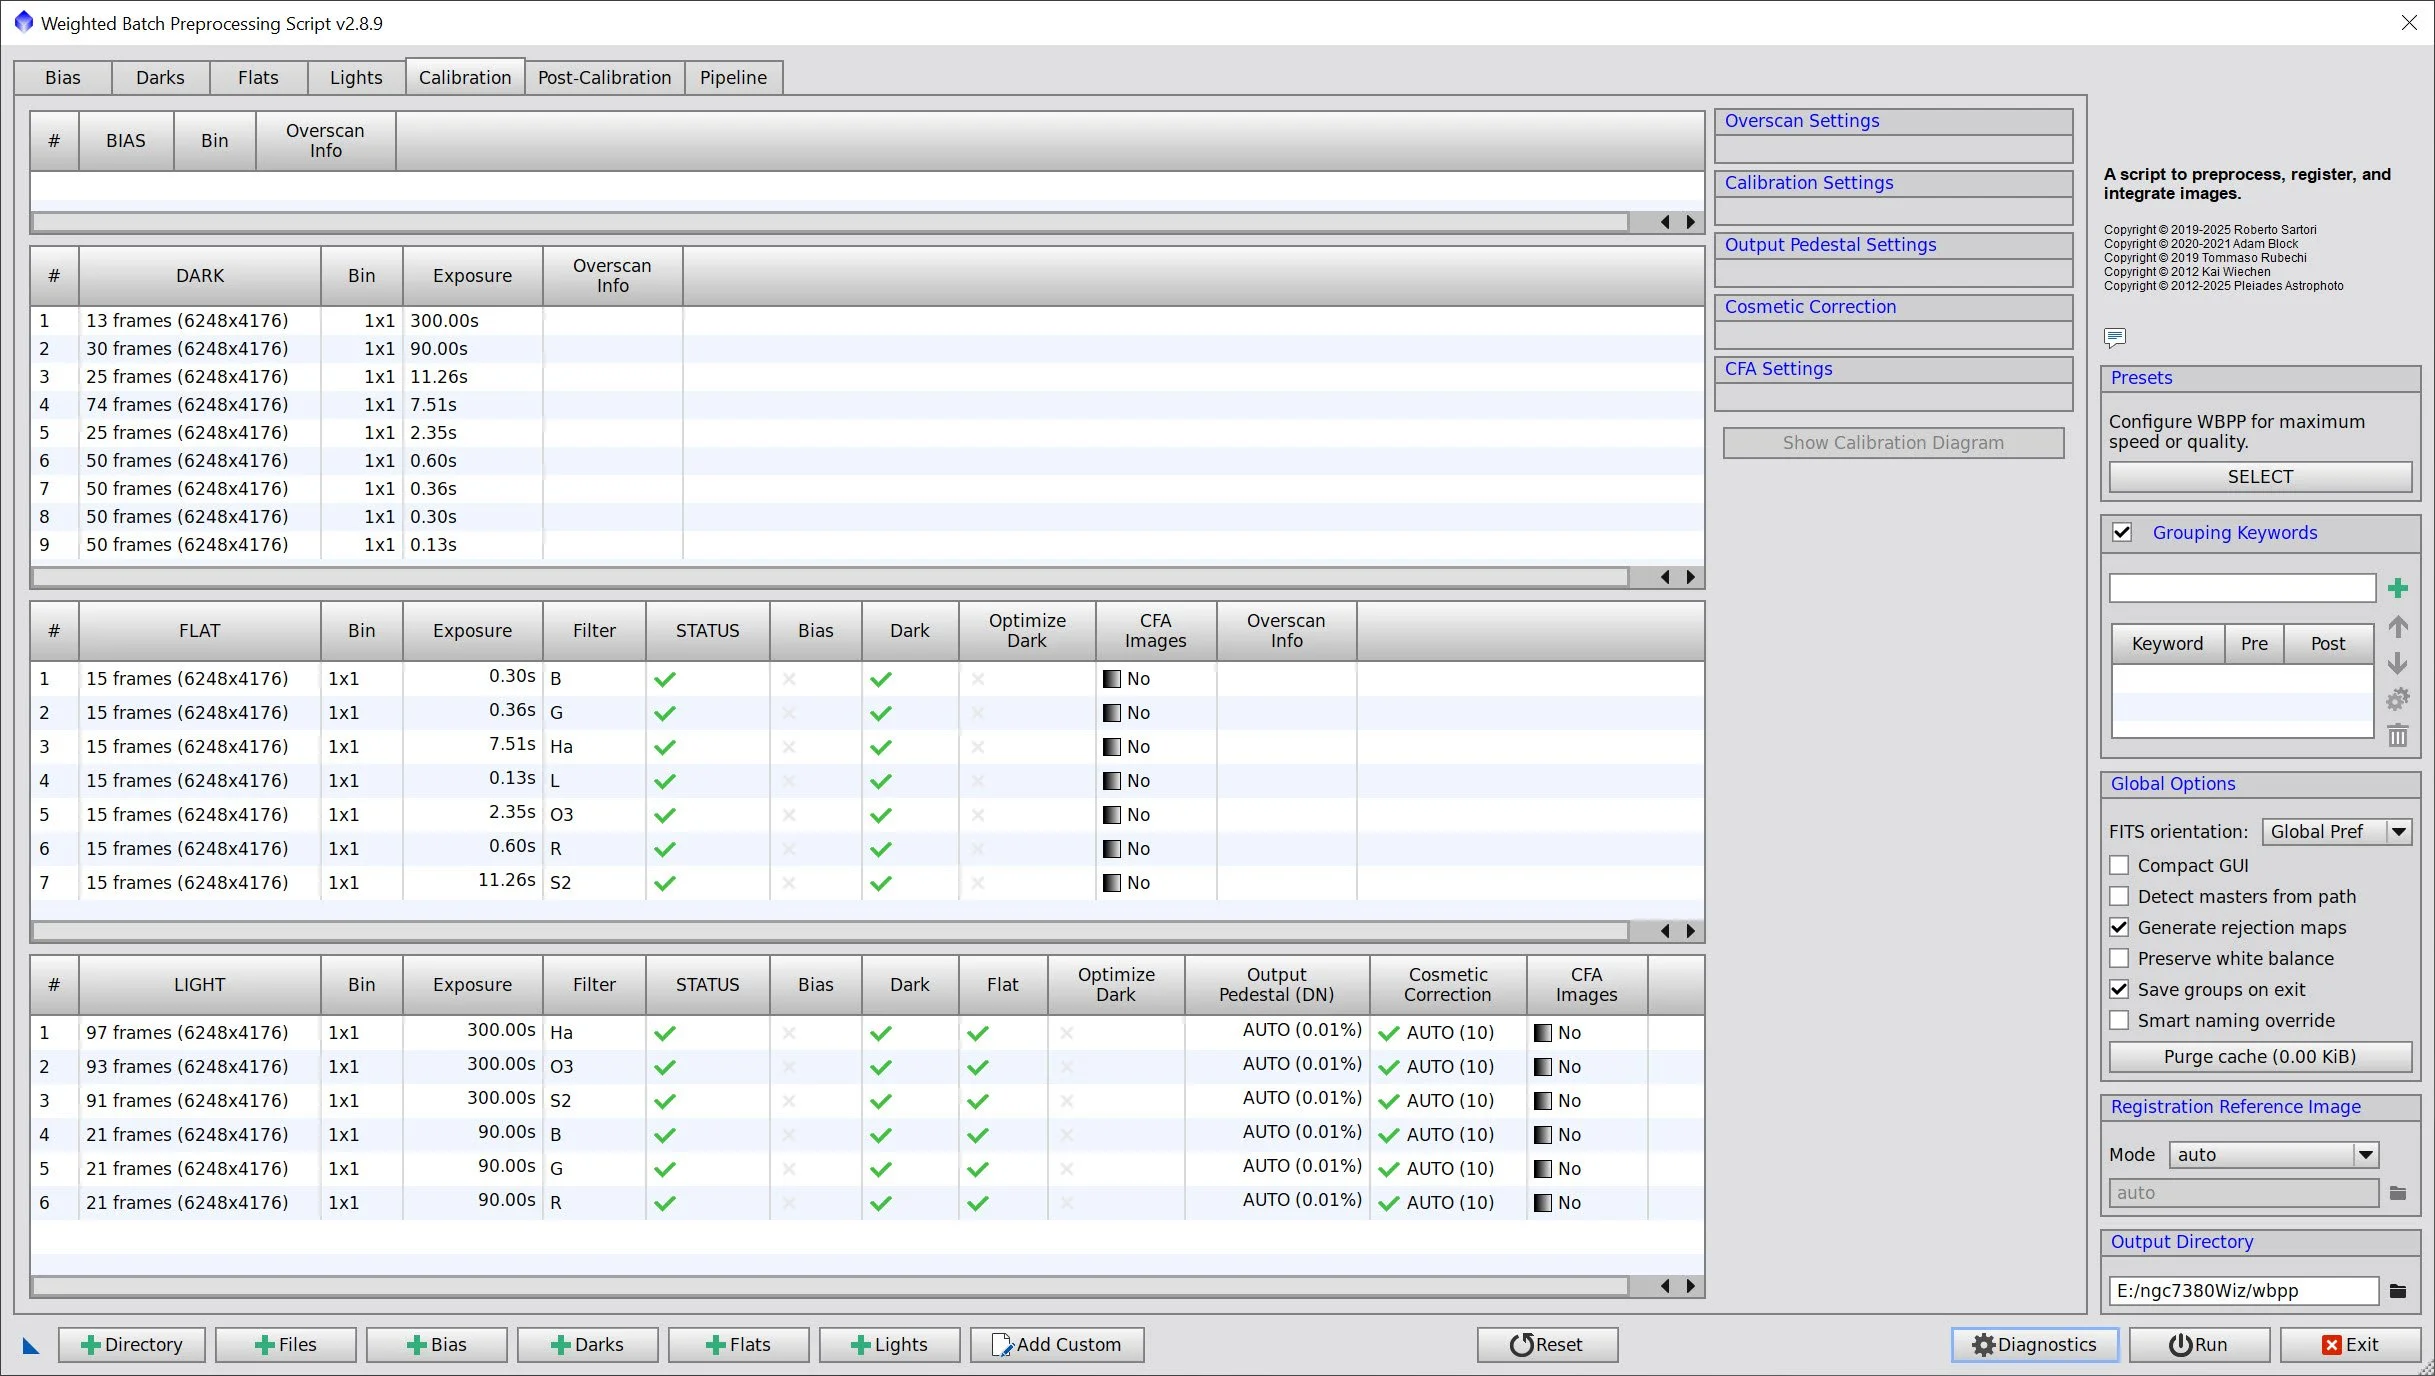
WBPP Calibration View

WBPP Post Calibration View

WBPP Pipeline View
3. Load Master Images and Create Color Images
Load all master images and rename them.
Using CombineChannels, create the Master SHO and RGB color images

Master Ha, O3, and S2 Images
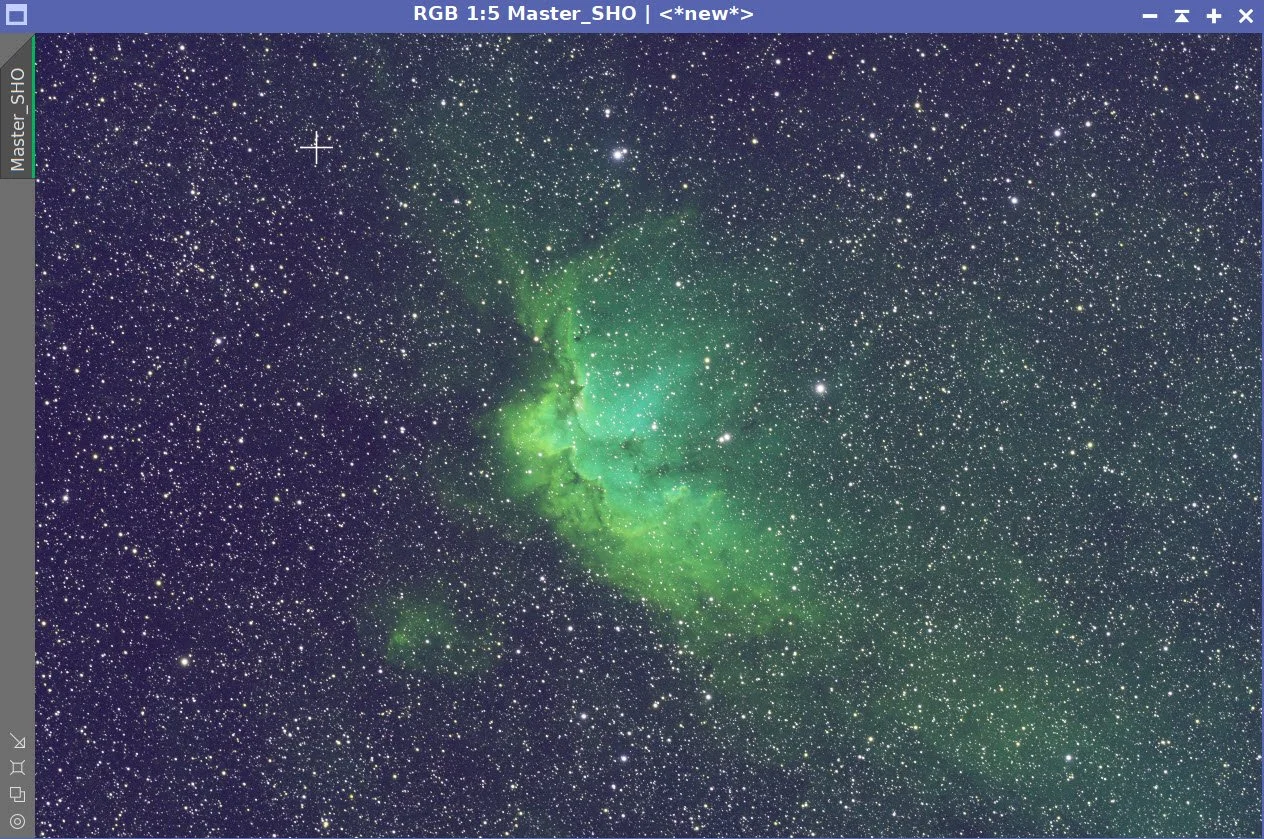
Master SHO image.

Master R, G, and B images
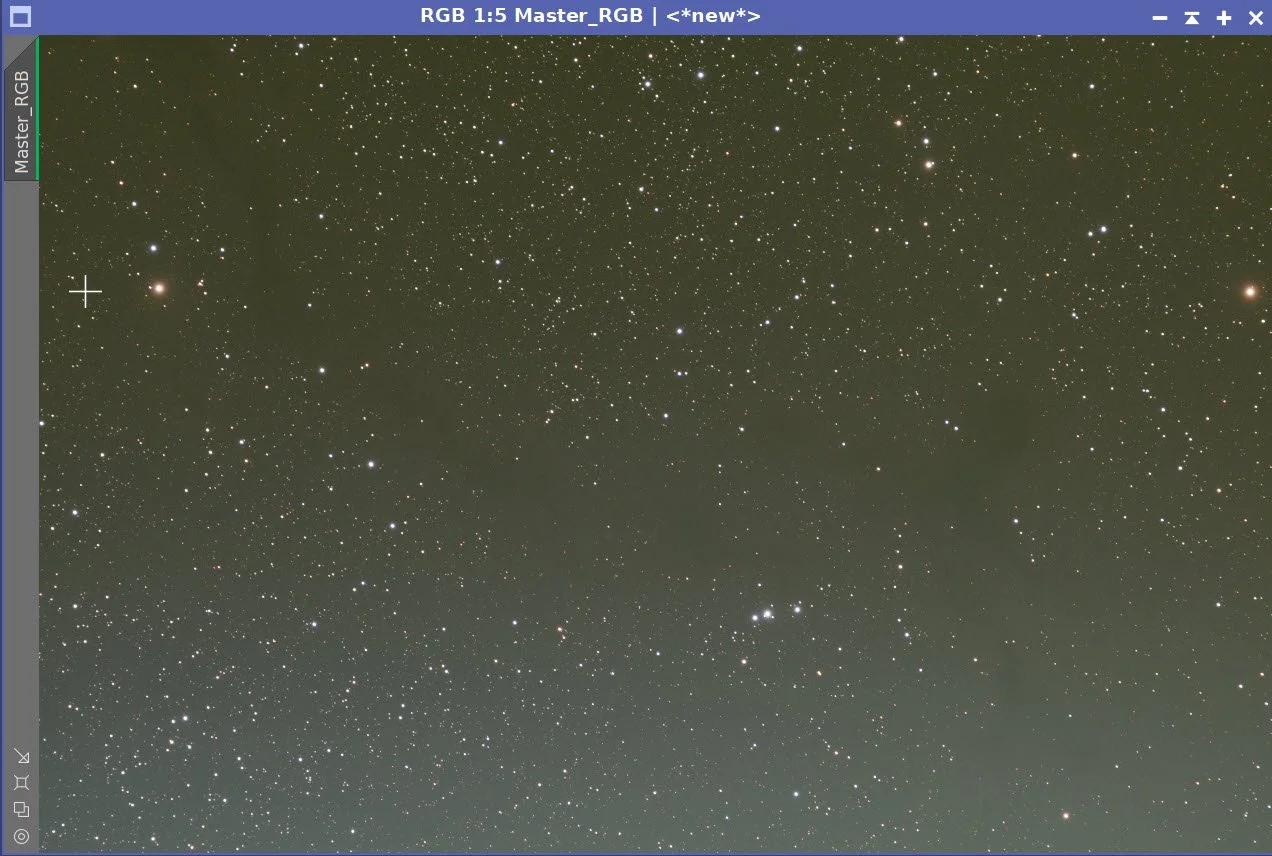
Master RGB color image.
4. Initial Process of Linear SHO data
Run DBE for the SHO linear image. Use subtraction for the correction method. Choose a sampling plan that avoids the nebulae (see below)
Run BXT - correct only. This cleans up and stars at the corners. Not much to do in this image as the scope is very crisp.
RUN PFSImage script to measure star sizes. X = 2.25, Y = 2.10. This will influence the values used in BXT.
Run Full BXT - I am using an enhanced set of values to shrink stars more. These are about double the measured star sizes. See the BXT Panel Snapshot below.
Run NXT V3 - see params from snapshot below.
Run SXT and don’t save the SHO stars.
I tried running NarrowbandNormalization on the linear image, but the resulting image seemed messed up from an STF point of view. So I used the STF->HT method to go nonlinear and then used NarrowbandNormalization as a first cut for color. See the screen snap below for the parameters used.
I still had some magenta tones in the background, so I did my Invert/SCNR Green at 1.0/Invert trick to remove that. The result was my starting nonlinear image for later processing.
Master SHO Image DBE Sampling Plan (click to enlarge)
Master SHO- Before DBE (click to enlarge)
Master SHO after DBE (click to enlarge)
Background Subtracted by DBE (click to enlarge)
Measuring Star Sizes with PFSImage Script (click to enlarge)
BXT Settings Used. (click to enlarge)
NXT Panel used. (click to enlarge)


Master RGB Before BXT Correct Only, After BXT Correct Only, After BXT Full, After NXT

Final Master SHO Image
Master SHO Starless Image (click to enlarge)
Before Narrowband Normalization (click to enlarge)
Afer NBNormalization (click to enlarge)
After SCNR Green at 0.0 (click to enlarge)

NarrowbandNormalization Paramters used.
After Image Invert (click to enlarge)
After the Final Inversion. (click to enlarge)
5. Process the Linear RGB Data
Run DBE for the RGB linear image. Use subtraction for the correction method. Choose a sampling plan that avoids the nebulae (see below)
Run BXT - correct only. This cleans up and stars at the corners. Not much to do in this image as the scope is very crisp.
Select a preview rectangle that samples the background sky, and then set up and run SPCC.
Use the 571 device curve
Use ZWO R, G, & B filter curves,
Run the PFSImage script to measure star sizes. X = 2.25, Y = 1.10. This will influence the values used in BXT.
Run Full BXT - I am using an enhanced set of values to shrink stars more. These are about double the measured star sizes. See the BXT Panel Snapshot below.
Run NXT V3 - see params from snapshot below.
Run SXT and don’t save the SHO stars.
I tried running NarrowbandNormalization on the linear image, but it produced an unexpected stretch when viewed with STF, so I reverted to STF→HT first. I then used NarrowbandNormalization as a first cut for color. Refer to the screenshot below for the parameters used.
I still had some magenta tones in the background, so I did my Invert/SCNR Green at 1.0/Invert trick to remove that. The result was my starting nonlinear image for later processing. Run SXT.
Master RGB DBE sampling Plan (click to enlarge)
Before DBE (click to enlarge)
Master RGB after DBE (click to enlarge)
Master L Background subtracted (click to enlarge)

Measuring RGB star sizes.

Params used for BXT

NXT Params used.


Master RGB before BXT Correct Only, After BXT Correct Only, After BXT Full, After NXT V3

FInal Master RGB image - Before Star Removal.

Master RGB Star image after SXT.
6. Take RGB Stars Nonlinear
Use Seti Astro Star Stretch Script to stretch Stars
I decided to create three versions of the nonlinear star image. I would start with the default settings of the StarStretch script, and then gradually increase the star sizes and boost the color. This gives me three different star images, and I can then choose which one I think looks best when the star and starless images are recombined.
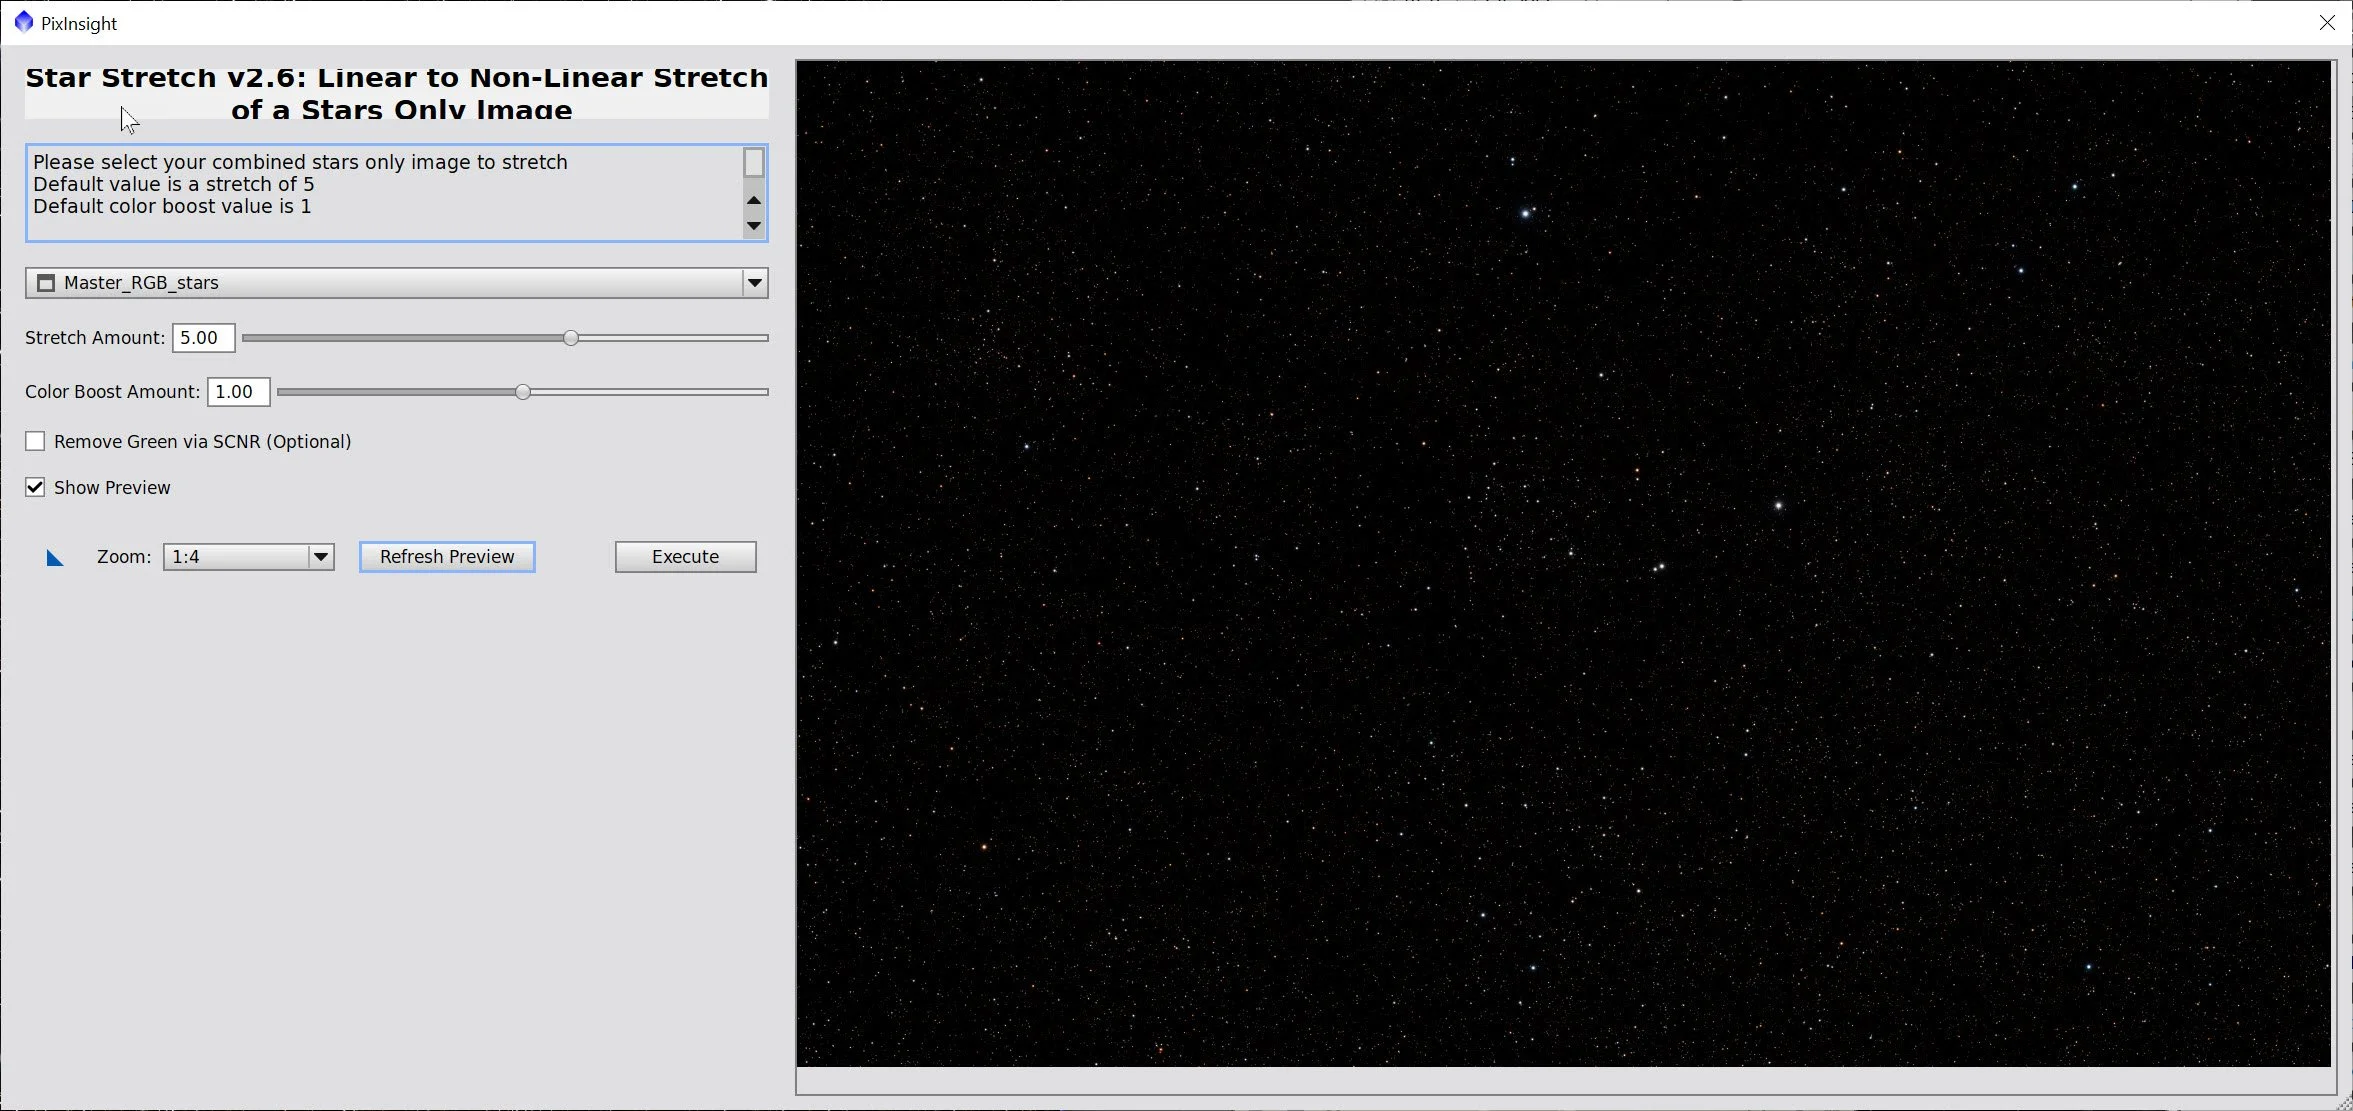
Star Stretch Script panel and default params used.

Nonlinear RGB Stars image #1

StarStetch Params for stars #2

Stars #2 Image

Starstretch Panel for Stars #2

Stars #3 Image
7. Process the Nonlinear SHO Starless Image
Create the WarmMask
Use the ColourMask Process with Star Hue 0 and end hue 72, with a blur of 5
Apply CT to boost the mask
Create the CoolMask
Use the ColourMask Process with Star Hue 169 and end hue 256, with a blur of 5
Apply CT to boost the mask
Apply CT to set the basic tone scale
Apply the WarmMask and adjust the color and tone scale with CT
Apply the CoolMask and adjust the color and tone scale with CT
Apply the WarmMask and apply LHE with a Scale factor of 168, Contrast Limit of 2.0, amount of 0.3, and an 8-bit Histogram. I often find that I want to apply contrast enhancement to the warm regions where things seem to be happening, and avoid doing this to the cool regions.
Apply the DarkStructuresEnhance script with default parameters to bring out the dark dust a bit more.
Apply a global (no mask) CT to adjust the color and tone scale for our current state.
Apply another round of CT with the WarmMask in place.
Create the AreaMask using the GAME script. The Goal here is to isolate the whiter pillar and plume structures so we can bring them out better.
Apply the AreaMask
Do a CT
Apply LHE with a factor of 64, Contrast limit of 2.0, and an amount of 0.5 with an 8-bit histogram.
Do a global sharpen using MLT with the params shown in the panel snapshot below.

Params used to create the initial WarmMask
Initial WarmMask (click to enlarge)
WamMask afer CT Boost (click to enlarge)

The Params used to create the initial CoolMask
Initial CoolMask (click to enlarge)
CoolMask after CT boost (click to enlarge)
After CT on whole image (click to enlarge).
After CT with the CoolMask (click to enlarge)
After the DarkStructuresEhance Script (click to enlarge)
After another CT with the WarmMask (click to enlarge)
AreaMask shown on image so you can see what is being enhanced. (click to enlarge)
LHE applied with the AreaMask in place (click to enlarge)
Afer Sharpening.
After CT with the WarmMask (click to enlarge)
After LHE with the WarmMask (click to enlarge)
After Global CT with no Mask (click to enlarge)

AreaMask create with GAME script.
CT with the AreaMask in place (click to enlarge)
MLT Panel Params used for global sharpening
8. Add the Stars Back In
Using the ScreenStars Script, add stars back into our SHO starless image. Do this three times with the three star images created
Pick the best one. I went with star image #1 because I think the heavier stars detract from the nebulosity in the image.

The script used to add the images back in,


Assessing the Three Star Images
Final Image ready for Photoshop Polishing!
9. Export the Image to Photoshop for Polishing
Save the image as a TIFF 16-bit unsigned and move to Photoshop
Make final global adjustments with Clarify, Curves, and the Color Mixer - slight tweaks really
Use the lasso tool with a feather of 100-pixel and select small detail areas of the image, and enhance with the Clarity, Texture, and color mixer tools
Added Watermarks
Export Clear, Watermarked, and Web-sized jpegs.
The Final Image!

The Final Image
10. Final Comments
On one level, this was a complicated process. The main complication was the need to process the RGB subframe separately from the SHO subframes. On the other hand, the processing steps used were simple and straightforward, and I had little trouble dealing with noise.
With the observatory now operational, I am finding it is easier than ever to extend my integration times.
With more integration, the SNR improves, and this, I believe, makes the processing relatively more straightforward to accomplish.
Feel free to use the back arrow to go back to the NGC 7380 Main page, or you can use the menu at the top of the page to continue your navigation.
Thanks,
Pat