
B33/NGC 2024 - The Horsehead and Flame Nebula - Dec 2025 Image Processing Walkthrough.
December 17, 2025
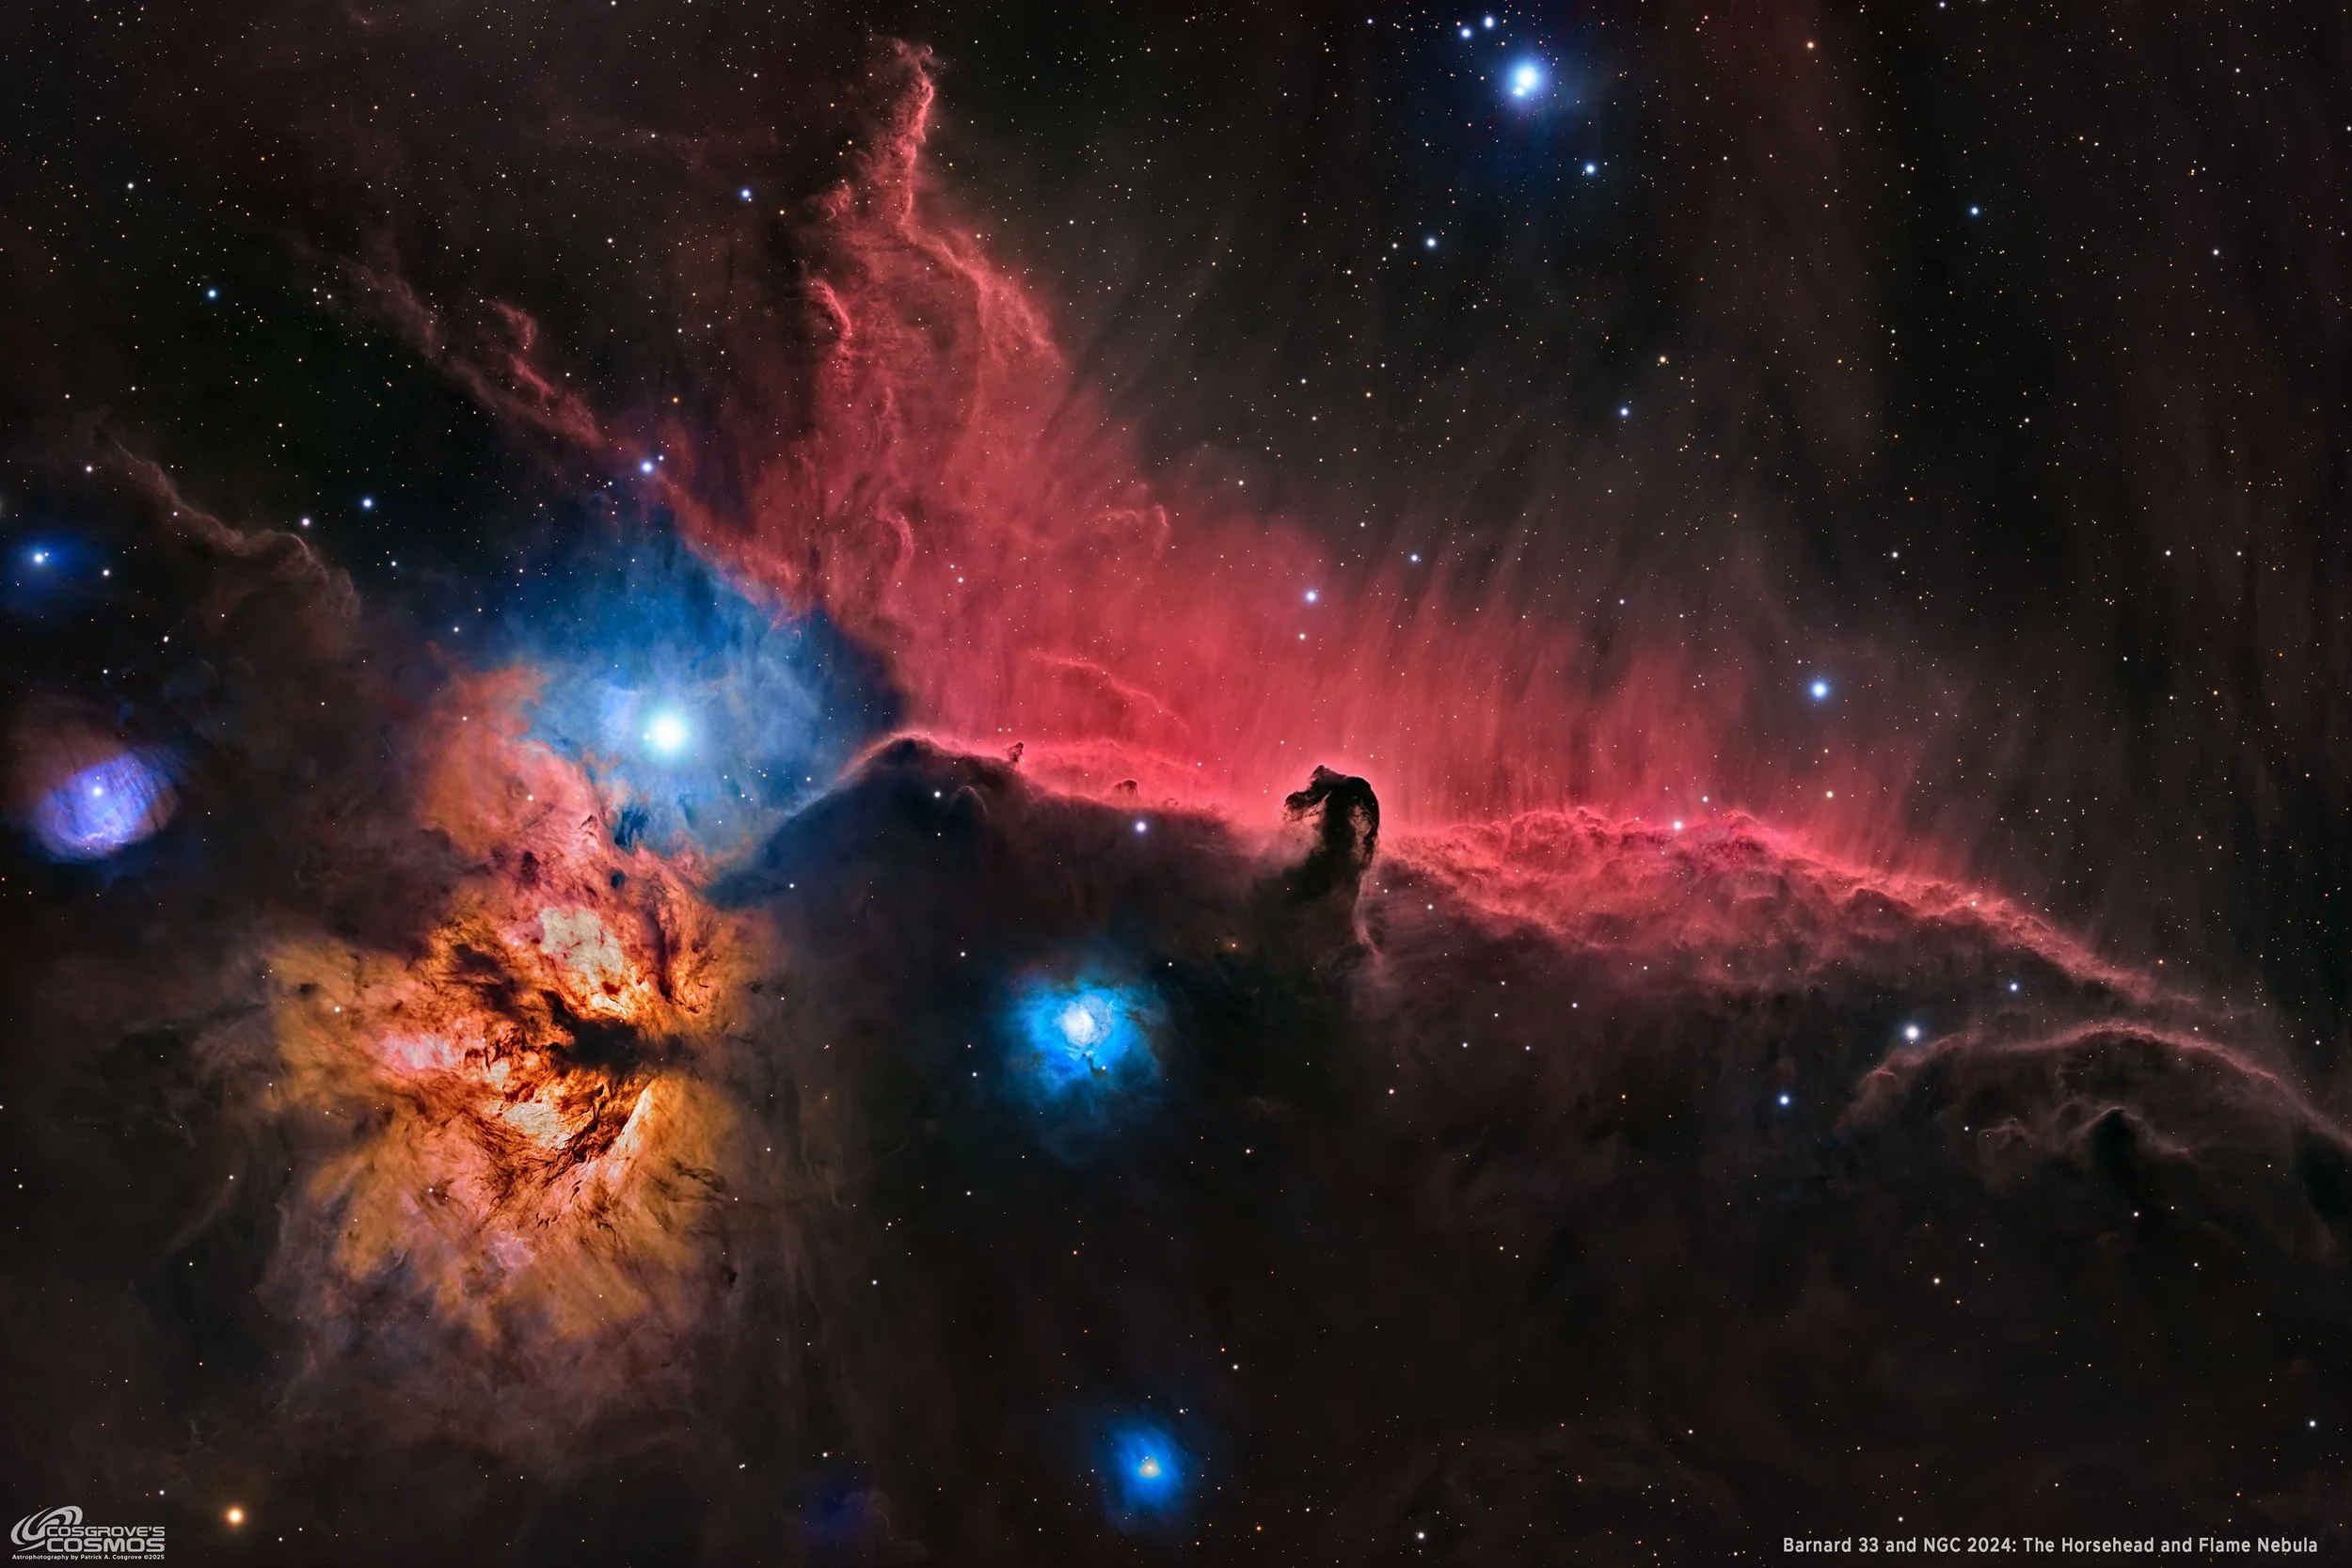
My 2025 image of Barnard 33 and NGC 2024
🔭 Project Summary
Target: B33 – The Horsehead Nebula (with NGC 2024 – The Flame Nebula)
Capture Dates: October 27 & 28, 2025
Constellation: Orion • Distance: ≈ 1,300–1,500 light-years
Type: Dark Nebula (B33) silhouetted against emission backdrop (IC 434) + Emission Nebula / H II Region (NGC 2024)
Imaging Period: October 27–28, 2025 • Total Integration: 5 h 59 m 30 s (LRGB + Ha)
Filters: L · R · G · B (ZWO 36mm Unmounted LRGB Gen II) + Ha (Astronomik 36mm 6 nm)
Telescope: William Optics FLT 132mm f/7 APO Refractor + P-FLAT7A 0.8× Reducer
Camera: ZWO ASI2600MM-Pro (−15 °C; Gain 0 LRGB, Gain 100 Ha)
Mount: iOptron CEM60 on custom steel pier
Processing: PixInsight & Photoshop
Location: Whispering Skies Observatory · Honeoye Falls, NY (USA)
Field Includes: IC 431, IC 432, IC 435, LBN 934, LBN 944, LBN 958, LBN 962
Table of Contents Show (Click on lines to navigate)
Special Note
Welcome to the New Image Processing Page for this project! You got here by following a link in the main Image Project Report, and you can easily return to that by using the back button on your browser.
Abbreviations Used
BXT BlurXTerminator by RC-Astro
CC Cosmetic Correction
CT Curves Transformation Process
DBE Dynamic Background Extraction Process
ET Exponential Transformation
HDRMT HDR MultiScale Transform
HDRC HDR Composition
NXT NoiseXTerminator by RC-Astro
MLT Multiscale Linear Transform
PI PixInsight
PS Photoshop
SCNR Subtractive Chromatic Noise Reduction Process
SFS SubFrameSelector
SPCC SpectroPhotometric Color Calibration
STF Screen Transfer Function
STF->HT method – Drag the STF triangle to the base of HistogramTransformation, then apply it to the image to take it nonlinear.
SXT StarXTerminator by RC-Astro
WBPP Weighted Batch Preprocessing Script
Summary:
B33 / NGC 2024 HaLRGB Processing Flow
Two-column swimlane summary aligned to your B33 2025 PixInsight → Photoshop workflow (LRGB + Ha).
Processing this Image
(All Processing is done in PixInsight, with some final touches done in Photoshop)
1. Blink
I screened all subs and cal frames with Blink. I was surprised that I did not remove ANY frames collected for this image.
2. WBPP 2.8.9
All frames were loaded into WBPP:
Reset everything
Load all lights
Load all flats
Load all darks
Select - maximum quality
Reference Image - auto - the default
Select the output directory for the WBPP folder
Enable CC for all light frames
Pedestal value - auto
Darks - set exposure tolerance to 0
Lights - set exposure tolerance to 0
Lights - all set except for a linear defect
set for Autocrop
I chose NOT to use Drizzle processing.
WBPP run in 1:01:14 minutes - no errors
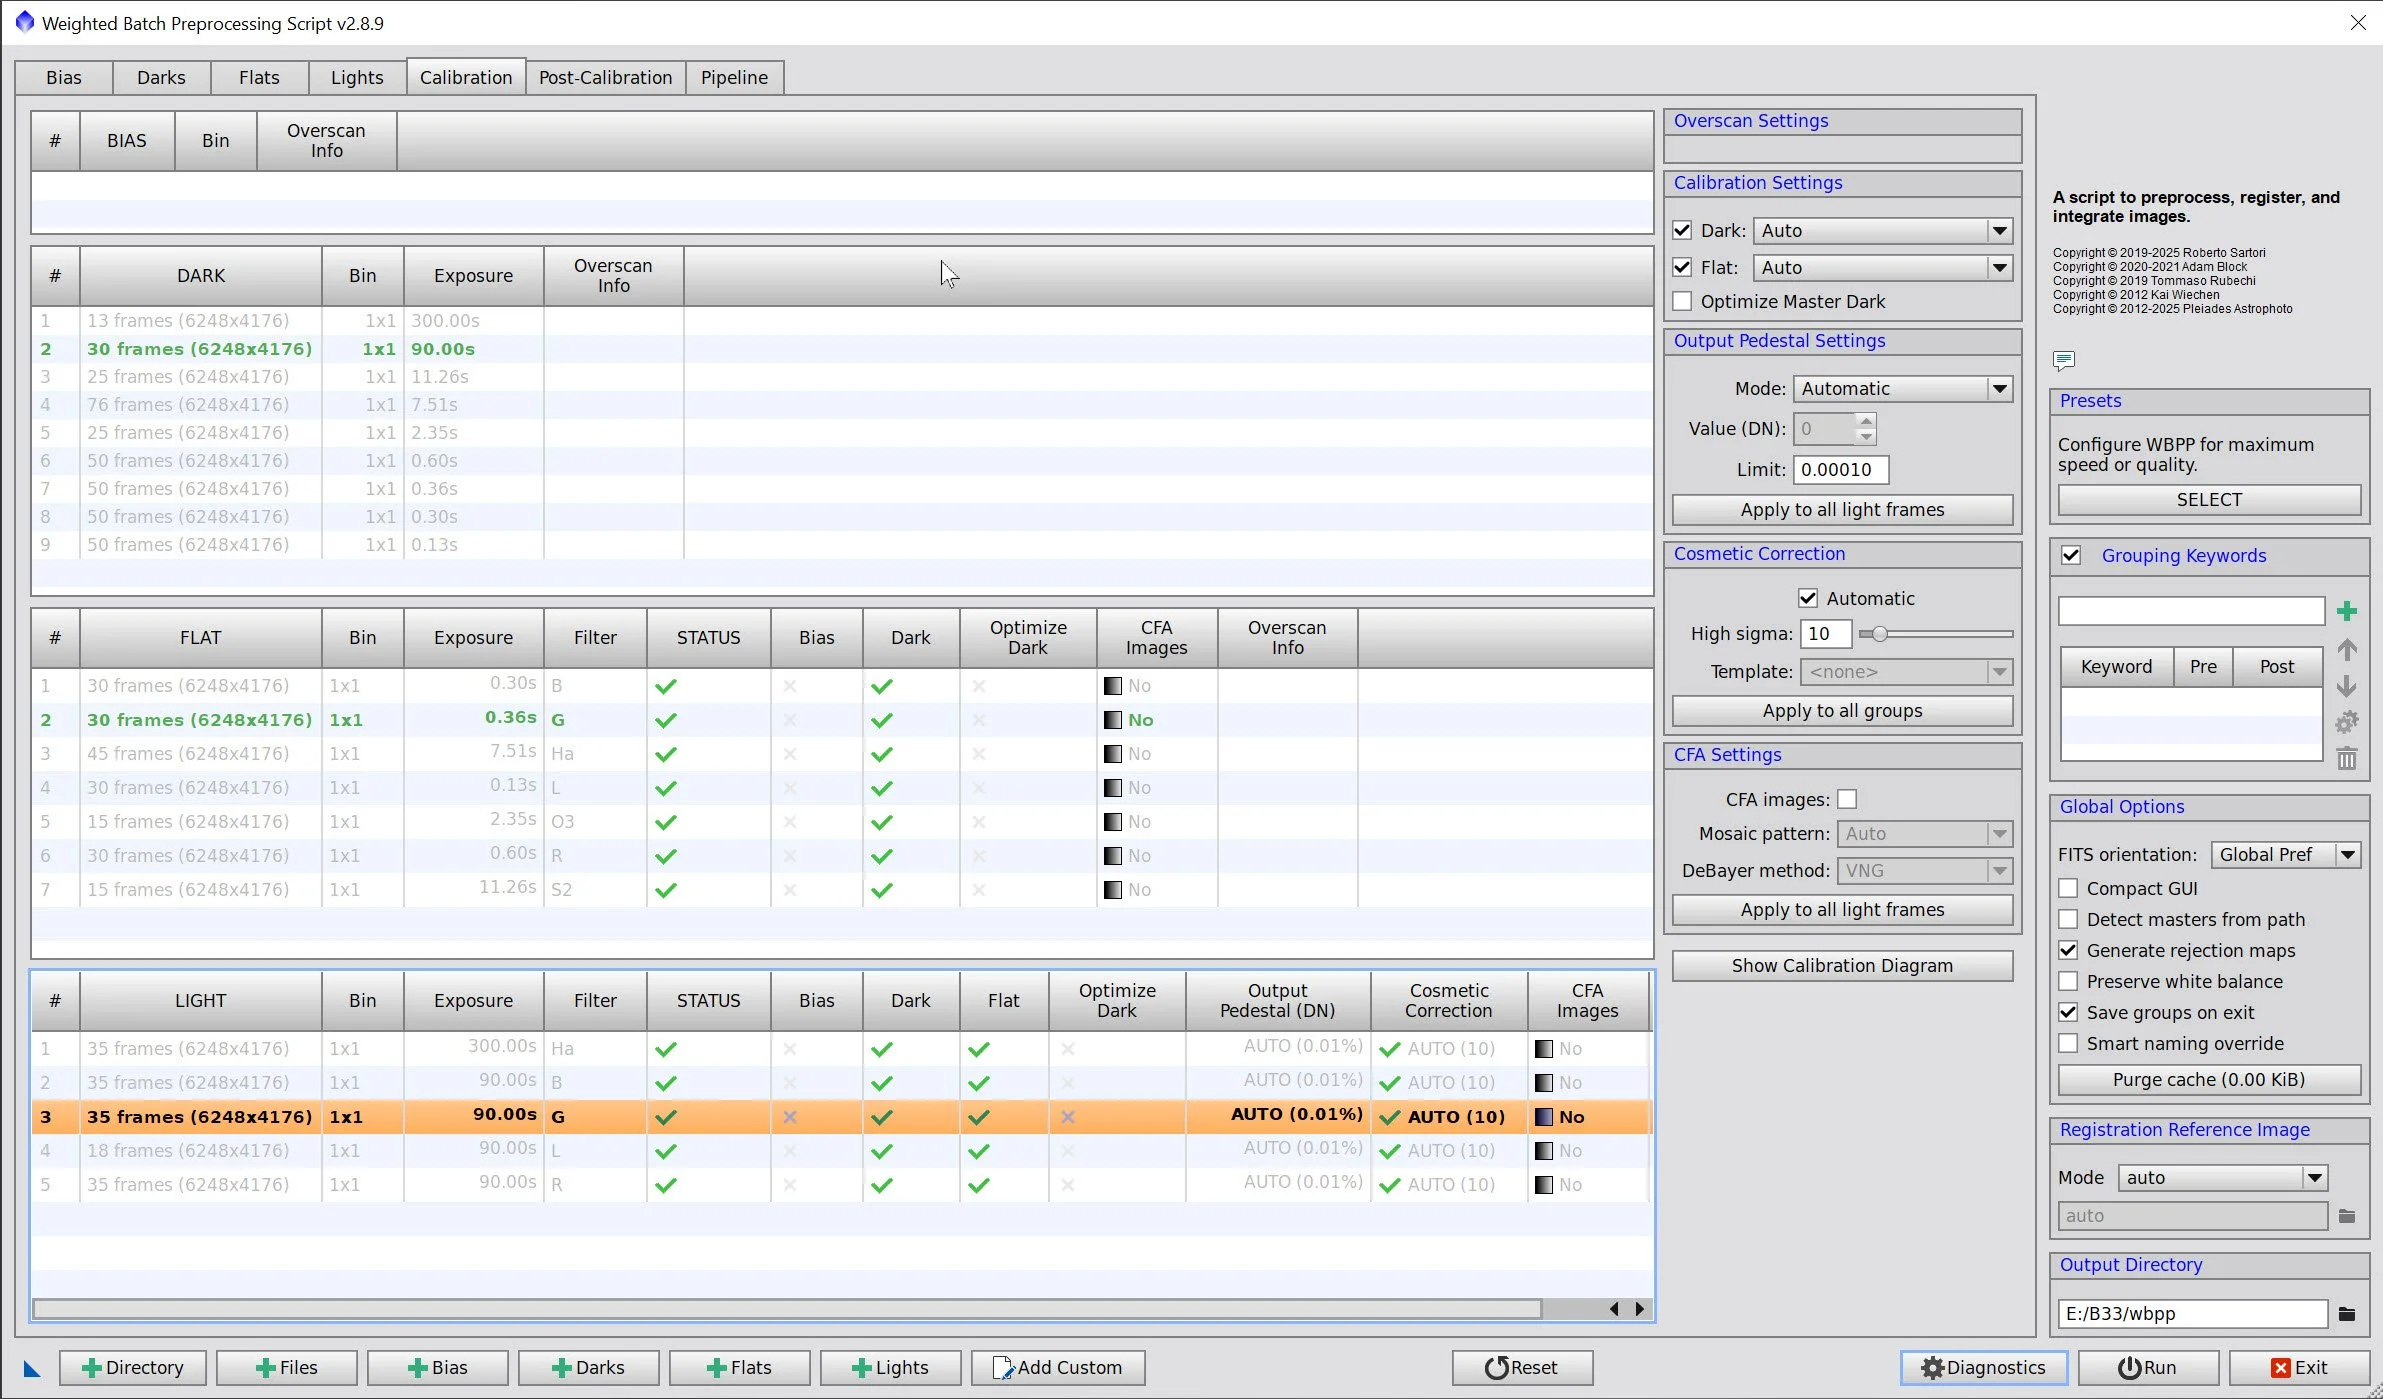
WBPP Calibration View
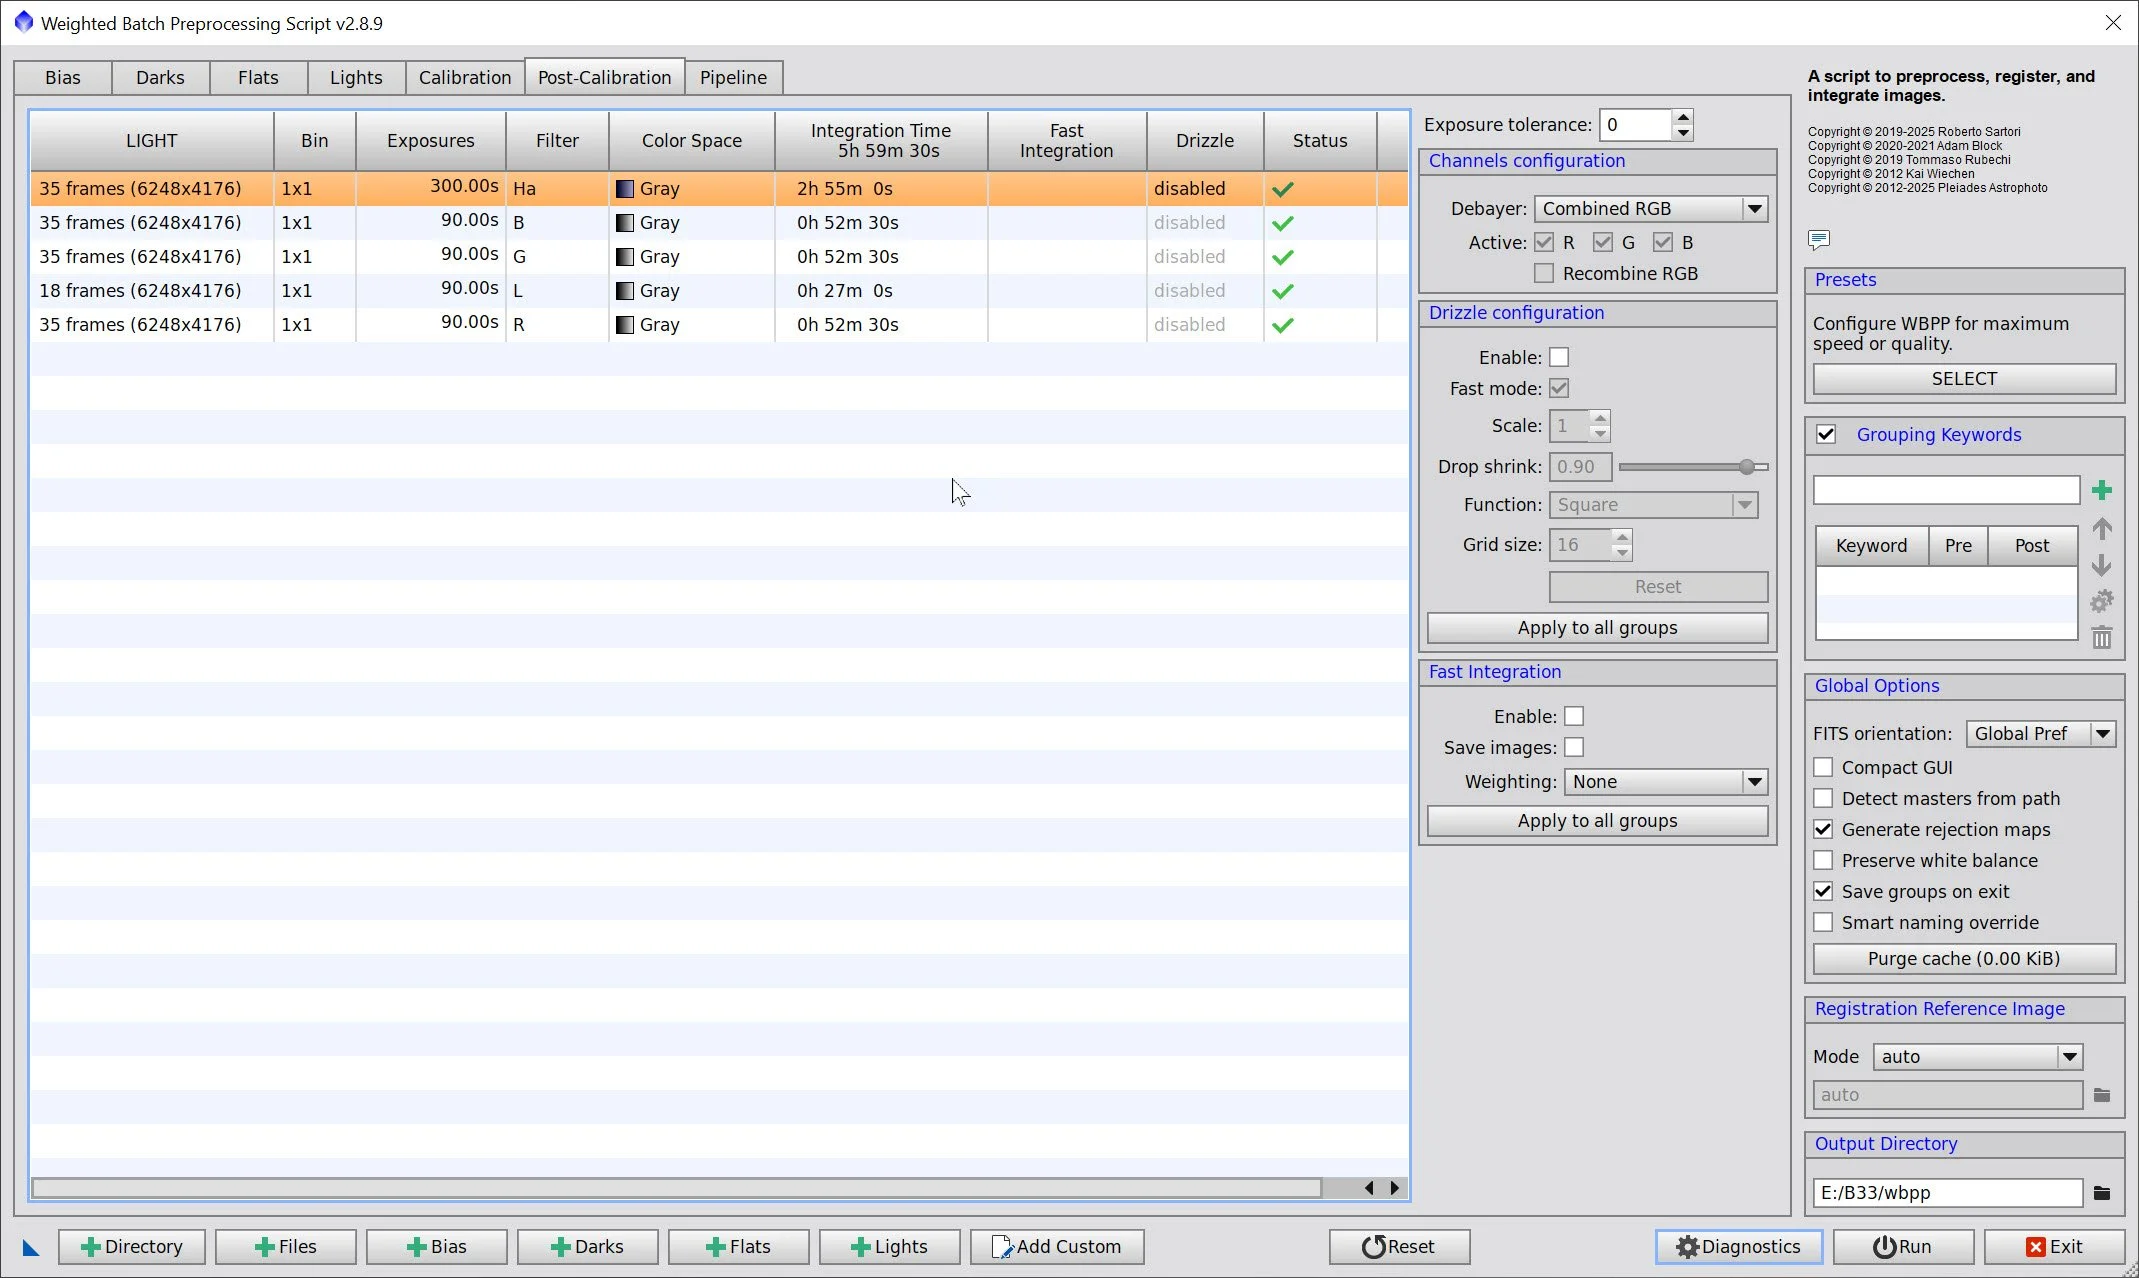
WBPP Post Calibration View
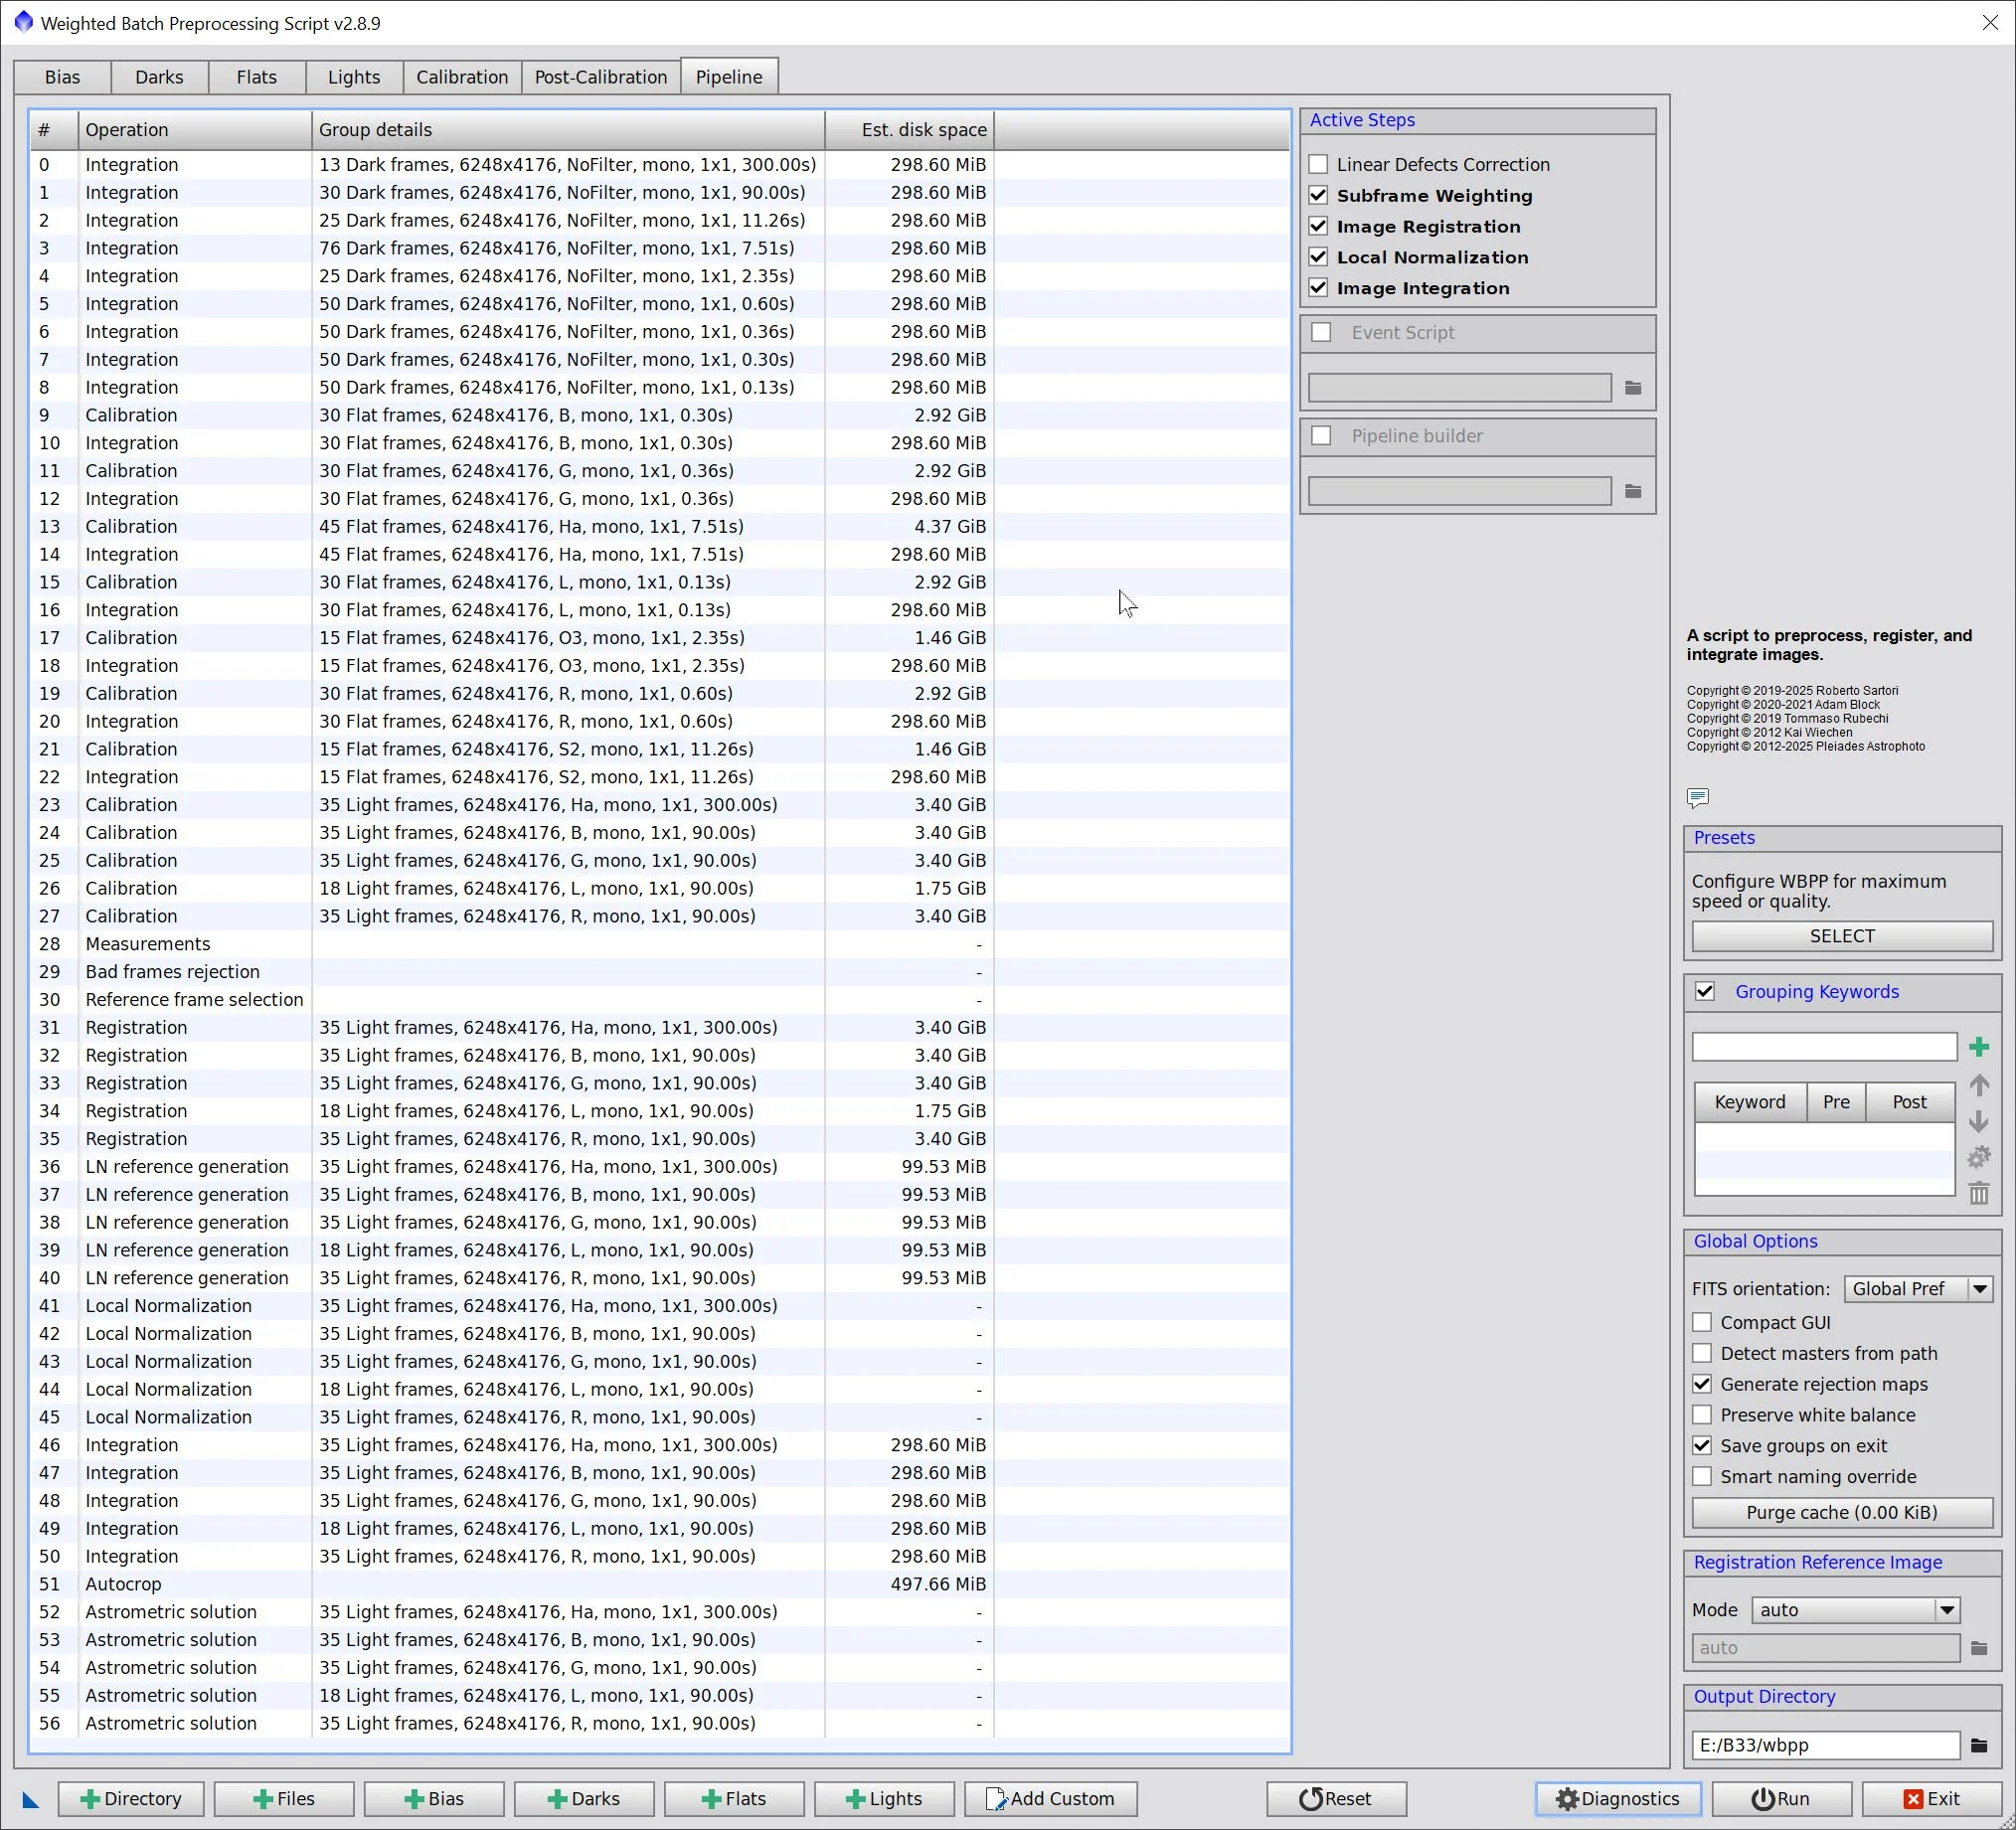
WBPP Pipeline View
3. Load Master Images and Create Color Images
Load all master images and rename them.
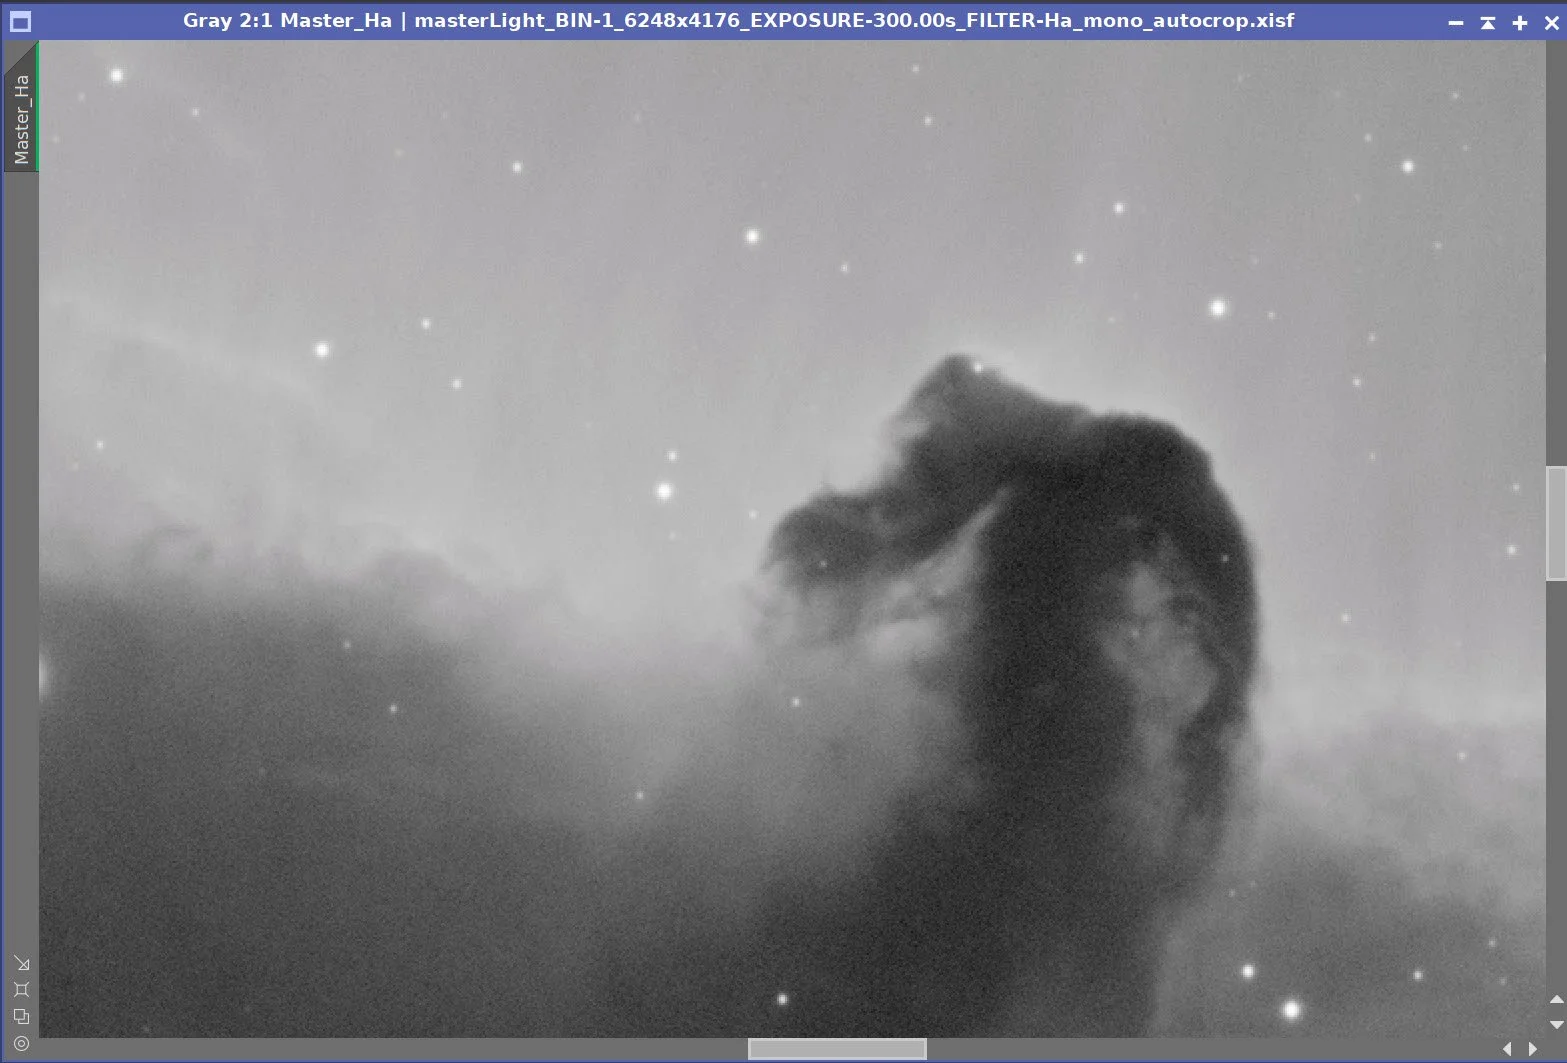
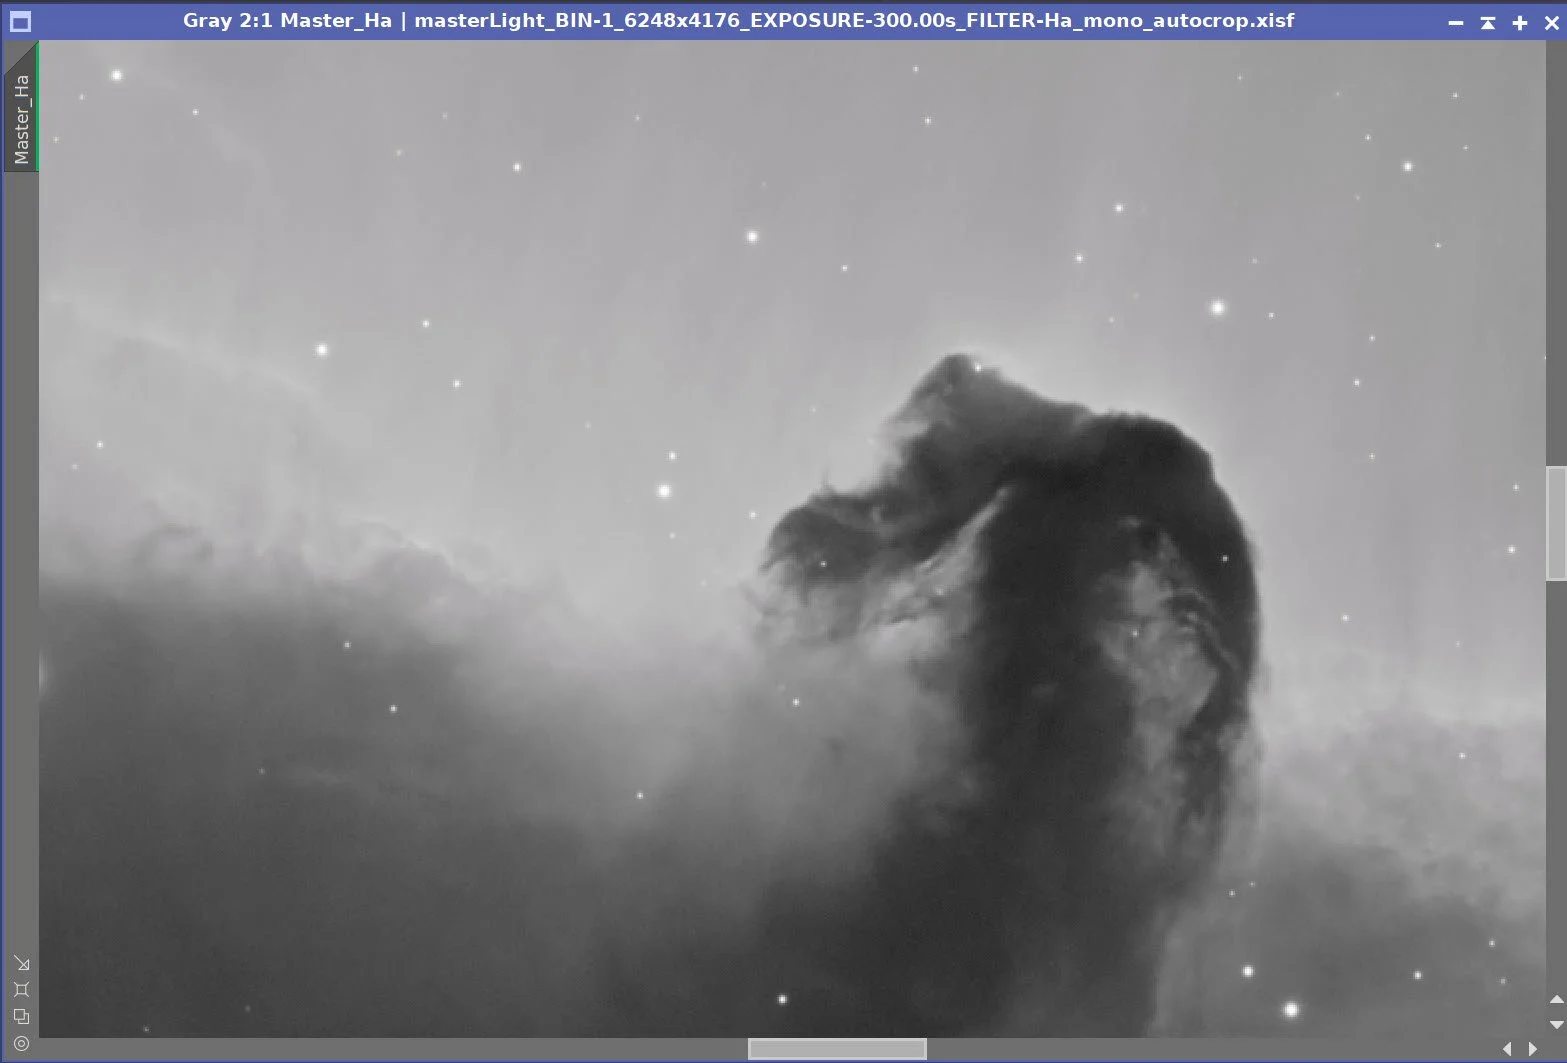
Master Ha -300-seconds
Mater LRGB-90-seconds
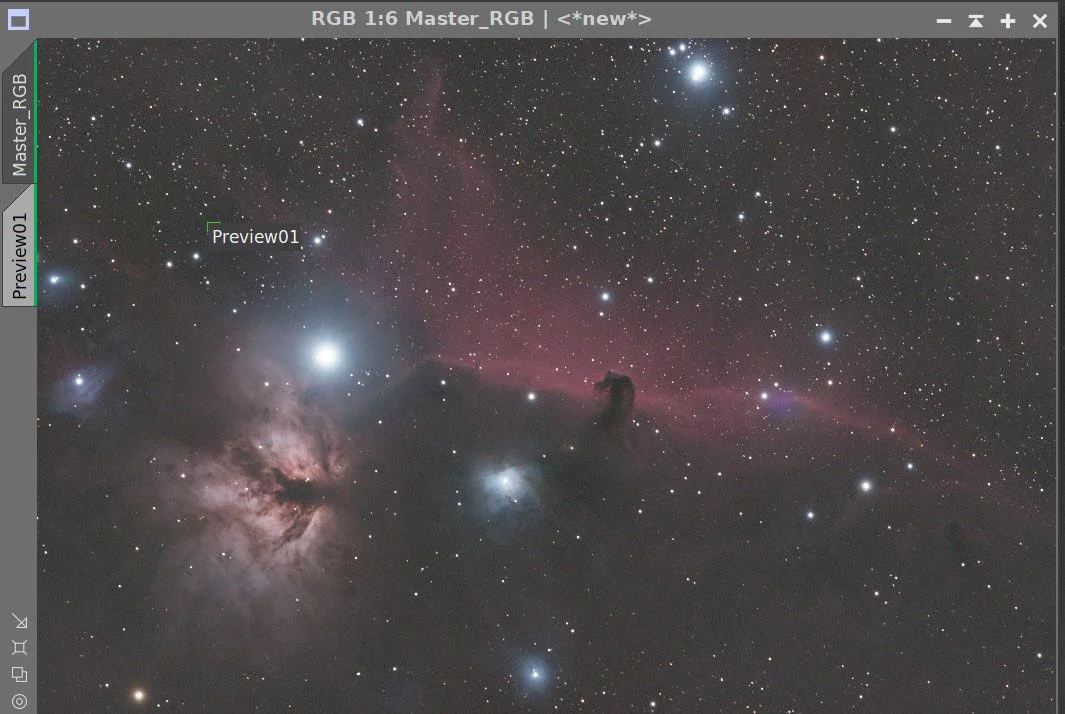
Using CombineChannels, create the Master RGB color image
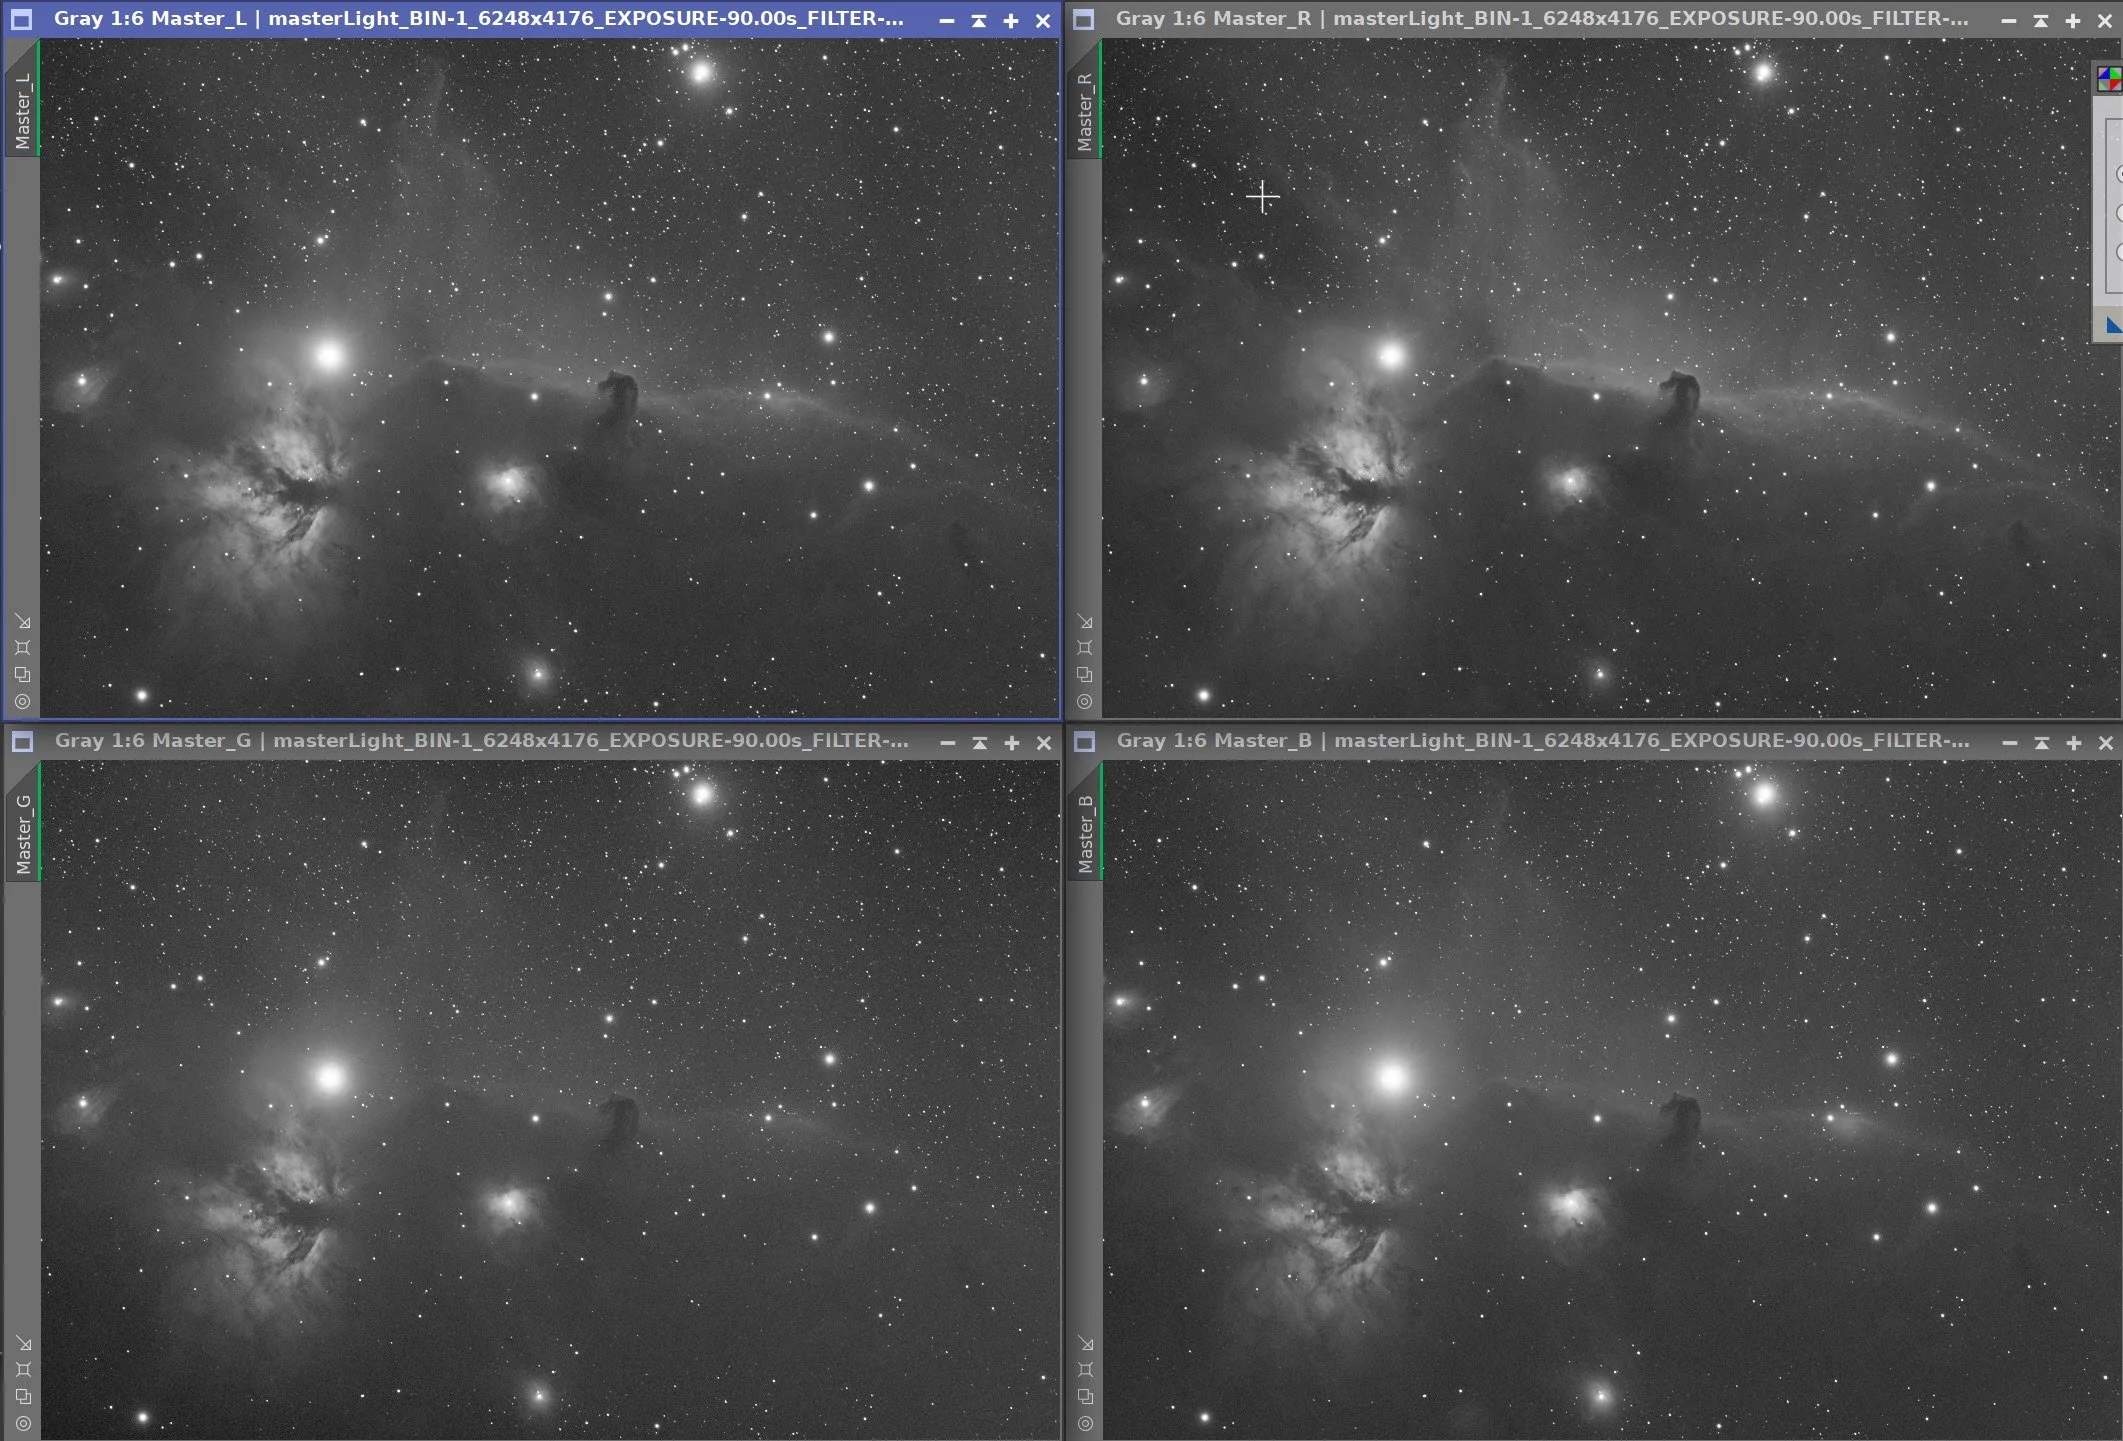
Master L, R, G, B 90-second images
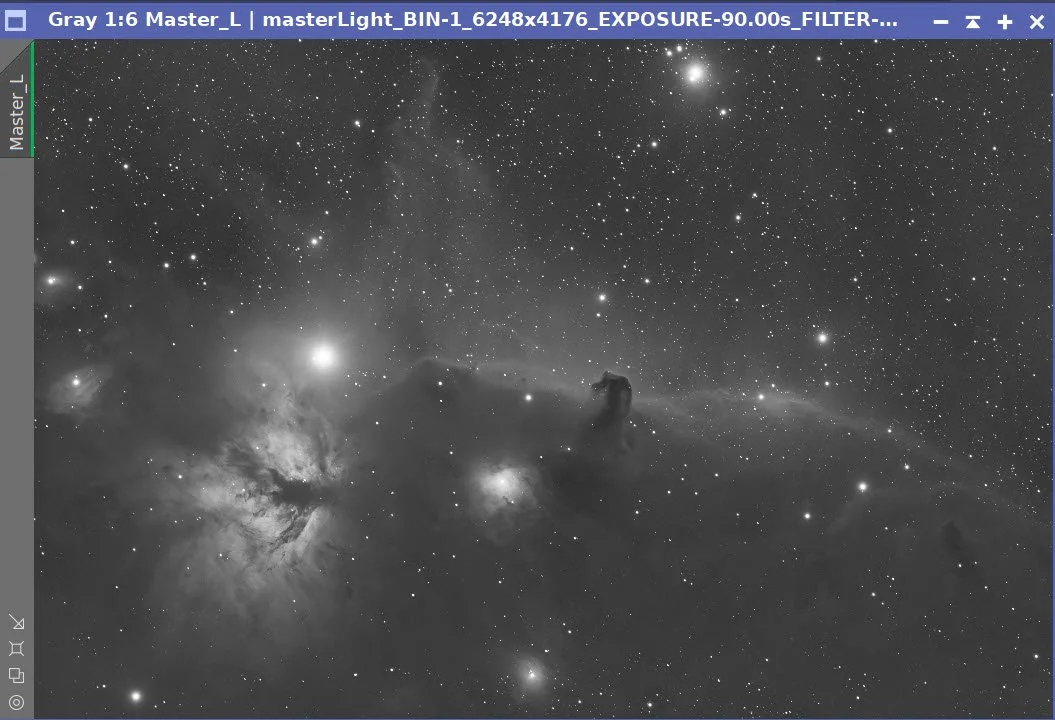
Master_Ha image. (click to enlarge)
Master RGB 90-second image (click to enlarge)
4. Initial Process of Linear Lum data
Run DBE for the Lum linear image. Use subtraction for the correction method. Choose a sampling plan that avoids the nebulae and bright stars. (see below)
Run BXT - Correct only. This cleans up the stars at the corners. Not much to do in this image, as the scope is very crisp.
Run PSFImage script to measure star sizes. X = 2.67 Y= 2.43. This will influence the values used in BXT.
Run Full BXT - I am using an enhanced set of values to shrink stars more. These are about a third more than the measured star sizes. See the BXT Panel Snapshot below.
Run NXT V3; refer to the parameters in the snapshot below.
Run SXT - no need to save the Lum stars, as we will not be using them.
Master L Image DBE Sampling Plan (click to enlarge)
Master L- Before DBE (click to enlarge)
Master L after DBE (click to enlarge)
Background Subtracted by DBE (click to enlarge)
Measuring Star Sizes with PSFImage Script (click to enlarge)
BXT Settings Used. (click to enlarge)
NXT Panel used. (click to enlarge)


Master Lum Before BXT Correct Only, After BXT Correct Only, After BXT Full, After NXT
Final Master Lum Image
Master Lum Starless Image (click to enlarge)
5. Initial Process of Linear Ha data
Run DBE for the Ha linear image. Use subtraction for the correction method. Choose a sampling plan that avoids the nebulae and bright stars. (see below)
Run the PSFImage script to measure star sizes. X = 2.35, Y 2.17. This will influence the values used in BXT.
Run BXT Correct Only
Run Full BXT using the parameters in the screen snapshot below.
Run NXT V3; refer to the parameters in the snapshot below.
Run SXT - no need to save the Lum stars, as we will not be using them.
I want to combine the Ha and L data later on, so I ran a LinFit here, using the L as the reference.
Finally, I ran SXT to remove stars, but I did not preserve the stars - I will not be using the Ha stars going further.
Master Ha Sampling Plan (click to enlarge)
Master Ha Before DBE (click to enlarge)
Master Ha after DBE (click to enlarge)
Master Ha Background (click to enlarge)
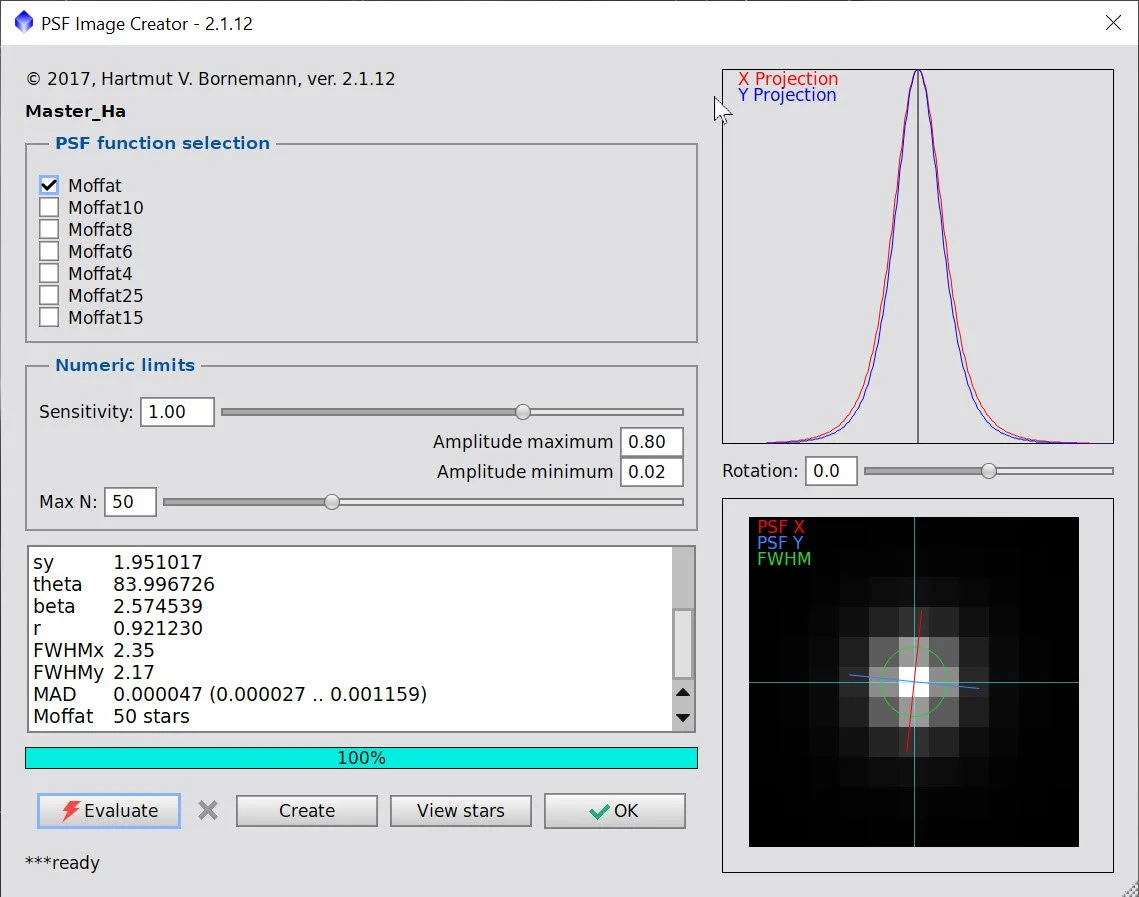
PSFImage measuring star sizes on the Ha Master

BXT Params used
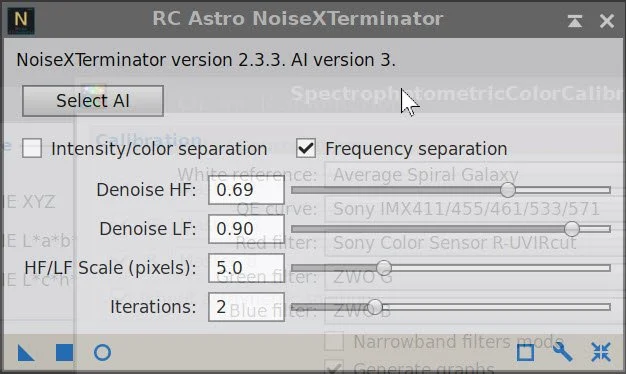
NXT Params used.


HA Before BXT, After BXT Fix Only, After BXT Full, After NXT V3
Master Ha before SXT (click to enlarge)
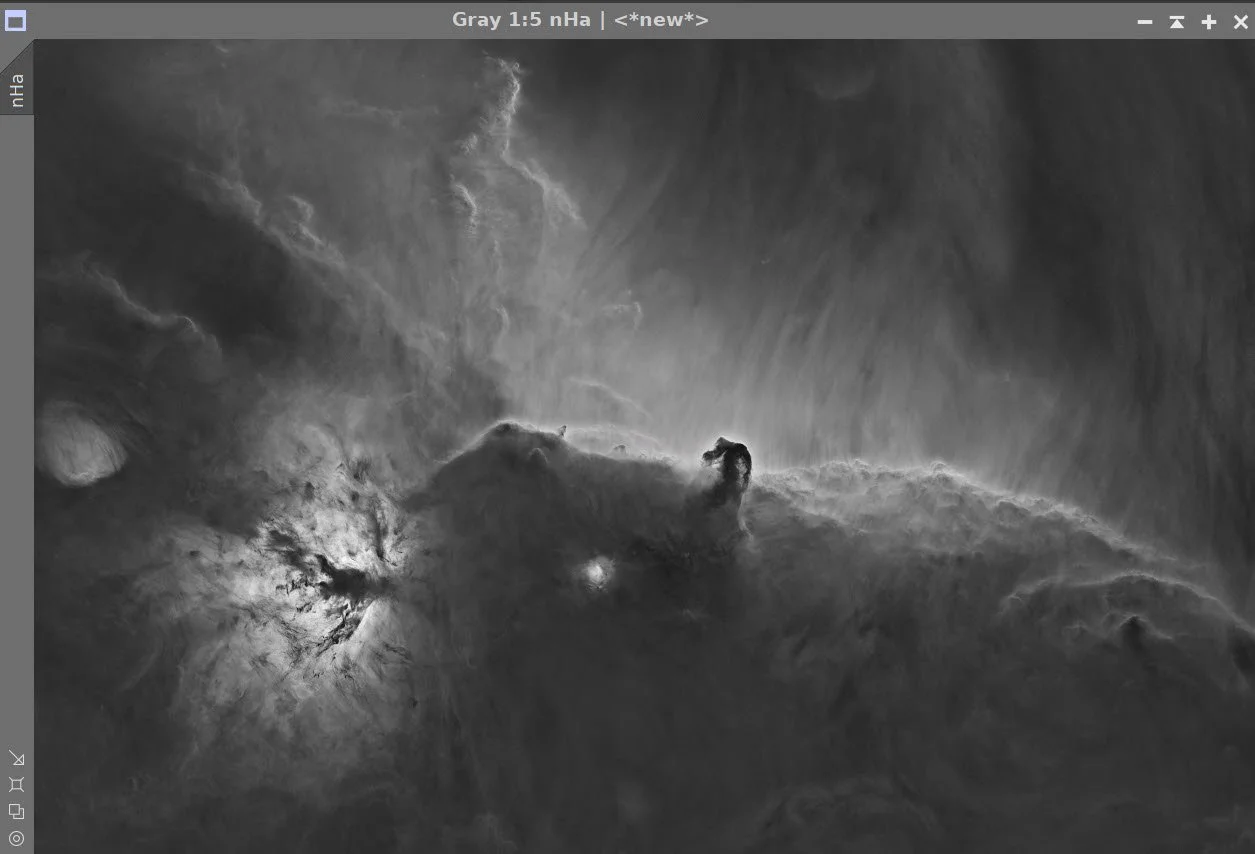
Master Ha Starless image (click to enlarge)
6. Process the RGB Masters
Run DBE using Subtractive correction
Select a background preview and run SPCC on the image
Run BXT - Correct only. This cleans up the stars at the corners. Not much to do in this image, as the scope is very crisp.
Run PSFImage script to measure star sizes. X = 2.57 Y= 2.2. This will influence the values used in BXT.
Run Full BXT - I am using an enhanced set of values to shrink stars more. These are about a third more than the measured star sizes. See the BXT Panel Snapshot below.
Run NXT - see params used in screenshot below
Run SXT and save Star images.
Master RGB 90sec Sampling Plan (click to enlarge)
Master RGB 90sec before DBE (click to enlarge)
Master RGB 90 sec after DBE (click to enlarge)
Master RGB Background removed (click to enlarge)
Master RGB 90-second before SPCC(click to enlarge)
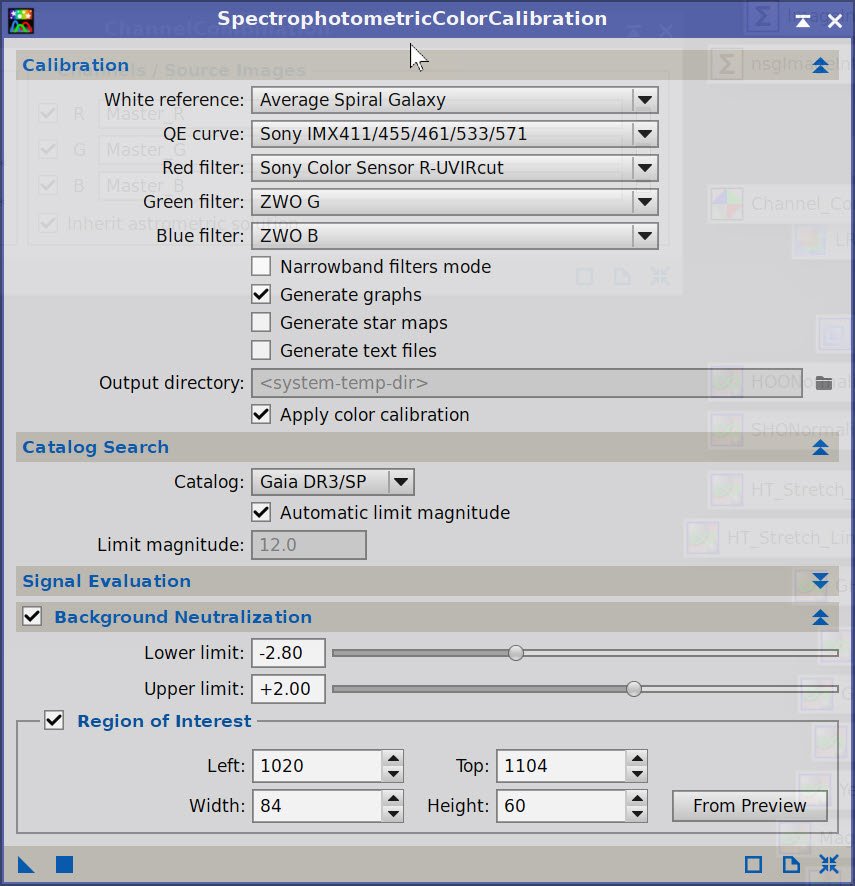
SPCC Panel showing parameters used.
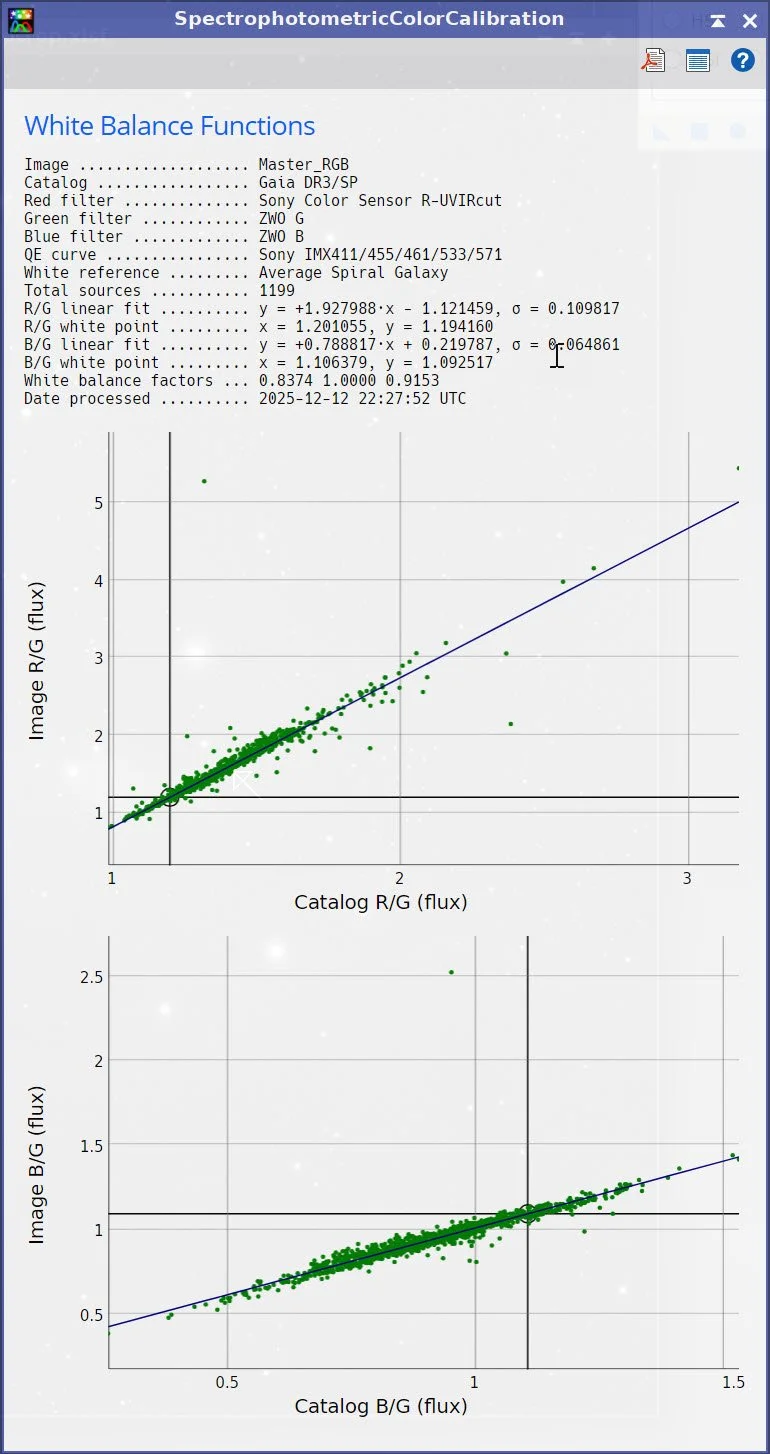
SPCC Regression results.
Master RGB after SPCC.
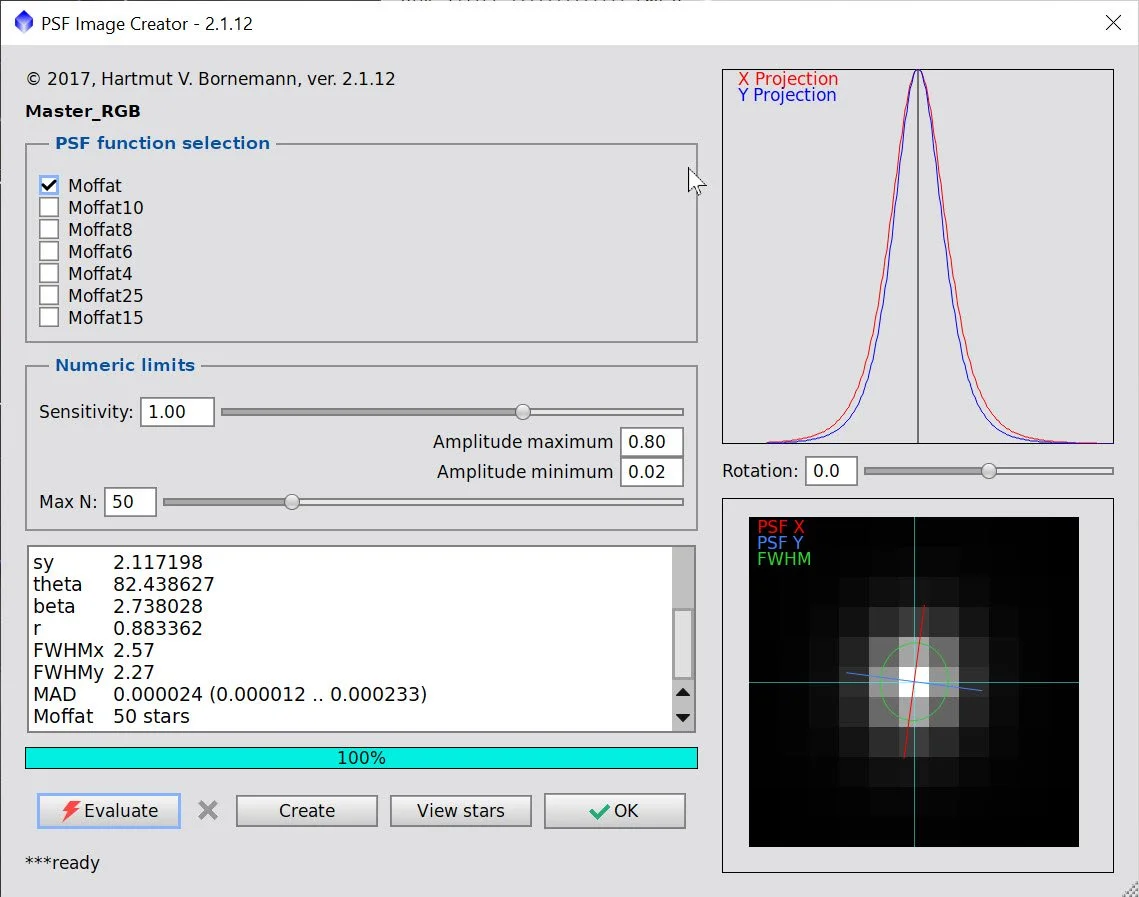
PSFImage panel showing star sizes.
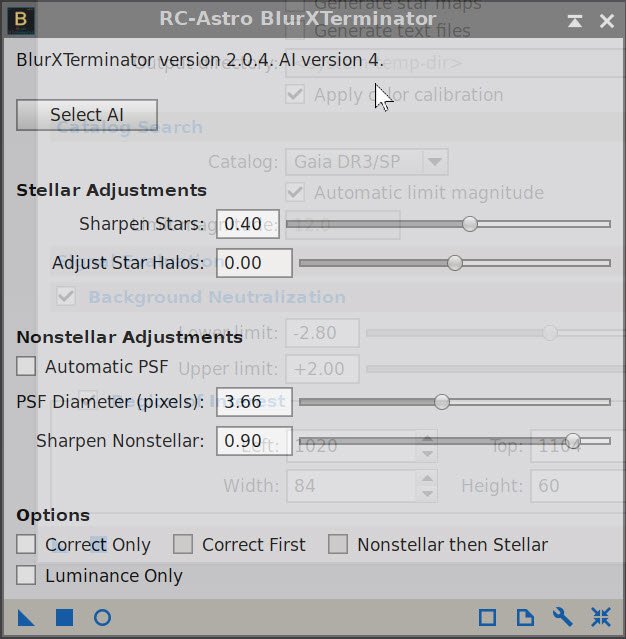
BXT Panel showing parameters used.
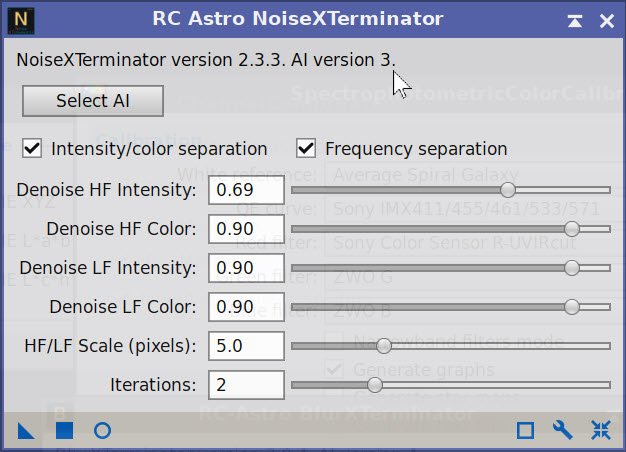
NXT Params used.

Master RGB Master Before BXT, BXT Correct Only, Full BXT, After NXT Full
Master RGB before SXT.
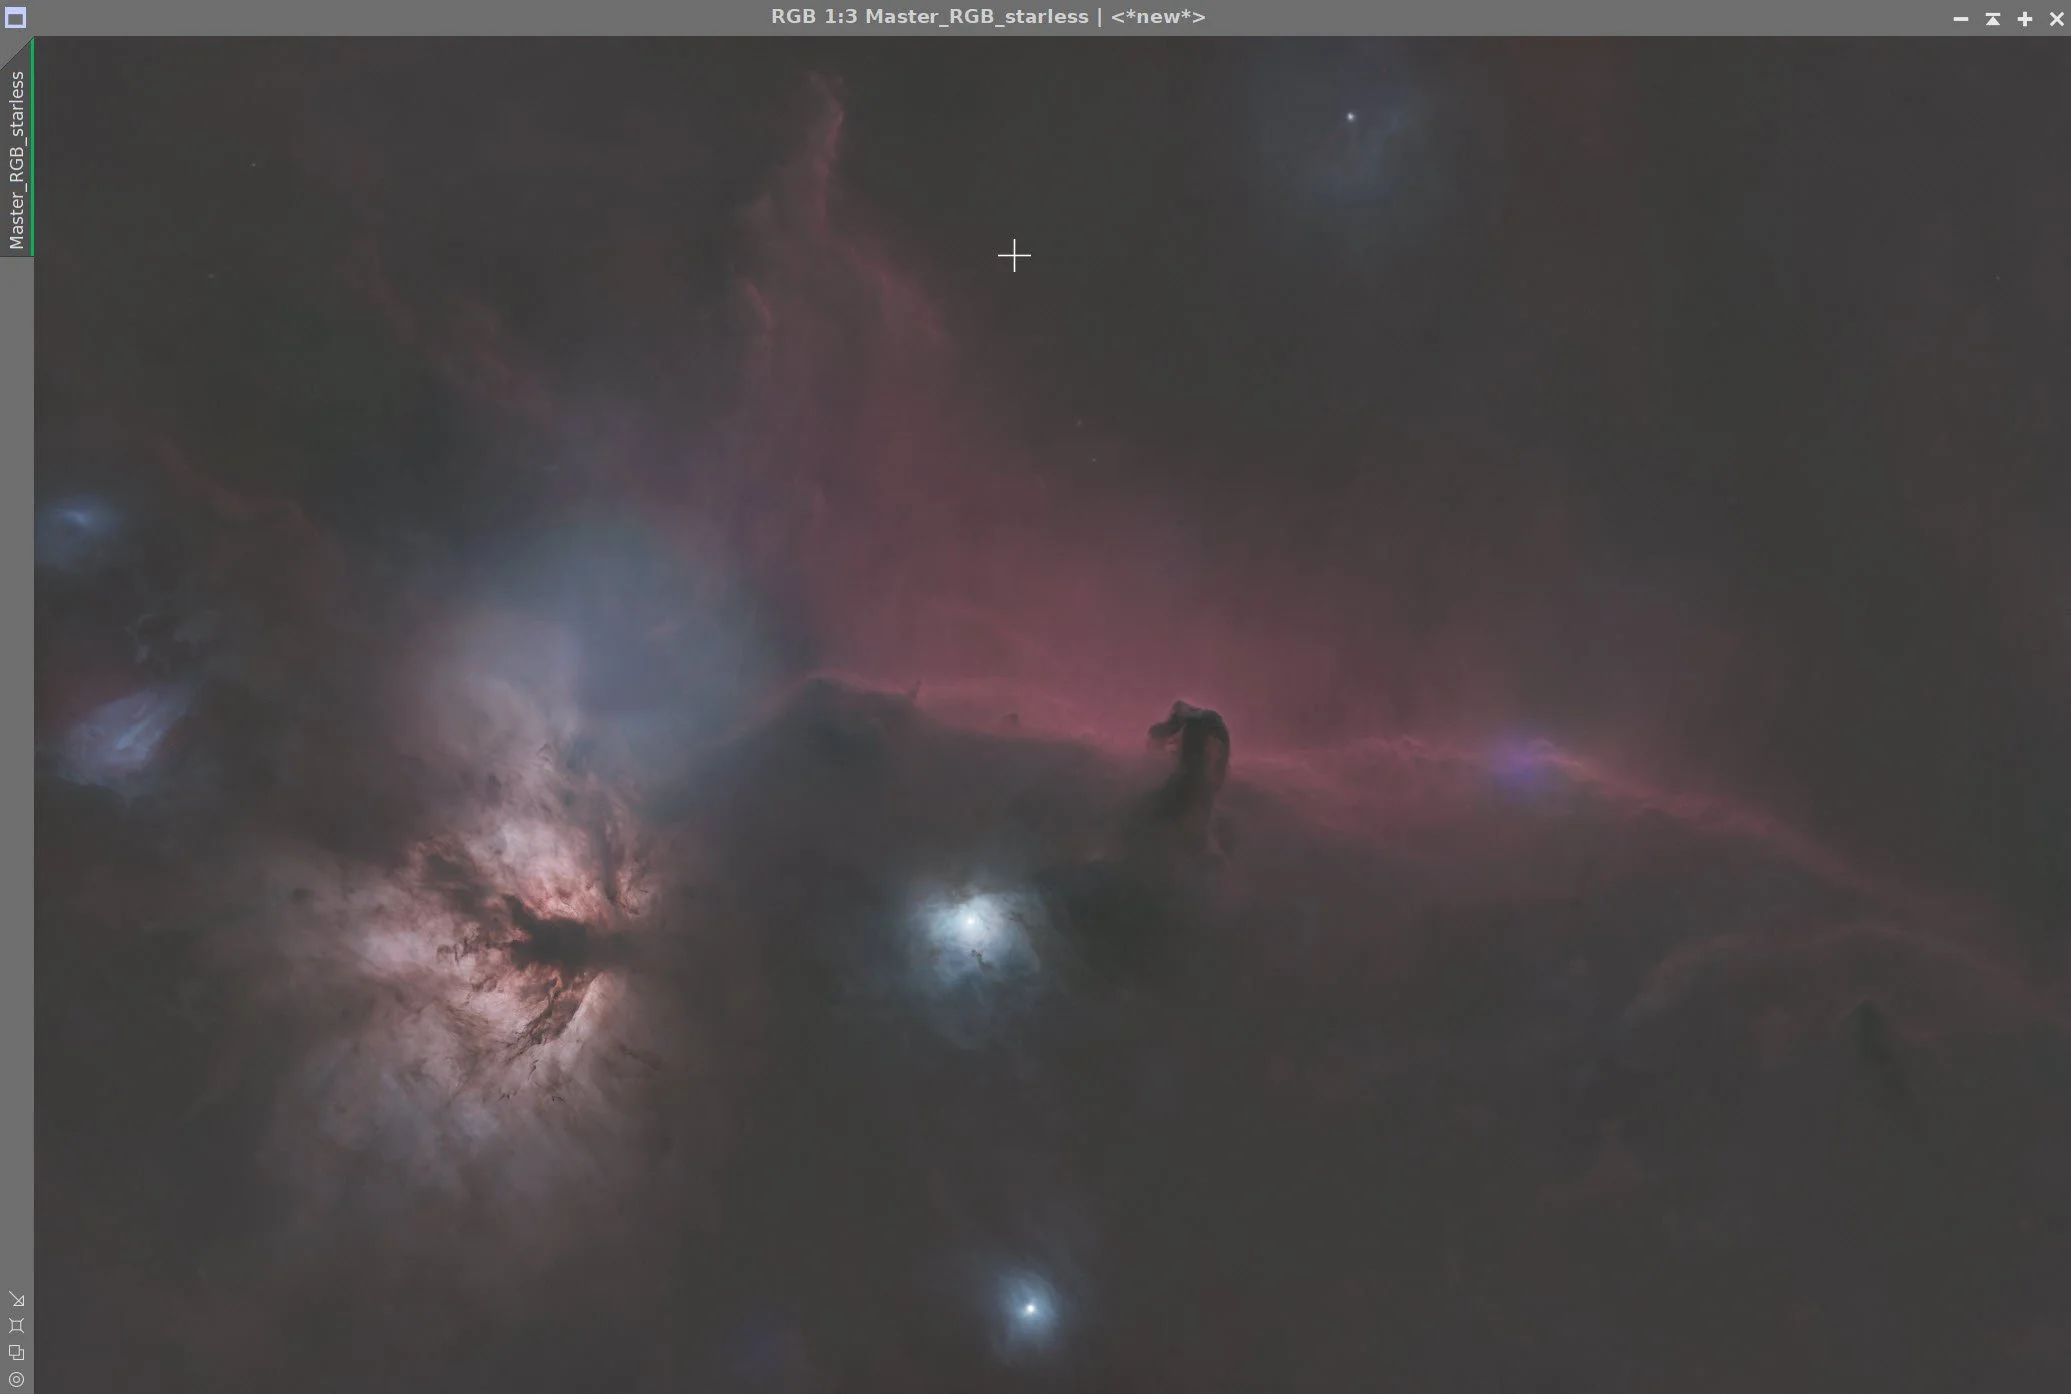
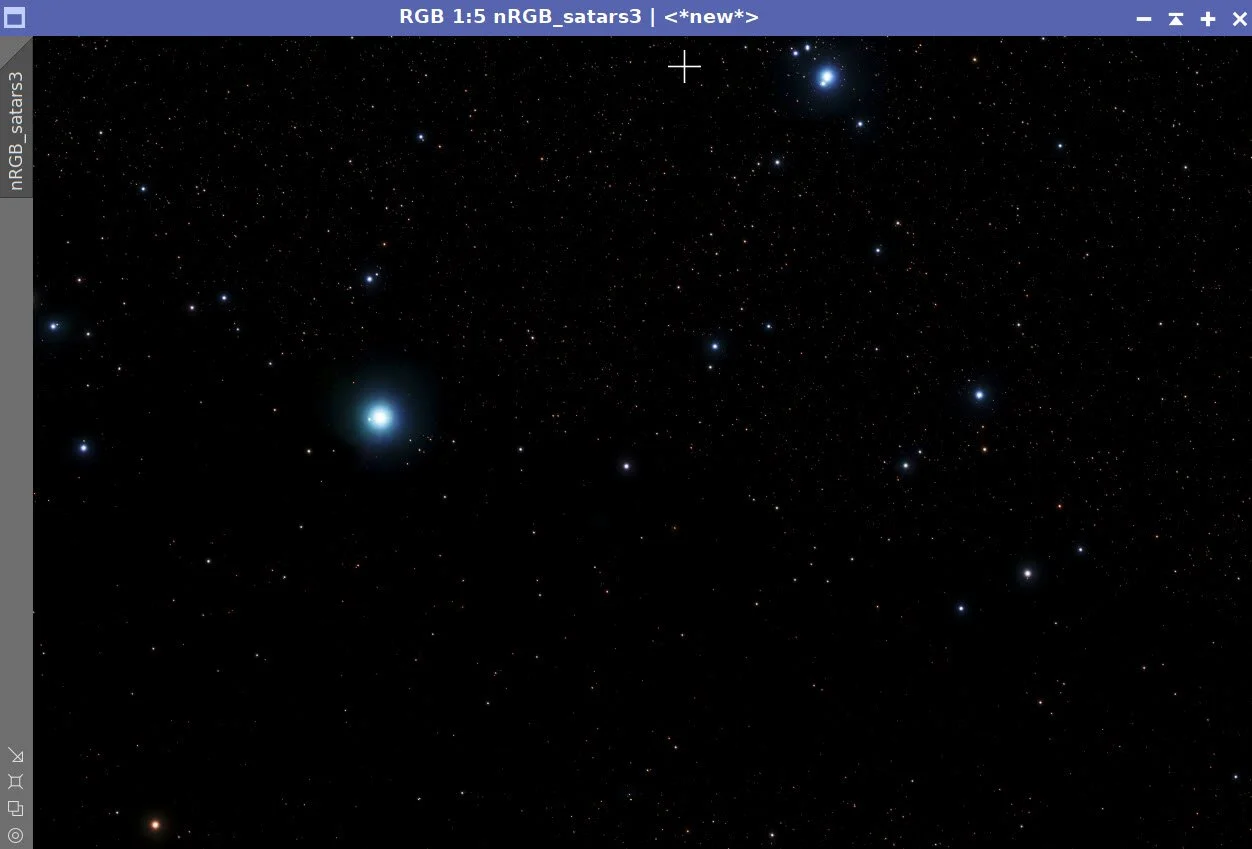
Master RGB Starles Image
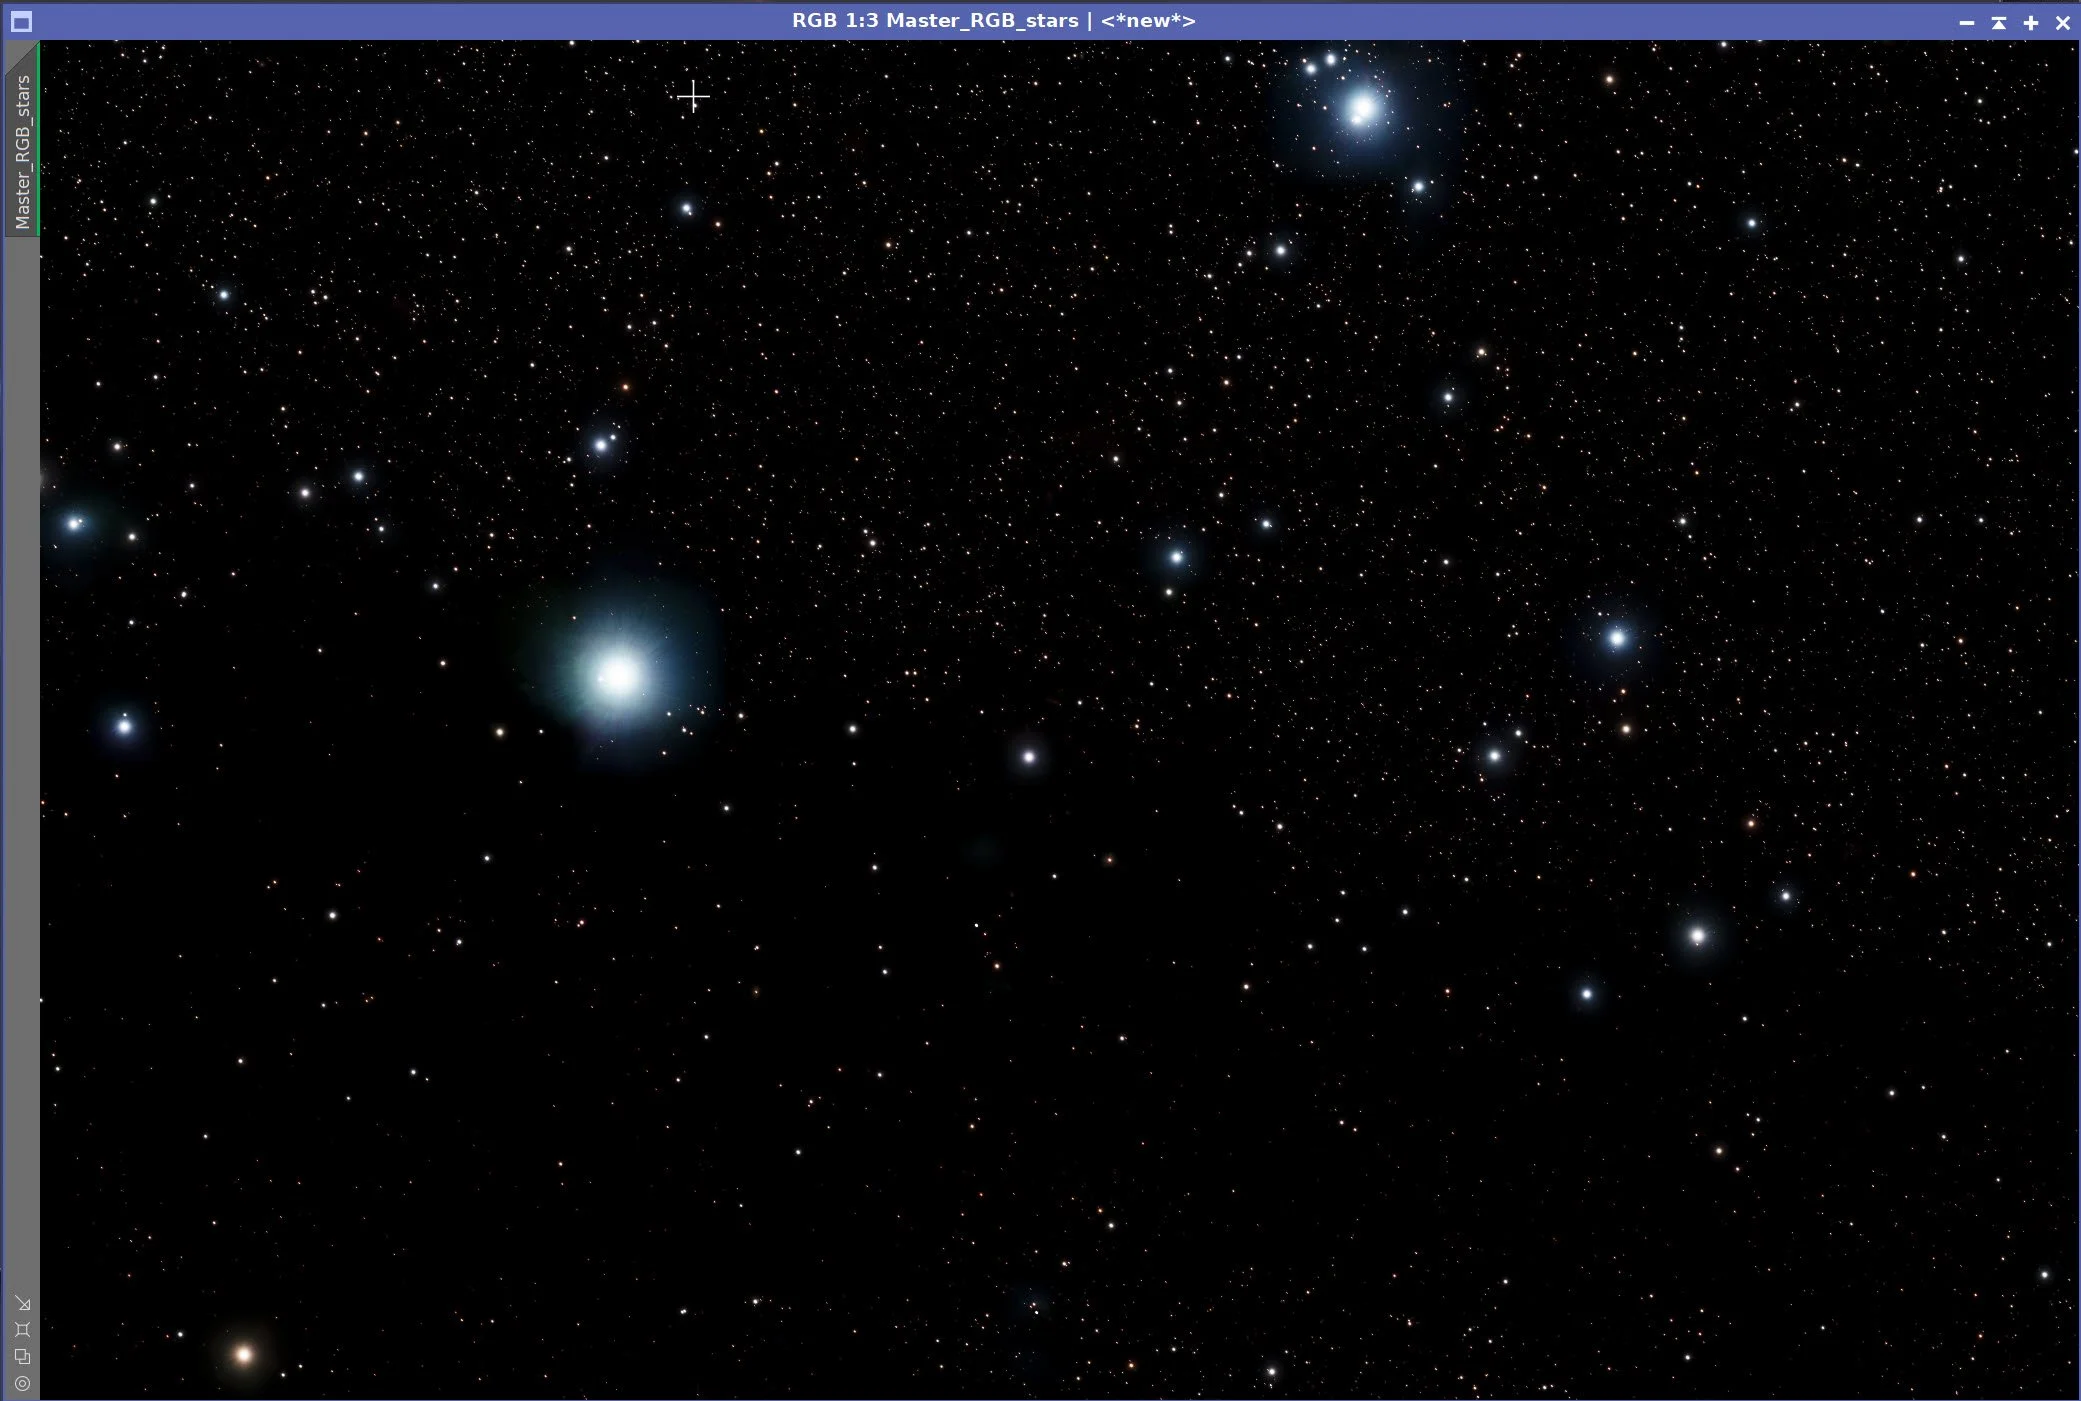
Master RGB Stars only image.
7. Go Nonlinear
Using the STF->HT Method, convert the linear Lum and Ha images to nonlinear. Remember that we did a LinearFit of the Ha to the L image, so use the STF when doing this.
Using the STF->HT Method, take the linear RGB image nonlinear.
Using Seti Astro Star Stretch, take the RGB Star image nonlinear. (See Panel snapshot below for parameters used).
Nonlinear Starting Lum Image (click to enlarge)
Nonlinear RGB image (click to enlarge)
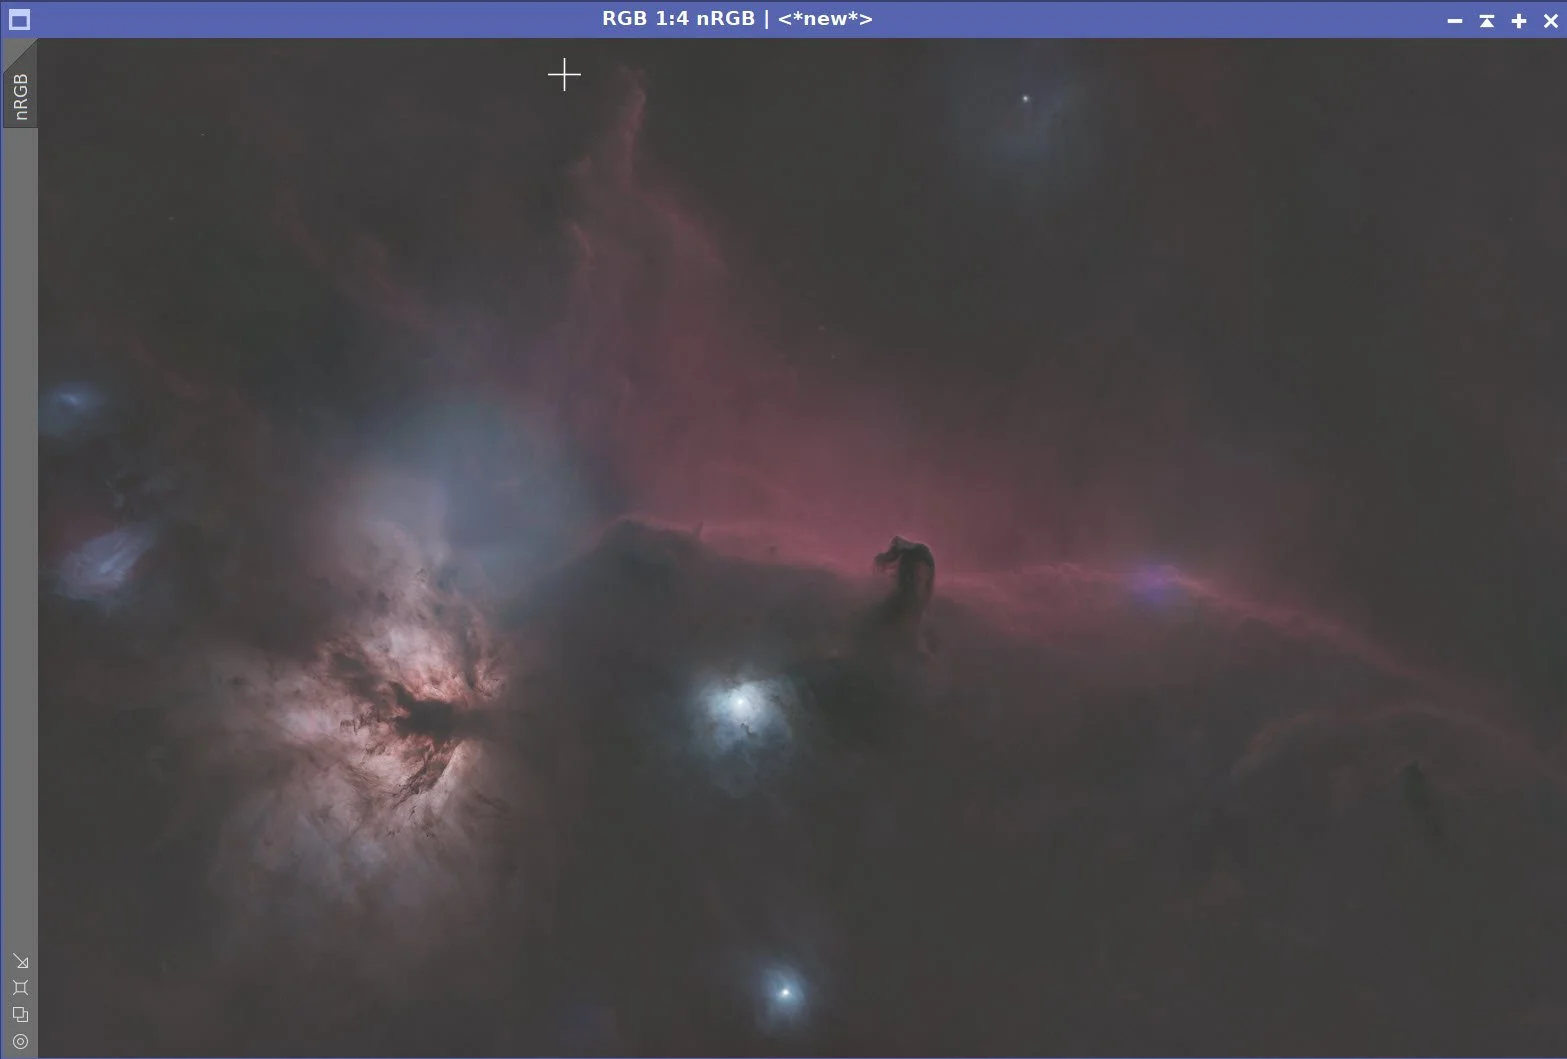
The nonlinear RGB HDR image.
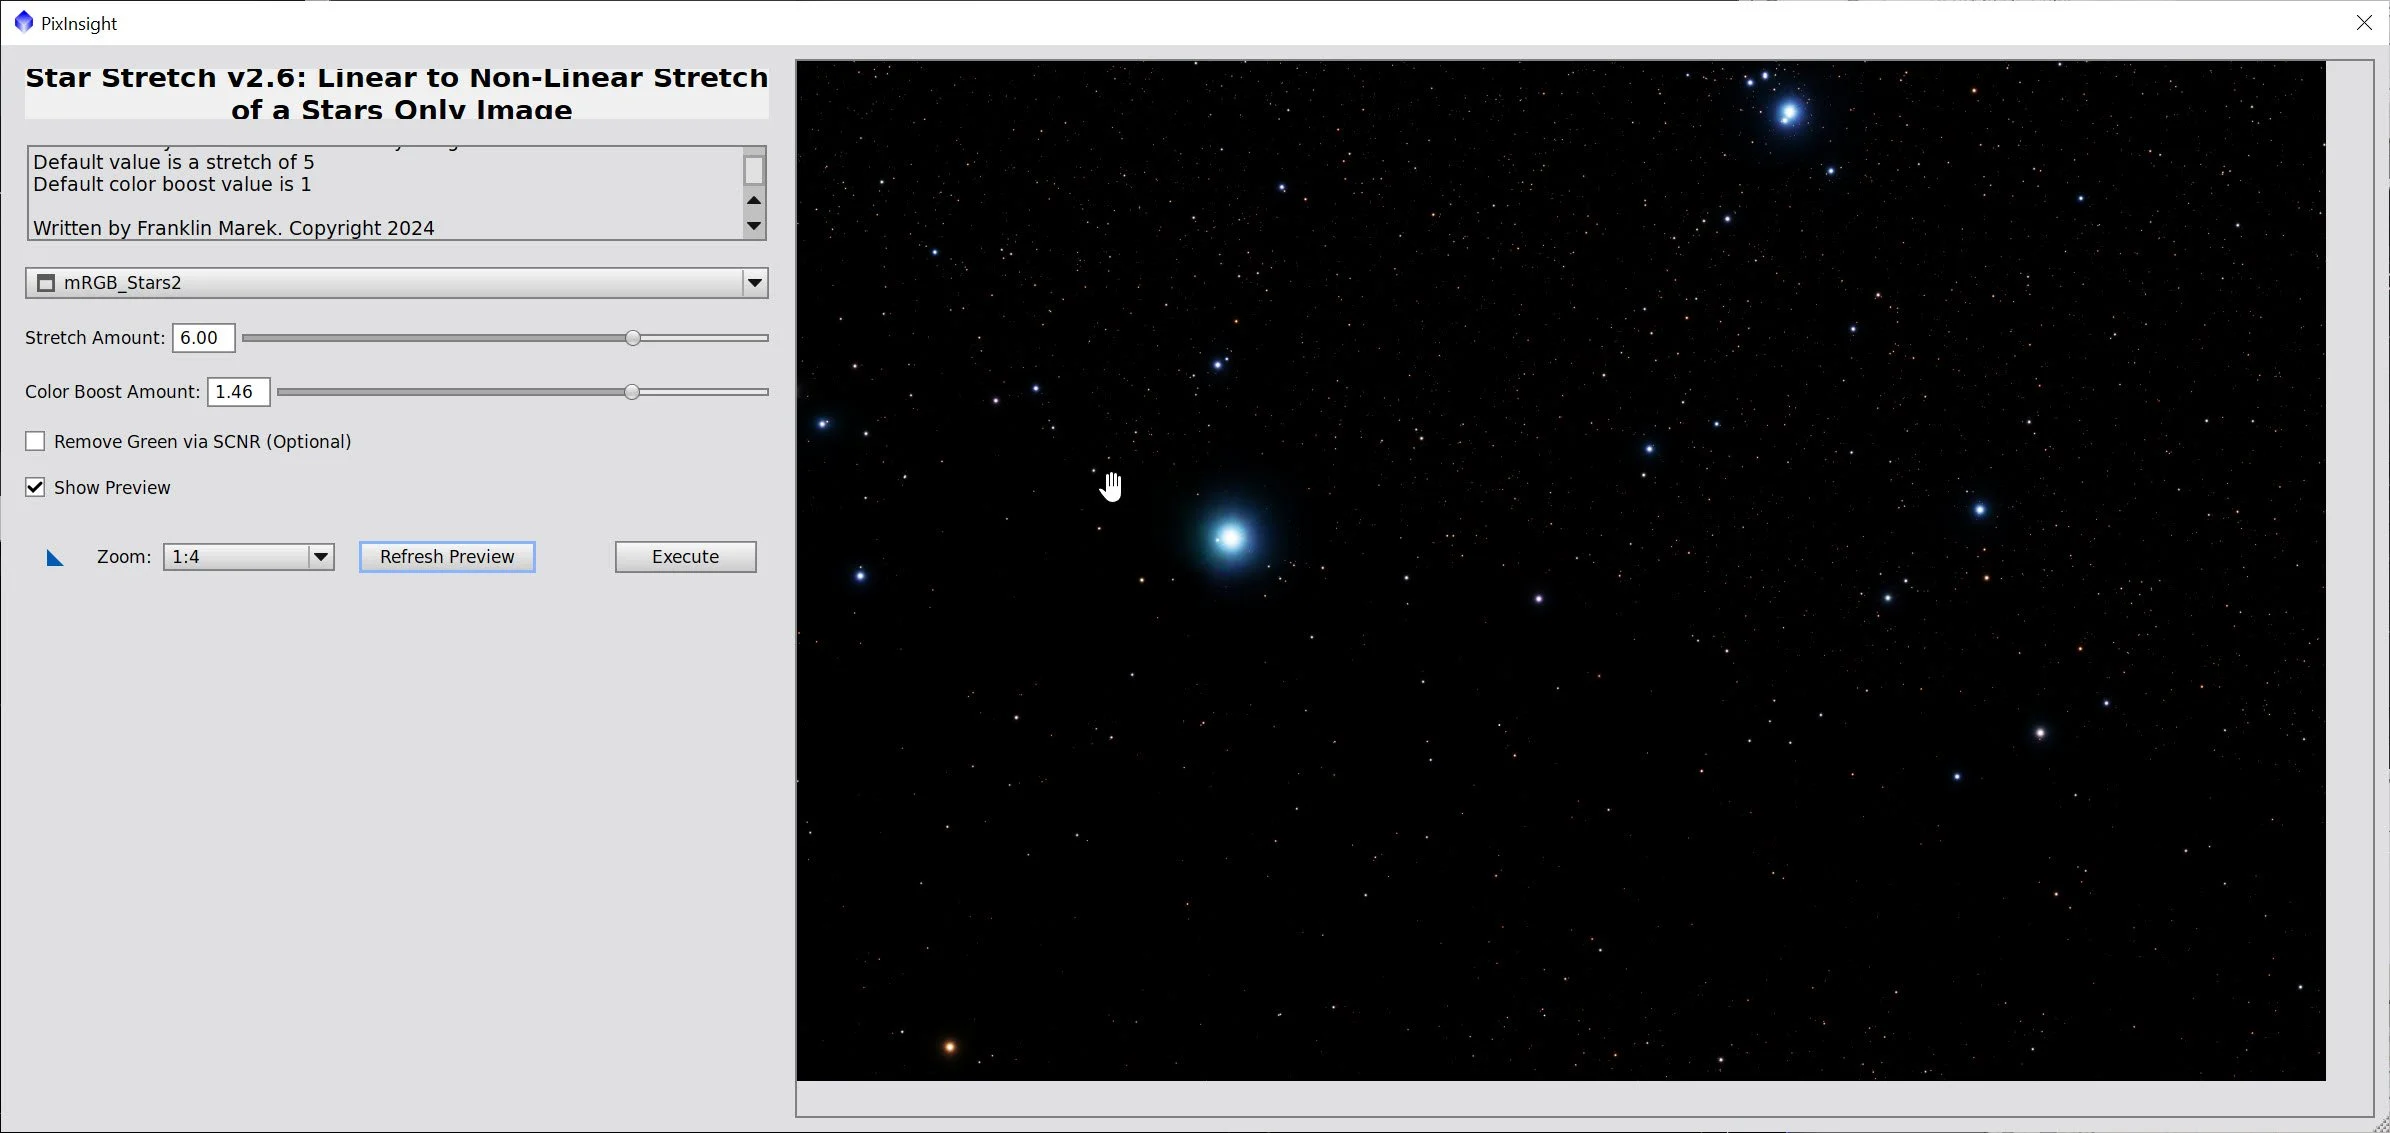
The Star Stretch Script and parameters used.
The resulting Star image
8. Process the Nonlinear Lum Starless Image
Use CT to lighten the outer tenuous nebulae and darken the core a bit
Apply HDRMT with 9 layers and “To Lightness” checked. This will open up blocked highlights. I tried various levels, but 7 seems best.
Apply CT
Apply LHE with a scale of 64, a contrast limit of 2.0, an amount of 0.1, and an 8-bit histogram. This is designed to enhance small-scale structures.
Apply LHE with a scale of 200, a contrast limit of 2.0, an amount of 0.1, and a 10-bit histogram. This is designed to enhance medium-scale structures.
Apply NXT V3 now (see parameters in the screenshot below).
Now do a final sharpening operation with MLT - see the screenshot below.
The initial L image (click to enlarge).
HDRMT applied (click to enlarge)
After LHE - Small Scale (click to enlarge)
NXT Params used (click to enlarge)
After CT (click to enlarge)
After CT (click to enlarge)
After LhE - Medium Scale (click to enlarge)
Apply NXT V3 (click to enlarge)
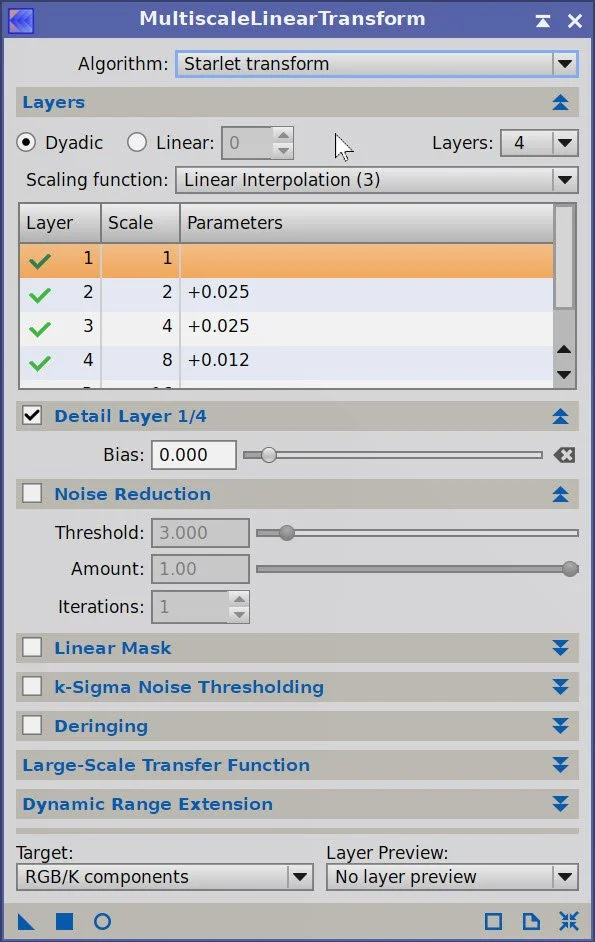
MLT Sharpening Panel
After MLT Sharpening run (click to enlarge)
9. Process the Nonlinear Ha Starless Image
Use CT to darken the outside and darken the core a bit.
Apply HDRMT with 7 layers and “To Lightness” checked. This will open up blocked highlights. I tried various levels, but 7 seems best.
Apply CT to adjust the tonescale after the previous step.
Apply LHE with a scale of 222, a contrast limit of 2.0, an amount of 0.10, and a 10-bit histogram. This is designed to enhance medium-scale structures.
Apply MLT Shaprening with params shown in the screensnap below.
Iniital Nonlinear Ha image(click to enlarge)

After HDRMT (click to enlarge)
After CT (click to enlarge)
After CT (click to enlarge)
After LHE Mid-scale (click to enlarge)
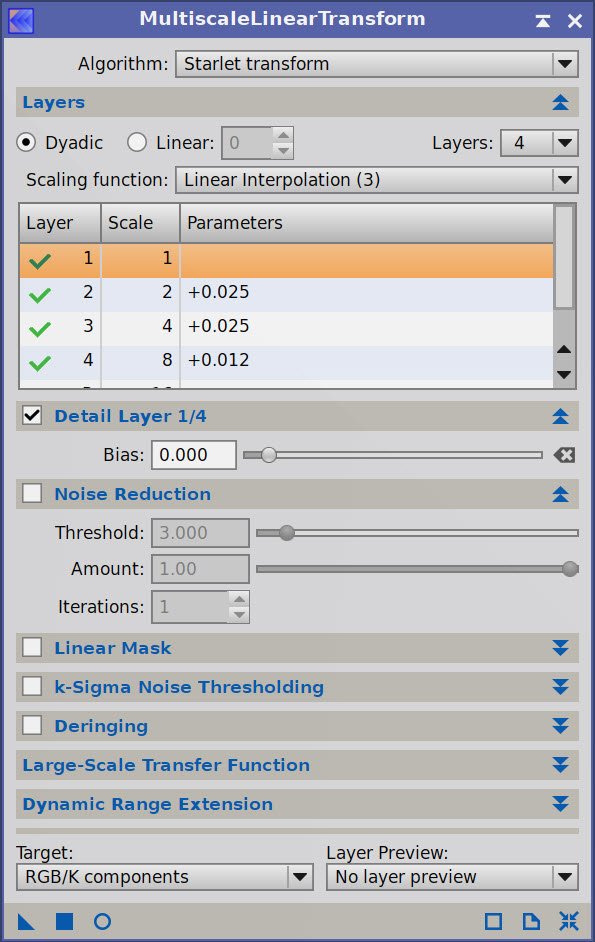
MLT Sharpen Parameters
After Sharpening.
10. Combine L and Ha image, and Process
Use PixelMath to blend the HA and L image. I tried different blend rates:
10% L - 90% Ha
25% L - 75% Ha
50% L - 50% Ha
I chose the second mix.
Adjust with CT
Create a GAME gradient mask that covers the Flame and the bright nebula near the Flame - call this the LHaMask
Apply HDRMT with the LHAMask. Use 7 layers and check “To Lightness”. This will open up blocked highlights.
Apply CT with the LHaMask
Use the RGBWOrkingSpace Panel to set the RGB coefficients to 1.0. We don’t want color scaling for future operations.
PM Blend example equation
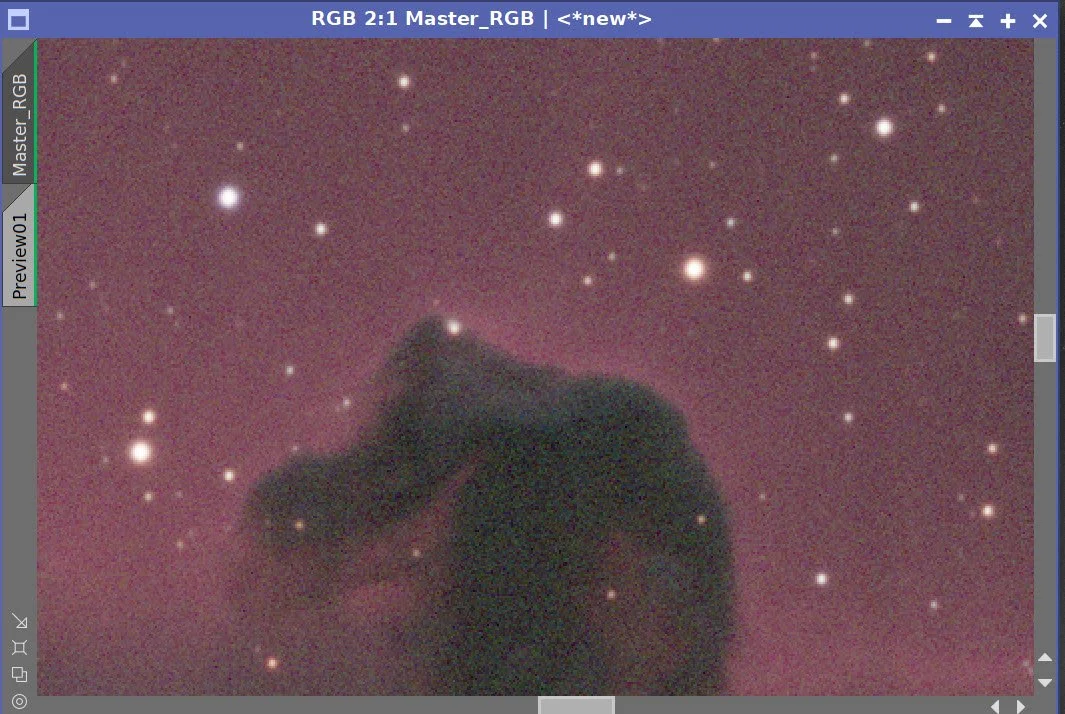
10% L - 90 % Ha Blend (click to enlarge)
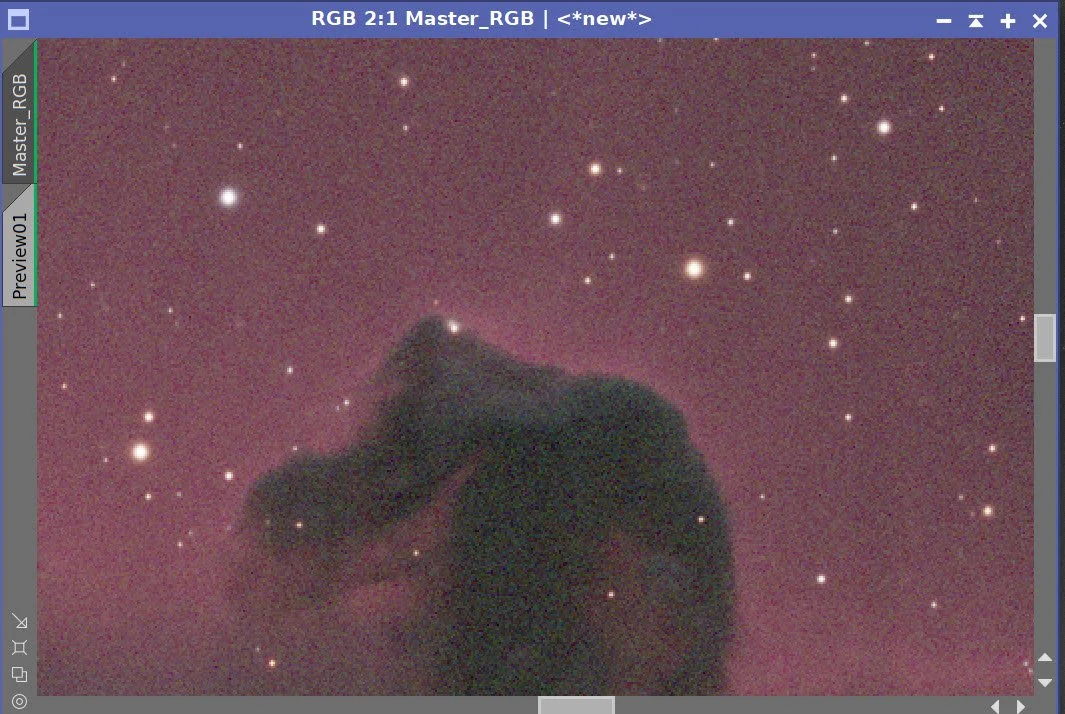
25% L - 75% Ha Blend (click to enlarge)
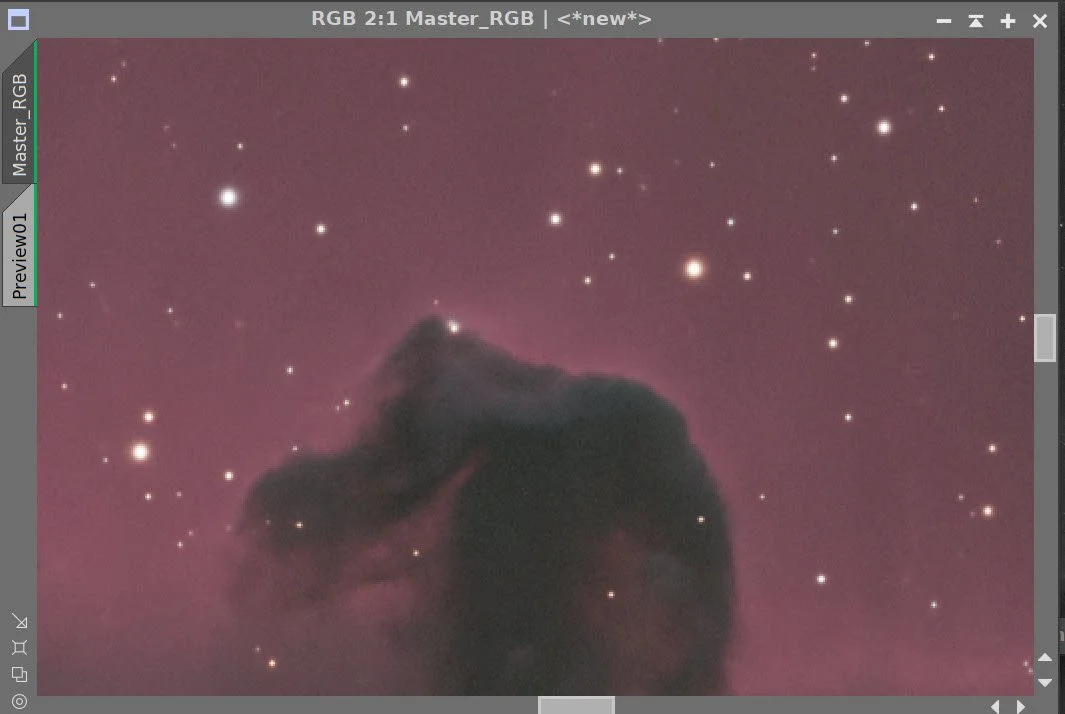
50% L - 50% Ha Blend (click to enlarge)
The Blended HaL image. (click to enlarge)
LHA Mask (click to enlarge)
CT Aplied with the LHA Mask in place (click to enlarge)
After CT (click to enlarge)
After HDRMT wIth the LHAMask (click to enlarge)
Set RGBWorkingSpace coeffcients to 1.0.
11. Process the RGB Image
Let's create some masks that we will be using with this image:
Using Range_Selection with parameters of a Range from 0.24 to 1.0, Fuzziness of 0.1, and a smooth of 20, create RangeMask
Make a copy of this mask and use DynamicPaintBrush to remove everything but the Horsehead region, and call this mask the HorseMask.
Make another copy of the RangeMask and use DynamicPaintBrush to remove all elements but the Flame Nebula, and call this the FlameMask
Using the ColourMask process, create a RedMask with the params in the snapshot below.
Use CT to boost it.
Using the ColourMask process, create a BlueMask using the parameters shown in the screenshot below.
Use CT to boost it.
Using the ColourMask process, create a PurpleMask using the parameters shown in the screenshot below. This will deal with a strange purple/magenta patch near the Horsehead.
Use CT to boost it.
Apply CT to the initial RGB image to adjust contrast and color saturation.
Apply the RedMask, and adjust color, brightness, and color saturation
Apply the PurpleMask, and adjust color, brightness, and color saturation - make this less obvious.
Apply the BlueMask, and adjust color, brightness, and color saturation
At this point, I want to bring in the LHa image. However, the signal levels of this image is much greater than the RGB image, so we need to adjust this.
Extract the CIE L* component and create a gray image.
Run LinearFit on this image using the LHa as a reference.
Now insert this L image back into the RGB using ChannelCombination in color mode and just use the L channel.
This will set up the RGB image to be a better signal match to the LHa image before that image is injected into the RGB image.
Run RGBWorkingSpace with the RGB Coefficients set to one, and apply to both the RGB and the LHa image so that during LRGBCombination, no color scaling happens.
Use LRGBCombination to insert the LHa image into the RGB image. See screensnap of the LRGBCombination panel below for params used.
Apply FlameMask and do a CT to adjust
Apply HorseMask and do a CT to adjust
With the HorseMask in place, apply LHE with a scale of 50, a contrast limit of 2.0, an amount of 0.20, and an 8-bit histogram. This will enhance the vertical striations in the curtain behind the Horsehead.
Apply MLT Sharpening - see panel snapshot below for params used.
We are close to done. I am now doing some Photoshop polishing operations here before the stars are added back in.
Export the RGB starless image as a 16-bit unsigned TIFF file
Pull this into Photoshop
Use Clarity, Texture, and Dehaze Effects tools, along with ColorMixer, to polish the image
Save as TIFF
Pull back into Pixinsight
Apply a final NXT (see params used in screenshot below)
The Core Mask (click to enlarge)
HorseMask (after editing) (click to enlarge)

Params used to create the Red Mask (click to enlarge)
Prams used to create the BlueMask (click to enlarge)
Params used to create the PurpleMask (Click to enlarge)
The initial RGB image (click to enlarge)
After CT with the RedMask(click to enlarge)
After CT with the BlueMask (click to enlarge)
After LinearFit to the LHa image. (click to enlarge)
The FlameMask
Initial Red Mask (click to enlarge)
After boosting with CT (click to enlarge)
Initial Blue Mask (click to enlarge)
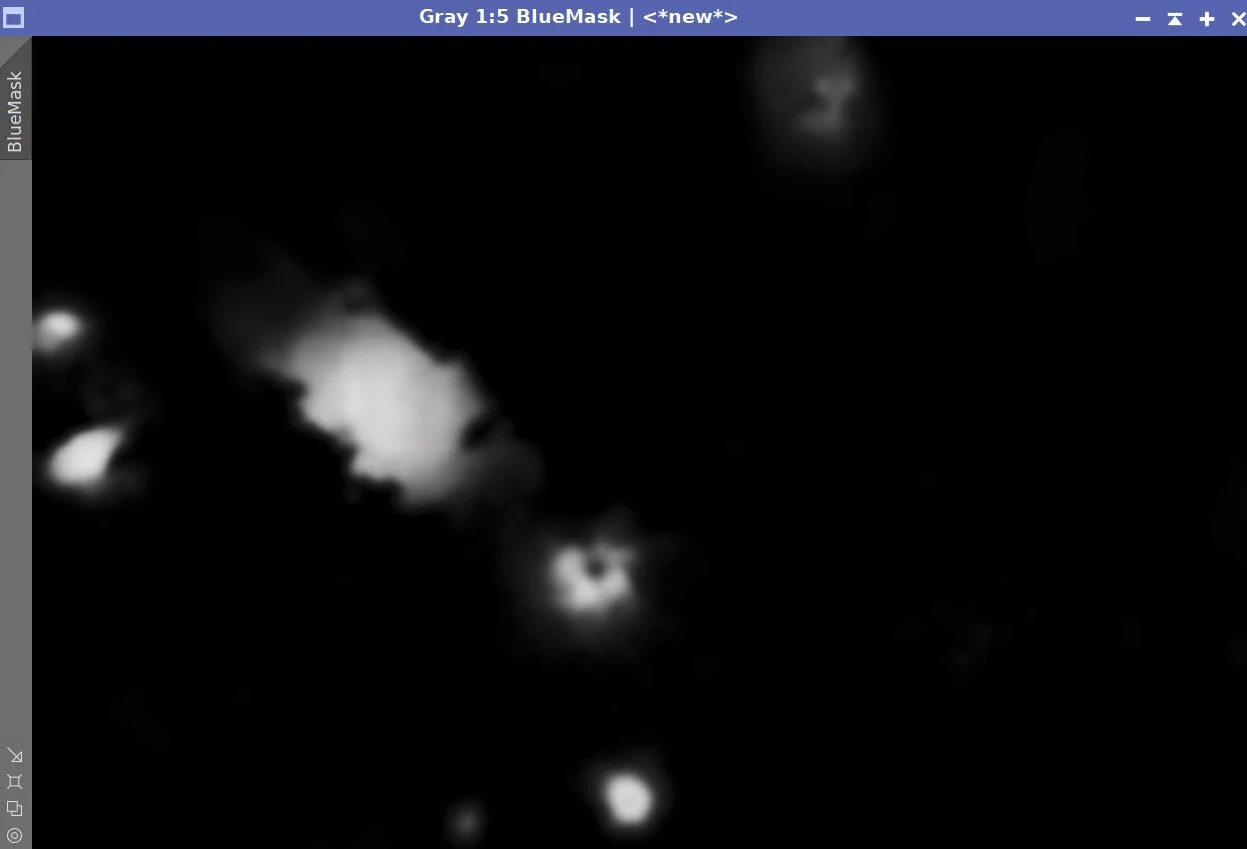
BlueMask after CT boost (click to enlarge)
Initial PurpleMask (click to enlarge)
PurpleMask after CT (click to enlarge)
After CT adjust (click to enlarge)
After CT with the Purple Mask (click to enlarge)
Extracted a Luminance image - Export this to Photoshop (click to enlarge)
After fitted L image is brought back in with ChannelCombination (click to enlarge)
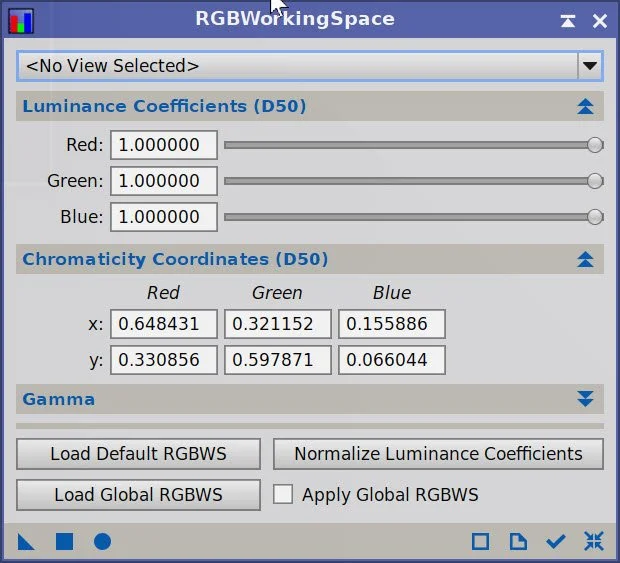
Set RGBWorkingSpace RGB coefficients to 1.o for RGB and LHA images
After LHA injection (click to enlarge)
After CT with HorseMask (click to enlarge)
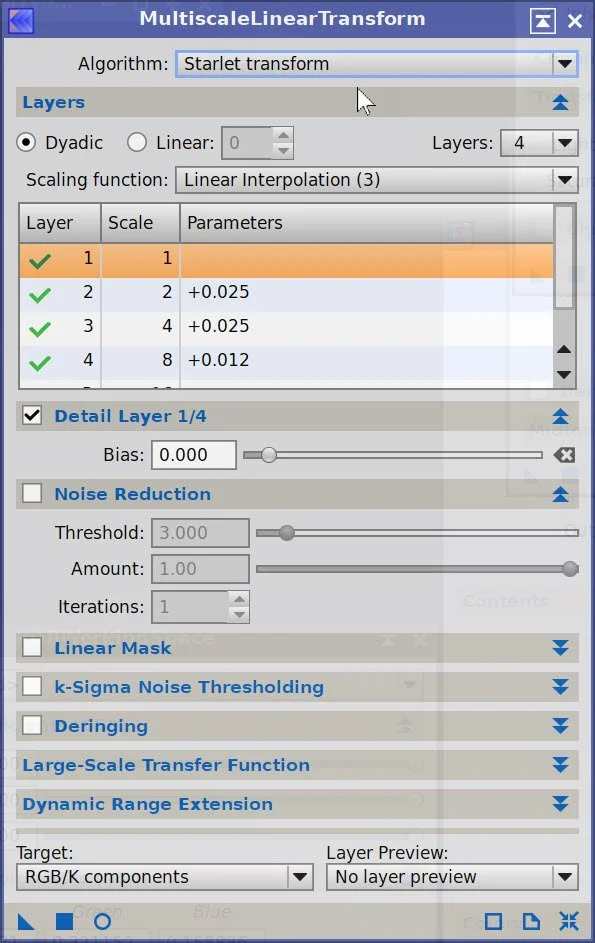
MLT Sharpening Prams (click to enlarge)
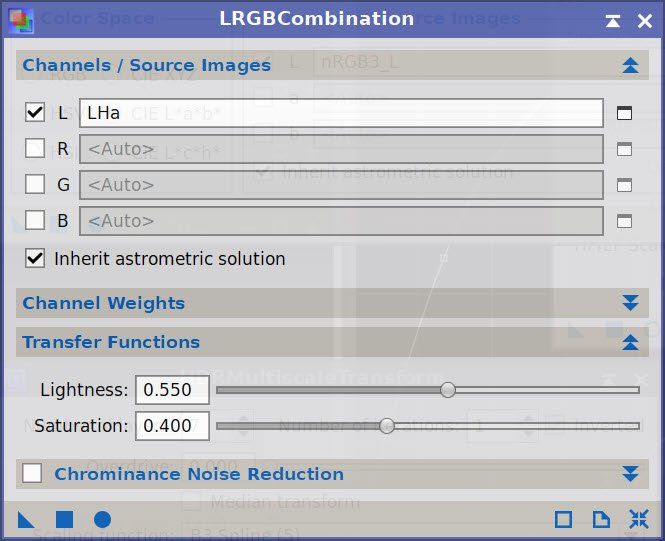
LRGBCombination Params used.
After CT with FLameMask (click. toenlarge)
Afer LHE for small scale detail (click to enlarge)
After MLT Sharpening (click to enlarge)
After Photoshop Export and Polish (click to enlarge)
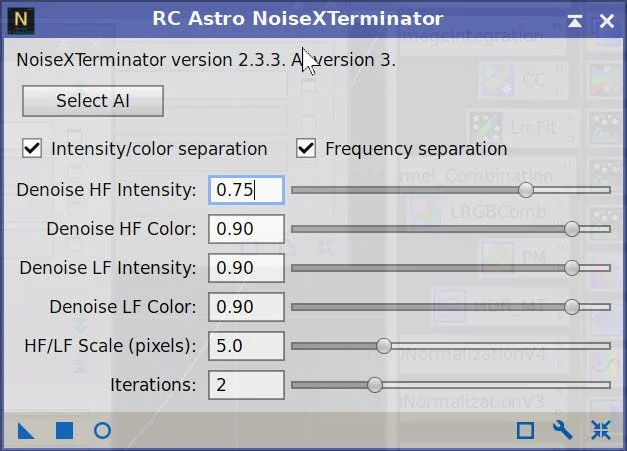
NXT Params used for the next step
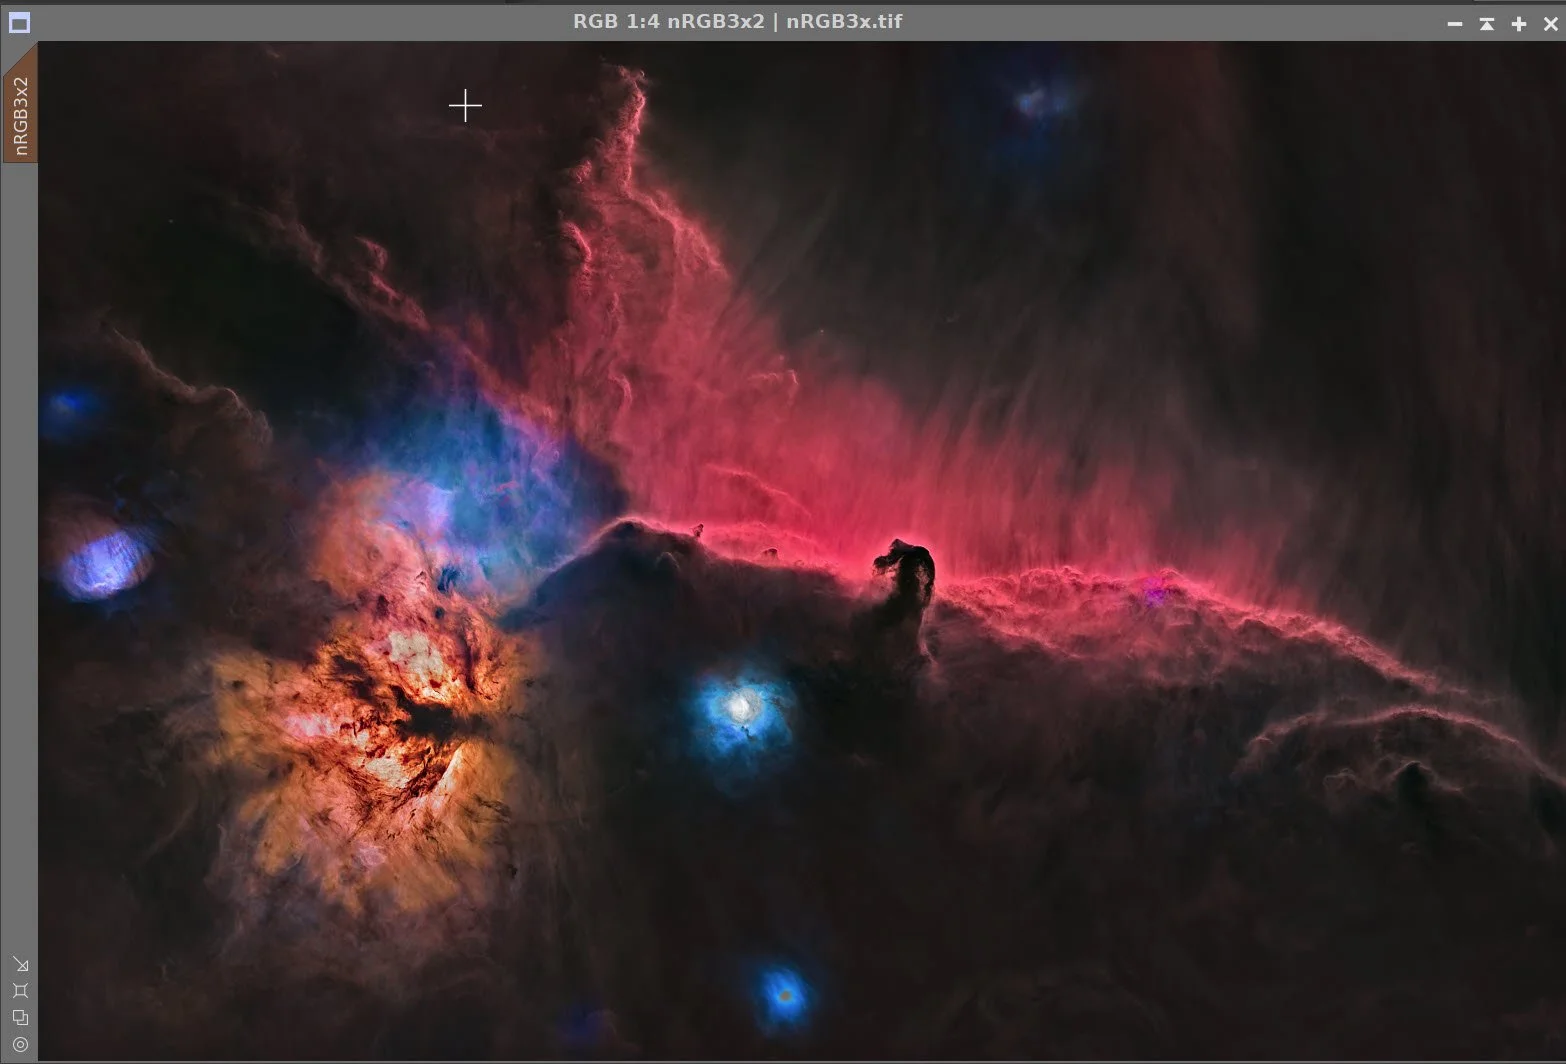
After NXT we have our final RGB Starless image.
12. Process and Add the Stars Back In
Apply CT to the current RGB star images. I want to boost color and star size, as they need to be large to look good with this level of nebulosity
Using the ScreenStars Script, add stars back into our RGB starless image.
Initial RGB Star Image (Click to enlarge)
Stars after CT (click to enlarge)
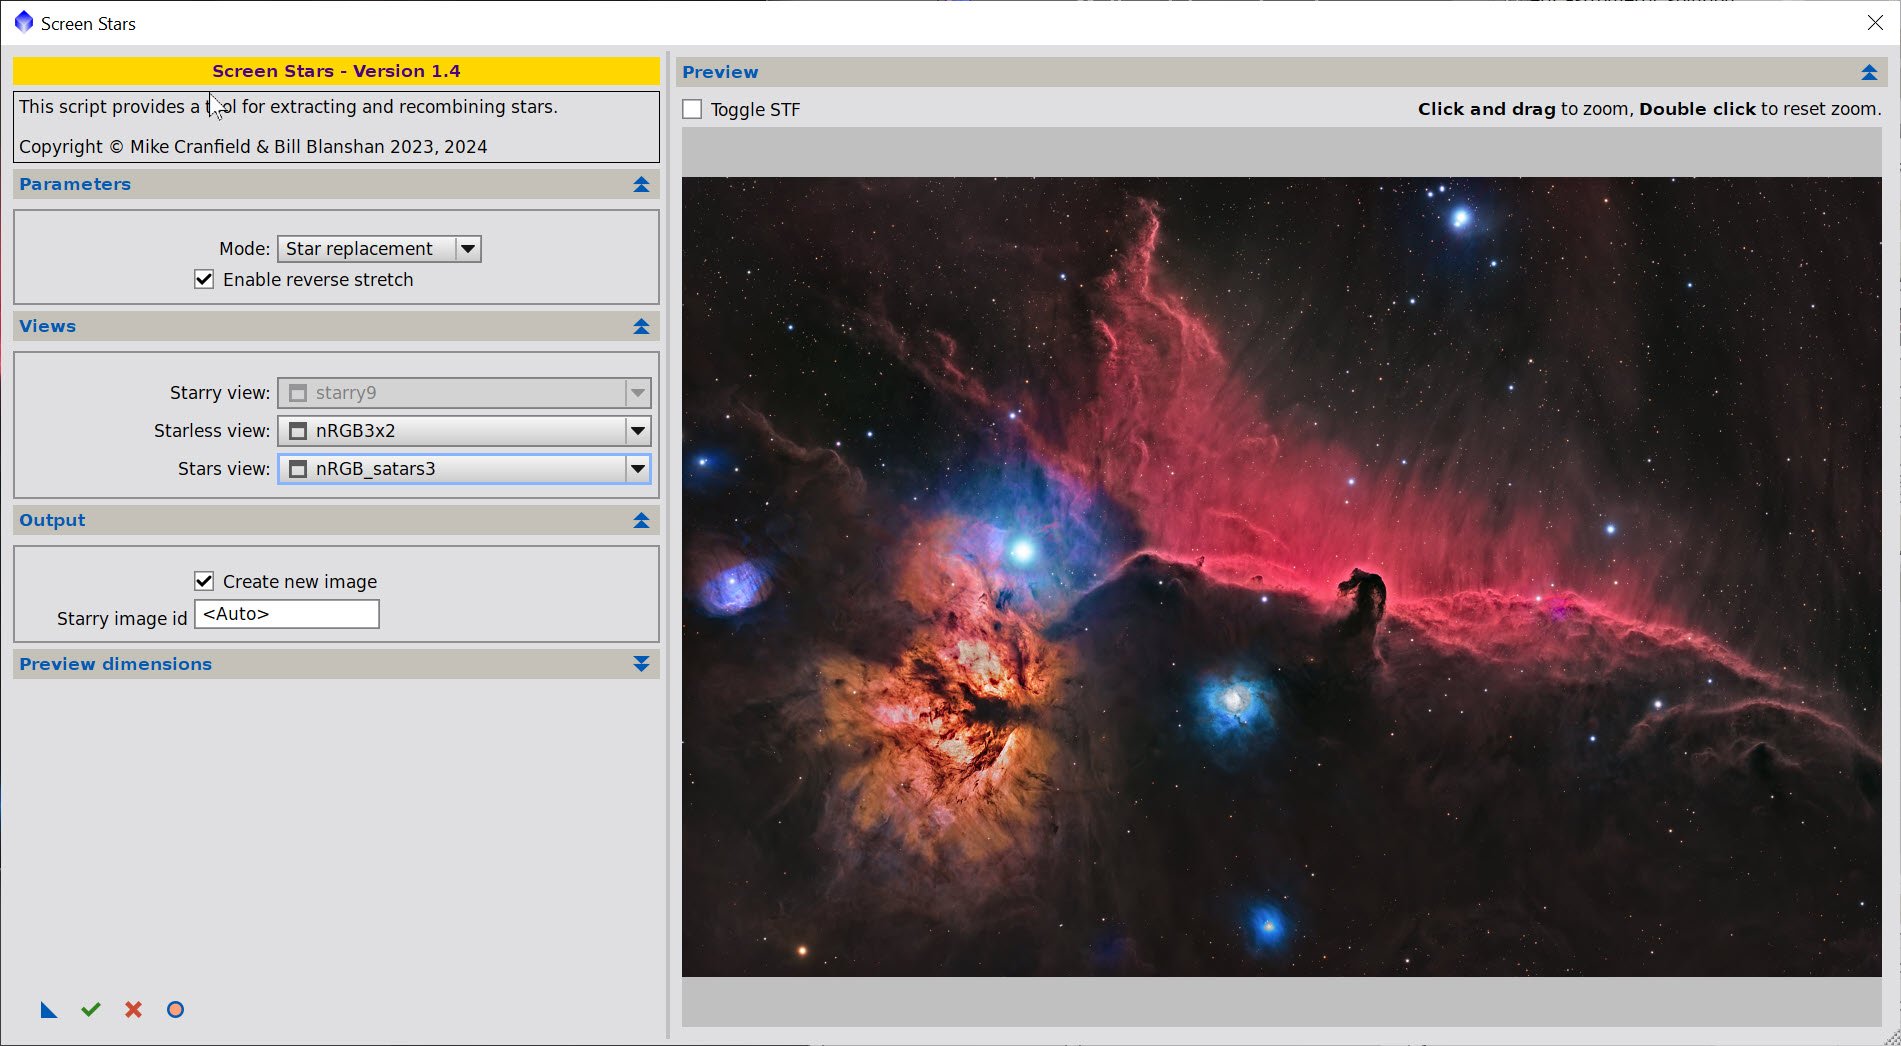
The script used to add the images back in,
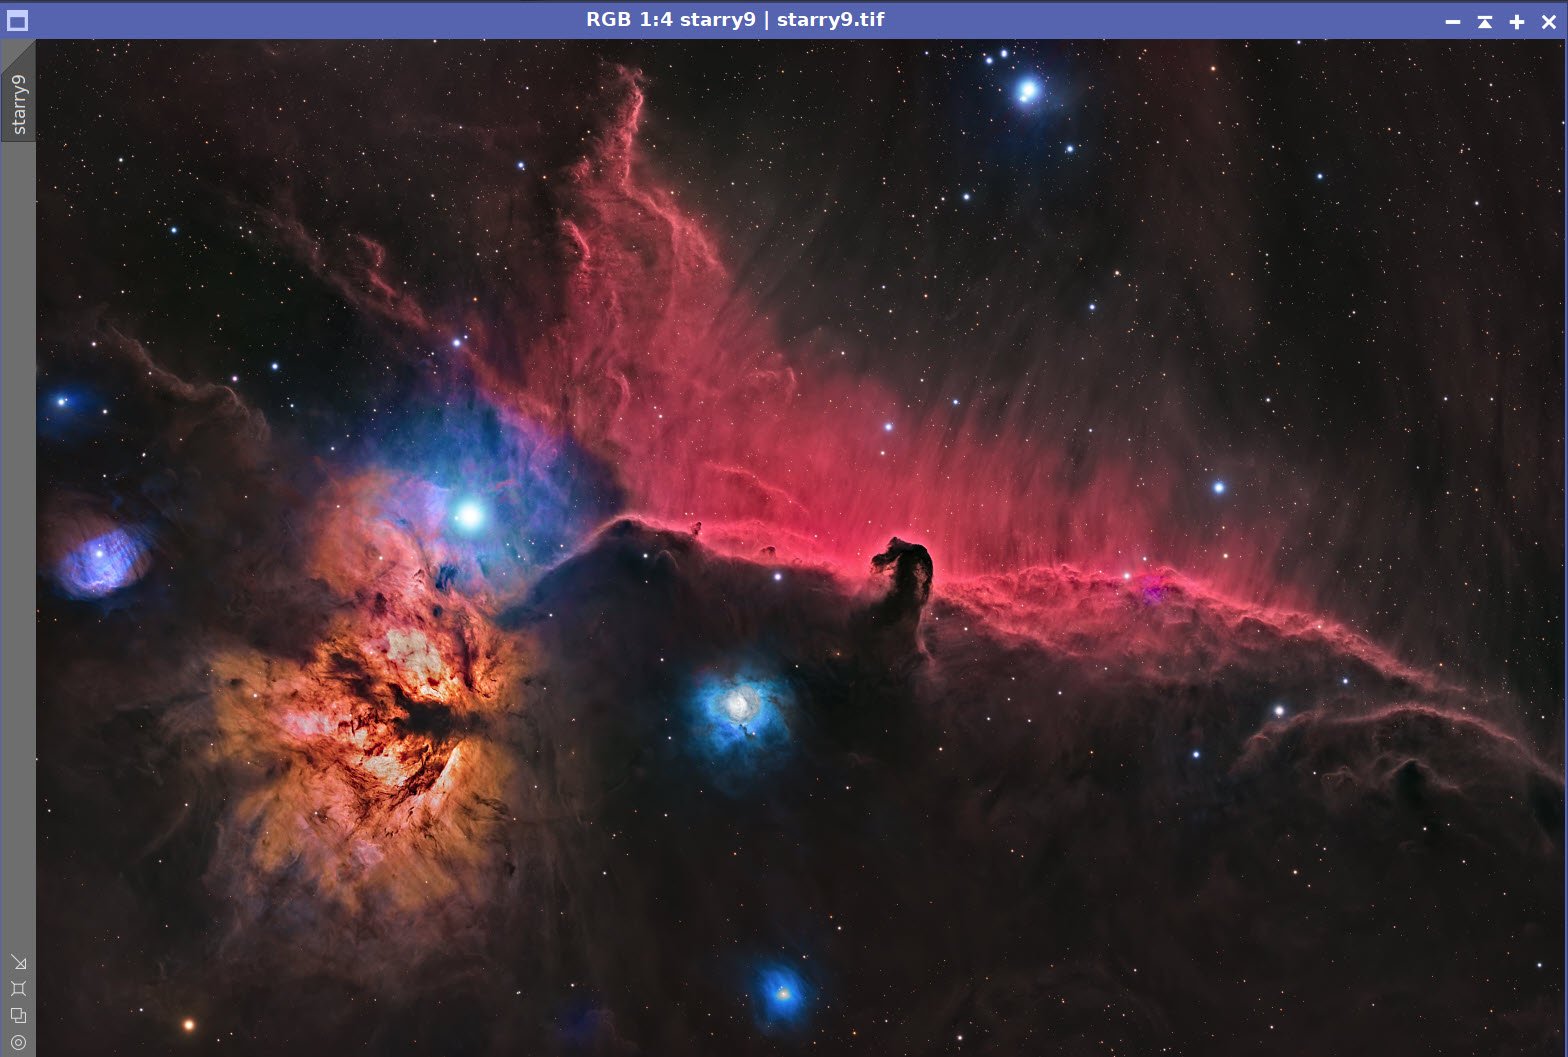
Stars now added - Image ready for Photoshop Polishing!
16. Export the Image to Photoshop for Polishing
Save the image as a TIFF 16-bit unsigned and move to Photoshop
Make final global adjustments with Clarify, Curves, and the Color Mixer - slight tweaks really
Added Watermarks
Export Clear, Watermarked, and Web-sized JPEGs.
The Final Image!

The First Cropped Image
Back to B33/NGC 2024 - Horsehead and Flame Nebula Project Page
Alternatively, you can use the back arrow to return to the B33.NGC 2024 main page, or you can use the menu at the top of the page to continue your navigation.
Thanks,
Pat