
IC 1848 - The Soul Nebula - Only 2 Hours of NB Data from an Abandoned Project
Date: December 17, 2021
Cosgrove’s Cosmos Catalog ➤#0091
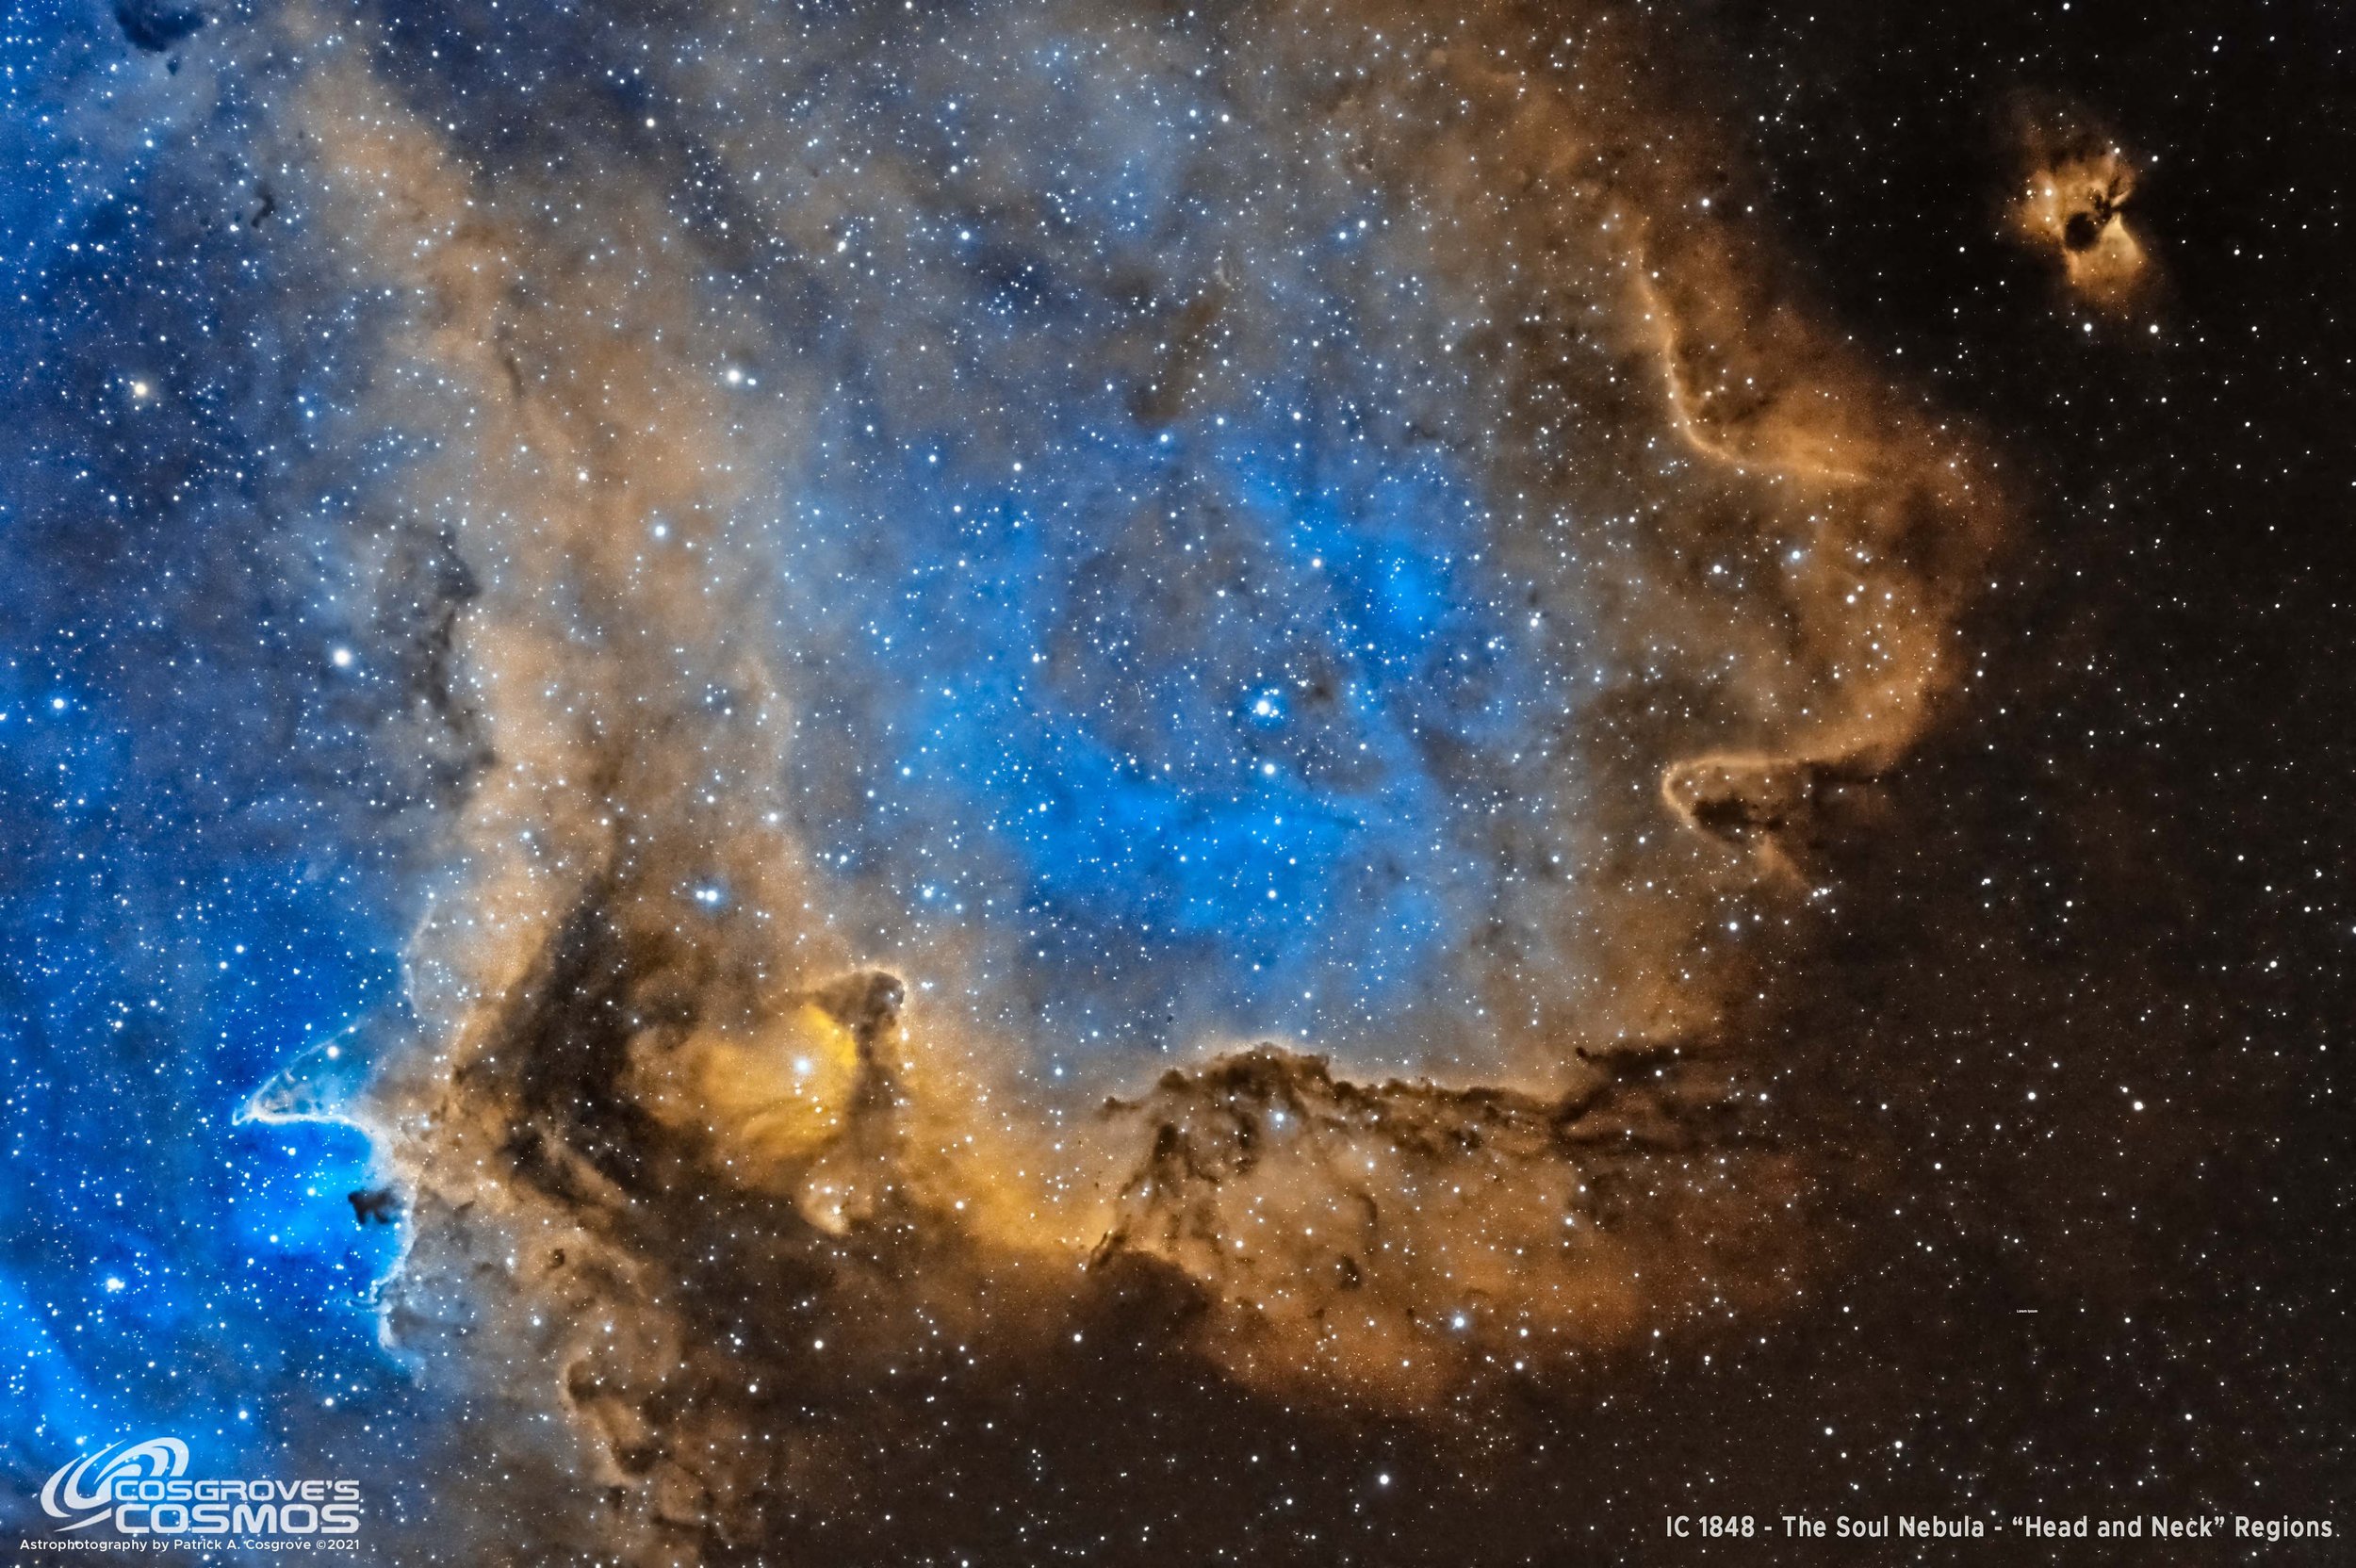
A study of a portion of IC 1848, The Soul Nebula, focusing on the “head” and “neck” regions! (click for full resolution version of image via Astrobin.com)
Table of Contents Show (Click on lines to navigate)
About the Target
IC 1848, also known as the Soul Nebula, The Embryo Nebula, and Westerhout 5, is an area of gas, and dust, with an associated cluster of young hot stars, located ~6,500 light-years away in the constellation of Cassiopeia. It is often associated with the Heart Nebula (IC 1805) - another famous object located 2.5 degrees away in the sky. These two regions are connected by a bridge of material and are illuminated by stars that are only about a million years old. These are mere toddlers compared to our Sun, estimated to be approximately 5 billion years old.
The Annotated Image

This annotated image was taken from a screengrab from my Astrobin account. The AnnotateImage script that I usually use to create this image was failing - so this was my backup method!
The Location in the Sky
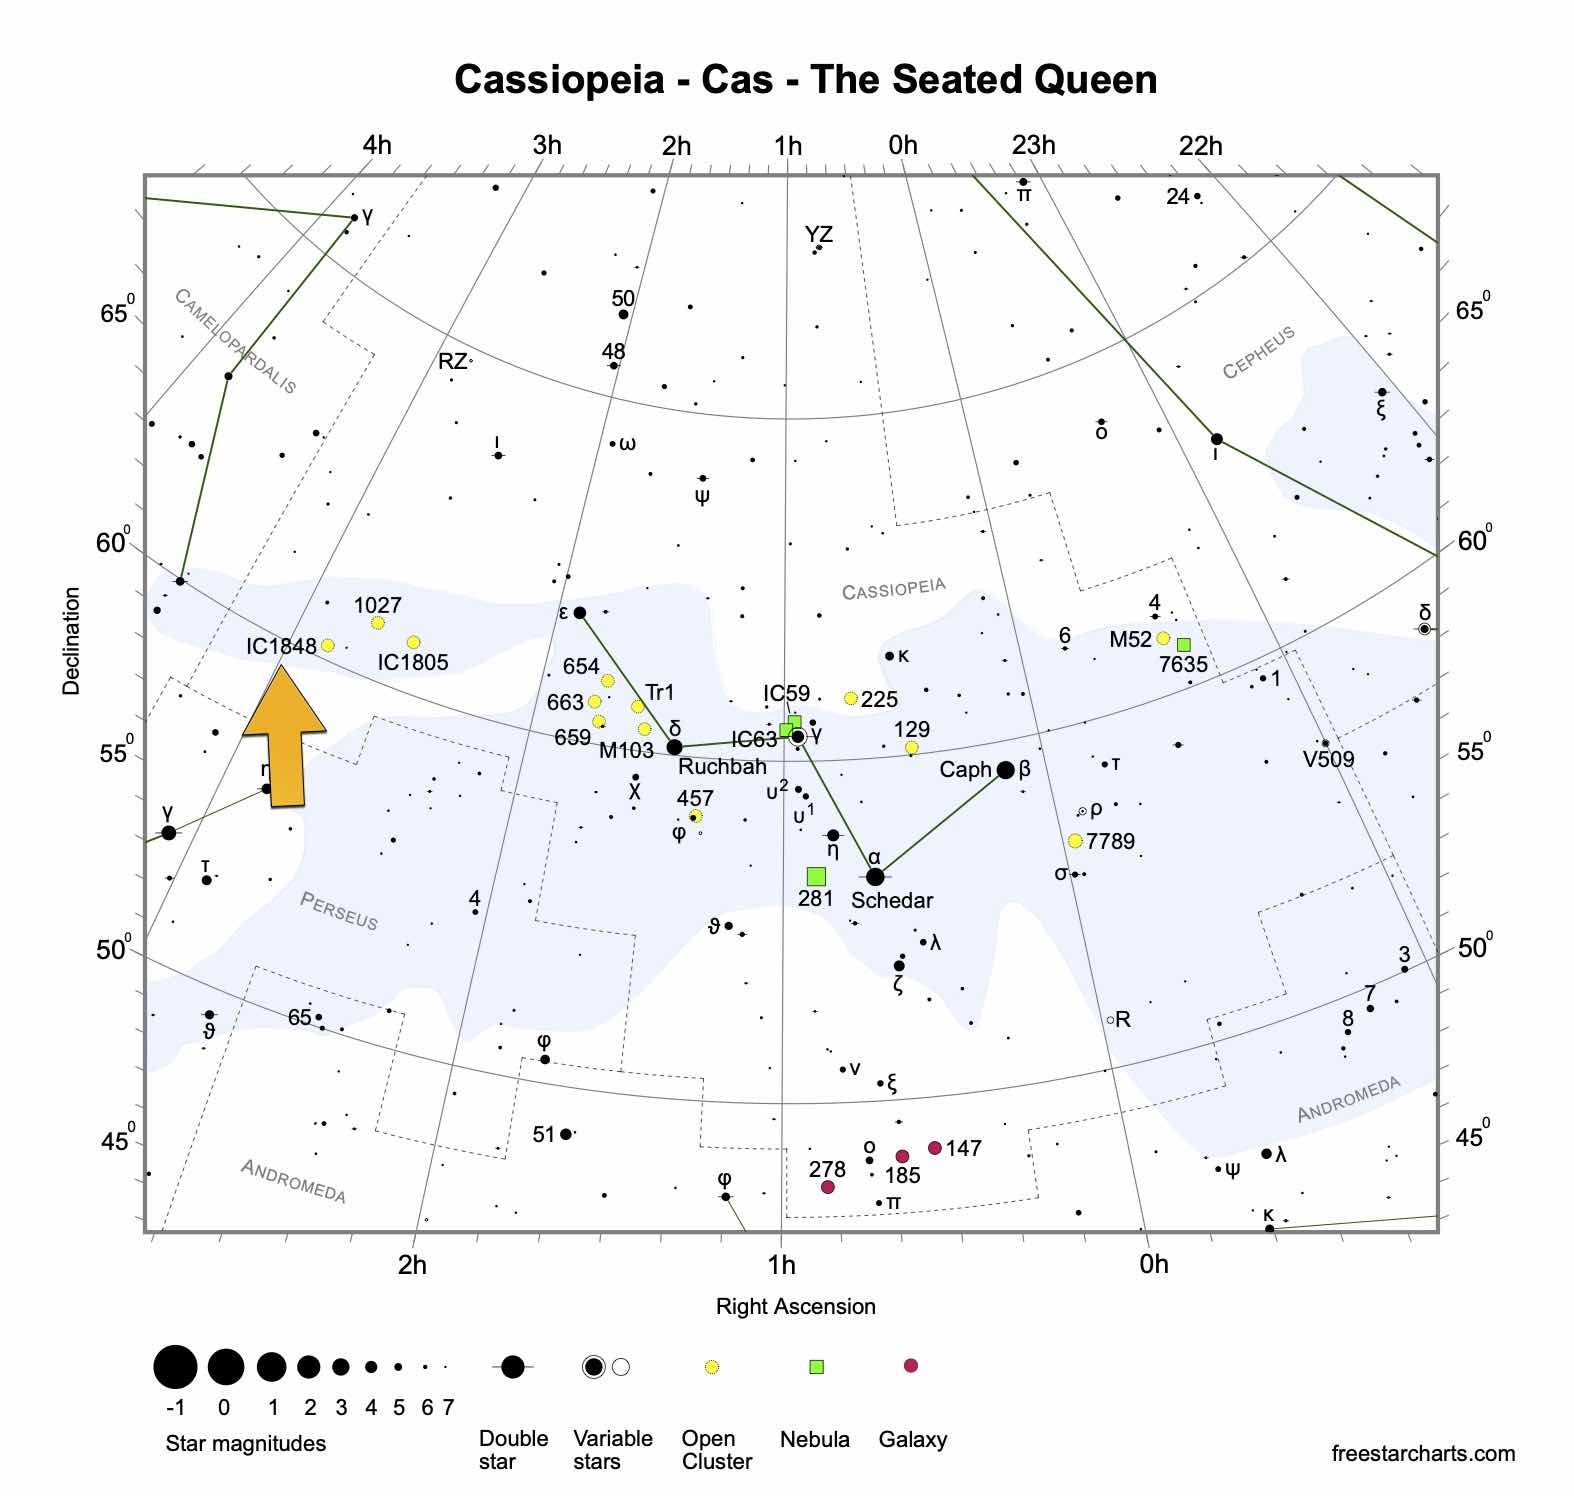
IAU/Sky & Telescope Constellation Map for Cassiopeia - IC1848 is indicated with the yellow arrow.
About the Project
In early November, we had a remarkably clear string of nights with no moon and during that four-night period I collected data for 9 separate targets - and I am still working my way through that treasure trove of data.
I have been saying that I captured data from 9 targets during this period of time, but I recently realized that that was not quite correct! There are actually 10 sets of data there!
Testing a New Computer
My wife and I often spend weeks at a time traveling down to North Carolina to visit my oldest son and his wife - who presented us with a beautiful granddaughter this past year. This has caused us to visit more often as my wife and I relish our new role as grandparents!
Because of these visits, I recently decided to build a powerful image processing computer in a smaller form factor so that I could take it with me allow me to do image processing when away from home. More about the computer later (I think I will be writing a gear article about it!). But once I set it up and configured the software, I thought it would be a good idea to run through a complete image process cycle on it - just to make sure that everything was working right.
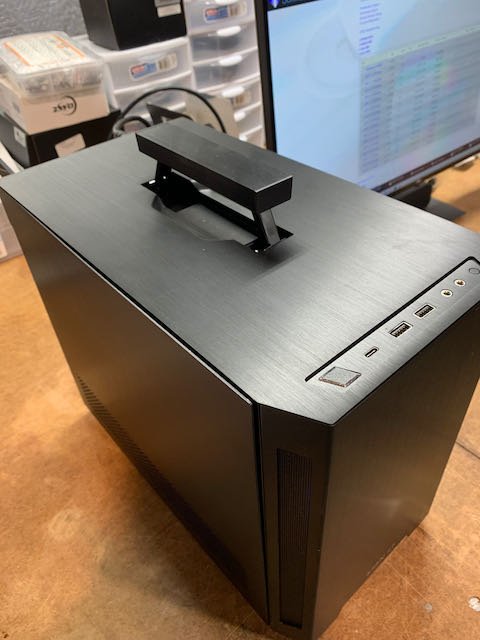
The Mini-ITX form-factor case used for transportable image processing computer.
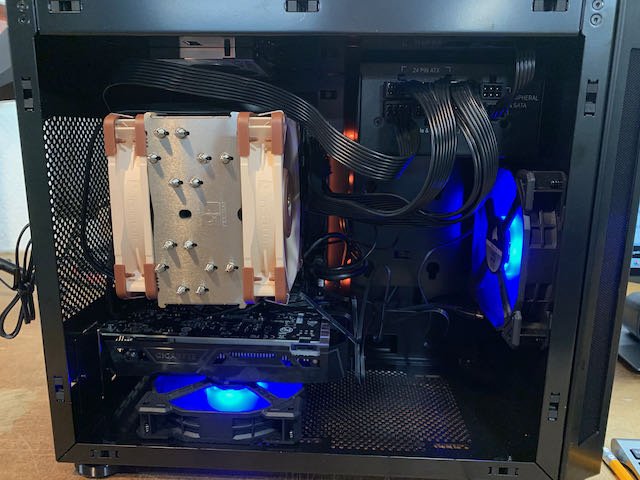
Looking inside the case. The biggest item in there is the cooler. It was the biggest one I could find that would fit in the smaller case - I needed all of the cooling I could get to keep the 12-core Ryzen processor from melting down. I will be writing a post in the gear section on this build in the near future.
So I was looking through the data set collected in November when I realized that there were 10 sets of data - not 9! How could that be?
Then I remembered!
On the fourth night, it looked like we might get a 5th and even a 6th night of good skies! Based on this I decided to go after a new target. I have always wanted to shoot the Heart and Soul Nebula. The Heart Nebula was already on my target list and I was using my wide-field FRA400 scope platform to collect data on that (you can see that project HERE). Could I squeeze in the Soul Nebula? I did not have a wide-field scope free so I decided to use my Astro-Physics 130mm APO platform to shoot it. It was not a wide field scope but I could do a “close-up study” - so I decided to go for it.
I used the Mosaic and Framing Wizard in Sequence Generator Pro to frame the head and shoulders area of the Soul nebula and created a sequence.

Here is the framing I chose for the this image.
I ran the sequence on the night of November 8th. I really did not get very far before I lost the target in the trees. I had only a handful of Ha, O3, and S2 images. It was a start, but I would have to add a lot more data to it over the next couple of nights to get anything worthwhile. I did not even shoot flats that night. I was tired - so I figured that I would shoot flats in the morning.
The next morning came, and at that point, it became obvious that the weather pattern had changed and my window for shooting was now closed. In my area, it is very rare to get any clear nights after mid-November. I realized that my goose was cooked and I would not be able to finish this project. With that - I simply forgot about it. I never even shot the flats for it!
So that’s where the 10th data set came from!
On a whim, I decided to use that data to go through a processing sequence to test the new computer setup. I knew the image would be garbage - but I could still validate the software config on the new PC. I mean, I only had 2 hours of integration on the target and no calibration files. It would just not be pretty.
So I did the processing. To my surprise, the image was - well - respectable!
How could this be?
I was using the new ASI2600MM-Pro on this rig - and it can do amazing things.
I still had a lot of noise in the image, but using my bag of tricks in Pixinsight and also using Topaz AI Denoise to help things along - I managed to tame the worst of noise.
So I present you my image from an abandoned and incomplete project! I hope you like it. I was pretty surprised myself that it did not come out looking completely terrible!
Image Processing Log
1. Blink Screening Process
All light images were reviewed with the Blink process.
No problems seen!
Flat images
no flats were collected. I will have to do without
Darks
used 300-sec darks taken from the NGC 1499 project files, captured at the same time.
2. WBPP 2.3 Run
all frames loaded
Cosmetic Correction setup
Pedastal image of 50 used.
Subframe weighting: psf signal - this is a new feature of version 2.3
I don’t usually do this, but I set up WBPP to do image integration as well.
Run complete with no issues
4. Dynamic Background Extraction
No gradients were seen so DBE was not run for this image.
5. Deconvolution Prep
For all images
Object mask created
A nonlinear version of the image was created using STF->HT
Use HT to clip blacks and push stars and nebula to white
Create Local protection images
Run StarMasks with layers = 6, all else default
Adjust star mask with HT to boost star size - move the middle arrow to the 25% point
Create PSF image with PSFImage Script.
6. Apply Deconvolution
For all images:
Apply Object mask to the image
Set psf to the right one for the image
add the right local support image
Create 3 preview sections on the image
Test different global dark settings until optimal found
Ha - 0.008
O3 - 0.005
S2 - 0.005
7. Run a Light NR pass to take the “fizz” off each image.
Run an MLT setup for a light “Take the fizz off the linear image” run.
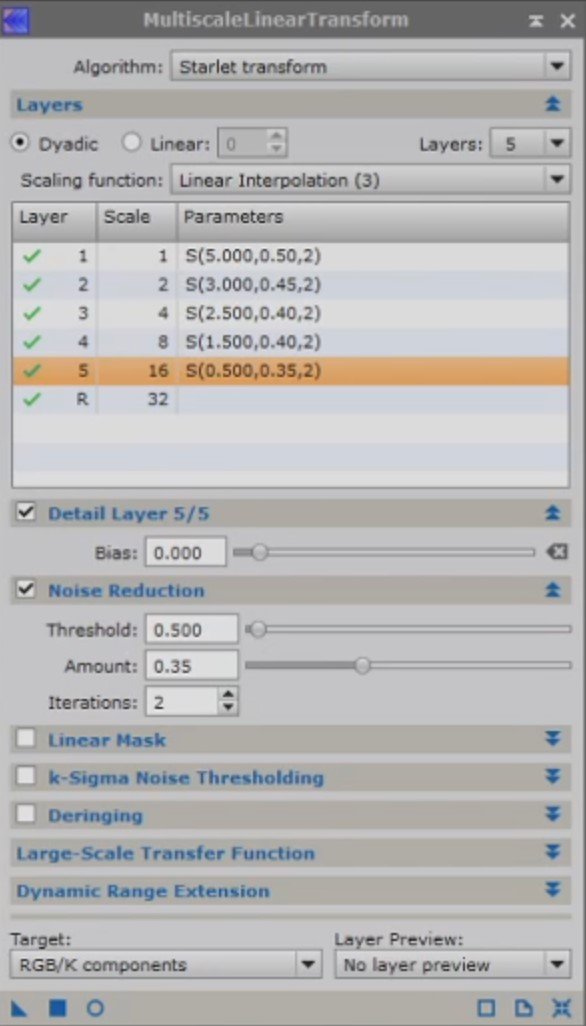
MLT setup or a linear NR run.
8. Create Nonlinear Versions of the Images
For each image
Use A preview to indicate a good sample of the background sky
Run MaskedStretch with background preview
Use CT to tweak tonescale
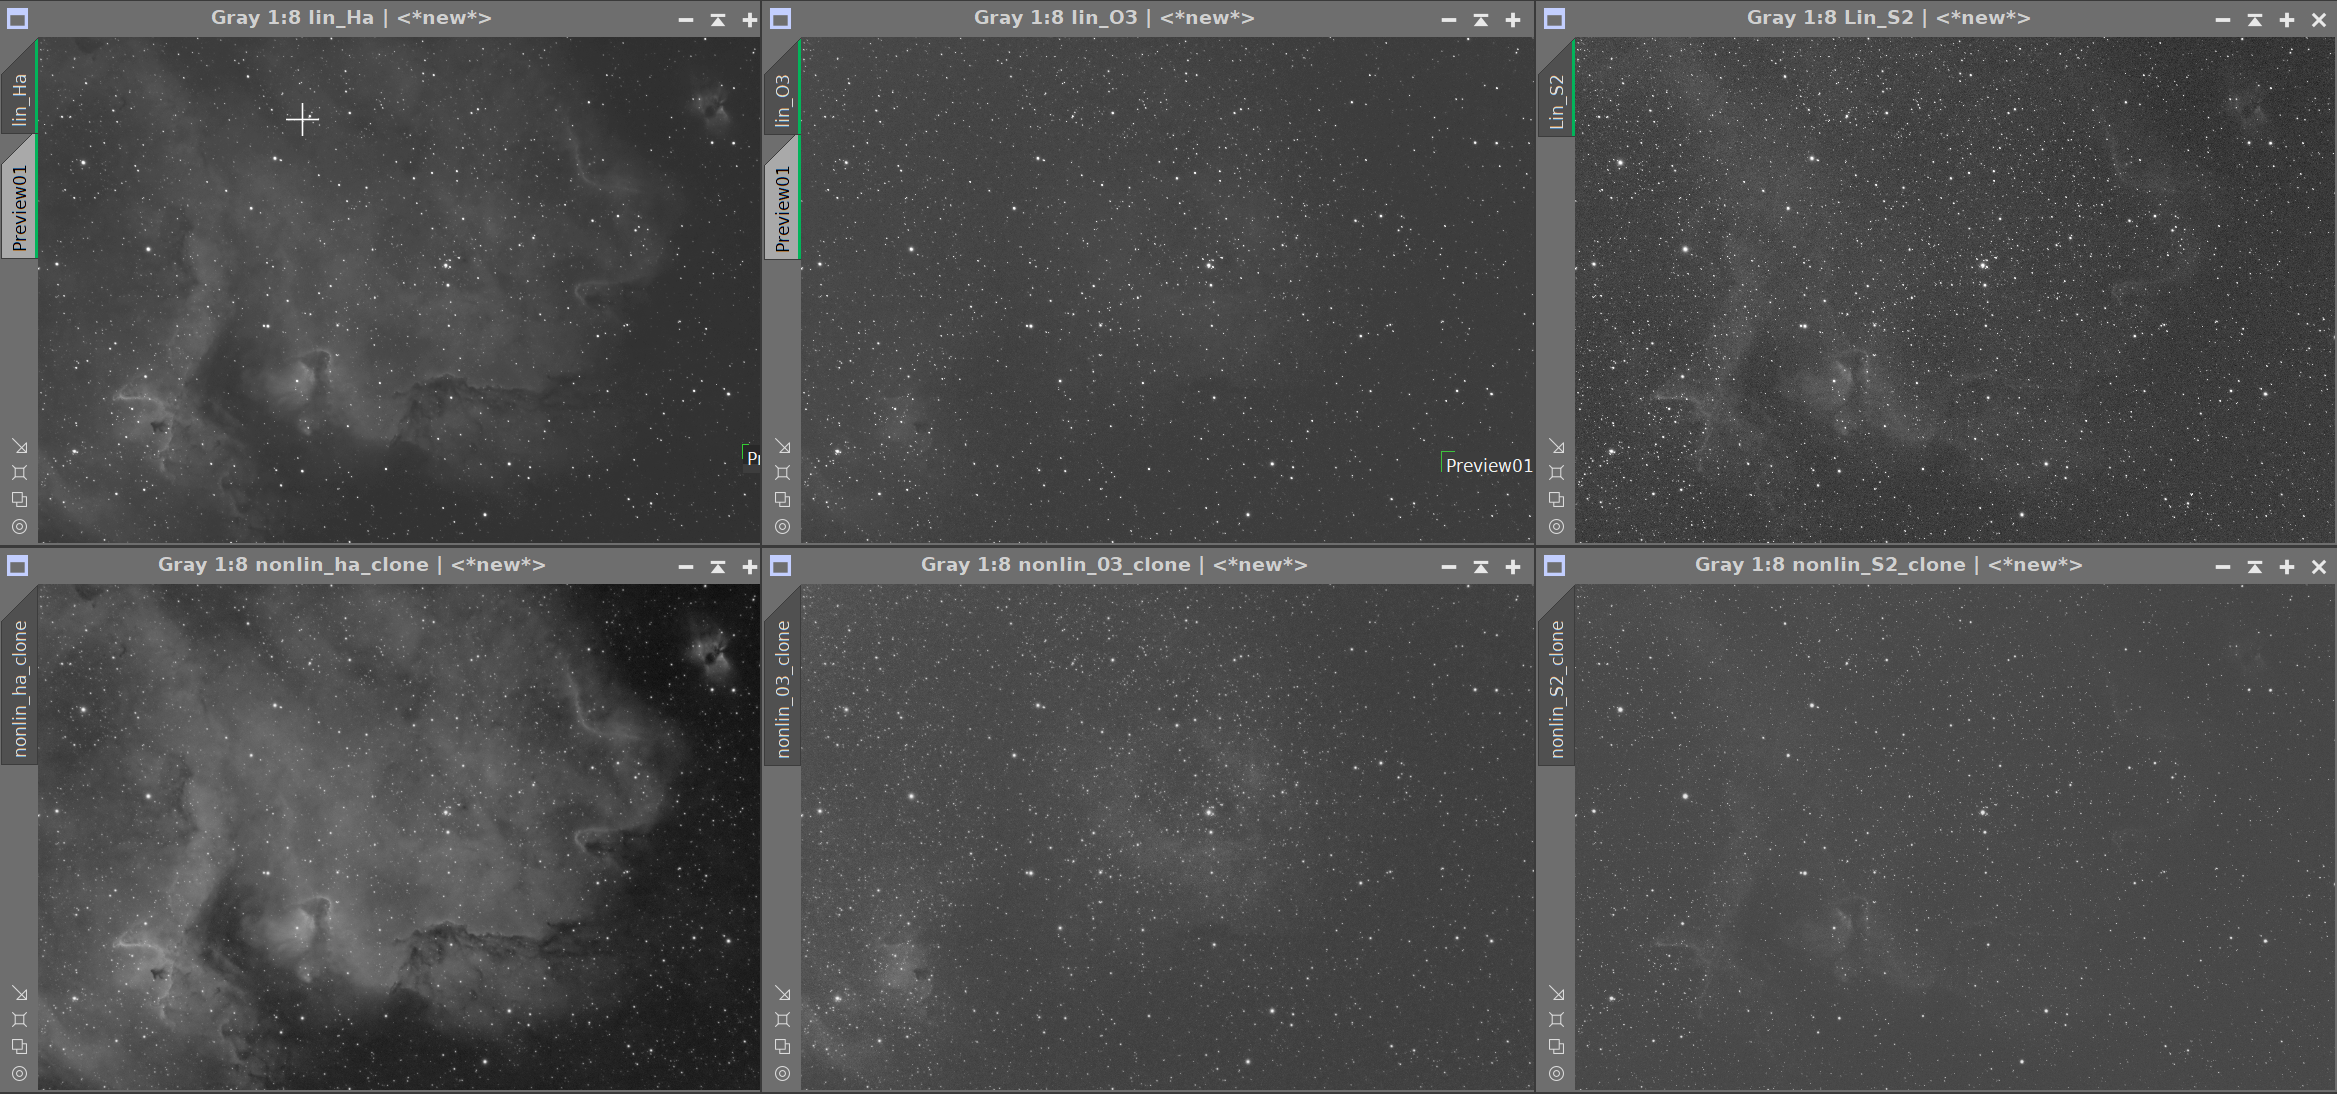
Top row is the linear Ha, OIII, and SII images. The second row is the resulting Nonlinear Ha, OIII, and SII images.
9. Create Color Image
Use Linfit to balance the three images
Use Ha as the reference image
Set Linfit range to run from 004 to 0.92
Apply to OIII and SII nonlinear images
Run Chanel combination tool with new Nonlinear images to create the first color image.
10. Initial Process of the Color Images
Run SCNR to remove green
Invert the Image
Run SCNR to remove green again
Invert the Image
Create a Blue Color Mask
Run ColorMask script for blue and remove 1 wavelet
Run HT to boost the mask to something more like an object mask
Smooth it off by running Convolve Process with a std dev 16
Apply Blue Mask
Use CT to adjust the color of the blue regions
Run LHE radius: 308, contrast limit: 2.0, Amount: 0.5, Histogram: 12-bit
Run LHE Radius 100, contrast limit:2.0, Amount: 0.5, Histogram: 10-bit
Now create a color mask to cover the orange-yellow areas of the image
Run ColorMask for green and remove one wavelet
Use HT to boost
convolve with std dev 16
Apply the Green Mask
Use CT to adjust the R, G, B curves to get the color desired.
run LHE Radius: 64, Contrast Limit: 2.0, Amount: 0.5, Histogram: 8-bit
Run LHE Radius: 180, Contrast Limit: 2.0, Amount: 0.4, Histogram: 10-bit
Run LHE Radius: 360, Contrast Limit: 2.0, Amount: 0.3, Histogram: 12-bit
Now create a star mask to tweak star color
run starmask process with scale 7, aggregate
run HT on starmask to boost it a bit
Apply the Star Mask
Run CT to lower sat
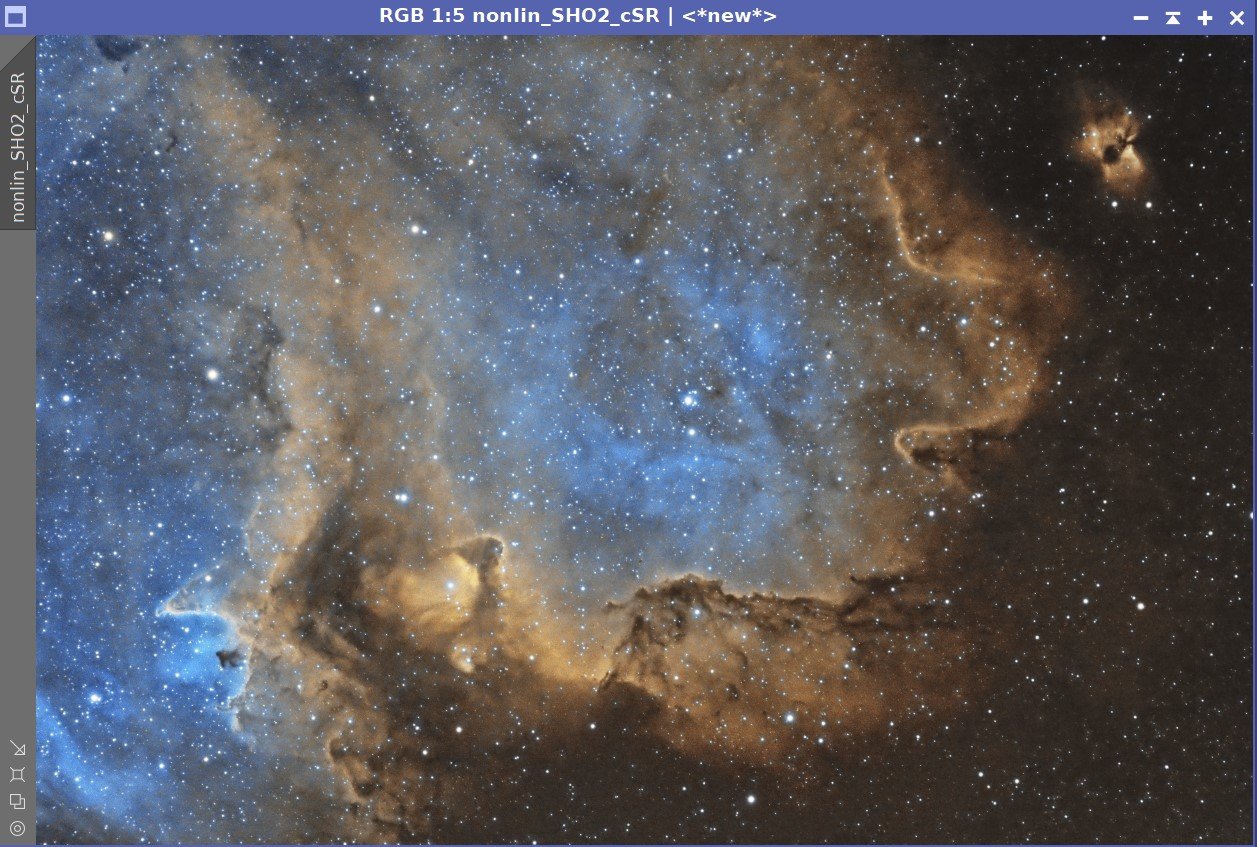
The initial SHO color image (click to enlarge)
Image after Invert. Note that Magenta regions are now geren. (click to enlarge)
Invert the image once again. (click to enlarge)
The Green mask used to adjust the orange colors of the image. (click to enlarge)
After using SCNR (click to enlarge)
After SCNR to remove green (click to enlarge)
The Blue mask used for blue adjustments (click to enlarge)

After all mask operations. (click to enlarge)
12. Nonlinear Noise Reduction
Run ACDNR as shown in the panel images below

ACDNR Lightness Panel Settings

Before ACDNR

ACDNR Chrominance Panel Settings

After ACDNR
13. Star Reduction
Run EZ-StarReduction using everything default and the Adam Block Method.

Before Star Reduction
After Star Reduction
16. Save images as Tiff and Move to Photoshop
In Photoshop:
Use Camera Raw Filter to adjust Global Clarity, Texture, and Color Mix
Use StarShrink filter to reduce large stars radius 46, strength 6, sharpness -1
Use StarShrink filter to reduce small stars radius 3, strength 6, sharpness -1
Use Topaz AI Denoise ( see panel setting below)
Section detail areas with lasso with a feather setting of 150 and adjust local clarity and Texture
Add watermarks
Export Clear, Watermarked, and Web-sized Jpegs.

TOpz AI Denoise Setting and how the image looked before application.

After Application. In image with tough noise issues, Topaz Ai Denoise can really help!
Capture Details
Lights Frames
Taken the night of November 8th, 2021
9 x 300 seconds, bin 1x1 @ -15C, Gain 100.0, Astrodon 5nm Ha Filter
6 x 300 seconds, bin 1x1 @ -15C, Gain 100.0, Astrodon 5nm OIII Filter
9 x 300 seconds, bin 1x1 @ -15C, Gain 100.0, Astronmiks 6nm SII Filter
Total of 2.0 hours
Cal Frames
25 Darks at 300 seconds, bin 1x1, -15C, gain 100
no Dark Flats taken
no flats taken!
Capture Hardware
Scope: Astrophysics 130mm Starfire F/8.35 APO refractor
Guide Scope: Televue 76mm Doublet
Camera: ZWO AS2600mm-pro with ZWO 7x36 Filter wheel with ZWO LRGB filter set, Astrodon 5nm Ha & OIII, and Astronomiks 6nm SII Narrowband filter set
Guide Camera: ZWO ASI290Mini
Focus Motor: Pegasus Astro Focus Cube 2
Camera Rotator: Pegasus Astro Falcon
Mount: Ioptron CEM60
Polar Alignment: Polemaster camera
Software
Capture Software: PHD2 Guider, Sequence Generator Pro controller
Image Processing: Pixinsight, Photoshop - assisted by Coffee, extensive processing indecision and second-guessing, editor regret and much swearing…..
Adding the next generation ZWO ASI2600MM-Pro camera and ZWO EFW 7x36 II EFW to the platform…