
Barnard 150 - The Seahorse Nebula: Processing Walkthrough

My Image of Barnard 150 - The Seahorse Nebula
(All Processing is done in Pixinsight, with some final touches done in Photoshop)
1. Blink
Lum
13 frames removed for thin clouds
Red
6 frames removed!
Green
7 Frames removed for clouds.
Blue
6 Frames removed for clouds.
Darks
All looks ok
Dark Flats
All looks ok
Flats
all good
2. WBPP 2.8.9
Reset everything
Load all lights
Load all flats
Load all darks
Select - maximum quality
Reference Image - auto - the default
Select the output directory to wbpp folder
Enable CC for all light frames
Pedestal value - auto
Darks -set exposure tolerance to 0
Lights - set exposure tolerance to 0
Lights - all set except for a linear defect
set for Autocrop
WBPP run 2:42:08 - no errors
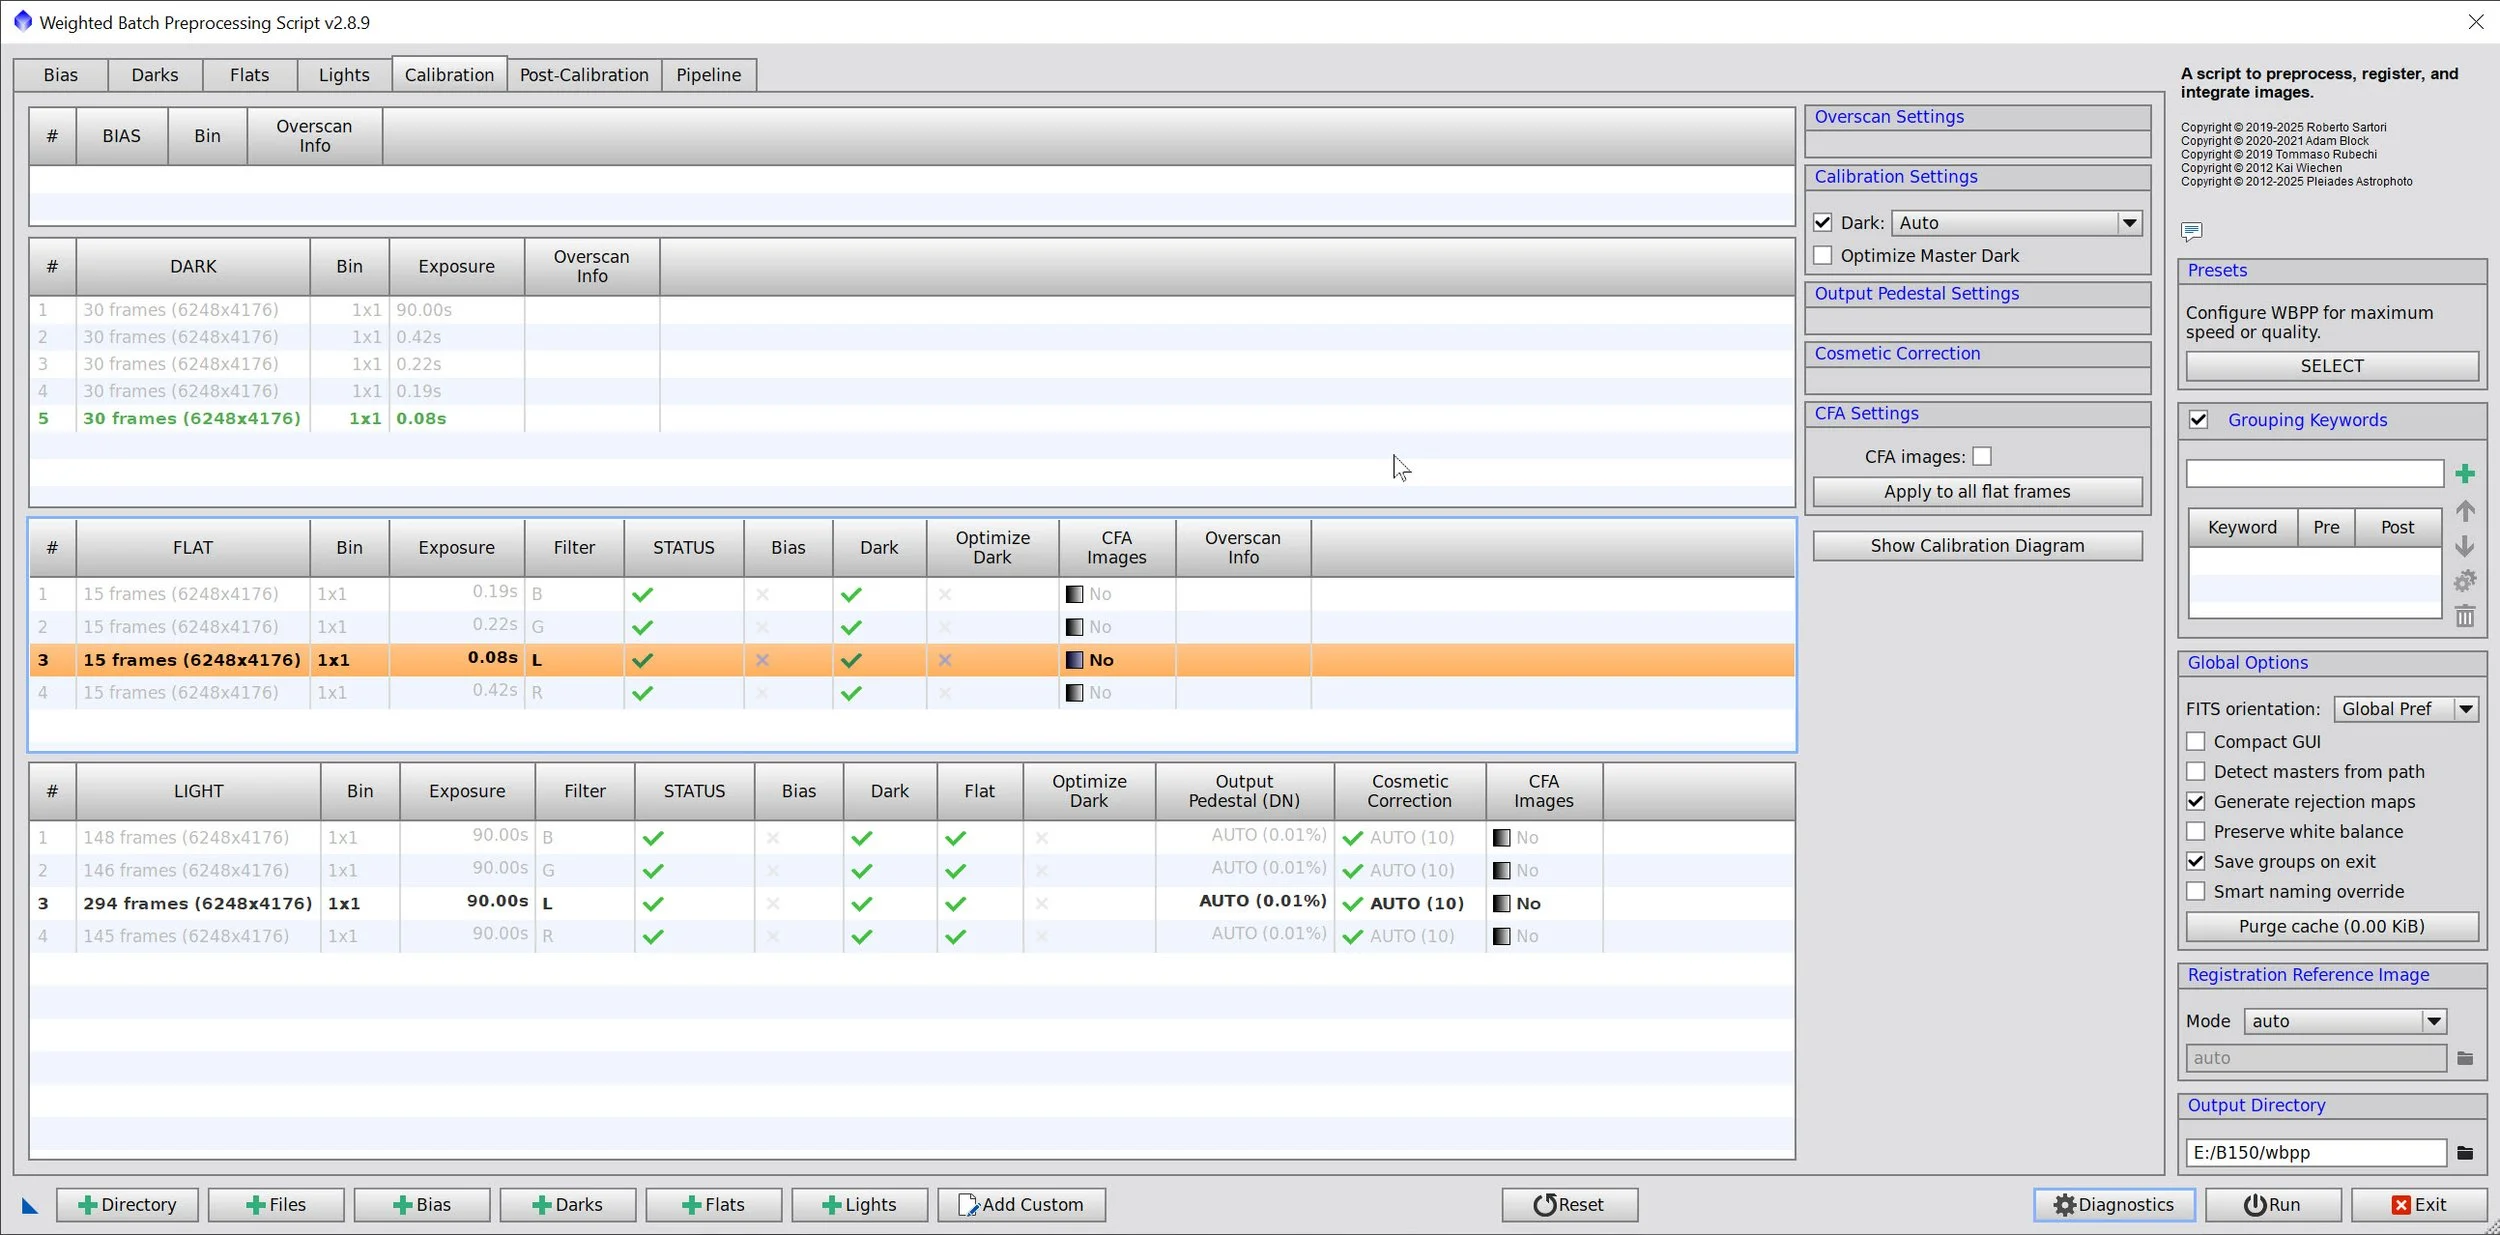
WBPP Calibration View

WBPP Post Calibration View

WBPP Pipeline View
3. Load Master Images and Create Color Images
Load all master images and rename them.
Using CombineChannels, create the Master RGB image

Master L, R, G, and B images.
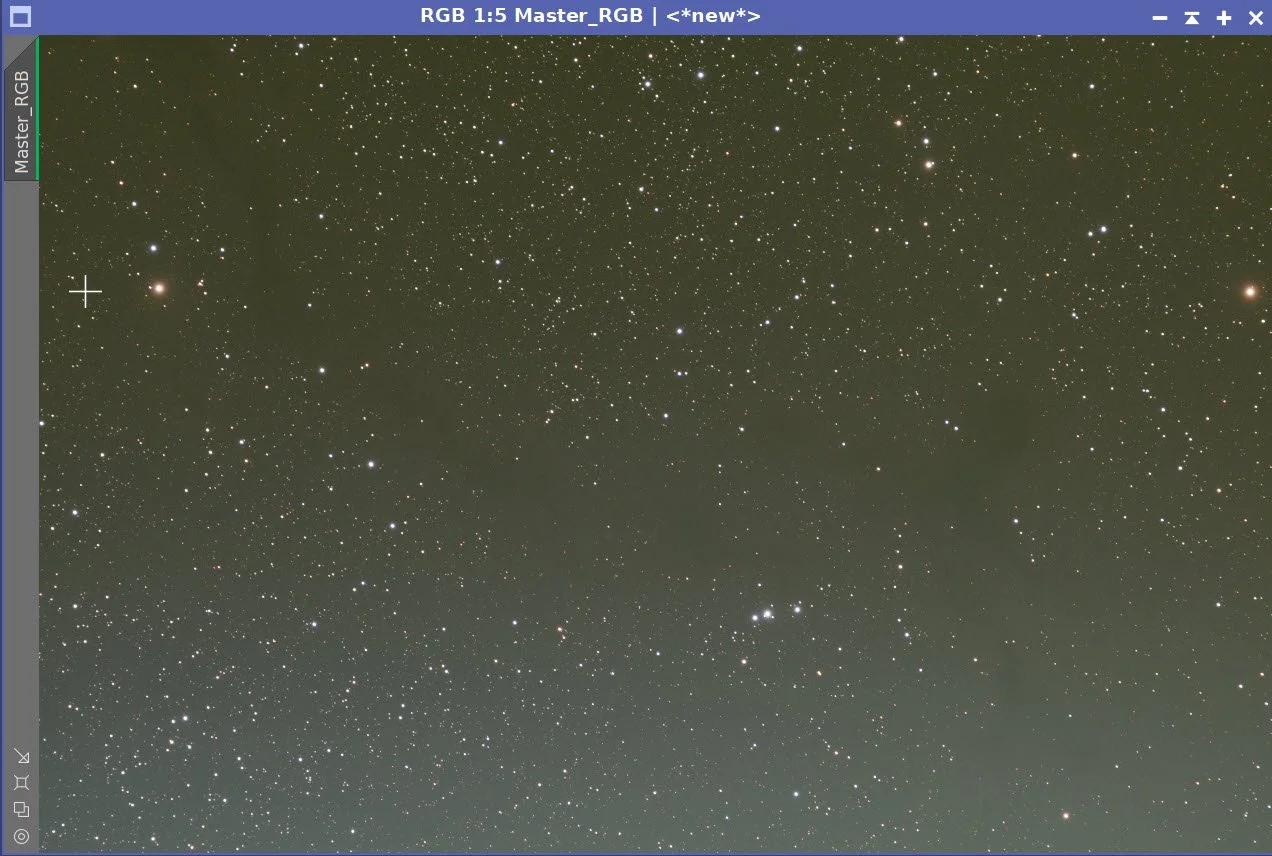
Initial RGB Color Master Image.
4. Initial Process of Linear RGB data
Run DBE for the RGB linear image. Use subtraction for the correction method. Choose a sampling plan that avoids the nebulae.
Run BXT - correct only. This cleans up and stars at the corners.
Select a preview rectangle sampling the background sky and then set up and run SPCC.
Use the 571 device curve
Use ZWO R, G, & B filter curves,
Run Full BXT - I am using default values here as I do not want to shrink the stars too much - I want them bigger to be better seen through all of the narrowband nebulae.
Run NXT V3 - see params from snapshot below
Run SXT and save the RGB stars.
Master RGB Image DBE Sampling Plan (click to enlarge)
MasterRGB- Before DBE (click to enlarge)
Master RGB after DBE (click to enlarge)
Background Subtracted by DBE (click to enlarge)

SPCC Panel Settings

SPCC Regression Results
Master RGB image before SPCC (click to enlarge)

BXT Settings Used.
Master RGB after SPCC (click to enlarge)
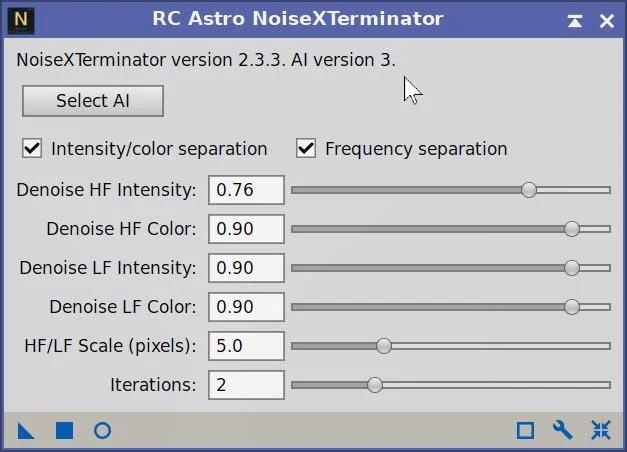
NXT Panel used.
SPCC Regression Result (click to enlarge)
BXT Parameters used.
NXT Parameters used.
Before BXT Fix Only (Copy)
Get Filter Config
Master RGB Before BXT Correct Only, After BXT Correct Only, After SPCC, After BXT Full, After NXT V3
Final Linaer RGB image.
View fullsize
Master RGB Stars Only
6. Process the Linear SHO Data
Run DBE for the SHO linear image. Use subtraction for the correction method. Choose a sampling plan that avoids the nebulae.
Run BXT - correct only. This cleans up and stars at the corners.
RUN PFSImage to get the star sizes. X = 1.81, Y= 1.92
Run Full BXT -I used values very close to the measured star sizes. See the panel snapshot below for the params used.
Run NXT V3 - see params from snapshot below.
I had a lot of trouble getting the color I wanted from this image. I tried manual methods and the NarrowbandNormalization script, but I couldn’t achieve the desired result. Then I had a thought. SPCC can be used with Narrowband images, but I had never tried it. When I gave it a go at first, I thought it looked terrible! All dark Green! But then I did an STF Update, and suddenly there was the image I had been looking for!
Select a preview rectangle sampling the background sky and then set up and run SPCC.
Use the 571 device curve
Define the filter specs from my Astronomiks narrowband filters.
Check Narrowband mode
Check the color calibration box.
Run
Update STF on the new image.
Run SXT and save the RGB stars.
Starting SHO Image.
View fullsize
Before DBE (click to enlarge)
View fullsize
Mastr SHO DBE Sample Patern (click to enlarge)
View fullsize
SHO after DBE and fresh STF. (click to enlarge)
View fullsize
SHO background removed (click to enlarge)
Results from PFSImage
BXT Params Used
NXT V3 params used.
Before BXT (Copy)
Get Filter Config
Master SHO before BXT Correct Only, After BXT Correct Only, After BXT Full, After NXT V3
View fullsize
Master SHO After SPCC but before STF update (click to enlarge)
Master SHO image After STF Update (click to enlarge)
Master SHO starless after STX
7. Process the SHO Starless Image
Take the image Nonlinear using the STF->HT method
Run SCNR Green at 0.8 to remove the green cast
Now we have magenta backgrounds to deal with:
Invert the image
Run SCNR Green at 0.8 again.
Invert the image back.
Now I applied a CT to darken the shadow regions and brighten the highlights - also to boost overall saturation.
Now I need to bring out the finer details. I chose LHE to do this.
Radius of 40, contrast limit of 2.0, Amount of 0.22, and an 8-bit histogram
Another CT to darken and boost contrast
Now do an MLT sharpen - see panel snapshot below for settings below.
Another CT to tweak things
Now - let's handle noise. NXT V3 is using settings from the panel snapshot below.
I still have too much magenta in the shadows and other areas.
Create a Magenta Mask using ColorMask_Mod Script
Blue is using Bill Blanshan’s Mask Blur Script.
Apply mask
Use CT to adjust saturation on masked areas.
View fullsize
The initial nonlinear SHO Starless image (click to enlarge)
View fullsize
After Inverting the SHO image. (Click to enlarge)
View fullsize
Invert again. Magenta mostly gone! (click to enlarge)
View fullsize
After LHE to bring out faint detail (click to enlarge)
View fullsize
MLT Sharpening Panel (click to enlarge)
View fullsize
Another CT adjust. (click to enlarge)
After SCNR Green at 0.8 (click to enlarge)
View fullsize
Run SCNR Green at 0.8 again (click to enlarge)
View fullsize
CT to Darken shadows and boost overal saturation (click to enlarge)
View fullsize
Another CT to again darken and boost sats (click to enlarge)
View fullsize
After MLT Sharpening (click to enlarge)
NXT Params used.
After NXT
Creating the Magenta Color Mask.
View fullsize
Magenta Mask after blur operation (click to enlarge)
View fullsize
Initial Magenta Mask (click to enlarge)
View fullsize
CT to remove saturation with Magenta Mask in place (click to enlarge)
8. Add The Stars Back In
Use the ScreenStars Script to add the stars back in.
View fullsize
The Final RGB Stars Image (click to enlarge)
View fullsize
The Final Starless SHO image (click to enlarge)
ScreenStars Panel.
The image with Stars inserted!
9. Export the Image to Photoshop for Polishing
I am pretty happy with the image and ready to polish it in Photoshop.
Save the image as a TIFF 16-bit unsigned and move to Photoshop
Make final global adjustments with Clarify, Curves, and the Color Mixer - slight tweaks really
Run Clarifier on the bottom-left corner and top center to get better definition. Areas selected with a lasso with a 100 pixel feather.
Added Watermarks
Export Clear, Watermarked, and Web-sized jpegs.
The Final Image!