
Date: October 27 , 2026
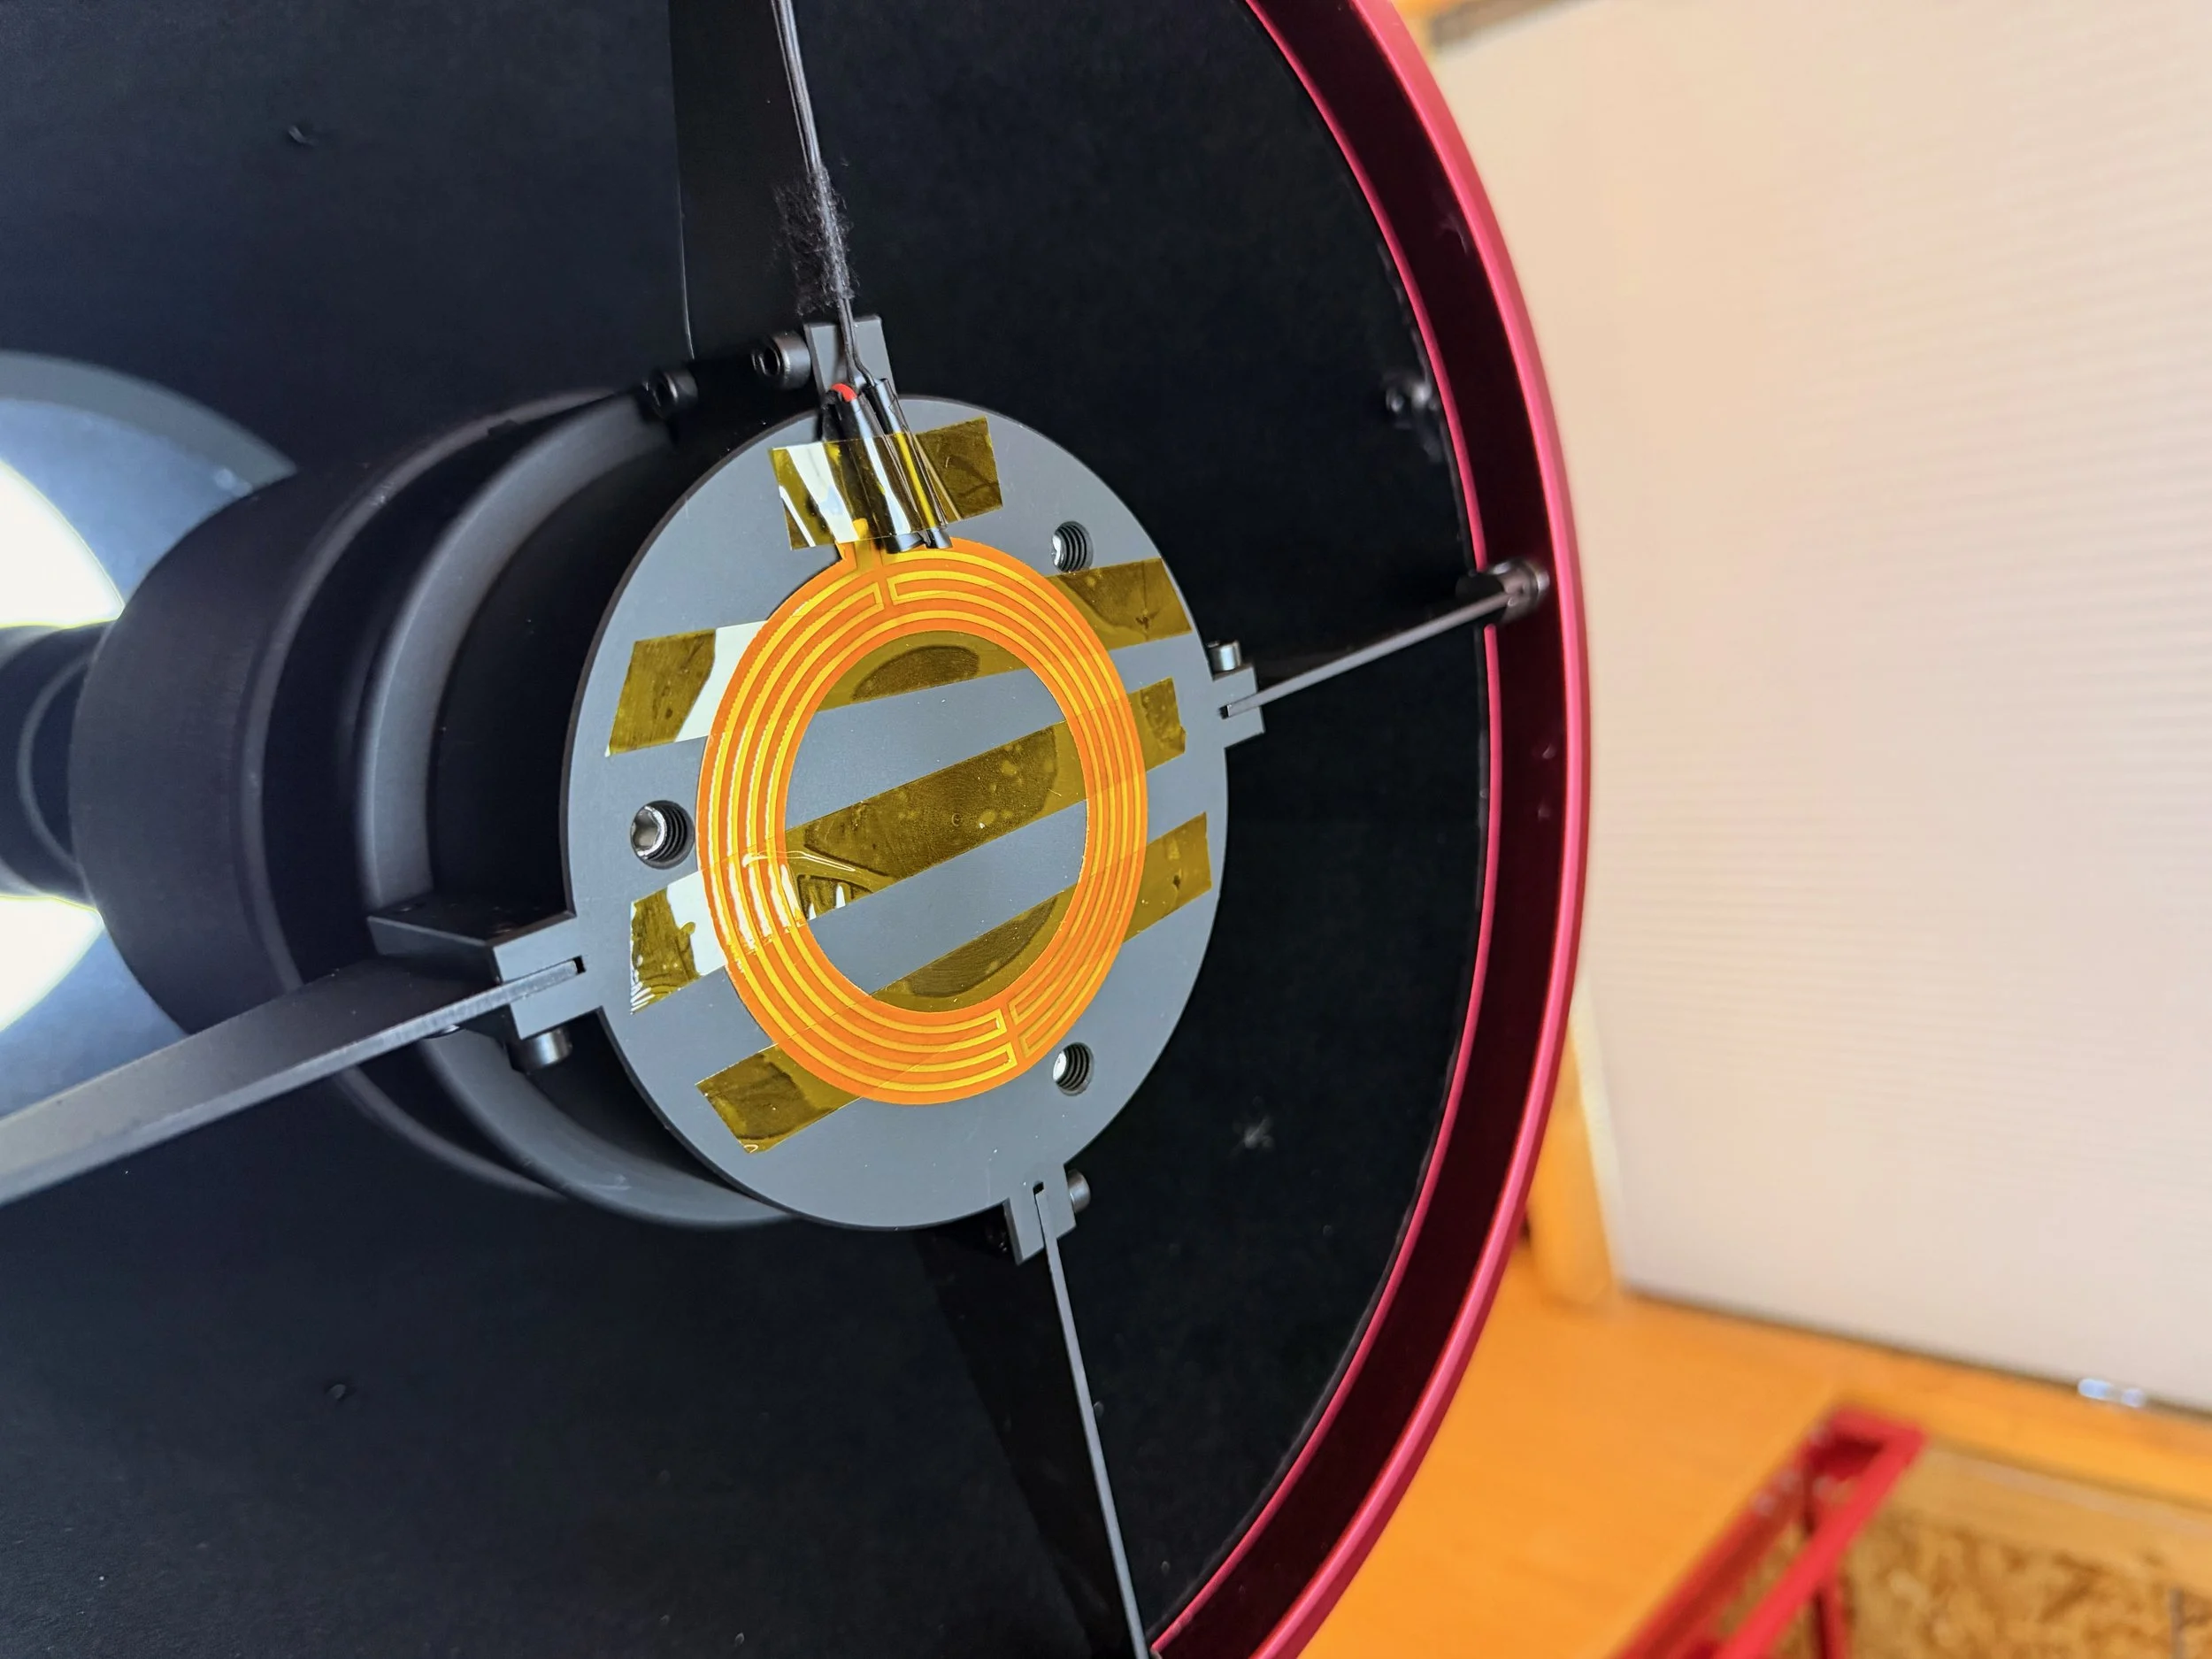
Table of Contents Show (Click on lines to navigate)
Solving a Dew Problem on the Sharpstar SCA260 V2
Early fall in western New York is prime dew season. After extended periods of rain, nighttime humidity can remain extremely high, and rapidly falling temperatures after sunset can produce remarkably heavy condensation.
My Sharpstar SCA260 V2 is a dew magnet!
I already had a large dew-heater strap wrapped around the rear of the optical tube near the primary mirror cell. That arrangement worked well for the rear of the telescope, but on particularly humid nights I began seeing significant dew at the front of the SCA260.
Two areas were especially troublesome:
The exposed front face of the secondary-mirror assembly.
The metal ring surrounding the front aperture of the telescope.
The secondary could accumulate enough moisture to significantly degrade the images. The outer metal ring was another concern because enough water could collect there to drip downward onto the primary mirror, depending on how the scope was oriented.
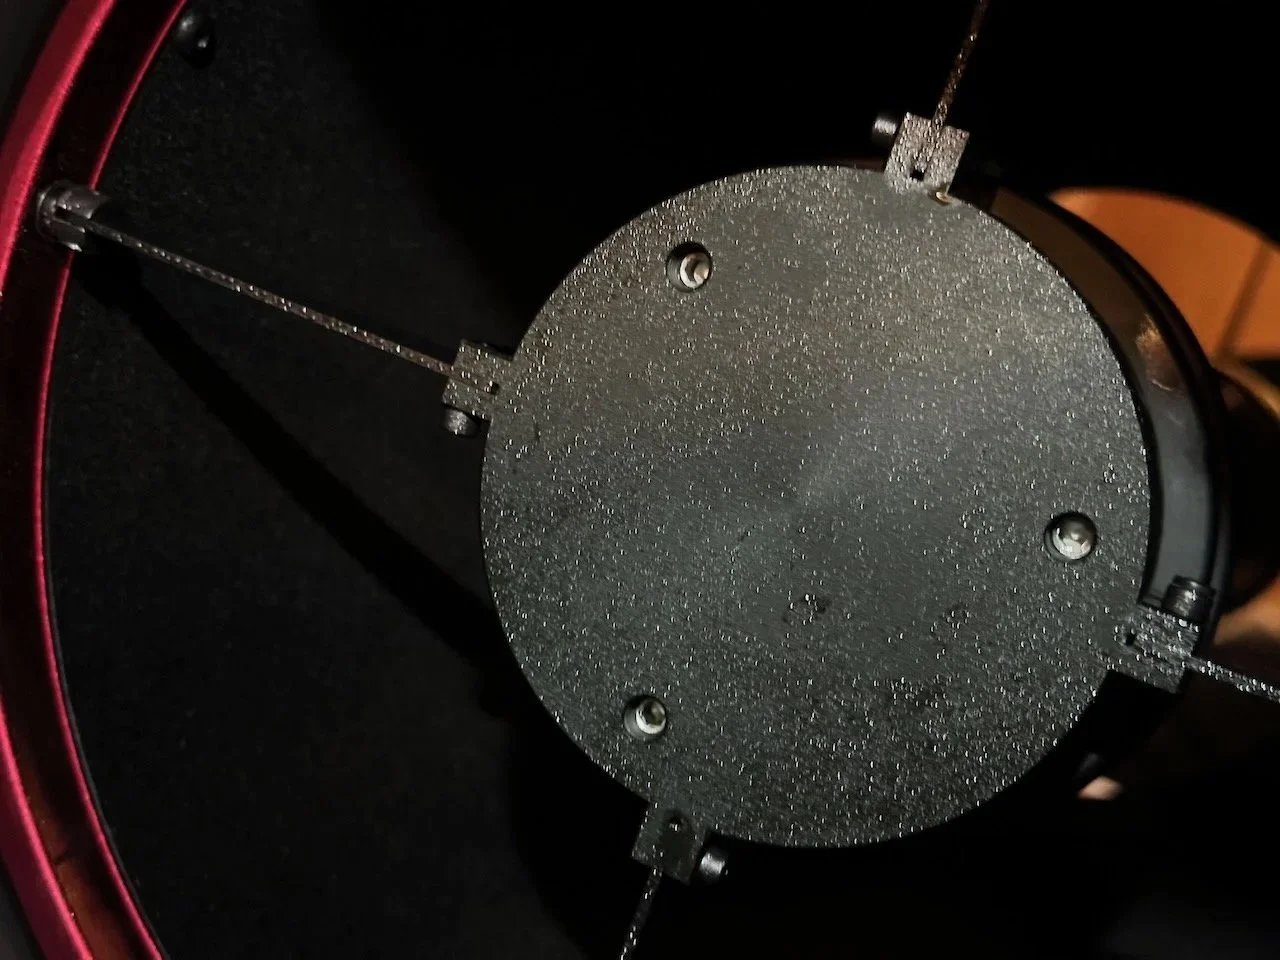
Dew on the secondary - and even the face of the spider vanes.
What followed was an iterative project in which each attempted solution taught me something about the problem.
Attempt #1: A Simple Dew Shield
My first approach was the simplest one.
I fabricated a temporary dew shield approximately 1.5 feet long from a sheet of black plastic and taped it around the front of the SCA260.
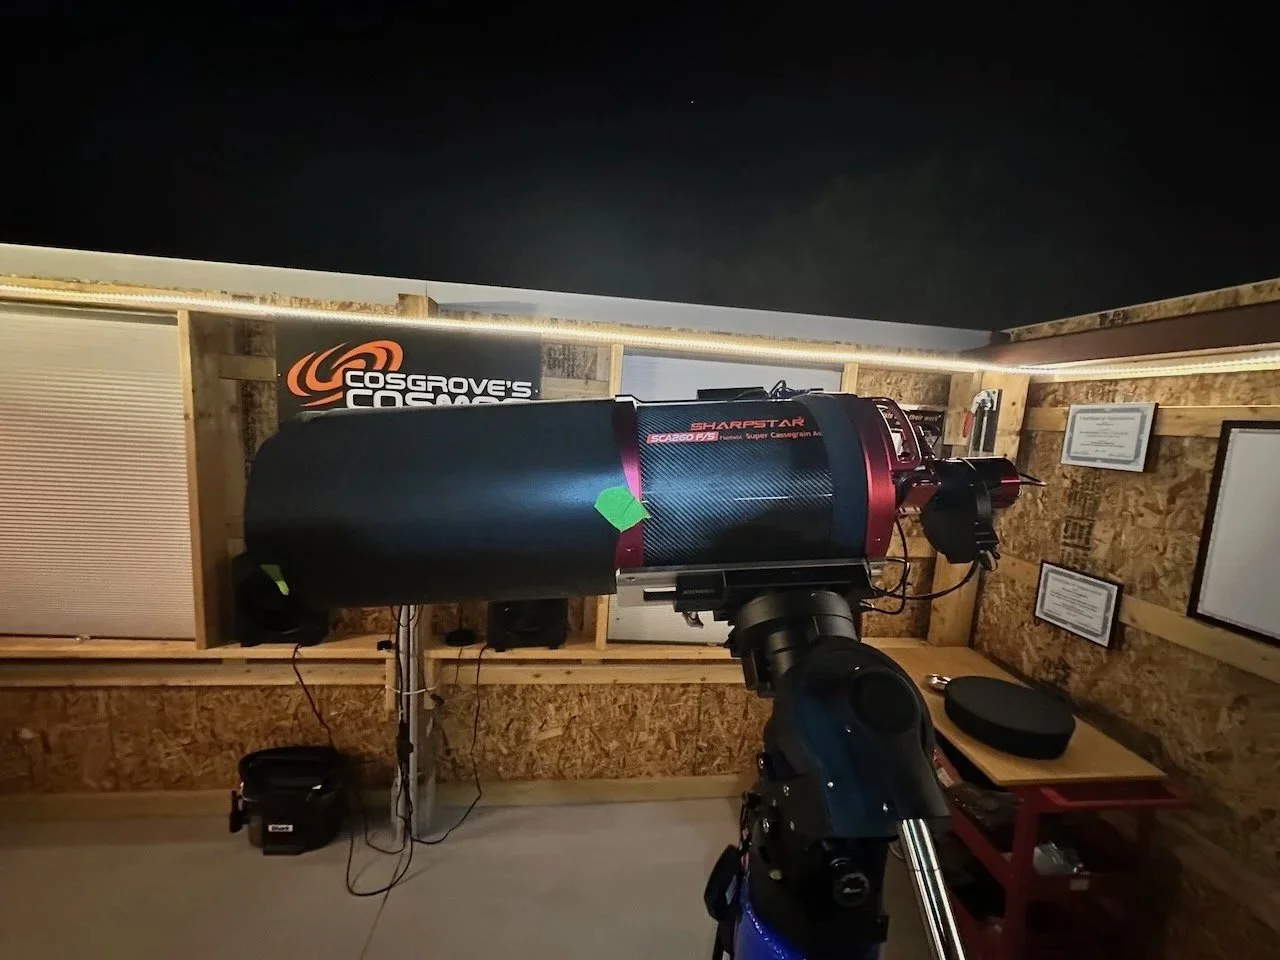
It was clunky attempt at a dew shield! But it helped.
The idea was straightforward. Dew formation on exposed optical surfaces is driven in large part by radiative cooling toward the clear night sky. A dew shield reduces the amount of sky visible to the secondary and front structure and should therefore reduce their radiative heat loss.
It helped.
The shield clearly delayed the onset of dew and reduced the amount that eventually formed.
What surprised me was that it did not eliminate the problem.
During sufficiently humid conditions, the secondary still eventually became wet. Moisture also continued to form on the metal ring at the front of the telescope.
The dew shield was useful, but it wasn't enough for the conditions I was experiencing.
That led to the next experiment: active heating.
Attempt #2: Heating the Secondary With an Eyepiece Dew Strap
I had a small dew-heater strap designed for a large eyepiece and decided to see whether it could be adapted to the SCA260 secondary assembly.
The secondary housing has a recessed area near the front where a thin heater could theoretically fit while remaining behind the existing central obstruction.
I wrapped the eyepiece heater around the cylindrical portion of the secondary housing and routed its round power cable outward along one of the spider vanes. For the test, I attached the cable to the vane with black cloth electrical tape.
The dew heater strap fit right into an indent on the secondary shroud - for the most part. (click to enlarge)
But the strap stays on by overlapping itself with velcro. This makes is considerably thicker and it now sticks out into the optical path - not good! (click to enlarge)
From a dew-control standpoint, the experiment succeeded.
The heater kept the secondary clear.
This was an important result because it conclusively showed that a relatively modest amount of active heat applied to the secondary assembly was enough to prevent condensation.
Unfortunately, the heater introduced a new problem.
A Fifth Diffraction Spike
The eyepiece heater closed by overlapping one end of the strap over the other and securing it with Velcro.
That overlap made one portion of the heater considerably thicker than the rest.
Although most of the heater fit within the shadow of the secondary assembly, the overlapped section protruded slightly into the optical path.
The effect was immediately visible in bright stars.
The normally symmetrical diffraction pattern developed an additional asymmetric feature — effectively a fifth diffraction spike or bulge on one side of the star.
For the particular imaging project I was working on, this was not catastrophic. I already had RGB star data acquired before installing the heater, and I planned to remove the narrowband stars during processing.
But it clearly was not a satisfactory permanent solution.
The experiment had nevertheless established two important facts:
Active heating would solve the secondary-dew problem.
Any permanent heater had to remain entirely within the existing secondary obstruction.
There was also another issue.
Even with the secondary heater working, I was still seeing substantial dew forming on the metal ring around the front aperture of the telescope.
That moisture could accumulate into droplets, creating the possibility that water could eventually fall onto the primary mirror.
So I needed to solve both problems independently.
The Final Approach
The permanent solution evolved into two separate heating systems at the front of the telescope:
A large heater band around the front metal ring.
A thin, flat heater mounted directly on the front face of the secondary assembly.
This addressed both of the locations where dew was actually forming rather than trying to warm the entire telescope indirectly from the rear.
Heating the Front Ring
For the front circumference of the telescope, I selected a:
Thousand Oaks HB-37 Dew Heater Band
The HB-37 is approximately 37 inches / 94 cm long and operates at:
12 volts
2.4 amps
approximately 28.8 watts
Dew strap used for the front of the scope (click to enlarge)
The heater wraps around the metal structure at the front of the SCA260 and prevents that structure from cooling sufficiently below ambient temperature for heavy condensation to develop.
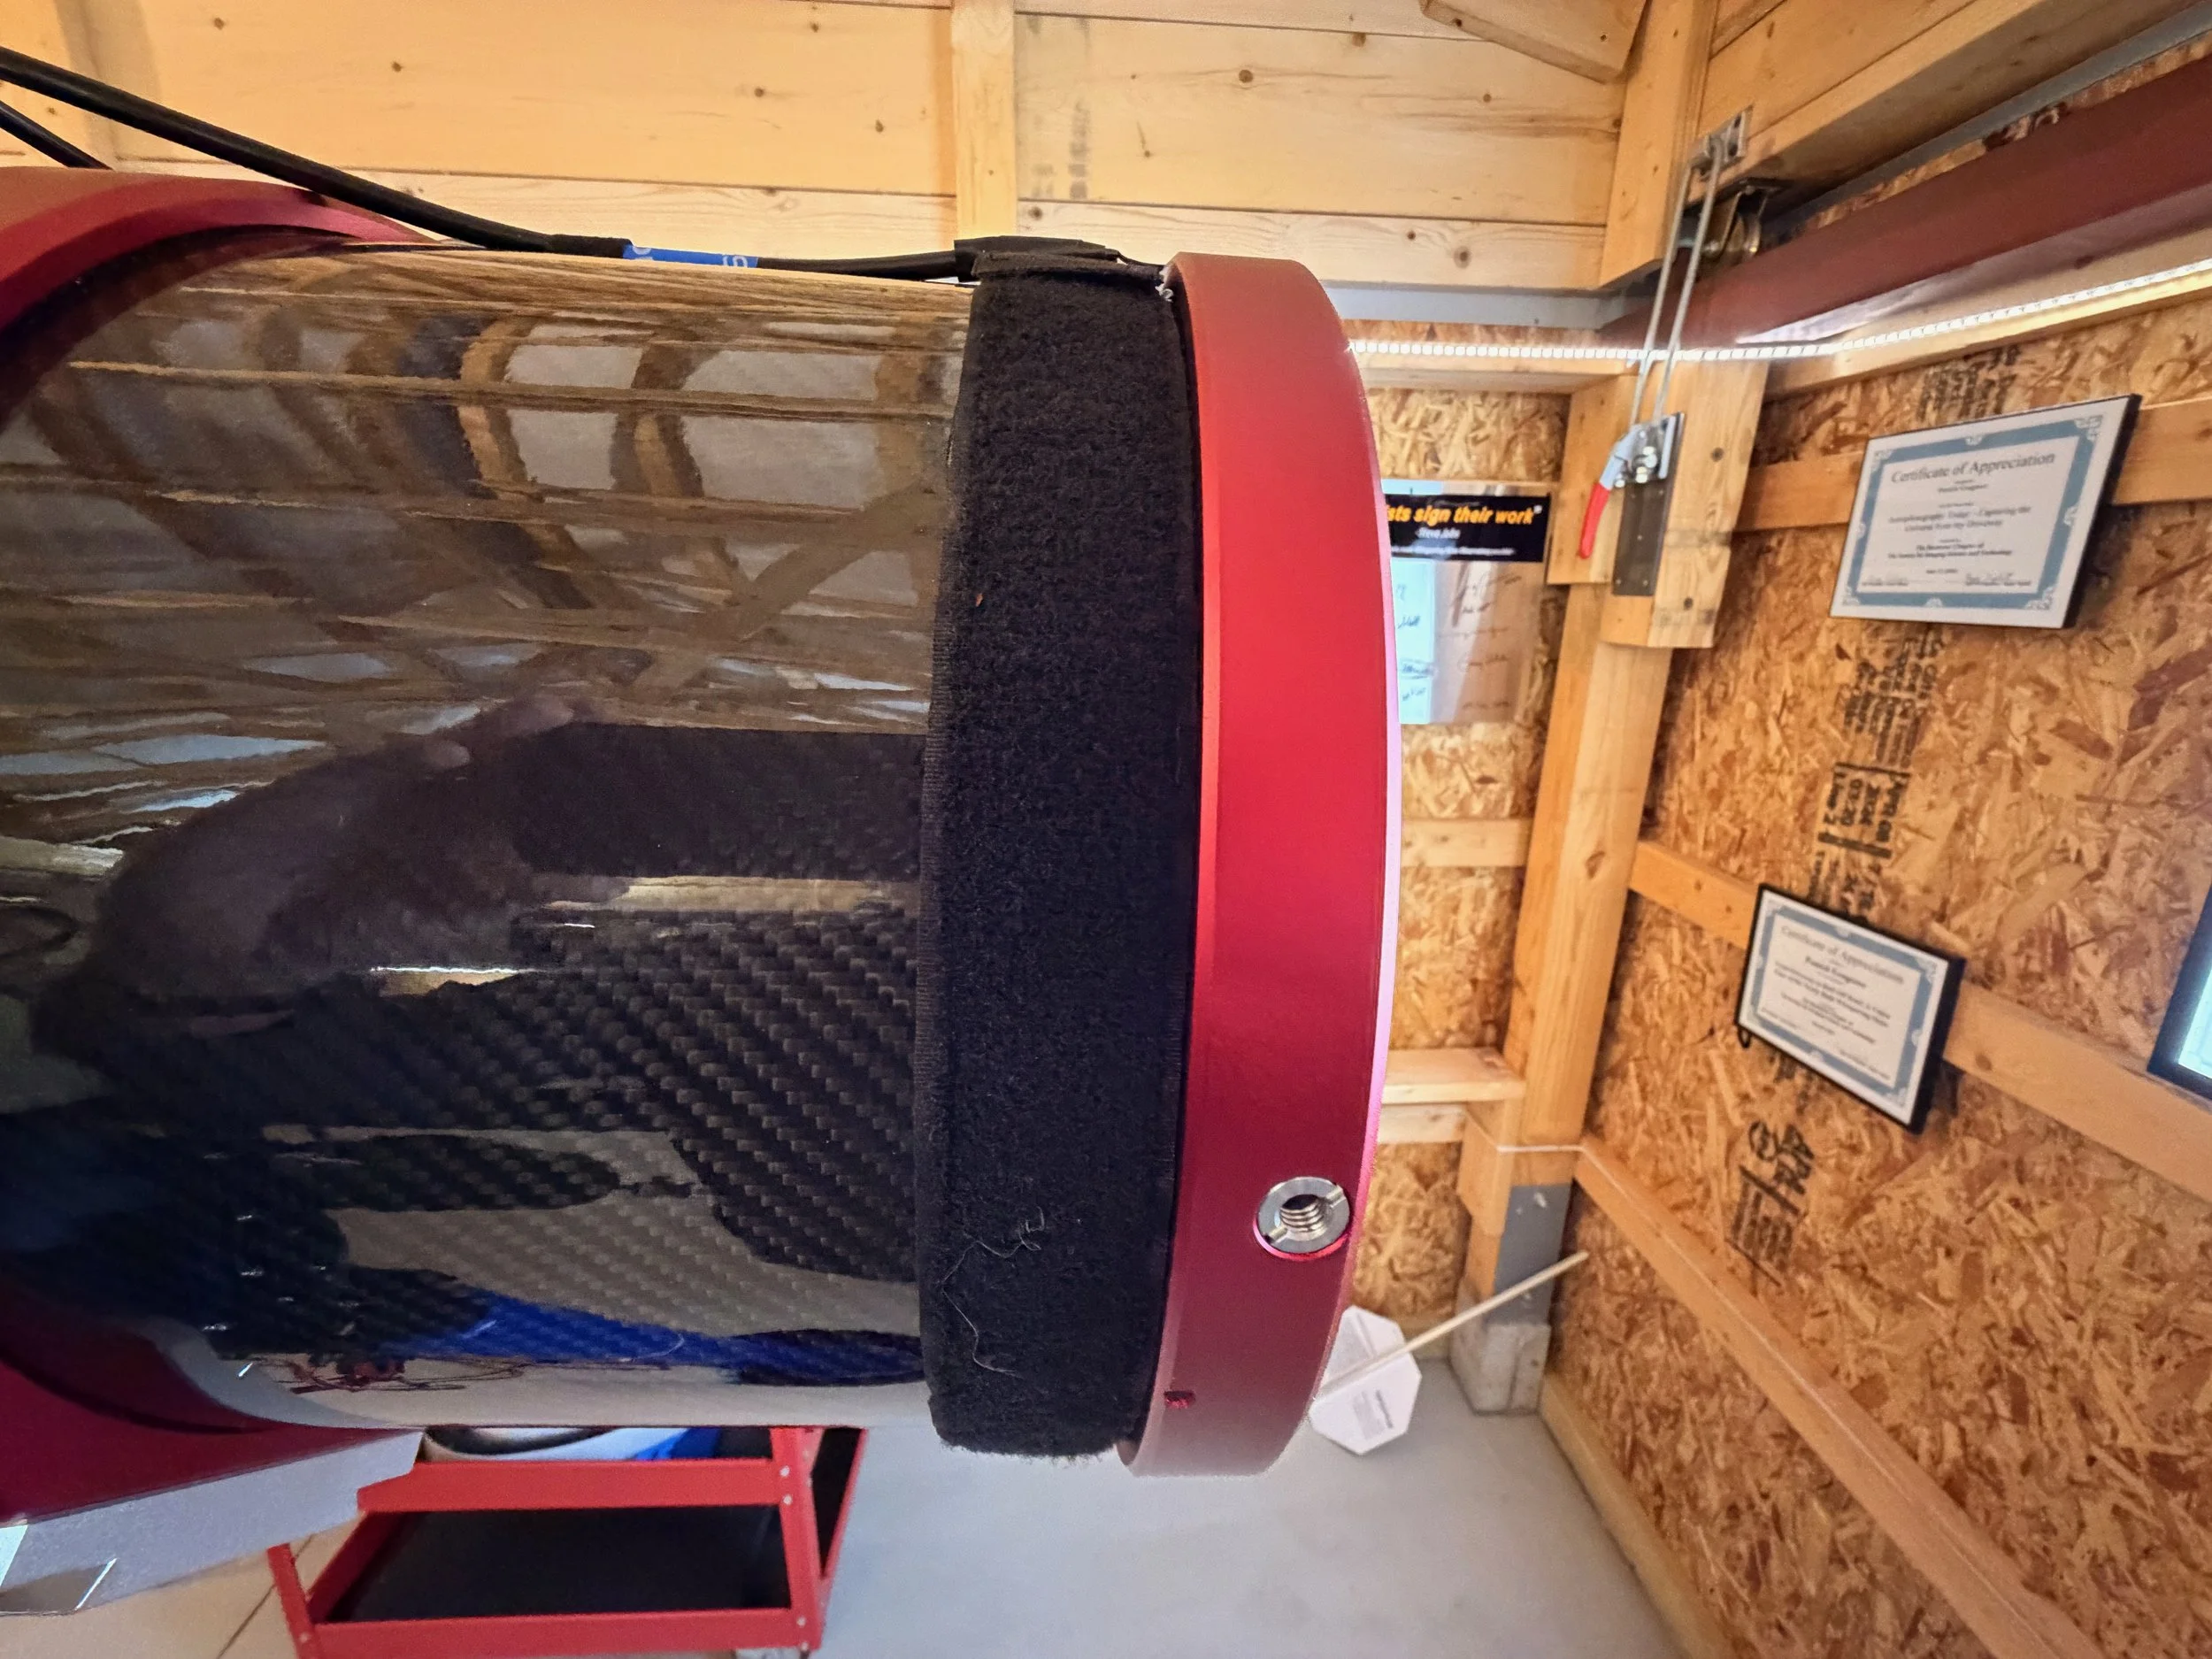
Dew strap next to the front metal ring of the telescope.
This is important not merely to keep the telescope dry, but also to eliminate the possibility of accumulated water dripping inward toward the primary mirror.
A Flat Heater for the Secondary
The secondary required a different solution.
A conventional wraparound heater had already demonstrated that it worked thermally, but the Velcro overlap made it unsuitable optically.
I realized that I already owned a ZWO anti-dew heater intended for cooled astronomy cameras. See the link below:
This heater is essentially a very thin circular heating element.
Its dimensions are approximately:
75 mm outside diameter
50 mm inside diameter
Electrical specifications are approximately:
12 V
0.35 A
4.2 W
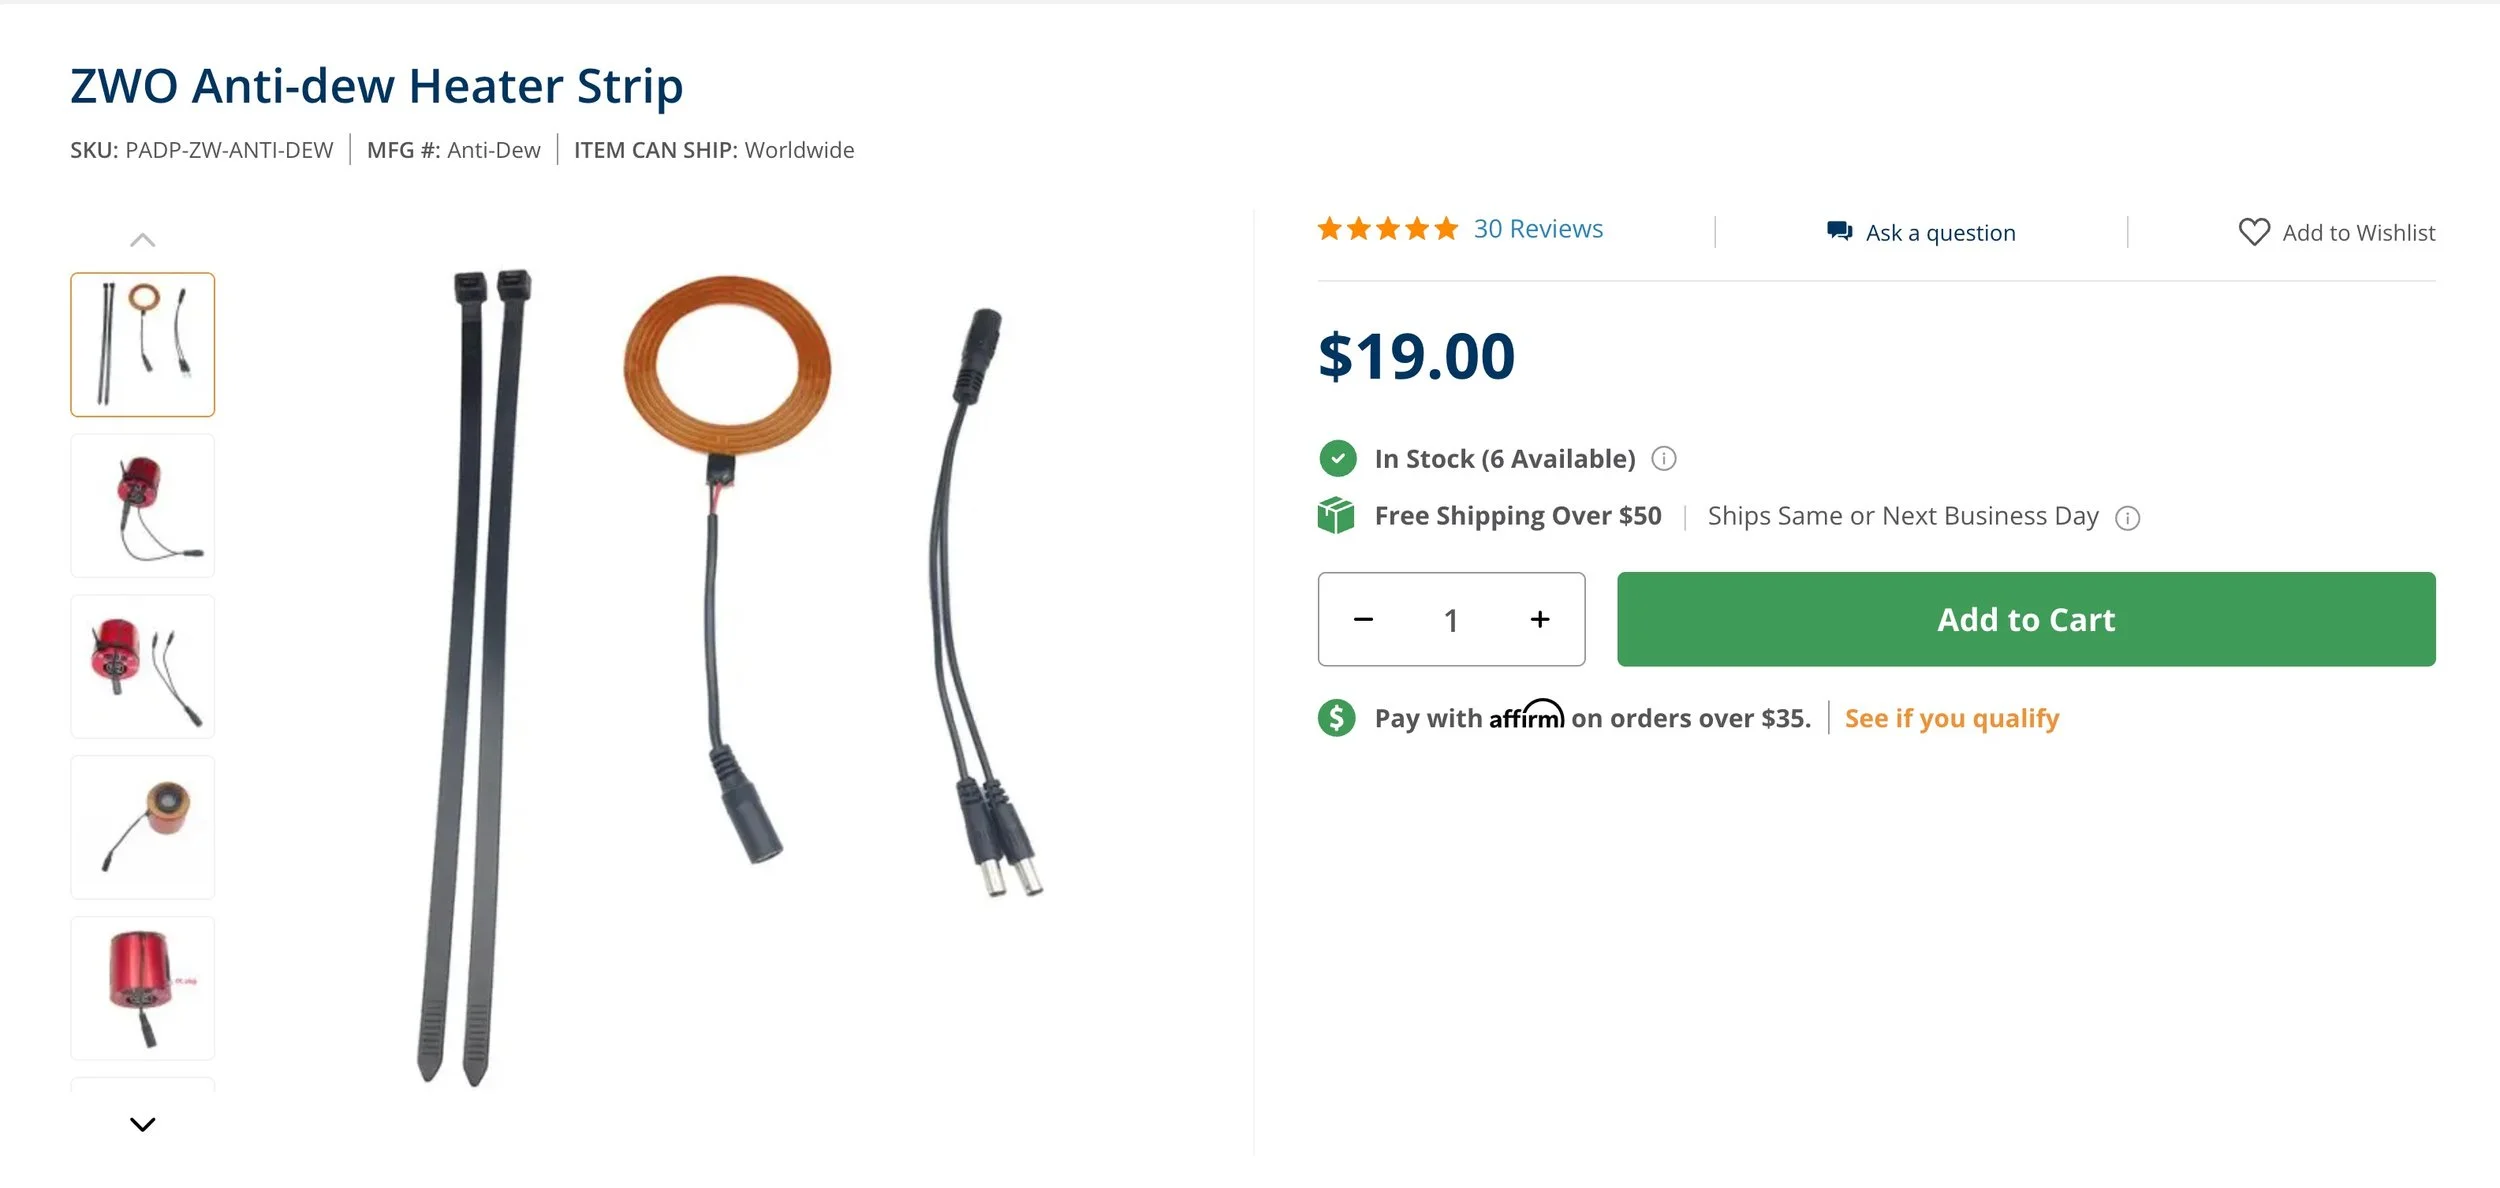
The ZWO Camera Dew Ring (click to enlarge)
When placed against the flat front surface of the SCA260 secondary assembly, it fit remarkably well.
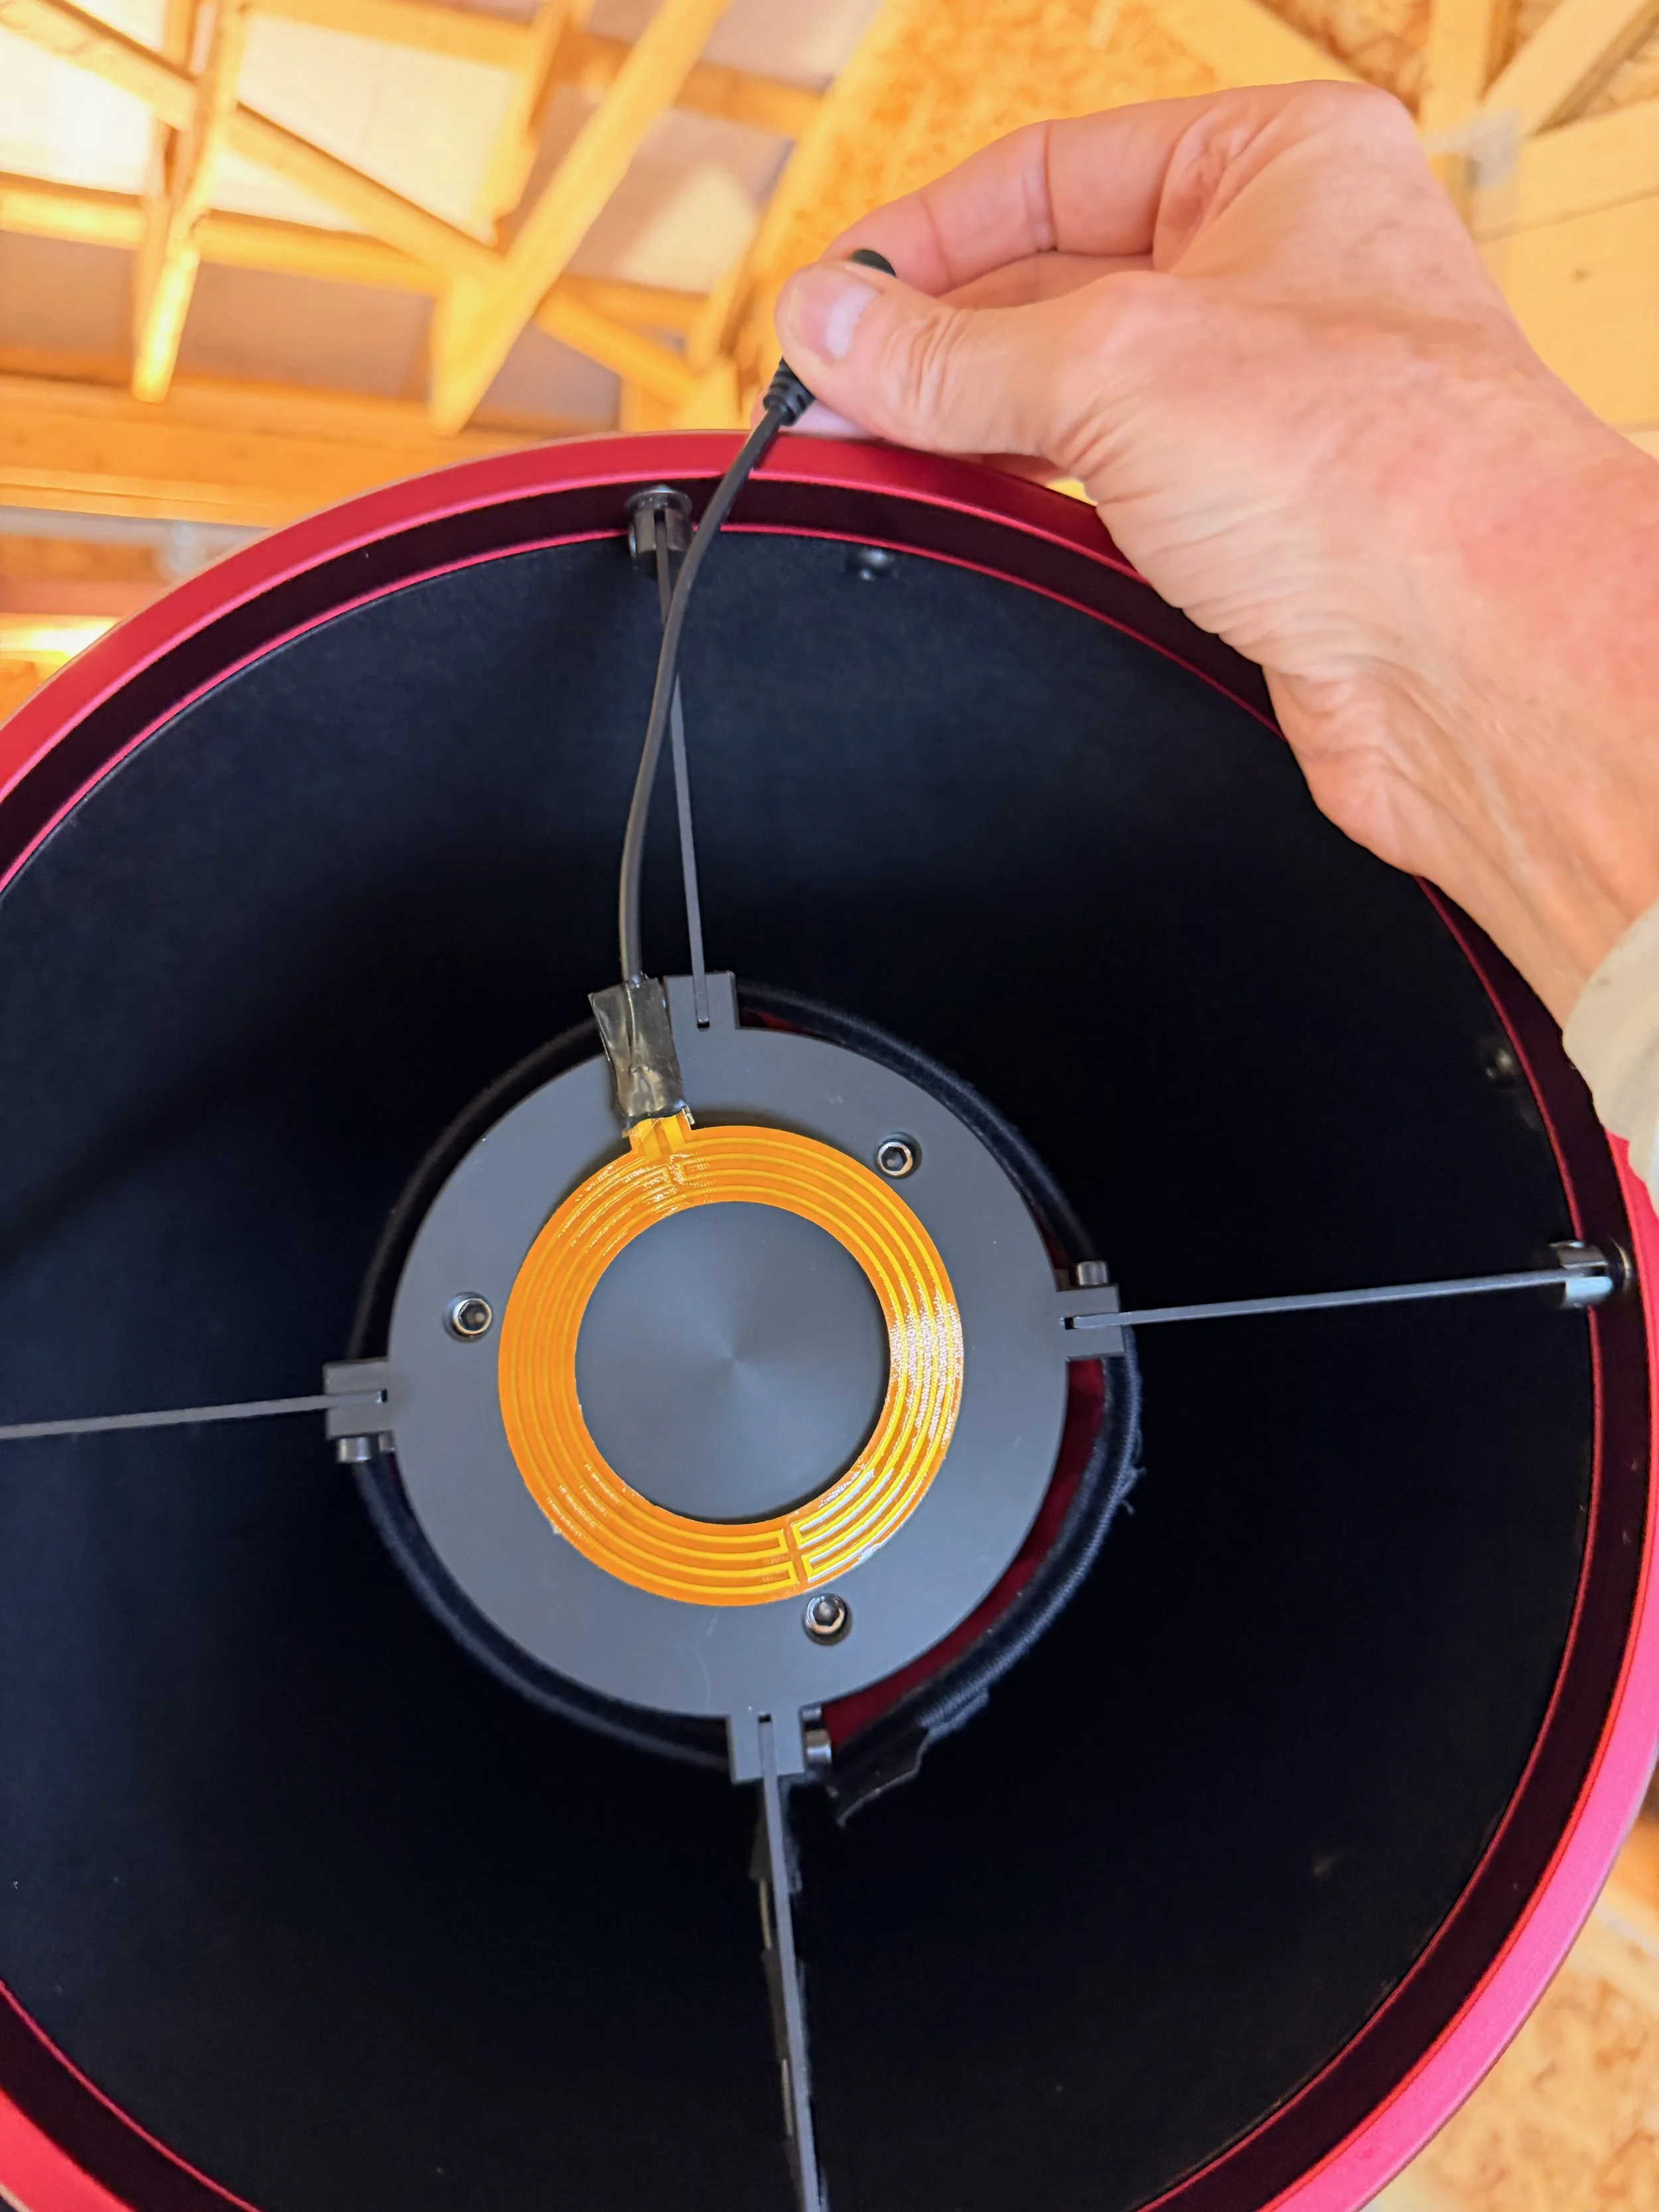
Dry fitting the ZWO Camera anti-dew heater. Fits perfectly. Note the stock cable is very thick!
The entire heater remained inside the diameter of the existing secondary obstruction, while the center opening and overall shape cleared the mechanical hardware on the secondary assembly.
That meant the heater itself would introduce no additional obstruction into the optical path.
This appeared to be an almost ideal solution. I would, however, have to deal with the thick stock power cable it comes with. This is way too thick for the feeding across the support vanes.
What Was Needed
The secondary-heater modification required only a few inexpensive components.
ZWO Camera Anti-Dew Heater Ring
The ZWO heater provides approximately:
This is a very modest electrical load.
30-AWG Silicone Ribbon Cable
The factory ZWO heater has a relatively thick round cable terminating in a standard 12-V barrel connector.
That cable would be undesirable across the SCA260 aperture.
I therefore replaced most of that cable with extremely thin 30-AWG silicone ribbon cable from Adafruit.
This was the falt cable I ordered from Adafruit. $2 and very thin! (click to enlarge)
The ribbon contains several fine stranded conductors bonded side by side. I separated two conductors from the ribbon to create a very small two-wire power lead.
The result is thin enough to route along the top of one of the SCA260 spider vanes with minimal additional projected obstruction.
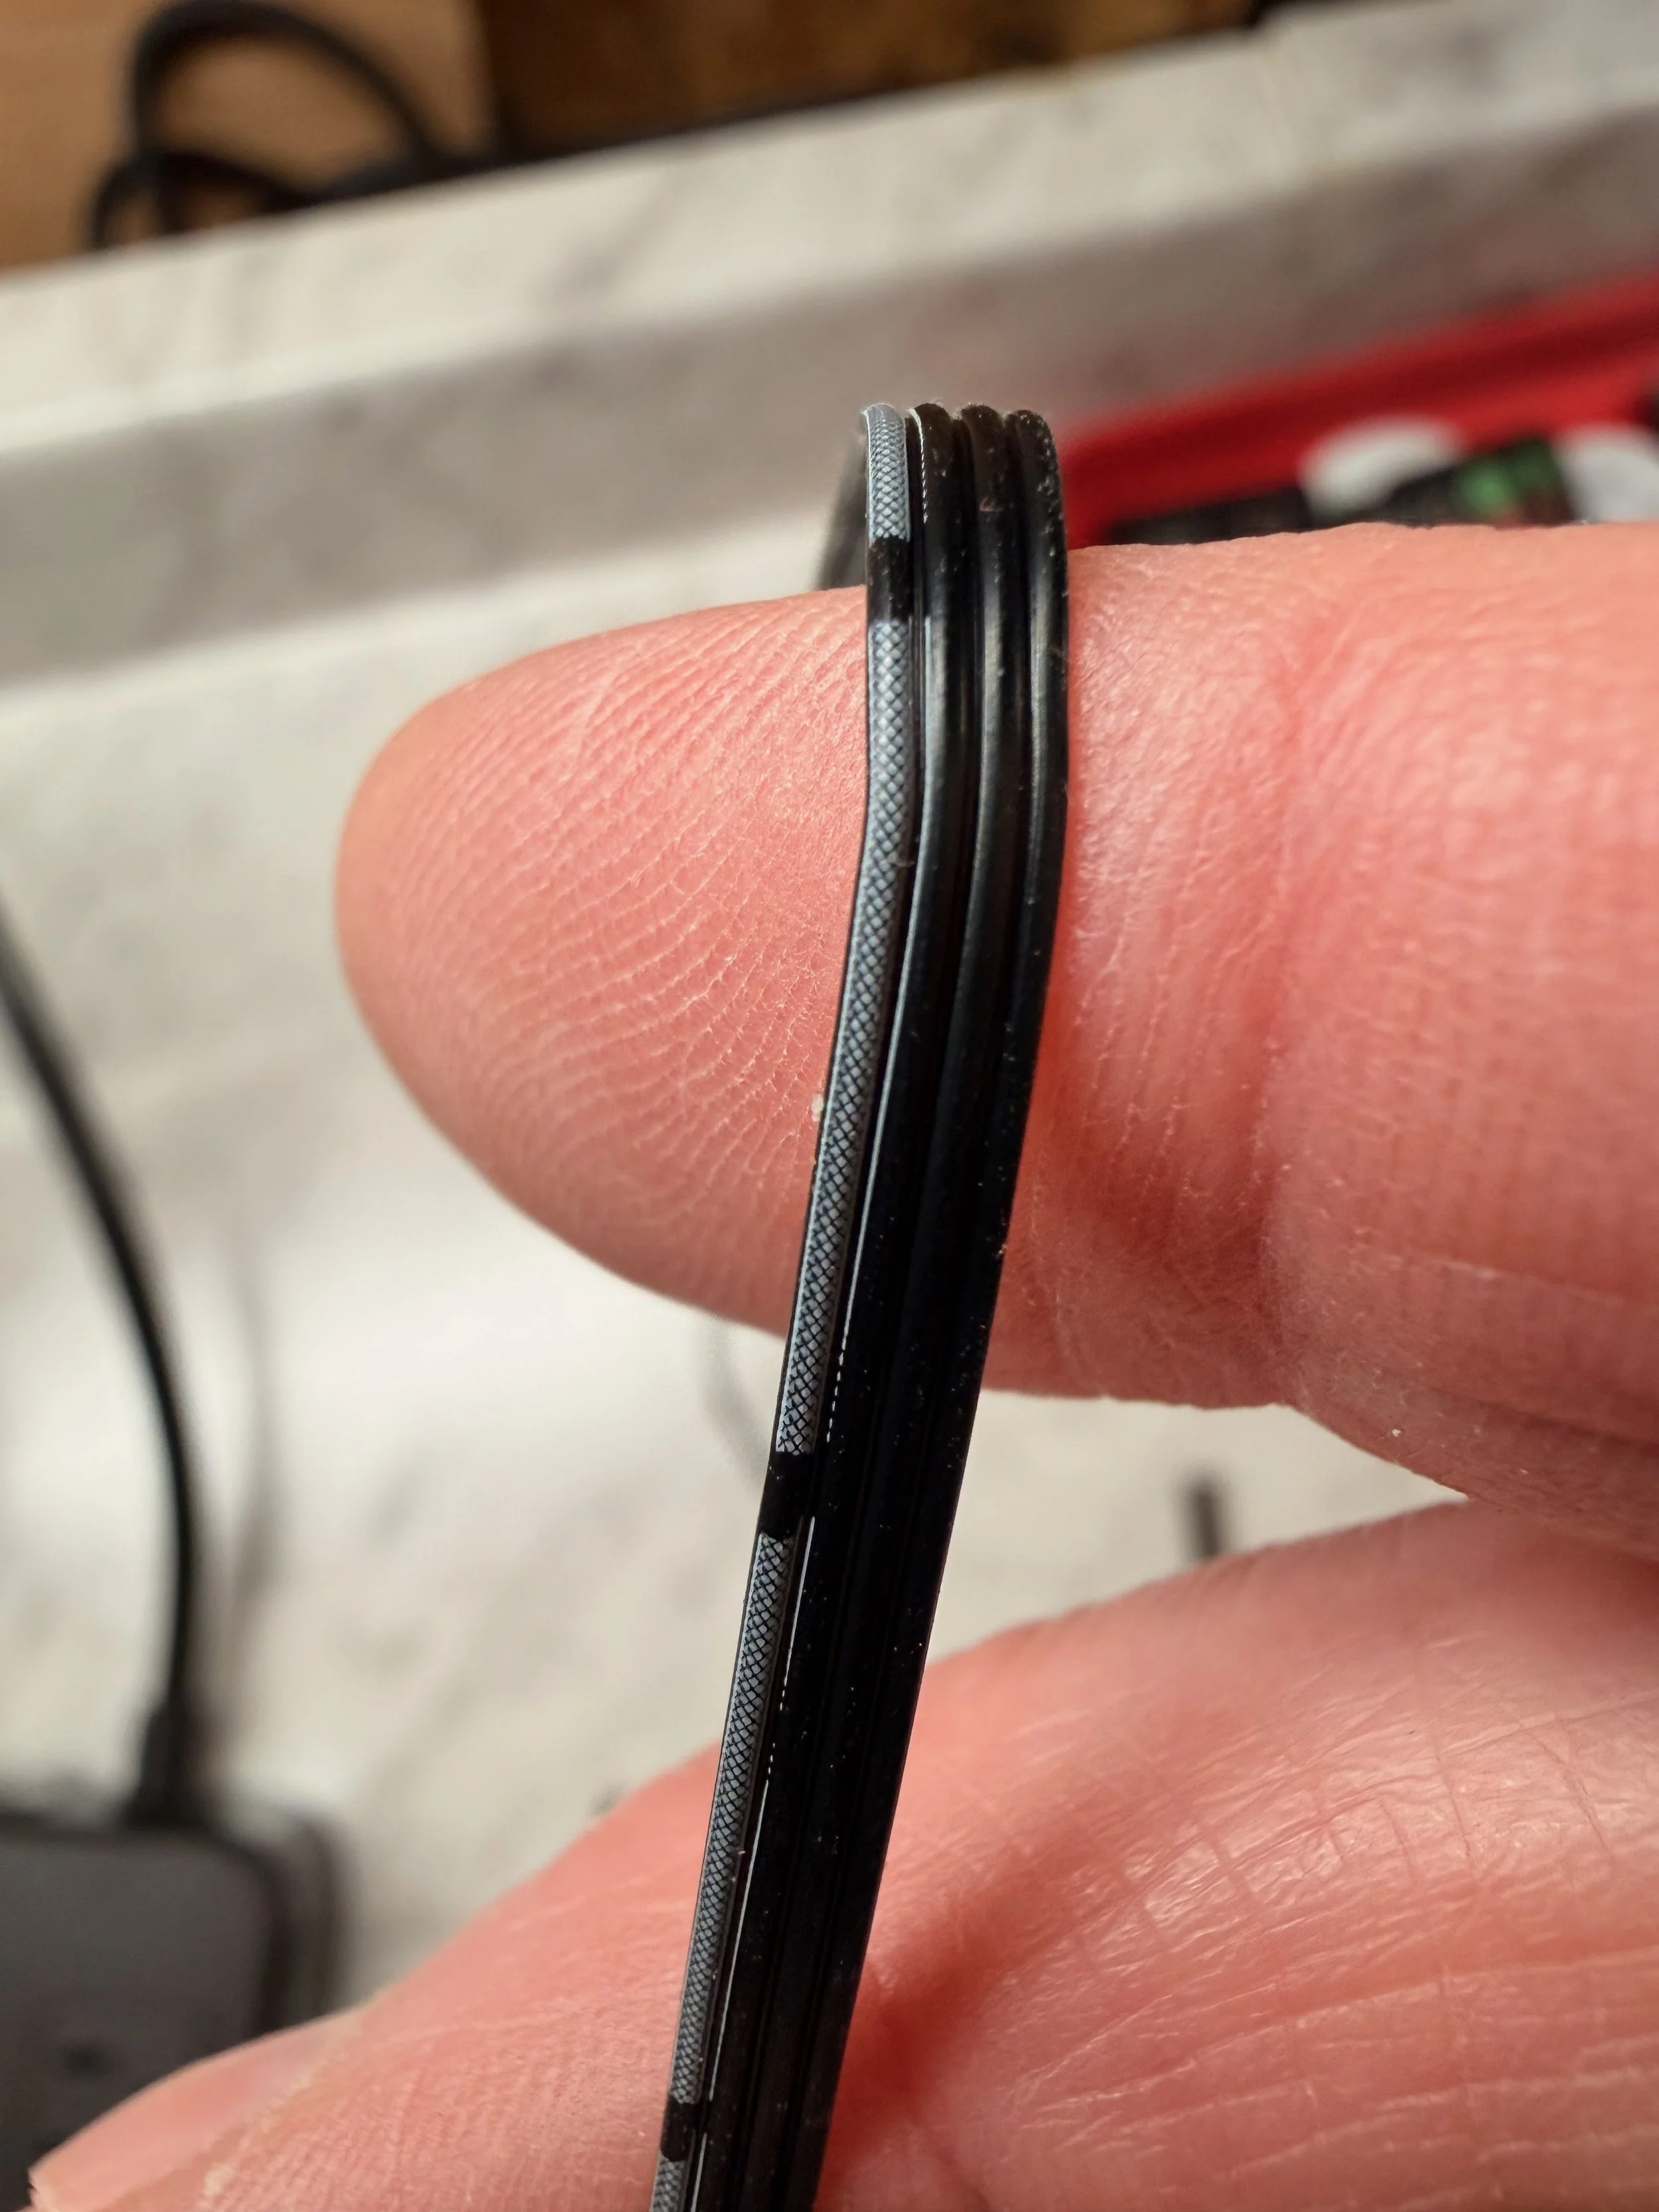
I just peeled off th rightmost two wires. This was about the width of the secondary support vaned! (click to enlarge)
RCA Cable
My SCA260 platform uses a Pegasus Astro Pocket Powerbox Micro for power distribution and dew control.
Its dew-heater outputs use RCA connectors.
The external portion of the new secondary-heater cable therefore terminates in an RCA plug.
The completed electrical path is:
ZWO heater → 30-AWG ribbon cable → conventional external cable → RCA plug →RCA Y-Splitter→ Pegasus Powerbox
Modifying and Soldering the Heater Cable
I did not want to solder directly to the flexible heating element.
The factory connection between the heater and its original cable is mechanically more robust than anything I could easily recreate.
I therefore left a short section of the original ZWO cable attached to the heater.
I cut the original cable a short distance from the heating element and stripped the two conductors.
Two conductors from the 30-AWG ribbon cable were then soldered to these wires.
Each connection was insulated independently to prevent a short circuit.
The splice itself remains completely behind the existing secondary obstruction, so its physical size has no optical consequence.
The thin ribbon cable then travels outward along one of the spider vanes.
At the outer edge of the telescope, where wire thickness no longer matters optically, the 30-AWG ribbon transitions to a more conventional flexible cable terminating in an RCA connector.
This gives me very fine wiring only where it matters.
Is 30-AWG Wire Heavy Enough?
The wire looks remarkably small, so this was worth calculating.
For a 1-foot wire, the ZWO heater draws approximately:
So, this is only about 25 milliwatts distributed across the entire wire run.
In practical terms, the ribbon cable should remain essentially at ambient temperature.
The 30-AWG wire therefore provides ample electrical capacity for this application while minimizing its optical footprint.
Routing the Ribbon Along the Spider Vane
The ribbon cable is attached to the broad surface of one spider vane and kept carefully aligned on the very edge.
The goal is to make the wire effectively disappear behind an existing obstruction.
This is considerably better than running the original round ZWO cable across the aperture.
Only very small pieces of flat black cloth electrical tape are needed to hold the ribbon in place.
The thin wires in place. (click to enlarge)
I specifically wanted the material used inside the optical path to be dark and nonreflective. A shiny or metallic tape surface on a spider vane would be undesirable because it could introduce unwanted reflections.
Because the ribbon carries only about 0.35 A, heating of the wire itself is essentially irrelevant.
Mounting the ZWO Heater
I also chose not to permanently bond the heater to the secondary assembly using the heater's own adhesive.
I wanted the installation to remain removable in case the secondary ever required service or disassembly.
The heater is therefore held flat against the metal face of the secondary assembly using removable retaining material rather than permanently glued into place.
To do this, I used ELEGOO High Temp Tape.
Here is the kind of heat tape I used to mount the heater ring. (click to enlarge)
The heater remains entirely inside the existing central obstruction.
Heat from the ZWO element is transferred into the metal secondary assembly and then into the secondary-mirror structure.
The goal is not to make the secondary noticeably warm.
It only needs enough additional thermal energy to prevent radiative cooling from pulling the secondary surface below the dew point.
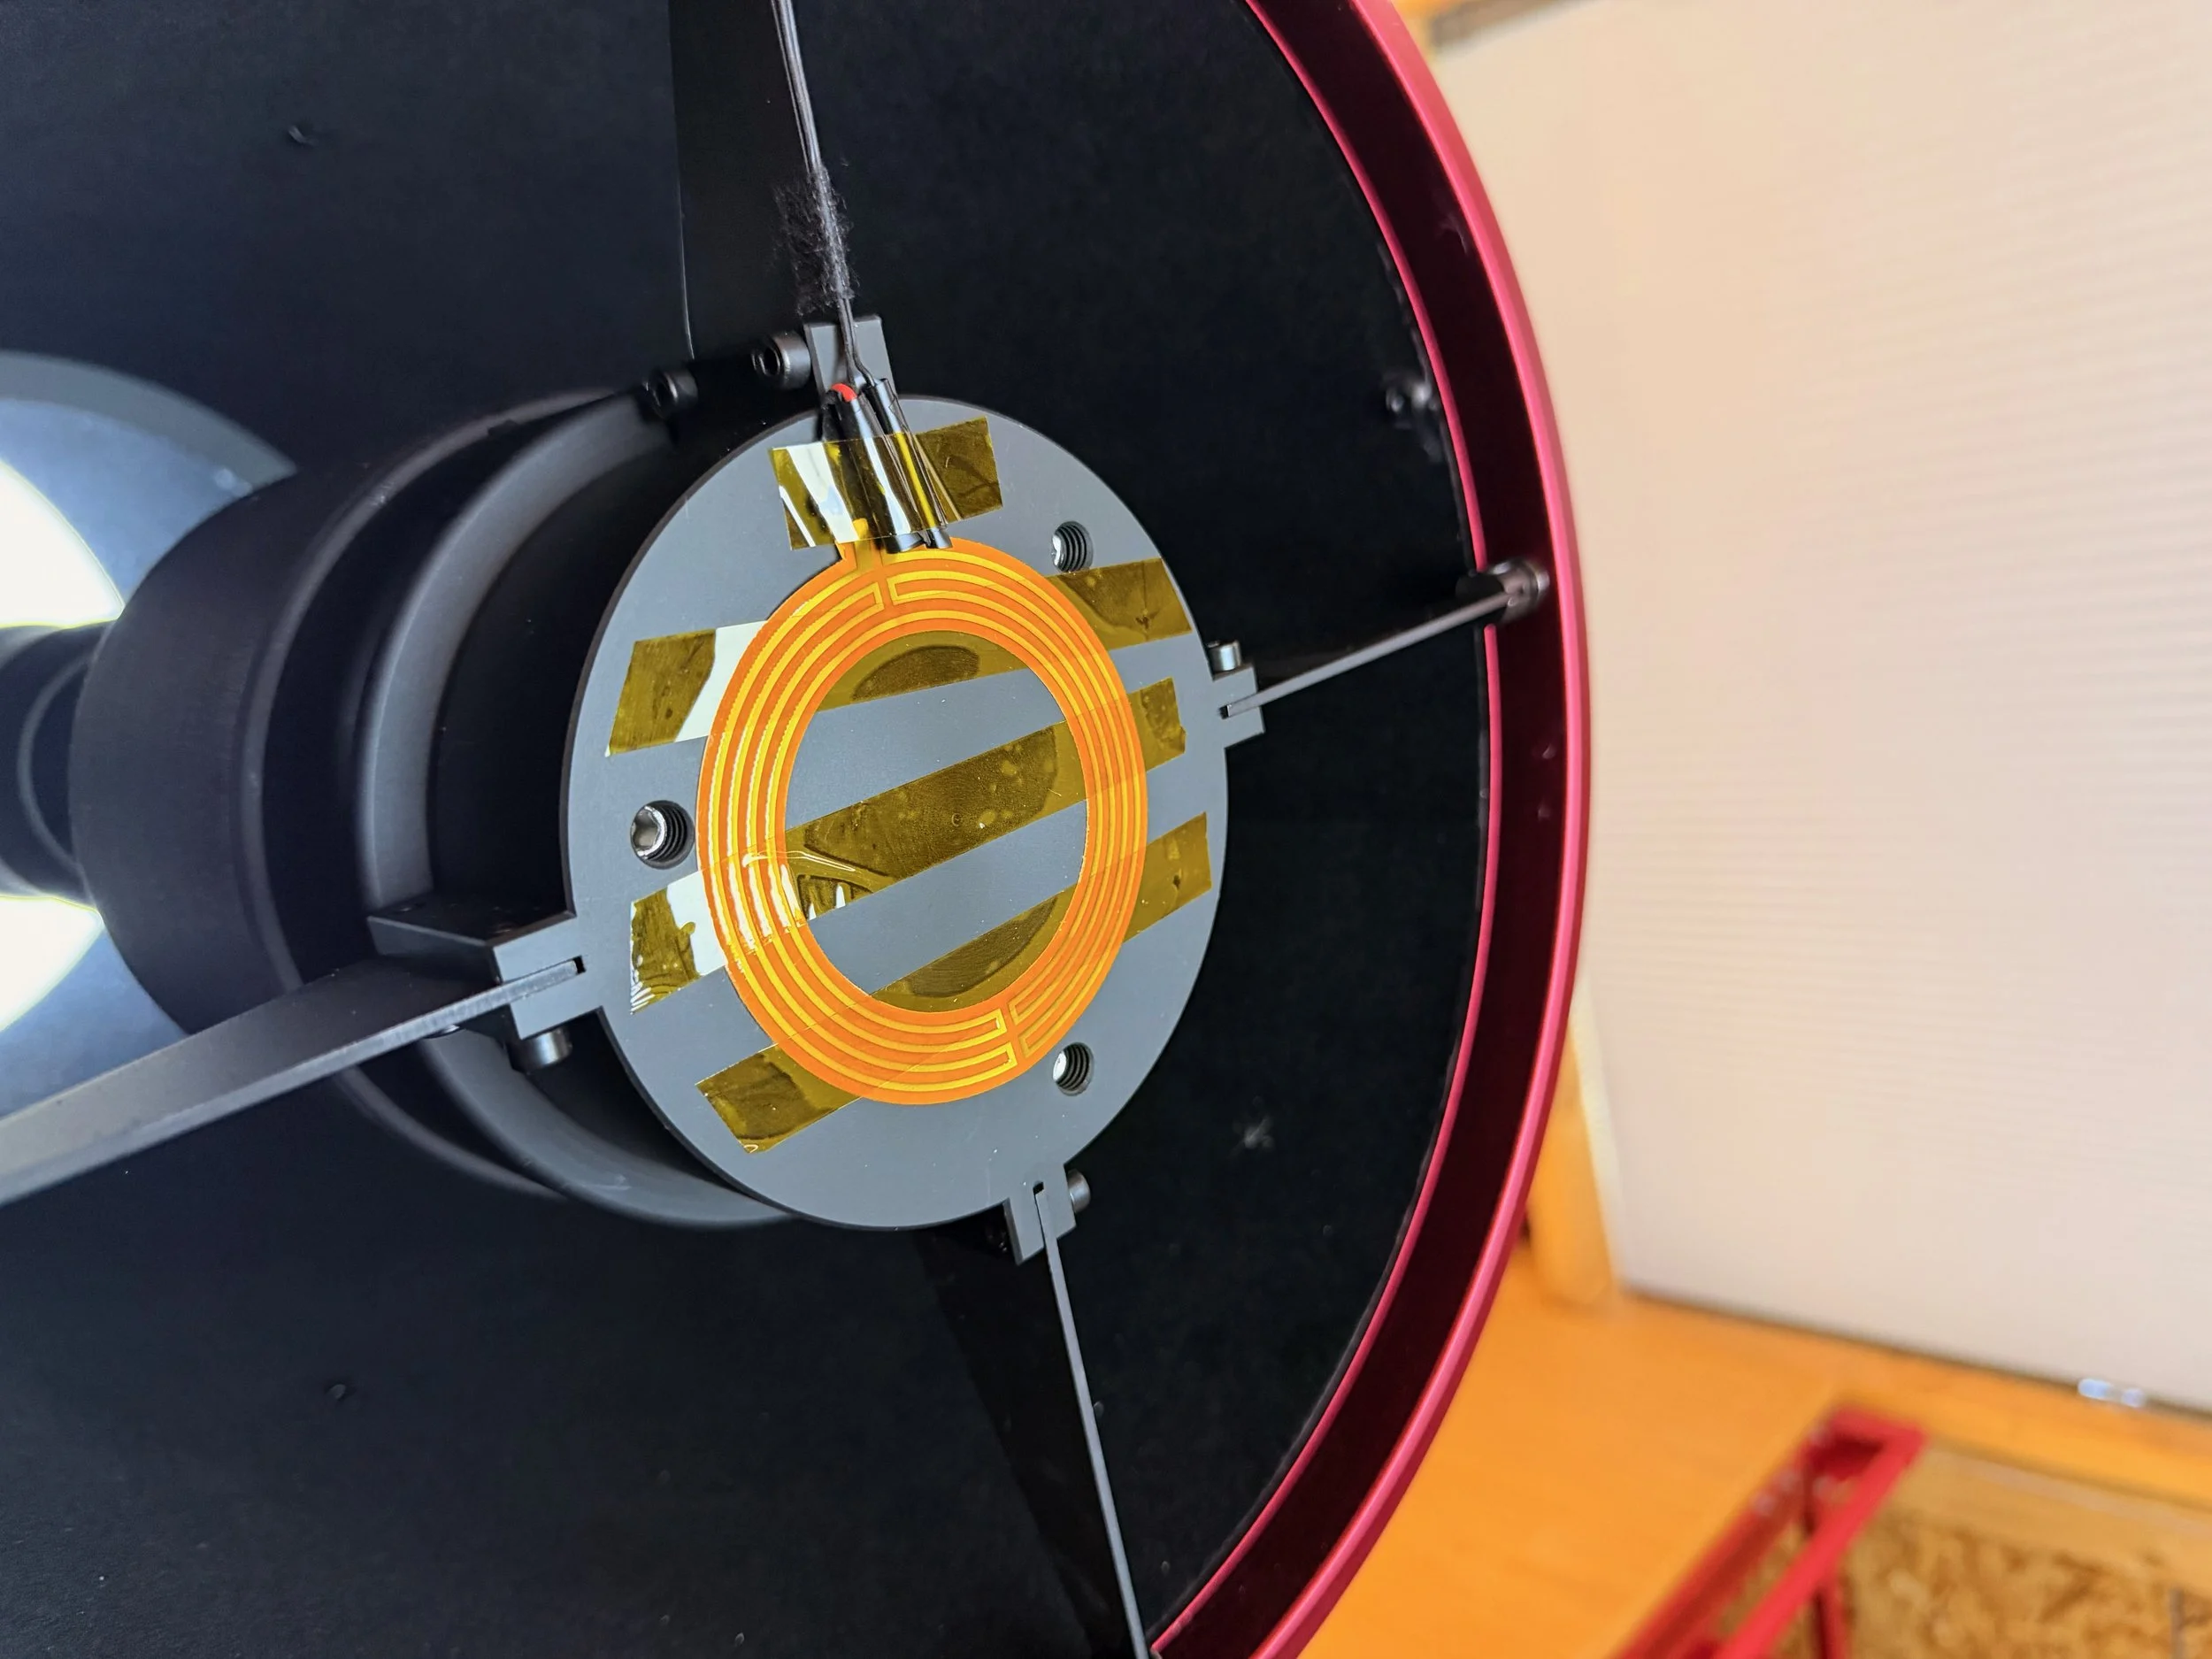
Not pretty, but te thermal tape holds the heating ring in place.!
Powering Three Dew Heaters
The SCA260 now effectively has three dew-control zones:
Rear of telescope
A large existing heater strap surrounds the rear of the tube near the primary mirror cell.
Front telescope ring
The Thousand Oaks HB-37 heats the metal ring surrounding the front aperture.
Secondary Mirror
The ZWO camera heater ring provides approximately 4.2 W directly at the secondary assembly.
My Pegasus Pocket Powerbox Micro has only two RCA dew-heater outputs, so three heaters required some planning.
The solution was to use an RCA Y-splitter on one heater channel.
The arrangement is:
Dew Port 1
→ Existing large rear heater
Dew Port 2
→ RCA Y-splitter
→ Thousand Oaks HB-37 front-ring heater
→ ZWO secondary heater
Electrical Load on the Shared Heater Channel
I needed to make sure that the twin large dew strips and the dew ring would not draw more than the powerbox could deliver, So I calcualted what the draw was:
The Pegasus Pocket Powerbox Micro dew-heater channel can comfortably accommodate this load.
So the Y-split arrangement is not merely convenient—it is well within the controller's electrical capability.
The shared channel is operating at only about:
2.75 A maximum
even with both heaters at full power.
Choosing the RCA Y-Splitter
One point worth noting is that RCA connectors are normally associated with audio equipment.
Many inexpensive RCA Y-cables are therefore constructed with extremely fine conductors because an audio signal requires almost no current.
That is not what we want for a dew-heater application.
The Y-adapter should use reasonably substantial copper conductors and good-quality connectors because the front-ring heater alone can draw 2.4 A.
After installing the system, a simple safety check is worthwhile.
Run both heaters connected to the Y-adapter at full power for 15–20 minutes and check the splitter and RCA connectors.
They should remain essentially cool.
Any connector that becomes noticeably warm is introducing excessive resistance and should be replaced.
Why the Final System Is Better
Each stage of this project revealed something useful.
Dew shield
The one-foot plastic dew shield delayed and reduced dew formation, but did not eliminate it under severe conditions.
Eyepiece heater
The wraparound eyepiece heater proved that active secondary heating worked, but its Velcro overlap entered the optical path and produced an additional diffraction feature.
Front-ring heater
The Thousand Oaks HB-37 addresses the separate problem of heavy condensation forming on the front metal structure and eliminates a potential source of water dripping toward the primary mirror.
ZWO secondary heater
The flat ZWO heater delivers the required heat while remaining entirely within the existing secondary obstruction.
The final arrangement therefore addresses the actual places where the SCA260 was losing heat:
Rear structure + front structure + secondary assembly
rather than relying on one heater at the rear of the telescope to control everything.
Initial Results
Testing
After mounting everything, I checked continuity and resistance loads, and all looked good. I then used the dew control in the Pegasus Astro Unity Platform in manual mode to slowly power things up. I used an infrared temperature gun to measure the temperature of the secondary face at ambient temperatures and with the ring powered up. I found that the secondary was now about 1.5 degrees warmer than ambient, and thea neither the wires of the ring got very warm.
Night Testing
I have now used this arrangement for three nights. Each night had a varying level of dew, and when I checked, both the outer ring and the face of the secondary were dew-free! One caveat is that none of these nights had very heavy dew, so I still need to see if this performs well for all dew conditions, but the initial results are very promising!
Final Thoughts
Heavy dew is a surprisingly effective way of finding weaknesses in an observatory system.
Under normal conditions, my existing rear heater was perfectly adequate. Only during extremely humid fall nights did the exposed secondary and front structure of the SCA260 begin behaving differently from the rest of the telescope.
The first surprise was that a substantial dew shield helped but still wasn't enough.
The second was how effectively a relatively small amount of active heat solved the secondary problem.
The third was that solving the thermal problem could create an optical one if the heater itself intruded into the aperture.
That made the inexpensive ZWO camera heater particularly attractive. It provides adequate heat, fits entirely within the existing secondary obstruction, and requires only about 0.35 A.
Combined with the Thousand Oaks heater around the front aperture, the SCA260 now has active dew protection exactly where it is needed.
This was also an economical solution as the dew ring sells for only $19!
The real test, of course, is a long imaging session during one of those nights when everything outside the observatory is dripping wet.
Unfortunately, western New York provides plenty of opportunities for that test.
Note: I will update this post as I gain more experience with this arrangement, but so far it has kept things dry on nights when I would normally have dew formation on the outer ring and the outer face of the secondary.