
Hello, Astro “Fans!”: Replacing the Fan in your ASI2600MM-Pro Astro Camera!
Date: April 4, 2026
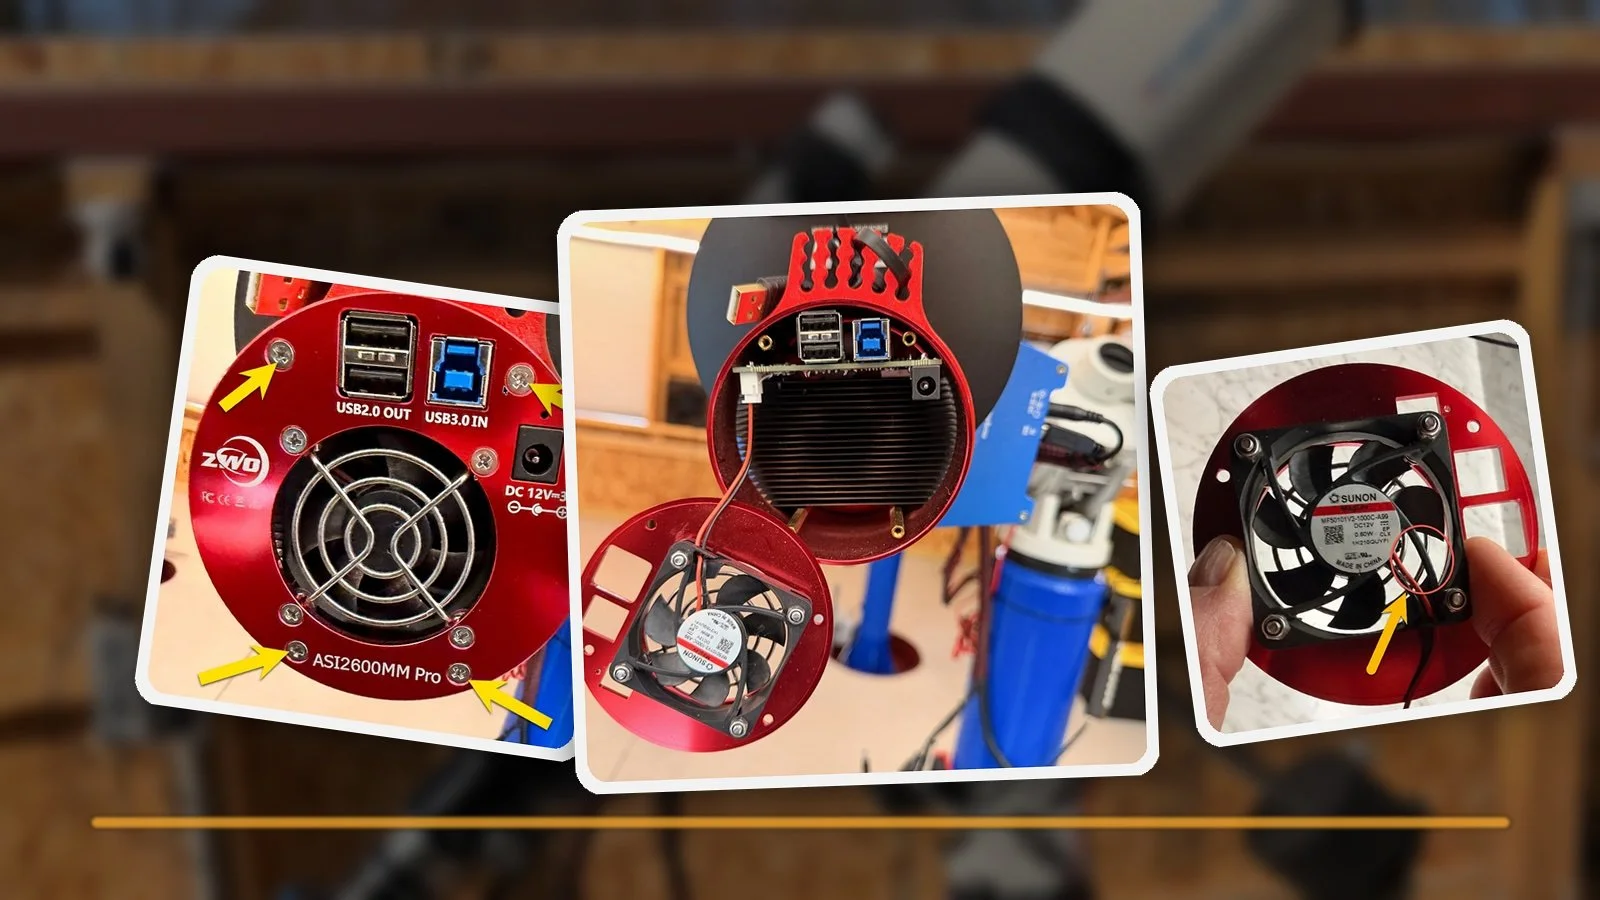
Table of Contents Show (Click on lines to navigate)
Summary and Verdict
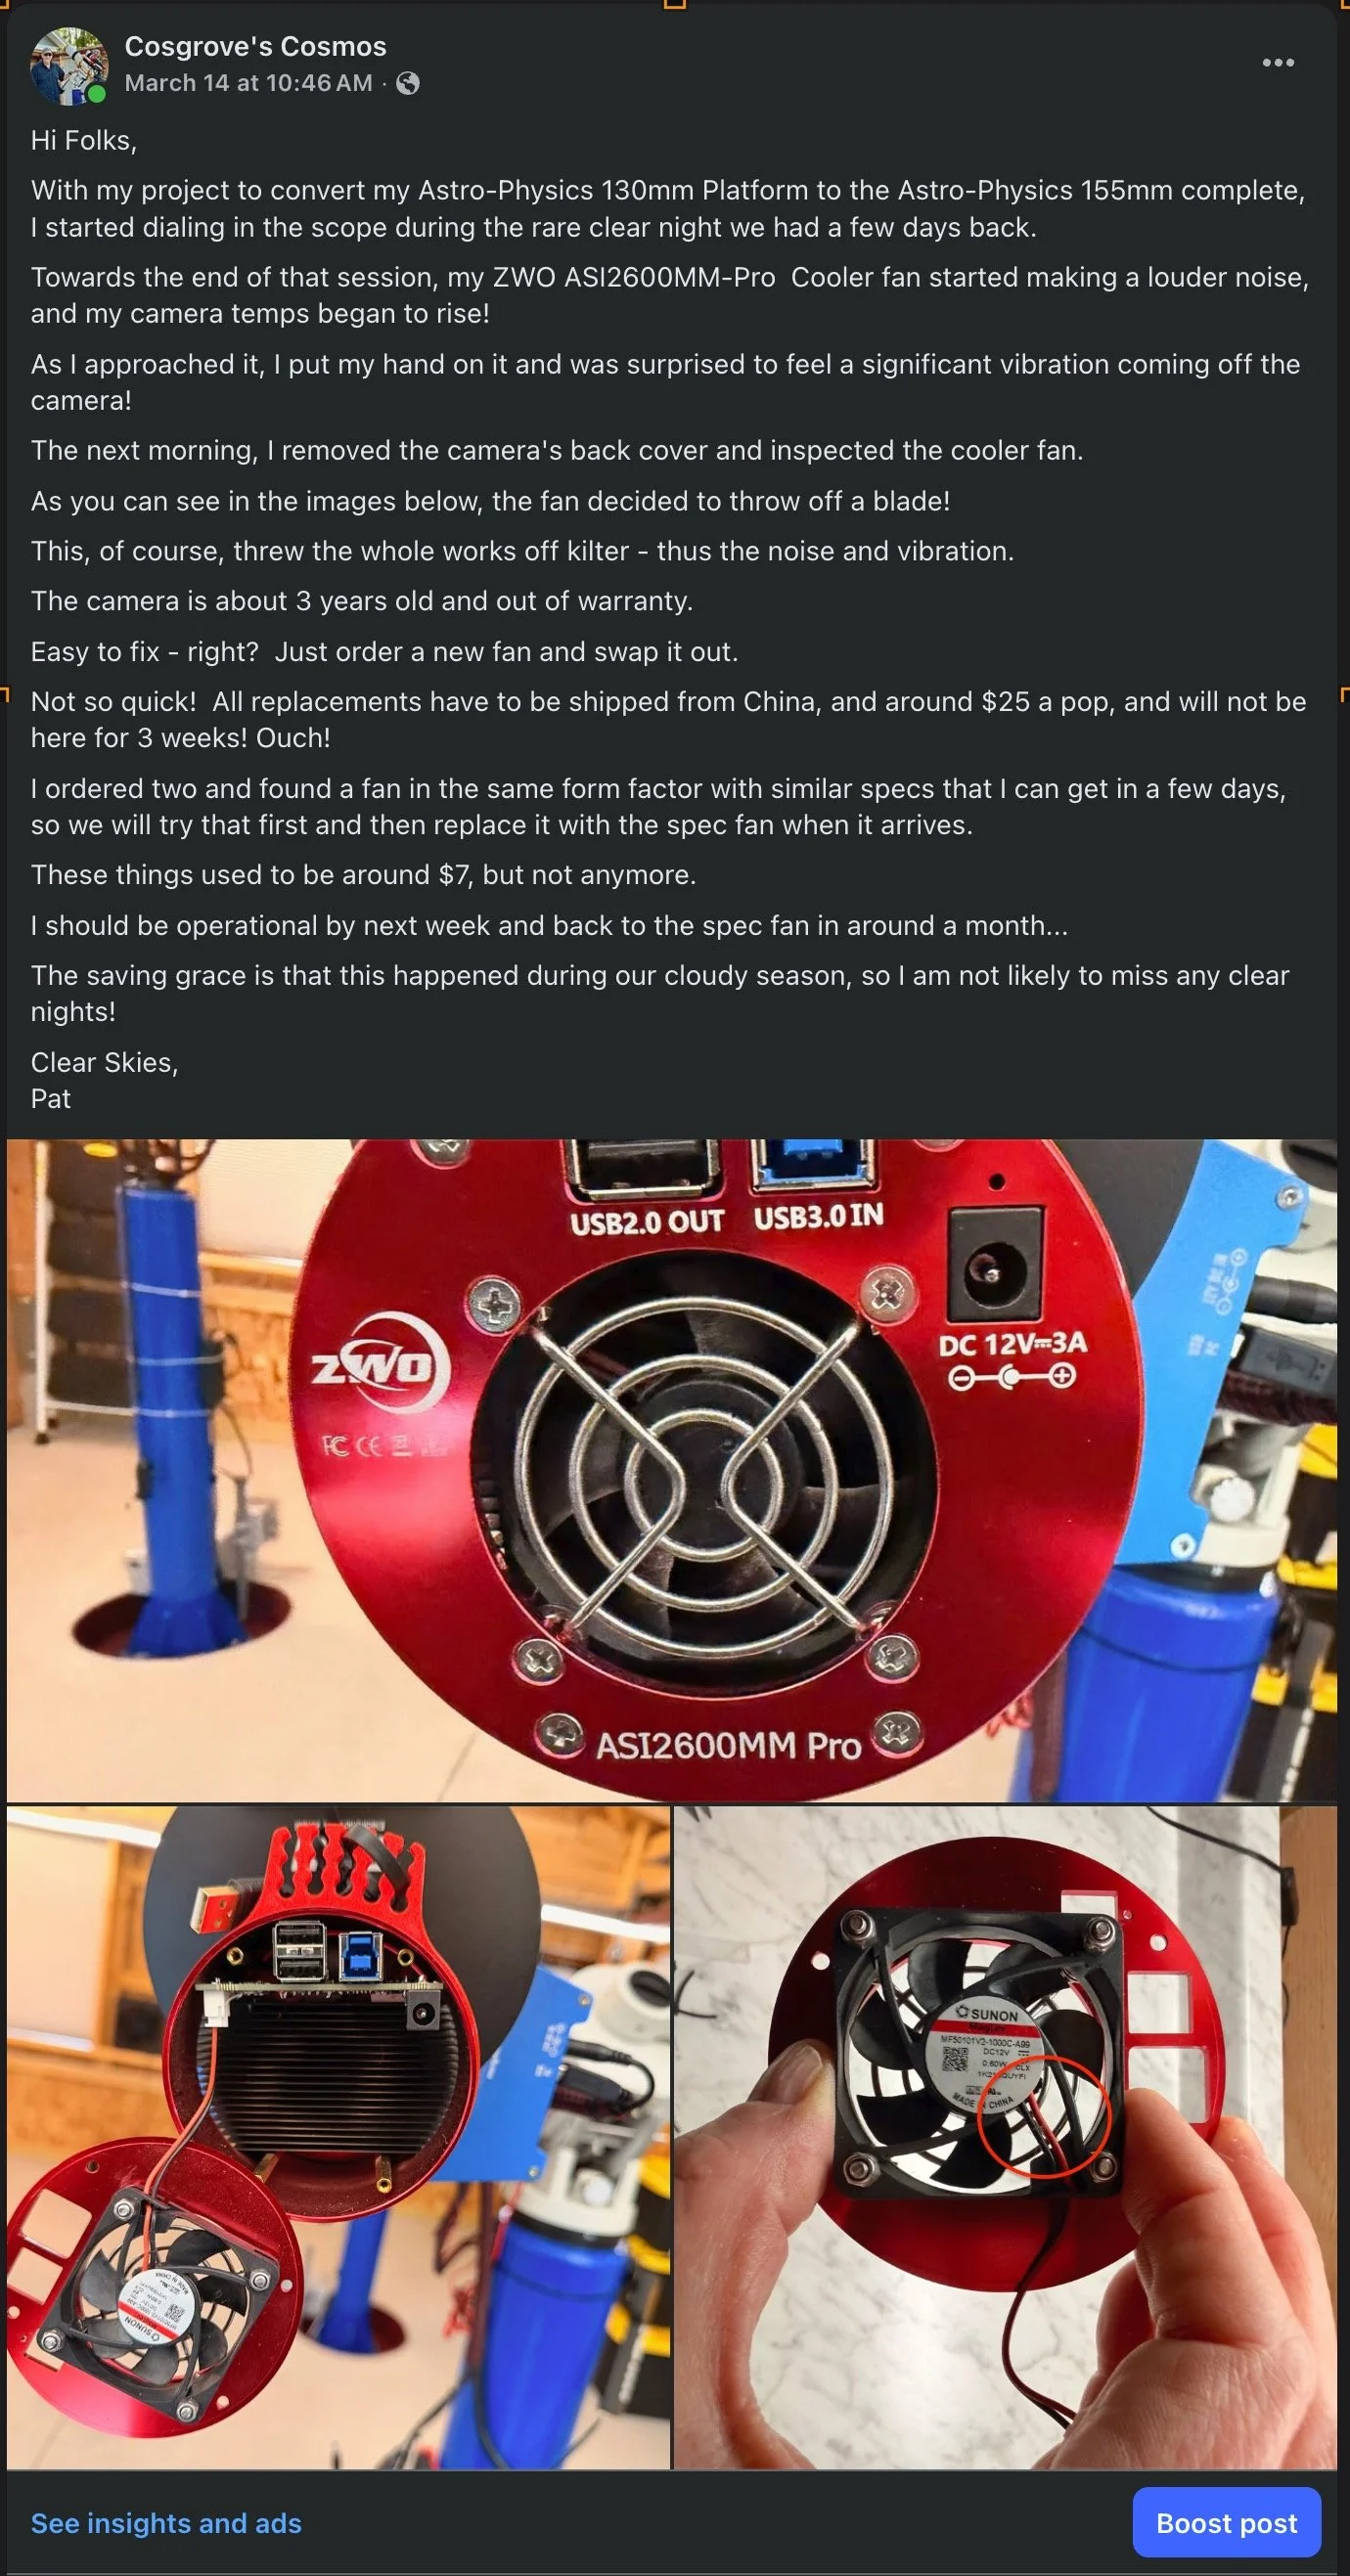
My ASI2600MM-Pro developed a loud, vibrating fan that turned out to have a missing blade. That led me to identify the original fan, compare replacement options, and look at what others have learned about vibration in these cameras.
The short version is simple: the ZWO FAN50 is the safest direct-fit replacement. Sunon and Same Sky offer close OEM-style alternatives, and some quieter aftermarket fans may help with vibration, but with tradeoffs. My recommendation is to start with the ZWO replacement and pay close attention to mounting hardware and isolation, because the install matters almost as much as the fan itself.
The Video Companion to this Post
Introduction
I recently put together a new platform to replace my old AP130 platform. This one replaced the main scope with an AP155 while reusing most components from the AP130 platform.
You can see that post here:
AP155 Version 1.0: Swapping the AP130 OTA for its Big Brother - the AP155!
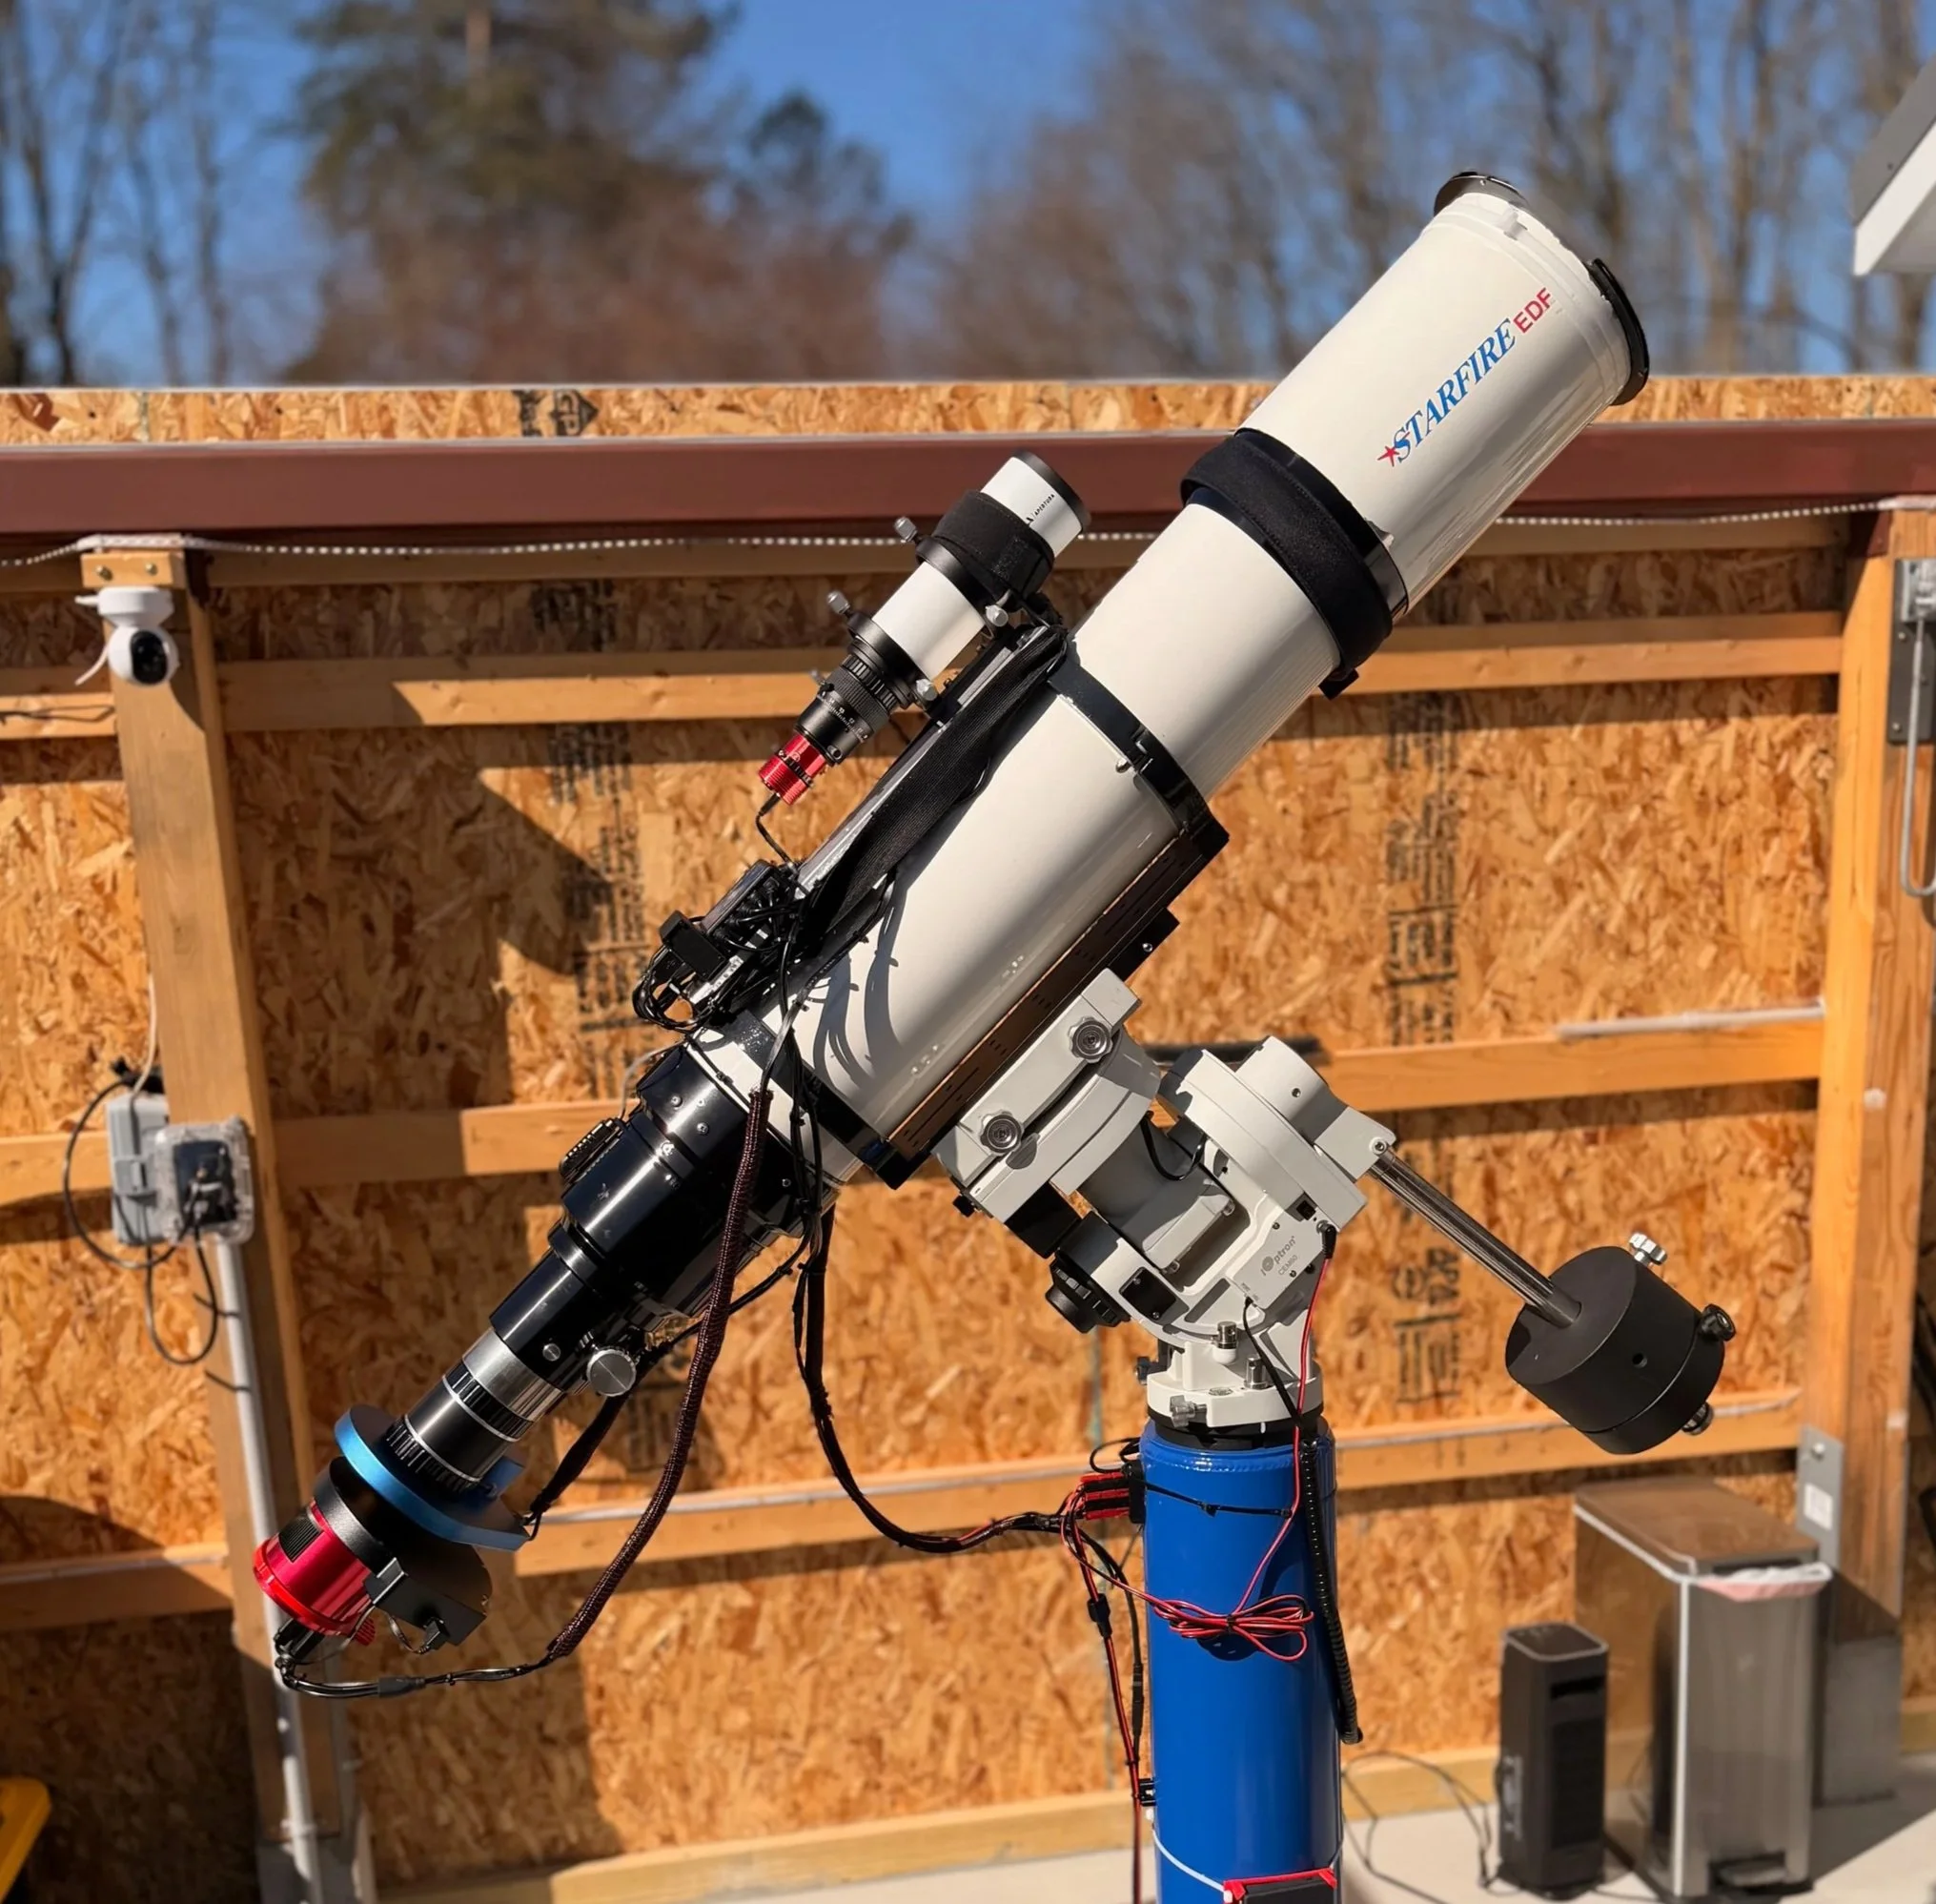
My newly configured AP155 Platform - I reused the camera from my AP130 platform. It was my oldest 2600-series camera and I soon discovered that it had a problem!
I completed this project, and on my first clear night, I went about doing focus, a filter focus series, PA, and so on.
I noticed that when I was doing this, the fan on the ASI2600MM-Pro camera sounded "loud," and when I put my hand on the camera, I could feel a strong vibration!
This is not good, I said to myself!
This started me down the rabbit hole of astro camera cooling fans. Something I knew little about, and if I had my way, would still be ignorant about to this day!
But we don’t always get what we want.
Investigating the Problem
My first thought was that maybe something got into the fan area - maybe even bugs or something. So my first task was to remove the camera's back plate so I could get at the fan. This is done by removing four screws on the back of the camera. Make sure you are not removing the screws around the fan area!
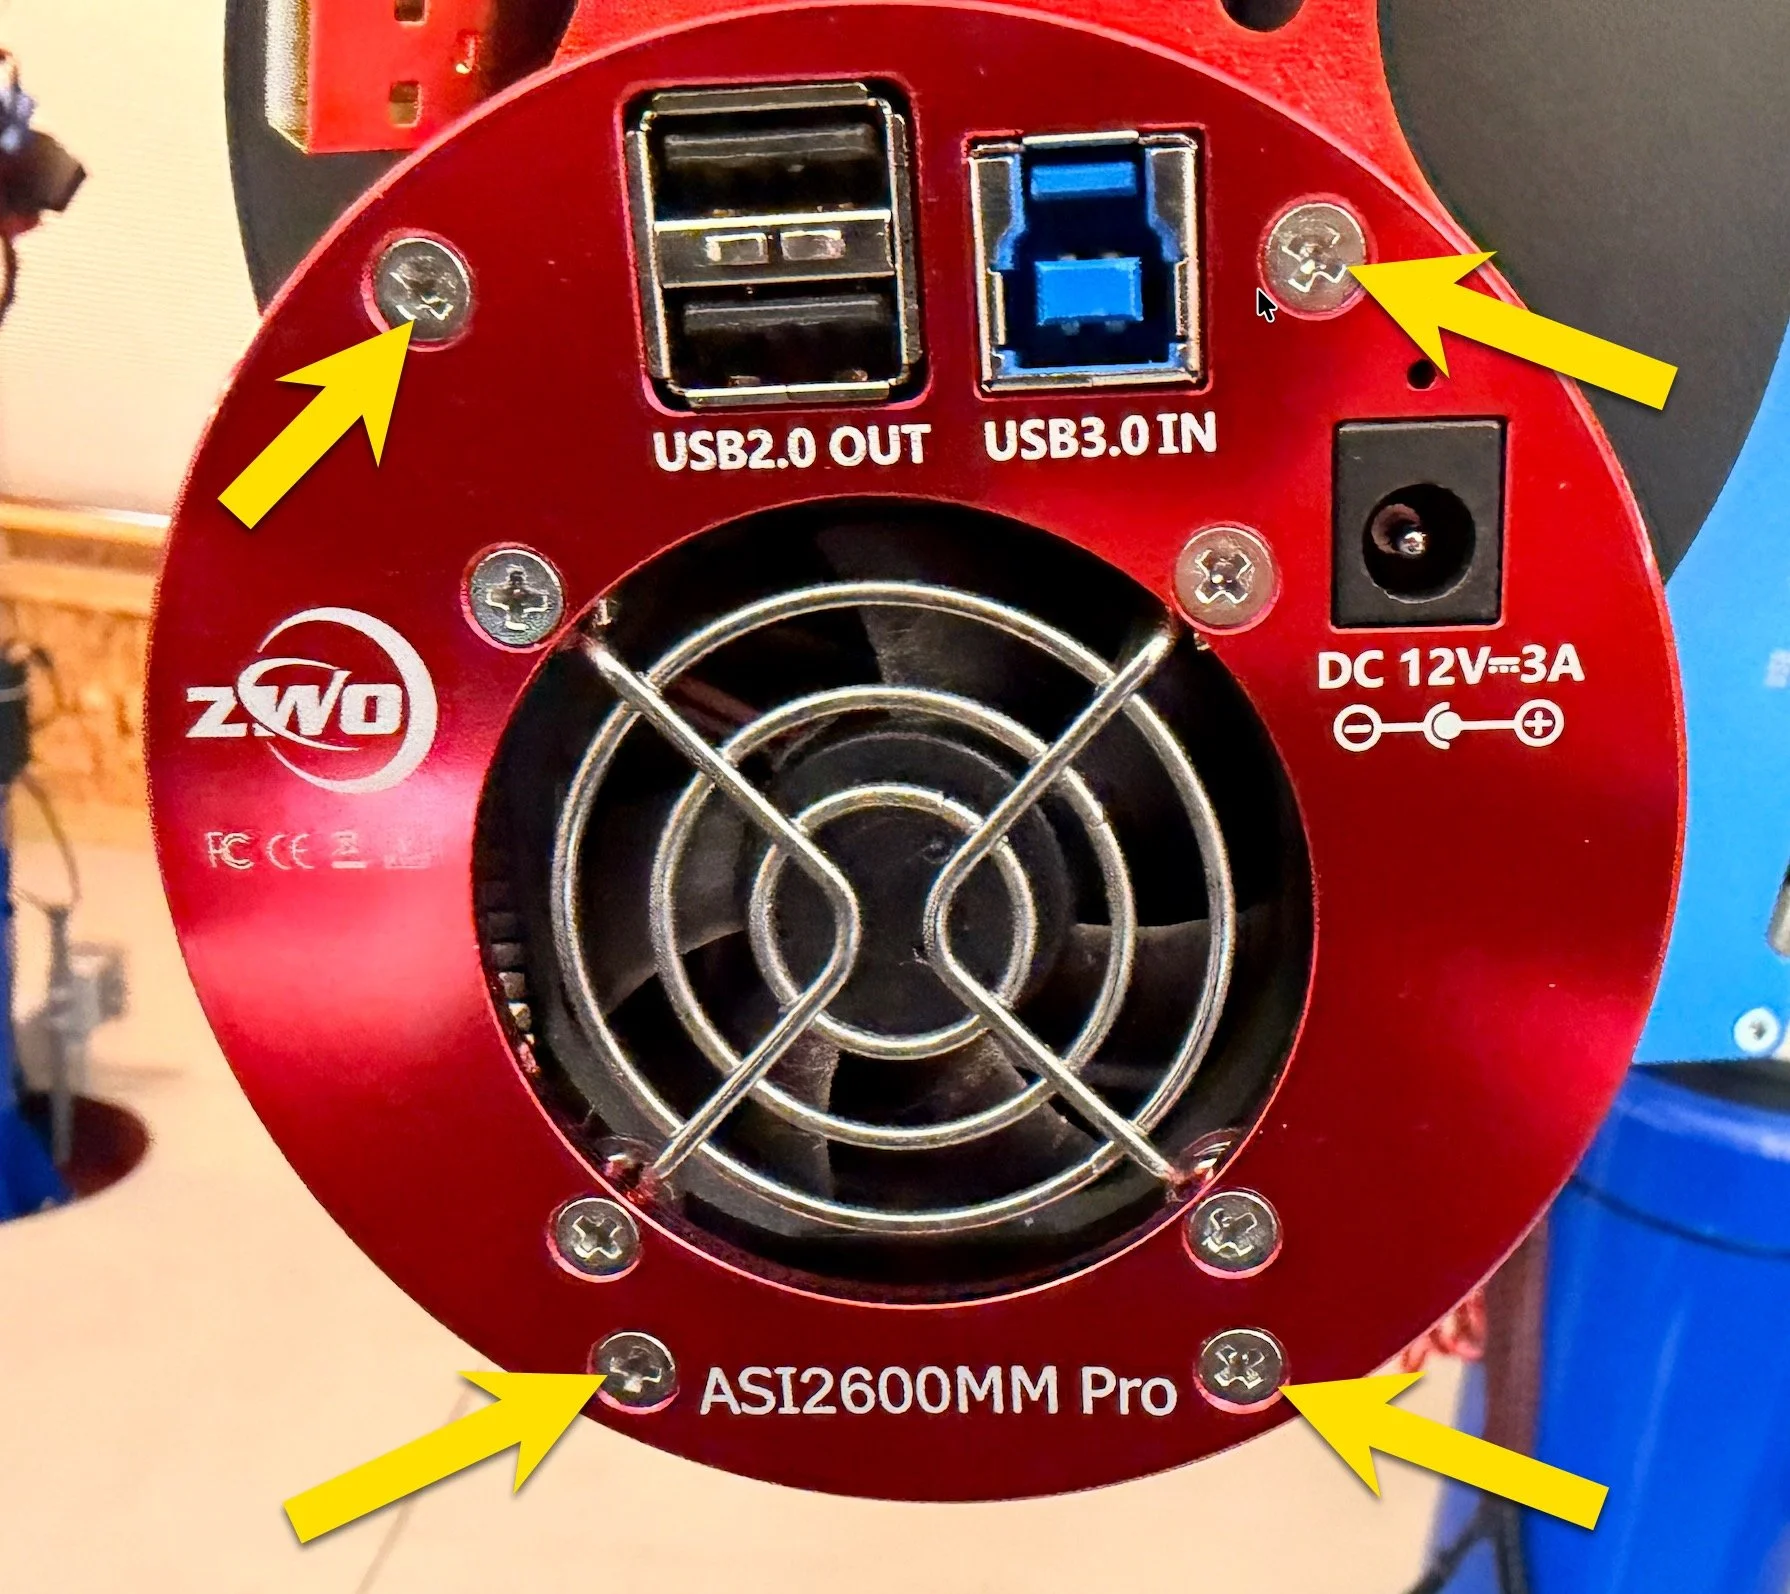
The back of the camera with yellow arrows pointing to the screws that need to be removed.
This comes off easily once these screws are removed.
The next day, I put the scope into a horizontal position and, removing 4 screws, took the back off the camera.
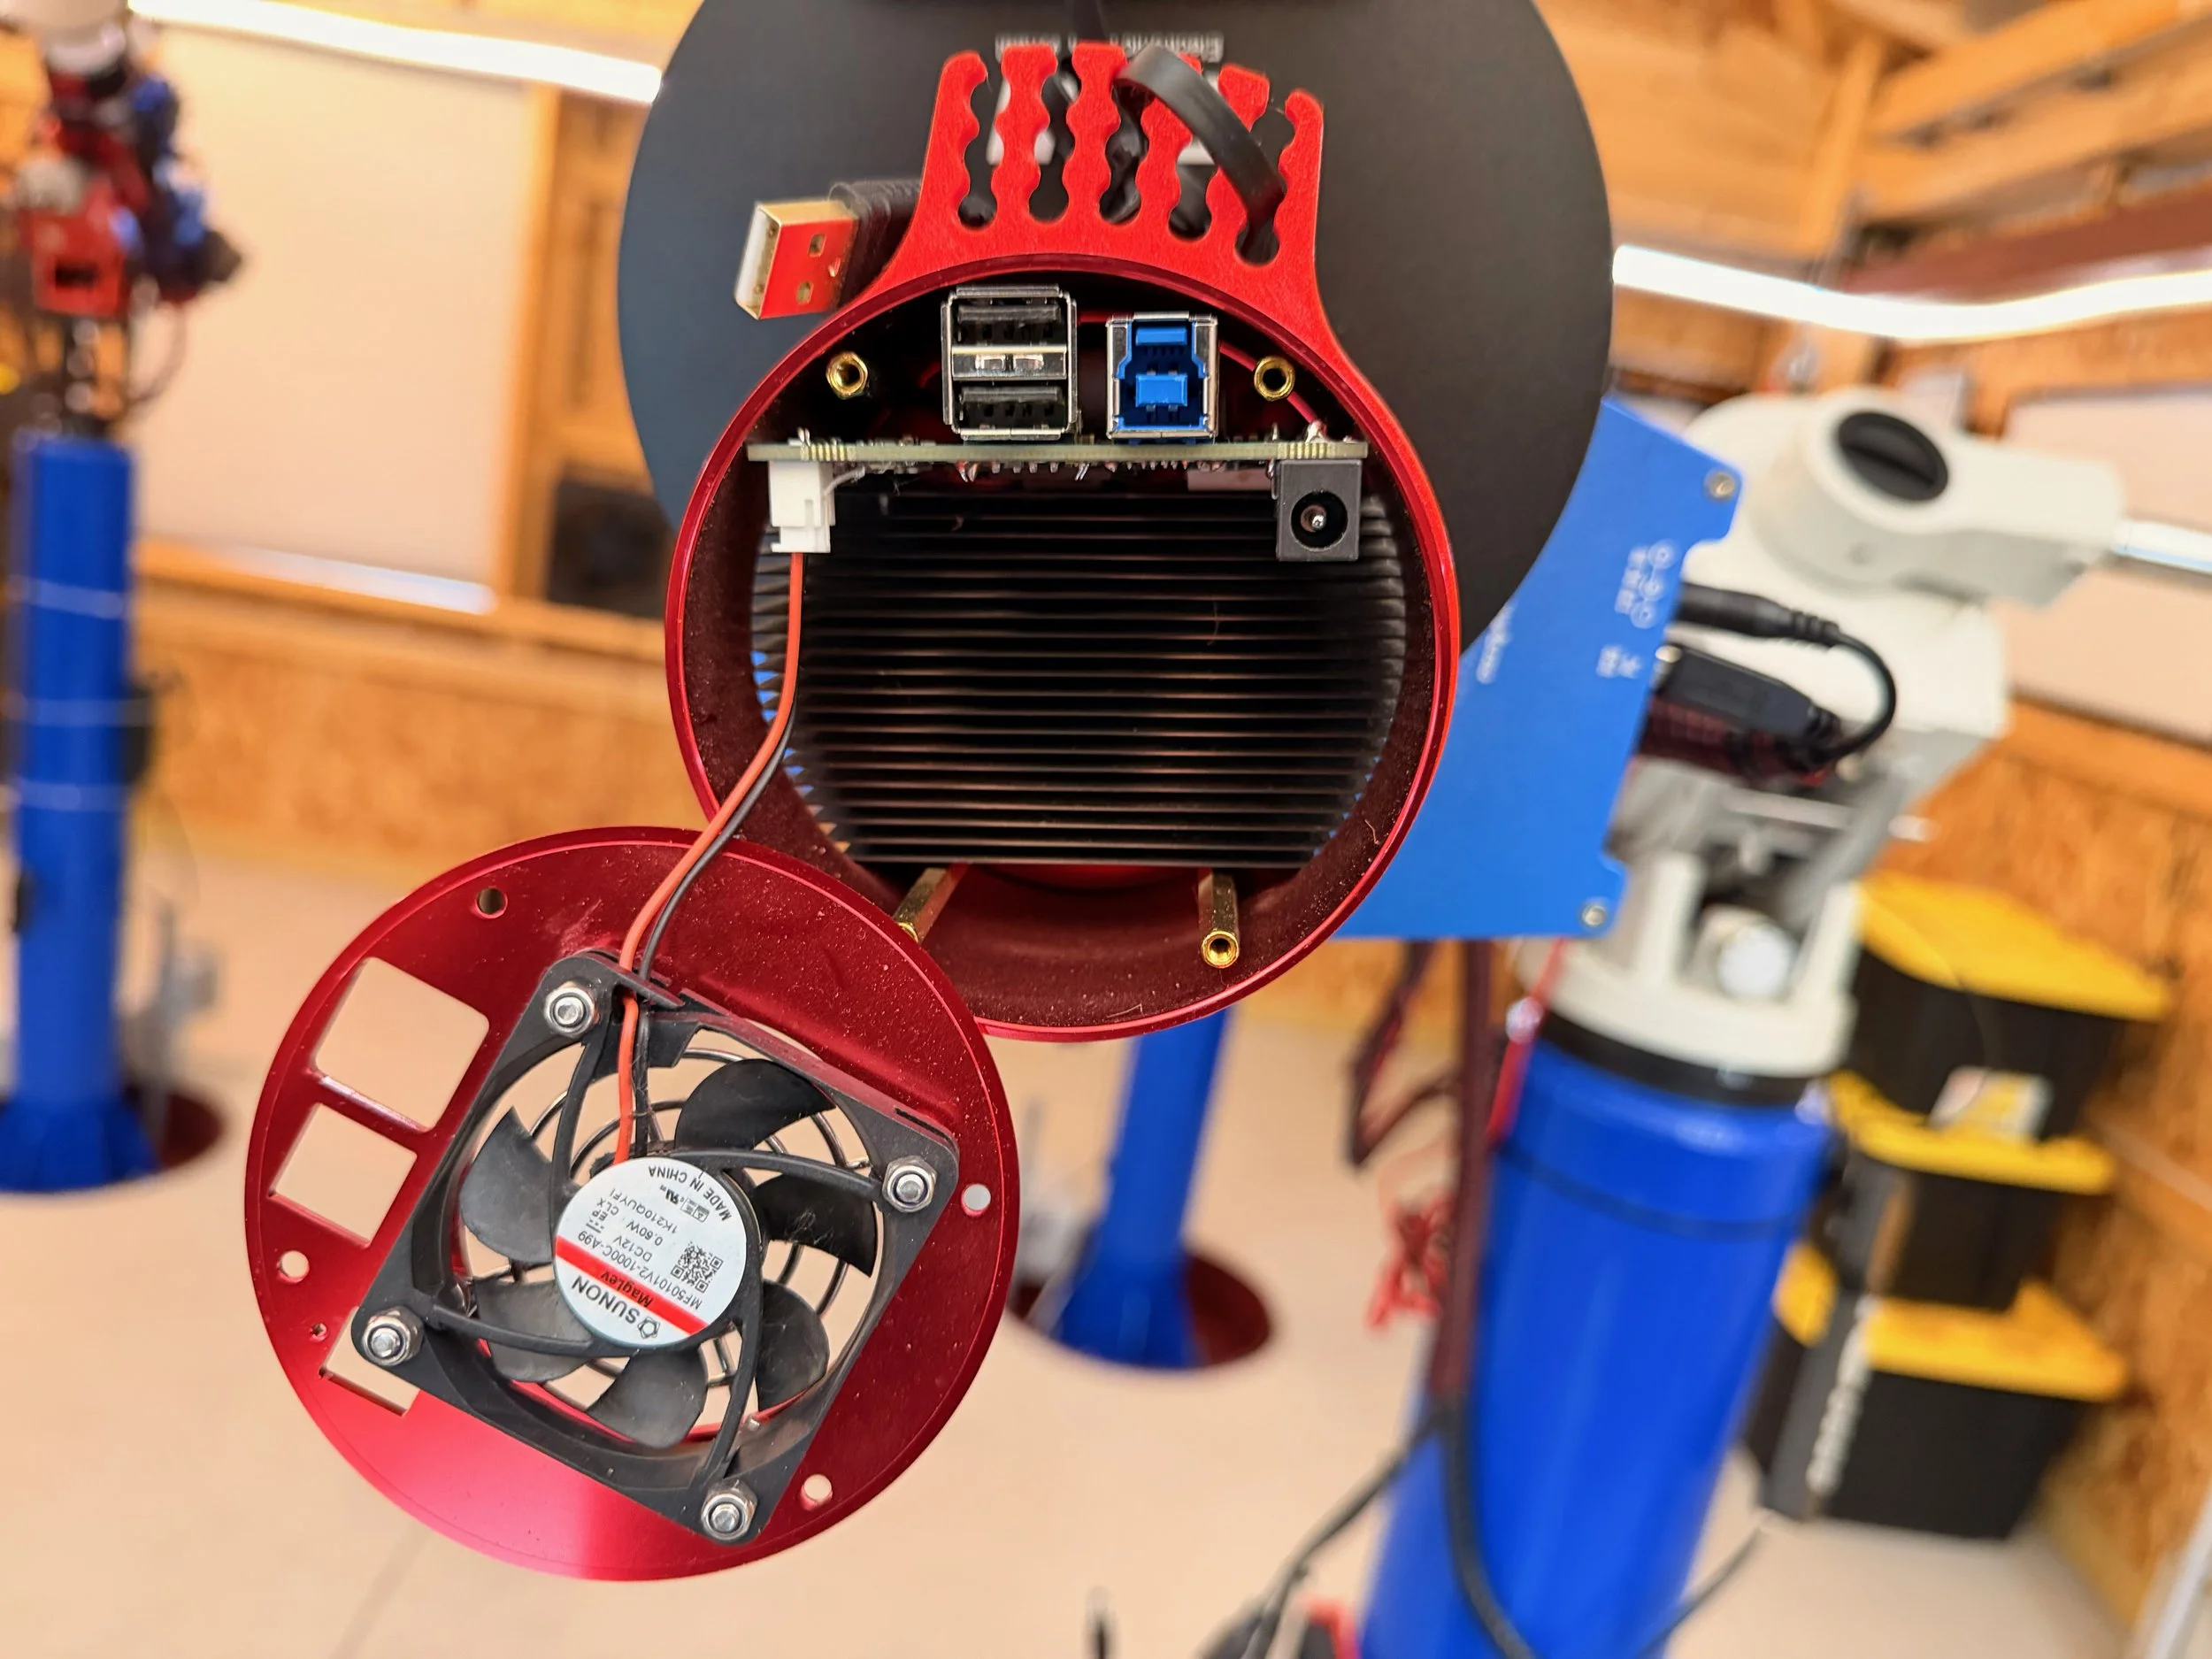
The back is now off the camera and you can see the fan, attached to a circuit board in the camera via a two wires and a plug.
Be careful - once you remove the back cover and the fan, the metal cylinder around the camera can become free and fall off.
I saw the fan was attached to the back plate and was connected to the camera with two wires that ended in a plug connected to a small circuit board.
I unseated the plug and immediately saw the problem with the fan - it had thrown a blade!
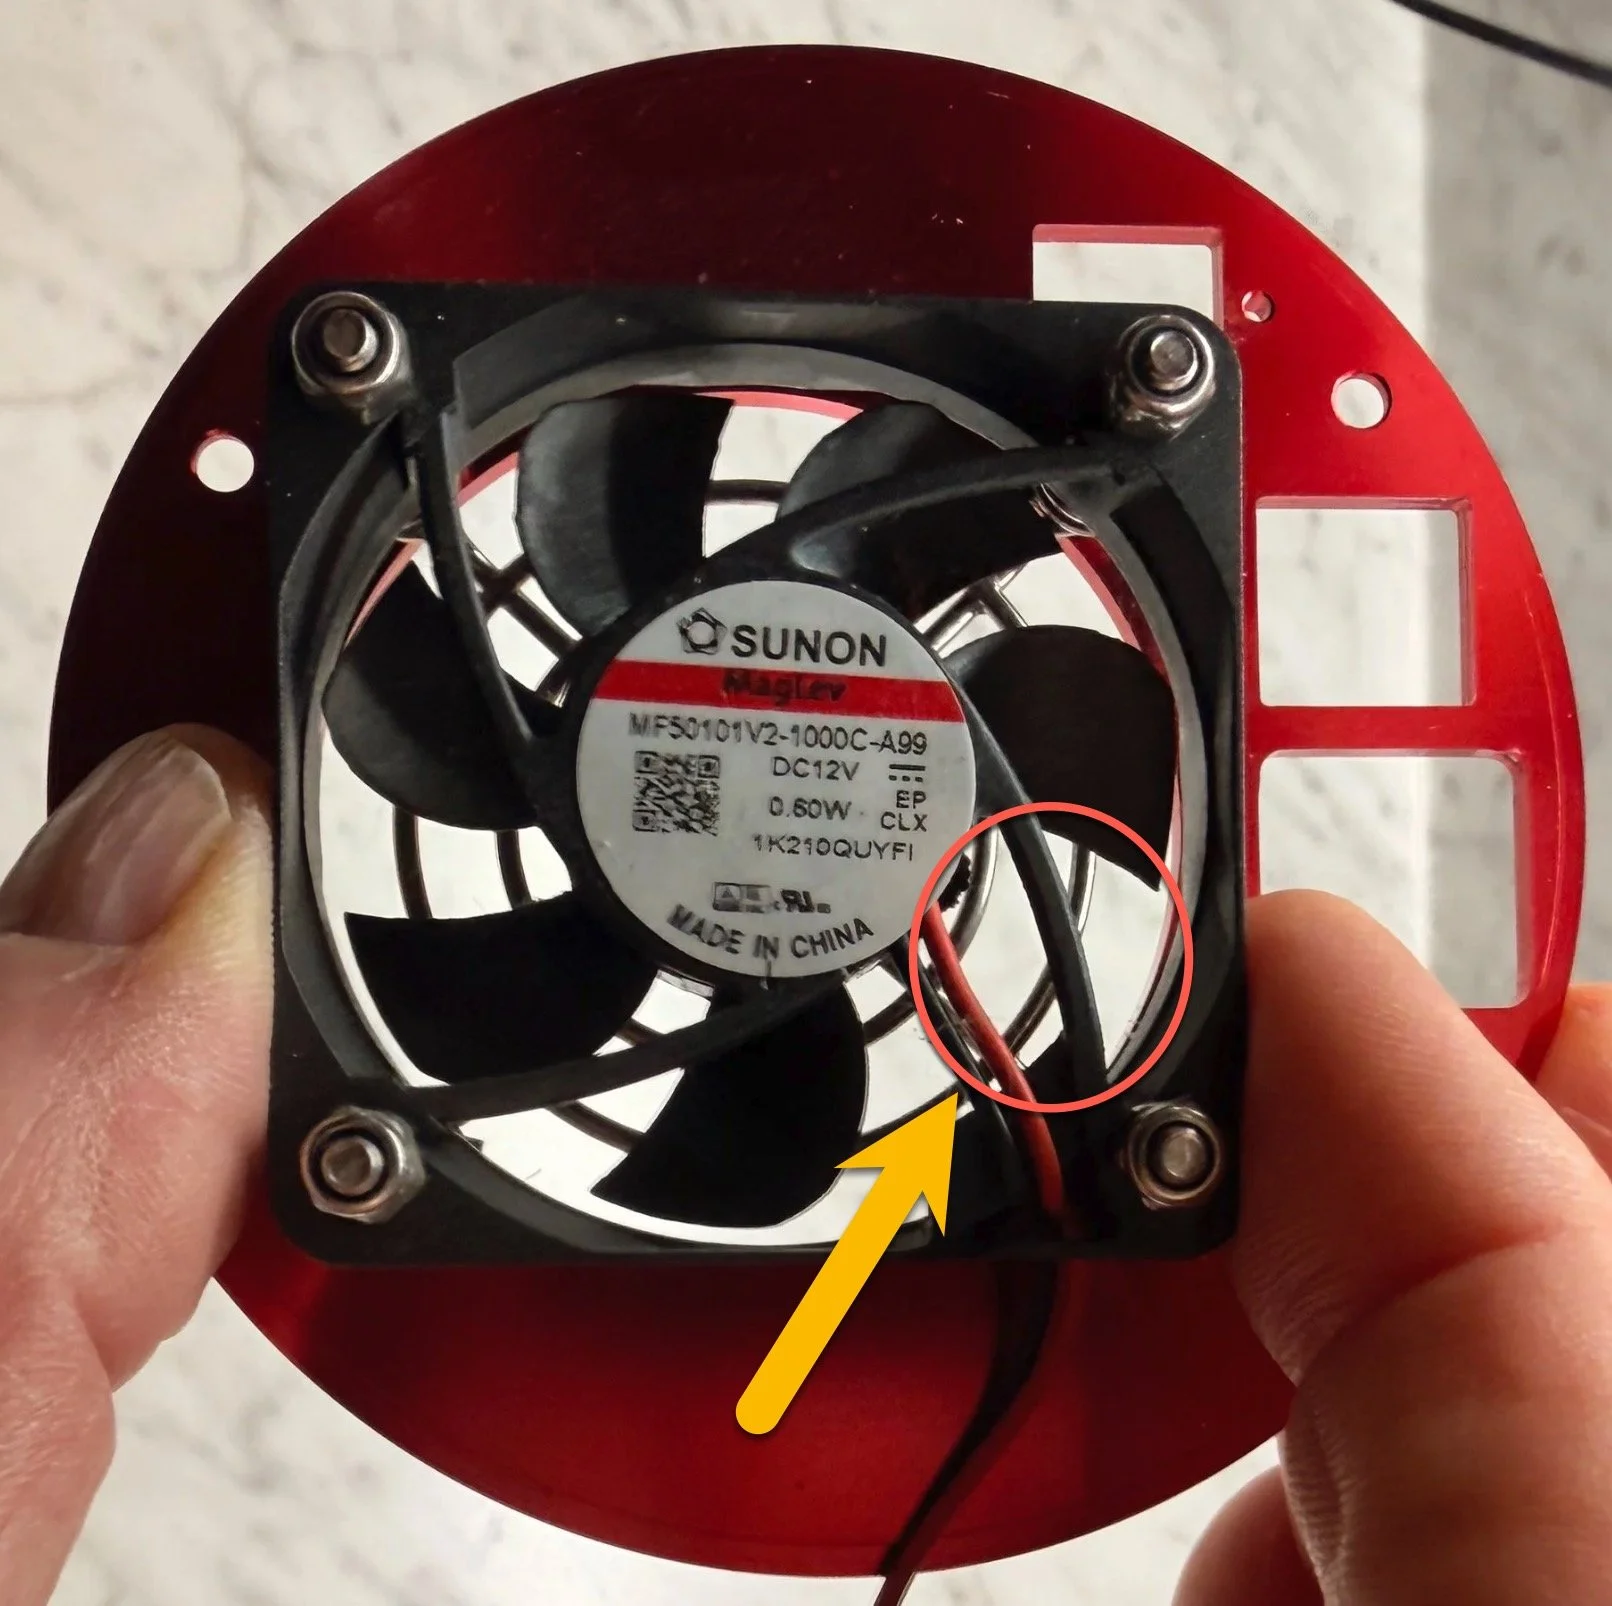
The fan was now missing a blade!
With one blade missing, the fan was no longer balanced, and this explained both the vibration and the louder noise I was hearing.
This was my very first 2600-series camera, and I purchased it when it first came out - so it's been a few years. So I guess I was due for something to happen.
So how do I fix this?
Send the camera back to ZWO for service? No way! I was not going to put the camera out of action that long!
I would get the fan specs and buy a replacement!
Easy-Peasy. Right?
With the cause identified, this stopped being just a repair story and became a research problem. I wanted to know the original fan specs, the real replacement choices, and what the community had learned about vibration control in these cameras.
Finding A Replacement Fan
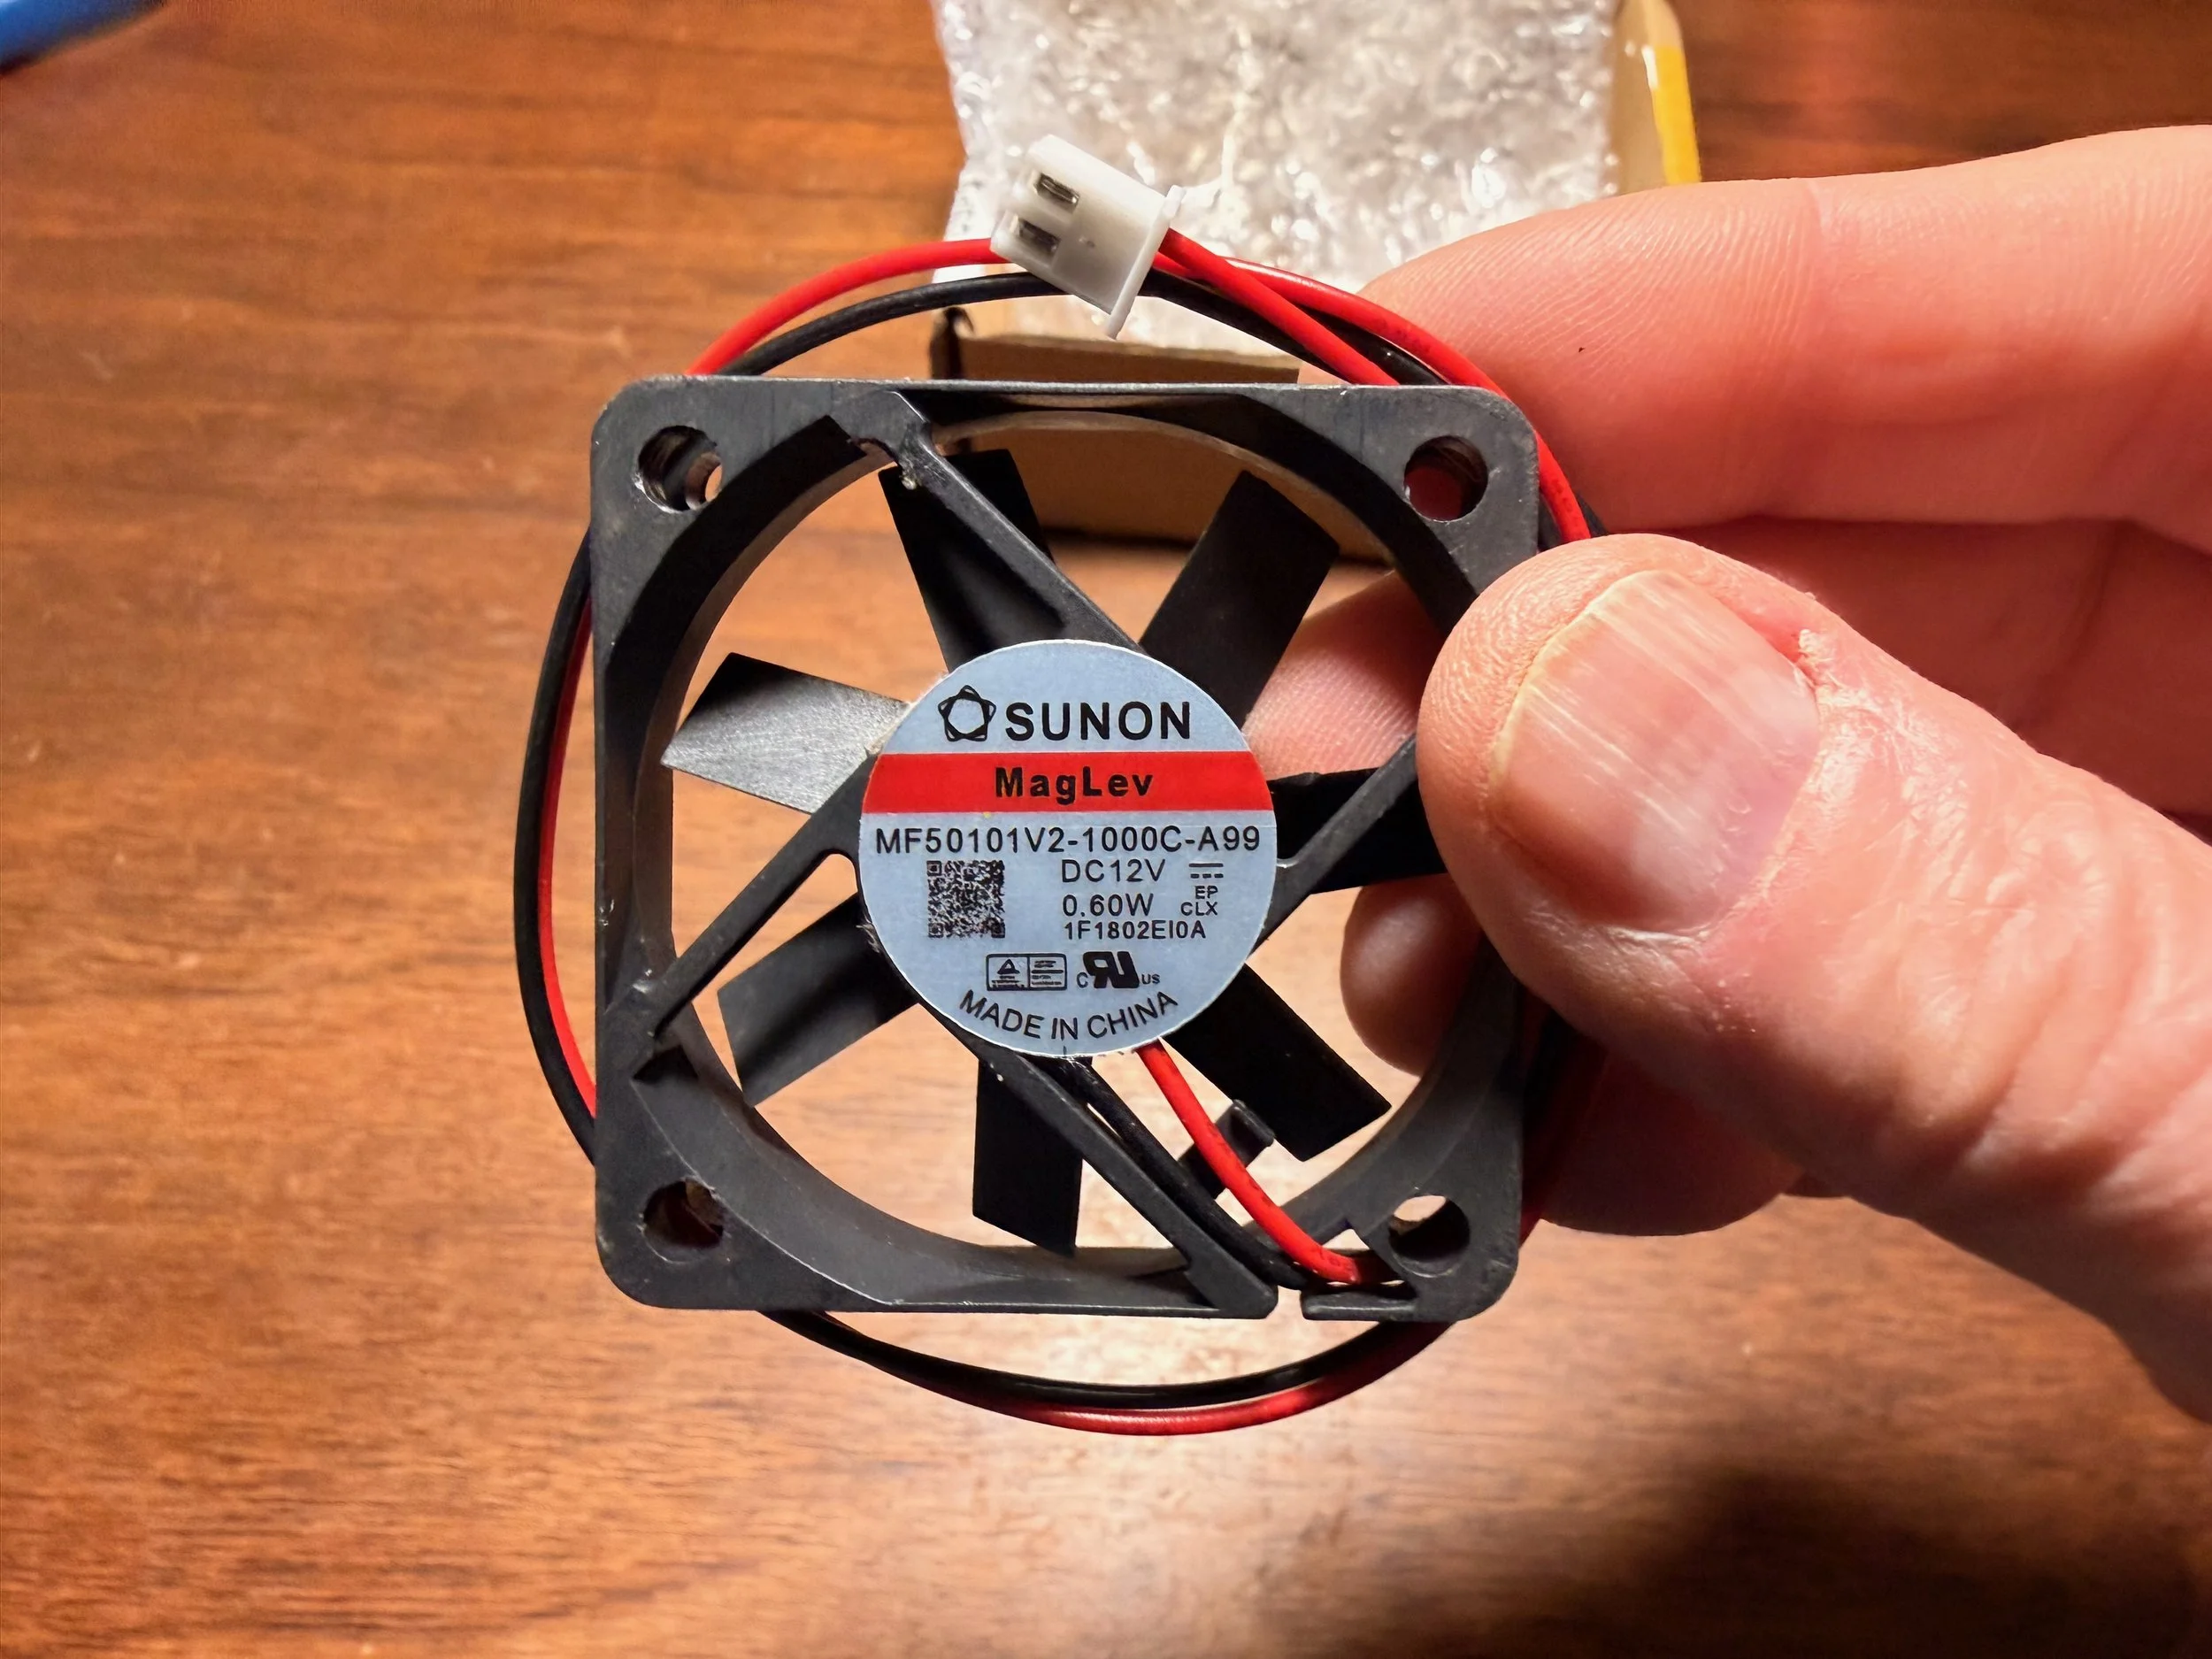
The fan had a 50x50x10mm form factor. Here are the details of the fan found in my camera:
Make : SUNON
Model: MF50101V2-1000C-A99
Specs: 12v, 0.60 watts, 4800 rpm, 11 CFM
Here is a spec sheet that was shared with me for the fan: SUNON Spec Sheet
So, I just need to find this specific fan - right?
Soooo - finding a fan! I went to Amazon and searched for that model fan. And I found one - selling for $25 each and coming from China with a delivery date about 3 weeks out! Here is the offering I found:
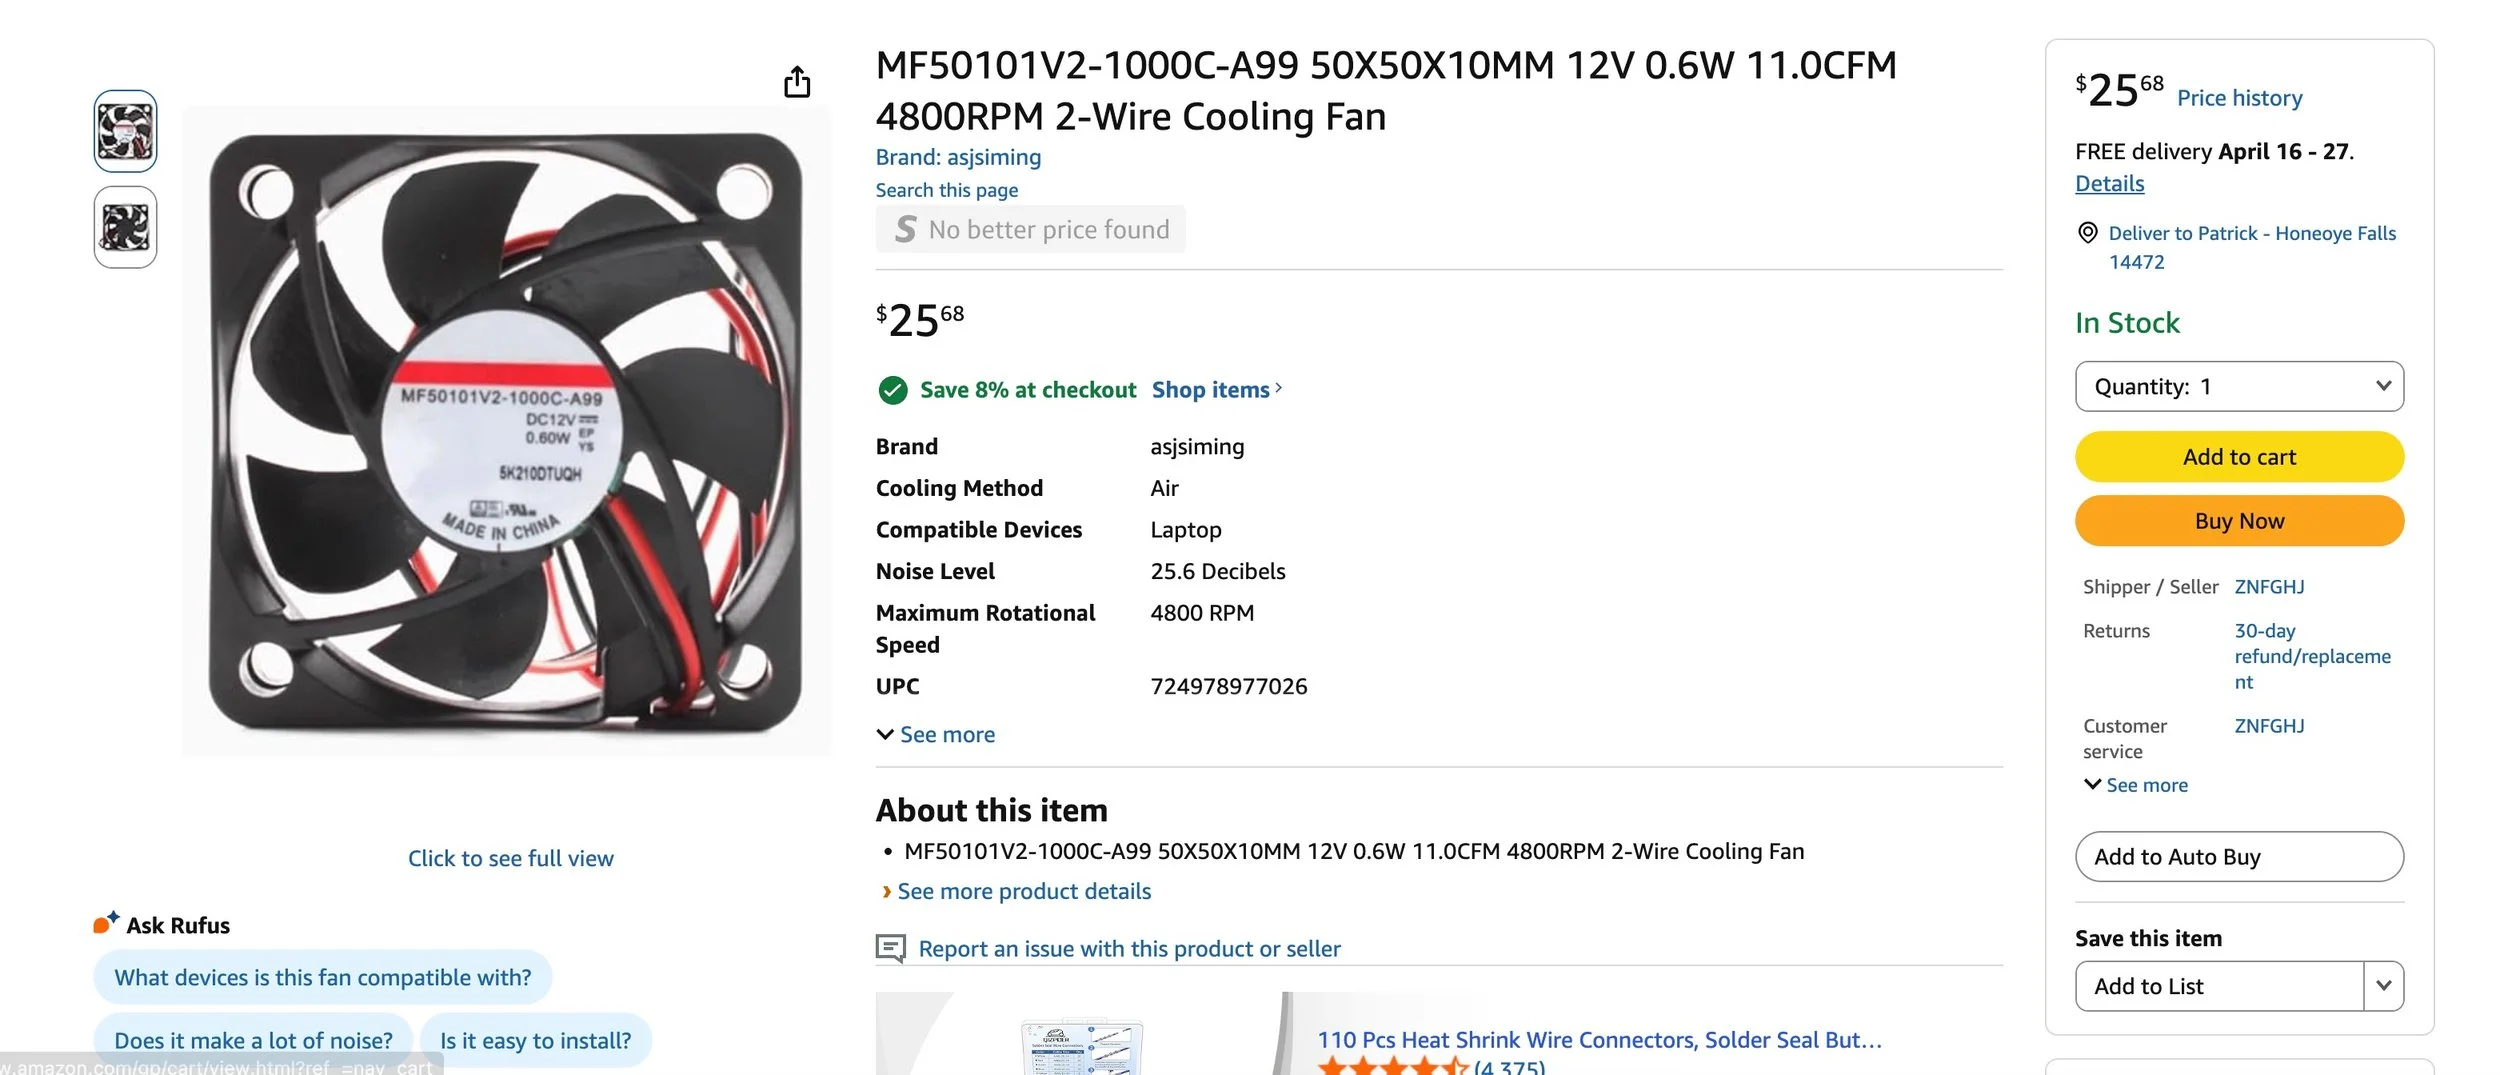
Here is the exact fan I was looking for. A bit costly for what it was, and the delivery was weeks out as it was coming from China.
Almost $26 and 2-3 week shipping? That seemed high and the delivery far off, so not very useful. Someone in the US should have this in stock - right?
So I broadened my search.
I searched for electrical part suppliers and suggested I try Digi-Key, Mouser, or Sager.
None of these had them in stock, or the ship time was just as bad.
I did find a source on eBay with high ratings, “mm0312.“ You can see the link for that one HERE.
$22, shipped from China, but with solid reviews. Well, I was going to need them, so I ordered two - one as a replacement and one as a backup
This was going to take a while, and I wanted something to get started with right away, so I had ChatGPT search for an alternative, and it came up with the following:
1. Noiseblocker XS-1 on Amazon
Amazon has the Noiseblocker NB-BlackSilent XS-1 50 × 50 × 10 mm, listed at 3000 RPM, 16 dBA, 6.77 CFM, 3-pin. Amazon flags it as a highly rated, well-priced item with free returns.
2. Noiseblocker XS-2 on Amazon
Amazon also has the Noiseblocker XS-2 50 × 50 × 10 mm, listed at 4000 RPM, 8.89 CFM, 3-pin. That is closer to your stock fan on airflow than the XS-1, but again, CN reports on the XS-2 are mixed.
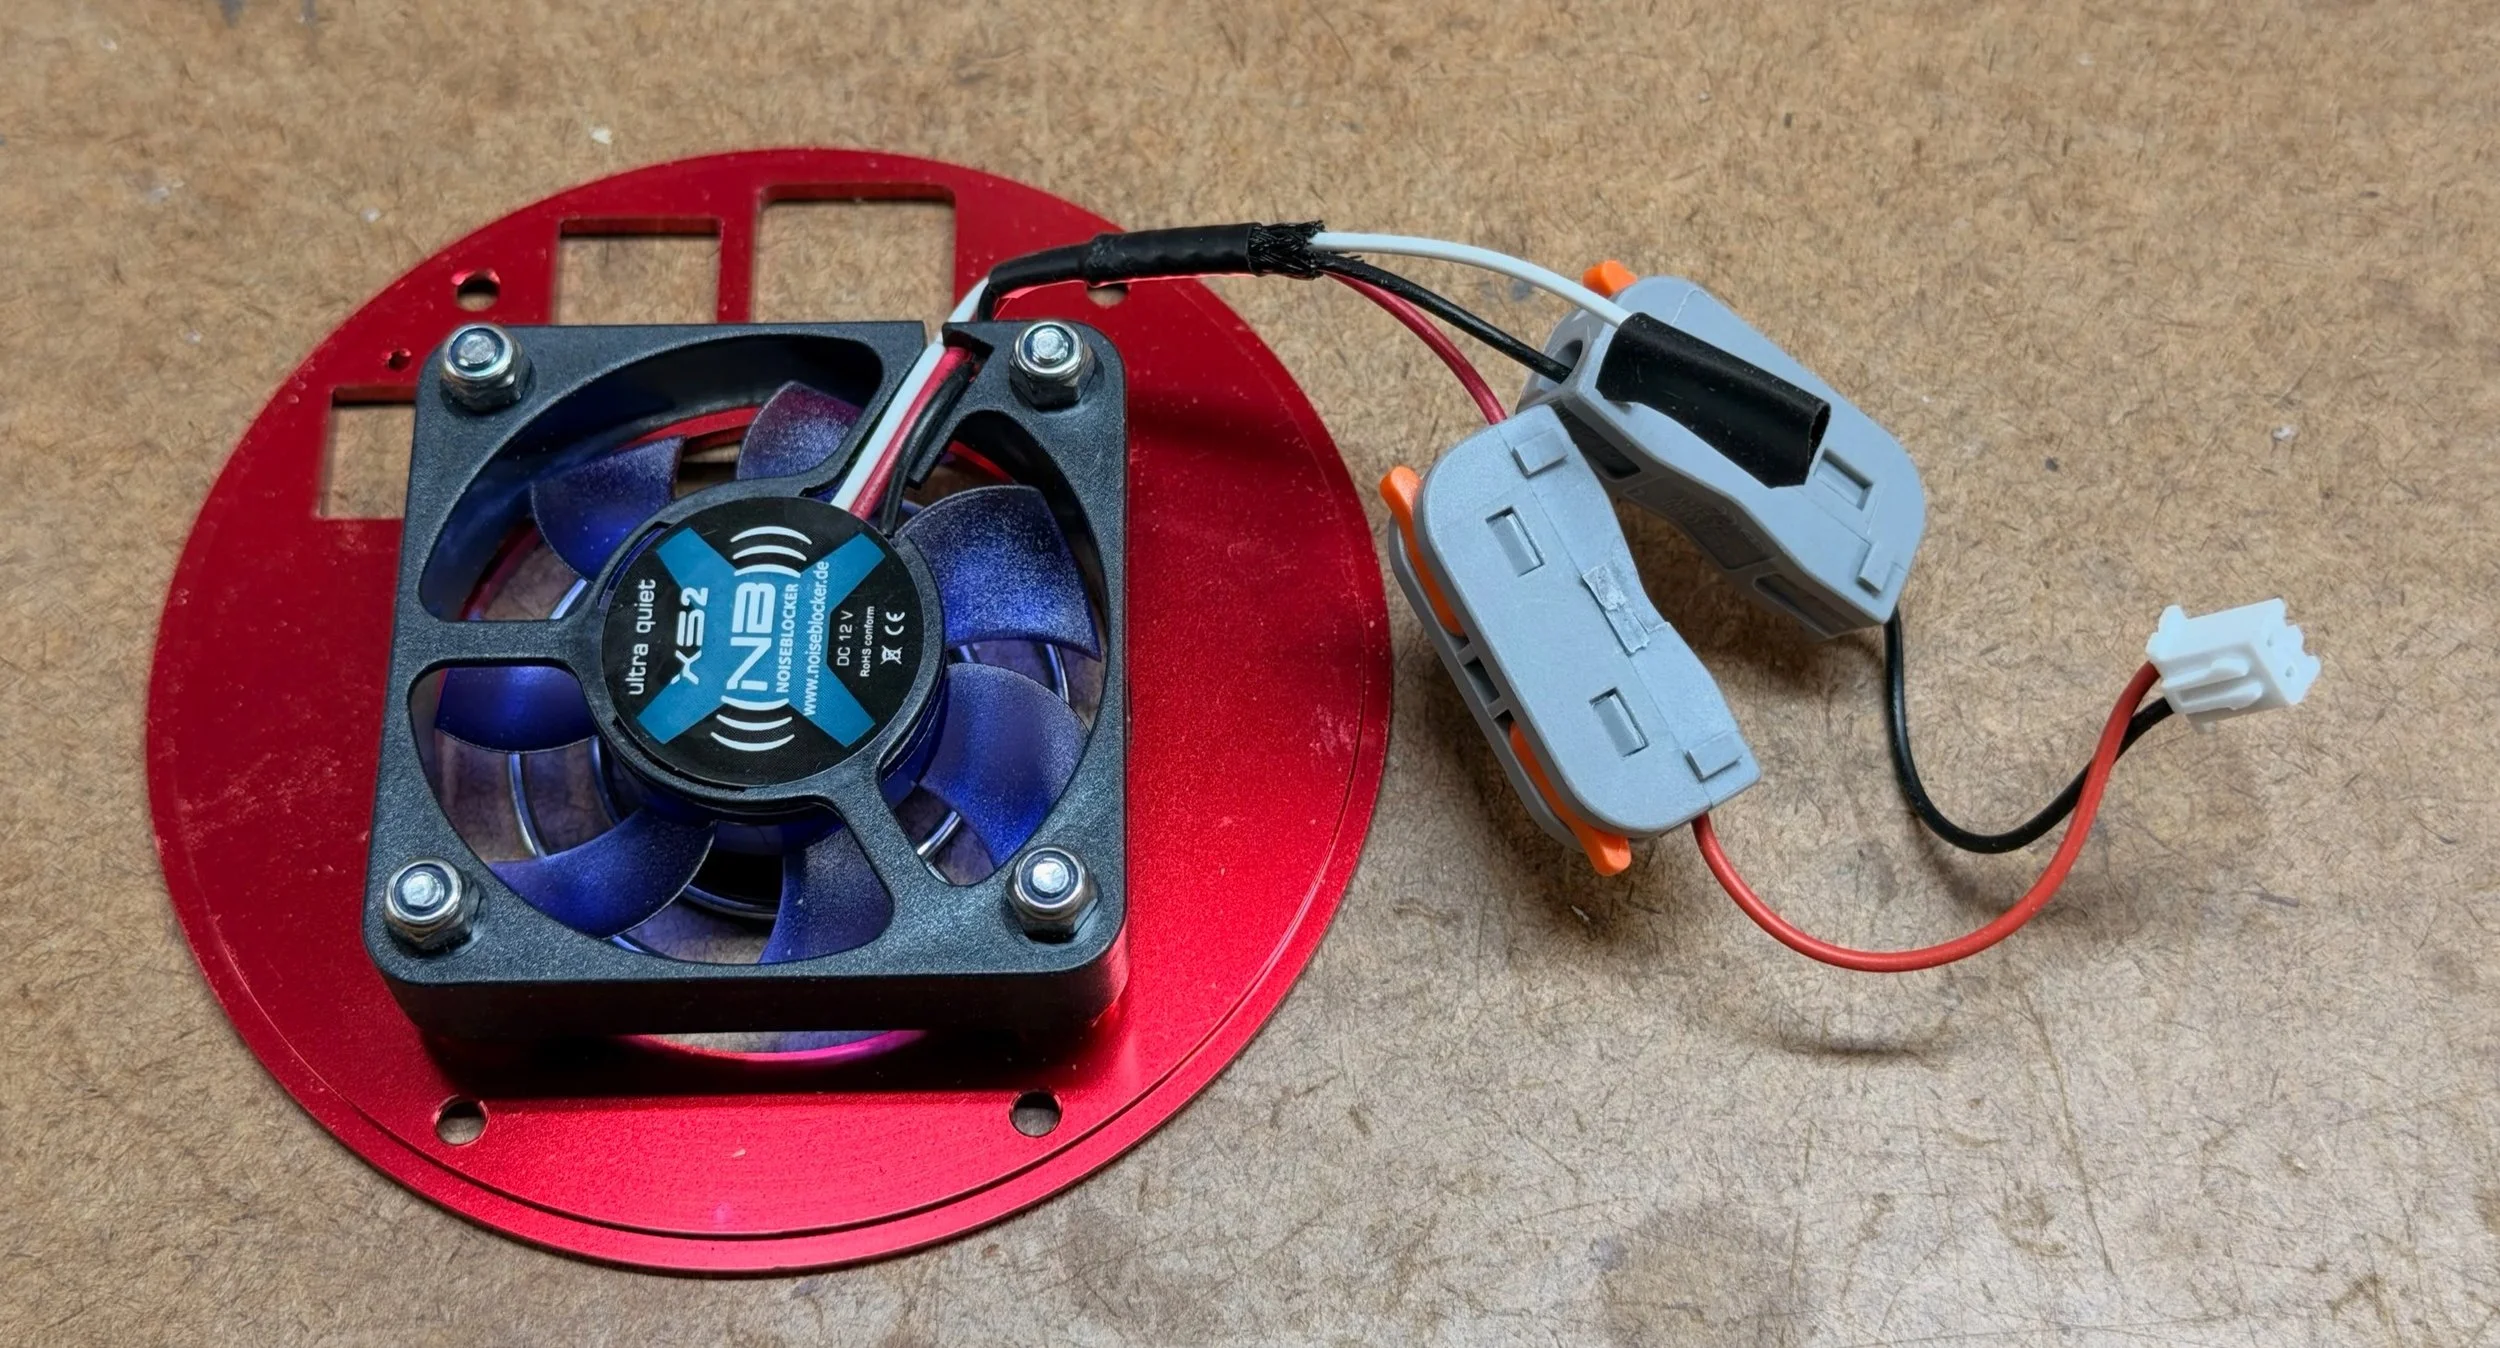
These were only $13, and I could get them in a couple of days. So I ordered one of each. I figured the XS-2 version was my best bet, as it had higher airflow. Both of these used a 3-wire control bundle, so I was going to have to cut that back and adapt the wire and plug from the old.
The First Fans Arrive
The fans arrived from Amazon, and my first task was to sort out the wiring. To do this, I stripped the sheath on the 3-wire bundle and cut and stripped the wires.
Then I cut the plug and wires from the bad fan. Next, I stripped those wires. After cutting the black wire sheath back on the new fan's cable, I found three wires: red, black, and white. The red and black were the ones I was interested in. The white was a tach wire, so I exposed no wire from this lead.
The logical thing to do is to solder the wires together and wrap them in shrink wrap. But I wasn't sure these fans would work, so I used a couple of (somewhat bulky) spring wire connectors to put them together for a test.
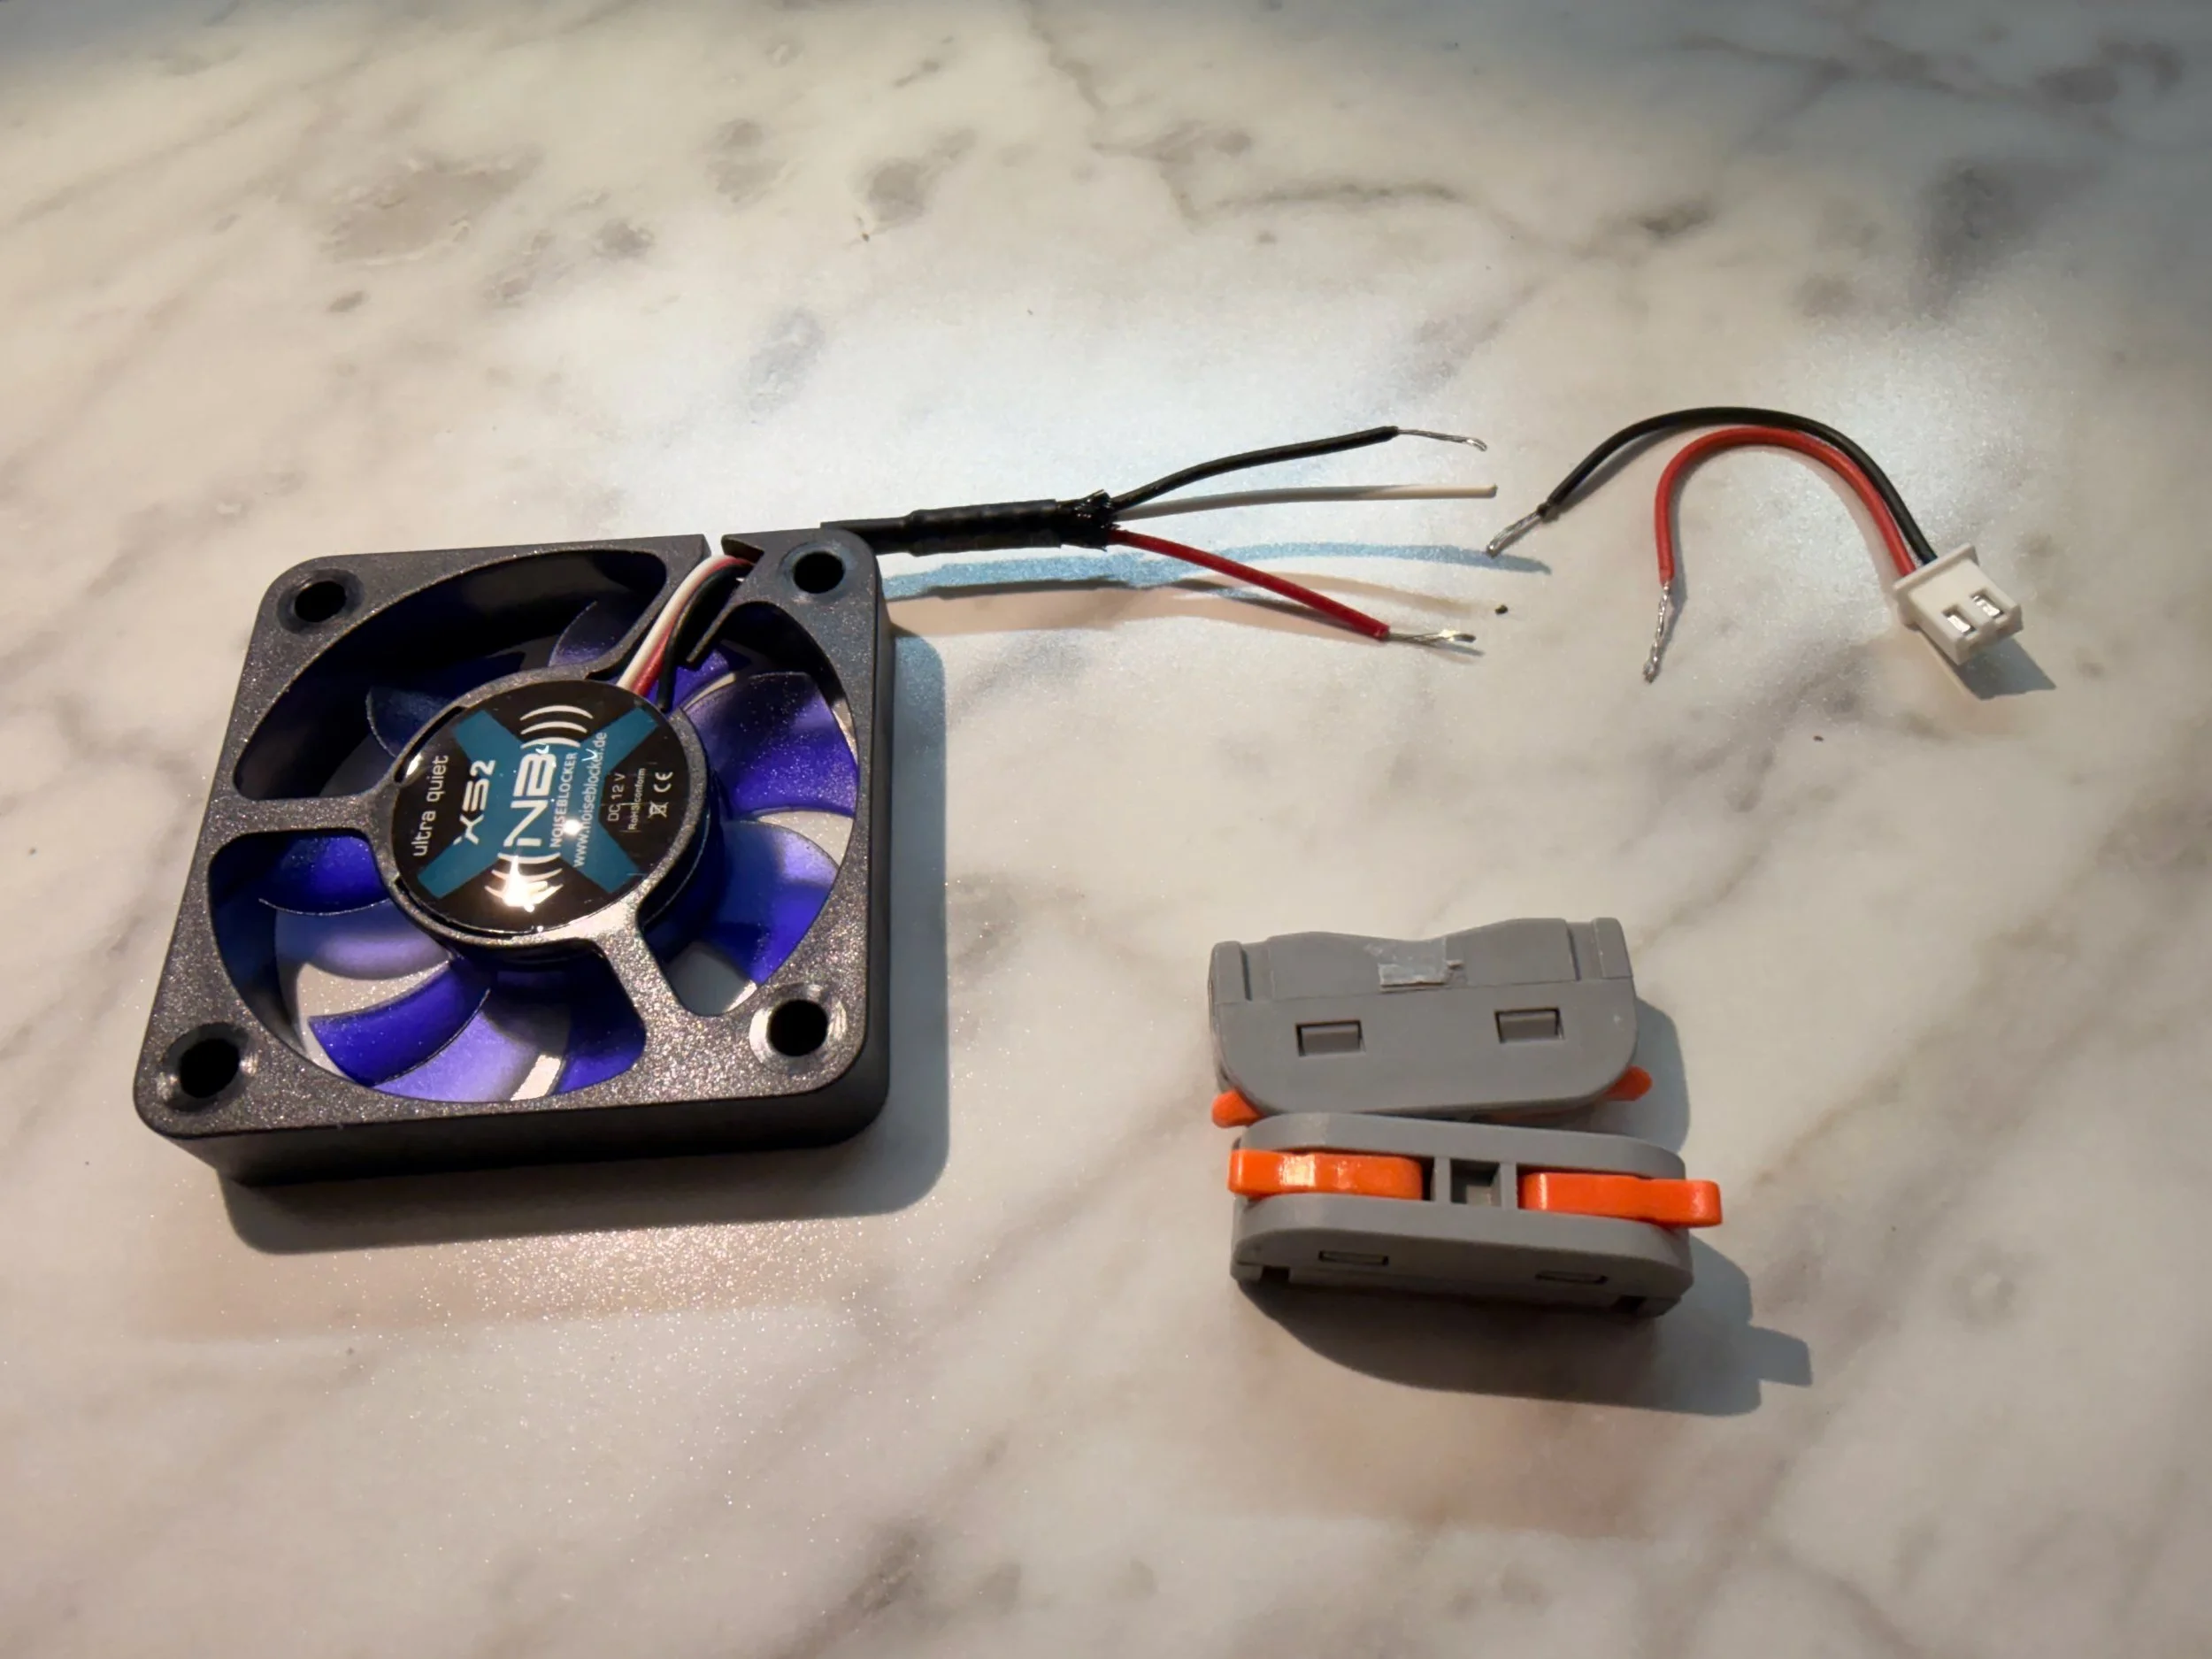
Ready for testing. The wires as stripped and ready to be joined with the spring connectors shown on the bottom right.
I carefully noted how the old fan was mounted to the camera plate. Blade direction and orientation, and how the screws and the vibration isolation washers were installed, so that I could put it back together the same way.
The fan screw went through the back cover of the camera, through one of the eyeholes in the fan grate, then through a washer, an O-ring, another washer, then the fan, and ended with a nut.
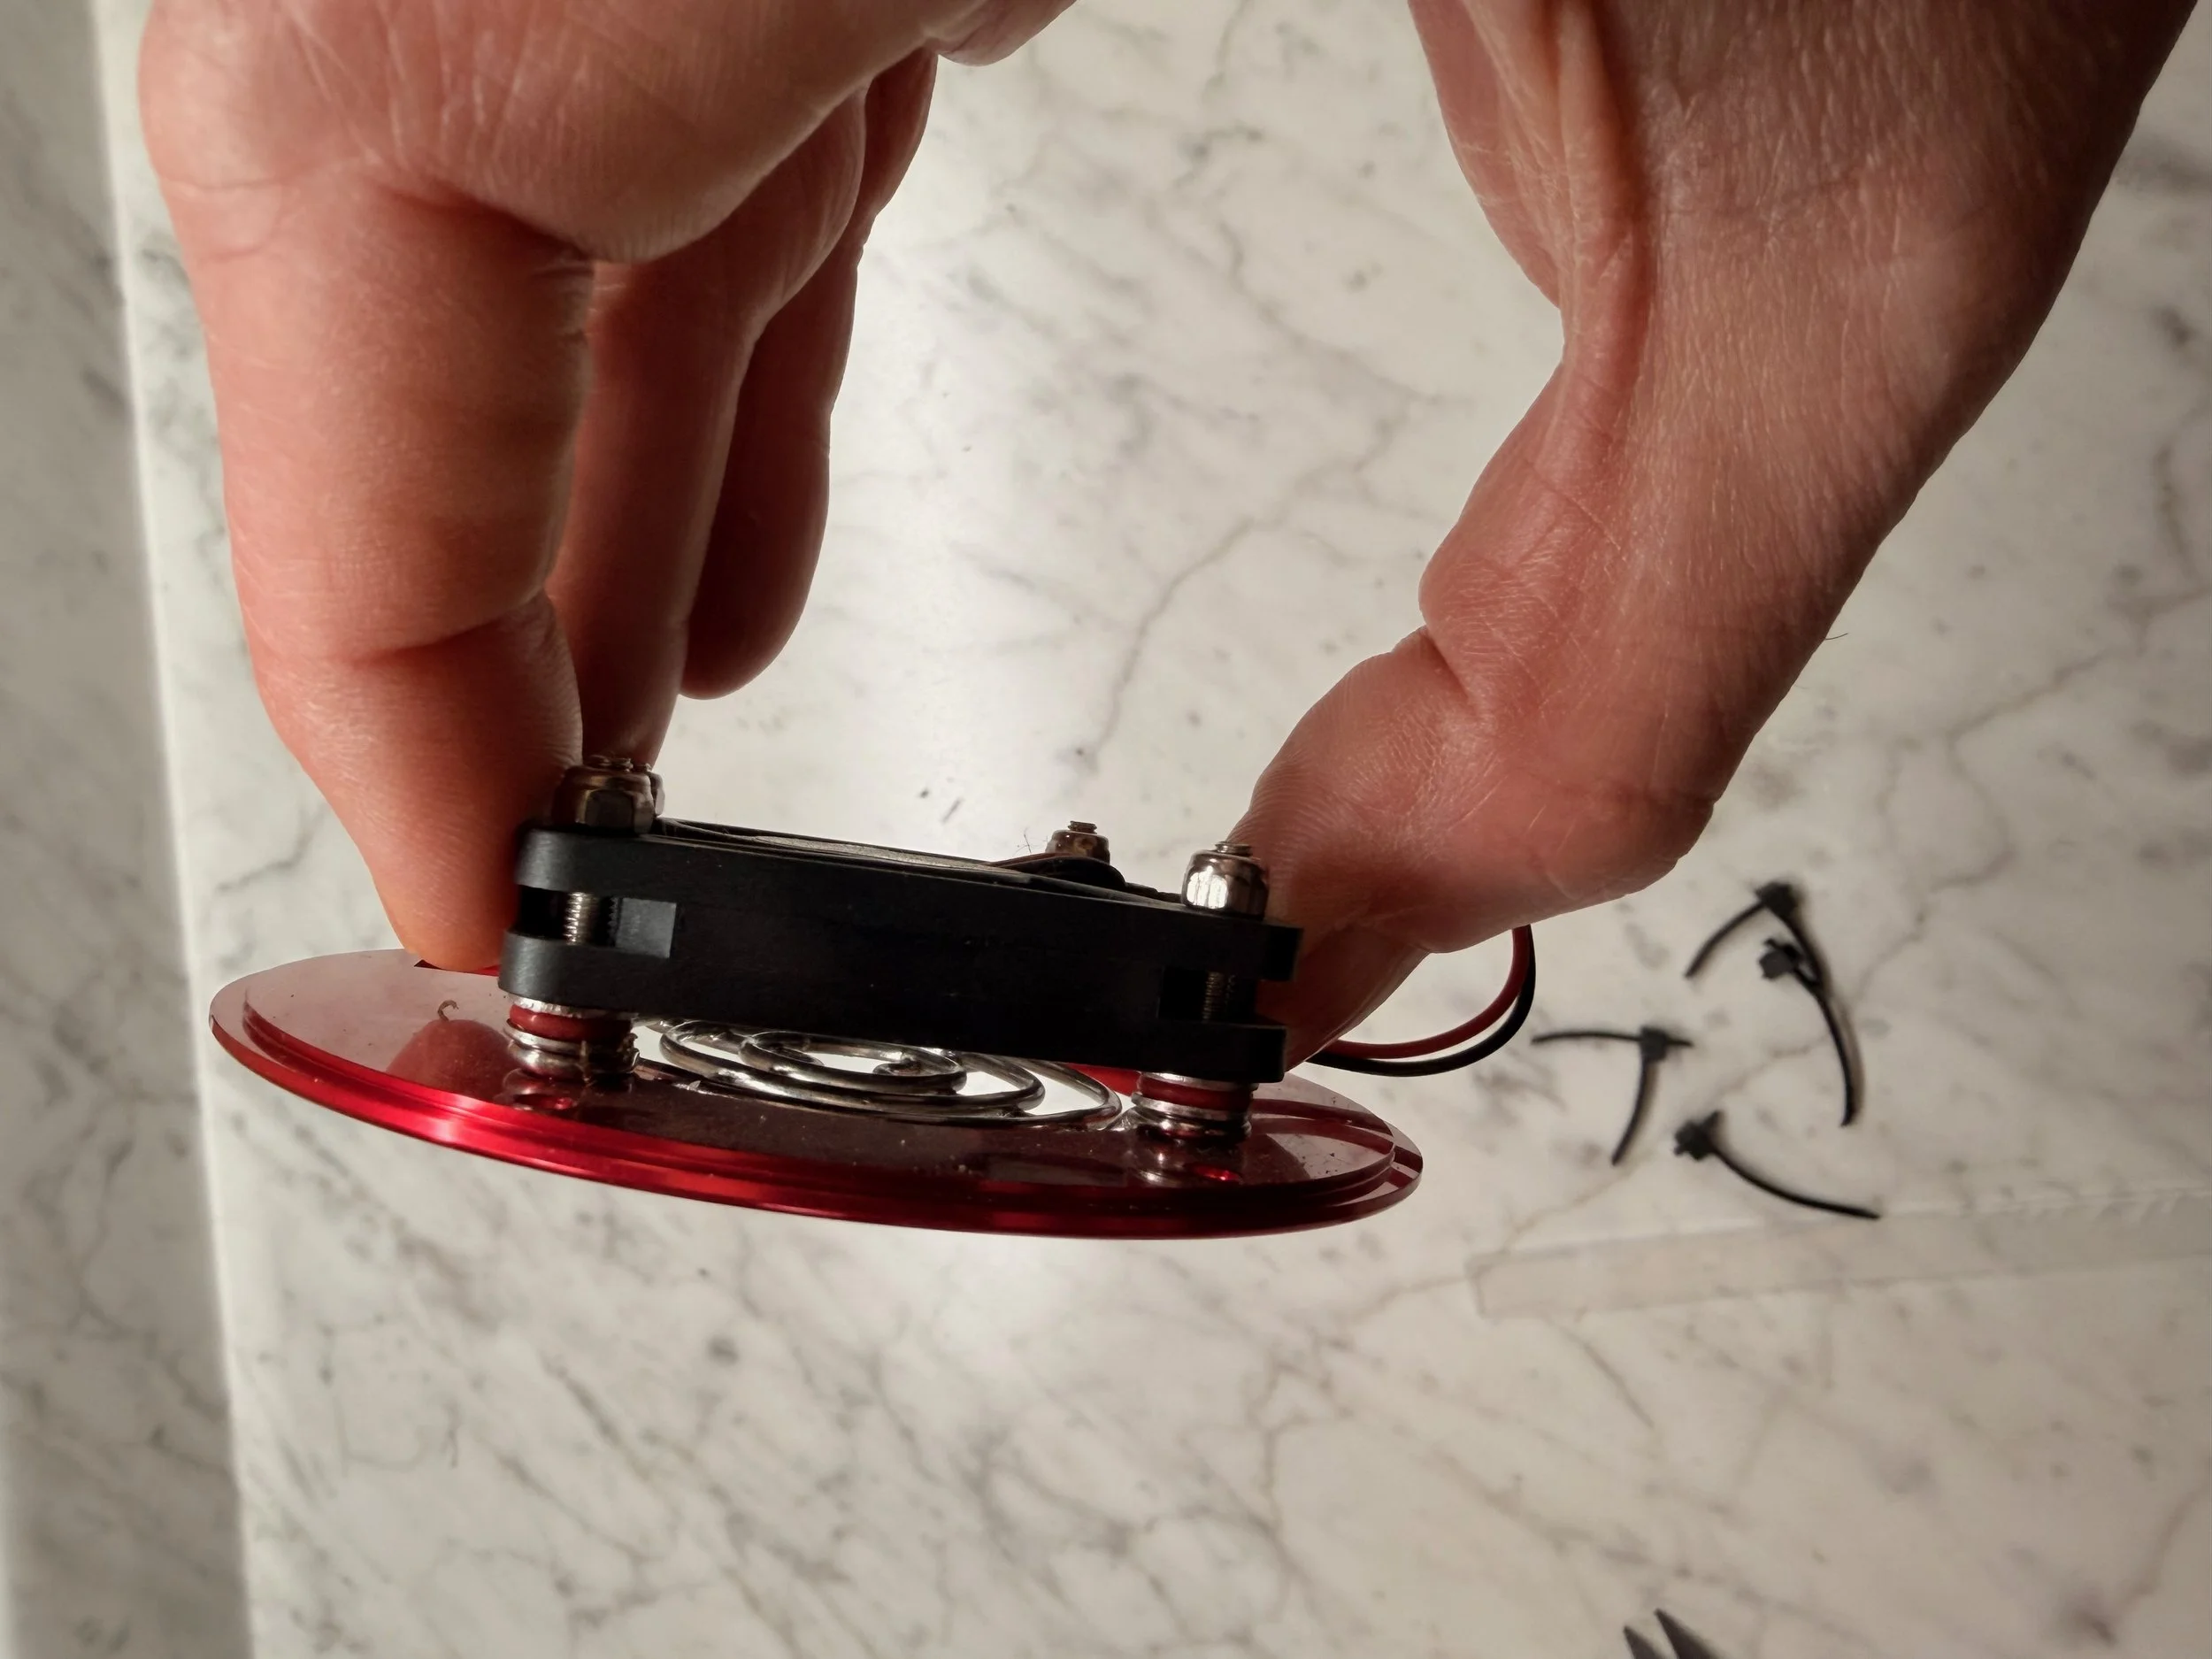
With this edge view of the old fan, the can see the mounting sequence that had to be replicated later.
I then mounted the fan back onto the camera plate and prepared to put it back in the camera.
Everything connected for the test.
Dust Removal
Before I reinstalled the fan, I took some time to blow the dust off the heat exchanger plates in the camera. I was surprised by how much dust had gotten in there, and I wanted to call this out, as I think I will start doing this on a yearly basis for my cameras. All that dust does not help the coloing one bit!
I plugged the fan in and replaced the cover. This was a little tricky due to the bulky spring connectors, but I was able to do it. I thought the connectors wouldn't help airflow at all, so this would be an interesting test. I was ready to power up the camera.
The fan was working, and it was very smooth and very quiet! I next tried driving the camera down to a target temp of -15 °C.
It achieved this with no problem. It was 40 degrees F out, so I guess it wasn’t that tough. Would it do that on a 90-degree F day in August? With the lower air throughput, I doubted it.
But I soldered things together and reassembled the camera!
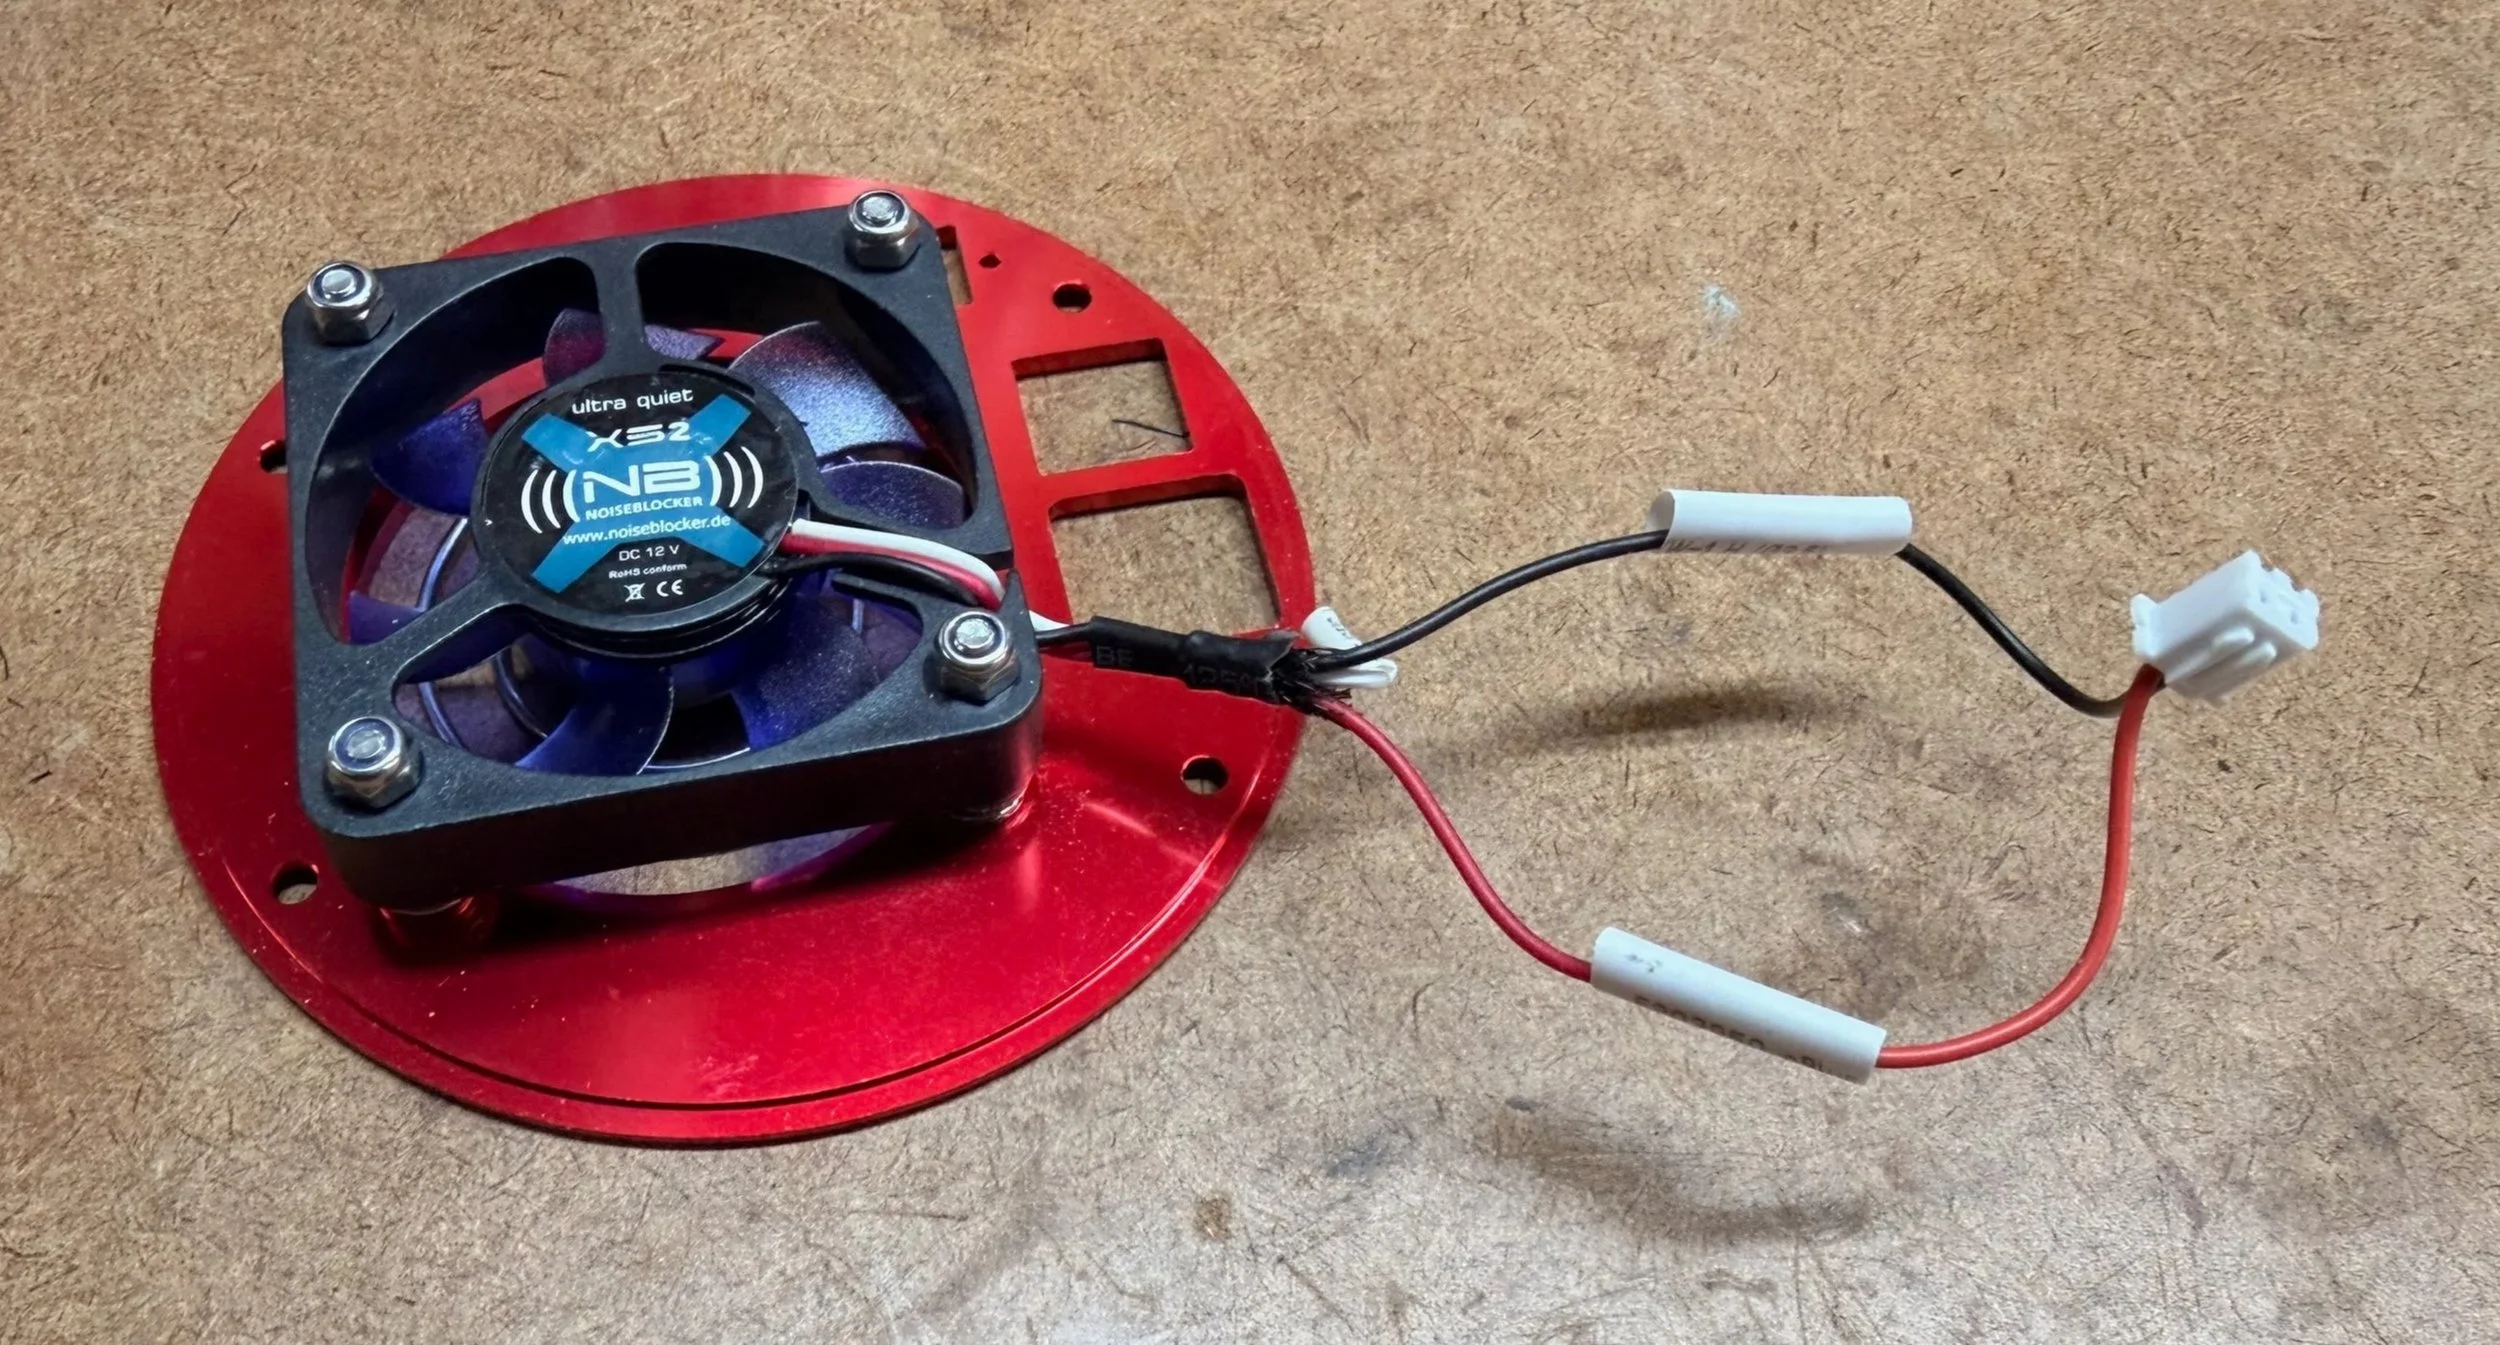
After soldering and heat-shrink tube application.
At this point I had a working temporary fix, but I still wanted to understand the bigger replacement landscape
I Am An Idiot
The whole fan thing was new to me, so I decided to post about the issue on social media - X, Bluesky, and Facebook:
And this got some interesting responses.
Did I check with ZWO to see if they had fans in stock that they could send me? ‘‘
Uhhh, no, I did not think to try that. seems obvious now. I am an Idiot…
Was I aware that Agena Astro and Highpoint Scientific both had replacement fans in stock for $15-18?
Uhhh, no, I didn't think to check my favorite astro supply houses for a fan, because I am an idiot..
One caveat: they do not specify what the fan is - no make, no model, no specs.
Was I aware that there was a long thread on this topic on Cloudy Nights?
Eeehh, no, I did not look there - did I mention that I am an idiot?
I even got a response from Dylan O’Donnell:
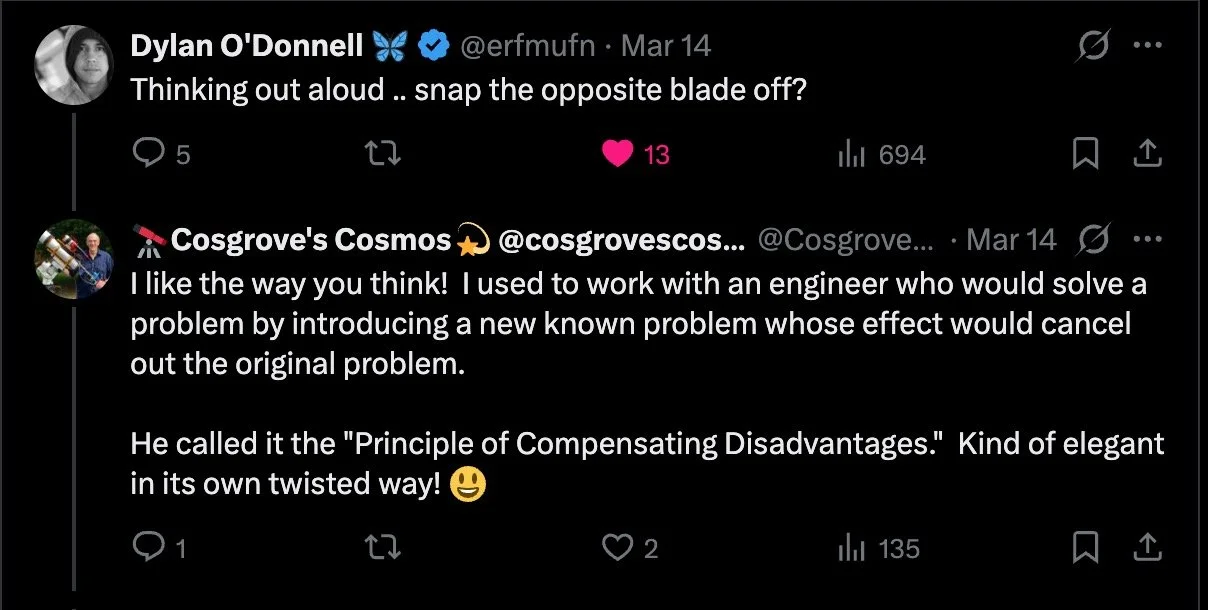
That’s one way to fix this problem!
First - I wanted to thank everyone who replied to my post. One thing I love about the Astrophotography Community is its willingness to help and share information with folks that they don’t even know. I love that!
Second, it points out that I was looking for a quick fix and not thinking more strategically.
So let me share a bit about what I learned.
A Summary of Fan Info
Let me start with that discussion thread on this topic in CloudyNights.
Some of this addressed replacing failed fans, and some dealt with concerns about fans causing vibration and image degradation.
You should read through this yourself, HERE, but I have tried to summarize the discussion below:
A long-running Cloudy Nights discussion on ASI2600/6200 fan vibration suggests the issue is real on some cameras, especially at longer focal lengths, but not universal. The practical takeaway is that the fix is often mechanical rather than mysterious.
- Observed problem – Several users reported elongated stars with the fan running and noticeably rounder stars with the fan disconnected.
- Isolation hardware – Silicone anti-vibration mounts were one of the first remedies tried, with the goal of reducing how much vibration reached the camera body.
- Aftermarket fan testing – Early comparisons suggested the stock Sunon fan had the most vibration, while smoother low-vibration replacements such as the Fractal fan were promising despite somewhat lower airflow.
- Simple replacement path – One of the clearest success reports came from installing a new ZWO replacement fan with fresh screws, washers, and O-rings, then tightening it firmly.
- Mounting matters – The thread suggests that fan mounting hardware can matter as much as the fan itself. Some users got the best result from snug mounting with O-rings rather than a loose “floating” install.
- Important caution – Not every star-shape problem is fan vibration. If elongation is radial or tangential in the corners, backfocus or collimation may be the real issue.
- Late-thread workaround – A no-disassembly mass-loading approach using tightly clamped lead tape was also suggested, though it appears less proven than fan replacement or improved mounting.
Bottom line: the thread points to three sensible steps—confirm it is really vibration, improve the mounting hardware, and replace the fan if needed.
Fan Replacement Options for 50 × 50 × 10mm Fans
Here is a summary of possible replacement fans - of course, this should be valid for 4-3-26, but may change over time.
If you want the safest direct-fit option, buy the ZWO FAN50. If you want the closest OEM-like match, look at the Sunon or Same Sky models. If you want a quieter aftermarket option, the XS-2 is potentially a better compromise.
Ranked by fit confidence, source quality, and closeness to the likely original Sunon-style fan used in some ZWO cooled cameras.
| Fan | Verified Specs | Price | Use Case | Source |
|---|---|---|---|---|
|
ZWO FAN50 Direct replacement |
50 mm replacement fan for ASI2600 / ASI6200 / ASI2400. Retail pages confirm compatibility, but do not publish airflow, RPM, or noise specs. |
$15.00 | Safest fit |
Agena High Point |
|
Sunon MF50101V2-1000U-A99 Likely OEM-style reference |
12 V, 50×50×10, 11.0 CFM, 4800 RPM, 25.6 dBA, 0.050 A, 0.6 W, 2-wire | $6.06 | Closest OEM-like match | DigiKey |
| Same Sky CFM-5010V-143-260 | 12 V, 50×50×10, 11.0 CFM, 4700 RPM, 25.6 dBA, 0.080 A, 0.96 W, 2-wire | $6.06 | Strong paper match | DigiKey |
| Noiseblocker XS-2 | 12 V, 50×50×10, 4000 RPM, 8.89 CFM, 21.1 dBA, 3-pin | $10.95 | Quiet aftermarket compromise |
MITXPC Amazon |
| Fractal Silent Series R3 50 mm | 12 V, 50×50×10, 3500 RPM, 6.8 CFM, 19.0 dBA, 0.05 A, 0.4 W, 3-pin | $8.99 | Quiet, lower airflow |
Fractal Amazon |
| Noiseblocker XS-1 | 12 V, 50×50×10, 3000 RPM, 6.77 CFM, 16 dBA, 3-pin | $10.95 | Quietest, biggest airflow drop | MITXPC |
|
Sunon MF50101V2-1000C-A99 OEM-class Sunon option |
12 V, 50×50×10, 4800 RPM ±15%, 11.0 CFM, 0.11 in-H₂O, 25.6 dBA, 50 mA rated, 58 mA max, 0.60 W rated, 0.70 W max, 2-wire, Vapo bearing, 60,000 hr life | $25.00 | OEM-class performance |
eBay Amazon |
- Noctua NA-SAV3 – Silicone anti-vibration mounts used to decouple the fan from the camera body.
- Noctua NA-SAV3 on Amazon
- Silicone O-rings – The Cloudy Nights thread discusses the stock red/orange isolating O-rings and references ZWO’s “7×2 O-ring x4” diagram; later posters also report some cameras and replacement kits arriving with more than one O-ring per screw point.
Noctua fans are worth acknowledging because they are popular in smaller 40×40 mm camera swaps. In the Cloudy Nights thread, they are referenced for cameras such as the ASI1600, but that is a different form factor than the 50×50×10 fans used in the ASI2600/6200 class.
For readers working on smaller cameras, the commonly referenced Noctua option is the Noctua NF-A4x10 FLX, a 40×40×10 mm fan. It is included here only as a related note, not as a 50 mm replacement candidate.
Practical reading: ZWO FAN50 is the safest direct-fit choice. Sunon and Same Sky are the closest OEM-style performance matches. XS-2 is the best quiet aftermarket compromise. Mounting hardware matters: the thread repeatedly points to silicone posts and O-rings as part of the fix, not just the fan itself.
The Direct Replacement Fans Arrive
I was out of town for a little over a week, and once I got back and picked up my mail, I found the eBay order with the two fans. These were delivered within the promised time frame, and I have no complaint there. The fans looked identical to the one I removed from the camera. So I plan to replace the current fan, since it moves less air.
My plan is to mount the new fan, and once we get clear skies (assuming that ever happens), I will do a test with the fan on and fan off and look for any evidence of image degradation.

The new replacement fans arrive!
Exact duplicated for original fan!
What I Would Do Now
If I were replacing this fan today, I would start with the ZWO FAN50 replacement. It is the most straightforward path; it is intended for these cameras, and it avoids turning a simple repair into a science project.
If I wanted to experiment with quieter or potentially lower-vibration alternatives, the Noiseblocker XS-2 would be one of the more interesting options to consider. But that route makes more sense for someone willing to accept a little more uncertainty around airflow, fit, and wiring.
Either way, I would not treat the fan alone as the whole answer. The mounting hardware matters. O-rings, isolation posts, and how firmly the fan is installed all play a role in whether the final result is smooth and quiet or still prone to vibration.
For now, I am using the existing O-rings - but this will be one area of further modification if my testing shows any vibration issue.
Updates and Conclusions
Once I install and test the new fan, I will update this post with my results.
As of now, I feel more educated about camera fans and better able to deal with issues with them as I go forward. Given that I run four cooled cameras, I expect to deal with this again someday!
And once again, thanks to the broader community for sharing their input and helping to rescue me from my idiocy!