
The Telescope Platform Card Builder
March 6, 2026
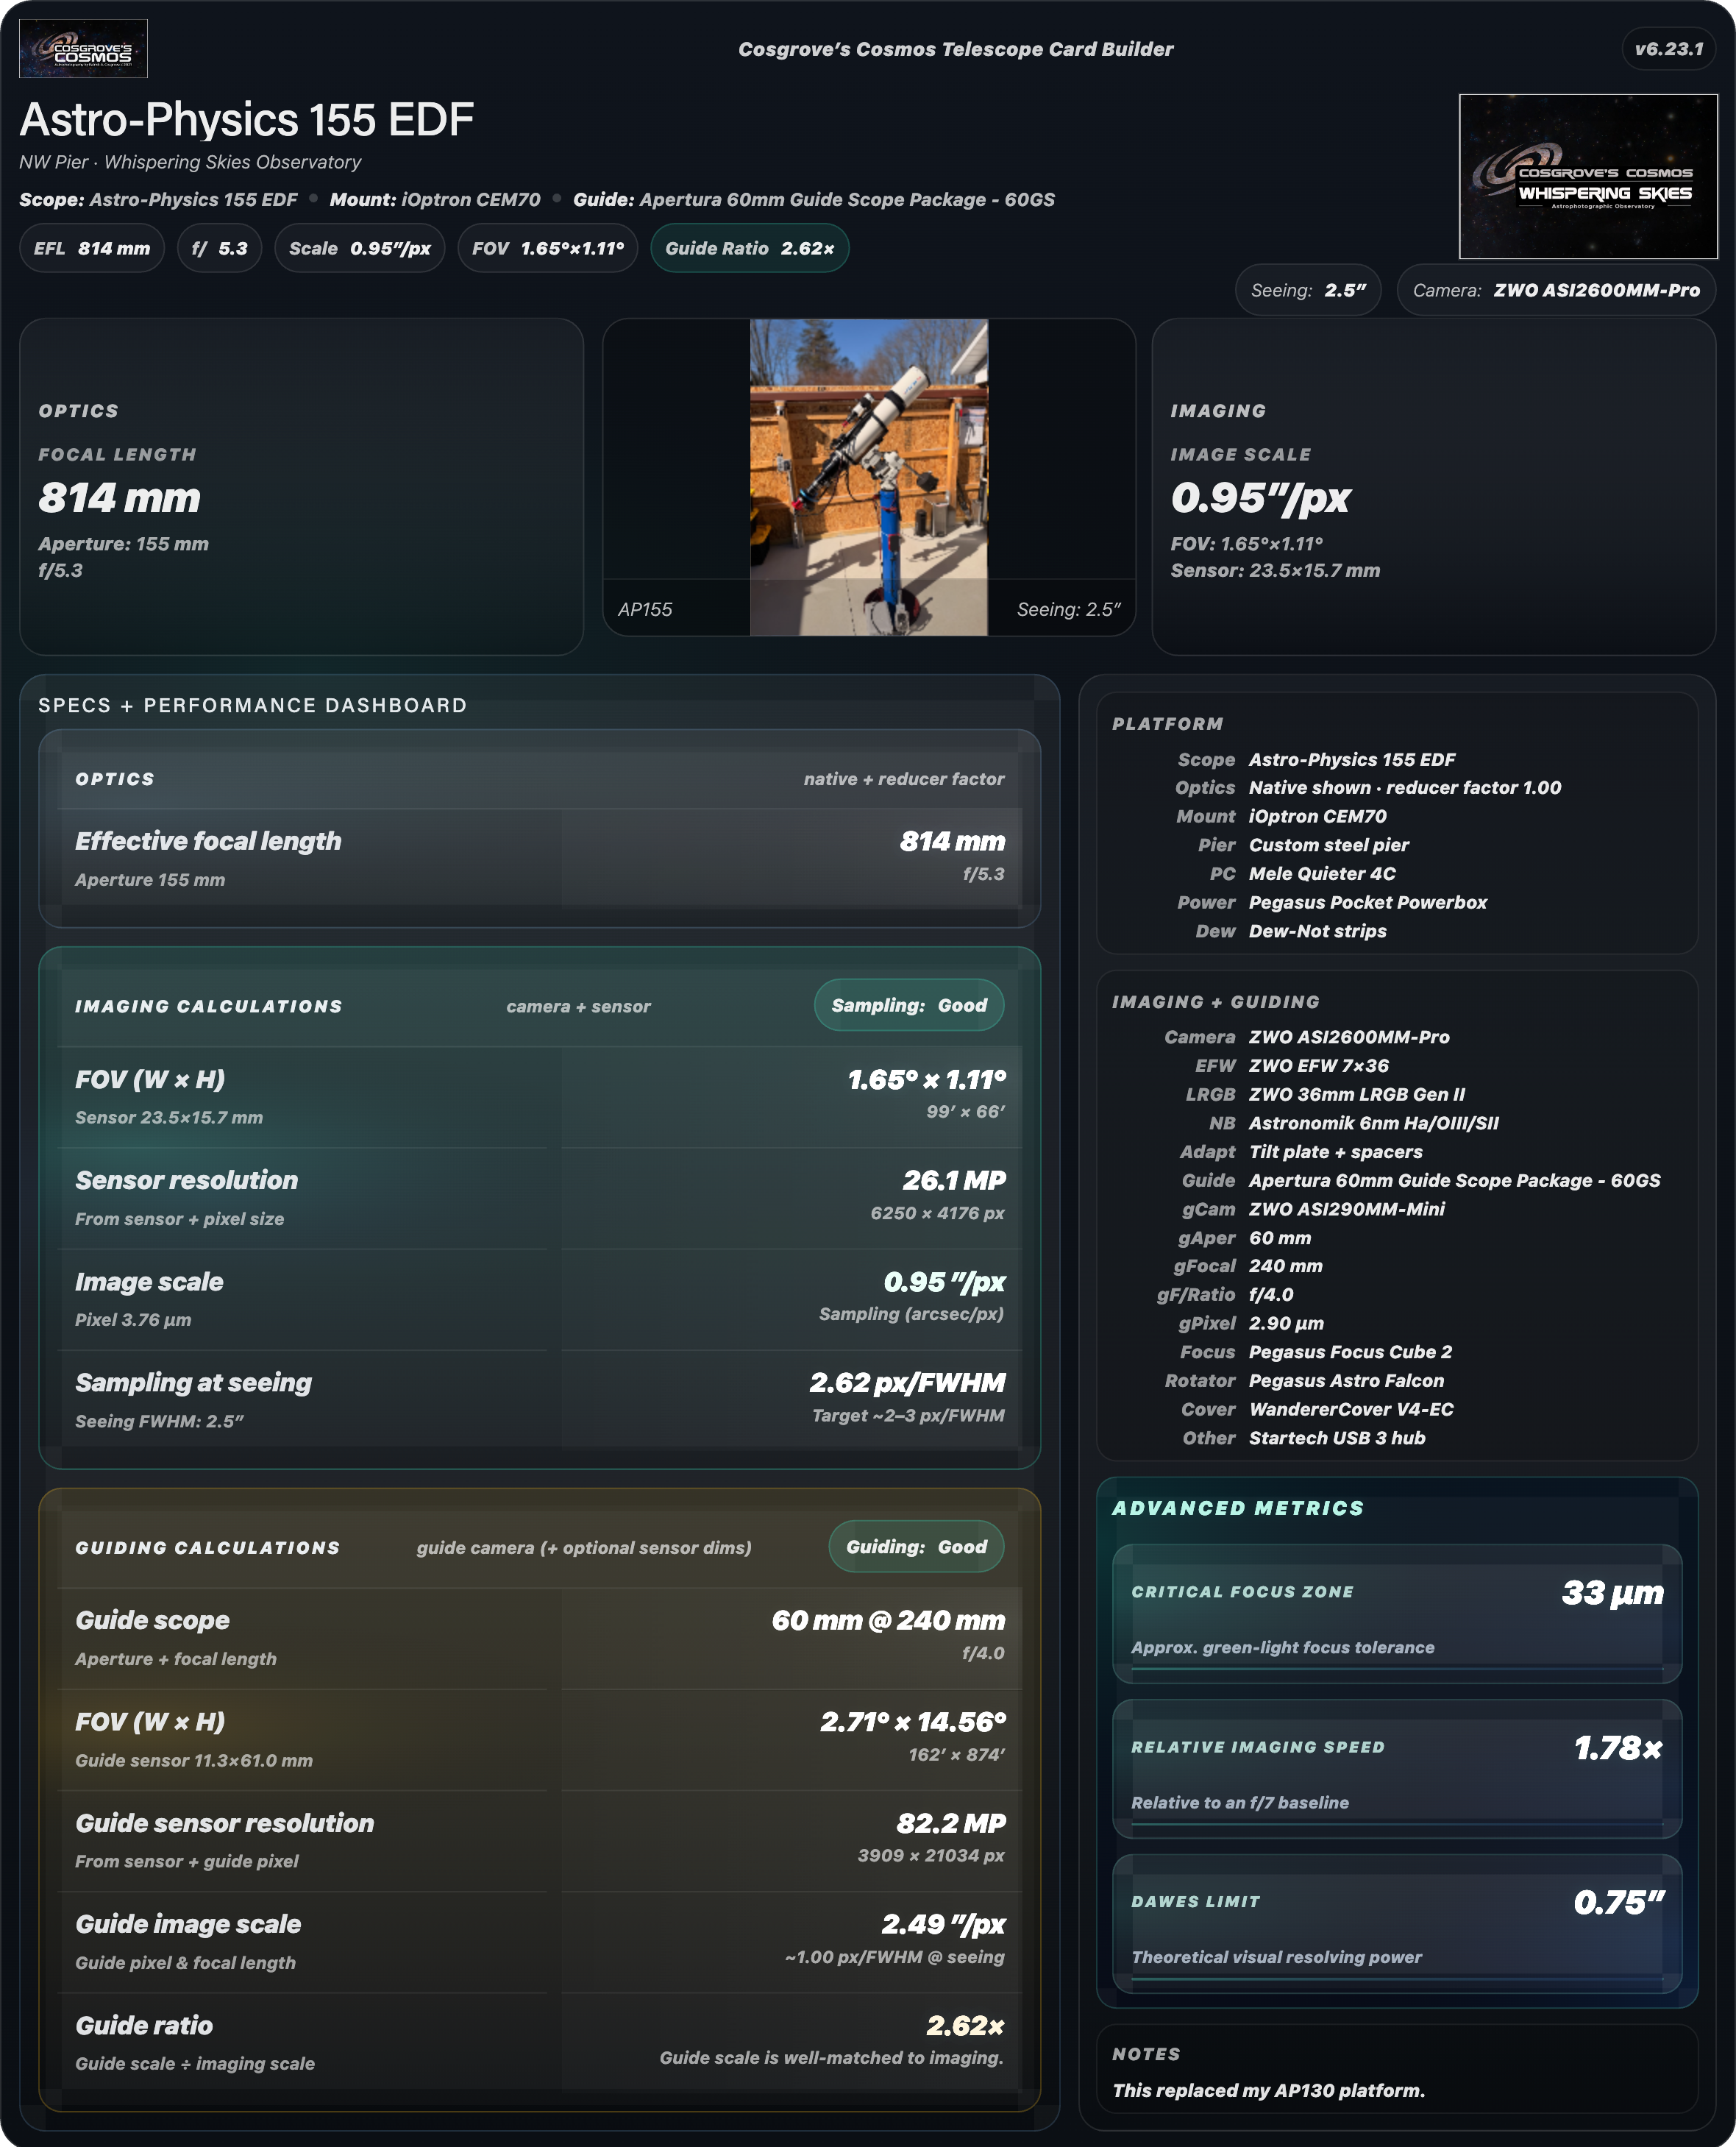
Here is an example card for my AP155 Platform..
Table of Contents Show (Click on lines to navigate)
Viewing note
This builder is usable on smaller screens, but the full layout is easiest to view and work with on a desktop or laptop display.
Introduction
If you spend much time in astrophotography, you already know how quickly the details of an imaging platform add up. Telescope, reducer, focal length, camera, sensor size, guiding setup, control hardware, accessories, image scale, field of view, sampling at seeing… it is a lot to keep organized.
I created this builder to solve that problem.
The Telescope Platform Card Builder lets you create a polished summary card for an imaging rig by combining platform specifications, supporting gear, uploaded images, and automatically computed values into a single downloadable PNG. The result is more than a simple equipment list. It is a visual platform profile that shows not only what the rig is, but how it performs.
That is what makes this tool different from a basic spec table.
How It Works
Enter the details of your telescope platform
Upload a hero image and optional logo if desired
Review the live preview and download the finished card as a PNG
Before You Begin
This builder works best on a desktop or laptop screen, where the full layout is easiest to view.
Saved rigs and uploaded images are stored locally in your browser on the device you are using. They are not uploaded to my website.
Now, on to the builder.
Why Use It?
This builder is useful if you want to:
Document your telescope platforms in a consistent way
Compare rigs based on both specifications and computed performance
Create attractive platform summaries for a website, article, presentation, or social post
Save multiple rigs locally in your browser and come back to them later
Generate a clean visual summary without building the graphic manually
What the Finished Card Includes
A completed card can include:
telescope and reducer information
focal length, aperture, and focal ratio
camera and sensor details
field of view and image scale calculations
sampling and guiding metrics
mount, control, and support hardware
accessories and notes
a platform image and optional logo
advanced derived values for a more complete technical snapshot
The Builder Screen
The builder lets you create a platform card by entering the key details of your imaging setup and watching the live preview update as you go.
The more complete the information you provide, the more useful and polished the finished card will be. You can keep it simple with the basics, or build out a much more complete technical profile, including optics, camera, guiding, accessories, and computed performance values.
You can also upload a hero image for the platform and an optional logo to personalize the final result.
If you plan to create more than one rig, the builder allows you to save named platform profiles locally in your browser and reload them later. JSON export and import are also available if you want to back up your work or move profiles between systems.
When you are satisfied with the layout, you can download the finished platform card as a PNG.
Quick Start
If this is your first time using the tool, here is the easiest way to get going:
Enter the core platform details first
Start with the platform title, telescope, focal length, aperture, camera, and mount.
Add a hero image and optional logo
A good platform image makes the final card much more visually compelling.
Fill in the supporting details.
Add reducer information, sensor size, guiding setup, accessories, control hardware, and notes as needed.
Review the computed values
The builder automatically calculates key values such as focal ratio, image scale, field of view, sampling at seeing, and guiding relationships.
Save your rig locally
If you may want to revisit the build later, save it before leaving the page.
Download the finished card
When the preview looks right, export the card as a PNG.
How Saving Works
This builder stores saved rigs locally in your browser on the device you are using right now. In other words, when you click Save, the rig is not being sent to my website or stored in some online account. It stays local to that browser.
That is convenient, because it means you can save a rig, come back later, make changes, and continue where you left off. But it also means those saved rigs are tied to that browser and device.
A few practical consequences follow from that:
If you switch to a different browser, your saved rigs will not be there.
If you move to a different computer or tablet, your saved rigs will not be there unless you exported them first.
If you clear browser storage or use private/incognito mode, you may lose what was saved locally.
Uploaded images work the same way. The hero image and logo are stored locally in your browser for convenience, but they are not included in the JSON export file.
Why JSON Export / Import is there
The Export JSON button lets you save the rig’s field values to a file. Think of it as a backup or transfer file for the rig definition itself.
That is useful if you want to:
Keep a backup copy of your rigs
Move rig definitions to another browser or computer
Share a rig definition with someone else
Protect yourself against losing browser-stored data
The Import JSON button restores those saved field values back into the builder.
One important limitation: the JSON file contains the field data, but not the uploaded images. If you import a rig on another browser or computer, you will need to upload the hero image and logo again.
The short version is this:
Save is for convenience in the current browser.
Export JSON is for backup and portability.
A Few Practical Tips
Best results usually come from accurately filling in the core optical and camera data.
Hero images with clean framing tend to work better than busy snapshots.
If the image does not sit well in the preview, try a different fit mode.
Saved rigs and uploaded images remain local to your browser on that device.
How the Computations are Done
How the Calculations Are Computed
One of the more useful aspects of this builder is that it does more than assemble an equipment list. It also calculates several values that help describe how a platform will actually perform. These are standard working formulae commonly used by astrophotographers. The intent here is not to bury the user in math, but to make the technical logic behind the card transparent.
Effective Focal Length
If a reducer or Barlow factor is entered, the builder applies that factor to the native telescope focal length to determine the effective focal length used throughout the card.
Effective Focal Ratio
The effective focal ratio is computed from the effective focal length and the telescope aperture.
Main Imaging Scale
Image scale is reported in arcseconds per pixel and is based on imaging-camera pixel size and effective focal length.
Field of View
Horizontal and vertical field of view are computed from the sensor dimensions and effective focal length.
Guide Scale
Guide scale is computed the same way as the main imaging scale, but uses guide-camera pixel size and guide-scope focal length.
Guide Ratio
Guide ratio compares guide scale to imaging scale. It gives a quick indication of how closely the guiding system is matched to the main imaging train.
Sampling at Seeing
Sampling at seeing estimates how many pixels span the seeing disk based on the entered seeing value and the computed main image scale.
Relative Imaging Speed
Relative imaging speed compares the effective focal ratio of the system to a reference focal ratio. In this builder, the comparison is made against f/7.
Critical Focus Zone (Approx.)
Critical Focus Zone is an approximate measure of the allowable focus tolerance. A commonly used estimate is:
Dawes Limit
Dawes Limit is a classic approximation for the theoretical resolving power of a telescope based on aperture.
Interpretation
These values are best thought of as working astrophotography metrics. They are highly useful for comparing rigs, evaluating sensor and focal-length pairings, and building a concise technical summary of a platform. Real-world performance will still depend on seeing, tracking, optical quality, focus, collimation, spacing accuracy, and processing choices.
Variable Definitions
- F_native = native telescope focal length (mm)
- F_eff = effective focal length after reducer/Barlow (mm)
- A = telescope aperture (mm)
- R = reducer or Barlow factor
- P_main = main camera pixel size (microns)
- P_guide = guide camera pixel size (microns)
- F_guide = guide scope focal length (mm)
- SensorWidth, SensorHeight = imaging sensor dimensions (mm)
- Seeing = seeing FWHM (arcseconds)
- λ = wavelength used for CFZ estimate (microns)
Why I Built This
I originally built this for my own website, where I wanted a cleaner and more visually compelling way to present the telescope platforms I actually use.
As the idea evolved, it became clear that this was not just a problem unique to me. Many astrophotographers have multiple rigs, changing configurations, and more technical detail than fits comfortably into a simple equipment list.
What I wanted was a way to bring those details together into a format that was information-dense, visually polished, and easy to share. This builder is the result.
Notes on Use
This builder is intended as a practical platform summary tool. It is designed to help organize equipment details, compare rigs, and create an attractive visual reference for a telescope platform.
As with any technical summary, the results are only as good as the information entered. Small differences in spacing, reducers, actual operating focal length, seeing conditions, or guiding performance can affect real-world results.
For that reason, the output should be viewed as a useful working profile rather than a strict engineering document. It is excellent for planning, documentation, sharing, and side-by-side comparison, but it should not be mistaken for a substitute for real field experience with a given setup.
Final Thoughts
I created this tool because I wanted a better way to present my own imaging platforms than a basic list of specifications or a static table.
What I wanted was a single clean summary card that combined the rig's technical details, computed performance values, and visual identity. Once that idea took shape, it seemed worth developing into a builder that other astrophotographers might find useful as well.
I hope that this tool makes it easier to document your own platforms, compare different rigs, and create a clear visual summary of the equipment you use.
If it proves useful to you, then it has done its job.
Feedback and Suggestions
Any feedback or suggestions you might have for improving the tool can be sent here: Contact@CosgrovesCosmos.com