
SH2-170, The “Little Rosette” Nebula in SHO - 7 hours.
Date: November 19, 2021
Cosgrove’s Cosmos Catalog ➤#0088
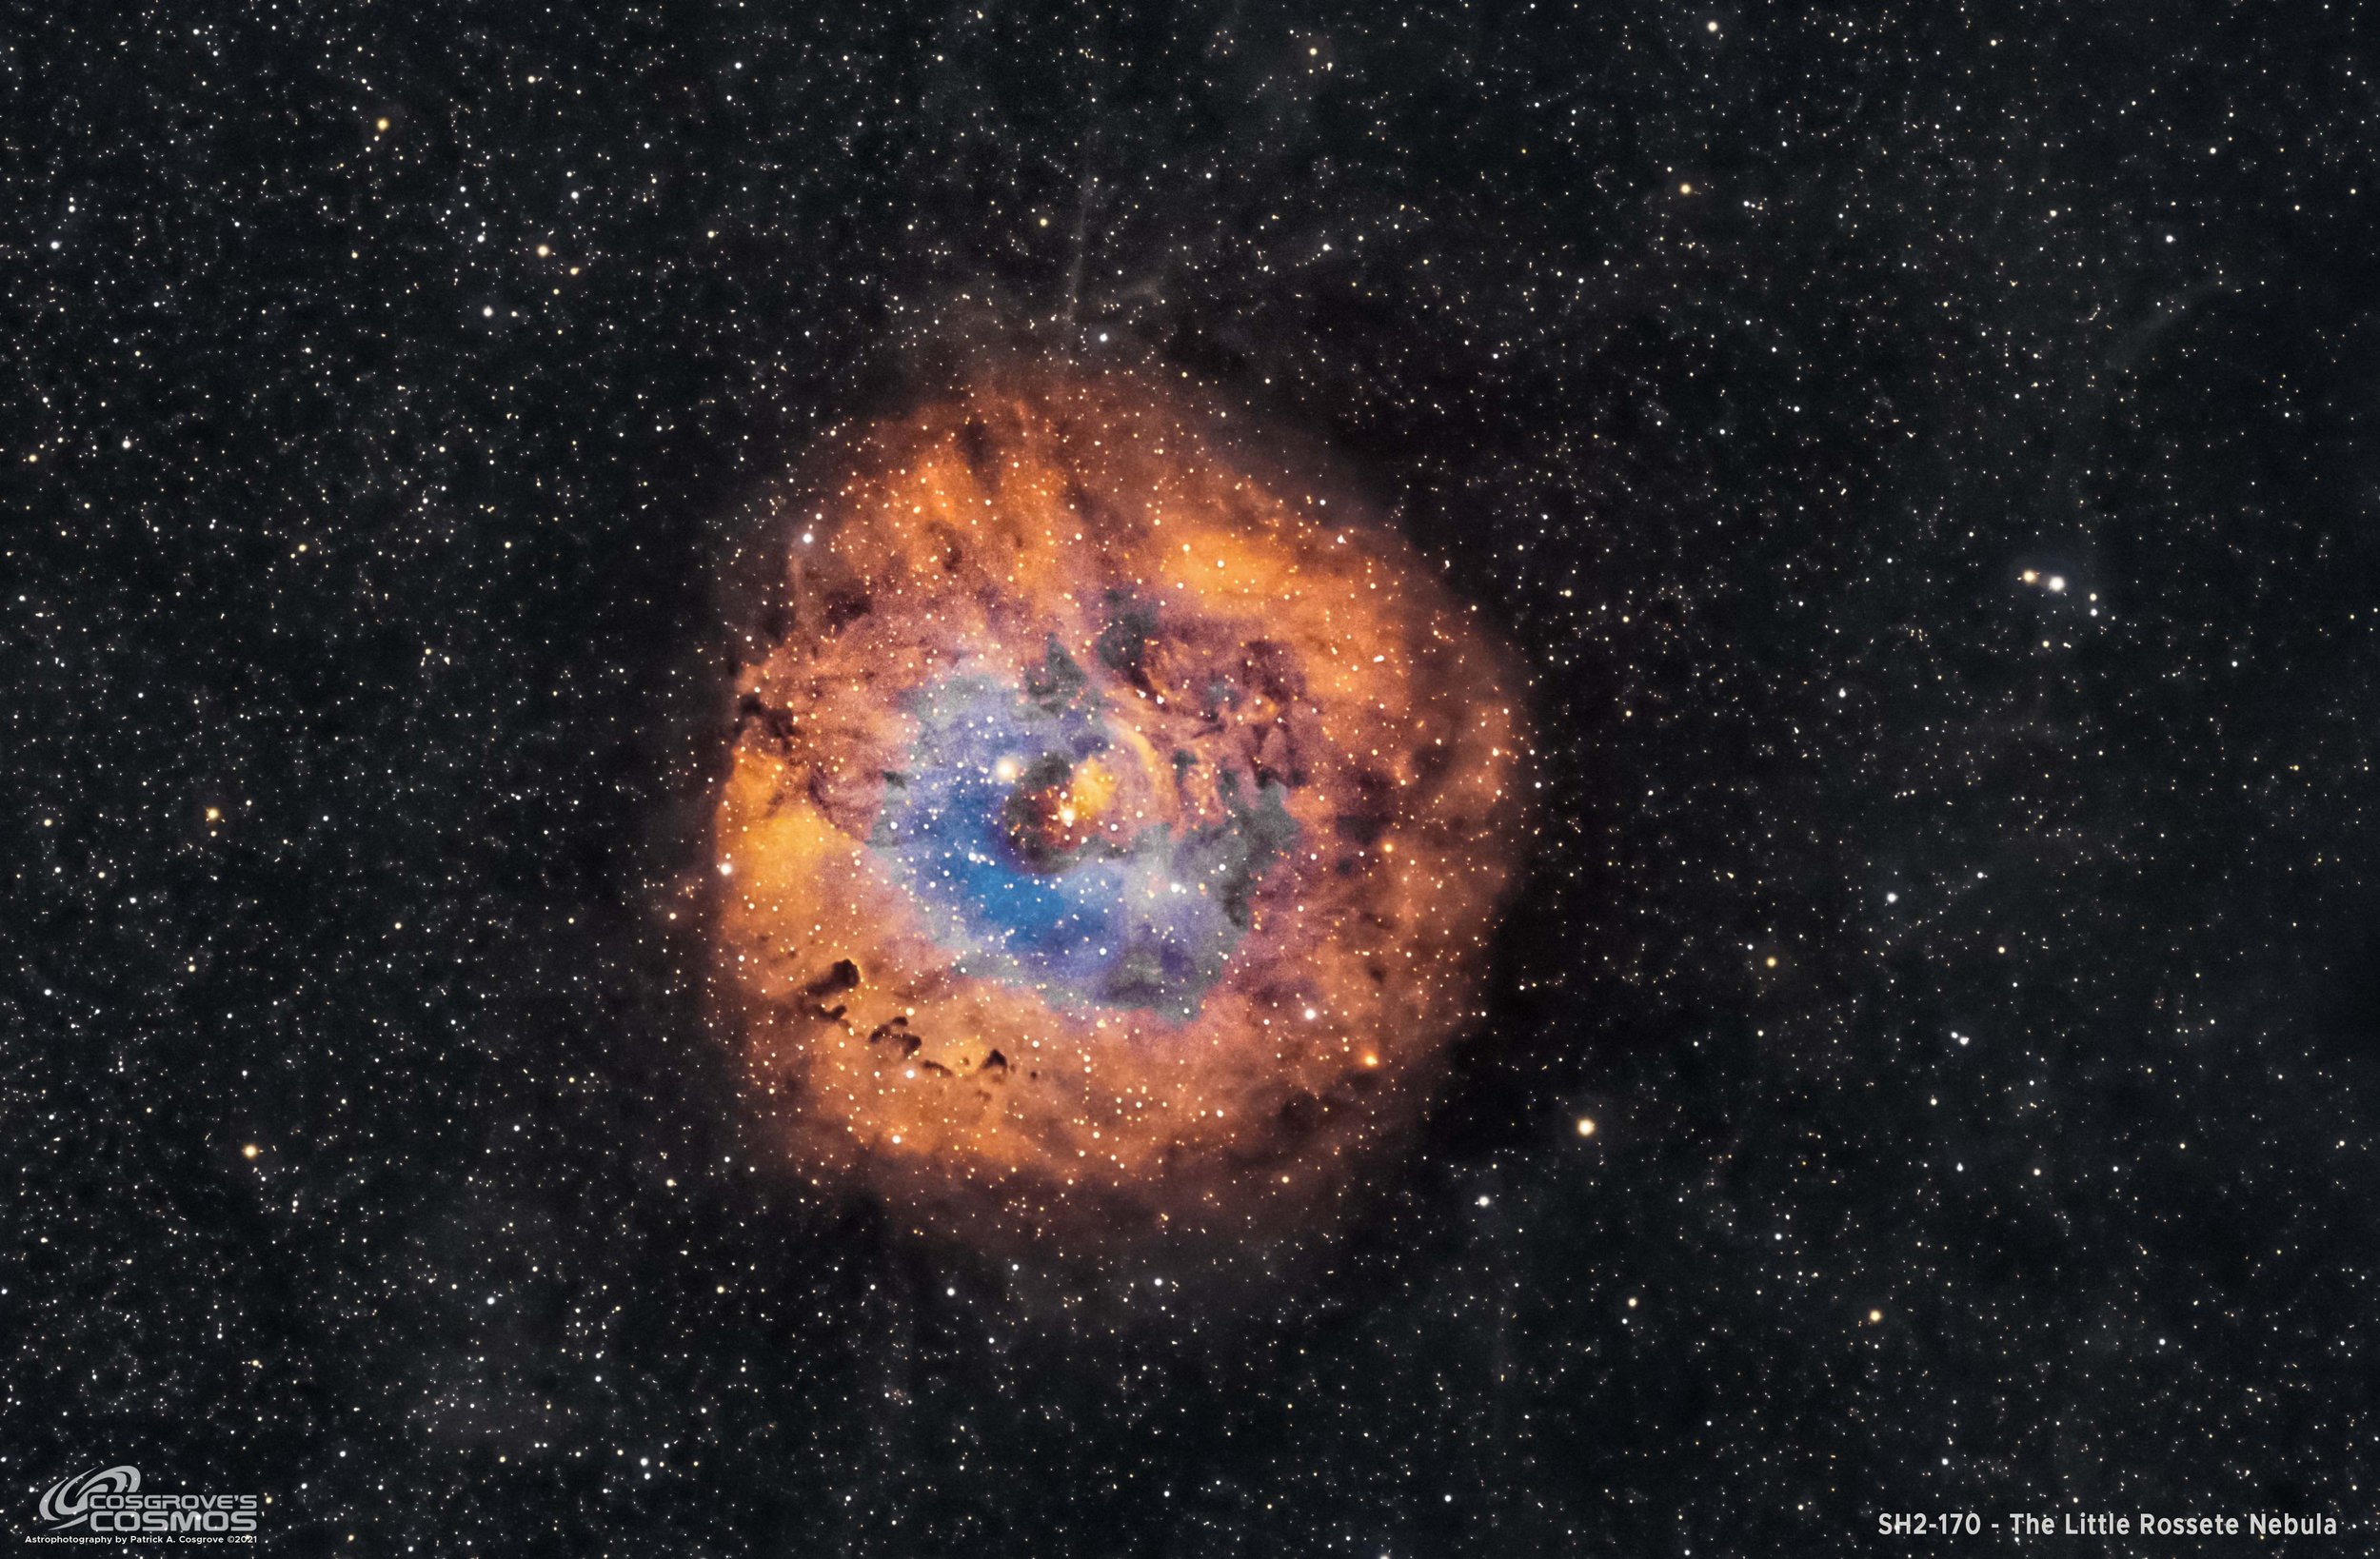
SH2-170, The Little Rosette Nebula. (click to image for full resolution via Astrobin.com)
Published in Sky & Telescope Magazine!
This image was featured in the Gallery Section of the June 2022 Issue! This was my second image in three months to be published! Thanks, Sky & Telescope!
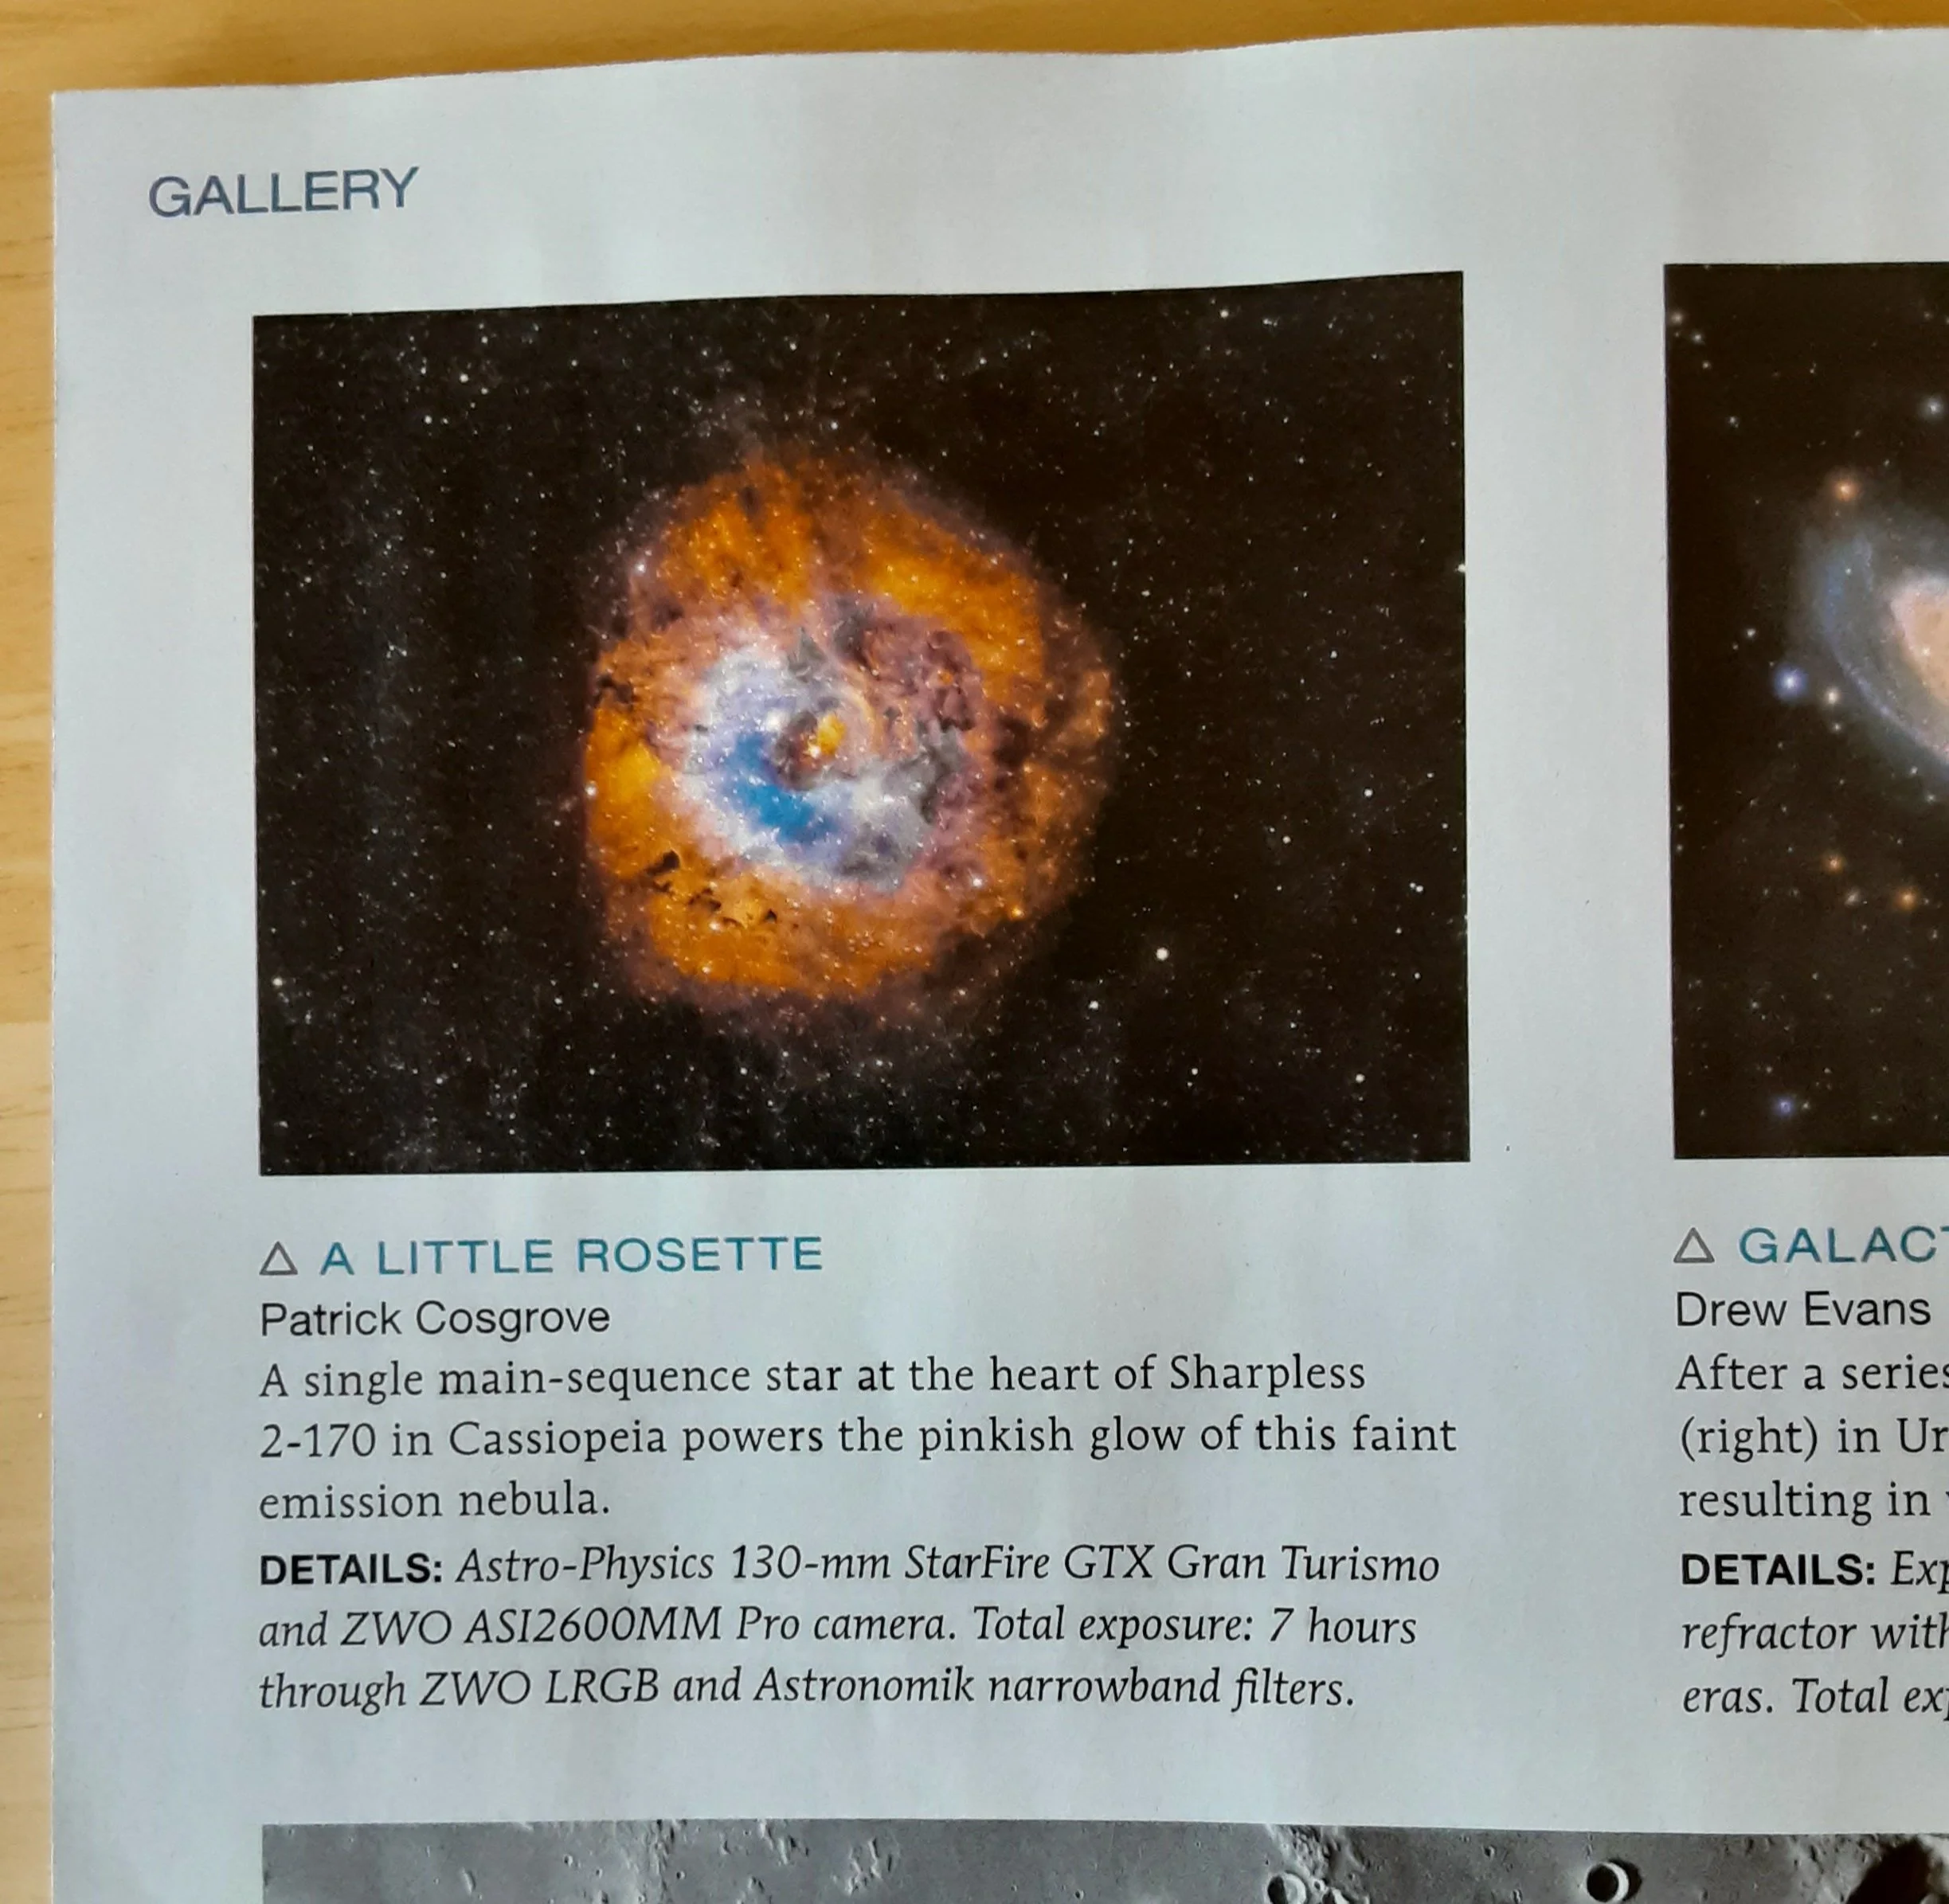
It’s always nice getting an image published!
Table of Contents Show (Click on lines to navigate)
About the Target
SH2-170, also known as the "Little Rosette" Nebula, is an H2 region located in the constellation of Cassiopeia. This region of gas and dust is located about 7500-light years away in the Perseus arm of our Milky Way galaxy.
The bright star at the nebula's center ionizes the surrounding hydrogen gas and causes it to glow. The nebula takes the form of a ring similar to the Rosette Nebula is 2/3rds the size of the full moon. While it is not small in size, it is a very faint and relatively unknown object.
While most of its light comes from ionized hydrogen, it also contains Oxygen and Sulfur gases which are also ionized and glowing. This fact makes it a good target for narrowband imaging, and the separate Ha, OIII, and SII images show the distribution of these molecules in the region.
There is also a significant level of dark dust mixed in with the gas, and dark knots and filaments can be seen throughout.
The Annotated Image
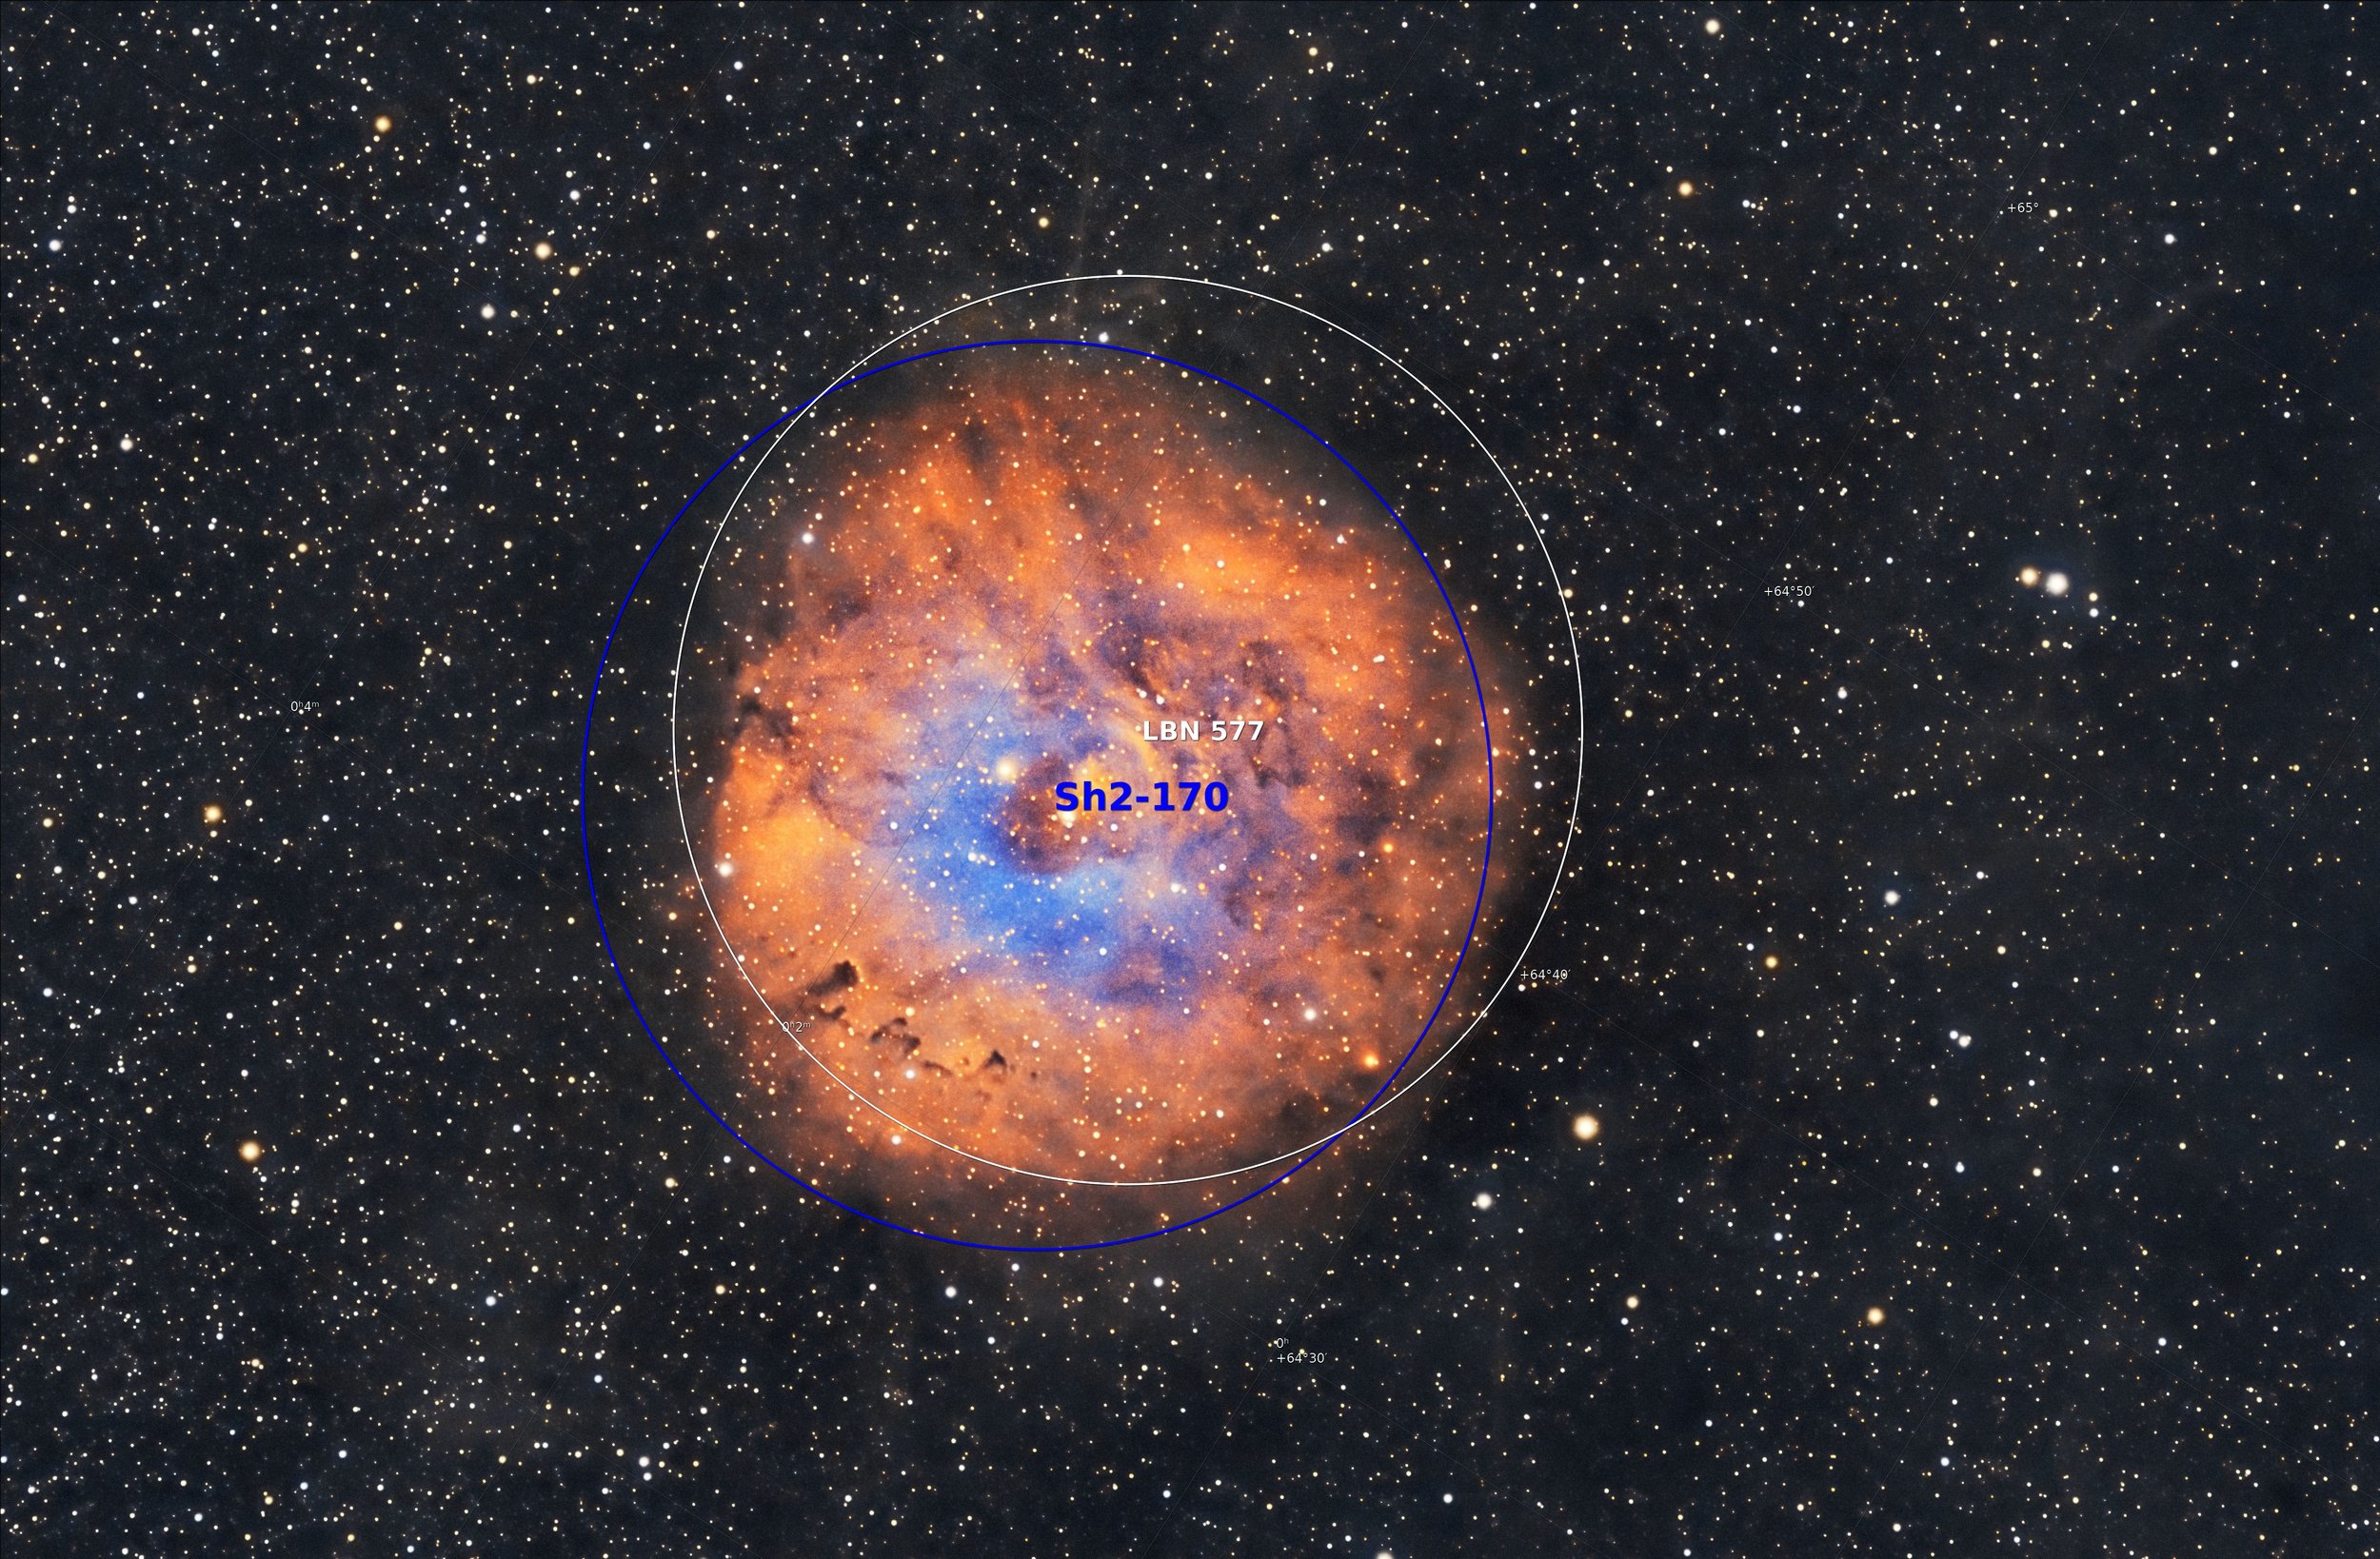
This annotated version of SH2-170 was created with Pixinsight ImageSolve and AnnotateImage scripts.
The Location in the Sky

IAU/Sky & Telescope Constellation Map for Cassiopeia - SH2-170 is indicated with the yellow arrow.
About the Project
November is typically a miserable month for astrophotography here in Western New York.
But not this November!
We had almost four clear moonless nights in a row - starting on November 5 and going through November 8th! The last night things began to deteriorate around 3 am, but since captures started around 7 pm that provided a full with hours of useful access to the sky. Simply amazing!
This is the second image I have processed from that what was captured at that time.
Target Selection
SH2-170 is a northern circumpolar object, meaning that it never sets below the horizon. Because of all of the trees I have on my property, I can only reach this part of the sky during the fall when it is riding highest in the sky. Even then, it is only exposed through the trees for about two hours a night. So I ended capturing about 2 hours a night for all four nights.
I shot this with the AP130 platform using the new ZWO ASI2600MM-Pro camera. Why this platform? Well - to fill a hole. I used this platform to shoot NGC 7293, the Helix Nebula, and NGC 1499, the California Nebula. Unfortunately, the Helix is very low to the south, and I could only capture it starting soon after dark and going for about 2 hours before it too sank behind the trees around 9:40 pm.
On the other hand, the California Nebula did not rise above the trees until about 12:30 am. So I had this hole in my shooting schedule between 9:40 pm and 12:30 am - and it turns out that SH2-170 slotted right in there just fine, as it became available from 9:30 pm to 12:15 am!
Sometimes a target choice is just something interesting that fits into a schedule!
Image Processing Discussion
Looking at the subs as they were coming in, I saw that there was a very strong Ha signal and very little O3 or S2 signal. This observation caused me to load up on Ha subs and cut back on O3 and S2 subs. This turned out to be a mistake. After stacking, it was evident that there was indeed a reasonable O3 and S2 image - but since I under-sampled them, it was clear that I was going to have to be aggressive in handling noise as I processed this image.
It was also evident that my master images were showing some signs of IFN - thus far I have not seen this in my other images.
What is IFN?
IFN stands for "Integrated Flux Nebula", and it is an extremely faint glow caused by the combined light of the stars of the Milky Way reflected by interstellar gas and dust. It’s most easily seen in images far away from the plane of the Milky Way.
Of course, since I am imaging towards the north, I am well away from the Milky Way and IFN is now becoming visible. A much deeper exposure would have shown this better but after four nights and culling frames that were impacted by passing clouds, I only had about 7 hours of total data. Even still, this is a first for me and if you look carefully at the starfield in the image you can see subtle details of the IFN.
It does appear a bit "smeared" out. Since I had to be aggressive with noise reduction, I assumed that I had lost some fine detail that is typically seen in IFN. There was a lot of background noise - especially in the O3 and S2 images. I thought that perhaps I was too heavy-handed in this case.
However - I went back and looked at the master images before any noise reduction was applied and it looked pretty much the same - sort of smeared look with no detail. So with this exposure, I was not capturing any filamentary detail that can often be seen in IFN.
This is why long integration cycles are so powerful. Lots of subs would have helped cut through the noise, brought out fine detail, and improved the overall image.
Image Processing Choices
This is also one of those images where you need to decide how you want to render the final image. I took a look at other samples of SH2-170 on Astrobin.com and you can see a wide variety of renderings that people have done working on this target. Some with low color, some with very high color. (Note: This is a super handy feature in Astrobin!)

Screen shot of Astrobin - showing samples of other images posted of SH2-170. Note the wide variety of color and false color treatments.
Being a high color guy, of course, my first choice was to do a version that was very high in contrast and color saturation - it practically leaped off the page.
When I shared this image with my local group it seemed as though I may have jumped the shark on this one, and taken things too far.
So I created a lower color version and I shared both with the Twitter #Astrophtography Community to get their feedback.

Here is the tweet I sent out asking for feedback…
I received a lot of responses to this. For most of the first day, the results were pretty much tied 50-50. One person indicated that they did not mind the orange coloration, but did not like the strong blue saturation. As the day came to a close the results were still close but slightly biased towards the lower color version.
Bottom Line - a lot of people preferred the high color versions and a lot of people - slightly more in this case - liked the lower color version. There is a lot of personal preference here.
Which do you like better?
Here is the “mid” color version (Click to enlarge)
Here is the high color version (click to enlarge)
I ended up going with the lower color version.
Why would I do that if I am typically a high color guy? I did it because, at the end of the day, I could see more detail in the less saturated version.
Image Critique
There are a lot of things that I like about this image. It’s an object that most folks are not familiar with. It's the first image that I have done that shows the IFN. It was actually quite enjoyable engaging with friends and the Twitter community and getting their reaction to this image. Finally - It’s an image that catches the eye and with its color and detail.
But there are things that I am just not happy about in this image. I really wish I had at least double the integration time on this image. I wish I had better balanced the exposures for O3 and S2.
I am pretty happy with the image, but I have to be realistic in its shortcomings. I can’t develop as an Astrophotographer if I don’t accept its shortcomings and take some learnings from it!
Image Processing Log
1. Blink Screening Process
All light images were reviewed with the Blink process.
Stars on all images were nice, round, and tight
Ha Images - 2 images were heavily obscured with clouds and were removed
O3 Images - all images looked good
S2 Image - 3 images were heavily obscured with clouds and were removed
Flat images
Found 3 Ha flats and S2 flats that were from aborted attempts where the exposure was not right. These were removed.
Flat Darks
All flat darks looked good
Darks
300-sec darks taken from the NGC 1499 project files, captured at the same time.
2. WBPP 2.3 Run
all frames loaded
setup for calibration only - no integration
Cosmetic Correction setup
Pedastal image of 50 used.
Subframe weighting: psf signal - this is a new feature of version 2.3
Run complete with no issues

This was the basic setup for WBPP.

The Post Process view shows the summary of frames used.
3. Image Integration
Run for each filter: Ha, O3, & S2
Winzorized sigma clipping with sigma low = 3.5, and Sigma high = 2.4
Psf signal used for weights
Check low and high large scale structure 2x2
This was used for all filters

4. Dynamic Background Extraction
was run on all images.
Subtraction used.
My standard sampling - see below.
O3 and S2 images have some gradients going from the outer edge and moving inwards. To better deal with this, I added sample points in those areas.
Ha Starting Linear image (click to enlarge)
O3 image - note gradients
(click to enlarge)
DBE Sampling Pattern (click to enlarge)
DBE sampling pattern for the O3 image - note the extra samples added. (click to enlarge)
After DBE Application (click to enlarge)
O3 after gradient fix (click to enlarge)
S2 image - note gradient on the sides. (click to enlarge)
S2 Image sampling (click to enlarge)
S2 after gradient fix. (click to enlarge)
5. Deconvolution Prep
For all images
Object mask created
A nonlinear version of the image was created using STF->HT
Use HT to clip blacks and push stars and nebula to white
Create Local protection images
Run StarMasks with layers = 6, all else default
Adjust star mask with HT to boost star size - move the middle arrow to the 25% point
Create PSF image with PSFImage Script.

Object Mask for Ha
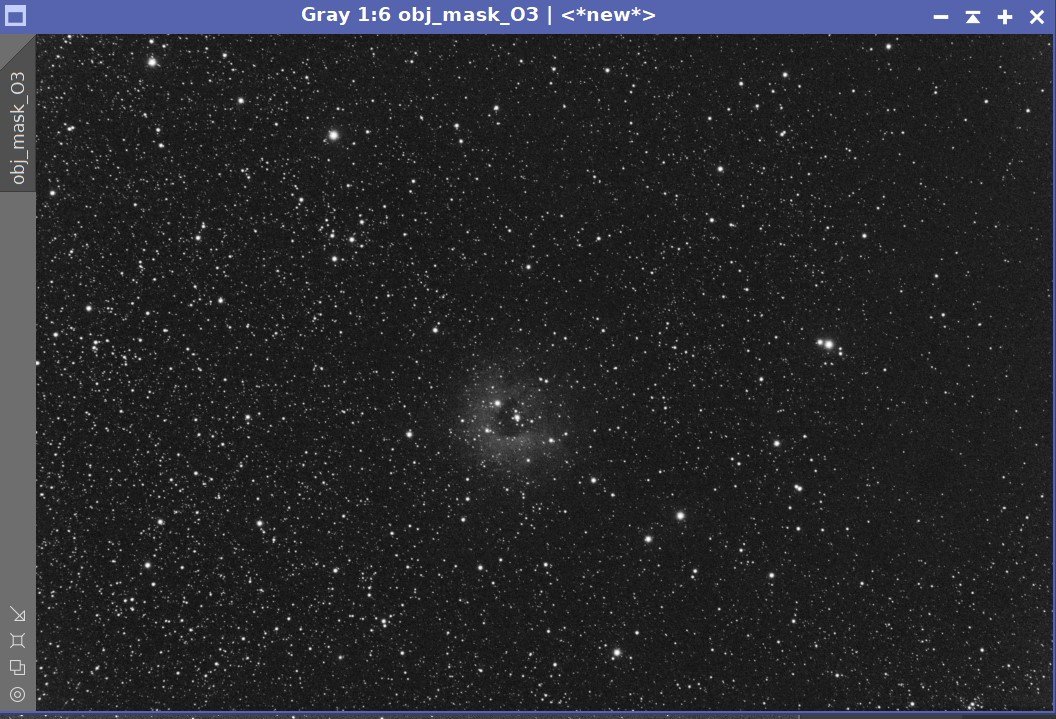
Object Mask for O3

Object Mask for S2

PSF image for Ha

PSF image for O3

PSF Image for S2
6. Apply Deconvolution
For all images:
Apply Object mask to the image
Set psf to the right one for the image
add the right local support image
Create 3 preview sections on the image
Test different global dark settings until optimal found
Ha - 0.003
O3 - 0.003
S2 - 0.005
7. Run a Light NR pass to take the “fizz” off each image.
Run EZ-Denoise script with default values on all images

This is a sample from the Ha image. The image has low noise but EZ-denoise shows clear improvements.

This sample is from the O3 image - the noise level here is much higher and EZ-Denoise does a good job cleaning it up

This sample is from the S2 image - the noise level here is much higher and EZ-Denoise does a good job cleaning it up
8. Create Nonlinear Versions of the Images
For each image
Use STF->HT method, tweek to get good blacks, and adjust nebula by eye

Nonlinear images: Ha, O3 and S2
9. Create Color Image
Run Chanel combination tool with new Nonlinear images to create the first color image.
10. Initial Process of the Color Images
Use SCNR to remove the Green from the initial Image
Invert the Image, run SCNR again to remove green, and then Invert the image back. This removes residual magenta tones.
Use CT to tweak tone scale and saturation
Create a blue mask using the ColorMask script - removing 1 layer to blur. Use DynamicPaintBrush to eliminate areas from the mask that fall outside the nebula.
Apply mask to SHO image, and boost blue layer, drop green layer, and boost sat.
Create a yellow mask using the ColorMask script - removing 1 layer to blur. Use DynamicPaintBrush to eliminate areas from the mask that fall outside the nebula.
Apply mask to SHO image, and boost Red layer, adjust Blye layer, and boost sat.
Apply Local Histogram Equalization with a radius of 64, max contrast of 2.0, and amount of 0.10
Apply Local Histogram Equalization with a radius of 214, max contrast of 2.0, and amount of 0.42
The initial color image (click to enlarge)
Initial tone and sat adjustments (click to enlarge)
The blue mask used for blue adjustments (click to enlarge)
After Dark Structure Enhancement (click to enlarge)
After using SCNR (click to enlarge)
After Color Mask adjustments (click to enlarge)
The yellow mask used for blue adjustments (click to enlarge)
After Topaz Denoise, and crop. (click to enlarge)
12. Nonlinear Noise Reduction
Export to 16-bit tiff file
Use topaz denoise - back to PI
13. Enhance Dark Structures
run EnhanceDarkStructures Script with defaults
14. Crop Images
Run Crop to stress nebula with the same aspect ratio
15. Star Reduction
Run EZ-StarReduction using everything default and the Adam Block Method.
16. Save images as Tiff and Move to Photoshop
In Photoshop:
Use Camera Raw Filter to adjust Global Clarity, Texture, and Color Mix
Use StarShrink filter to reduce large stars radius 46, strength 6, sharpness -1
Use StarShrink filter to reduce small stars radius 3, strength 6, sharpness -1
Add watermarks
Export Clear, Watermarked, and Web-sized Jpegs.
Capture Details
Lights Frames
Taken the nights of November 5th-8th, 2021
38 x 300 seconds, bin 1x1 @ -15C, Gain 100.0, Astrodon 5nm Ha Filter
29 x 300 seconds, bin 1x1 @ -15C, Gain 100.0, Astrodon 5nm OIII Filter
17 x 300 seconds, bin 1x1 @ -15C, Gain 100.0, Astronmiks 6nm SII Filter
Total of 7.0 hours
Cal Frames
25 Darks at 300 seconds, bin 1x1, -15C, gain 100
25 Dark Flats at Flat exposure times, bin 1x1, -15C, gain 100
Flats darks
12 Ha Flats
12 OIII Flats
12 SII Flats
Capture Hardware
Scope: Astrophysics 130mm Starfire F/8.35 APO refractor
Guide Scope: Televue 76mm Doublet
Camera: ZWO AS2600mm-pro with ZWO 7x36 Filter wheel with ZWO LRGB filter set, Astrodon 5nm Ha & OIII, and Astronomiks 6nm SII Narrowband filter set
Guide Camera: ZWO ASI290Mini
Focus Motor: Pegasus Astro Focus Cube 2
Camera Rotator: Pegasus Astro Falcon
Mount: Ioptron CEM60
Polar Alignment: Polemaster camera
Software
Capture Software: PHD2 Guider, Sequence Generator Pro controller
Image Processing: Pixinsight, Photoshop - assisted by Coffee, extensive processing indecision and second-guessing, editor regret and much swearing…..
Adding the next generation ZWO ASI2600MM-Pro camera and ZWO EFW 7x36 II EFW to the platform…