
SH2-132 The Lion Nebula in SHO (8.33 hours)
Date: September 12, 2021
Cosgrove’s Cosmos Catalog ➤#0083

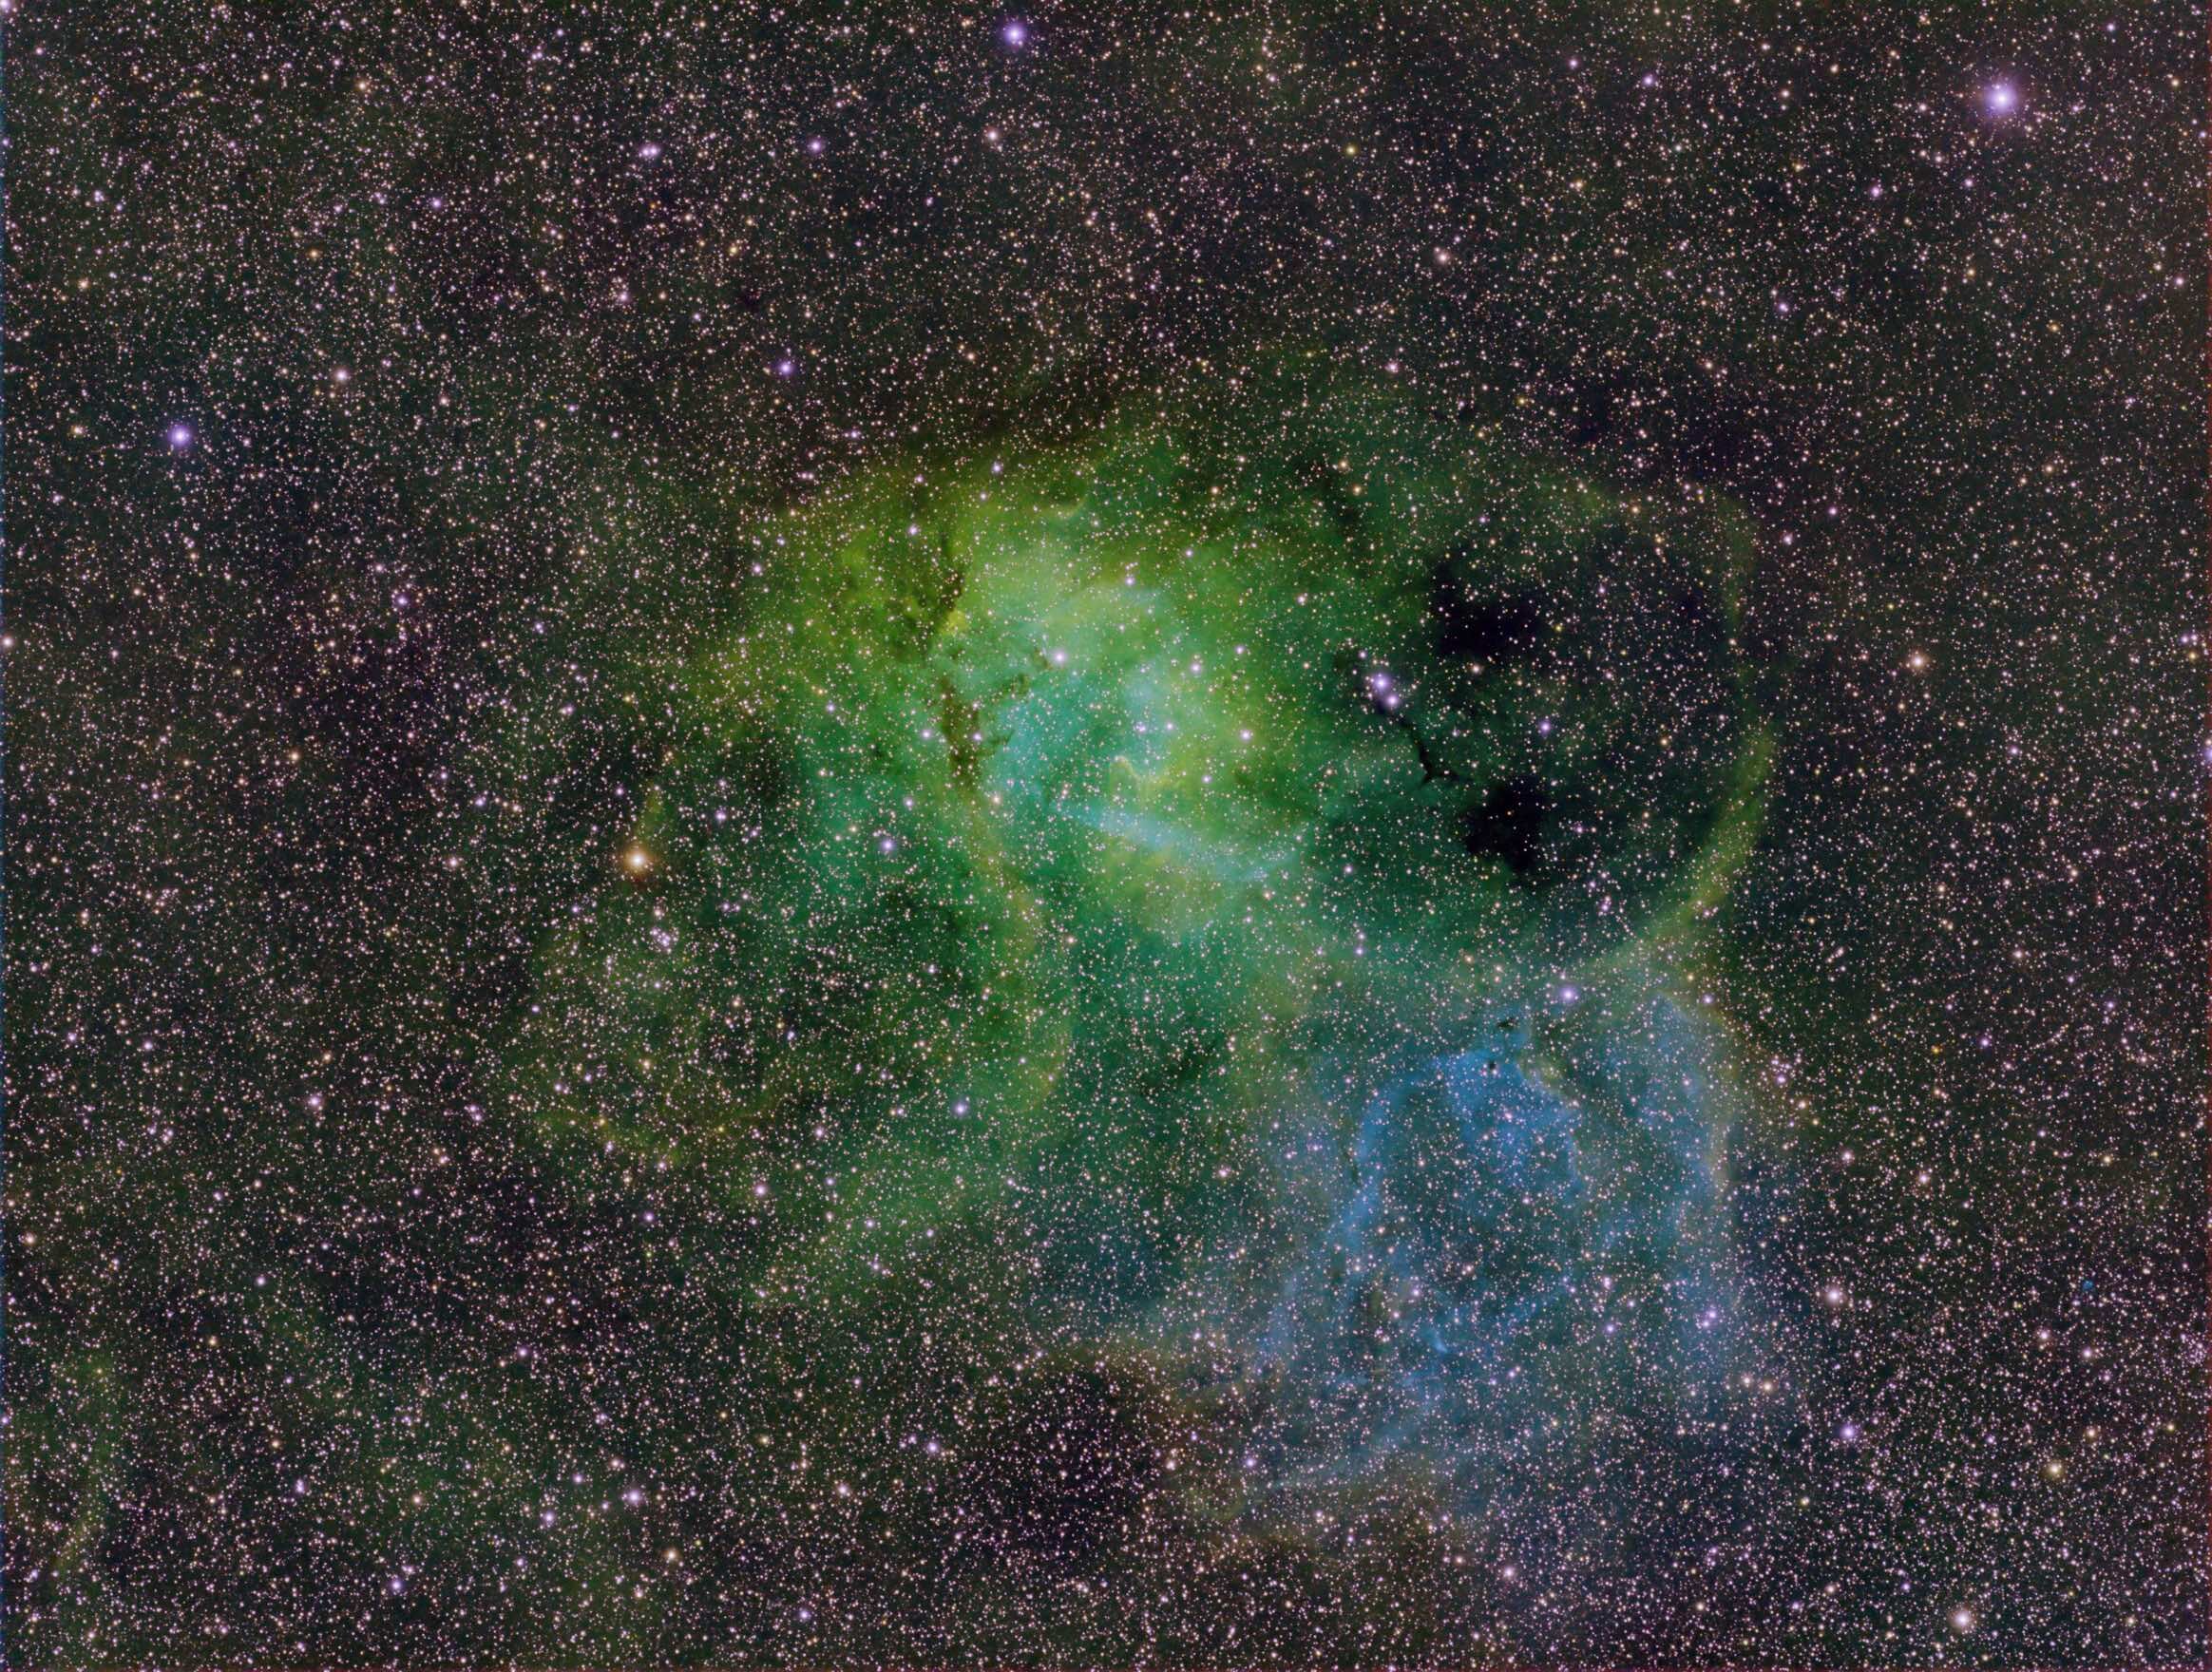
SH2-132 - The Lion Nebula (click image for full resolution via Astrobin.com)

Awarded Flickr “Explore” Status on Sept 13, 2021!
Table of Contents Show (Click on lines to navigate)
About the Target
SH2-132, also known as The Lion Nebula, is a rich HII region with star clusters, emission nebulae, and dark dust regions. Located in the southern portion of the constellation Cepheus, the Lion Nebula is roughly 10,00 light-years away in the Perseus Arm of the Milky Way Galaxy.
This is primarily an emission nebula with some massive stars responsible for ionizing the gas in this region. In particular, two Wolf-Rayet stars have been identified - with the designation HD 211564 and HD 211853.
Wolf-Rayet stars are huge and hot and have a white-blue coloration. These stars are at least 20 times more massive than our Sun and can be hundreds of thousands or even millions of times brighter! In addition, they tend to be eruptive and possess extremely high solar winds.
This whole region is believed to be an area of new star formation.
The Annotated Image
The annotated image was created using the ImageSolver and AnnotateImage scripts in Pixinsight. (Click to enlarge)
The Location in the Sky

This IAU/Sky & Telescope Constellation Chart shows the location of the SH2-132 indicated by the yellow arrow.
About the Project
This summer has been a bit of a disappointment weather-wise. August yielded three days of good imaging at the beginning of the month. We are almost halfway through September, and I got three nights of imaging so far, with clear nights seen on the 1st, then 4th, and the 6th. We have been cloudy and stormy in between, but at least the temperatures have been cool, and the skeeters are mostly gone.
Another advantage is that it is getting darker earlier now - which expands the possible hours of capture.
Until this year, I had never heard of SH2-132. Then I began to see some images posted on Astrobin, which put it on my radar. It seemed like an interesting target - especially for narrowband imaging. It is also a challenging target - while it is very large, it is also very faint. To do this shot, I would need a significant level of integration. While I am willing to dedicate the time necessary to get this integration, you never know how willing Mother Nature is to go along with it.
Since it is a relatively large target - measuring over a degree in diameter - I chose my Askar FRA400 platform for this shot. As it turned out - I was not able to get all of the integration time I wanted on this target - so I may be adding data to this in the future.
The composition was done using the Framing and Mosaic Wizard in Sequence Generator Pro. When you jump into the wizard, you can search for the target in question, and it will pull up an image of a survey plate holding your target.

Then, as you click and drag an area over the image, the app will drop a rectangular box representing the capture size of your telescope and camera combination.

Once you have the box, you can move and rotate the field to get the composition that you want.
After this is done, you can program the sequence for the evening and store it until you are ready to use it.
While it is dark at 9 pm these days, I had to wait until almost midnight for Sh2-132 to clear the trees. While I was waiting for this to become accessible, I was churning away with my other two telescopes - each capturing their own targets.

My three platforms all set up and waiting for darkness. (Note the fans were there to blow away skeeters - but they were not needed at this point - the skeeters seem to gone for the season. The car mats are laid on top of some of the cables so I don’t trip on them in the dark!)

Here is a screenshot from the display in my Den. This is on one of the 4K 32” monitors. Three Sequence Generator Pro screens can be seen doing live capture for 3 different targets. SH2-132 is shown on the screen on the bottom right. The screen on the bottom left is from my pan-and-tilt security camera. This lets me see and hear my mounts during the night.
Imaging went well for the first two nights, and I got about 3 hours each night. I set things up so that I collected 12 subs of 5 minutes for each filter. On the third night, I had just finished taking the images for the Ha and the OIII filters and finished taking my first sub for the S2 filters when my telescope rigs started complaining that they had lost the guide star. I thought that a cloud must be moving through. Sequence Generator Pro kept trying to recover and restart the sequence. When this did not successfully happen for almost 30 minutes, I finally went outside to check - and I saw that the entire sky was socked-in with cloud cover. This was not expected and shut me down prematurely.
The weather was supposed to be clear on the 10th, so I planned to capture that night because the moon would be coming into play over the weekend.
As it turned out, the 10th had mostly clouds with only short periods of clearing. When you have three telescope rigs set up in the driveway - and you have to take that all back down again at the end of the night - you really want good conditions. Also - you certainly do not want to get caught with your gear outside if there is a chance of a pop-up shower coming through. There is no quick way to protect your gear should it start to rain, so you really want a good clear night to operate.
As it turned out, my captures for SH2-132 were over for now. This is a very faint nebula, and I counted on having much more integration time under my belt. I knew this would not provide for a "great" image - but you have to deal with the cards you were dealt. With some luck, I will have an opportunity to add a few more nights to this target after the next full moon.
SH2-132 Processing Log
1. Blinking the Images
All lights and cal frames were blinked
I was surprised that everything looked very good.
Stars were all round and tracking looked good.
No variable gradients or at least very few subtle ones.
No problems with planes or other issues
2. WBPP v2.1 was loaded with all subs and cal frames
I then set up WBPP to handle calibration. Normally I never use this for image integration, but I had decided to use Drizzle on this project, and for me, it is easiest to use WBPP to do the whole process and then use DrizzleIntgration to complete it.
Enabled integration
Set Rejection parameters - Windsorized Sigma Clipping, with a high reject lever of 3.5, and a low level of 2.5
Setup a Pedestal image 50 counts
Enabled drizzle
Setup so that each night's flats were used to calibrate that night's lights
3. DrizzleIntegration was used to create Ha, O3, and S2 master images. Default Parameters used
4. DynamicCrop - all master images were cropped in a consistent fashion to exclude ragged edges.
5. Run DBE on each image.
set up samples to avoid nebulae, and subtract the method.
6. Prep for Deconvolution
Object Masks created for each layer. HT was used to adjust so that the background sky was black, and most Nebula areas were white.
Local support images were created. These are basically star maps of the biggest and brightest stars. Since these are usually saturated and clipped, they never have normal point spread functions, so they don’t fit the deconvolution model and it does bad things to them. I used Starmap with 6 layers and every else set to default for this.
Psf files created- These are point spread function files. I created the using the PSImage Script. Piece of cake!
7. Run Deconvolution
Setup several preview areas to test on each image
Apply the object mask
Set the deconvolution tool to use the right psf and local support maps
For each layer - explore what global dark value gives the best response without dark rings.
Ha: 0.007
O3: 0.007
S2: 0.004
8. Linear noise reduction
I cannot use my standard Mure Denoise method as it does not work with drizzled data.
EZ -Denoise was used with default parameters on all images
9. Go Nonlinear and Combine Images
Now I was ready to go nonlinear. For each image:
Select the lowest background area with a preview box
Run MaksedStretch using the preview box
Adjusted Ha with HT to clip unused black range, and to boost mid-tones - this was done by eye.
Used CT to reduce background sky and boost nebula signal to look about equal to Ha. This was done for both O3 and S2 to make them visually equal.
Note that the S2 image has little signal - I had to boost it a lot to make them seem balanced. This has the least integration and was hurting.

The Nonlinear Ha Image (Click to enlarge)

Nonlinear O3 Image (Click to enlarge)

Non Linear S2 image (Click to enlarge)
10. Create a Color SHO Image.
Use ChannelCombinaton tool to create the initial SHO image.
The first color image in SHO.
11. Initial Color Balance of the SHO image.
Use SCNR to remove excess green In the image. This leaves some sky area and stars looking magenta.
Invert the image - this gives it a color-negative look
Magenta regions of the image now look green. Use SCNR-Green to remove the excess green
Invert the Image again.
Use the Curves, Transform Tool, to
Boost sats
Apply S-curve on neutral channel
You now have a pretty good base image for the Hubble palette with no magenta star issues that are so common in this realm.
12. Create Color Masks
Blue mask - use ColorMask script with Blue chosen
Adjust mask
Fix star-rings in the mask by eliminating them with the DynamicPaintBrush or CloneStamp tool
Run deconvolution on the mask to smooth it out
Boost mask contrast with HT to recover loss of intensity from Convolution operation
Green mask - ColorMask script with Green Chosen
Adjust mask as in the blue example above
13. Adjust colors
Apply Blue mask
With CT, adjust Sat and color curves to get the color effect you want on blue
Apply the Green Mask
With CT, adjust Sat and color curves to get the color effect you want on the Golden areas of the image
14. Do First Non-Linear DeNoise
Use ACDNR with Chrominance set to 4.5, and Lightness set to 2.5
Use a lightness map
Verify lightness map coverage - adjust as needed.
Test on several previews and adjust as needed.
Apply on image
15. Run MLT to enhance structures in the 100-pixel size range
use 9 layers
bias of 0.03 on layers 8 & 9
16. Use ColorSat to selectively adjust colors
boost gold, blues and cyans
17. Do another ACDNR run - lightly this time:
Chrominance: with mask, setting of 2.5
Lightness: With mask setting of 1.5
18. Star Reduction - I am finding that widefield images with rich starfields create an overpowering number of stars that can dominate an image. I am not sure but this may be the case, even more, when you Drizzle the image, as smaller stars now have more structure. In order to deal with this, I use the EZ-StarReduction script in Pixinsight. I select the “Adam Block” method and leave everything else are a default. I ended up running it twice and you can see the result below. I also ended up running MLT with layer 1 disabled. This removes some of the very small background stars as well.
Sh2-132 without any star reduction steps taken. The Starfield is so rich that it detracts from the nebula. (Click to enlarge)
Here is the image with one round of EZ-Star Reduction using the Adam Block method and all default values. (Click to enlarge)
Here is SH2-132 with two full rounds of EZ-StarReduction, I am pretty happy with this. It still gives the impression of a very rich star field without dominating the nebula as much. (Click to enlarge)
19. Shift over to Photoshop
Export image as a TIFF file - 16 bit.
Run Photoshop, load image
20. Global Tweaks using the Camera Raw filter
Light adjustment of Clarity
Light adjustment of Texture
Tweaked Curves
Run color mixer and tweaked blues and oranges.
21. Local Tweaks - using the lasso selection tool with 130 feather settings, select key feature areas of the image and do subtle enhancements
For selected areas - tweak with Camera Raw filter. These are very small tweaks.
Clarity
Texture
Curves
Target:
Dark clouds in the circle area
Gold regions - Color Mix - boost sat for gold
22. FInal Str Reduction - I used the StarShrink Filter with the following parameters to do a further reduction in the smallest stars:
pixel size: 3
strength: 4
sharpness -3
23. Share the image with some friends for feedback
Feedback received:
Gold regions still have some noise.
some thought the blue saturation was fine, and other thought it was too much.
23. Make final changes
Reduce blue sat a bit
Use the StarShrink tool to shrink only the largest stars slightly.
Run Topaz Denoie AI on the gold regions for a very minor additional level of noise reduction,.
24. Finalize image
Add my custom watermarks
Save image.
Export a clean image - full res - no watermarks
Export a full res image - with watermarks
Export a subsampled image with higher jpeg compression for web use.
Capture Information
Light Frames
37 x 300 seconds, bin 1x1 @ -15C, unity gain, Astronomiks 6nm Ha Filter
38 x 300 seconds, bin 1x1 @ -15C, Unity gain, Astronomiks 6nm OIII Filter
25 x 300 seconds, bin 1x1 @ -15C, unity gain, Astronomiks 6nm SII Filter
Total of 8.33 hours
Cal Frames
30 Darks at 300 seconds, bin 1x1, -15C, gain unity
30 Dark Flats at Flat exposure times, bin 1x1, -15C, gain unity (taken for each night)
Flats collected separately for each evening to account for camera rotator variances:
15 Ha Flats
15 OIII Flats
15 SII Flats
Capture Hardware
Scope: Askar FRA400 73MM F/5/5 Quintuplet Astrograph
Guide Scope: Sharpstar 66EDPHII
Camera: ZWO ASI1600mm-pro with ZWO Filter wheel with ZWO LRGB filter set,
and Astronomiks 6nm Narrowband filter set
Guide Camera: ZWO ASI290Mini
Focus Motor: Pegasus ZWO EAF 5V
Mount: Ioptron CEM 26
Polar Alignment: Ipolar camera
Software
Capture Software: PHD2 Guider, Sequence Generator Pro controller
Image Processing: Pixinsight, Photoshop - assisted by Coffee, extensive processing indecision and second-guessing, editor regret and much swearing….. Given the problems on this image, more than the usual whining….
The portable scope platform is supposed to be, well, portable. That means light and compact. In determining how to pack this platform for travel, I realized that the finder scope mounting rings made no sense in this application and I changed them out with something both more rigid and compact - the William Optics 50mm base-slide ring set.